Dirtdevil MHDU600 Le manuel du propriétaire
- Catégorie
- Aspirateurs
- Taper
- Le manuel du propriétaire

Upright Vacuum Cleaner
Owner's Manual
Aspirateur vertical
Guide de I'utilisateur
Aspirador de escoba
Manual de instrucciones
Let us help you put your
vacuum together or answer
any questions, call:
1
-877-REGINA6
(USA
&
Canada)
PLEASE READ THIS MANUAL THROUGHLY AND
CAREFULLY BEFORE OPERATING THE CLEANER
LIRE CE GUIDE ATTENTIVEMENT AVANT DE FAIRE
FONCTIONNER L'ASPIRATEUR
LEA DETENIDAMENTE ESTE MANUAL ANTES
DE
UTlLlZAR EL ASPIRADOR
AWARNING:
Cleaner assembly may include
small parts, Small parts can
present a choking hazard.
For quick reference, please record your
vacuum information below.
Model
#:
Mfg. Code:
(Mfg.
code located an the lower backside
of
cleaner)
02004
All
rights reserved
#
1-1
13002-000 2/04

TABLE OF CONTENTS
LIMITED WARRANTY
To the consumer. Royal Appliance Mfg
.
Co
.
warrants this vacuum cleaner to be free of defects in material or
workmanship commencing upon the date of the original purchase
.
Refer to your vacuum cleaner carton for the
length of warranty and save your original sales receipt to validate start of warranty period
.
If the vacuum cleaner should become defective within the warranty period. we will repair or replace any
defective parts free of charge
.
The complete machine must be delivered prepaid to any ROYALm Authorized
Sales
&
Warranty Service Station
.
Please include complete description of the problem. day of purchase. copy
of original sales receipt and your name. address and telephone number
.
If you are not near a Warranty Station.
call the factory for assistance at USA
&
Canada: 1-877-REGINA6
.
Use only genuine Royaf@ replacement parts
.
The warranty does not include unusual wear. damage resulting from accident or unreasonable use of the
vacuum cleaner
.
This warranty does not cover brushes. flat belts. filters and bulbs
.
This warranty does not
cover unauthorized repairs
.
This warranty gives you specific legal rights and you may also have other rights
(Other rights may vary from state to state in the USA)
.
-
--
-
-
--
2

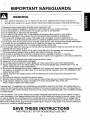
IMPORTANT SAFEGUARDS
WARNING
Your safety is important to us. To reduce the risk of fire, electrical shock, injury to persons or
damage when using your vacuum cleaner, follow basic safety precautions including the following:
1. Disconnect power supply before servicing
andlor cleaning the unit.
2. Do not leave appliance plugged in. Unplug from outlet when not in use or before servicing.
3.
Do not use outdoors or on wet surfaces. Do not pick up water or wet materials.
.
.
4.
Do not handle plug or appliance with wet hands.
5. Do not allow it to be used as a toy. Close attention is necessary when used by or near children.
6. Use only as described in this manual. Use only attachments recommended by manufacturer.
7.
Do not use with damaged cord or plug. If the supply cord is damaged, it must be replaced by the
manufacturer or an Authorized Service Center or a similarly qualified person in order to avoid a hazard.
8. Do not pull or carry by the power cord as a handle, close door on cord, or pull the cord around sharp edges
or corners. Do not run appliance over the cord. Keep the cord away from heated surfaces.
9.
Do not unplug by pulling the cord. To unplug, grasp the plug, not the cord.
10. Do not put any object into openings. Do not use with any opening blocked. Keep free from dust, lint, hair and
anything that may reduce air flow.
I
I.
Keep hair, loose clothing, fingers, and all parts of body away from the openings and moving parts.
Do not use vacuum cleaner to pick up sharp, hard objects, small toys, pins, etc.
12. Do not pick up anything that is burning or smoking, such as cigarettes, matches, or hot ashes.
13. Do not use to pick up flammable or combustible liquid or vapors such as gasoline or use in areas where they
may exist.
14. Do not use vacuum cleaner without filter bag andlor filters in place.
15. Always turn off all controls before unplugging.
16. Do not keep vacuum cleaner on chairs, tables, etc. Extra care must be taken when cleaning stairs.
17. Always unplug the unit or turn off the switch when the unit automatically stops unintentionally. If not, the
vacuum cleaner could re-start unintentionally.
18.
Do not use with damaged cord or plug. If appliance is not working as it should, has been dropped, damaged,
left outdoors, or dropped into water, return it to a service center for inspection. Call 1-877-REGINA6 for the
nearest service center.
19.
Cleaner must be in the upright position to lift the rotating brush off the carpet when doing above floor
cleaning.
20. Do not use an extension cord with this vacuum cleaner.
21. Store the vacuum cleaner indoors. Put the vacuum cleaner away after use to prevent tripping accidents.
22. Using improper voltage may result in damage to the motor and possible injury to the user.
Proper voltage is listed on the cleaner plate.
?olarized plug: This appliance has a polarized plug (one blade is wider than the other). As a safety feature to
,educe the risk of electric shock, this plug is intended to fit in polarized outlet only one way. If the plug does not
iit fully into the outlet, reverse the plug. If still does not fit, contact a qualified electrician. Do not attempt to defeat
ihis safety feature.
Thermal protector: This vacuum cleaner has a special thermostat that protects the vacuum cleaner in case of
notor overheatinq. If the cleaner suddenlv shuts off, turn off the switch and un~lun the vacuum cleaner. Check
the vacuum cleaner for a possible sourciof overheating such as a full bag, a blocked hose or clogged filter. If
these conditions are found. fix them and wait at least 30 minutes before attemotina to use the vacuum cleaner.
~ier the 30 minutes period, plug the vacuum cleaner back in and turn on the switth. If the vacuum cleaner still
does not run, contact a qualified electrician.
SAVE THESE INSTRUCTIONS
THIS PRODUCT IS FOR HOUSEHOLD USE ONLY

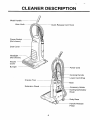
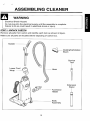
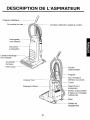
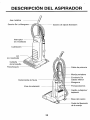
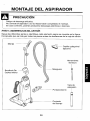
CLEANER DESCRIPTION
Metal Handle
(Not shown)
Dust Cover
I
I
I
Quick
Release Cord Hook
Crevice Tool
-
Extension Wand
Pedal

ASSEMBLING CLEANER
WARNING
Electrical Shock Hazard
Do not plug into the electrical supply until the assembly is complete.
Failure to do so could result in electrical shock or injury.
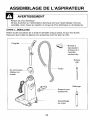
STEP
1:
UNPACK CARTON
Remove all parts from carton and identify each item as shown in figure.
Make sure all parts are located before disposing of carton box.
Handle
Dusting/Upholstery
Brush
Hose
Crevice
Tool
Extension
Wand
Accessory
Holder
k
Body
Assembly

ASSEMBLING CLEANER
WARNING
Electrical Shock Hazard
Do not plug into the electrical supply until the assembly is complete.
Failure to do so could result in electrical shock or injury.
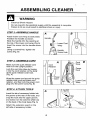
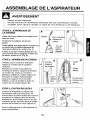
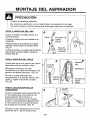
STEP
2:
ASSEMBLE HANDLE
Attach lower cord wrap to body base.
Position the handle as shown.
Slide the handle into the opening at
the top of the lower cord wrap.(Fig.A)
Insert the screw into the handle screw
hole.
Using a screwdriver, tighten the
screw.(Fig. B)
STEP
3:
ASSEMBLE CORD
Make sure the quick release cord
hook is in the upright position.
Lock the cord into place by forcing
it into the cord retainer on the body
of the quick release cord hook.
(Fig. A)
Wrap the power cord around the quick
release cord hook and lower cord
retainer, and then lock the power cord
plug onto the power
cord.(Fig. B)
STEP 4: ATTACH TOOLS
Insert the tab of accessory holder into
the groove at the rear of the body, and
snap the hook into the upper groove,
and screw it on the columns which are
on the back of the body
base.(Fig. A)
Attach the extension wand on the
left side of accessory holder.
Handle
"Y

ASSEMBLING CLEANER
WARNING
Electrical Shock Hazard
Do not plug into the electrical supply until the assembly is complete.
Failure to do so could result in electrical shock or injury.
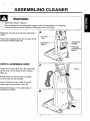
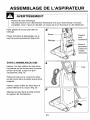
Slide the crevice tool into the extension
wand.
Place the dusting brush on the top of the
accessory
holder.(Fig.
B)
STEP
5:
ASSEMBLE HOSE
Insert the hose collar into the opening
at the rear of the body until it snaps.
(Fig. A)
Place hose on hose hook, located
on the front of the handle.
Insert another hose collar into the
lower part of the body. (Fig.
B)
Attach the hose on the right side of
accessory holder.

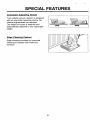
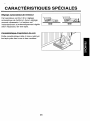
SPECIAL FEATURES
Automatic Adiustina Nozzle
Your upright vacuum cleaner is designed
with an automatic adjusting nozzle. No
manual adjustments are required.
The height of nozzle is instantly and
automatically adjusted to any carpet pile
height.
Edae Cleanina Feature
Edge cleaning provides for improved
cleaning of carpets near walls and
furniture.

m
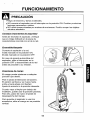
OPERATION
WARNING
Personal Injury and Product Damage Hazard
DO NOT
plug in if switch is in the
ON
position. Personal injury or damage could occur.
DO NOT
use outlets above counters. Damage to items in surrounding area could occur
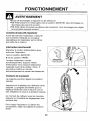
Important Safety Tips
Before you plug in your vacuum cleaner,
make sure that the voltage indicated on
the rating label of the vacuum cleaner is
the same as your local supply.
On/Off Switch
Plug the power cord to operate cleaner.
I
is marked on
ON
position.
0
is marked on
OFF
position.
If the vacuum cleaner stops automatically,
always turn off the switch and unplug the
unit before checking.
Handle Positions
The handle may be adjusted to any
position required.
Step on the handle release pedal. The
handle is released to move up and down
freely. Adjust the body to any position
required.
When cleaning under furniture, parallel
position may
be
used. To get to the
parallel position, press handle release
pedal again.
To store vacuum or use attachments, set
the handle to the upright position.

OPERATION
WARNING
I
Personal Injury and Product Damage Hazard
I
DO NOT plug in if switch is in the ON position. Personal injury or damage could occur.
DO NOT use outlets above counters. Damage to items in surrounding area could occur.
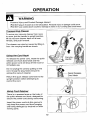
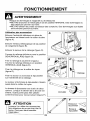
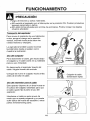
Transportina Cleaner
To move your vacuum cleaner from room
to room, put the handle in upright position,
tilt the vacuum cleaner back on its rear
wheels, and push forward.
The cleaner can also be moved by lifting it,
from the carrying handle as shown.
Usina the Cord Hook
To release the power cord, rotate the quick
release cord hook downward and the
entire power cord will drop off the hook for
immediate use.
Do not unplug the cord by pulling on the
cord. Grasp the plug head and pull to
unplug the vacuum cleaner.
Return the quick release cord hook to the
upright position before attempting to
rewind the cord.
Usina Cord Retainer
There is a recessed area on the body of
the quick release cord hook, designed to
secure the power cord during vacuuming.
Insert the power cord into this groove to
help keep the power cord from hanging
and being damaged by brushroll or other
moving parts.

OPERATION
WARNING
Personal Injury and Product Damage Hazard
DO NOT plug in if switch is in the ON position. Personal injury or damage could occur.
DO NOT use outlets above counters. Damage to items in surrounding area could occur.
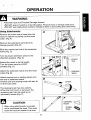
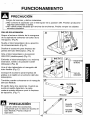
Usina Attachments
Remove the lower end of hose from the
vacuum cleaner by pulling out the hose
collar. (Fig A)
Remove the extension wand from its
storage
position.(Fig.
B)
Slide the crevice tool out of the extension
wand.(Fig. C)
Turn
the lower extension wand to the
UNLOCK position. (Fig.
D)
Extend the wand to its full length.
Turn the lower wand to LOCK
position.(Fig. D)
Attach the extension wand onto the hose
collar.(Fig.
E)
Attach crevice tool or dusting brush onto
the end of extension wand.
Crevice tool and dusting brush will also fit
on the hose collar.
The dusting brush has two options.
When the front brush is removed, the
remaining part can be used as an
upholstery
nozzle.(Fig. F)
CAUTION
When using attachments, be careful
not to overextend the hose. This could
cause the vacuum cleaner to tip over.
P
I
Lock
I

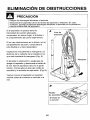
REMOVING CLOGS
WARNING
Electrical Shock or Personal Injury Hazard
Disconnect electrical supply before servicing or cleaning the unit. Failure to do so could
result in electrical shock or personal injury from the vacuum cleaner suddenly starting.
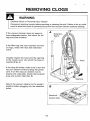
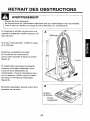
If the vacuum cleaner does not seem to
have adequate suction, first check for full
bag and dust chamber.
If the filter bag and dust chamber are free
of clogs, check the hose and extension
wand.
Visually inspect the hose and the opening
of the nozzle cover into which the hose is
inserted.(Fig.
A)
If the clog still exists, make sure to turn the
vacuum cleaner off and unplug the power
cord. Turn the vacuum cleaner over to
expose the underside. Check the brushroll
area and suction
inlet.(Fig.
B)
Return the vacuum cleaner to the upright
position before plugging into the electrical
outlet.

REPLACEMENT INSTRUCTIONS
WARNING
Electrical Shock or Personal Injury Hazard
Disconnect electrical supply before servicing or cleaning the unit. Failure to do so could
result in electrical shock or personal injury from the vacuum cleaner suddenly starting.
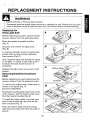
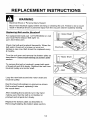
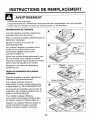
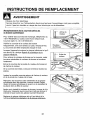
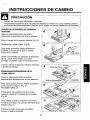
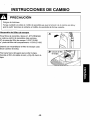
Replacinu the
Head Liaht
Bulb
Before replacing any parts, disconnect the
vacuum cleaner from the electrical outlet.
Place the handle to parallel position.
(Fig. A)
Unscrew and remove the light cover.
(Fig.
B)
To remove old bulb, push it in toward bulb
socket while turning counter-clockwise,
then remove.(Fig.
C)
Use a bayonet base bulb having the rating
of
15-20W.
To install a new bulb, push it
in toward the bulb socket and turn it
clockwise.
Replace the light cover and secure it with
screws.
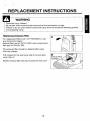
Removina/lnstallina the Bottom
Plate
Before replacing any parts,disconnect the
vacuum cleaner from the electrical outlet.
To remove the bottom plate, slide latch as
shown in the figure.(Fig. A)
DO NOT UNSCREW.
Pushing the locking tabs toward the center
of the vacuum, pull the bottom plate away
from the nozzle
housing.(Fig.
B)
To install the bottom plate, hook the front
end of bottom plate into the slots on the
front of
nozzle.(Fig. C)
Press the bottom plate until the locking
tabs snap into place then slide the latch to
secure.

REPLACEMENT INSTRUCTIONS
WARNING
I
Electrical Shock or Personal Injury Hazard
Disconnect electrical supply before servicing or cleaning the unit. Failure to do so could
result in electrical shock or personal injury from the vacuum cleaner suddenly starting.
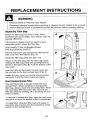
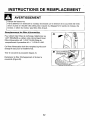
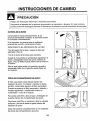
Replacina Belt andlor Brushroll
For replacement belts call 1-877-REGINA6 or visit
your local Home Depot. Belt style 12,
part #3-910340-001.
Check the belt and brushroll frequently. When the
belt
andlor brushroll is broken or worn out,
replace a new one. Belt should be replaced every
6
months.
Turn the unit over and remove the bottom plate as
described in Removinullnstallina the bottom plate
section.
To remove the belt or brushroll, grasp both ends
of brushroll and lift it slowly. Remove the belt from
brushroll pulley and motor shaft.
Loop the new belt around the motor shaft and
brushroll pulley.
Rest the brushroll endcaps on grooves as shown.
Roll brushroll forward, replacing it into
the nozzle head.
After installing the brushroll, turn it by hand
making sure that the belt is not twisted or
pinched and all parts turn freely.
Replace the bottom plate as described in
Removingllnstalling the bottom plate section.

REPLACEMENT INSTRUCTIONS
WARNING
Personal Injury Hazard
Be careful when removing the brushroll as the belt tension is high.
(
Failure to do so could result in personal injury from the brushroll releasing quickly
1
I
and snapping away.
I
Replacinu Exhaust Filter
For replacement filters call 1-877-REGINA6 or visit
your local Home Depot.
Exhaust filter part #I -231 F13-000, dust compartment
filter part
#I
-231 LGI -000.
This exhaust filter should be replaced after every
third bag change.
Pull outward on the dust cover grip to remove dust
cover.(Fig. A)
Replace exhaust filter and (Fig.
B)
close the dust cover.

REPLACEMENT INSTRUCTIONS
WARNING
Electrical Shock or Personal Injury Hazard
Disconnect electrical supply before servicing or cleaning the unit. Failure to do so could
result in electrical shock or personal injury from the vacuum cleaner suddenly starting.
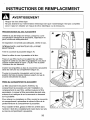
Rei~lacina Filter
Baq
Check the filter bag from time to time. When
excessive dirt accumulates, your cleaner may not
operate effectively.
If the vacuum cleaner does not seem to have
adequate suction, check the filter bag.
DISCONNECT THE CLEANER FROM
THE ELECTRICAL OUTLET.
Pull the dust cover grip forward and remove the
dust cover from the cleaner.(Fig. A)
Grasp the filter bag collar and pull it out.
Attach a new filter bag onto the filter bag holder
holding the filter bag collar and pushing back as
shown in the
figure.(Fig.
B)
Tuck the bottom of the
bag under.
Insert the tabs on the bottom of dust cover into
the grooves on the dust
compartment.(Fig.
C)
Rotate the dust cover up into the closed position
and press it until the hook snaps into place.
Dust Compartment Filter
The secondary filter is located inside the dust
compartment. When installing or changing the
filter bag, always check the secondary filter. When
the secondary filter becomes dirty, remove the
filter and clean by shaking off or brushing off over
trash container.
To remove or replace this filter, open the dust cover
and pull it out from the bottom of dust compartment.
To install filter, slide this filter back into place. It
should be fully inserted into the projections of the
bottom of dust compartment.

MAINTENANCE
WARNING
I
Electrical Shock or Personal Injury Hazard
Disconnect electrical supply before servicing or cleaning the unit. Failure to do so could
result in electrical shock or personal injury from the vacuum cleaner suddenly starting.
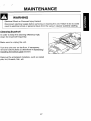
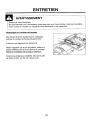
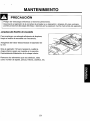
Cleanina Brushroll
In order to keep the cleaning efficiency high,
clean the brushroll frequently.
Make sure to unplug the unit.
Turn the unit over on the floor. If necessary,
remove bottom plate as described in Removinal
lnstallina the bottom plate section.
Remove the entangled materials, such as carpet
pile, lint, threads, hair, etc.

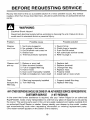
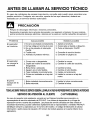
BEFORE REQUESTING SERVICE
Review this chart to find out a possible solution if a minor problem occurs. Any service
needed, other than those described here, should be performed by an authorized service
center.
WARNING
Electrical Shock Hazard
Disconnect electrical supply before servicing or cleaning the unit. Failure to do so
could result in electrical shock or personal injury.
Problem
Cleaner
won't run.
Cleaner
won'.
pick up.
Dust
escapes the
filter bag.
Possible cause
I
Possible solution
1.
Not firmly plugged in
2.
No voltage in wall outlet
3.
OnIOff switch not turned on
4.
Broken fuse
5.
Thermal protector operated
1.
Broken or worn belt
2.
Worn brushroll bristles
3.
Full or clogged filter bag
4.
Hole in hose
5.
Dust cover improperly installed
6.
Belt not installed on motor shaft
1.
Plug in firmly.
2.
Check fuse or breaker.
3.
Push OnIOff switch.
4.
Ask authorized service center.
5.
Refer to page
3.
--
I.
Replace belt.
2.
Replace brushroll.
3.
Change filter bag.
4.
Replace hose.
5.
Properly install
6.
Install belt on motor shaft.
1.
Filter bag improperly installed
2.
Torn filter bag
1.
Properly install filter bag.
2.
Replace filter bag.
ANY OTHER SERVICING SHOULD BE DONE BY AN AUTHORIZED SERVICE REPRESENTATIVE
CUSTOMER SERVICE (1-877-REGINA6)
In the event that further assistance is required, see your Yellow Pages for an authorized
RoyaPDealer. Costs of any transportation to and from any place of repair are to be paid by
the owner. The service parts used in this unit are easily replaced and readily available from
an authorized Royal@ Dealer or retailer. Always identify your cleaner by the model number
and manufacturing code when requesting information or ordering replacement parts.
(The model number appears on the bottom of the cleaner.)

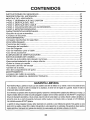
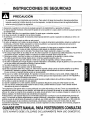
INSTRUCTIONS DE
SECURITE
IMPORTANTES
........................................................
20
DESCRIPTION DE L'ASPIRATEUR
.............................................................................
21
ASSEMBLAGE DE L'ASPIRATEUR
.............................................................................
22
.
ETAPE 1
:
DEBALLAGE
.............................................................................................
22
.
ETAPE
2
:
ASSEMBLAGE DE LA POIGNEE
.............................................................
23
.
ETAPE
3
:
ASSEMBLAGE DU CORDON
..................................................................
23
.
ETAPE 4
:
FIXATION DES OUTILS
.........................................................................
23
.
ETAPE
5
:
ASSEMBLAGE DU TUBE
.....................................................................
24
CARACTERISTIQUES SPECIALES
...........................................................................
25
.
Reglage automatique de I'embout
.............................................................................
25
.
Caracteristique d'aspiration de coin
...........................................................................
25
FONCTIONNEMENT
....................................................................................................
26
.
Conseils de securite importants
.................................................................................
26
.
lnterrupteur marche-arr6t
...........................................................................................
26
.
Positions de la poignee
..............................................................................................
26
.
Transport de I'aspirateur
............................................................................................
27
.
Utilisation du crochet de cordon
..................................................................................
27
.
Utilisation de Itarr6toir
..................................................................................................
27
.
Utilisation des accessoires
..........................................................................................
28
RETRAIT DES OBSTRUCTIONS
.................................................................................
29
INSTRUCTIONS DE REMPLACEMENT
......................................................................
30
.
Remplacement de I'ampoule
......................................................................................
30
.
Retrait et installation de la plaque inferieure
.............................................................
30
.
Remplacement de la courroie etlou de la brosse cylindrique
...................................
31
.
Remplacement du filtre d'evacuation
.....................................................................
32
.
Remplacement du sac
a
poussiere
..........................................................................
33
............................................................................
.
Filtre du compartiment
a
poussiere
33
ENTRETIEN
.................................................................................................................
34
.
Nettoyage du rouleau de brosse
.................................................................................
34
.........................................................................
AVANT D'APPELER LE TECHNICIEN 35
GARANTIE
LlMlTEE
A
Mention
du
consommateur.
Royal Appliance
Mfg.Co,
garanM
que
cet
aspirateur
est
depourvu
de
defauts
materiels
ou
de main
d'oeuvre
a
compter
de
la
date
de
I'achat initial
.
Consultez I'emballage
de
votre
aspirateur
pour
connaitre la
duree
de
la garantie
et
conservez
les
originaux
devos
preuves
d'achat
afin de
valider le
debut
de
la
periode
de
garantie
.
Si I'aspirateur
s'avera'it
defectueux
pendant
la
duree
de
la garantie.
nous
reparerons
ou
remplacerons
toute
pib defectueuse
gratuiiement
.
La
machine entiere
doit
&re
hree
affranchie
a
tout
centre
de
vente
et
de
reparations
sous
garantie
agree
par
ROYALa
.
Veuillez
y
joindre la description complete
du
probleme. la date
d'achat.
une
copie
des
preuves de
I'achat initial ainsique
votre
nom.
votre
adresse
et
votre
numero
de
telephone
.
Si
vous
n'htes
pas
a
proximite
d'un
centre
de
reparations
sous
garantie.
appelez
I'usine
pour
demander
de
I'assistance
aux
USA
&
au
Canada
au
.1.8774EGINA6
.
Utilisez uniquement
des
pibs
de
rechange
ROYAL@
d'origine
.
Cette
garantie
ne
couvre
pas
I'usure
anormale
ni les
dommages
provoques
par
un
accident
ou
par
une
utilisation
non
raisonnable
de
I'aspirateur
.
Cette
garantie
ne
couvre pas
les
brosses.
les courroies plates. les filtres ni les ampoules
.
Cette
garantie
ne
couvre
pas
les reparations
non
homologuees
.
Cette
garantie
vous
confere
des
droits
juridiques sp6cifiques
et
vous
avez
peut-hire
egalement
d'autres
dro'i
(Les
autres
droits
peuvent
varier
dun
etat
a
I'autre
des
Etatsilnis)
.

'InWl!dse,l ap anbeld el Ins aanb!pu! lsa apauo3 uo!sual el .Jnap!l!inj
ap alla!iuaiod alnssalq aun la lnaiow np uo!le~o!la!ap el lanbonold ap anbs!~ apaIlo3u! uo!suai aun,p uo!les!l!ln,l .zz
'alny3 aun
e
tjp iuappae in01 ~ay3adwa,p u!@ uo!ies!l!in salde lnale~!dsej za6uetl .Jna!lalu!j lnaleI!dse,l zahlasuo3
.~z
'lnalel!dse la3 Jane a6~0lle~ ap uopjo:, unm zas!yin,N
.oz
.los a1 zaAogau snon anbs~ol luenalnos el ua auanbolu el ap anjleioj assoiq el .ianalua,p u!le p!uan all? l!op malel!dsa,1.6~
.ay3old snld a[ suo!leledal ap a~iua3 a1 lapeluo3 mod gy~183tl-~~8-~ a1 zaladdy
~~o!padsu! aun mod uo!ieledal ap a~lua3 ne akzauodda~ 'nea,[ suep aqwol ~!,s no 'Yna!ialxa,l assy 'a~o!lalap 'aqwol
pa I!,S 'ayj a1 p#ap I! awwo3 sed auuo!puoj au ~!aleddej !S ,sa~o!~aiap as!ld aun no uopjoa un 3ane jasyin sed aN .8~
,luawau!epnos ayaew ua aJuaual as inad l!a~edde,l
'uou!~ yawanb!ieluolne Inas aiaJJe,s ~!aledde,l anbslol i!n3l!3 sloy lnaldnllalu!,l ajllaw no ~!a~edde,l jay3uelqap s~no!nol .~1
'smlwsa sal suep
JnaleI!dse,l lassed mod sal!essa3au suo!lnwa~d sal alpuaid inej
11
qa 'alqei aun 'as!ey3 aun Ins [!a~edde,l aluaw sed aN .g1
'Jatpuelqap ap wne i!nxp s~oy ~!a~eddq alualu s~no!nol
.z;
1
'salll!j sal noha ala!ssnod
.e
3es a1 sues la~!dse sed aN .p1
qnpo~d sa3 iuannolial as no
si!olpua sap suep Jas!yln !u a3uassaIl ap awo3 salq!Pnqwoa no salqewwep! s1nad.e~ sap no sap!nb!l sap ial!dse sed aN
'EL
.sapney3 sajpua3 no sauawnlle 'saaale6p slai sluelyq no slueunj sl!npold sap laI!dse sed aN '11
'7a 'sal6u!da sap 'siano! si!iad ap 'snlu!od 'slnp sla!qo sap Jassaluel mod ~nalel!dse,l
Jasyln sed aN ,sal!qoa sa3a!d sap la salnuanno sap sdlo3 np ayed alnoi la s16!op 'sayxl spawaiy 'xnanay3 .1au6!013 1
'lyp yqap a[ aj!npaI luennod la!qo allne inol no xnanay3 sal 'a!dle(3
el 'a~a!ssnod el lal!latl 'saanllsqo iuos samuanno sal !s jas!yin sed aN ,saJnuanno sal suep sia!qo,p jalasu! sed aN '01
'uop~o3 a1 uou la ay3!y el ~!s!es 'Jayauaqap mod 'uop~o3 a1 Ins luml ua ~ay3ue~qap sed aN
73
,sapney3 saxpns sap uoplo3 a[ lau6!0[3 1op103 a1 Ins lnal~l!dse,[ ~assed alyl sad aN .sluey3ueq
su!o3 sap no sp~oq sap ins uop~o3 a1 la)!! !u 'uop~o3 a1 Ins auod el lawlaj sed au 'uoplo3 a1 led ~aY0dsuell !u JaJ!! sed aN
3
,anbs!~ !no1 lal!na,p u!je a!l!pnb uap!uyai un no as!qne ayas ap aqua3 un
no lueqlqel a1 led aaeldlual all? yop I! 'a6ewwopua pa uoplo3 a1 !S ,a6eluluopua isa ay3!j el no uoplo3 a1 !s las!yln sed aN
.L
.lua!lqaj a1 led sapuewwo3al sa~!ossa33e sal iuawalnas Jas!l!in 'ap!n6 a3 suep y3ap isa l!,nb la! iualualnas Jas!yln '9
,iuejua un led no sa~d asyln isa [!,s sa~!essa3au suo!inaald sal alpuald ,lano! un awu.103 ~!aredde iaa las!l!in sed aN
,z;
'saall!now su!~ sal aana l!aledde,l no ayy el la[nd!uew sed aN .p
'sall!now xnqlaiew sap no ma,[ ap lal!dse sed aN .saall!now sa3epns sap Ins no Jna!lawa,l
e
jas!yln sed aN
.&
.aqhlas a1 lanpaga mod no as!l!ln sed Isay ~!,nbslo[ lay3uelqap a1 'ay3uelq ~!aledde,l jass!el sed aN
.z
,l!a~edde,l douau ap noha a3!hlas a[ Janpaga,p luene uo!ieluaw!le,l lay3uelqaa
La page est en cours de chargement...
La page est en cours de chargement...
La page est en cours de chargement...
La page est en cours de chargement...
La page est en cours de chargement...
La page est en cours de chargement...
La page est en cours de chargement...
La page est en cours de chargement...
La page est en cours de chargement...
La page est en cours de chargement...
La page est en cours de chargement...
La page est en cours de chargement...
La page est en cours de chargement...
La page est en cours de chargement...
La page est en cours de chargement...
La page est en cours de chargement...
La page est en cours de chargement...
La page est en cours de chargement...
La page est en cours de chargement...
La page est en cours de chargement...
La page est en cours de chargement...
La page est en cours de chargement...
La page est en cours de chargement...
La page est en cours de chargement...
La page est en cours de chargement...
La page est en cours de chargement...
La page est en cours de chargement...
La page est en cours de chargement...
La page est en cours de chargement...
La page est en cours de chargement...
La page est en cours de chargement...
La page est en cours de chargement...
-
 1
1
-
 2
2
-
 3
3
-
 4
4
-
 5
5
-
 6
6
-
 7
7
-
 8
8
-
 9
9
-
 10
10
-
 11
11
-
 12
12
-
 13
13
-
 14
14
-
 15
15
-
 16
16
-
 17
17
-
 18
18
-
 19
19
-
 20
20
-
 21
21
-
 22
22
-
 23
23
-
 24
24
-
 25
25
-
 26
26
-
 27
27
-
 28
28
-
 29
29
-
 30
30
-
 31
31
-
 32
32
-
 33
33
-
 34
34
-
 35
35
-
 36
36
-
 37
37
-
 38
38
-
 39
39
-
 40
40
-
 41
41
-
 42
42
-
 43
43
-
 44
44
-
 45
45
-
 46
46
-
 47
47
-
 48
48
-
 49
49
-
 50
50
-
 51
51
-
 52
52


Dirtdevil MHDU600 Le manuel du propriétaire
- Catégorie
- Aspirateurs
- Taper
- Le manuel du propriétaire
dans d''autres langues
- English: Dirtdevil MHDU600 Owner's manual
- español: Dirtdevil MHDU600 El manual del propietario
Documents connexes
-
Dirtdevil M1018Z Le manuel du propriétaire
-
Dirt Devil Vacuum Cleaner Manuel utilisateur
-
-
-
Dirtdevil Swift Stick Le manuel du propriétaire
-
-