Powerfist 9041559 Le manuel du propriétaire
- Catégorie
- Compresseurs d'air
- Taper
- Le manuel du propriétaire

V1.1 9041559
Please read and understand all instructions before use. Retain this manual for
future reference.

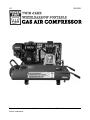
9041559 9 Gallon Twin-Tank Wheelbarrow Portable Air Compressor V1.1
2 For technical questions call 1-800-665-8685
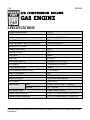
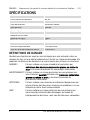
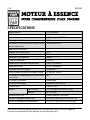
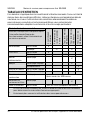
SPECIFICATIONS
Engine Type Predator Gas Engine
Decibel Rating 95 dB
Air Tank Size 9 gal.
Tank Type Twin-tank
Drain Type Manual
Drive Type Belt
Number of Stages 1
Number of Cylinders 1
Cylinder Material Cast Iron
Air Delivery @ 40 PSI 10.2 CFM
Air Delivery @ 90 PSI 9 CFM
Max. Pressure Rating 135 PSI
Outlet Connection Size and Type 3/8 in. NPTF
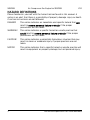
HAZARD DEFINITIONS
Please familiarize yourself with the hazard notices found in this manual. A
notice is an alert that there is a possibility of property damage, injury or
death if certain instructions are not followed.
DANGER! This notice indicates an immediate and specific hazard that
will result in severe personal injury or death if the proper
precautions are not taken.
WARNING! This notice indicates a specific hazard or unsafe practice that
could result in severe personal injury or death if the proper
precautions are not taken.
CAUTION! This notice indicates a potentially hazardous situation that may
result in minor or moderate injury if proper practices are not
taken.
NOTICE! This notice indicates that a specific hazard or unsafe practice
will result in equipment or property damage, but not personal
injury.

V1.1 9 Gallon Twin-Tank Wheelbarrow Portable Air Compressor 9041559
Visit www.princessauto.com for more information 3
INTRODUCTION
The 9 Gallon Twin-Tank Wheelbarrow Portable Air Compressor features a
twin cast-iron cylinder compressor with a 212 cc engine and oil-lubricated
pump, making this a durable and reliable compressor for the jobsite.
A separate engine manual is included. Please consult it when necessary.
SAFETY
WARNING! Read and understand all instructions before using this tool. The
operator must follow basic precautions to reduce the risk of personal injury
and/or damage to the equipment.
Keep this manual for safety warnings, precautions, operating or inspection
and maintenance instructions.
WORK AREA
1. Operate in a safe work environment. Keep your work area clean, well-
lit and free of distractions. Place lights so you are not working in a
shadow.
2. Keep anyone not wearing the appropriate safety equipment away from
the work area.
3. Store unused tools properly in a safe and dry location to prevent rust
or damage. Lock tools away and keep out of the reach of children.
4. Do not install or use in the presence of flammable gases, dust or
liquids.
PERSONAL SAFETY
WARNING! Wear personal protective equipment approved by the Canadian
Standards Association (CSA) or American National Standards Institute (ANSI).
PERSONAL PROTECTIVE EQUIPMENT
1. Always wear impact safety goggles that provide front and side protection
for the eyes. Eye protection equipment should comply with CSA Z94.3-07
or ANSI Z87.1 standards based on the type of work performed.
2. Wear gloves that provide protection based on the work materials or to
reduce the effects of tool vibration.
a. Do not wear gloves when operating a tool that can snag the
material and pull the hand into the tool.
3. Wear protective clothing designed for the work environment and tool.

9041559 9 Gallon Twin-Tank Wheelbarrow Portable Air Compressor V1.1
4 For technical questions call 1-800-665-8685
4. Non-skid footwear is recommended to maintain footing and balance in
the work environment.
5. Wear a NIOSH approved respirator when working on materials that
produce hazardous fumes, dust or particulate matter.
6. This air source may cause hearing damage. Wear hearing protection
gear with an appropriate Noise Reduction Rating to withstand the
decibel levels.
PERSONAL PRECAUTIONS
Control the tool, personal movement and the work environment to avoid
personal injury or damage to tool.
1. Do not operate any tool when tired or under the influence of drugs,
alcohol or medications.
2. Avoid wearing clothes or jewelry that can become entangled with the
moving parts of a tool. Keep long hair covered or bound.
3. Do not overreach when operating a tool. Proper footing and balance
enables better control in unexpected situations.
SPECIFIC SAFETY PRECAUTIONS
WARNING! DO NOT let comfort or familiarity with product (gained from
repeated use) replace strict adherence to the tool safety rules. If you use
this tool unsafely or incorrectly, you can suffer serious personal injury.
WARNING! Excessive compressor RPMs could cause a pulley or flywheel to
shatter, possibly causing bodily harm or death. Do not operate the
compressor above the recommended RPM as supplied by the factory.
WARNING! Do not use the compressor in an environment with toxic, volatile
or corrosive vapours, air temperatures exceeding 104°F, water, or extremely
dirty air. Operate the compressor in an area with adequate ventilation.
WARNING! Discharge piping can exceed 350°F when compressor is
operating. Do not use plastic pipe or lead tin soldered joints for a discharge
line. Do not modify the discharge line.
1. Use the correct tool for the job. This tool was designed for a specific
function. Do not modify or alter this tool or use it for an unintended
purpose.
2. Do not use the tool if any parts are damaged, broken or misplaced.
Repair or replace the parts.
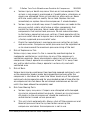
3. Risk of Bursting

V1.1 9 Gallon Twin-Tank Wheelbarrow Portable Air Compressor 9041559
Visit www.princessauto.com for more information 5
a. Serious injury or death may occur from an air tank explosion if the
air tank is not properly maintained or if modifications, alterations or
repairs are attempted. Drain air tank daily or after each use. Never
drill into, weld, patch or modify the air tank. Replace the tank
immediately or replace the entire compressor, if a leak develops.
b. Serious injury or death may occur if modifications are made to the
pressure switch, safety relief valve or other components that
control the tank pressure. Never make adjustments to the
components that control tank pressure. Do not make alterations
to the factory operating pressure settings. Check operation of the
pressure relief valve on a regular basis and never operate without
a factory approved pressure relief valve.
c. Check the manufacturer’s maximum pressure rating for air tools
and accessories. Compressor outlet pressure must be regulated so
as to never exceed the maximum pressure rating of the tool.
4. Risk of Explosion or Fire
Serious injury may occur if a fire is caused by overheating due to
inadequate ventilation or restrictions to any of the compressor’s
ventilation openings. Never place objects against or on top of an air
compressor. Always operate air compressor at least 12 in. away from
any wall or obstruction. Always operate in a clean, dry and well-
ventilated area.
5. Risk of Burn
Serious burn injuries could occur from touching exposed metal parts such
as the compressor head or motor during operation and even after the
compressor is shut down for some time. Never touch any of the exposed
metal parts during operation and for an extended period of time after the
air compressor has shut down. Do not attempt maintenance on the unit
until it has been allowed to completely cool.
6. Risk from Moving Parts
a. Serious injury may occur if repairs are attempted with damaged,
missing or removed protective guards, shrouds or missing covers.
All repairs to the air compressor should be made only by
authorized or trained service personnel.
b. This unit starts automatically. Always shut off the compressor and
bleed all pressure from the system before servicing the
compressor and when the compressor is not in use.

9041559 9 Gallon Twin-Tank Wheelbarrow Portable Air Compressor V1.1
6 For technical questions call 1-800-665-8685
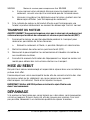
7. Risk of Damage to Air Compressor or Property
a. Failure to transport or operate the air compressor properly may
result in major repair expenses. Always run the compressor in a level,
secure position that keeps it from tipping or falling during use.
b. Do not operate without an air filter or in a corrosive environment.
c. Always transport in a level position and use protective mats to
keep truck beds clean, etc. Fasten the compressor down securely.
Pressure must be released from the tank before transporting.
d. In cold climates, drain the tank after each use to avoid ice buildup.
8. Air supplied to the inlet filter must be clean. The compressor belt guard
must not be located closer than 12 inches to a wall, or 24 inches to
another compressor. Additional safety can be achieved by locating the
pulley drive system, with the guard, next to the wall.
9. Never use this compressor to inflate low pressure objects (i.e. toys,
footballs, etc.).
10. Do not replace the safety valve with a plug.
11. Do not install a shutoff valve in the compressor discharge line without
first installing a safety valve of proper size and design between the
shutoff valve and the compressor.
12. Periodically check all safety valves for proper operation. Safety valves
aid in preventing system failures by relieving system pressure when
compressed air reaches a pre-determined pressure level.
a. Do not attempt to tamper with safety valve. Anything loosened
from this device could fly up and hit you. Failure to heed this
warning could result in death or serious personal injury.
13. Do not move the compressor while in use.
14. Check the manufacturer’s maximum pressure rating for air tools and
accessories. Compressor outlet pressure must be regulated to never
exceed the maximum pressure rating of the tool (see Specifications).
Exceeding the maximum PSI rating can create a bursting hazard,
causing injury and property damage.
15. Serious injury may occur from loose debris being propelled at high speeds
from the compressed air stream. Always wear OSHA approved safety
glasses to protect the eyes during operation of the air compressor.
16. Always turn off the air compressor and drain tank pressure completely
before attempting maintenance or attaching air tools. Release pressure
slowly from the system.

V1.1 9 Gallon Twin-Tank Wheelbarrow Portable Air Compressor 9041559
Visit www.princessauto.com for more information 7
17. Serious injury or death may occur from inhaling compressed air. The air
stream may contain carbon monoxide, toxic vapors or solid particles. Never
inhale compressed air directly from the pump or air tool.
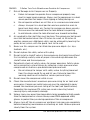
AIR HOSE PRECAUTIONS
1. Inspect the tool's air hose for cracks, fraying or other faults before each
use. Discontinue use if the air hose is damaged or hissing is heard from
the air hose or couplers. Replace the defective air hose.
2. Do not allow people, mobile equipment or vehicles to pass over the
unprotected air hose. Position the air hose away from high traffic
areas, in a reinforced conduit or place planks on both sides of the air
hose to create a protective trench.
3. Prevent damage to the air hose by observing the following:
a. Never carry the tool by the air hose.
b. Keep the air hose behind the tool and out of the tool's work path.
c. Keep the air hose away from heat, oil, sharp edges or moving
parts.
d. Do not wrap the air hose around the tool as sharp edges may
pierce or crack the air hose. Gently coil the hose and either hang
on a hook or fasten with a device to keep hose together when
storing.
4. A damaged or disconnected air hose under pressure may whip around
and inflict personal injury or damage the work area. Secure the
compressor's air hose to a fixed or permanent structure with clamps or
cable ties.
5. Install an in-line shutoff valve or regulator to allow immediate control over
the air supply in an emergency, even if a hose is ruptured.
UNPACKING
WARNING! Do not operate the tool if any part is missing. Replace the
missing part before operating. Failure to do so could result in a malfunction
and personal injury.
Remove the parts and accessories from the packaging and inspect for damage.
Make sure that all items in the contents are included.
Contents: • Air Compressor • Rubber feet (4)

9041559 9 Gallon Twin-Tank Wheelbarrow Portable Air Compressor V1.1
8 For technical questions call 1-800-665-8685
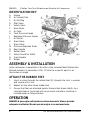
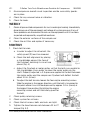
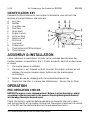
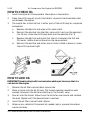
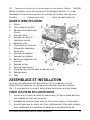
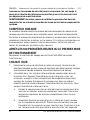
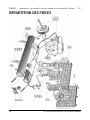
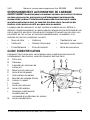
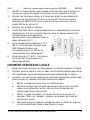
IDENTIFICATION KEY
A Engine
B Air Intake Filter
C Oil Fill Plug
D Pilot Valve
E Safety Valve
F Hour Meter
G Air Tank
H Tank Pressure Gauge
I Regulator Pressure Gauge
J Air Outlet
K Drain Valve
L Drain Valve
M Pressure Regulator Knob
N Rear Handle
O Rubber Foot
P Safety Guard for V-Belt
Q Front Handle
R Wheel
ASSEMBLY & INSTALLATION
Letter references in parenthesis (A) refer to the included Identification Key.
Dashed numbers in parenthesis (Fig. 1-1) refer to a specific point in an
illustration or image.
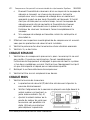
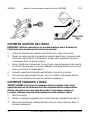
ATTACH THE RUBBER FEET
1. Insert a screw through the rubber foot (O), through the strut, a washer
and secure with a nut.
2. Repeat for the other three rubber feet.
3. Ensure that feet are attached evenly. Uneven feet drawn tightly to a
concrete floor or truck bed will cause severe vibrations resulting in
cracked welds or fatigue failure.
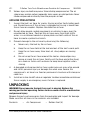
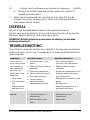
OPERATION
DANGER! A gas engine will produce carbon monoxide. Always provide
adequate ventilation! Do not operate engine in an enclosed area.
Fig.
1

V1.1 9 Gallon Twin-Tank Wheelbarrow Portable Air Compressor 9041559
Visit www.princessauto.com for more information 9
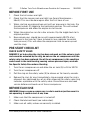
BEFORE FIRST USE
1. Check that all screws are tight.
2. Check that the tension rods are tight (see Care & Maintenance –
Month). This must be done again after the first hour of use.
3. When starting an engine driven unit with air pressure in the tank, flip
the pilot valve’s (D) toggle to the horizontal position. This will unload
the compressor and allow the engine to start easier.
4. When the engine has run for a few minutes, flip the toggle back to its
original position.
5. New compressors should be run with approximately 80 PSI of air
pressure in the tank for 1 hour to break-in (use regulator to control
tank pressure). This will allow the compressor time to warm up and
seat the rings.
PRE-START CHECKLIST
CHECK SAFETY VALVE
DANGER! If air leaks after the ring has been released, or if the valve is stuck
and cannot be actuated by the ring, do not use the air compressor until the
safety valve has been replaced. Use of the air compressor in this condition
could result in the tank bursting causing serious personal injury or death.
See Specific Safety Precautions: Bursting.
1. Turn the air compressor on and allow the air tank (G) to fill to 30 PSI.
2. Turn the air compressor off.
3. Pull the ring on the safety valve (E) to release air for twenty seconds.
4. Release the ring. Air must immediately stop escaping when the ring is
released. Any continued loss of air after releasing the safety valve ring
indicates a problem with the safety valve. Discontinue use and seek
service before continued use of the air compressor.
BEFORE EACH USE
WARNING! Never assume a compressor is safe to work on just because it is
not operating. It could restart at any time.
1. Make sure that the compressor is turned off.
2. Check the lubricant level (see Lubrication).
3. Make sure all safety valves are correctly installed.

9041559 9 Gallon Twin-Tank Wheelbarrow Portable Air Compressor V1.1
10 For technical questions call 1-800-665-8685
4. Be sure all guards are in place and securely mounted. Guards must
provide protection from moving parts while still allowing full air flow
for cooling purposes.
5. Drain moisture from the air tanks (See Maintenance: Daily).
WARNING! Do not open a drain valve (K and L) on any air tank containing
more than 30 PSI of air pressure.
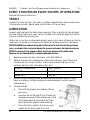
PILOT VALVE ADJUSTMENTS
WARNING! The pilot valve is set at the factory for maximum efficiency.
Adjustments to either component must be performed by a qualified
technician. Exceeding the factory recommended maximum pressure may
cause personal injury.
The adjustments must be made while the unit is operating. Extreme caution
must be taken while working on the unit. Make all differential and unload
pressure adjustments in very small increments (1/8 turn).
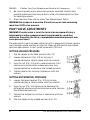
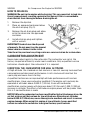
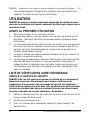
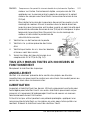
SETTING UNLOAD PRESSURE
1. Flip the toggle to the ‘RUN’ position (Fig. 2-1)
2. Loosen the locknut (Fig. 2-3) by turning it
counterclockwise. Hold in place with the wrench.
3. Turn the nut (Fig. 2-2) with a second wrench. Turn
clockwise to increase the unload pressure, turn
counterclockwise to decrease the unload pressure.
4. Tighten locknut by turning it clockwise with the
wrench.
SETTING DIFFERENTIAL PRESSURE
5. Loosen the lower locknut (Fig. 3-3) by turning
counterclockwise. Hold in place with the wrench.
6. Turn the nut (Fig. 3-2) clockwise to decrease the
differential pressure and counterclockwise to increase
the differential pressure.
7. Tighten the locknut by turning it clockwise with the
wrench.
8. Flip the toggle to the unload position (Fig. 3-1).
Fig. 2
Fig. 3

V1.1 9 Gallon Twin-Tank Wheelbarrow Portable Air Compressor 9041559
Visit www.princessauto.com for more information 11
START/STOP
1. Connect the air line to the quick coupler.
2. To adjust the amount of air pressure supplied:
a. Pull up on the regulator knob (M) to unlock it.
b. The regulator pressure gauge (I) displays the current line pressure.
Turn the knob clockwise to increase pressure and
counterclockwise to decrease pressure.
c. Push the knob down to lock it into position.
3. Ensure the drain valve on each tank (K and L) is closed by rotating
them to the left.
4. Open the petcock on the unloader valve for cold starts (turn clockwise
or in).
5. Flip the toggle on the pilot valve to the vertical position.
6. Start the gas engine (consult the gas engine manual).
7. Watch and listen for excessive vibration and unusual noises. If either
exist, stop the compressor and refer to Troubleshooting.
8. Allow the compressor to run for a few minutes.
9. Close the petcock (turn counterclockwise).
10. Flip the toggle on the pilot valve to the ‘RUN’ position. The compressor
should pump up the tank to 135 PSI, then unload. If pressure exceeds
135 PSI, see Troubleshooting.
11. To stop the compressor, shut the engine off.
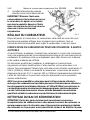
USING THE COMPRESSOR
WARNING! Always ensure the regulator pressure gauge reads zero before
changing air tools or disconnecting the hose from the air outlet. Failure to
do so could result in possible serious personal injury. Run the tool to
depressurize the system.
Your tool may require more air consumption than this air compressor is
capable of providing. Check the tool manual to avoid damage to the tool or
risk of personal injury.
Always use the minimum amount of pressure necessary for your
application. Using a higher pressure than needed will drain air from the tank
more rapidly and cause the unit to cycle on more frequently.

9041559 9 Gallon Twin-Tank Wheelbarrow Portable Air Compressor V1.1
12 For technical questions call 1-800-665-8685
1. Attach the air hose to the air outlet (J).
2. Rotate pressure regulator knob (M) to the desired line pressure. Turning
the knob clockwise increases air pressure at the outlet; turning
counterclockwise reduces air pressure at the outlet.
a. If using an inflation accessory, control the amount of air flow with
the pressure regulator knob.
3. Always shut off the engine when the task is finished. Never leave the
compressor running while unattended.
4. Completely relieve the system of air pressure by pulling the ring on the
safety valve. Position yourself so that the expelled moisture and air is
not blown towards you. Continue to pull the ring until all air pressure
escapes. Depressurize the tanks completely.
5. Drain moisture from each air tank using the drain valve (K and L)
located on the underside. Only do this when the tanks pressure is 10
PSI or lower. Position the compressor so that the drain valve is lower
than the rest of the air tank. Drain until all moisture is removed. Leave
the valves open until the tanks have time to dry.
6. Disconnect the air hose from compressor and hang the open ends
down to allow any moisture to drain.
7. Store the compressor and hose in a cool, dry place.
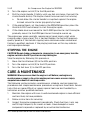
CARE & MAINTENANCE
Consult the Gas Engine manual for engine maintenance instructions.
1. Maintain the tool with care. A tool in good condition is efficient, easier
to control and will have fewer problems.
2. Inspect the tool fittings, alignment, hoses and power supply cord
periodically. Have damaged or worn components repaired or replaced
by an authorized technician. Only use identical replacement parts
when servicing.
3. Follow instructions for lubricating and changing accessories.
4. Only use accessories intended for use with this tool.
5. Keep the tool clean, dry and free from oil/grease at all times.
6. Maintain the tool’s labels and name plates. These carry important
information. If unreadable or missing, contact Princess Auto Ltd. for
replacements.
a. Do not operate this tool if it does not contain a legible warning label.

V1.1 9 Gallon Twin-Tank Wheelbarrow Portable Air Compressor 9041559
Visit www.princessauto.com for more information 13
7. The compressor may only be operated in temperatures under 104°F and
over 32°F. In cold climates, the compressor should be installed in a
heated building.
8. Fill the compressor pump with oil (see Lubrication).
9. Fill the fuel tank with fuel.
10. Rust can form inside the crankcase and on internal components as a result
of condensation. A compressor must operate long enough during each run
cycle to reach full operating temperature in order to reduce the risk of
condensation.
11. Condensation can also form in the air tank of your compressor. When this
happens, a mixture of air and moisture will be expelled through the
service valve and into whatever is connected to the valve (e.g. air hoses,
metal air lines, pneumatic tools, spray guns). An in-line filter, may be
required to eliminate the moisture.
12. Drive pulleys and compressor flywheels must be properly aligned and
tensioned to specifications.
WARNING! Only qualified service personnel should repair the tool. An
improperly repaired tool may present a hazard to the user and/or others.
CLEANING
1. Always use a clean cloth. Never use brake fluids, gasoline, petroleum-
based products, or any strong solvents to clean the unit. Doing so
could risk deterioration of the enclosure plastic.
2. Clean the intake filter every 100 hours in service. The intake filter
prevents dust and dirt from being drawn in and a clogged intake filter
will decrease performance. To clean the intake filter:
a. Remove the two hex screw from the air intake filter (B) cover.
b. Remove the filter from the two halves of the plastic housing, tap it
to remove the dirt, blast it down with low-pressure compressed
air (approx. 43 PSI) from inside of the filter to remove fine
particles and re-insert it.
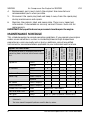
MAINTENANCE SCHEDULE
WARNING! Some surface temperatures exceed 350°F when the unit is
operating. Do not touch as it may cause a burn injury. Wait for the unit to
cool before starting to service.

9041559 9 Gallon Twin-Tank Wheelbarrow Portable Air Compressor V1.1
14 For technical questions call 1-800-665-8685
WARNING! Before servicing, always shut off the engine and remove the
spark plug wire. Release all air from the tank by pulling the ring on the
safety valve until all air pressure escapes. Failure to depressurize tank
before maintenance may cause serious personal injury.
WARNING! Never attempt to relieve air pressure in an air tank by removing
a pipe plug or any other system component.
HOUR METER
The hour meter records the engine and compressor’s running time to assure
required maintenance is performed on schedule.
Refer to the gas engine owner’s manual for maintenance procedures to be
performed on the engine. If the unit is used in an excessively dirty or dusty
environment, check and perform all maintenance procedures more often.
AFTER FIRST 100 HOURS OR FIRST MONTH OF OPERATION
Replace break-in lubricant with SAE 40W oil (see lubrication).
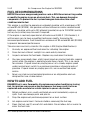
DAILY
1. Maintain the lubricant level at the halfway point on the sight glass.
Discolored lubricant or a higher lubricant level reading may indicate
the presence of condensed liquids (see Troubleshooting).
2. Humidity in the air causes condensate to form in the air tank. Drain
moisture from air tank(s). Tank(s) subjected to freezing temperatures may
contain ice. Store the compressor in a heated area before attempting to
drain moisture from the tank(s). To drain moisture from the air tanks:
a. Turn the air compressor off and allow air compressor to become
cool to the touch before servicing. Turn pressure regulator knob
fully counterclockwise.
b. Completely relieve the system of air pressure by pulling the ring on
the safety valve (E). Position yourself so that the moisture and air
being expelled does not touch you. Continue to pull the ring until all
air pressure escapes.
c. Drain moisture from the air tanks using the drain valve located on
the underside of each air tank. Tilt the compressor in the direction
of the drain valve into a suitable container until all moisture has
been removed. If unit will not be used for a while, leave drain valve
open to allow moisture to completely drain out and help prevent
corrosion on the inside of tank. Otherwise, close valve completely.
d. If drain valve is clogged, remove and clean valve and reinstall.

V1.1 9 Gallon Twin-Tank Wheelbarrow Portable Air Compressor 9041559
Visit www.princessauto.com for more information 15
3. Give compressor overall visual inspection and be sure safety guards
are in place.
4. Check for any unusual noise or vibration.
5. Check for leaks.
WEEK LY
1. Check all pressurized components for rust, cracking or leaking. Immediately
discontinue use of the equipment and relieve all system pressure if any of
these problems are discovered. Do not use the equipment until it has been
inspected and repaired by a qualified mechanic.
2. Clean the exterior surfaces of the compressor.
3. Check the air filter and replace if necessary.
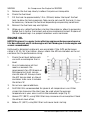
MONTHLY
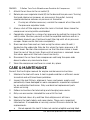
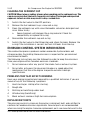
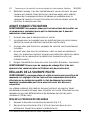
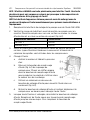
1. Check belt tension.
a. In order to adjust the drive belt, the
safety guard (P) must be removed.
b. Check the belt alignment by placing
a straightedge against the face of
the flywheel, touching its rim at two
places (Fig. 4).
c. Adjust the flywheel or motor pulley so that the belt runs parallel to
the straightedge. Use a puller to move the motor pulley on the
shaft. Properly adjusted, a 3 lb pressure applied to the belt between
the motor pulley and the compressor flywheel will deflect the belt
about 1/4 in. (6 mm).
d. To adjust the belt tension, loosen the four engine mounting screws.
Slide the engine in the proper direction, until the belt is tensioned to
the point where it can still be depressed by approx. 1/4 in. (6 mm) at
the longest free position. Re-tighten the engine
mounting screws and refit the safety guard for
the belt.
2. Check pulley retaining screws.
3. Check system for air leaks.
4. Check that all screws, bolts and nuts are tight.
5. Tighten the head tension rods between 22 to 27
torque (Fig. 5-1).
Fig. 4
Fig. 5

9041559 9 Gallon Twin-Tank Wheelbarrow Portable Air Compressor V1.1
16 For technical questions call 1-800-665-8685
EVERY 3 MONTHS OR EVERY 300 HRS. OF OPERATION
Change the pump’s lubricant
Y EA RLY
Inspect the tank for rust, pin holes, or other imperfections that could cause
it to become unsafe. Never weld or drill holes in the air tank.
LUBRICATION
Inspect and lubricate the tool when required. Only use light oil to lubricate
the tool. Other lubricants may not be suitable and could damage the tool or
cause a malfunction during use.
When not in use for an extended period, apply a thin coat of lubricant to the
steel parts to avoid rust. Remove the lubricant before using the tool again.
NOTICE! NEVER use a penetrating oil to lubricate the tool. Penetrating oil may
act as a solvent that can break down the grease and cause the tool to seize up.
NOTICE! Lubricant that appears milky may have mixed with condensate.
Replace the oil immediately to avoid equipment failure.
1. Replace pump’s break-in lubricant with SAE 40W oil.
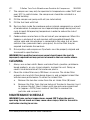
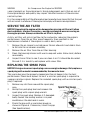
2. Before starting this compressor, check the lubricant level. Place the
compressor on a level surface. The oil level should register at the
halfway point on the sight glass (Fig. 6-2).
Ambient Temperature SAE Viscosity
30-104°F SAE 40
Below 30°F SAE 30
3. Do not use petroleum-based automotive oils because specific types
have a tendency to foam and leave carbon deposits when used in
compressors.
4. Change the oil.
a. Shut off the engine and release the air
pressure.
b. Unscrew the oil fill plug (Fig. 6-1) from the
compressor pump. Place a clean rag in the
oil fill plug opening to prevent dirt from
getting into the engine while draining.
c. Use a funnel to collect the oil in a pan
under the oil drain plug (Fig. 6-3).
Fig. 6

V1.1 9 Gallon Twin-Tank Wheelbarrow Portable Air Compressor 9041559
Visit www.princessauto.com for more information 17
d. Remove the oil drain plug and tilt the compressor slightly as
needed to remove all oil.
5. When the oil has drained out, re-fit the oil drain plug. Fill new oil
through the oil filler opening until it comes up to the required level.
Then replace the oil fill plug.
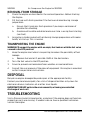
DISPOSAL
Recycle a tool damaged beyond repair at the appropriate facility.
Contact your local municipality for a list of disposal facilities or by-laws for
electronic devices, batteries, oil or other toxic liquids.
IMPORTANT! DO NOT pollute the environment by allowing uncontrolled
discharge of waste oil.
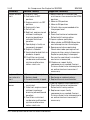
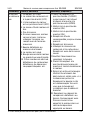
TROUBLESHOOTING
Visit a Princess Auto Ltd. location for a solution if the tool does not function
properly or parts are missing. If unable to do so, have a qualified technician
service the tool.
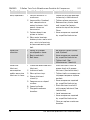
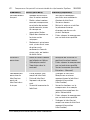
Problem(s) Possible Cause(s) Suggested Solution(s)
Motor hums or
runs slowly when
first turned on,
but compressor
does not start.
Motor then stops
humming.
• Fuses blow
• Circuit breakers
trip
• Motor thermal
overload trips
1. Lubricant used is too
heavy.
2. Defective check valve or
unloader.
3. Freezing temperature.
4. Motor sized incorrectly.
5. Drive belt too tight.
6. Lack of proper
ventilation/room
temperature too high.
1. Use a lighter weight
lubricant (see Lubrication)
2. Replace check valve or
unloader.
3.
Warm the compressor or use
a lighter weight lubricant
(see Lubrication).
4. Replace with correctly sized
motor.
5. Re-adjust belt.
6. Move the compressor to a
well-ventilated area.
Compressor won’t
operate.
1. Defective engine.
2. Lack of lubricant in
compressor.
3. Belt too tight or too
loose.
1. Replace or repair engine.
2. Add lubricant (see
Lubrication)
3. Adjust belt.

9041559 9 Gallon Twin-Tank Wheelbarrow Portable Air Compressor V1.1
18 For technical questions call 1-800-665-8685
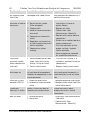
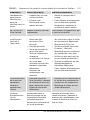
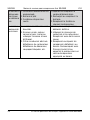
Problem(s) Possible Cause(s) Suggested Solution(s)
Noisy operation. 1. Lack of lubricant in
crankcase.
2. Loose pulley, flywheel,
belt, compressor or
motor fasteners, belt
guard, clamps or
accessories.
3. Carbon deposits on
piston or valves.
4. Worn main bearings,
broken piston, worn wrist
pins, wrist pin bearings,
or loose connecting rod
bolt.
1. Check for possible damage
to bearings. Add lubricant.
2. Tighten where necessary.
3. Remove the cylinder head
and inspect for foreign
matter on top of the piston.
Clean.
4. Have compressor repaired
by a qualified technician.
Excessive
vibration
1. Pulley & flywheel
misaligned or loose.
2. Bent crankshaft.
3. Belt loose.
1. Re-align or tighten pulley
and flywheel.
2. Have compressor repaired
by a qualified technician.
3. Tighten belt. (See
Maintenance - Monthly)
Excessive
lubricant
consumption
and/or excessive
lubricant in hose
1. Crankcase overfilled with
lubricant.
2. Lubricant leaks.
3. Worn piston rings.
4. Wrong lubricant
viscosity.
5. Compressor on sloped
surface.
6. Scored cylinder.
7. Plugged crankcase
breather.
1. Drain lubricant. Refill to
proper level with proper
lubricant (See Lubrication)
2. Tighten bolts on compressor
to proper torque or replace
gaskets.
3. Have compressor repaired
by a qualified technician.
4. Drain lubricant and refill
with proper lubricant (See
Lubrication)
5. Level compressor.
6. Have compressor repaired
by a qualified technician.
7. Clean or replace crankcase
breather.

V1.1 9 Gallon Twin-Tank Wheelbarrow Portable Air Compressor 9041559
Visit www.princessauto.com for more information 19
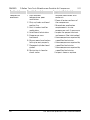
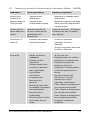
Problem(s) Possible Cause(s) Suggested Solution(s)
Air blowing from
inlet filter
Damaged inlet (reed) valve. Have compressor repaired by a
qualified technician.
Insufficient
pressure at tool or
accessory
1. Leaks or restrictions.
2. Restricted air intake
(filter plugged).
3. Slipping belt.
4. Hose or hose connectors
too small.
5. Compressor incorrectly
sized.
6. Regulator not turned up
to high enough pressure /
faulty regulator.
7. Compressor valves
leaking.
1. Check for leaks or
restrictions in hose or
piping. Repair.
2. Replace air filter.
3. Tighten belt. (See
Maintenance - Monthly)
4. Replace with larger hose or
connectors.
5. Either use a smaller tool or a
larger compressor.
6. Turn the regulator to the
proper setting / replace
faulty regulator.
7. Have compressor repaired
by a qualified technician.
Tank loses
pressure rapidly
when compressor
shuts off.
1. Loose connection or leak
(pipe, tank drain valve,
tubing, fitting or hose).
2. Faulty check valve.
1. Turn unit off, unplug it, &
tighten or replace fittings or
components.
2. Replace faulty check valve.
Moisture in
discharge air.
Condensation in tank, caused
by high level of atmospheric
humidity or compressor is not
run long enough.
Drain tank after every use.
Drain tank more frequently in
humid weather & use an inline
filter.
Pressure in tank
exceeds 135 PSI.
1. Defective pilot valve.
2. Incorrectly adjusted pilot
valve.
1. Replace defective pilot valve.
2. Readjust pilot valve (see Pilot
Valve Adjustment)
Crankcase
lubricant is milky.
Water in lubricant due to
humidity or condensation.
Change lubricant. Move
compressor to less humid
atmosphere.
Belt roll over. 1. Misaligned belts.
2. Loose belt.
1. Align belts (See Maintenance
- Monthly)
2. Tighten belts (See
Maintenance - Monthly)

9041559 9 Gallon Twin-Tank Wheelbarrow Portable Air Compressor V1.1
20 For technical questions call 1-800-665-8685
Problem(s) Possible Cause(s) Suggested Solution(s)
Compressor
overheats.
1. High ambient
temperature, poor
ventilation.
2. Dirty cylinder and head
cooling fins.
3. Unit is undersized for
application.
4. Insufficient lubrication.
5. Compressor runs
backward.
6. One or more head valves
failing to seat properly.
7. Damaged cylinder head
gasket.
8. Restriction in head or
check valve.
1. Increase ventilation with
cooler air.
2. Clean all outer surfaces of
the compressor.
3. Re-evaluate application
requirements; re-size
compressor unit if necessary.
4. Inspect for proper lubricant
and amount (See Lubrication).
5. Have compressor repaired by
a qualified technician.
6. Have compressor repaired by
a qualified technician.
7. Have compressor repaired by
a qualified technician.
8. Inspect, clean or replace.
La page est en cours de chargement...
La page est en cours de chargement...
La page est en cours de chargement...
La page est en cours de chargement...
La page est en cours de chargement...
La page est en cours de chargement...
La page est en cours de chargement...
La page est en cours de chargement...
La page est en cours de chargement...
La page est en cours de chargement...
La page est en cours de chargement...
La page est en cours de chargement...
La page est en cours de chargement...
La page est en cours de chargement...
La page est en cours de chargement...
La page est en cours de chargement...
La page est en cours de chargement...
La page est en cours de chargement...
La page est en cours de chargement...
La page est en cours de chargement...
La page est en cours de chargement...
La page est en cours de chargement...
La page est en cours de chargement...
La page est en cours de chargement...
La page est en cours de chargement...
La page est en cours de chargement...
La page est en cours de chargement...
La page est en cours de chargement...
La page est en cours de chargement...
La page est en cours de chargement...
La page est en cours de chargement...
La page est en cours de chargement...
La page est en cours de chargement...
La page est en cours de chargement...
La page est en cours de chargement...
La page est en cours de chargement...
La page est en cours de chargement...
La page est en cours de chargement...
La page est en cours de chargement...
La page est en cours de chargement...
La page est en cours de chargement...
La page est en cours de chargement...
La page est en cours de chargement...
La page est en cours de chargement...
La page est en cours de chargement...
La page est en cours de chargement...
La page est en cours de chargement...
La page est en cours de chargement...
La page est en cours de chargement...
La page est en cours de chargement...
La page est en cours de chargement...
La page est en cours de chargement...
La page est en cours de chargement...
La page est en cours de chargement...
La page est en cours de chargement...
La page est en cours de chargement...
La page est en cours de chargement...
La page est en cours de chargement...
La page est en cours de chargement...
La page est en cours de chargement...
La page est en cours de chargement...
La page est en cours de chargement...
La page est en cours de chargement...
La page est en cours de chargement...
La page est en cours de chargement...
La page est en cours de chargement...
La page est en cours de chargement...
La page est en cours de chargement...
La page est en cours de chargement...
La page est en cours de chargement...
La page est en cours de chargement...
La page est en cours de chargement...
La page est en cours de chargement...
La page est en cours de chargement...
La page est en cours de chargement...
La page est en cours de chargement...
-
 1
1
-
 2
2
-
 3
3
-
 4
4
-
 5
5
-
 6
6
-
 7
7
-
 8
8
-
 9
9
-
 10
10
-
 11
11
-
 12
12
-
 13
13
-
 14
14
-
 15
15
-
 16
16
-
 17
17
-
 18
18
-
 19
19
-
 20
20
-
 21
21
-
 22
22
-
 23
23
-
 24
24
-
 25
25
-
 26
26
-
 27
27
-
 28
28
-
 29
29
-
 30
30
-
 31
31
-
 32
32
-
 33
33
-
 34
34
-
 35
35
-
 36
36
-
 37
37
-
 38
38
-
 39
39
-
 40
40
-
 41
41
-
 42
42
-
 43
43
-
 44
44
-
 45
45
-
 46
46
-
 47
47
-
 48
48
-
 49
49
-
 50
50
-
 51
51
-
 52
52
-
 53
53
-
 54
54
-
 55
55
-
 56
56
-
 57
57
-
 58
58
-
 59
59
-
 60
60
-
 61
61
-
 62
62
-
 63
63
-
 64
64
-
 65
65
-
 66
66
-
 67
67
-
 68
68
-
 69
69
-
 70
70
-
 71
71
-
 72
72
-
 73
73
-
 74
74
-
 75
75
-
 76
76
-
 77
77
-
 78
78
-
 79
79
-
 80
80
-
 81
81
-
 82
82
-
 83
83
-
 84
84
-
 85
85
-
 86
86
-
 87
87
-
 88
88
-
 89
89
-
 90
90
-
 91
91
-
 92
92
-
 93
93
-
 94
94
-
 95
95
-
 96
96


Powerfist 9041559 Le manuel du propriétaire
- Catégorie
- Compresseurs d'air
- Taper
- Le manuel du propriétaire
dans d''autres langues
- English: Powerfist 9041559 Owner's manual
Documents connexes
-
Powerfist 8315517 Le manuel du propriétaire
-
-
-
-
-
-
-
Autres documents
-
PROPOINT 8996977 Le manuel du propriétaire
-
-
-
-
-
Senco PC0947 Combo Le manuel du propriétaire
-
Senco PC1280 Le manuel du propriétaire
-
Power Fist 8474975 Le manuel du propriétaire
-
-