
ARM303-4A-340
DIGITAL ANGLE TORQUE WRENCH
PRODUCT INFORMATION MANUAL
Manuel informations du produit
Manual información del producto
English
Français
Español
THIS MANUAL CONTAINS IMPORTANT INFORMATION REGARDING SAFETY,
OPERATION, MAINTENANCE AND STORAGE OF THIS PRODUCT.
CE MANUEL CONTIENT DES INFORMATIONS IMPORTANTE CONCERNANT LA
SECURITE, L'OPERATION, LA MAINTENANCE ET LE STOCKAGE DE CE
PRODUIT.
ESTE MANUAL CONTIENE INFORMACIÓN IMPORTANTE ACERCA DE LA
SEGURIDAD, FUNCIONAMIENTO, MANTENIMIENTO Y ALMACENAMIENTO DE
ESTE PRODUCTO.
DO NOT ATTEMPT TO OPERATE THE TOOL UNTIL YOU HAVE READ AND UNDERSTOOD ALL
INSTRUCTIONS AND SAFETY RULES CONTAINED IN THIS MANUAL. FAILURE TO COMPLY
MAY RESULT IN ACCIDE
NTS INVOLVING FIRE, ELECTRIC SHOCK, OR SERIOUS PERSONAL
INJURY. SAVE THIS OWNER’S MANUAL FOR FUTURE REFERENCE AND REVIEW IT
FREQUENTLY FOR SAFE OPERATION.
NE PAS TENTER D'OPERER L'OUTIL TANT QUE VOUS N'AVEZ PAS LU ET COMPRIS TOUTES
LES INSTRUCTIONS ET REGLES DE SECURITE CONTENUES DANS CE MANUEL. SINON VOUS
RISQUEZ DES ACCIDENTS TELS QU'UN INCENDIE, UNE ELECTROCUTION, OU DES
BLESSURES CORPORELLES GRAVES. CONSERVEZ CE MODE D'EMPLOI EN CAS DE BESOIN ET
RELISEZ-LE SOUVENT POUR UTILISER VOTRE OUTIL EN TOUTE SECURITE.
NO UTILICE ESTA HERRAMIENTA HASTA HABER LEÍDO Y COMPRENDIDO TO
DAS LAS
INSTRUCCIONES Y NORMAS DE SEGURIDAD CONTENIDAS EN ESTE MANUAL. SI NO LO
HACE PODRÍA PROVOCAR ACCIDENTES CON FUEGO, DESCARGA ELÉCTRICA O LESIONES
PERSONALES SERIAS. GUARDE ESTE MANUAL DE INSTRUCCIONES PARA SU CONSULTA EN
EL FUTURO Y REVÍSELO FRECUENTEMENTE PARA UN USO SEGURO.
40732743-NA

1English1
English -1
THANKS FOR CHOOSING THIS PRODUCT
ACDelco provides you with products at an affordable price, and we would like you to
be fully satisfied with this product and our technical support. If any help or advice is
needed, please kindly contact us.
INTENDED USE
This tool is intended for personal and hand use only.
This digital torque tool display fastener torque specification settings, torque readings
and peak hold measurements. Recommended use it indoor.
GENERAL SAFETY RULES
READ AND UNDERSTAND ALL INSTRUCTIONS.
Failure to follow all instructions listed below may result in
electric shock, fire and/or serious injury. The term "power tool" in all of the warnings
listed below refers to your mains-operated (corded) power tool or battery-operated
(cordless) power tool.
SAVE THESE INSTRUCTIONS FOR FUTURE REFERENCE
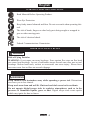
RECOGNIZE SAFETY SYMBOLS, WORDS AND LABELS
The safety instructions provided in this manual are not intended to cover all possible
conditions and practices that may occur when operating, maintaining and cleaning
power tools.
Always use common sense and pay particular attention to all the DANGER,
WARNING, CAUTION and NOTE statements of this manual.
This is the safety alert symbol. It is used to alert you to potential
personal injury hazards. Obey all safety messages that follow this
symbol to avoid possible injury or death.
DANGER indicates an imminently hazardous situation which, if
not avoided, will result in death or serious injury.
WARNING indicates a potentially hazardous situation which, if
not avoided, could result in death or serious injury.
CAUTION indicates a potentially hazardous situation which, if
not avoided, may result in minor or moderate injury.
NOTE provides additional information that is useful for proper
use and maintenance of this tool. If a NOTE is indicated make
sure it is fully understood.
DANGER
NOTE
CAUTION
WARNING
WARNING

1English1
English -2
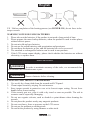
WARNING LABEL IDENTIFICATION
Read Manuals Before Operating Product.
Wear Eye Protection.
Keep body stance balanced and firm. Do not overreach when operating this
tool.
The risk of hands, fingers or other body parts being caught or wrapped in
gear or other moving parts.
The risk of electrical shock.
Federal Communications Commission.
IMPORTANT SAFETY RULES
Risk of Flying Particles
WARNING: Over-torque can cause breakage. Force against flex stops on flex head
can cause head breakage. An out of calibration torque wrench can cause part or tool
breakage. Broken hand tools, sockets or accessories can cause injury. Excess force
can cause crow foot or flare nut wrench slippage.
WORK AREA
Keep children and bystanders away while operating a power tool. Distractions
can cause you to lose control.
Keep work area clean and well lit. Cluttered and dark areas invite accidents.
Do not operate digital torque tools in explosive atmospheres, such as in the
presence of flammable liquids, gases or dust. Digital torque tools create sparks
which may ignite the dust or fumes.
WARNING
DANGER

1English1
English -3
ELECTRICAL SAFETY
Electrical shock can cause injury.
Plastic part is not insulated.
Do not use on live electrical circuits.
PERSONAL SAFETY
Stay alert, watch what you are doing and use common sense when operating a
power tool. Do not use a power tool while you are tired or under the influence of
drugs, alcohol or medication. A moment of inattention while operating power tools
may result in serious personal injury.
Use personal safety equipment. Always wear eye protection. Safety equipment
such as dust mask, non-skid safety shoes, hard hat, or hearing protection used for
appropriate conditions will reduce personal injuries.
Do not overreach. Keep proper footing and balance at all times. This enables
better control of the power tool in unexpected situations.
Do not expose digital torque tools to rain or wet conditions. Water entering a
digital torque tool will increase the risk of electric shock.
Ratchet mechanism may slip of break if dirty, mismatched or worn parts are
used, or direction lever is not fully engaged. Ratchets that slip or break can cause
injury.
Always pull-do not push- on the wrench handle and adjust your stance to
prevent a possible fall while applying torque.
WARNING
WARNING

1English1
English -4
POWER TOOL USE AND CARE
For hand use only.
Do not apply excessive torque or force to the tool housing. The torque only
applies on the driver head.
Do not shake or shock.
Never use this digital torque tool to loosen fasteners.
This digital torque tool is for hand use only.
Always verify that the digital torque tool capacity matches or exceeds each
application before proceeding.
Always verify the calibration of the digital torque tool if you know or suspect its
capacity has been exceeded. To ensure accurate measurement periodic
recalibration is necessary.
Never force the head of flex head drive against stops.
Keep this digital torque tool away from magnets.
Do not apply excessive force to the LCD panel.
Use the digital torque tool only for the intended use described in this manual. Do
not use this digital torque tool as a hammer.
Do not use the digital torque tool if it is not working properly, or if it has
suffered any damage.
Be sure all components, including wrenches, extensions, drivers and sockets are
rated to match or exceed the torque being applied with tool.
Do not disassemble the digital torque tool.
Observe all equipment, system and manufacturer’s warnings, cautions and
procedures when using this digital torque tool.
Always using the correct size socket for the fastener being torqued.
Do not use damaged sockets, showing signs of wear or cracks.
Do not apply torque exceeding the rated capacity, regardless of whether the
digital torque tool is On or Off. Avoid shock load. Over-torque(110% of Max.
torque range) could cause breakage or lose accuracy.
Never operate digital torque tool when powered OFF. Always power digital
torque tool ON prior to applying torque.
Do not press ON/ZERO button while torque is being applied.
CAUTION

1English1
English -5
BATTERY TOOL USE AND CARE
Under abusive conditions, liquid may be ejected from the battery, avoid contact.
If contact accidentally occurs, flush with water. If liquid contacts eyes,
additionally seek medical help. Liquid ejected from the battery may cause irritation
or burns.
Do not expose this digital torque tool to dust or sand as this could cause serious
damage. Do not expose the digital torque tool to extreme temperature, humidity
direct sunlight or shock violently.
SERVICE
Tool service must be performed only by qualified repair personnel. Service or
maintenance performed by unqualified personnel may result in a risk of injury.
When servicing a tool, use only identical replacement parts. Follow instructions
in the Maintenance section of this manual. Use of unauthorized parts or failure to
follow Maintenance Instructions may create a risk of shock or injury.
SPECIFIC SAFETY RULES AND SYMBOLS
Recommended operating temperature is -10-60°C (14-140°F).
Always replace damaged fasteners before applying torque.
SYMBOLS
The label on your tool may include the following symbols. The symbols and their
definitions are as follows:
SYMBOL NAME EXPLANATION
V Volts Voltage (potential)
kg Kilograms Weight
Direct Current Type of Current
CAUTION
CAUTION

1English1
English -6
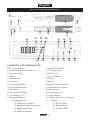
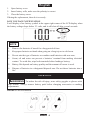
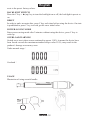
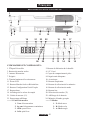
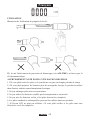
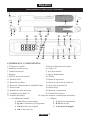
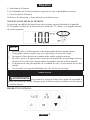
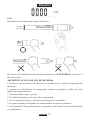
FUNCTIONAL DESCRIPTION
CONTROLS AND COMPONENTS:
1. Reversible Ratchet 2 Quick Release Button
3. Forward and reverse selection lever 4. 1/2” Square Drive
5. Decoration Ring 6. Battery Cover
7. Handle 8. Anti-slip Handle
9. LED Indicator 10. Buzzer
11.LCD Panel 12.Button
13. Power/Reset Button 14. Memory Selection Button
15.Unit Selection Button 16. Mode Selection Button
17. Up Button 18. Down Button
19. Torque Value Display 20. Mode Display (*2)
21. Unit Display (*1) 22. Battery Display
23. Percentage Display 24. Memory Group Number Display
------*1 Measuring Units: ------*2 Modes:
1. N-m: Newton Meters 1. F: Trace Mode
2. kg-cm: Kilogram Centimeters 2. K: Peak Mode
3. in-lb: Inch Pounds 3. A: Angle Mode
4. ft-lb: Foot Pounds
1
4
5 7
6
2
3
11 12
8
19
21
23
22
15
16
17
24
20
9
13 14
18
10

1English1
English -7
SPECIFICATIONS
Model Number
ARM303-4A-340
Drive
1/2” Square
Voltage
3 Vdc
Head Type
Quick Release Ratchet
Gear Teeth
72
Length
26-1/4" (666 mm)
Accuracy
ŹCW
±1.5% from 20% to 100% of full scale
ŹCCW
±2.5% from 20% to 100% of full scale
Angle
+/-2Ʊ
Operation Range
Torque
12.5-250.7 ft-lbs (17-340 Nm)
Angle
720Ʊ
Memory Capacity
30 data sets
LED
2 LED (GREEN + RED)
Vibration Warning
Yes (While reaching to 90% of Setting Value)
Resolution
1 kg-cm, 0.1 N-m, 1 in-lb, 0.1 ft-lb / 1Ʊ
Operation Mode
Peak (K) / Trace (F) / Angle (A)
Power Saving Mode
After 2 minutes of No Use
Operating Temperature
-10-60°C
Storage Temperature
-20-70°C
Battery
AAA (Alkaline) Battery x 2
Tool Weight
3.06 lbs (1.39 kg)
ASSEMBLY
BATTERY INSTALL AND REPLACEMENT

1English1
English -8
1. Open battery cover.
2. Insert battery cells, make sure the polarity is correct.
3. Close the battery cover.
If doing the replacement, then do it reversely.
LOW VOLTAGE NOTIFICATION
It will display a low battery symbol in the upper right corner of the LCD display when
the battery voltage drops below 2.3 volts, and it will shut off after several seconds.
1. Remove the batteries if stored for a long period of time.
2. Keep spare batteries on hand when going on a long trip or to cold areas.
3. Do not mix the type of batteries or combine used batteries with new ones.
4. Sweat, oil and water can prevent a batteries’ terminal from making electrical
contact. To avoid this, wipe both terminals before loading a battery.
5. Battery life depends on battery quality and the amount of buzzer is used.
6. Dispose of batteries in a designated disposal area. Do not throw batteries into a
fire.
OPERATION
To reduce the risk of injury, wear safety goggles or glasses with
side shields. Always remove battery pack before changing accessories or making
adjustments.
PRODUCT FUNCTIONS
NOTE
WARNING

1English1
English -9
Name of Function Key Function Description
C key Power and Reset
U/S key Unit Selection
M key Memory Selection
F/K/A key Mode Selection
Ÿ(UP) key Number Increasing
ź(DOWN) key Number Decreasing
POWER ON
Press C key to turn the digital torque tool on.
After the backlit LCD flashing, the display will be show 0000, and then enter the
operating mode. When this product is used for the first time, it will display the
product's smallest operating value after entering the operating mode. The units are
preset as N-m, the memory will display the first set, the mode will be tracking mode F,
the percentage position will display 0%, and the battery scale will show the voltage
detected at that time (all 30 memory data sets will have the same preset value).
POWER OFF
Press C key and hold 3 seconds to switch off.
RESET
Press C key to reset (when device turned on)
HOW TO SELECT UNIT
Press U/S key to select N-m, Kg-cm, lb-in, and lb-ft; the preset unit is N-m.
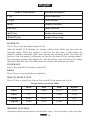
Torque Unit Conversion Table
lb-in lb-ft N-m Kg-cm
1 lb-in
1 0.083 0.113 1.152
1 lb-ft
12 1 1.356 13.83
1 N-m
8.851 0.737 1 10.2
1 Kg-cm
0.868 0.072 0.098 1
MEMORY FUNCTION
All memory data sets are preset as the smallest value. To set a memory value, press the

1English1
English -10
M KEY, and the digit on the far right of the M-01 display will begin to flash; use Ÿ
(up) or ź (down) to select the memory data set (up and down keys can be held down
for continuous increasing or decreasing. Press the M Key after selected, will leave the
select mode to stop flash.
HOW TO SET TRACE MODE (F), PEAK MODE (K) OR ANGLE MODE (A)
TRACE MODE (F) (preset as trace mode at time of first use)
After setting a value (assuming the value is 50N-m), the force applied by the wrench
will gradually increase from 0000. When force is applied, the displayed value will
change as the user applies different amounts of force; the reading will increase as force
increased, and decrease as force decreased. The reading will jump to 50 N-m when the
user releases his grip and lets up.
PEAK MODE (K)
After setting a value (assuming the value is 50N-m), the force applied by the wrench
will gradually increase from 0000. When force is applied, the displayed value will
change as the user applies different amounts of force; the reading is the final torque
value. After the display flashes 10 seconds (no actions or buttons will be effective at
this time), it will automatic back to the original setting data or press the C key to return
to the selected value, or apply force again and the measured torque value will rise from
0000.
ANGLE MODE (A)
After setting a degree (assuming is 50Ʊ), the force applied by the wrench will gradually
increase from 0Ʊ. When force is applied, the displayed degree will change as the user
applies different amounts of force. It will cross-display the final degree and torque
value when user stops force the wrench, 10 seconds flashing (no actions or buttons will
be effective at this time), it will automatic back to the original setting data or press the
C key to return to the selected value, or apply force again and the measured angle
degree will rise from 0Ʊ.
MEASUREMENT RANGE SELECTION
Values can be freely selected as long as force is not being measured or memory
selection has not been performed. After completing torque measurement in either mode,
the selected value can be displayed.
Ÿ(UP) / ź(DOWN) SELECTION
Pressing the Ÿ (up) key once will cause the value on the far right to increase by one;
pressing the key continuously will cause the value to increase continuously. Pressing
the ź (down) key once will cause the value on the far right to decrease by one.
LED & BUZZER
The green LED will come on and there will be a beep each time a key is pressed.
In the tracking mode, the two LEDs will be green and red. For example: when the set
torque value is 20N-m, the reading will begin to change from 0000 as soon as the user
begins to apply force. It approach the preset value 80%炻the green light will now begin

1English1
English -11
to flash and the buzzer will be heard. As the applied torque approaches the preset value,
the green light will flash faster, and the buzzer will buzz faster. When the applied
torque reaches the preset value 100%, the green light will remain on and the buzzer will
continue to sound. When the torque exceeds the preset value (101%), the red light will
come on, and the buzzer will continue to sound; the buzzer sound will decrease
gradually as force is relaxed.
The peak mode is the same as the tracking mode, but the LED and buzzer will stop
once force is relaxed.
In the angle mode, the two LEDs will be green and red. For example: when the set
angle degree is 20Ʊ, the reading will begin to change from 0Ʊ as soon as the user begins
to apply force. It approach the preset value 80%炻the green light will now begin to
flash and the buzzer will be heard. As the applied torque approaches the preset value,
the green light will flash faster, and the buzzer will buzz faster. When the applied reach
the preset degree 100%, the green light will remain on and the buzzer will continue to
sound. When it exceeds the preset degree (101%), the red light will come on, and the
buzzer will continue to sound; the buzzer sound will decrease gradually as force is
relaxed.
VIBRATION WARNING
For example : when if the set torque value is 20N-m, the reading will begin to change
from 0000, it will start to vibrate once the torque value reached to 90%, and it will stop
when the force is relaxed lower than 90% of preset value.
Vibration operation will automatically stop under angle mode.
LCD PERCENTAGE DISPLAY
The ordinary display is 0%
In tracking mode, if the set torque value is 20N-m, the display will show 50% after
force increases from 0N-m to 25N-m, and so on. The torque value will decrease after
force has been relaxed, and the display will return to the torque setting value after force
has completely relaxed.
The peak mode is the same as the tracking mode, but the displayed value will be the
percentage of the final torque after force is no longer applied, the Maximum is 100%.
In angle mode, if the set degree is 50Ʊ, the display will show 50% after force increases
from 0Ʊ to 25Ʊ, and so on. The displayed value will be the percentage of the final degree
after force is no longer applied, the Maximum is 100%.
LOW VOLTAGE DISPLAY
The LCD battery display has four increments. Greater or equal to 3V is shown as
completely charged; less than 2.8V is shown as 3 increments, less than 2.6V is shown
as 2 increments, and less than 2.4V is shown as one increment; when there is less than
2.3V, all functions will cease, and the instrument will turn off after the LCD battery
indicator flashes for 5 sec.
RESET MEMORY FUNCTION
Press and hold the C key + ź (down) key; after 5 sec., all values stored in memory

1English1
English -12
reset to the preset factory values.
BACKLIGHT SWITCH
Press the C key + Ÿ (up) key to turn the backlight on or off; the backlight is preset as
on.
RESET
In order to make accurate data, press C key each time before using the device. On state
is prohibited to press C key to avoid get the error initial value.
POWER SAVING MODE
Enter power-saving mode after 2 minutes without using the device, press C key to
wake up.
OVERLOAD WARNING
Switch on or reset when screen continued to appear 110%, it means the device have
been forced exceeds the maximum standard torque value 110%, may result in the
products’ damage or accuracy error.
Under normal usage烉
Overload烉
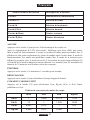
USAGE
Illustration of using wrench handle:

1English1
English -13
P.S烉Before completion of the booting process (see POWER ON), do not force in the
torque wrench.
WARNING NOTE FOR USING BATTERIES
1. Please take out the batteries, if the product is not used a long period of time.
2. Please prepare the more backup batteries, when the product is used in other places
without electric power.
3. Do not mix old and new batteries.
4. Do not use the soiled batteries with perspiration and greasiness.
5. Do not throw the batteries at fire, and the batteries have to be recovered.
6. The standard or rechargeable batteries can be used in our products.
7. If the LCD screen cannot display, please check whether the batteries are without
electricity, or replace them.
MAINTENANCE
In order to maintain accuracy of the tools, we recommend that
you conduct the calibration once a year.
Remove batteries before cleaning.
CLEANING AND THINGS TO REMEMBER
1. Use a soft, dry, clean-cloth clean the wrench and LCD panel.
2. Clean torque wrench by wiping. Do not immerse.
3. Store torque wrench in protective case at its lowest torque setting. Do not force
handle below lowest setting.
4. If the wrench gets wet, wipe it with a dry towel as soon as possible. The salt in
seawater can be especially damaging.
5. Do not use organic solvents, such as alcohol or point thinner when cleaning the
wrench.
6. Do not place the product nearby any magnetic products.
7. Do not exert heavy force or pressure on the LCD screen.
8. Do not use the products as striking tools.
9. Do not hit the products by using hammer or other tools.
WARNING
WARNING

1English1
English -14
10. Exceeding the largest standard torque value may result in the products’ damage or
accuracy error(110%).
11. Do not use near or place in water.
12. Do not place the product in the high temperature and damp environment or do not
expose the product to sunlight.
13. Do not place the product in the full dust or sand environment.
14. Do not violently shake or drop the product.
15. Please take out the batteries if the product is not used a long period of time.
16. Do not throw the batteries into fire, and the batteries have to be recycled.
17. Please read carefully the operating manual, and then follow the guides of the
manual, before using the digital torque wrench.
18. Off state is prohibited to use.
19. Do not use the additional tools to extend the length of the handle, such as: iron or
plastic pipe.
20. Do not touch any button when torque is exerted.
21. The digital torque wrench cannot be applied to the conductive tools.
LUBRICATE
The wrench’s internal mechanism is permanently lubricated during assembly. Do not
attempt to lubricate the internal mechanism.
ACCESSORIES
Use only accessories that are recommended by the manufacturer for your model.
Accessories that may be suitable for one tool may become hazardous when used on
another tool.
Recommended accessories for use with your tool are available at extra cost from your
local service center.
IMPORTANT: To assure product SAFETY and RELIABILITY, repairs, maintenance
and adjustments should be performed by certified service centers or other qualified
service organizations, always using identical replacement parts.
PROTECTING THE ENVIRONMENT
Before disposing of damaged, check with your state Environmental Protection Agency
to find out about special restrictions on the disposal of tool or return them to a certified
service center for recycling.
ACDelco, ACDelco Emblem and the ACDelco related graphics are General Motors
Trademarks used under license to Mobiletron Electronics Co., Ltd.

1Français1
Français -1
MERCI D'AVOIR CHOISI CE PRODUIT
ACDelco offre des produits à des prix abordables et nous espérons que ce produit et
notre support technique vous satisferont pleinement. Si vous avez besoin d'assistance,
n'hésitez pas à nous contacter.
UTILISATION PREVUE
Cet outil est uniquement prévu pour une utilisation personnelle et manuelle.
Cet outil dynamométrique numérique affiche les paramètres de spécification du couple
de serrage, les lectures de couple et les mesures de la retenue en crête. Il est
recommandé de l'utiliser en extérieur.
RÈGLES GÉNÉRALES DE SÉCURITÉ
LISEZ ET COMPRENEZ TOUTES LES
INSTRUCTIONS. Le non respect des instructions
listées ci-dessous risquera d'engendrer une électrocution, un incendie et/ou des
blessures graves. Le terme « outil électrique » dans tous les avertissements ci-dessous
réfère à votre outil électrique branché sur le secteur (avec cordon) ou à votre outil
électrique alimenté par une batterie (sans cordon).
CONSERVEZ CES INSTRUCTIONS EN CAS DE BESOIN FUTUR
SACHEZ RECONNAITRE LES SYMBOLES, LES MOTS, ET LES
AVIS DE SECURITE
Le but des instructions de sécurité fournies dans ce manuel n'est pas de couvrir tous les
cas possibles pouvant se présenter pendant le fonctionnement, la maintenance et le
nettoyage des outils.
Faites toujours preuve de bon sens et faites particulièrement attention aux instructions
marquées DANGER, AVERTISSEMENT, ATTENTION et AVIS dans ce manuel.
C'est le symbole d'alerte de sécurité. Il est utilisé pour vous
avertir d'un risque de dommages corporels. Obéissez à tous
les messages de sécurité qui suivent ce symbole pour éviter
tous risques de dommages corporels.
DANGER indique une situation dangereuse imminente qui, si
elle n'est pas évitée, risque d'entraîner la mort ou des
dommages corporels graves.
AVERTISSEMENT indique une situation potentiellement
dangereuse qui, si elle n'est pas évitée, risque d'entraîner la
mort ou des dommages corporels graves.
ATTENTION indique une situation potentiellement
dangereuse qui, si elle n'est pas évitée, risque d'entraîner des
dommages corporels mineurs ou modérés.
DANGER
ATTENTION
AVERTISSEMENT
AVERTISSEMENT

1Français1
Français -2
AVIS fournit des informations supplémentaires utiles pour
l'utilisation et la maintenance de cet outil. Assurez-vous de
comprendre parfaitement les AVIS indiqués.
IDENTIFICATION D'ÉTIQUETTE D'AVERTISSEMENT
Lisez les manuels avant d'utiliser le produit.
Port de protection oculaire.
Positionnez votre corps de manière bien équilibrée et stable. Ne jouez pas
au plus malin lorsque vous utilisez cet outil.
Il y a un risque que vos mains, vos doigts ou d'autres parties de votre corps
soient prises ou s'enroulent autour de la boîte de vitesse ou d'autres
éléments en mouvement.
Risque de choc électrique.
Commission fédérale des communications (FCC en anglais).
RÈGLES IMPORTANTES DE SÉCURITÉ
Risque de particules volantes
AVERTISSEMENT: Un surcouple peut entraîner des cassures. Une force excessive
sur les arrêtoirs de la tête articulée peut entraîner une cassure de la tête. Une clé
dynamométrique qui n'est plus étalonner peut entraîner une cassure de l'outil ou d'un
composant. L’utilisation d’outils manuels, de douilles ou d’accessoires cassés risque
d'engendrer des blessures. Une force excessive peut causer un glissement du pied-de-
biche ou de la clé polygonale ouverte.
ESPACE DE TRAVAIL
Gardez les enfants et les spectateurs hors d'atteinte pendant le fonctionnement
d'un outil électrique. Des distractions peuvent vous faire perdre le contrôle.
Gardez votre espace de travail propre et bien éclairé. Le désordre et le manque
d'éclairage sont des conditions propices aux accidents.
N'utilisez pas les outils dynamométriques numériques dans des endroits ou il y a
des risques d'explosion, comme en présence de liquides inflammables, de gaz ou
de poussière. Les outils dynamométroques numériques font des étincelles qui
risquent d'enflammer les poussières ou les émanations.
AVERTISSEMENT
DANGER
AVIS

1Français1
Français -3
SÉCURITÉ ÉLECTRIQUE
Un choc électrique risque de vous blesser.
Le composant en plastique n'est pas isolé.
N'utilisez pas l'outil sur des circuits électiques sous tension.
SÉCURITÉ PERSONNELLE
Restez attentif, faites attention à ce que vous faites et utilisez votre bon sens
lorsque vous utilisez l'outil électrique. N'utilisez pas un outil électrique quand
vous êtes fatigué ou sous l'influences de drogue, d'alcool ou de médicaments. Un
moment d'inattention pendant l'utilisation de l'outil électrique peut engendrer des
blessures corporelles graves.
Utilisez des équipements individuels de sécurité. Portez toujours des protections
pour vos yeux. L'utilisation d'équipement de sécurité comme un masque anti-
poussière, des chaussures de sécurité anti-dérapantes, un casque de sécurité ou des
protections auditives réduiront les risques de blessures corporelles.
Ne jouez pas au plus malin. Gardez constamment vos appuis et votre équilibre.
Ceci permet de mieux contrôler votre outil électrique dans des situations inattendues.
N'exposez pas les outils électriques à la pluie ou à l'humidité. Toute pénétration
d'eau à l'intérieur de l'outil augmentera les risques de choc électrique.
Le mécanisme de cliquet peut glisser ou casser si des composants sont sales, mal
adaptés ou usés, ou si le levier de direction n'est pas engagé à fond. Des cliquets
qui glissent ou cassent risquent de vous blesser.
Tirez mais ne poussez pas sur la poignée de la clé et réglez votre mise au point
pour éviter une chute lors de l'application du couple.
UTILISATION ET ENTRETIEN D'UNE BATTERIE
Prévu uniquement pour une utilisation manuelle.
N'exercez pas un couple ou une force excessive sur la coque de l'outil. Le couple
s'applique uniquement sur la tête.
Ne pas secouer et ne pas cogner l'outil.
N'utilisez jamais cet outil dynamométrique numérique pour desserrer des
éléments de fixation filetés.
Cet outil dynamométrique numérique est uniquement prévu pour une
utilisation manuelle.
ATTENTION
AVERTISSEMENT
AVERTISSEMENT

1Français1
Français -4
Vérifiez toujours que la capacité de l'outil dynamométrique numérique est
correspond ou excède l’application avant de procéder.
Vérifiez toujours l'étalonnage de l'outil dynamométrique numérique si savez ou
si vous soupçonnez que sa capacité a été dépassée. Pour garantir la précision des
mesures, un étalonnage périodique est nécessaire.
Ne forcez jamais la tête articulée au-delà des arrêtoirs.
Gardez l'outil dynamométrique numérique éloigné des objets magnétiques.
N'appliquez pas de force excessive sur le panneau LCD.
N'utilisez l'outil dynamométrique numérique que pour les utilisations décrites
dans ce manuel. N'utilisez pas cet outil dynamométrique numérique comme
marteau.
N'utilisez pas cet outil dynamométrique numérique s'il ne fonctionne pas
correctement ou s'il a été endommagé.
Vérifiez que tous les composants, y compris les clés, les extensions, les moteurs
d'entraînement et les douilles supportent un couple équivalent ou supérieur au
couple appliqué par l'outil.
Ne démontez pas l'outil dynamométrique numérique.
Respectez tous les avertissements du fabricants, les précautions et les
procédures d'utilisation de cet outil, des équipements et du système.
Utilisez toujours une douille de dimension adéquate pour serrer un élément de
fixation.
N'utilisez pas des douilles endommagées ou montrant des signes d'usure ou de
fêlure.
N'appliquez pas un couple excédant la capacité nominale, que l'outil
dynamométrique numérique soit allumé ou éteint. Éviter les effets de choc. Un
surcouple (110% de la plage de couple max.) peut causer une fuite ou une perte
de précision.
N'opérez jamais l'outil dynamométrique numérique quand il est éteint. Allumez
toujours l'outil avant d'appliquer un couple.
N'appuyez pas sur le bouton ON/ZERO pendant l'application d'un couple.

1Français1
Français -5
UTILISATION ET ENTRETIEN D'UNE BATTERIE
Dans des conditions abusives, du liquide risque d'être éjecté de la batterie.Évitez
tout contact. Si un contact se produit accidentellement, rincez abondamment à
l'eau. Si du liquide entre en contact avec vos yeux, consultez votre médecin. Le
liquide éjecté de la batterie cause des irritations ou des brûlures.
N'exposez pas cet outil dynamométrique numérique à la poussière ou au sable
car cela peut causer de sérieux dommages. N'exposez pas l'outil dynamométrique
numérique à des températures extrêmes, à l'humidité, aux rayons directs du soleil ou
à des chocs violents.
RÉPARATION
La réparation de l'outil doit être effectuée par un technicien qualifié. Toute
réparation ou maintenance effectuée par un technicien non qualifié risquera de causer
des blessures.
Lors de la réparation d'un outil, utilisez uniquement des pièces de rechange
identiques. Suivez les instructions dans la section Maintenance de ce manuel.
L'utilisation de pièces non autorisées ou le non respect des instructions de
maintenance créera un risque de choc électrique ou de blessures.
RÈGLES ET SYMBOLES SPÉCIFIQUES DE SÉCURITÉ
La plage de température de fonctionnement recommandée est -10-60°C (14-
140°F).
Remplacez toujours des éléments de fixation endommagés avant d'appliquer un
couple.
SYMBOLES
L'étiquette sur votre outil inclut les symboles suivants. Les symboles et leurs
définitions sont :
SYMBOLE NOM DESCRIPTION
V Volts Tension (potentiel)
kg Kilogrammes Poids
Courant direct Type de courant
ATTENTION
ATTENTION
La page est en cours de chargement...
La page est en cours de chargement...
La page est en cours de chargement...
La page est en cours de chargement...
La page est en cours de chargement...
La page est en cours de chargement...
La page est en cours de chargement...
La page est en cours de chargement...
La page est en cours de chargement...
La page est en cours de chargement...
La page est en cours de chargement...
La page est en cours de chargement...
La page est en cours de chargement...
La page est en cours de chargement...
La page est en cours de chargement...
La page est en cours de chargement...
La page est en cours de chargement...
La page est en cours de chargement...
La page est en cours de chargement...
La page est en cours de chargement...
La page est en cours de chargement...
La page est en cours de chargement...
La page est en cours de chargement...
La page est en cours de chargement...
La page est en cours de chargement...
-
 1
1
-
 2
2
-
 3
3
-
 4
4
-
 5
5
-
 6
6
-
 7
7
-
 8
8
-
 9
9
-
 10
10
-
 11
11
-
 12
12
-
 13
13
-
 14
14
-
 15
15
-
 16
16
-
 17
17
-
 18
18
-
 19
19
-
 20
20
-
 21
21
-
 22
22
-
 23
23
-
 24
24
-
 25
25
-
 26
26
-
 27
27
-
 28
28
-
 29
29
-
 30
30
-
 31
31
-
 32
32
-
 33
33
-
 34
34
-
 35
35
-
 36
36
-
 37
37
-
 38
38
-
 39
39
-
 40
40
-
 41
41
-
 42
42
-
 43
43
-
 44
44
-
 45
45


ACDelco Tools ARW1201 Manuel utilisateur
- Taper
- Manuel utilisateur
dans d''autres langues
- English: ACDelco Tools ARW1201 User manual
- español: ACDelco Tools ARW1201 Manual de usuario
Documents connexes


Autres documents
-
ACDelco ARM 3V Series Product Information Manual
-
-
-
-
-
-
-
PROPOINT 8727729 Le manuel du propriétaire
-
-