COMMODORE
fl
®
©~
COLOR
MONITOR
user's
guide


1802
Color
Monitor
users
guide
©Commodore Electronics, Ltd. 1986. All rights reserved.

USER'S GUIDE STATEMENT
"This
equipment generates and
uses
radio frequency energy.
If
it
is
not
properly installed and
used
in
strict
accordance
with
the manu-
facturer's instructions, this
equipment
may interfere
with
radio and
television reception. This machine
has
been tested and
found
to
comply
with
the limits
for
a
Class
B
computing
device peripheral in
accordance
with
the specifications in Subpart J
of
Part 15
of
FCC
Rules, which
are
designed
to
provide reasonable
protection
against
such interference in a residential installation.
If
you
suspect inter-
ference, you
can
test this
equipment
by
turning
it
off
and on.
If
you
determine
that
there
is
interference
with
radio
or
television recep-
tion,
try
one
or
more
of
the
following
measures
to
correct
it:
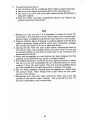
• reorient the receiving antenna
• move the computer away
from
the receiver
• change the relative positions
of
the
computer
equipment and the
receiver
• plug the
computer
into
a
different
outlet
so
that
the
computer
and
the receiver
are
on
different
branch circuits.
If
necessary, consult
your
Commodore dealer
or
an
experienced
radio/television technician
for
additional suggestions.
You
may also
wish
to
consult the
following
booklet,
which
was prepared
by
the
Federal Communications Commission:
"How
to
Identify
and Resolve Radio-TV Interference Problems"
This
booklet
is
available
from
the U.S., Government Printing Office,
Washington, D.C. 20402,
Stock
No. 004-000-00345-4."
You should
use
only
the
monitor
cable recommended
by
Commo-
dore. The cable
is
specially shielded, in accordance
with
the regula-
tions
of
the Federal Comminications Commission. Failure
to
use
the
appropriate cable
will
invalidate the
FCC
grant
of
Certification, and
may
cause
harmful radio interference.
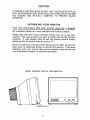
CAUTION
If
you
have
technical problems
with
your
Commodore 1802
color
monitor,
especially
if
your
set produces
only
sound
with
no picture
or
if
the viewing
area
shrinks
to
half
size, unplug the set and call
your
dealer
or
service technician.
For
your
safety,
please
carefully
read
the
SAFETY
PRECAUTIONS
on
pages
7 and 8 in this user's manual.
WARNING
DO
NOT
EXPOSE
THIS
EQUIPMENT
TO
MOISTURE.
SUCH EX-
POSURE COULD CAUSE
FIRE
OR
ELECTRIC
SHOCK.

CAUTION
TO
PREVENT
ELECTRIC
SHOCK
DO
NOT
USE
THIS
(POLARIZED)
PLUG
WITH
AN
EXTENSION
CORD,
RECEPTACLE
OR
OTHER
OUTLET
UNLESS
THE
BLADES
CAN
BE
FULLY
INSERTED
TO
PREVENT
BLADE
EXPOSURE.
INTRODUCING YOUR MONITOR
Your
new Commodore 1802
color
monitor
gives
you a superior
color
picture
that
enhances
your
computing experience. This moni-
tor
is
simple
to
hook
up
to
your
computer
and
is
easy
to
adjust.
Please
read
this
brief
manual carefully before you
try
to
use
your
monitor.
The manual shows you
how
to
install and
use
the
monitor
correctly.
It
also explains
how
to
use
the picture control knobs,
which are like
to
control
knobs on a
color
TV.
Be
sure
to
heed any warnings in this manual, and
do
NOT remove the
back cover
or
otherwise
attempt
to
service this
monitor.
If
you
have
problems
with
your
monitor
that
are
not
covered in this manual,
see
your
Commodore dealer
or
a qualified technician.
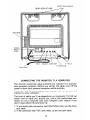
FRONT AND SIDE VIEW OF 1802 MONITOR
c::
commodore;l
POWER
VolU",
IRlGHtlCf:SS
11111111111111111111111111111
-
-0-0-
POWER SWITCH
1

CARRYING
HANDLE
SPEAKER
SIGNAL
IN
PU
T -tffft----.1+t--t=l.!...r"
PANEL
TINT
Power
Cord
H. POSITION
CONNECTING
THE
MONITOR
TO
A COMPUTER
The
monitor
connection cable connects
your
monitor
to
a Commo-
dore personal computer. Before
you
connect the cable,
turn
off
the
power
to
both
your
personal
computer
and the
monitor.
There
are
two
different
cables
that
you
can
use
to
connect the
monitor
to
your
computer.
The kind
of
cable
you'll
use
depends on
your
computer.
To
find
out
which kind
of
cable you should
use,
look
at the audio/video con-
nector on
your
computer
(see
your
computer's user manual
if
you
don't
know
where this connector is).
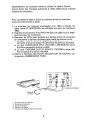
1.
If
the audio/video connector
has
EIGHT
little
holes,
use
the three-
jack cable.
2.
!f
the connector
has
FIVE
little
holes,
use
the two-jack cable.
2

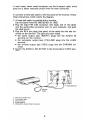
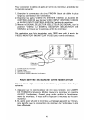
In
most cases, newer model computers use the three-jack cable, which
gives
you
a better resolution picture than the other connection.
To
connect a three-jack cable
to
the rear panel
of
the monitor,
fellow
these instructions, which
clarify
the diagram.
1.
A three-jack cable
is
supplied
with
a monitor.
Use
this cable (Parts. No. 905103-02)
for
1802.
2.
Plug
the eight PIN
DIN
connector (the larger
end
of
the cable)
into
the audio/video connector
port
on
your
computer. Just push
the cable end in.
3.
Plug
the RCA pin plugs (the jacks)
of
the cable
into
the rear ter-
minals on the monitor. The jacks
are
color
coded.
• the audio
output
jack (WHITE) plugs
into
the
AUDIO
IN
terminal on the monitor.
• the luminance
output
jack (YELLOW) plugs
into
the
LUMA
terminal.
• the chroma
output
·jack (RED) plugs
into
the CHROMA ter-
minal.
4.
Switch the
SIGNAL
SELECTOR
to
the Commodore VIDEO posi-
tion.
1.
Monitor's
Audio
Input
2.
Luminence
Input
3.
Chroma
Input
4. Signal Selector
5.
Computer's
Audio/Video
Connector
3

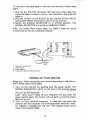
To
connect a two-jack cable
to
the rear
of
the
monitor,
foUow these
steps:
1.
Plug
the five PIN D IN connector (the larger end
of
the cable
into
the audio/video connector
port
on
your
computer.) Just push
the
cable in.
2.
Plug the
VIDEO
IN
and
AUDIO
IN jacks
into
the
VIDEO
INPUT
and
AUDIO
INPUT terminals on the rear
of
the
monitor.
3.
Switch the
SIGNAL
SELECTOR
to
the
VIDEO
position. The
SIGNAL
SELECTOR
is
a switch on the
REAR
PANEL.
After
you
follow
these simple steps,
your
1802
is
ready
for
use
as
a video
monitor
for
your
personal computer.
AUOiO-l
~
--
4.
lUP1A
@)
3. Signal
Selector
1.
Monitor's
Audio
Input
2.
Video'lnput
3.
Signal Selector
4.
Computer's
Audio/Video
Connector
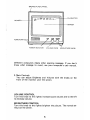
TURNING
ON
YOUR MONITOR
When you finish connecting
your
monitor
according
to
the instruc-
tions,
follow
these simple steps:
1.
Turn
on the
monitor
by
pushing
down
the power switch. The
POWER
INDICATOR
LIGHT
on the
front
of
the'monitor
shows
you when the power
is
on. Always
turn
on the
monitor
BEFORE
you
turn
on the computer.
Later, when
you're
ready
to
turn
the power
off,
just
press
the
power
button
again. The
button
will
pop back up and the
power
light
will
go
out.
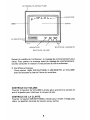
2.
Turn
on
your
personal computer. You
can
tell
that
both
the
monitor
and the
computer
are
working
correctly
when the moni-
tor
displays a
massage
like
this
one, which appears when
you're
using a Commodore 1802:
4

SMOKED
PLASTIC
PANEL
I
BOADER
f/::Y////
~
(Ol'fttDDOll:f
""
BASI(
v2
t/::
we.
RAN
5YSTEH
38~1I
BASlt
8YTES
FREE
REA"
.
CHARACTER
Y:
SCREEN
I/'
'/ '/
lit;:.
commodore
~
POWER
........
IIRIGHTNESS
WITC~
11111111111111111111111111111
7
~
/
POWER S
/'
/
\
/
/ \"
POWER
INDICATOR
VOLUME
KNOB
BRIGHTNESS
KNOB
Different
computers
display
other
opening messages.
If
you
don't
know
what
message
to
expect, see
your
computer's
user manual.
3. Main Controls
You' can
adjust
Brightness and Volume with
the
knobs on the
front
of
the
monitor
under
the
screen.
VOLUME CONTROL
Turn
this
knob
to
the
right
to
increase sound volume and
to
the left
to
decrease volume.
BRIGHTNESS CONTROL
Turn
this
knob
to
the
right
to
brighten the picture.
The
normal set-
ting
is
at
the
center.
5

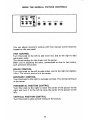
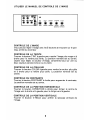
USING THE MANUAL PICTURE CONTROLS
AUllll-I
A111t1-2
C~
@@
-t
•
i@C(i.
TINT
COLOR
CONTRAST
H.
POSITION
V.
HOLD
@ @
@ @ @
You
can
adjust
monitor's
picture
with
five manual
control
buttons
located on the rear panel.
TINT
CONTROL
Turn
this
knob
to
the
left
to
add more red, and
to
the
right
to
add
more green color.
The normal setting
for
this
knob
is
at
the center.
When
you're
adjusting the color, concentrate on one
or
two
colors,
such
as
brown
and
purple.
COLOR CONTROL
Turn
this knob
to
the
left
to
pale colors, and
to
the right
to
brighten
colors. The normal setting
-is
at
the center.
CONTRAST CONTROL
Turn
this
knob
to
the right
to
increase contrast. The normal setting
is
at the center.
HORIZONTAL POSITION CONTROL
Turn
this
knob
to
the right
to
move the center
of
the picture
to
the
right, and
turn
it
to
the
left
to
move the center
of
the picture
to
the
left.
VERTICAL POSITION CONTROL
Turn this knob
to
stop vertical rolling
of
the picture.
6

SAFETY PRECAUTIONS
Electrical energy
can
perform
many useful functions. This
unit
has
been
engineered and manufactured
to
assure
your
personal safety.
But
improper
use
can
result in
potential
electrical shock
or
fire
hazards. In
order
not
to
defeat the safeguards incorporated in
this
monitor,
observe the
following
basic rules
for
its installation
use
and
servicing.
And
also
follow
all warnings
ar.Jd
instructions marked on
your
video
monitor.
INSTALLATION
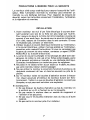
1.
Your
set
is
equipped
with
a polarized AC line plug (one blade
of
the plug
is
wider
than the other). .
This safety feature allows the plug
to
fit
into
the power
outlet
only
one way. Should
you
be
unable
to
insert the plug
full
into
the
outlet,
try
reversing the plug. Should
it
still fail
to
fit,
contact
your
electrician.
2.
Operate the set
only
from
a power source
an
indicated on the set
or
refer
to
the user's manual
for
this
information
If
you
are
not
sure
of
the
type
of
power
supplied
to
your
home, consult
your
dealer
or
local power company.
3.
Overloaded AC outlets and extension cords
are
dangerous, and
so
are
frayed power cords and broken plugs. They may result in a
shock
orfire
hazard. Call
your
service technician
for
replacement.
4.
Do
not
allow
anything
to
the rest
or
roll over the power cord,
and
do
not
place the set where power cord
is
subject
to
traffic
or
abuse. This may result in a shock
or
fire hazard.
5.
Do
not
use
this set near water -
for
example, near a
bathtub,
washbowl, kitchen sink,
or
laundry tub, in a wet basement,
or
near a SWimming pool, etc.
6.
Sets are provided
with
ventilation openings in the cabinet
to
allow
heat generated
during
operation
to
be
released.
If
these
openings
are
blocked, heat
built
up
within
the set
can
cause
failures which may result in a
fire
hazard. Therefore:
• Never
block
the
bottom
ventilation slots
by
placing
it
on a
bed, sofa rug, etc,
• Never place a set in a
"built-in';
enclosure unless proper ven-
tilation
is
provided·
• Never cover the openings
with
cloth
or
other
material·
• Never place the set near
or
over a radiator
or
heat register.
7

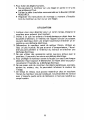
7.
To
avoid personal
injury:
• Do
not
place a set on a slopping shelf unless
property
secured;
•
Use
only
a cart stand recommended
by
the manufacturer.
• Do
not
try
to
roll a cart
with
small casters across thresholds
or
deep pile carpets.
• Wall and shelf mounted installations should
use
factory
ap-
proved mounting instructions.
USE
1. Always
turn
the set
off
if
it
is
necessary
to
leave
the room
for
more than a short period
of
time. Never
leave
a
set
on when leav-
ingthe
house. A possible
malfunction
may result in a
fire
hazard.
2. Caution children about dropping
or
pushing objects
into
the set's
cabinet openings. Some internal parts carry hazardous voltages
and contact
can
result in a
fire
or
electrical shock.
3. Unplug the set
from
the wall
outlet
before cleaning the face
of
the picture tube.
Use
a slightly damp
(not
wet) cloth.
Do
not
use
an
aerosol
directly
on the
picture
tube since
it
may overspray and
cause
electrical shock.
4.
Never
add
accessories
to
a set
that
has
not
been designed
for
this
purpose. Such additions may result in a shock hazard.
5.
For
added
protection
of
the set during a lightning storm
or
when
the set
is
to
be
left
unattended
for
an
extended period
of
time,
unplug
it
from
the wall
outlet.
This
will
prevent possible shock
and fire hazards due
to
lightning storms
or
power
line
surges.
6. Do
not
bring magnetic devices such
as
magnets
or
motors
near
the picture tube. These things
have
a bad effect on the
color
purity
of
the picture.
7. Sometimes you may feel static
electricity
when you touch the
surface
of
the picture tube. Howeve, this
is
normal
for
any
TV
set and
is
harmless
to
the human body.
8

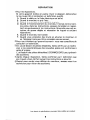
SERVICE
1.
Unplug the set
from
the wall
outlet
and
refer servicing
to
quali-
fied service personnel under the
following
conditions:
A. When the power cord
or
plug
is
damaged
or
frayed.
B.
If
liquid
has
been
spilled
into
the
set
C.
If
the set
has
been
exposed
to
rain
or
water.
D.
If
the
set
does
not
operate
normally
by
following the operat-
ing instructions.
Adjust
only
those controls
that
are
covered
in the operating instructions,
an
improper adjustment
of
other
controls may result in damage and
will
often
require
extensive
work
by
a qualified technician
to
restore the set
to
normal operation.
E.
If
the set
has
been
dropped
or
the cabinet
has
been
damaged.
F.
When the set exhibits a
distinct
change in performance - this
indicates a
need
for
servicing.
G.
If
snapping
or
popping
from
the set
is
continuous
or
frequent
while the set
is
operating.
It
is
normal
for
some
sets
to
make
occasional snapping
or
popping sounds, particularly when
be-
ing turned on
or
off.
2.
Do
not
attempt
to
service this
set
yourself,
as
opening
or
remov-
ing covers may expose you
to
dangerous voltage
or
other
hazards .
. " Refer all servicing
to
qualified service personnel.
3. When replacement parts
are
required have the service technician
verify
in
writing
that
the replacements
he
uses
have
the
same
safety characteristics
as
the original parts.
Use
of
manufacturer's
specified replacements
can
prevent fire, shock
or
other
hazards.
4. Upon completion
of
any service
or
repairs
to
the set, please
ask
the service technician
to
perform the safety check described in
the manufacturers' service literature.
5. When a video
monitor
reaches the end
of
its useful life, improper
disposal could result in a picture tube implosion. Ask a qualified
service technician
to
dispose
of
the
set.
Design
and
specifications subject
to
change
without
notice.
9


>
COMMODORE 1802
MONITEUR COULEUR
MANUEL D'UTILISATION

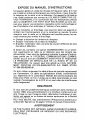
EXPOSE
DU
MANUEL D'INSTRUCTIONS
Cet appareil genere
et
utilise de I'energie de frequence radio. S'il n'est
pas
installe et utilise
conformement
aux instructions, il peut
brouiller
la
reception
de
la
radio et
de
la
television. Cet appareil a ete teste et
s'est revele conforme aux normes du ((CLASS B COMPUTING DE-
VICE
PERIPHERAL))
en
conformite
avec
les
descriptions precises
dans
la
((SUBPART J OF
PART
15 OF
FCC
RULES))
qui
sont con-
<;:ues
pour assurer une
protection
raisonable contre
les
brouillages
en
cas
d'installation
d'un
ordinateur a
I'interieur
d'une maison.
Si
vous constatiez un brouillage, vous pourriez tester cet appareil
en
arretant
son
fonctionnement
et
en
Ie
remettant
en
marche. Si vo.tre
reception
avec
la
radio ou
la
television est brouillee prenez
les
me-
sures
suivantes
pour
arreter
Ie
brouillage:
• Changer
la
direction
de I'antenne du recepteur.
• Eloigner I'ordinateur de
la
radio du recepteur.
• Brancher I'ordinateur dans une prise de courant
differente
de celie
des
radio et television.
Si
besoin est, contactez une
agence
((COMMODORE)) ou un techni-
cien experimente
en
radio ou
en
television
pour
des
conseils sup-
plementaires. Vous pourriez egalement consulter
Ie
manuel d'instruc-
tions publie par
Ie
((FEDERAL
COMMUNICATIONS
COMMIS-
SION))
sous
Ie
titre
de
((COMMENT
IDENTIFIER
ET RESOURDE
LE PROBLEME DE
BROUILLAGE
DE
LA
RADIO
ET DE
LA
TELEVISION)).
Ce
manuel peut etre achete
au
((U.S.
GOVERN-
MENT
PRINTING
OFFICE-WASHINGTON
D.C. 20402, STOCK
N° 004-000-00345-4)).
On
doit
utiliser
uniqument
Ie
dlble
d'ecran de controle recommande
par Commodore.
Ce
dible
est specialement blinde,
conformement
aux
reglemEmts
de
la
commission federale
des
Communications
des
Etats-Unis (FCC). Si
I'on
n'utilise
pas
Ie
cable recommande, on rend
invalide I'homologation
de
la
FCC
et
on peut creer
des
interferences
radio dangereuses.
REMARQUES
Si
vous
avez
des
problemes techniques concernant votre
moniteur
en
couleur 1802, plus particulierement
si
Ie
moniteur
n'emet que
Ie
son
sans
I'image ou que I'image
se
reduit, debranchez I'ordinateur et con-
tactez une
agence
ou un bureau de service apres-vente
de
la
Societe
((COMMODORE)).
Pour votre securite, lisez attentivement ((Precautions
a prendre
pour
la
securite))
figurant
sur
les
pages
7
et
8 de
ce
manuel d'instructions.
AVERTISSEM
ENT
NE PAS PLACER
CET
APPAREIL
DANS
UN
ENDROIT
HUMIDE.
CELA
PEUT
ENTRAINER
UN
INCENDIE
OU UNE
DECHARGE
ELECTR IQUE.

ATTENTION
POUR PREVENIR
LES
CHOCS ELECTRIQUES
NE
PAS
UTILISER
CEnE
FICHE POLARISEE AVEC UN PROLONGATEUR, UNE PRISE
DE
COURANT OU UNE AUTRE SORTIE
DE
COURANT, SAUF
SI
LES
LAMES
PEUVENT
ETRE
INSEREES A FOND SANS
EN
LAISSER AUCUNE
PARTIE
A DECOUVERT.
INTRODUCTION
DE
VOTRE
MONITEUR
Votre
moniteur
en
couleur ((COMMODORE 1802)) vous
offre
de
belles images qui vous plairont.
Ce
moniteur
peut facilement etre
connecte
a votre ordinateur
et
son reglage
est
simple.
Lisez attentivement
Ie
manuel
d'instructions
avant
la
mise
en
marche
du moniteur.
Ce
manuel vous explique comment installer et utiliser
Ie
moniteur
et
egalement
comment
manipuler
les
boutons
de
con-
troles d'images
qui
sont pareils a ceux d'une television
en
coulleur.
Faites
attention
aux avertissements
figurant
sur
ce
manuel
et
en
cas
de panne
ne
pas
ouvrir
Ie
panneau arriere
sans
presence
d'un
techni-
cien.
Si
vous
avez
des
problemes avec
Ie
monite.ur
qui
ne
sont men-
tionnes dans
ce
manuel d'instructions, contactez un bureau de service
apresvente ((COMMODORE ou un technicien qualifie)).
LE
PANNEAU
DE
PROTECTION
ARRIERE
DU
MONITEUR 1802
COTE
COMMUTATEUR
DE MISE SOUS
TENSION
1
FACE
c:
commodoreJ
'GItER
VCl.UI1(
1I1U1it11l((SS
11111111111111111111111111111
/"
00-
/'
/'
/
~
/
I
ALIMENTATION
VOLUME
LUMINOSITE

ARRIERE POIGNES
DE
TRANSPORT
HAUT·PARLEUR
BORNES
D'
ENTR
EE
-111It--flH-1f==l.!...t:
SIGNAL
CORDON
D'ALIMENTATION
CONTRASTE
(CONTRAST)
POSITION
HORIZONTALE
(H. POSITION)
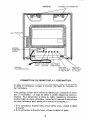
CONNECTION DU MONITEUR A L'ORDINATEUR
POSITION
VERTICALE
(V.
HOLD)
Le
ciible connecte votre
moniteur
a I'ordinateur. Avant de connecter
Ie
ciible a I'ordinateur, coupez
Ie
courant ((arrivee)) du
moniteur
et
de I'ordinateur.
Vous pouvez utiliser deux sortes de cables pour connecter
Ie
moni-
teur
a I'ordinateur.
Le
type de cable a utiliser depend de votre or-
dinateur. Pour determiner
Ie
choix du cable, regardez
Ie
connecteur
Audio/Video
de votre ordinateur (consultez
Ie
manuel d'instructions
de votre ordinateur
pour
savoir ou
se
trouve
Ie
connecteur).
1.
Si
Ie
connecteur
Audio/Video
a
huit
petits trous, utilisez
Ie
dible
a 3-jacks.
2.
Si
Ie
connecteur a 5 petits trous, utilisez
Ie
cable a 2-jacks.
2

Generalement, les nouveaux moniteurs utilisent
Ie
dible
a 3-jacks.
Celuici donne des immages superieures
a celles obtenues par d'autres
moyens
de
connection.
Pour connecter
el
dible
a 3-jacks
au
panneau arriere du moniteur,
suivez
les
instructions ci-apres.
1.
Le moniteur est toujours accompagne d'un
dlble
a 3-jacks.
Ce
cable (parts N° 905103-02) n'est utilisable que pour
les
moniteurs
1802.
2.
Brancher
Ie
connecteur
d'huit
PIN
DIN
(bout
de
dlble
Ie
plus
large)
au
connecteur de I'ordinateur.
3.
Brancher
les
RCA jacks du cable aux bornes arriere du moniteur
en
comparant
la
couleur de chaque jack a celie de chaque borne.
•
Le
jack
AUDIO
OUTPUT (SORTIE AUDIO)-blanc
doit
etre
connecte
a
la
borne
AUDIO
IN (ENTREE AUDIO) du moniteur.
•
Le
jack
LUMINANCE
INPUT (ENTREE LUMINOSITE)-jaune
doit
etre connecte a
la
borne
LUMA.
•
Le
jack
CHROMA
OUTPUT (SORTIE CHROMA)-rouge do
it
etre connecte a
la
borne
CH
ROMA.
4.
Mettre
Ie
SIGNAL
SELECTOR (SELECTEUR DE
SIGNAL)
sur
la
position COMMODORE
VIDEO.
Cable de
moniteur
1.
Entree
Audio
du
moniteur
2.
Entree
de
lum inosite
3.
Entree
de
Croma
4.
Selecteur de Signal •
5.
Connecteur
Addio/Video
de
I'ordinateur
3

Pour connecter
Ie
cable a 2-jacks a I'arriere du moniteur, procedez de
la
maniere suivante:
1.
Brancher
Ie
connecteur
de
cinq PIN D IN (bout
de
cable
Ie
plus
large)
au
connecteur de I'ordinateur.
2. Brancher
les
jacks
VIDEO
IN (ENTREE
VIDEO)
et
AUD
10 IN
(ENTREE AUDIO) aux bornes
VIDEO
INPUT (ENTREE
VIDEO)
et
AUDIO
INPUT (ENTREE
AUDIO)
a I'arriere du moniteur.
3.
Mettre
Ie
SIGNAL
SELECTOR (SELECTEUR DE
SIGNAL)
sur
la
position VIDEO.
Le
SIGNAL
SELECTOR (SELECTEUR DE
SIGNAL)
se
trouve sur
Ie
panneau arriere du moniteur.
Cet operation une fois terminees, votre 1802
sera
pret a servir de
VIDEO
MONITOR (MONITEUR VIDEO) pour votre ordinateur.
~
4.
Cable de
moniteur
1.
Entree
Audio
du
moniteur
2. Entree Video
3.
Selecteur de Signal
4.
Cor:mecteur
Audio/Video
de
I'ordinateur
AUDIO·!
®
lUI1A
®
3. Selecteur de Signal
POUR
METTRE
EN
MARCHE VOTRE MONITATEUR
Celui-ci etant deja connecte a I'ordinateur, procedez dela
fac;:on
suivante:
1.
Appuyez sur
Ie
commutateur
de
mise
sous
tension;
LA
LAMPE
DE TENSION s'allumera. Mettez toujours
Ie
moniteur
en
marche
AVANT
I'ordinateur. Quand vous voulez arreter
Ie
fonctionne-
ment du moniteur,
iI
vous
suffit
d'appuyer a nouveau sur
Ie
com-
mutateur.
2. Si,
apres
avoir allume
Ie
moniteur,.un
message
apparait sur I'ecran,
cela
signifie que
la
connection du moniteur de I'ordinateur a ete
bien effectuee.
4
La page est en cours de chargement...
La page est en cours de chargement...
La page est en cours de chargement...
La page est en cours de chargement...
La page est en cours de chargement...
La page est en cours de chargement...
La page est en cours de chargement...
La page est en cours de chargement...
-
 1
1
-
 2
2
-
 3
3
-
 4
4
-
 5
5
-
 6
6
-
 7
7
-
 8
8
-
 9
9
-
 10
10
-
 11
11
-
 12
12
-
 13
13
-
 14
14
-
 15
15
-
 16
16
-
 17
17
-
 18
18
-
 19
19
-
 20
20
-
 21
21
-
 22
22
-
 23
23
-
 24
24
-
 25
25
-
 26
26
-
 27
27
-
 28
28


dans d''autres langues
- English: Commodore 1802 User manual
Documents connexes
-
Commodore 1902 Manuel utilisateur
-
-
-
-
-
-
-
-