

2

3
Quickstart Guide (English)
Introduction
Box Contents
NS6II
USB Cable
Power Adapter
Software Download Card
Quickstart Guide
Safety & Warranty Manual
Support
For the latest information about this product (documentation, technical specifications, system
requirements, compatibility information, etc.) and product registration, visit numark.com.
For additional product support, visit numark.com/support.
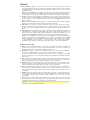
Setup
Before getting started:
• Read the Safety & Warranty Manual before using NS6II.
• Make sure all items listed in the Box Contents are included.
• Remove the blue film from the platters before using NS6II.
1. Install the Drivers and Software
Windows users only: Install the drivers before installing the software.
Drivers (Windows users only): Download and install the latest drivers from
numark.com/NS6II. (You will be asked to connect the NS6II to your computer during
installation.)
Software: Download and install the latest version of Serato DJ from serato.com.
Important: Download the full NS6II
Use
r
Gu
i
de
fr
o
m n
u
m
a
rk.
co
m
/
N
S6
II.

4
2. Connect and Start DJing!
Follow this sequence of steps whenever you use NS6II:
1. Make sure all devices are off and all faders and gain knobs are set to "zero."
2. Connect input sources (microphones, turntables, CD players, etc.) to the NS6II.
3. Connect output devices (power amplifiers, sub-mixer, recorders, etc.) to the NS6II.
4. Plug all devices into power sources, and turn on devices in proper order:
• When starting a session, turn on (1) input sources, (2) NS6II, (3) output devices.
• When ending a session, turn off (1) output devices, (2) NS6II, (3) input sources.
5. Connect the NS6II to your computer with the USB cable (included) and to your
headphones.
6. Open Serato DJ and go! For more information on how to use Serato DJ with NS6II, visit
serato.com/dj/support and select Numark NS6II.
Important:
• Touch the platters to calibrate the touch-sensitive circuitry before using NS6II.
• When reconnecting the NS6II to your computer, the NS6II will recall the previous positions
of the software (e.g., Pitch, effects parameters, etc.). Be mindful of this before playing a
track.
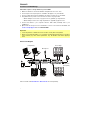
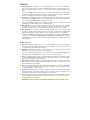
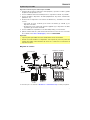
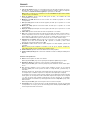
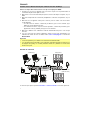
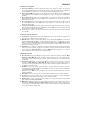
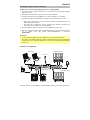
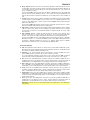
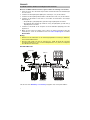
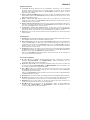
Connection Diagram
Items not listed under Introduction > Box Contents are sold separately.
Computer(s)
Microphone
House Amp
Power
CD Player Turntable Booth Amp
Headphones
(front panel)
Rear Panel

5
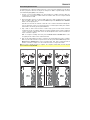
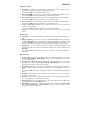
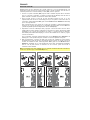
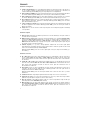
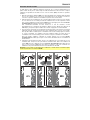
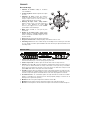
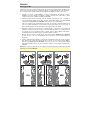
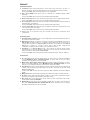
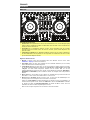
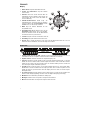
Transitioning Between DJs
The NS6II allows two computers running Serato DJ to connect to the unit simultaneously. This allows
two DJs to play at the same time for easy DJ set changeovers. With a computer already connected
to the NS6II and playing (PC1), do the following:
1. Connect a second computer (PC2) to the unused USB port on NS6II’s rear panel. Once the
computer has connected, the software will show all decks offline. The first computer will still
control both sides of NS6II.
2. Before giving PC2 control of one side of NS6II, make sure no audio is playing from PC2 on that
deck, as it will go offline. Then, press and hold Shift and press the Browse Focus / PC1/PC2
button on the non-playing deck.
PC2 will now control the two channels on that side of the controller, and will automatically have
focus of the browse controls. Use the browse knob to scroll through the library, then add the
desired track to the deck by pressing the Load button.
3. Play a track on PC2’s deck and mix it in when ready—you’ll now have audio from both
computers in the mix. For example, while PC1 uses Deck A (and the mixer controls for Channels
1 & 3) to control their computer, PC2 can also use Deck B (and the mixer controls for Channels 2
& 4) to control their computer.
With one computer controlling each deck, press the Browse Focus / PC1/PC2 button on the
non-playing deck to switch control of the browse knob.
4. Fade out the audio playing from PC1’s computer to the audio playing from PC2’s computer.
When only the audio from PC2’s computer is left in the mix, press and hold Shift and press the
Browse Focus / PC1/PC2 button on the non-playing deck. Now, PC2 is using both Decks A
and B to control their computer. You can now disconnect PC1’s computer from NS6II.
Note: If a deck is already in use by a computer, the computer’s virtual deck (in Serato DJ) will
become black and display IN USE.
Step 1 Steps 2-3 Step 4

6
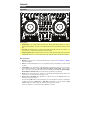
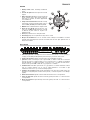
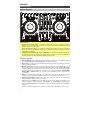
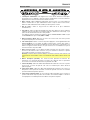
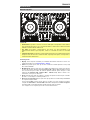
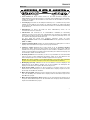
Features
Top Panel
2
3
4
39
37
6
7
8
11
21
31
5
33
34
27
29
47
28
22
23
26
25
9
10
14
15
16
38
42
43
41
12
13
12
13
12
13
12
13
17
18
18
20
19
36
30
4
4
46
45
48
35
40
4
7
11
9
10
7
11
9
10
7
11
9
10
14 14 14
6
8
8
8
8
21
20
19
2
22
23
25
31 322928 30
26
27
32
1
1
5
38
38 38
24
24
39
40
41
42 42
43 43
46 46 46
47 47 47
42
43
4
4
45
42 42
43 43
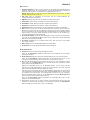
Useful Terms:
• Audio Pointer: The current position in a track from where audio will play. When you select a
track and begin playing, the Audio Pointer will usually start from the beginning and stop at the
end.
• Cue Point: A marked position in a track, which will be permanently stored by the software. You
can set, return to, or delete Cue Points with the Cue Controls.
• Temporary Cue Point: A marked position in a track, which will only remain while that track is
still loaded in the Deck. You can set and return to the Temporary Cue Point with the Cue button.
General Controls
1. Displays: Use this screen to view information about the current track. See Features > Display
for more information.
2. Shift: Press and hold this button to access secondary functions (in red lettering) of other controls
on NS6II.
3. Touch Mode: Press this button to toggle through the Touch Modes. Press once to access the
touch-capacitive functions of NS6II's FX 1 Knob, FX 2 Knob, and FX 3 Knob. Press a second
time to access the touch-capacitive functions of those knobs plus the EQ Knobs (Channel High,
Channel Mid, and Channel Low). These functions are momentary, not "latching."
4. Deck: Selects which Layer in the software is controlled by that hardware Deck. Deck A can
control Layer 1 or 3; Deck B can control Layer 2 or 4.
5. Browse Focus / PC1/PC2: Press this button to shift the focus of the Scroll knob from one
connected computer to another.
Press and hold Shift and then press this button to select whether the deck is controlling the
computer connected to USB Port 1 or USB Port 2. Remember to set the channel’s input
selector to PC if you want it to play the audio from that layer in the software
If only one computer is connected, this button will have no function.

7
Mixer Controls
6. Input Selector: Set this switch to the desired audio source from this channel: PC (a track
playing on that layer in the software) or Line (a device connected to the Line/Phono Inputs on
NS6II's rear panel).
Note: The Line/Phono switches on NS6II's rear panel must also be set properly. Also, a
channel's controls will only send MIDI information when its Input Selector is set to PC.
7. Gain Trim: Adjusts the pre-fader, pre-EQ audio level of the corresponding channel in the
software.
8. LED Meters: Monitors the audio levels of the corresponding channel.
9. Channel High: Adjusts the high (treble) frequencies. When Touch Mode is activated, touching
this knob will mute the corresponding channel's high frequencies (an "EQ kill").
10. Channel Mid: Adjusts the mid-range frequencies. When Touch Mode is activated, touching this
knob will mute the corresponding channel's mid-range frequencies (an "EQ kill").
11. Channel Low: Adjusts the low (bass) frequencies. When Touch Mode is activated, touching this
knob will mute the corresponding channel's low frequencies (an "EQ kill").
12. Channel Fader: Adjusts the audio level on the corresponding channel in the software.
13. PFL: Press this button to send this channel's pre-fader signal to the Cue Channel for monitoring.
When engaged, the button will be lit. By pressing one PFL button at a time, you will cue that
channel alone (and deactivate PFL monitoring for the other channels). To cue to multiple
channels simultaneously, press the PFL buttons for those channels at the same time.
14. Crossfader Assign: Routes the audio playing on the corresponding channel to either side of the
crossfader (A or B), or bypasses the crossfader and sends the audio directly to the Program Mix
(center, Off).
15. Crossfader: Blends audio between the channels assigned to the left and right side of the
crossfader.
Note: The crossfader is user-replaceable if it should ever wear out. Simply remove the
facepanel, then remove the screws holding it in position.
16. Master Volume: Adjusts the output volume of the Program Mix.
17. Booth Volume: Adjusts the output volume of the Booth Output mix.
Playback Controls
18. Platter: Controls the playhead in the software.
Press and hold Shift and then move the platter to move quickly through the track.
19. Play / Pause: This button pauses or resumes playback.
Press and hold Shift and then press this button to "stutter-play" the track from the last set Cue
Point.
20. Cue: When the Deck is paused, you can set a Temporary Cue Point by moving the platter to
place the playhead at the desired location and then pressing the Cue Button.
During playback, you can press the Cue Button to return the track to this Temporary Cue Point.
(If you did not set a Temporary Cue Point, then it will return to the beginning of the track.)
If the Deck is paused, you can press and hold the Cue Button to play the track from the
Temporary Cue Point. Releasing the Cue Button will return the track to the Temporary Cue Point
and pause it. To continue playback without returning to the Temporary Cue Point, press and
hold the Cue Button, then press and hold the Play Button, and then release both buttons.
Press and hold Shift and then press this button to return to the beginning of the track.
21. Sync: Press this button to automatically match the corresponding Deck's tempo with the
opposite Deck's tempo and phase. Press and hold Shift and press this button to deactivate
Sync.

8
22. Bleep / Keylock: Press this button to reverse audio playback of the track on the corresponding
deck. Press this button again to resume normal playback from where it would have been if you
had never engaged the Bleep function (i.e., as if the track had been playing forward the whole
time).
Press and hold Shift and then press this button to activate or deactivate Keylock: the key of the
song will lock to whatever position the pitch fader is at when Keylock is activated. This feature
allows you to change the speed of the song without changing the key.
23. Scratch: Press this button to activate or deactivate Scratch Mode. In this mode, you can touch
the center part of the platter will scratch like a turntable when you spin it. If Scratch Mode is off,
the center part of the platter will pitch-bend when you spin it.
Press and hold Shift and then press this button to toggle between time elapsed and time
remaining in the jog wheel display of the corresponding deck.
24. Strip Search: The length of this strip represents the length of the entire track. Place your finger
on a point along this sensor to jump to that point in the track. (If you want to scroll through a
track, we recommend using your computer rather than running your finger along the strip.)
25. Slip / Quantize: When using the software's Beat Grid, hold Slip and move the platter to "slip"
(i.e., shift or slide) the entire Beat Grid to the left or right. This is helpful when the Beat Grid is
slightly misaligned with the track’s transients. See the Serato DJ manual for more information.
Press and hold Shift and press the Deck A (left side) Slip button to enable or disable Quantize
for Layer 1 or 3. Press and hold Shift and press the Deck B (right side) Slip button to enable or
disable Quantize for Layer 2 or 4. When enabled, setting and triggering cues and loops will snap
to the Beat Grid.
Pad Mode Controls
26. Pads: These pads have different functions on each Deck depending on the current Pad Mode.
These pads are the same pads used with Akai Professional MPCs, so they are velocity-sensitive
(in certain modes only), durable, and easy to play.
27. Parameter < / >: Use these buttons for various functions in each Pad Mode. Press and hold
Shift and use these buttons to access secondary parameters.
If you have purchased the Serato Pitch N’ Time expansion, pressing and holding Shift and then
pressing these buttons will adjust the Key of the current track down (<) or up (>).
28. Cues: This Pad Mode button switches the pads between two modes: Hot Cue Mode and Hot
Cue Auto-Loop Mode. When the button is unlit, the first press will always select Hot Cue Mode.
Please see the User Guide for more information.
29. Auto / Roll: This Pad Mode button puts the pads in two modes: Auto-Loop Mode and Loop Roll
Mode. When the button is unlit, the first press will always select Auto-Loop Mode. Please see
the User Guide for more information.
30. Loop: This Pad Mode button switches the pads between two banks of saved loops and Manual
Loop controls. When the button is unlit, the first press will always select the first bank. Please
see the User Guide for more information.
31. Sampler: This Pad Mode button switches the pads between two modes: Sample Player Mode
and Sample Velocity Trigger Mode. When the button is unlit, the first press will always select
Sample Player Mode. Please see the User Guide for more information.
32. Slicer: This Pad Mode button switches the pads between two modes: Slicer Mode and Slicer
Loop Mode. When the button is unlit, the first press will always select Slicer Mode. Please see
the User Guide for more information.
Important: Your track must have a set Beat Grid for Slicer Mode or Slicer Loop Mode to work.

9
Navigation Controls
33. Scroll Knob: Use this knob to scroll through lists of tracks, Crates, etc. in the software. You can
also press it to move between the panels shown in the software.
Press and hold Shift and turn this knob to quickly scroll.
34. View / Sort by BPM: Press this button to toggle through the available software display modes.
Press and hold Shift and then press this button to sort the Library by BPM.
35. Back / Sort by Song: Press this button to move the selector backward in the software panels.
Press and hold Shift and then press this button to sort the Library by Song.
36. Area / Sort by Key: Press this to toggle through the Files, Browse, Prepare, and History panels.
Press and hold Shift and then press this button to sort the Library by Key.
37. L. Prep / Sort by Artist: Press this button to add a selected track to the list of tracks in the
Prepare Area in the software.
Press and hold Shift and then press this button to sort the Library by Artist.
38. Load: Press one of these buttons while a track is selected to assign it to the corresponding
channel.
Pitch Controls
39. Pitch Fader: Controls the track's playback speed. An LED next to the fader will light up when set
at 0%.
40. Takeover LEDs: When you select the other Deck with the Deck Select switch, the position of
the NS6II's Pitch Fader may not match the Pitch setting for that Deck in the software. Slowly
move the Pitch Fader in the direction indicated by the Takeover LED arrow until it turns off. At
this point, the Pitch Fader matches the Pitch setting in the software and can control it again.
41. Pitch Bend ( + / – ): Press or hold down either of these buttons to temporarily adjust the track's
playback speed. When released, the track playback will return to the speed designated by the
Pitch Fader.
Press and hold Shift and then press these buttons to adjust the Tempo Range forward (+) or
backward (–).
Effects Controls
42. FX 1, FX 2, FX 3: These buttons have different functions on each Deck depending on the current
FX Mode: Single-FX Mode or Multi-FX Mode. Please see the User Guide for more information
on how each mode works.
43. FX 1 Knob, FX 2 Knob, FX 3 Knob: These knobs have different functions on each Deck
depending on the current FX Mode: Single-FX Mode or Multi-FX Mode. Please see the User
Guide for more information on how each mode works.
44. Beat / Mode: Tap this button repeatedly at the desired tempo to set the rate of the effects' low-
frequency oscillators (LFOs). Press and hold this button to reset Beat Multiplier to the Deck's
BPM.
Press and hold Shift and then press this button to switch between Single-FX Mode and Multi-FX
Mode.
45. Beat Knob: Turn this knob to set the Time Division for the selected effects. You can also press it
to reset the Time Division to 1.
46. FX Assign: Use these buttons to apply Effect A and/or B to the corresponding channel (Each
effect can be applied to any or all of the four channels).
47. Channel Filter: Turn this knob to adjust the filter on the corresponding channel. The type of filter
it adjusts will depend on the Filter Mode button.
48. Filter Mode: Press this button to cycle through the Filter Modes, which affect the Channel Filter
knobs: Off, Filter-Roll Mode, or Filter-FX Mode. Please see the User Guide for more
information on how each mode works.

10
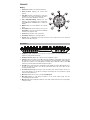
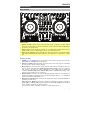
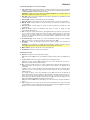
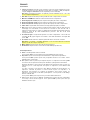
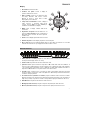
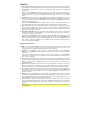
Display
1. Active Deck: Indicates the currently active deck.
2. Platter Position: Displays the current track
position.
3. Time Bars: Provides a visual reference of the time
remaining for the current track. When the track is
almost over, the bars will flash as a warning.
4. Time Elapsed/Remaining: Displays the time
elapsed or time remaining for the current track.
Press Shift and the Scratch button to change the
display.
5. BPM: Displays the current BPM for the selected
track.
6. Pitch Adjust: Indicates the direction to move the
Pitch Fader to match the current track’s BPM with
the track on the opposite deck.
7. Pitch: Displays the pitch of the current track.
8. Pitch Range: Displays the current pitch range.
9. Keylock: This icon illuminates when Keylock is active for the current deck. See the Serato DJ
manual to learn about Keylock.
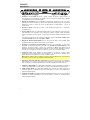
Front Panel
1
2
3
4
5
6
7
6
8
8
7
1. Headphones (1/4" or 1/8"): Connect your 1/4" or 1/8" (6.35 mm or 3.5 mm) headphones to this
output for cueing and mix monitoring.
2. Headphone Volume: Adjusts the volume level of the headphone output.
3. Split Cue: When this switch is in the On position, the headphone audio will be "split" such that
all channels sent to Cue are mixed to mono and applied to the left headphone channel and the
Program mix is mixed to mono and applied to the right channel. When the switch is in the Off
position, Cue and Program audio will be "blended" together.
4. Cue Mix: Turn to mix between Cue and Program in the Headphone channel. When all the way to
the left, only channels routed to Cue will be heard. When all the way to the right, only the
Program mix will be heard.
5. Crossfader Contour: Adjusts the slope of the crossfader curve. Turn the knob to the left for a
smooth fade (mixing) or to the right for a sharp cut (scratching). The center position is a typical
setting for club performances.
6. Mic Level: Adjusts the level of the corresponding Mic Inputs.
7. Mic High: Adjusts the high (treble) frequencies of the audio signal coming from the
corresponding microphone input.
8. Mic Low: Adjusts the low (bass) frequencies of the audio signal coming from the corresponding
microphone input.
2
3
4
5
6
7
8
1
9

11
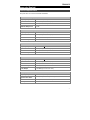
Rear Panel
1
2
3
45
6
7
810
9
5
6
11
1. Power Switch: Turns NS6II on and off. Turn on NS6II after all input devices have been
connected and before you turn on amplifiers. Turn off amplifiers before you turn off NS6II.
2. Power In: Use the included power adapter (12 V DC, 2 A, center-positive) to connect NS6II to a
power outlet. While the power is switched off, plug the cable into NS6II first, and then plug the
cable into a power outlet.
3. Cable Restraint: You can secure cables to this restraint to help avoid disconnecting them
accidentally.
4. USB Port 1/2: Use a standard USB cable (included) to connect each USB port to an available
USB port on a computer. These 2 ports allow you to control audio from 2 computers at the same
time, which allow for seamless transitions while switching from one DJ to another.
To set a channel to control your computer, set its Input Selector to PC, and set its USB
selector to the desired port (1 or 2).
5. Line/Phono Inputs (RCA): Connect your audio sources to these inputs. These inputs can
accept both line and phono-level signals.
6. Line/Phono Switch: Flip this switch to the appropriate position, depending on the device
connected to the Line/Phono Inputs. If you are using phono-level turntables, set this switch to
Phono to provide the additional amplification needed for phono-level signals. If using a line-level
device, such as a CD player or sampler, set this switch to Line.
7. Grounding Terminal: If using phono-level turntables with a grounding wire, connect the
grounding wire to these terminals. If you experience a low “hum” or “buzz”, this could mean that
your turntables are not grounded.
Note: Some turntables have a grounding wire built into the RCA connection and, therefore,
nothing needs to be connected to the grounding terminal.
8. Mic Inputs (1/4"): Connect 1/4" (6.35 mm) microphones to these inputs. Microphone controls
are located on the front panel. The inputs’ audio signals are routed directly to the Program Mix
and Cue Mix.
9. Booth Output (RCA): Use standard RCA cables to connect this output to a booth monitoring
system. The level of this output is controlled by the Booth knob on the top panel.
10. Master Output (RCA): Use standard RCA cables to connect this output to a speaker or amplifier
system. The level of this output is controlled by the Master knob on the top panel.
11. Master Output (XLR): Connect this low-impedance XLR output to a PA system or powered
monitors. The level of this output is controlled with the Master knob on the top panel.

12
Guía de inicio rápido (Español)
Introducción
Contenido de la caja
NS6II
Cable USB
Adaptador de alimentación
Tarjeta de descarga de software
Guía de inicio rápido
Manual sobre la seguridad y garantía
Soporte
Para obtener la información más reciente acerca de este producto (documentación,
especificaciones técnicas, requisitos de sistema, información de compatibilidad, etc.) y
registrarlo, visite numark.com.
Para soporte adicional del producto, visite numark.com/support.
Instalación
Antes de empezar:
• Lea el Manual sobre la seguridad y garantía antes de usar el NS6II.
• Asegúrese de que estén presentes todos los elementos enumerados en Contenido de la
caja.
• Retire la película azul de los platos antes de usar el NS6II.
1. Instale los drivers y el software
Usuarios de Windows: Instale los drivers antes de instalar el software.
Drivers (usuarios de Windows): Descargue y instale los drivers más recientes de
numark.com/NS6II. (El sistema le solicitará que conecte el NS6II a la computadora durante la
instalación).
Software: Descargue y instale la versión más reciente de Serato DJ de serato.com.
Importante: Descargue la Guía del usuario
de NS6II de numark.com/NS6II.

13
2. ¡Conecte y sea el DJ!
Siga esta secuencia de pasos toda vez que use NS6II:
1. Asegúrese de que todos los dispositivos estén apagados y que todos los faders y perillas
de ganancia estén ajustados a "cero".
2. Conecte al NS6II las fuentes de entrada (micrófonos, reproductores de CD, etc.) al NS6II.
3. Conecte al NS6II los dispositivos de salida (amplificadores de potencia, submezclador,
grabadores, etc.).
4. Enchufe todos los dispositivos a las fuentes de alimentación y enciéndalos en el orden
correcto:
• Para iniciar la sesión, encienda (1) las fuentes de entrada, (2) el NS6II, (3) los
dispositivos de salida.
• Al terminar la sesión, invierta esta operación apagando (1) los dispositivos de salida,
(2) el NS6II y (3) las fuentes de entrada.
5. Conecte el NS6II a la computadora con el cable USB (incluido) y a sus auriculares.
6. ¡Abra el software Serato DJ y allá va! Para más información acerca de cómo usar Serato
DJ con NS6II, visite serato.com/dj/support y seleccione Numark NS6II.
Importante:
• Toque los platos para calibrar el circuito sensible al tacto antes de usar NS6II.
• Cuando reconecta el NS6II a la computadora, éste recupera las posiciones previas del
software (por ejemplo, pitch, parámetros de efectos, etc.). Tenga esto en cuenta antes de
reproducir una pista.
Diagrama de conexión
Los elementos que no se enumeran en Introducción > Contenido de la caja se venden por separado.
Computadora(s)
Micrófono
Amplificador de auditorio
Alimentación
Reproductor
de CD
Giradiscos
Amplificador de cabina
Auriculares
(panel frontal)
Panel trasero

14
Transición entre DJ
El NS6II permite que dos ordenadores que ejecutan Serato DJ se conecten simultáneamente a la
unidad. Esto permite que dos DJ toquen al mismo tiempo y facilita el traspaso entre DJ. Con un
ordenador previamente conectado al NS6II y tocando (PC1), realice lo siguiente:
1. Conecte un segundo ordenador (PC2) al puerto USB no utilizado del panel trasero del NS6II.
Una vez conectado el ordenador, el software mostrará todas las bandejas fuera de línea. El
primer ordenador continuará controlando aún ambos lados del NS6II.
2. Antes de pasar al PC2 el control de un lado del NS6II, asegúrese de que no se esté
reproduciendo audio de PC2 en esa bandeja, puesto que va a pasar a estar fuera de línea. A
continuación, mantenga pulsado Shift y pulse el botón Browse Focus / PC1/PC2 de la bandeja
que no está reproduciendo.
PC2 controlará ahora los dos canales de ese lado del controlador y tendrá automáticamente
enfoque de los controles de navegación. Use la perilla de navegación para recorrer la biblioteca
y añada a la pantalla la pista deseada pulsando el botón Load (Cargar).
3. Reproduzca un tema en la bandeja de PC2 y agréguelo a la mezcla cuando esté listo—ahora
tendrá audio proveniente de ambos ordenadores en la mezcla. Por ejemplo, mientras PC1 utiliza
la bandeja A (y los controles del mezclador de los canales 1 y 3) para controlar su ordenador,
PC2 también puede utilizar la bandeja B (y los controles del mezclador de los canales 2 y 4) para
controlar su ordenador.
Con un ordenador controlando cada bandeja, pulse el botón Browse Focus / PC1/PC2 de la
bandeja que no está reproduciendo para conmutar el control de la perilla de navegación.
4. Baje progresivamente el volumen del audio que proviene del ordenador de PC1y aumente
progresivamente el audio que proviene del ordenador de PC2. Cuando solo quede en la mezcla
el audio del ordenador de PC2, mantenga pulsado Shift y pulse el botón Browse Focus /
PC1/PC2 de la bandeja que no está reproduciendo. Ahora, PC2 está utilizando las bandejas
tanto A como B para controlar su ordenador. En este momento, puede desconectar el
ordenador de PC1 del NS6II.
Nota: Si una bandeja esta siendo utilizada ya por un ordenador, la bandeja virtual del ordenador (en
Serato DJ) se pondrá negra y mostrará IN USE (En uso).
Paso 1 Paso 2 Paso 3

15
Características
Panel superior
2
3
4
39
37
6
7
8
11
21
31
5
33
34
27
29
47
28
22
23
26
25
9
10
14
15
16
38
42
43
41
12
13
12
13
12
13
12
13
17
18
18
20
19
36
30
4
4
46
45
48
35
40
4
7
11
9
10
7
11
9
10
7
11
9
10
14 14 14
6
8
8
8
8
21
20
19
2
22
23
25
31 322928 30
26
27
32
1
1
5
38
38 38
24
24
39
40
41
42 42
43 43
46 46 46
47 47 47
42
43
4
4
45
42 42
43 43
Términos útiles:
• Puntero de audio: Posición actual de la pista desde donde se reproduce el audio. Cuando
usted selecciona una pista y comienza a reproducir, el puntero de audio arranca habitualmente
al comienzo y se detiene al final.
• Punto de cue: Posición marcada en una pista, que el software almacena permanentemente. Es
posible establecer, volver o eliminar puntos de cue con los Controles de Cue.
• Punto de cue temporal: Posición marcada en la pista que permanece sólo mientras la pista
está cargada en la bandeja. Es posible establecer y volver al punto de cue temporal con el botón
Cue.
Controles generales
1. Pantalla: Use esta pantalla para ver la información relacionada con la pista actual. Consulte
Características > Pantalla para más información.
2. Función secundaria: Mantenga pulsado este botón para acceder a las funciones secundarias
(en letra roja) de los demás controles del NS6II.
3. Modo táctil: Pulse este botón para cambiar el modo táctil. Pulse una vez para acceder a las
funciones táctiles capacitivas de las perillas FX 1, FX 2 y FX 3 del NS6II. Pulse una segunda vez
para acceder a las funciones táctiles capacitivas de estas perillas más las perillas del
ecualizador (Channel High [Altas], Channel Mid [Medias] y Channel Low [Bajas]). Estas
funciones son momentáneas, no de "enganche".
4. Bandeja virtual: Se usa para seleccionar qué bandeja virtual del software es controlada por esa
bandeja del hardware. La bandeja A puede controlar las bandejas virtuales 1 ó 3. La bandeja B
puede controlar las bandejas virtuales 2 ó 4.
5. Browse Focus / PC1/PC2: Pulse este botón para desplazar el enfoque de la perilla Scroll de un
ordenador conectado al otro.
Mantenga pulsado Shift para seleccionar si la bandeja controlará el ordenador conectado al
Puerto USB 1 o al Puerto USB 2. Recuerde ajustar el selector de entrada del canal a PC si
desea reproducir el audio de esa capa del software.
Si solo está conectado un ordenador, este botón no tendrá ninguna función.

16
Controles del mezclador
6. Selector de entrada: Coloque este conmutadora en la fuente de audio deseada de este canal—
PC (una pista que se reproduce en esa bandeja virtual del software) o Line (un dispositivo
conectado a las entradas de línea/fonográfica) en el panel trasero del NS6II).
Nota: Tenga en cuenta que los conmutadores selectores Line/Phono del panel trasero también
se deben colocar correctamente.
7. Ajuste de ganancia: Ajusta el nivel de audio previo al fader y al ecualizador del canal
correspondiente en el software.
8. Medidores con LED: Monitorean el nivel de audio de la salida de programa en el canal
correspondiente.
9. Altas (de canal): Ajusta las altas frecuencias (agudos) del audio que se reproduce en el canal
correspondiente.
10. Medios (de canal): Ajusta las frecuencias medias del audio que se reproduce en el canal
correspondiente.
11. Bajas (de canal): Ajusta las bajas frecuencias (graves) del audio que se reproduce en el canal
correspondiente.
12. Fader canal: Ajusta el nivel de audio del canal correspondiente en el software.
13. PFL: Pulse este botón para enviar esta señal de nivel pre-fader al canal de cue para monitoreo.
Cuando está pulsado, el botón se enciende. Al pulsar un botón PFL a la vez, hace cue en ese
canal solamente (y desactiva el monitoreo de PFL de los demás canales). Para hacer cue en
varios canales simultáneamente, pulse los botones PFL de esos canales al mismo tiempo.
14. Asignación de crossfader: Aplica el audio que se reproduce en el canal correspondiente a
cualquiera de los lados del crossfader (A o B), o puentea el crossfader y envía el audio
directamente a la mezcla programa (centro, Off).
15. Crossfader: Combina el audio entre los canales asignados a los lados izquierdo y derecho del
crossfader.
Nota: El usuario puede reemplazar el crossfader en caso de que se desgaste. Simplemente,
retire el panel frontal y luego los tornillos que lo mantienen sujeto.
16. Volumen maestro: Ajusta el volumen de salida de la mezcla de programa.
17. Volumen cabina (booth): Ajusta el volumen de salida de la mezcla de salida para cabina (Booth
Output).
Controles de la reproducción
18. Plato: Controla el puntero de audio en el software.
Mantenga pulsado Shift y luego mueva el plato para desplazarse rápidamente por la pista.
19. Reproducir / Pausa: Con este botón se pone en pausa o reanuda la reproducción.
Mantenga pulsado Shift y pulse este botón para que la pista "tartamudee" desde el último punto
de cue.
20. Cue: Cuando la bandeja se pone en pausa, puede establecer un punto de cue temporal
moviendo el plato para colocar el puntero de audio en el lugar deseado y pulsando luego el
botón Cue.
Durante la reproducción, puede pulsar el botón Cue para que la pista vuelva a este punto de
cue temporal. (Si no estableció un punto de cue temporal, volverá al principio de la pista.)
Si la bandeja está en pausa, puede mantener pulsado el botón Cue para reproducir la pista
desde el punto de cue temporal. Al soltar el botón Cue, la pista vuelve al punto de cue temporal
y se pone en pausa. Para continuar la reproducción sin volver al punto de cue temporal,
mantenga pulsado el botón Cue, luego mantenga pulsado el botón de reproducir y luego suelte
ambos botones.
Mantenga pulsado Shift y pulse este botón para volver al comienzo de la pista.
21. Sincronismo: Pulse este botón para hacer coincidir automáticamente el tempo de la bandeja
correspondiente con el tempo y la fase de la bandeja opuesta. Mantenga pulsado Shift y pulse
este botón para desactivar el sincronismo.

17
22. Bleep / Keylock: Pulse este botón para invertir la reproducción de audio de la pista en la bandeja
correspondiente. Pulse este botón de nuevo para reanudar la reproducción normal desde donde lo
haría si nunca se hubiera activado la función Bleep (es decir, si la pista se hubiera estado
reproduciendo hacia adelante todo el tiempo).
Mantenga pulsado Shift y pulse este botón para activar o desactivar Keylock. La tonalidad del tema se
enganchará a la posición en que esté el fader de pitch cuando se activa Keylock. Esta función permite
cambiar la velocidad del tema sin cambiar la tonalidad.
23. Rayado: Pulse este botón para activar o desactivar el modo Rayado. En este modo, puede tocar la
parte central del plato para rayar el audio como cuando mueve un giradiscos. Si el modo está
desactivado, la parte central del plato produce inflexión de pitch (pitch bend) cuando se hace girar.
Mantenga pulsado Shift y luego pulse este botón para conmutar entre el tiempo transcurrido y el
tiempo restante en la visualización de la rueda de avance de la bandeja correspondiente.
24. Tira de búsqueda: La longitud de esta tira representa la longitud de la pista completa. Coloque su
dedo en un punto de este sensor para saltar a ese punto en la pista. (Si desea desplazarse a lo largo de
una pista, recomendamos que use la computadora en vez de pasar el dedo a lo largo de la tira.)
25. Resbalar / Cuantizar: Cuando se usa la grilla de beats del software, mantenga pulsado Slip (Resbalar)
y mueva el plato para "hacer resbalar" (es decir, desplazar o deslizar) la grilla de beats completa a la
izquierda o la derecha. Esta función es útil cuando la grilla de beats está ligeramente desalineada con
las transiciones de la pista. Para más información, consulte el Manual de referencia de Serato DJ.
Mantenga pulsado Shift y pulse el botón Slip de la pantalla A (lado izquierdo) para habilitar o
deshabilitar Quantize (Cuantificador) de la capa 1 o 3. Mantenga pulsado Shift y pulse el botón Slip de
la pantalla B (lado derecho) para habilitar o deshabilitar Quantize (Cuantificador) de la capa 2 o 4.
Cuando se activa, al establecer y disparar cues y bucles la grilla de beats se hace coincidir.
Controles de modo de pad
26.
Pads: Estos pads tienen distintas funciones en cada bandeja en función del modo de pad activado.
Son los mismos usados en los MPC Akai Professional, de modo que son sensibles a la velocidad (solo
en algunos modelos), durables y fáciles de tocar.
27. Parámetro < / >: Use estos botones para diversas funciones en cada modo de pad. Mantenga pulsado
Shift y pulse este botón para acceder a las funciones secundarias.
Si adquirió la expansión Serato Pitch N’ Time, al mantener pulsado Shift y pulsar estos botones, se
ajustará la tonalidad de la pista actual hacia abajo (<) o hacia arriba (>).
28. Cues: Este botón de modo de pad cambia los pads entre dos modos: Modo de Hot Cue (Cue rápido) y
loop automático con cue rápido. Cuando el botón está apagado, la primera pulsación selecciona
siempre el modo de cue rápido. Consulte la Guía del usuario para obtener más información.
29. Auto / Regreso: Este botón de modo de pad cambia los pads entre dos modos: Loop automático y
loop con regreso. Cuando el botón está apagado, la primera pulsación selecciona siempre el modo de
loop automático. Consulte la Guía del usuario para obtener más información.
30. Loop: Este botón de modo de pad cambia los pads entre dos bancos de bucles guardados y controles
de loop manual. Cuando el botón está apagado, la primera pulsación selecciona siempre el primer
banco. Consulte la Guía del usuario para obtener más información.
31. Muestreador: Este botón de modo de pad cambia los pads entre dos modos: Reproductor de
muestras y disparo por velocidad de muestras. Cuando el botón está apagado, la primera pulsación
selecciona siempre el modo de reproductor de muestras. Consulte la Guía del usuario para obtener
más información.
32. Cortador: Este botón de modo de pad cambia los pads entre dos modos: Cortador y loop del
cortador. Cuando el botón está apagado, la primera pulsación selecciona siempre el modo cortador.
Consulte la Guía del usuario para obtener más información.
Importante: Su pista debe tener configurada una grilla de bits para que los modos cortador o loop del
cortador funcionen.

18
Controles de navegación
33. Perilla de desplazamiento: Use esta perilla para desplazarse por las listas de pistas, cajas de discos,
etc. en el software. También es posible pulsarlo para moverse entre los paneles que se muestran en el
software. Mantenga pulsado Shift y luego gire esta perilla para recorrer rápidamente.
34. Vista / Ordenar por BPM: Pulse este botón para alternar entre los modos de visualización disponibles
del software. Mantenga pulsado Shift y pulse este botón para ordenar la biblioteca por BPM.
35. Atrás / Ordenar por canción: Pulse este botón para desplazar el selector hacia atrás en los paneles
de software. Mantenga pulsado Shift y pulse este botón para ordenar la biblioteca por canción.
36. Área / Ordenar por tono: Pulse este control para alternar entre los paneles Files, Browse, Prepare, y
History (Archivos, Navegación, Preparación e Historial). Mantenga pulsado Shift y pulse este botón
para ordenar la biblioteca por tono.
37. L. Prep / Ordenar por artista: Pulse este botón para agregar una pista seleccionada a la lista de pistas
del área de preparación del software. Mantenga pulsado Shift y pulse este botón para ordenar la
biblioteca por artista.
38. Carga: Pulse uno de estos botones cuando haya una pista seleccionada para agregarla a la bandeja
correspondiente.
Controles de pitch
39. Fader de pitch: Controla la velocidad de reproducción de la cinta. El LED que está junto al fader se
enciende cuando se ajusta a 0%.
40. LED de toma de control: Cuando usted selecciona la otra bandeja con el conmutador bandeja virtual,
la posición del fader de pitch del NS6II puede no coincidir con el ajuste de pitch correspondiente a esa
bandeja en el software. Mueva lentamente el fader de pitch en el sentido indicado con la flecha de los
LED de toma de control hasta que se apague. En ese punto, el fader de pitch iguala el ajuste de pitch
del software y puede controlarlo nuevamente.
41. Inflexión de pitch ( + / – ): Pulse o retenga pulsados cualquiera de estos botones para ajustar
temporalmente la velocidad de reproducción de la cinta. Cuando se suelta, la reproducción de la cinta
vuelve a la velocidad designada por el fader de pitch.
Mantenga pulsado Shift y pulse estos botones para ajustar el rango de tempo hacia adelante (+) o
hacia atrás (–).
Controles de efectos
42. FX 1, FX 2, FX 3: Estos botones tienen distintas funciones en cada bandeja en función del modo de
efectos activado: Modo de efecto único o Modo multiefectos. Consulte la Guía del usuario para
obtener más información. Consulte la Guía del usuario para más información sobre el funcionamiento
de cada modo.
43. Perillas FX 1, FX 2 y FX 3: Estas perillas tienen distintas funciones en cada bandeja en función del
modo de efectos activado: Modo de efecto único o Modo multiefectos. Consulte la Guía del usuario
para obtener más información. Consulte la Guía del usuario para más información sobre el
funcionamiento de cada modo.
44. Beat / Modo: Toque este botón repetidamente al tempo deseado para ajustar la frecuencia de los
osciladores de baja frecuencia (LFO) del efecto. Mantenga pulsado este botón para reiniciar el
multiplicador de beats a las BPM de la bandeja.
Mantenga pulsado Shift y pulse este botón para cambiar entre el modo de efecto único y el modo
multiefectos.
45. Perilla de beats: Gire esta perilla para ajustar la división de tiempo de los efectos seleccionados.
46. Asignación de efectos: Use estos botones para aplicar los efectos A y/o B al canal correspondiente.
(Cada efecto puede aplicarse a alguna o todos los cuatro canales.)
47. Filtro de canal: Gire esta perilla para ajustar el filtro en el canal correspondiente. El tipo de filtro que
ajusta depende del botón Filter Mode (Modo de filtro).
48. Modo de filtro: Pulse este botón para cambiar el modo de filtro, que afecta a las perillas de filtro de
canal: desactivado, Modo de filtro con regreso o Modo de filtro-efecto. Consulte la Guía del usuario
para obtener más información. Consulte la Guía del usuario para más información sobre el
funcionamiento de cada modo.

19
Pantalla
1. Bandeja activa: Indica la bandeja actualmente
activa.
2. Posición del plato: Muestra la posición actual de
la pista.
3. Barras de tiempo: Brinda una referencia visual del
tiempo restante para la pista actual. Cuando la
pista está por terminar, las barras parpadearán
como advertencia.
4. Tiempo transcurrido/restante: Muestra el tiempo
transcurrido o restante de la pista actual. Pulse los
botones Shift y Scratch para cambiar la pantalla.
5. BPM: Muestra los BPM actuales de la pista actual.
6. Ajuste de tono (pitch): Indica la dirección en la
cual mover el fader de tono para hacer coincidir
los BPM de la pista actual con la pista en la
bandeja opuesta.
7. Pitch (Tono): Muestra el tono de la pista actual.
8. Pitch range (Rango de tono): Muestra el rango del tono actual.
9. Bloqueo de tonalidad: Este icono se enciende cuando el bloqueo de tonalidad se encuentra
activado para la bandeja actual. Consulte el manual Serato DJ Intro para aprender sobre el
bloqueo de tonalidad.
Panel frontal
1
2
3
4
5
6
7
6
8
8
7
1. Auriculares (6,35 mm o 3,5 mm): Conecte sus auriculares de 6,35 mm o 3,5 mm (1/4 pulg. o
1/8 pulg.) a esta salida para búsqueda de punto inicial (cue) y monitoreo de la mezcla.
2. Volumen de auriculares: Ajusta el nivel de volumen de la salida para auriculares.
3. Split Cue: Cuando este interruptor está en posición On, se "divide" el audio de los auriculares
de modo que todos los canales enviados a cue se mezclan a mono y se aplican a la salida del
auricular izquierdo y la salida de programa se mezcla a mono y se aplica al canal derecho.
Cuando está en posición Off, el audio de cue y programa se "combinan"
4. Combinación de cue: Gírelo para mezclar cue y programa en el canal de auriculares. Cuando
está en el extremo izquierdo, sólo se oyen los canales aplicados a cue. Cuando se gira
totalmente a la derecha, se oye sólo la mezcla del programa.
5. Pendiente del crossfader: Permite ajustar la pendiente de la curva del crossfader. Ajuste este
interruptor a la izquierda para una fusión suave (mezcla) o a la derecha para un corte abrupto
(rayado).
6. Ganancia del micrófono: Ajusta el nivel de audio del canal micrófono correspondiente.
7. Treble del micrófono: Ajusta las altas frecuencias (agudos) del audio en el canal micrófono
correspondiente.
8. Graves del micrófono: Ajusta las bajas frecuencias (graves) del audio en el canal micrófono
correspondiente.
2
3
4
5
6
7
8
1
9

20
Panel trasero
1
2
3
45
6
7
810
9
5
6
11
1. Interruptor de encendido: Enciende y apaga el NS6II. Encienda el NS6II después de
desconectar todos los dispositivos de entrada y antes de encender los amplificadores. Apague
los amplificadores antes de apagar el NS6II.
2. Entrada de alimentación: Use el adaptador de alimentación incluido (12 V DC, 2 A, centro
positivo) para conectar el NS6II a un tomacorriente alimentado. Mientras está desconectada la
alimentación eléctrica, enchufe la fuente de alimentación al NS6II primero, y luego al
tomacorriente.
3. Presilla del cable: Puede fijar un cable a esta presilla para evitar que se desenchufe
accidentalmente.
4. Puertos USB 1/2: Utilice un cable USB (incluido) para conectar cada puerto USB a un puerto
USB disponible en un ordenador. Estos 2 puertos le permiten controlar el audio proveniente
desde 2 ordenadores al mismo tiempo, lo que permite transiciones fluidas al pasar de un DJ a
otro.
Para ajustar el canal a fin de que controle su ordenador, ajuste su selector de entrada a PC y
su selector de USB al puerto deseado (USB1 o USB2).
5. Entradas de línea/fonográfica (RCA): Conecte sus fuentes de audio a estas entradas. Estas
entradas pueden aceptar señales de nivel de línea y fonográfico.
6. Interruptor de entrada de línea/fonográfica: Coloque este conmutador en la posición
apropiada, en función del dispositivo conectado a las entradas de línea/fonográfica. Si usa
giradiscos de nivel fonográfico, coloque este conmutador en Phono para proporcionar la
amplificación adicional necesaria para las señales de este nivel. Si usa un dispositivo de nivel de
línea, tal como un reproductor de CD o muestreador, coloque este conmutador en Line.
7. Terminal de tierra: Si usa giradiscos de nivel fonográfico con cable de conexión a tierra,
asegúrese de conectar dicho cable a estos terminales. Si se experimenta un zumbido grave,
puede significar que sus giradiscos no están conectados a tierra.
Nota: Algunos giradiscos tienen el cable de conexión a tierra incorporado a la conexión RCA y,
por lo tanto, no es necesario conectar nada al terminal de tierra.
8. Entradas de micrófono (6,35 mm / 1/4 pulg): Conecte micrófonos de 6,35 mm (1/4 pulg.) a
estas entradas. Los controles de micrófono se encuentran en el panel frontal. Las señales de
audio de entrada se encaminan directamente a la mezcla de programa y la mezcla de cue.
9. Salida para cabina (RCA): Use cables RCA estándar para conectar esta salida a un sistema de
monitoreo de cabina. El nivel de esta salida se controla con la perilla Booth del panel superior.
10. Salida maestra (RCA): Use cables RCA estándar para conectar esta salida maestra a un
sistema de altavoces o amplificador. El nivel de esta salida se controla con la perilla olumen
maestro del panel superior.
11. Salida maestra (XLR): Esta salida XLR de baja impedancia sirve para conectar a un sistema de
megafonía o monitores alimentados. El nivel de esta salida se controla con la perilla volumen
maestro del panel superior.
La page est en cours de chargement...
La page est en cours de chargement...
La page est en cours de chargement...
La page est en cours de chargement...
La page est en cours de chargement...
La page est en cours de chargement...
La page est en cours de chargement...
La page est en cours de chargement...
La page est en cours de chargement...
La page est en cours de chargement...
La page est en cours de chargement...
La page est en cours de chargement...
La page est en cours de chargement...
La page est en cours de chargement...
La page est en cours de chargement...
La page est en cours de chargement...
La page est en cours de chargement...
La page est en cours de chargement...
La page est en cours de chargement...
La page est en cours de chargement...
La page est en cours de chargement...
La page est en cours de chargement...
La page est en cours de chargement...
La page est en cours de chargement...
La page est en cours de chargement...
La page est en cours de chargement...
La page est en cours de chargement...
La page est en cours de chargement...
La page est en cours de chargement...
La page est en cours de chargement...
La page est en cours de chargement...
La page est en cours de chargement...
-
 1
1
-
 2
2
-
 3
3
-
 4
4
-
 5
5
-
 6
6
-
 7
7
-
 8
8
-
 9
9
-
 10
10
-
 11
11
-
 12
12
-
 13
13
-
 14
14
-
 15
15
-
 16
16
-
 17
17
-
 18
18
-
 19
19
-
 20
20
-
 21
21
-
 22
22
-
 23
23
-
 24
24
-
 25
25
-
 26
26
-
 27
27
-
 28
28
-
 29
29
-
 30
30
-
 31
31
-
 32
32
-
 33
33
-
 34
34
-
 35
35
-
 36
36
-
 37
37
-
 38
38
-
 39
39
-
 40
40
-
 41
41
-
 42
42
-
 43
43
-
 44
44
-
 45
45
-
 46
46
-
 47
47
-
 48
48
-
 49
49
-
 50
50
-
 51
51
-
 52
52


Numark NS6II Guide de démarrage rapide
- Catégorie
- Contrôleurs DJ
- Taper
- Guide de démarrage rapide
dans d''autres langues
- italiano: Numark NS6II Guida Rapida
- English: Numark NS6II Quick start guide
- español: Numark NS6II Guía de inicio rápido
- Deutsch: Numark NS6II Schnellstartanleitung
Documents connexes
-
Numark NVII Guide de démarrage rapide
-
Numark NS7III Guide de démarrage rapide
-
Numark NS6II Mode d'emploi
-
Numark Industries iCDMIX 2 Manuel utilisateur
-
-
-
Numark NDX500 Manuel utilisateur
-
-
Numark Scratch 24-Bit 2-Channel DJ Scratch Mixer Manuel utilisateur
-
Autres documents
-
Denon DJ MC4000 Manuel utilisateur
-
-
Denon MCX8000 Guide de démarrage rapide
-
Denon MC7000 Le manuel du propriétaire
-
Akai amx Le manuel du propriétaire
-
Akai AFX Manuel utilisateur
-
 Mixars Primo Manuel utilisateur
-
Reloop Mixon 8 Pro Manuel utilisateur
-
Reloop Terminal Mix 8 Guide de démarrage rapide
-
iON DISCOVER DJ PRO Le manuel du propriétaire
