Power Fist 8784662 Le manuel du propriétaire
- Catégorie
- Système de soudage
- Taper
- Le manuel du propriétaire

V 4.0 8784662
Please read and understand all instructions before use. Retain this manual for
future reference.
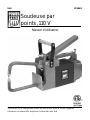
User Manual
110 Volt Spot Welder

8784662 110 Volt Spot Welder V 4.0
2 For technical questions call 1-800-665-8685
SPECIFICATIONS
Type Spot Welder
Voltage Rating 110 to 120 V AC
Current Rating 22A
Output Current Rating 1.5 kVA @ 50% Duty Cycle (5 seconds ON / 5 seconds OFF)
Welding Capacity Up to a combined thickness of 1/8 in. mild steel sheet or
two pieces of 20 gauge steel sheets.
Duty Cycle
50% @ 1.5 kVA, based on ten seconds (unit can weld for 5
seconds out of a 10 second time interval).
Working Temperature 14 to 104ºF (-10 to 40ºC)
Working Humidity Effective up to 50% humidity at 40ºC
Effective up to 90% humidity at 20ºC
Storage Temperature -4 to 131 ºF (-20 to 55ºC)
INTRODUCTION
The 110V Spot Welder permits quick and accurate welds in workpieces up to
1/8 in. thick.
SAFETY
WARNING! Read and understand all instructions before using this tool. The
operator must follow basic precautions to reduce the risk of personal injury
and/or damage to the equipment.
HAZARD DEFINITIONS
Please familiarize yourself with the hazard notices found in this manual. A notice
is an alert that there is a possibility of property damage, injury or death if certain
instructions are not followed.
110 Volt Spot Welder

V 4.0 110 Volt Spot Welder 8784662
Visit www.princessauto.com for more information 3
DANGER! This notice indicates an immediate and specific hazard that will
result in severe personal injury or death if the proper precautions
are not taken.
WARNING! This notice indicates a specific hazard or unsafe practice that could
result in severe personal injury or death if the proper precautions
are not taken.
CAUTION! This notice indicates a potentially hazardous situation that may
result in minor or moderate injury if proper practices are not taken.
NOTICE! This notice indicates that a specific hazard or unsafe practice will
result in equipment or property damage, but not personal injury.
WORK AREA
1. Operate in a safe work environment. Keep your work area clean, well-lit
and free of distractions.
2. Remove all unnecessary people from the work area when welding.
Anyone remaining in the work area must wear the appropriate welding
safety equipment.
3. Store tools properly in a safe and dry location. Keep tools out of the reach
of children.
4. Do not weld on damp surfaces that can transmit the electric current.
5. Do not install or use in the presence of flammable gases, dust or liquids.
6. Welding sparks and ejected molten slag can start a fire. Remove
combustible materials within 39 ft (12 metres) of the welding unit. See Fire
and Explosion Precautions.
7. Have a fire extinguisher readily available (see Fire and Explosion
Precautions).
8. Keep the welding unit at least one foot from any wall or structure.
9. Check that the work area is free from fires, sparks or hot debris before
leaving.

8784662 110 Volt Spot Welder V 4.0
4 For technical questions call 1-800-665-8685
PERSONAL SAFETY
WARNING! Wear personal protective equipment approved by the Canadian
Standards Association (CSA) or American National Standards Institute (ANSI).
1. Remove any combustibles, such as a butane lighter or matches from your
person before doing any welding.
2. Wear dry, hole-free insulating gloves and body protection.
3. Do not touch hot parts with bare hands.
4. Allow cooling period before working on equipment.
PERSONAL PROTECTIVE EQUIPMENT
1. Always wear impact safety goggles that provide front and side protection
for the eyes.
2. Wear gloves that provide protection based on the work materials or to
reduce the effects of tool vibration.
3. Non-skid footwear is recommended to maintain footing and balance in the
work environment.
4. Wear a safety harness if working above floor level.
5. To handle hot parts, use proper tools and/or wear heavy, insulated welding
gloves and clothing to prevent burns.
6. Wear approved safety glasses with side shields or wear a face shield.
HEAD PROTECTION
1. Wear DIN 5 shade protection when spot welding.
2. Wear the appropriate type of full-face shield in addition to safety googles,
as the work can create molten, acid or chemical splashes.
3. Wear ear plugs when welding overhead to prevent spatter or slag from
falling into ear.
PROTECTIVE CLOTHING
1. Wear protective clothing made from durable, flame resistant materials,
leather welding gloves and full foot protection.
2. Wear a leather apron or jacket, leather welding gloves and fire-resistant
footwear when welding. Wear thick clothes that do not expose the skin.
Ultraviolet or infrared light can burn skin with sufficient exposure.

V 4.0 110 Volt Spot Welder 8784662
Visit www.princessauto.com for more information 5
3. Choose clothing fabrics that resist sparks, heat and flames. Artificial
fabrics may burn and melt, resulting in a more severe injury.
4. Do not wear clothing that can hold hot debris or sparks such as pant cuffs,
shirt pockets or boots. Choose clothing that has flaps over pockets or wear
clothing to cover the openings such as pant legs over the boots or an
apron over the shirt.
5. Remove all jewelry before proceeding to weld.
6. Wear protective clothing made from durable, flame resistant materials,
leather welding gloves and full foot protection.
RESPIRATORS
1. Respiratory protection is needed when ventilation is not sufficient to
remove welding fumes or when there is risk of oxygen deficiency.
2. Work in a confined space only if it is well ventilated or while wearing an air-
supplied respirator. Welding fumes and gases can displace air and lower
the oxygen level causing injury or death. Be sure the breathing air is safe.
PERSONAL PRECAUTIONS
Control the tool, personal movement and the work environment to avoid
personal injury or damage to the tool.
1. Do not operate any tool when tired or under the influence of drugs, alcohol
or medications.
2. Avoid wearing clothes or jewelry that can become entangled with the
moving parts of a tool. Keep long hair covered or bound.
3. Remove all jewelry or metal items from your person before welding. Metal
items may connect to the welding unit’s electrical circuit, causing an injury
or death.
4. Do not overreach when operating the tool. Proper footing and balance
enables better control in unexpected situations.
6. Do not wear any personal grooming products that are flammable, such as
hair preparations or cologne with an alcohol base.

8784662 110 Volt Spot Welder V 4.0
6 For technical questions call 1-800-665-8685
SPECIFIC SAFETY PRECAUTIONS
DANGER! DO NOT let comfort or familiarity with product (gained from
repeated use) replace strict adherence to the tool safety rules. If you use
this tool unsafely or incorrectly, you can suffer serious personal injury.
1. Use the correct tool for the job. This tool was designed for a specific
function. Do not modify or alter this tool or use it for an unintended
purpose.
2. Do not weld if you are in an awkward position. Always have a secure
stance while welding to prevent accidents.
3. Keep all panels and covers securely in place when operating the welding unit.
4. Do not exceed the equipment’s rated capacity.
5. Use only correct fuses or circuit breakers. Do not oversize or bypass them.
6. Turn off all equipment when not in use.
7. Overuse can cause overheating. Allow a cooling period; follow the rated
duty cycle.
8. Do not allow persons who are not familiar with the tool or have not read
these instructions to use the tool.
FIRE AND EXPLOSION PRECAUTIONS
Spot welding can produce sparks and hot spatter that can start fires.
1. Clear the floor and walls of an area of all combustible and/or flammable
materials. Solid floors of concrete or masonry is the preferred
working surface.
a. Cover any combustible material with fire resistant covers or shields, if
it cannot be removed. The covering must be tight and should not
leave openings for sparks to enter.
b. A combustible floor should be protected with a fire resistant covering.
Alternatives are to spray the floor with water to keep it wet for the
duration of the welding or cover with damp sand. Care must also be
taken to avoid an electric shock when this is done. A combustible floor
directly laid onto concrete does not need to be sprayed with water.

V 4.0 110 Volt Spot Welder 8784662
Visit www.princessauto.com for more information 7
2. Check that there are no structural openings or cracks that hot debris can
enter. Seal cracks and openings to adjacent areas that a spark or slag can
enter. Seal any openings found with a fire-resistant cover. Shut doors and
windows that do not provide ventilation or erect protective screens in front
of them when possible.
3. Do not weld a panel that is a sandwich construction of combustible and
metal materials.
4. Do not perform any welding work on containers that held flammable or
toxic substance until they are cleaned by a person trained in removing
toxic and flammable substances and vapours.
5. Open a container before performing any welding work on it. The heat
generated by the welding process will cause the air and gases to expand.
The internal pressure may cause a sealed or closed container to rupture,
possibly causing an injury or death.
6. Have a fire extinguisher available for immediate use. A dry chemical fire
extinguisher with Types A, B and C is suggested.
a. Do not use liquid based fire extinguishing methods near the electric
arc welding unit, as it may cause a shock hazard.
7. Ventilation systems should be positioned so sparks or molten slag isn’t
carried to an adjacent area.
8. Have a Fire Watcher observing areas outside of the welder’s view, such as
the opposite side of a wall or behind the welder. A fire may also start on the
other side of a structure that could not be removed. The Fire Watcher will
extinguish a fire or raise the alarm to evacuate if the fire cannot be
contained by the extinguishing equipment.
a. A fire watch extends at least 30 minutes after the welding is complete
to ensure there are no fires caused by smoldering sparks or ejected
material.
FUMES AND GASES
Welding may produce hazardous fumes and gas during the welding process. A well
ventilated work area can normally remove the fumes and gases, but sometimes the
welding produces fumes and gases that are hazardous to your health.

8784662 110 Volt Spot Welder V 4.0
8 For technical questions call 1-800-665-8685
Stop welding if your eyes, nose or throat become irritated. This indicates the
ventilation is not adequate to remove the fumes. Do not resume welding until
the ventilation is improved and the discomfort ceases.
1. Only work in a confined space if the area is well ventilated or while wearing
an air-supplied respirator. Always have a trained watchperson nearby.
2. Avoid positions that allow welding fumes to reach your face.
3. Ventilate the work area to remove welding fumes and gases. The fumes
and gases should be drawn away from the user. Welding fumes and gases
can displace air and lower the oxygen level causing injury or death. Be sure
the breathing air is safe.
a. If ventilation in the work area is poor, use an approved air-supplied
respirator. All the people in the work area must also have air-supplied
respirators.
4. Avoid welding in a work area that has vapours from cleaning, degreasing
or any spraying operations. The heat and light from welding can react with
the vapour and form irritating or potentially toxic gases. Wait for the
vapours to disperse.
5. Consult the manufacturer's Material Safety Data Sheets (MSDS) for
instructions and precautions about metals, consumables, coatings,
cleaners and degreasers.
a. Do not weld on coated metals such as galvanized, lead or cadmium
plated steel, unless the coating is removed from the weld area. The
coatings and any metals containing these elements can give off toxic
fumes during the welding process.
b. Do not weld, cut or heat lead, zinc, cadmium, mercury, beryllium or
similar metals without seeking professional advice and inspection of
the welding area’s ventilation. These metals produce extreme toxic
fumes, which can cause discomfort, illness and death.
c. Do not weld or cut near chlorinated solvents or in areas that
chlorinates solvents can enter. The heat or ultraviolet light of the arc
can separate chlorinated hydrocarbons into a toxic gas (phosgene)
that can poison or suffocate the user or bystanders.

V 4.0 110 Volt Spot Welder 8784662
Visit www.princessauto.com for more information 9
ELECTRICAL SAFETY
WARNING! Do not touch or handle a live tool with any part of your body that
is wet or damp. Wet skin reduces resistance to electrical current,
increasing the danger of a serious or fatal shock.
WARNING! To reduce risk of electric shock, be certain that the plug is
connected to a properly grounded receptacle.
1. Disconnect the tool from the power supply before making any adjustments,
changing accessories, cleaning, servicing or when storing. Such preventive
safety measures reduce the risk of starting the tool accidentally.
2. Protect yourself against electric shocks when working on electrical
equipment. Avoid body contact with grounded surfaces. There is an
increased chance of electrical shock if your body is grounded.
a. Insulate yourself from the electrical current and ground using dry
insulating mats or covers big enough to prevent physical contact with
the workpiece or ground.
3. Do not expose the tool to rain, snow, frost or any other damp or wet
conditions. Water entering a tool will increase the risk of electric shock.
4. Do not alter any parts of the tool or accessories. All parts and accessories
are designed with built-in safety features that may be compromised if
altered.
5. Make certain the power source conforms to requirements of your
equipment (see Specifications).
6. This tool is only for use on 120 V (single phase) and is equipped with a
three-prong grounded power supply cord and plug. Check with a
qualified electrician if you are in doubt as to whether the outlet is
properly grounded. If the tool should electronically malfunction or break
down, grounding provides a low resistance path to carry electricity away
from the user.
a. Never remove the grounding prong or modify the plug in any way, as
this will render the tool unsafe.
b. Do not use any adapter plugs.
WARNING! All wiring should be performed by a qualified electrician.

8784662 110 Volt Spot Welder V 4.0
10 For technical questions call 1-800-665-8685
ELECTRIC TOOL PRECAUTIONS
1. Do not use any power tool with a malfunctioning power switch or control.
A power tool that fails to respond to the controls is dangerous and can
cause an injury. A qualified technician must repair and verify the power tool
is operating correctly, before it can be used.
2. This equipment requires a dedicated 120 volt, 20 amp single-phase
alternating current circuit equipped with a similarly rated circuit breaker or
a slow blow fuse. Do not run other appliances, lights, tools or equipment
on the circuit while operating this tool.
3. Disconnect the power source before installing or servicing the tool.
4. Keep hands and fingers away from the work area. Any part of body contacting
the tool’s working parts could cause an injury.
a. Keep away from pinch points.
b. Do not put hands between tips.
5. Never touch the tool accessory or workpiece during or immediately after use.
They may be hot and could inflict a burn injury.
6. Do not touch the electrode or welded surface immediately after use. The
surface will be hot and may cause an injury.
7. Take work breaks to prevent the tool's motor from overheating and/or
overloading. Refer to the welding unit’s duty cycle in Specifications.
POWER CORD
1. Insert the power cord plug directly to the power supply whenever possible.
Extension cords are not recommended for use with this welding unit.
a. Use a welding extension cord designed to exceed the welding unit’s
maximum power requirements when an extension cord is required.
2. Do not operate this tool if the power cord is frayed, damaged or poorly
spliced, as an electric shock may occur, resulting in personal injury or
property damage.
a. Inspect the tool's power cord for cracks, fraying or other faults in the
insulation or plug before each use.
b. Discontinue use if a power cord feels more than comfortably warm
while operating the tool.

V 4.0 110 Volt Spot Welder 8784662
Visit www.princessauto.com for more information 11
3. Keep all connections dry and off the ground to reduce the risk of electric
shock. Do not touch the plug with wet hands.
4. Prevent damage to the power cord by observing the following:
a. Do not pull on the cord to disconnect the plug from an outlet.
b. Keep the cord away from heat, oil, sharp edges or moving parts.
c. Never use the cord to carry the tool.
d. Place the electrical cord in a position that prevents it from coming into
contact with the tool and getting caught by the workpiece. The cord
should always stay behind the tool.
5. Do not allow people, mobile equipment or vehicles to pass over
unprotected power cords.
a. Position power cords away from traffic areas.
b. Place cords in reinforced conduits or place planks on either side of
the power cord to create a protective trench.
6. Do not wrap the cord around the tool, as sharp edges may cut insulation or
cause cracks if wound too tight. Gently coil cord and either hang on a hook
or fasten with a device to keep cord together during storage.
UNPACKING
WARNING! Do not operate the tool if any part is missing. Replace the
missing part before operating. Failure to do so could result in a malfunction
and personal injury.
Remove the parts and accessories from the packaging and inspect for damage.
Make sure that all items in the contents are included.
Contents:
• Spot Welder
• Wooden Handle Assembly and Hardware
• Copper Electrode Tips, 4 pcs

8784662 110 Volt Spot Welder V 4.0
12 For technical questions call 1-800-665-8685
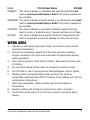
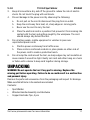
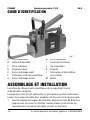
IDENTIFICATION KEY
A Upper Tong
B Electrode Tip
C Lower Tong
D Wood Handle
E Front Jam Nut
F Spatter Guard
G Rear Jam Nut
H Hex Nut
I Operating Lever
J Cap Screw
K Handle
L Power Switch
(not visible)
M Housing
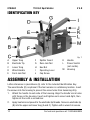
ASSEMBLY & INSTALLATION
Letter references in parenthesis (A) refer to the included Identification Key.
The wood handle (D) is optional if the tool remains in a stationary location. Insert
the screws into the housing to prevent the screw holes from becoming dirty.
1. Attach the handle to each side of the housing. Align the handle’s arm holes
with those on the housing. Insert and tighten each screw hand-tight, then
tighten all four with a screwdriver.
2. Apply heat sink compound to the electrode tip threads. Screw an electrode tip
(B) into the upper and lower tong (A and C). Tighten with a wrench to secure.
Fig. 1

V 4.0 110 Volt Spot Welder 8784662
Visit www.princessauto.com for more information 13
3. Align the tongs. The length of both the upper and lower tongs can be
adjusted to align the electrode tips.
a. Loosen the four screw located on the block that holds the jam nuts.
b. Reposition the upper tong to align with the lower tong. Check both
length and rotation to align the electrode tips. The tips should touch
when you press the operating lever (I) down. If they still do not align,
you may need to reposition the lower tong.
c. Tighten the four screws.
d. Reposition the lower tong in the same way as the upper tong. The
four screws holding the lower tong in place are on the tool’s bottom.
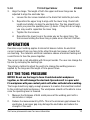
OPERATION
Resistance spot welding applies to almost all known metals. An electrical
current is passed from one tong to the other through two pieces of metal that
are touching. The material’s electrical resistance causes a localized heating and
a weld forms to fuse the pieces together.
The current rate is not adjustable with this spot welder. The user can change the
tip size by reshaping the existing tips.
The primary method to adjust the weld is to change the welding pressure
applied by the tongs and the length of time power flows.
SET THE TONG PRESSURE
NOTICE! Do not use the tongs to force ill-matched metal workpieces
together, as this will damage the electrode tips and result in a poor weld.
Fix workpieces with poor contact points with other methods before welding.
The tongs should only apply enough pressure to create a firm electrical contact
to the combined metal workpieces. The workpieces should not be able to move
once the operating lever is lowered.
1. Measure the thickness of both metal pieces at the welding point with a
micrometer or caliper.
2. Reduce the measurement by 25%. This is the minimum gap between the
electrodes. A narrower gap may damage the electrodes and reduce the
strength of the weld.

8784662 110 Volt Spot Welder V 4.0
14 For technical questions call 1-800-665-8685
3. Push the lever down and measure the gap between the two electrodes.
Adjust the gap between the upper and lower tongs (A and C).
a. Loosen the front jam nut (E) several turns to decrease the tong gap.
b. Measure the gap. Repeat step a. until the gap is the correct width.
c. Tighten the rear jam nut (G) until it is secure against the block.
Tighten the front jam nut.
d. Use the same method to widen the gap, but move the rear jam nut
first, then secure the block with the front jam nut.
4. Fine adjustments may be necessary after several test welds.
5. The force necessary to press down the operating lever is adjustable.
Tighten the hex nut (H) on each side to increase the friction and loosen to
decrease it. The lever movement should be smooth to avoid damage to the
workpiece or electrode tips.
6. The width between the tongs can also be adjusted with the cap screw (J).
The cap screw physically stops the operating lever from lowering past a
certain point.
The adjustments only apply within the gap range set in step 3.
a. Loosen the nut on the cap screw by several turns. This screw locks
the cap screw in place.
b. Tighten the cap screw to narrow the tong gap. Loosen the screw to
increase the tong gap.
c. Once set, adjust the nut on the screw to lock the cap screw in place.
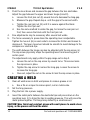
CREATING A WELD
1. Clean all weld areas on both workpieces to remove grease or oil.
a. Use a file or scraper to remove paint, rust or metal scale.
2. Set the tong pressure.
3. Plug the tool into a power supply.
4. Insert the metal parts between the electrode tips and press down on the
operating lever (I) to bring the tips to welding pressure. This will press the
metal pieces together. The tongs may deflect by a small amount.
CAUTION! Wear thick heat resistant gloves with small pieces to avoid a burn
injury, as the process will heat the metal.

V 4.0 110 Volt Spot Welder 8784662
Visit www.princessauto.com for more information 15
5. Press the power switch (L) left or right to pass a current through the
workpieces. Release the switch and it will automatically center itself in the
OFF position.
6. Hold the tongs in place for a moment before raising the operating lever to
open the jaws.
7. Remove or reposition the workpiece.
8. Wait until the duty cycle completes before starting the next weld (see
Specifications).
9. Space subsequent welds apart from each other. Part or all of the current
may pass through the nearby weld instead of creating a new weld.
TEST PROCEDURES
Conduct a test with scrap metal of the same thickness and type to properly
adjust the spot welder.
VISUAL TEST
Observe the deformation and shape of the surface contact points at both sides
of the weld. Excessive ‘dishing’ of the surface contact point indicates one or
more of the following:
1. Excessive tong pressure. Adjust the tong pressure to increase the tong
gap.
2. Time holding the power switch. Adjust the length of time holding the
operating lever down to create the correct weld.
3. If the resistance spot weld does not have an even, concentric surface
appearance, the problem could be misalignment of the electrode tips. Align
the electrode tips with the power off.
MECHANICAL TEST
Place one end of the resistance spot weld sample in the vice jaws. Use mechanical
means to force the weld apart. The weld should remain on one piece, with a
matching hole in the other metal piece. Check for proper weld diameter.
Once the spot welder is fine-tuned, proceed with the welding job.

8784662 110 Volt Spot Welder V 4.0
16 For technical questions call 1-800-665-8685
CARE & MAINTENANCE
1. Maintain the tool with care. A tool in good condition is efficient, easier to
control and will have fewer problems.
2. Inspect the tool components periodically. Repair or replace damaged or
worn components. Only use identical replacement parts when servicing.
3. Only use accessories intended for use with this tool.
4. Follow instructions for lubricating and changing accessories.
5. Keep the tool handles clean, dry and free from oil/grease at all times.
6. Maintain the tool’s labels and name plates. These carry important information.
If unreadable or missing, contact Princess Auto Ltd. for replacements.
7. Make sure the electrode tips are clean. Dress the tips to remove
accumulated slag if necessary.
WARNING! Only qualified service personnel should repair the tool. An
improperly repaired tool may present a hazard to the user and/or others.
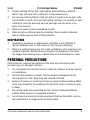
DRESSING THE TIPS
Deformed electrode tips are a by-product of use. The tips must be dressed
to maintain the weld efficiency. Use a file or a dresser tool to reshape the
electrode tips.
1. Remove each electrode tip from the tool and either place it in a vice or
locking pliers. Only apply enough pressure on the flat sides to hold the tip
in place. Too much pressure will deform the tip.
2. Remove the excess metal with the file or dresser tool. Attempt to
reproduce the original slope on all side.
3. Once the side are shaped, file the point
to a smooth surface that is 1/8 in. in
diameter (d). You may choose to
create a narrower diameter point for
use with thinner workpieces.
4. Repeat steps 2 and 3 until the tip is
properly dressed.
5. Replace the tip if the dressing fails or the slope is too shallow.
Fig. 2

V 4.0 110 Volt Spot Welder 8784662
Visit www.princessauto.com for more information 17
REPLACING THE TIPS
1. Remove the used tips and recycle or dispose of them.
2. Coat the threads of the electrode tips with a heat sink compound (sold
separately).
3. Screw the tips into the upper and lower tong. Tighten to secure, but be
careful not to overtighten.
REPLACING THE TONGS
Follow Assembly & Installation step 3 to loosen and remove the tong holders.
Insert new tongs and follow the alignment instructions in step 3.
CLEANING
Periodically clean dust, dirt, grease, etc. from your welding unit.
MAINTENANCE SCHEDULE
CAUTION! Disconnect the machine from the main power supply before
servicing or maintaining the machine.
Every three months:
1. Oil the unit’s contact points where metal rubs against metal, such as the
operating lever.
2. Inspect the electrode tips for splaying or slag.
3. Replace damaged or unreadable labels.
IMPORTANT! Perform the maintenance procedures monthly with heavy tool use.
STORAGE
When not in use for an extended period, apply a thin coat of lubricant to the
steel parts to avoid rust. Remove the lubricant before using the tool again.
DISPOSAL
Recycle a tool damaged beyond repair at the appropriate facility.
Contact your local municipality for a list of disposal facilities or by-laws for
electronic devices, batteries, oil or other toxic liquids.

8784662 110 Volt Spot Welder V 4.0
18 For technical questions call 1-800-665-8685
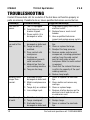
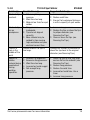
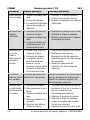
TROUBLESHOOTING
Contact Princess Auto Ltd. for a solution if the tool does not function properly or
parts are missing. If unable to do so, have a qualified technician service the tool.
Problem(s) Possible Cause(s) Suggested Solution(s)
Tool has no
power.
1. Tool is unplugged.
2. Fuse blown or circuit
breaker tripped.
3. Power switch (I) is
damaged or worn.
1. Plug power supply cord into an
electrical outlet.
2. Replace fuse or reset circuit
breaker.
3. Have a qualified technician
inspect and replace power switch.
Poor weld or
no weld at the
tips.
1. Electrode tips are
damaged or deformed.
2. Tongs are dirty or
oxidized.
3. Poor contact with
workpieces.
4. Coatings on
workpieces prevents
solid connection.
5. Material too thick for
spot welding machine.
6. Tong are too long.
1. Dress or replace the electrode
tips.
2. Clean or replace the tongs.
3. Readjust the tong pressure.
4. Remove oxides and chemical
compounds, including galvanized
coating, from the weld contact
point on both sides of each
workpiece. Metal to metal contact
is required.
5. Check that the material thickness
is within the capacity of the spot
welding machine.
6. Reduce tong length.
Welding takes
longer than
normal.
1. Electrode tips are
damaged or deformed.
2. Metals workpieces are
dirty.
3. Tongs dirty or oxidized.
4. Low voltage input.
1. Dress or replace the electrode
tips.
2. Clean metals and remove any
coatings.
3. Clean or replace tongs.
4. Remove all other devices on the
electrical circuit and do not use
an extension cord.
Burn through
at weld.
1. Weld time too long.
2. Tongs misaligned.
3. Electrode tips are
damaged or deformed.
1. Shorten weld time.
2. Realign tongs.
3. Dress or replace the electrode
tips

V 4.0 110 Volt Spot Welder 8784662
Visit www.princessauto.com for more information 19
Problem(s) Possible Cause(s) Suggested Solution(s)
Electrode tips
overheat.
1. Not enough tong
pressure.
2. Weld time too long.
3. Material too thick for spot
welder.
1. Increase tong pressure.
2. Reduce weld time.
3. Ensure that workpiece thickness
is within capacity of spot welder.
Electrode tips
arc on
workpieces.
1. Tong pressure
inadequate.
2. Tips are not aligned
correctly.
3. Base material may be
welded to tips causing
high resistance and poor
electrical current flow.
1. Increase tong pressure.
2. Realign the tips or dress the tips
to proper diameter (see
Dressing the Tips).
3. Clean or dress the tips (see
Dressing the Tips).
There is a
hole in the
middle of the
weld.
Contact area of the tips is
too large.
Change to a smaller tip diameter or
dress the tips back to the original
diameter (see Dressing Tips).
Spatter or
molten
material being
expelled out
during
welding
operation.
1. Incorrect tip alignment.
2. Excessive tong pressure.
3. Weld time too long.
4. Inconsistent weld nugget.
5. Not enough tong
pressure.
1. Dress the tips so that they align
and are flat on the material (see
Dressing the Tips).
2. Reduce tong pressure.
3. Reduce the weld time.
4. Inconsistent weld time. Use a
timer.
5. Increase tong pressure.

8784662 110 Volt Spot Welder V 4.0
20 For technical questions call 1-800-665-8685
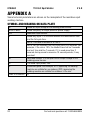
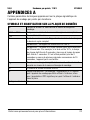
APPENDIX A
Some technical parameters are shown on the nameplate of the resistance spot
welding machine.
SYMBOL AND MEANING ON DATA PLATE
U
1
Rated AC input voltage of the welding power source.
50Hz or 60Hz Rated Frequency of single phase AC power supply.
I
1max
Maximum input current.
X
Rated duty cycle. It is the ratio between the load duration time
and the full cycle time.
NOTE: This ratio is between 0 to 100%.
NOTE: For this standard, one fully cycle time is 30 seconds. For
example, if the rate is 10%, the loaded time shall be 3 seconds
and rest time shall be 7 seconds. If it is used more than 3
seconds during several successive 10 second periods, it may
overheat.
U
0
Non-load voltage. It is the open-circuit output voltage of the
welding power source.
S
1
The rated input power, kVA.
IP
Protection grade. For example, IP21, approving the welding
machine as suitable for use indoors; IP23, approving the
welding machine as suitable for outdoors in the rain.
Class of Insulation H
La page est en cours de chargement...
La page est en cours de chargement...
La page est en cours de chargement...
La page est en cours de chargement...
La page est en cours de chargement...
La page est en cours de chargement...
La page est en cours de chargement...
La page est en cours de chargement...
La page est en cours de chargement...
La page est en cours de chargement...
La page est en cours de chargement...
La page est en cours de chargement...
La page est en cours de chargement...
La page est en cours de chargement...
La page est en cours de chargement...
La page est en cours de chargement...
La page est en cours de chargement...
La page est en cours de chargement...
La page est en cours de chargement...
La page est en cours de chargement...
La page est en cours de chargement...
La page est en cours de chargement...
La page est en cours de chargement...
La page est en cours de chargement...
-
 1
1
-
 2
2
-
 3
3
-
 4
4
-
 5
5
-
 6
6
-
 7
7
-
 8
8
-
 9
9
-
 10
10
-
 11
11
-
 12
12
-
 13
13
-
 14
14
-
 15
15
-
 16
16
-
 17
17
-
 18
18
-
 19
19
-
 20
20
-
 21
21
-
 22
22
-
 23
23
-
 24
24
-
 25
25
-
 26
26
-
 27
27
-
 28
28
-
 29
29
-
 30
30
-
 31
31
-
 32
32
-
 33
33
-
 34
34
-
 35
35
-
 36
36
-
 37
37
-
 38
38
-
 39
39
-
 40
40
-
 41
41
-
 42
42
-
 43
43
-
 44
44


Power Fist 8784662 Le manuel du propriétaire
- Catégorie
- Système de soudage
- Taper
- Le manuel du propriétaire
dans d''autres langues
- English: Power Fist 8784662 Owner's manual
Documents connexes
-
Power Fist 8630196 Le manuel du propriétaire
-
-
-
-
-
-
-
-
Autres documents
-
PROPOINT 8784720 Le manuel du propriétaire
-
HobartWelders HSW 15 Le manuel du propriétaire
-
-
Miller LMSW-52T Le manuel du propriétaire
-
-
-
-
-
-