

EN
Quick Start Guide
Thank you for purchasing this
Moticam. This camera is a delicate
instrument and should be handled
with care. When not in use, please
store the camera in a safe place with
the dust cap attached. Do not let the
camera get in contact with water or
expose it to extreme temperatures
(below 0 or above 50 degrees
Celsius). In order to receive the
highest level of service, please retain
your receipt as proof of purchase
and register your camera online at
www.motic.com today.
Should you have any questions
please do not hesitate to contact our
customer service.
ES
Guia Rápida de Inicio
Gracias por comprar esta Moticam.
Esta cámara es un delicado
instrumento que debe ser
manipulado con cuidado. Cuando no
vaya a usarla, guárdela en un lugar
seguro y con tapa protectora
anti-polvo puesta. No deje que entre
en contacto con el agua ni la
exponga a temperaturas extremas
(por debajo de 0ºC o por encima de
50ºC). Para recibir un completo nivel
de servicio post venta, conserve su
factura como prueba de compra y
registre su cámara online en
www.motic.com hoy mismo.
Si tiene alguna duda póngase en
contacto con nuestro servicio de
atención al cliente.
DE
Schnellstart – Anleitung
Vielen Dank für den Kauf dieser
Moticam.Diese Kamera ist ein
empfindliches Instrument und sollte
mit Sorgfalt behandelt werden.
Wenn nicht in Gebrauch, bewahren
Sie bitte die Kamera an einem
sicheren Ort mit der Schutzkappe
verbunden auf. Lassen Sie die
Kamera nicht in Berührung mit
Wasser kommen und setzen Sie sie
keinen extremen Temperaturen
(unter 0 oder über 50 Grad Celsius)
aus. Um den besten Service zu
erhalten, bewahren Sie bitte die
Quittung als Kaufbeleg auf und
registrieren Sie heute Ihre Kamera
online unter www.motic.com.
Sollten Sie Fragen haben, zögern Sie
bitte nicht, unseren Kundenservice
zu kontaktieren.
FR
Guide Rapide D'installation
Merci d'avoir acheté cette Moticam.
Cette caméra est un instrument
délicat et doit être manipulé avec
soin. Lorsqu'elle n'est pas utilisée
merci de bien vouloir la stocker dans
un lieu sec avec le bouchon
anti-poussière bien positionné. Ne
pas mettre cette camera en contact
avec de l'eau ou l'exposer à des
températures extrêmes (en dessous
de 0 ou au dessus de 50 degrés
Celsius). Afin de recevoir le meilleur
service après vente merci de
conserver votre facture comme
preuve d'achat, et enregistrer dès
aujourd'hui votre caméra en ligne
sur www.motic.com.
Pour tout renseignement n'hésitez
pas à contacter notre service client.
IT
Guida Quick Start
Grazie per aver acquistato questa
Moticam. Questa telecamera è uno
strumento delicato e deve essere
utilizzato con cura. Quando non si
usa, si prega di conservarla in un
posto sicuro con il tappo antipolvere.
Non lasciarla a contatto con acqua o
esposta a temperature estreme (al di
sotto degli 0 gradi e al di sopra dei
50 gradi). Al fine di ottenere le
migliori prestazioni possibili, per
favore conservare la ricevuta come
prova d’acquisto e registrare la
telecamera online sul sito
www.motic.com fin da oggi.
In caso di dubbi non esitare a
contattare il servizio clienti.
North America
+49 93 756 62 86
Global
1-877-901-4141
Europe [email protected]

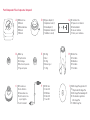
Parts / Komponenten / Pièces / Componentes / Componenti
A
Moticam Case
Moticam
Moticam Gehäuse
Moticam
Moticam
EN
ES
DE
FR
IT
E
C-Ring
Aro-C
C-Ring
Anneau type C
C-Ring
EN
ES
DE
FR
IT
I
Motic Images Plus application CD
CD aplicación Motic Images Plus
Motic Images Plus Anwendungs-CD
CD contenant les applications
Motic Images Plus
CD Motic Image Plus
EN
ES
DE
FR
IT
F
USB Cable
Cable USB
USB-Kabel
Câble USB
Cavo USB
EN
ES
DE
FR
IT
G
Calibration Slide
Preparación de Calibración
Kalibriermaßstab
Lame de Calibration
Vetrino per la Calibrazione
EN
ES
DE
FR
IT
H
Macro Tube
Tubo Macro
Makrotubus
Tube Macro
Tubo Macro
EN
ES
DE
FR
IT
B
Dust Cap
Tapa Protectora
Schutzkappe
Bouchon anti-poussière
Tappo anti-polvere
EN
ES
DE
FR
IT
C
Focusable Lens
Lente Enfocable
Fokussierbare Linse
Lentille macro à mise
au point réglable
Lenti Focalizzanti
EN
ES
DE
FR
IT
D
Eyepiece Adapter (2)
Adaptadores Ocular (2)
Okular-Adapter (2)
Adaptateurs Oculaires (2)
Adattatore Oculare (2)
EN
ES
DE
FR
IT

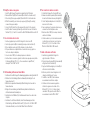
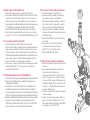
Using the camera on an eyepiece
1. Install the Motic Images Plus application program from the CD included.
2. Remove the Dust Cap (B) from the camera (A) and attach the focusable lens (C).
3. Choose the right size eyepiece adapter (D) and attach this to the focusable lens.
4. Attach this assembly to your microscope’s eyepiece by tightening the centering
screws on the eyepiece adapter.
5. Connect the USB cable (F) onto the camera and then plug it into the computer
6. Install the driver if necessary by following the instructions on screen. The driver for
Moticam 1SP, 2, 3, 5 and 10 is located in the Motic USB2 Driver Subfolder on the CD
Uso de la cámara sobre el ocular
1. Instale el programa de aplicación Motic Images Plus incluido en el CD.
2. Quite la tapa protectora (B) de la cámara (A) y enrosque la lente enfocable (C).
3. Elija el adaptador ocular correcto (D) y enrósquelo a la lente enfocable.
4. Coloque la cámara con el adaptador sobre el ocular del microscopio y ajuste los
tornillos de centraje del adaptador.
5. Conecte el cable USB (F) en la cámara y después en el ordenador.
6. Instale el driver si es necesario, siguiendo las instrucciones que aparecen en pantalla.
El driver para Moticam 1SP, 2, 3, 5 y 10 se encuentra en la carpeta “Driver”,
subcarpeta “Motic USB2” del CD.
Die Verwendung der Kamera auf einem Okular
1. Installieren Sie das Motic Images Plus Anwendungsprogramm von der mitgelieferten CD
2. Entfernen Sie die Schutzkappe (B) von der Kamera (A) und befestigen Sie die
fokussierbare Linse (C)
3. Wählen Sie den passenden Okularadapter (D) und befestigen Sie diesen auf die
fokussierbare Linse
4. Bringen Sie diese Anordnung an Ihrem Mikroskop-Okular durch Anziehen der
Zentrierschrauben am Okularadapter an.
5. Verbinden Sie das USB-Kabel (F) mit der Kamera und stecken Sie es dann in den
Computer
6. Installieren Sie den Treiber bei Bedarf, indem Sie den Anweisungen auf dem
Bildschirm folgen. Der Treiber für Moticam 1SP, 2,3,5 und 10 ist im "Motic USB2"
Unterordner enthalten, der sich im Ordner "Driver" auf der CD befindet.
Pour connecter la caméra à un oculaire
1. Installer Motic Images Plus à l'aide du CD fourni
2. Enlever le bouchon anti-poussière (B) de la caméra (A)
et visser la lentille macro à mise au point réglable (C).
3. Choisir l'adaptateur adéquat selon la taille (D) et le
visser sur la lentille macro.
4. Fixer ce montage sur l'oculaire de votre microscope
en serrant les vis de l'adaptateur oculaire
5. Brancher le câble USB (F) à la camera, le brancher
ensuite sur l'ordinateur
6. Installer au besoin le pilote de la caméra en suivant
les instructions sur votre écran. Le pilote pour les
Moticam 1SP, 2, 3, 5 et 10 est dans le fichier
"Driver" du CD dans "Motic USB2 camera".
Usando la telecamera sull’oculare
1. Insatallare il programma Motic Image Plus
application usando il CD incluso.
2. Togliere il tappo anti-polvere (B) dalla telecamera (A)
ed applicare la lente focalizzante (C)
3. Scegliere l’adattatore adeguato per l’oculare (D) ed
attaccarlo alla lente focalizzante.
4. Attaccarlo quindi all’oculare stringendo la vite di
centraggio sull’adattatore dell’ oculare.
5. Connettere il cavo USB (F) alla telecamera e
successivamente connetterla al computer
6. Installare ora il driver necessario seguendo le
istruzioni che appaiono sullo schermo. Per la
Moticam 1SP, 2, 3, 5 e 10, il driver si troverà
consultando il CD, aprendo la cartella “Driver” e
successivamente la cartella “Motic USB2”.
EN
ES
DE
FR
IT

Using the camera as a Macro Camera
1. Install the Motic Images Plus application program from the CD included.
2. Remove the Dust Cap (B) from the camera (A) and attach the focusable lens (C).
3. Attach the Macro Tube (H) onto the lens
4. Place this assembly over the item you wish to view and ensure there is adequate
lighting. If necessary, a desk lamp is a good solution.
5. Connect the USB cable (F) onto the camera and then plug it into the computer
6. Install the driver if necessary by following the instructions on screen. The driver for
Moticam 1SP, 2, 3, 5 and 10 is located in the Motic USB2 Driver Subfolder on the CD
Uso de la cámara como cámara macro
1. Instale el programa de aplicación Motic Images Plus incluido en el CD.
2. Quite la tapa protectora (B) de la cámara (A) y enrosque la lente enfocable (C).
3. Enrosque el tubo macro (H) en la lente.
4. Coloque ahora la cámara con el tubo macro sobre el objeto que desea visualizar.
Asegúrese de que el objeto está correctamente iluminado. Si fuera necesario una
lámpara de sobremesa puede ser una buena solución.
5. Conecte el cable USB (F) en la cámara y después en el ordenador.
6. Instale el driver si es necesario, siguiendo las instrucciones que aparecen en pantalla.
El driver para Moticam 1SP, 2, 3, 5 y 10 se encuentra en la carpeta “Driver”,
subcarpeta “Motic USB2” del CD.
Die Verwendung der Kamera als Makro-Kamera
1. Installieren Sie das Motic Images Plus Anwendungsprogramm von der mitgelieferten CD
2. Entfernen Sie die Schutzkappe (B) von der Kamera (A) und befestigen Sie die
fokussierbare Linse (C)
3. Befestigen Sie den Makrotubus (H) an der Linse
4. Legen Sie diese Anordnung über den Gegenstand, den Sie sich ansehen möchten
und sorgen Sie für eine ausreichende Beleuchtung. Falls erforderlich, wäre eine
Schreibtischlampe eine gute Lösung.
5. Verbinden Sie das USB-Kabel (F) mit der Kamera und stecken Sie es dann in den Computer
6. Installieren Sie den Treiber bei Bedarf, indem Sie den Anweisungen auf dem
Bildschirm folgen. Der Treiber für Moticam 1SP, 2,3,5 und 10 ist im "Motic USB2"
Unterordner enthalten, der sich im Ordner "Driver" auf der CD befindet.
EN
Pour utiliser la caméra en observation macro
1. Installer Motic Images Plus à l'aide du CD fourni
2. Enlever le bouchon anti-poussière (B) de la caméra (A) et
visser la lentille macro à mise au point réglable (C).
3. Visser le tube macro à la lentille
4. Placer ce montage au dessus du spécimen à observer, et
assurer vous que l'éclairage est suffisant, ajouter une simple
lampe de bureau est une bonne option
5. Brancher le câble USB (F) à la camera, le brancher ensuite
sur l'ordinateur
6. Installer au besoin le pilote de la caméra en suivant
les instructions sur votre écran. Le pilote pour les
Moticam 1SP, 2, 3, 5 et 10 est dans le fichier
"Driver" du CD dans "Motic USB2 camera".
Usando la telecamera come Macro Camera
1. Insatallare il programma Motic Image Plus application
usando il CD incluso.
2. Togliere il tappo anti-polvere (B) dalla telecamera (A) ed
applicare la lente focalizzante (C)
3. Attaccare il tubo Macro (H) alla lente
4. Metterlo quindi sull’oggetto che si vuole visualizzare ed
assicurarsi che ci sia un illuminazione adeguata. Se fosse
necessario, una lampada da tavolo puó essere una buona opzione
5. Connettere il cavo USB (F) alla telecamera e successivamente
connetterla al computer
6. Installare ora il driver necessario seguendo le istruzioni che
appaiono sullo schermo. Per la Moticam 1SP, 2, 3, 5 e 10, il
driver si troverà consultando il CD, aprendo la cartella “Driver”
e successivamente la cartella “Motic USB2”.
FR
IT
ES
DE

Using the camera on a Trinocular Microscope
1. Install the Motic Images Plus application program from the CD included.
2. Remove the Dust Cap (B) from the camera (A) and attach the microscope’s C-Mount
adapter (*Please note that the C-Mount adapter is specific to your microscope. For
Motic microscopes, please consult the relevant Motic Accessory list and choose an
appropriate adapter for your Moticam. Depending on the type of adapter and microscope,
the C-Ring (E) may be necessary between the camera and the C-mount adapter).
3. Connect the USB cable (F) onto the camera and then plug it into the computer
4. Install the driver if necessary by following the instructions on screen. The driver for
Moticam 1SP, 2, 3, 5 and 10 is located in the Motic USB2 Driver Subfolder on the CD.
Uso de la cámara en un microscopio trinocular
1. Instale el programa de aplicación Motic Images Plus incluido en el CD.
2. Quite la tapa protectora (B) de la cámara (A) y enrosque el adaptador con montura C.
* Tenga en cuenta que el adaptador con montura C es específico para su microscopio.
Para microscopios Motic, consulte la correspondiente lista de accesorios Motic y elija
al adaptador apropiado para su Moticam. Dependiendo del tipo de adaptador y microscopio,
puede ser necesario instalar el aro C (E) entre la cámara y el adaptador con montura C.
3. Conecte el cable USB (F) en la cámara y después en el ordenador.
4. Instale el driver si es necesario, siguiendo las instrucciones que aparecen en pantalla.
El driver para Moticam 1SP, 2, 3, 5 y 10 se encuentra en la carpeta “Driver”,
subcarpeta “Motic USB2” del CD.
Die Verwendung der Kamera auf einem Trinokular-Mikroskop
1. Installieren Sie das Motic Images Plus Anwendungsprogramm von der mitgelieferten CD
2. Entfernen Sie die Schutzkappe (B) von der Kamera (A) und befestigen Sie den
C-Mount-Adapter des Mikroskops
3. Bitte beachten Sie, dass der C-Mount-Adapter speziell für Ihr Mikroskop ist. Für
Motic Mikroskope konsultieren Sie bitte die Motic Zubehör-Liste und wählen Sie
einen passenden Adapter für Ihre Moticam. Je nach Art des Adapters und Mikroskops
könnte der C-Ring (E) zwischen der Kamera und dem C-Mount-Adapter notwendig sein.
4. Verbinden Sie das USB-Kabel (F) mit der Kamera und stecken Sie es dann in den Computer
5. Installieren Sie den Treiber bei Bedarf, indem Sie den Anweisungen auf dem
Bildschirm folgen. Der Treiber für Moticam 1SP, 2,3,5 und 10 ist im "Motic USB2"
Unterordner enthalten, der sich im Ordner "Driver" auf der CD befindet.
EN
Pour connecter la caméra à un Microscope trinoculaire
1. Installer Motic Images Plus à l'aide du CD fourni
2. Enlever le bouchon anti-poussière (B) de la caméra (A) et
visser la lentille macro à mise au point réglable (C).
* Veuillez noter que l'adaptateur C-mount varie en fonction de
votre microscope. Pour les microscopes Motic, consulter la
liste des accessoires et choisir l'adaptateur approprié pour
votre Moticam. Suivant le type d'adaptateur et microscope,
l'anneau type C (E) sera peut être nécessaire entre la caméra
et l'adaptateur C-mount.
3. Brancher le câble USB (F) à la camera, le brancher ensuite
sur l'ordinateur
4. Installer au besoin le pilote de la caméra en suivant
les instructions sur votre écran. Le pilote pour les
Moticam 1SP, 2, 3, 5 et 10 est dans le fichier
"Driver" du CD dans "Motic USB2 camera".
Usando la telecamera su un Microscopio Trinoculare
1. Insatallare il programma Motic Image Plus application usando
il CD incluso.
2. Togliere il tappo anti-polvere (B) dalla telecamera (A) ed
attaccare al microscopio l’adattatore passo C
* Per favore prendere nota del fatto che l’adattatore passo C è
costruito per il proprio microscopio, per favore consultare il
listino accessori di Motic e segliere l’adattatore adeguato alla
propria Moticam. Dipendendo dal tipo di adattatore e dal tipo
di microscopio, il C-Ring (E) potrebbe essere necessario tra la
telecamera e l’adattatore passo C.
3. Connettere il cavo USB (F) alla telecamera e successivamente
connetterla al computer
4. Installare ora il driver necessario seguendo le istruzioni che
appaiono sullo schermo. Per la Moticam 1SP, 2, 3, 5 e 10, il
driver si troverà consultando il CD, aprendo la cartella “Driver”
e successivamente la cartella “Motic USB2”.
FR
IT
ES
DE

CD Software

-
 1
1
-
 2
2
-
 3
3
-
 4
4
-
 5
5
-
 6
6
-
 7
7
-
 8
8


dans d''autres langues
- italiano: Motic Moticam Guida Rapida
- English: Motic Moticam Quick start guide
- español: Motic Moticam Guía de inicio rápido
- Deutsch: Motic Moticam Schnellstartanleitung
Documents connexes
-
Motic Moticam S Series Guide de démarrage rapide
-
 Moticam 1080 Guide de démarrage rapide
-
-
-
Motic Moticam X3 Guide de démarrage rapide
-
-
-
-
-


