Kicker Bullfrog BF100 Le manuel du propriétaire
- Catégorie
- Équipement musical supplémentaire
- Taper
- Le manuel du propriétaire

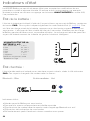
User Manual for
KICKER Bullfrog Series Audio Systems
Manual del Propietario para los
Sistemas de Audio de la Serie KICKER Bullfrog
Manuel d’utilisation
des systèmes audio KICKER Bullfrog
BF100
Owner’s Manual
Manual del Propietario
Manuel d’utilisation

1
Contents | Contenido | Table des matières
Introduction . . . . . . . . . . . . 2
Hardware Overview. . . . . . . . . 3
Status Indicators. . . . . . . . . . . . . . . . . . . . . 3
Connections . . . . . . . . . . . . . . . . . . . . . . 4
Controls . . . . . . . . . . . . . . . . . . . . . . . . 5
Hardware Operation . . . . . . . . 6
Bluetooth Mode . . . . . . . . . . . . . . . . . . . . . 6
AUX Mode . . . . . . . . . . . . . . . . . . . . . . . 8
Auto Turn-Off & Reset . . . . . . . . . . . . . . . . . . . 9
KICKER Connect App . . . . . . . 10
Troubleshooting . . . . . . . . . 15
Specifi cations . . . . . . . . . . 42
Safety/Warranty . . . . . . . . . 43
Introducción . . . . . . . . . . . 2
Descripción del hardware . . . . . 16
Indicadores de estado . . . . . . . . . . . . . . . . . 16
Conexiones . . . . . . . . . . . . . . . . . . . . . 17
Controles . . . . . . . . . . . . . . . . . . . . . . 18
Funcionamiento del Hardware . . . . 19
Modo Bluetooth . . . . . . . . . . . . . . . . . . . . 19
Modo AUX . . . . . . . . . . . . . . . . . . . . . . 21
Apagado automático y reajuste . . . . . . . . . . . . . . 22
Aplicación KICKER Connect . . . . 23
Solución de problemas . . . . . . 28
Especifi caciones . . . . . . . . . 42
Seguridad / Garantía . . . . . . . 43
Introduction . . . . . . . . . . . . 2
Présentation du matériel . . . . . . 29
Indicateurs d’état . . . . . . . . . . . . . . . . . . . 29
Branchements . . . . . . . . . . . . . . . . . . . . 30
Commandes . . . . . . . . . . . . . . . . . . . . . 31
Fonctionnement du matériel . . . . . 32
Mode Bluetooth . . . . . . . . . . . . . . . . . . . . 32
Mode AUX . . . . . . . . . . . . . . . . . . . . . . 34
Arrêt et réinitialisation automatiques . . . . . . . . . . . . . 35
Appli KICKER Connect . . . . . . 36
Dépannage . . . . . . . . . . . 41
Spécifi cations . . . . . . . . . . 42
Sécurité / Garantie . . . . . . . . 43

2
Introduction | Introducción
Congratulations! You are the proud new owner of a KICKER Bullfrog audio system. Whether
tailgating before the game, creating some ambience for that date you’ve brought home, or just
relaxing in your natural habitat, the KICKER Bullfrog is ready to hop along life with you! The Bullfrog
features:
• KICKER Connect - Our mobile application for unlocking and controlling all the powerful features
of your Bullfrog.
• 360° Sound - Speakers on both sides supply sound for the whole room!
• Double-Kick
™
- Need more juice? Pair two Bullfrog’s! Use KICKER Connect, or hardware
settings, to add another Bullfrog to your chorus.
• IP67 Certifi cation - On your boat, at the lake or in your back yard, the Bullfrog is certifi ed tough.
Now you can play what you want - anywhere you want.
• 100’ Bluetooth
®
Range - Anywhere you go, the fun goes with you. A 100 foot Bluetooth range
lets you walk everywhere around the party without missing a note.
With sound so good you just might croak, the Bullfrog licks the competition. (frog puns are toadally
lame)
¡Felicitaciones! Es el nuevo y orgulloso dueño de un sistema de audio Bullfrog de KICKER.
Ya sea si se reúne con amigos antes del partido, crea un ambiente especial para la cita que llevó
a su casa o, simplemente, se relaja en su hábitat natural, ¡el sistema Bullfrog de KICKER está listo
para acompañarlo en todo momento! El Bullfrog incluye:
• KICKER Connect: nuestra aplicación móvil para desbloquear y controlar todas las poderosas
funciones de su Bullfrog.
• Sonido de 360°: ¡los altavoces en ambos lados ofrecen sonido a todo el ambiente!
• Double-Kick
™
: ¿Necesita más potencia? ¡Conecte dos Bullfrog! Utilice KICKER Connect,
o las confi guraciones del hardware, para agregar otro Bullfrog a su coro.
• Certifi cación IP67: en su bote, en el lago o en su patio trasero, el Bullfrog cuenta con una
certifi cación que prueba su resistencia. Ahora puede reproducir lo que quiera, donde quiera.
• Rango Bluetooth
®
de 100 pies: la diversión lo acompañará adonde vaya. Un rango Bluetooth
de 100 pies le permite caminar por todos lados en una fi esta sin perder ni una nota.
Con un sonido tan sorprendente que lo puede estremecer, el Bullfrog supera a la competencia.
Félicitations ! Vous êtes le fi er nouveau propriétaire d’un système audio KICKER Bullfrog.
Que vous fassiez la fête avant un match, créiez une ambiance pour une soirée intime à la maison,
ou souhaitiez simplement vous détendre dans votre quotidien, le système KICKER Bullfrog vous
aidera à animer votre vie ! Le système Bullfrog comprend :
• KICKER Connect - Notre application mobile pour déverrouiller et contrôler toutes les puissantes
fonctionnalités de votre Bullfrog.
• Son 360° - Des haut-parleurs des deux côtés pour sonoriser la pièce entière !
• Double-Kick
™
- Vous avez besoin de plus de puissance ? Jumelez deux Bullfrog ! Utilisez
KICKER Connect, ou les paramètres de votre matériel, pour ajouter un autre Bullfrog à votre
chœur.
• Certifi é IP67 - Utilisez votre Bullfrog sur votre bateau, au bord d’un lac ou sur votre terrasse,
sa robustesse est certifi ée. Vous pouvez désormais écouter ce que vous voulez, partout où
vous le souhaitez.
• Portée Bluetooth
®
de 30 m - Où que vous alliez, le fun vous accompagne. Une portée
Bluetooth
®
de 30 mètres vous permet de faire le tour de la fête sans manquer une note.
Avec un son qui vous donne envie de chanter, le Bullfrog écrase ses concurrents.

3
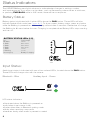
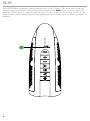
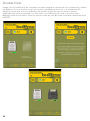
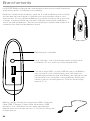
Input Status:
Audio input status is indicated with one of two colored LEDs, located above the PAIR button.
These LEDs will change color with the source:
Bluetooth - Blue Auxiliary Input - Green
Status Indicators
The KICKER Bullfrog uses light indicators to acknowledge changes in settings, modes,
and input response. If no action can be taken, such as decreasing volume when at minimum,
or pressing FWD/BACK while in AUX mode, there will be no response.
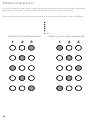
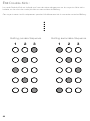
Battery Status:
Battery status is indicated with 5 white LEDs above the PAIR button. These LEDs will also
indicate Double-Kick mode (see Pages 6–7). To show current battery status, press any button
while the Bullfrog is powered on. Status display will end after 5 seconds. Remember to charge
the Bullfrog for 6 hours before fi rst use. Charging is complete when Battery LEDs stop counting
and turn off.
{
BATTERY STATUS LEDs (1-5)
Off Full Charge
All Solid >80%
4 Solid 60%–80%
3 Solid 40%–60%
2 Solid 20%-40%
1 Solid <20%
1 Blinking <10%
Counting Up Battery Charging
AUX
}
LED status indicators:
• illuminated when the Bullfrog is powered on
• solid when input source is set
• fl ashes blue when in Bluetooth pairing mode
• blinks when receiving commands
• breathes slowly when audio is paused or muted

4
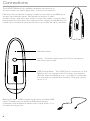
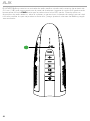
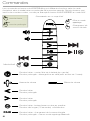
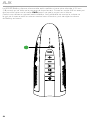
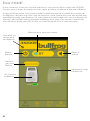
Connections
The KICKER Bullfrog has multiple hardware connections to
accommodate any audio application, indoors and outdoors.
Peel back the protective covering located on the side of the Bullfrog to
access the hardware panel. Remember to replace it when
fi nished. When operating near water or other risky areas, you are solely
responsible for maintaining the water-resistant integrity of the Bullfrog. All
connections should be removed and the cap should be tightly secured.
Hardware reset
Line In - Provides audio input via 3.5mm connection
with AUX input mode.
USB Charge Bank - The USB Type A connection on the
Bullfrog acts as a power bank to charge your external
devices when the Bullfrog is on, or power is connected.
It is also used to update the fi rmware. Charging current
up to 2.1A.
Bullfrog Charge - USB charging input using included USB
cable. Charge using an existing USB power supply,
computer or other external device with charge bank. 2.1A
for optimal charge time.

5
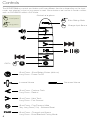
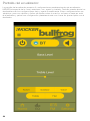
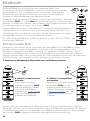
Controls
The KICKER Bullfrog controls and buttons will have different functions depending on the input
mode, and whether a short or long press is used. Some buttons are inactive in certain modes,
such as FWD/BACK while in AUX mode.
1S
Controls at a glance
Short Press - Show Battery Status (while on)
Long Press - Power On/Off
Increase Volume
PAIR
Decrease Volume
Short Press - Previous Track
Long Press - Rewind
Short Press - Next Track
Long Press - Fast Forward
Short Press - Play/Pause or Mute
Very Long Press (10s) - Software Reset
Short Press - Change Input Source
Long Press - Enter Bluetooth Pairing Mode
Off/On
Change Input Source
Enter Pairing Mode
1S
1S
short press
long press
1
S
sh
ort pres
s
long pres
s

6
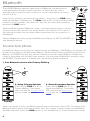
Bluetooth
The KICKER Bullfrog supports audio input via Bluetooth transfer protocol.
It will remember and auto-connect with up to 5 audio devices. Use a
software reset to wipe the auto-connect list, or pair more devices to bump
the last one off.
Enter Pairing mode by performing a long press (1 second) of the PAIR button
while the speaker is powered on. The Blue source LED will fl ash while in pairing
mode for up to 2 minutes, then time-out. You may also exit pairing mode by
pressing the PAIR button.
When the Bullfrog enters Bluetooth mode, it will automatically begin to search
for and connect with the last connected device. If that device is not found, it
will continue to search for the other saved connections until a connection is
established.
When in Bluetooth Pairing mode, the Bullfrog will display as “BF100 KICKER” on
your Bluetooth device.
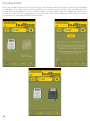
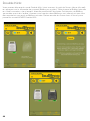
Double-Kick Mode:
Double-Kick allows you to play your audio through two Bullfrogs. One Bullfrog, the Primary, will
broadcast the audio to the Secondary Bullfrog. Audio and EQ settings applied by the Primary
Bullfrog, or KICKER Connect app, will be mirrored on the Secondary Bullfrog. Double-Kick
mode is compatible with all audio input sources. You may enter Double-Kick mode by using
the KICKER Connect app, or manually with the following button sequence.
1. Pair Bluetooth device with Primary Bullfrog
2.
1S
3.
1S
Primary Secondary
2. Setup Primary Speaker
Press & Hold PAIR and ‘+’ on
Primary Bullfrog. The battery
LEDs will indicate Primary mode
with an inside-out pattern.
3. Setup Secondary Speaker
Press & Hold PAIR and ‘–’ on
Secondary Bullfrog. The battery
LEDs will indicate Secondary
mode
with an outside-in pattern.
When successful, the Primary Bullfrog should have a solid input source LED. The Secondary
Bullfrog should have all input source LEDs solid. Any volume changes made on one Bullfrog
will effect the other. Press the PAIR button, or turn the Bullfrog off, to exit Double-Kick mode.
=
1S

7
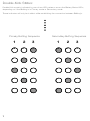
Double-Kick Status:
Double-Kick mode is indicated by one of two LED patterns across the Battery Status LEDs,
depending on if the Bullfrog is in Primary mode or Secondary mode.
These indicators will only be in effect while establishing the connection between Bullfrog’s.
Primary Bullfrog Sequence Secondary Bullfrog Sequence
112233

8
AUX
The KICKER Bullfrog features auxiliary audio input via the 3.5mm (1/8”) input jack located on
the hardware panel. Enter AUX mode by short pressing the PAIR button until the green LED is
selected. When using an external audio device, it is best to turn up the volume or gain on the
audio source to the highest level possible without distortion, then adjust the Bullfrog volume as
needed.

9
Power Saver Mode:
If no audio is detected for 10 minutes, the Bullfrog will automatically enter Power Saver mode
while in Bluetooth and AUX modes.
Auto Turn-Off:
Auto Turn-off is disabled while using the USB Charge Bank, or when charging. The Bullfrog will
enter OFF mode after 1 hour. It must be turned back on for the KICKER Connect App to work.
Hardware Reset:
A hardware reset allows the speaker to recover from unexpected issues. If the speaker
becomes unresponsive, momentarily press the reset button on the side of the speaker using a
paperclip.
Factory Reset:
Factory reset restores the speaker back to the way it was shipped to you. This can be useful
to reset the equalizer and volume levels to default, and can help resolve issues with Bluetooth,
or with the Kicker Connect app. To perform a factory reset, turn the speaker on and press and
hold the Play button for 10 seconds, or until the LEDs turn off.

10
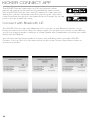
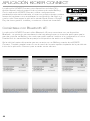
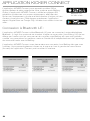
KICKER CONNECT APP
The KICKER Connect application for iOS and Android mobile
devices will unlock the full potential of your Bullfrog audio system.
With the KICKER Connect app, use EQ presets or make your own
adjustment, perform hardware tasks like a factory reset, and much
more! Download the app from the Apple Store or Google Play for free,
install it and get started right away.
Connect with Bluetooth LE:
The KICKER Connect app uses Bluetooth LE to connect to your Bluetooth device, a Low
Energy transfer protocol that does not stream audio, but still gives you control of your Bullfrog,
so you can make changes to settings or initiate Double Kick independent of pairing your audio
device with the Bullfrog.
You will automatically be prompted to connect with a Bullfrog when you open KICKER
Connect. You can also click the menu at the top left of the Connect App Home screen to
access this window.
tap one

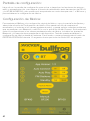
11
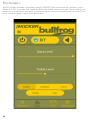
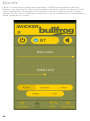
Power
On/Off
Connect or
Disconnect
Bullfrogs
Select Input Source
Adjust
Volume
Show Bullfrog
Versions
Update your
Bullfrog
Start Double Kick
Mode
HOME Screen:
At any time and from any screen, you can use KICKER Connect to change input sources,
adjust the volume, or turn the Bullfrog on and off.
From the Home screen, you can check the battery life and versions of your Bullfrogs, initiate
updates, or use Double Kick to play audio through two Bullfrogs via Bluetooth. If you are
using Double Kick, any EQ or volume adjustments will be mirrored to the secondary Bullfrog.
No matter what input source you’re using, BT or AUX, Double Kick is available.

12
Double Kick:
You may initiate Double Kick at any time from the Home screen by tapping the empty silhouette
of a Bullfrog. This will place the Primary Bullfrog in connect mode, where it will wait 60 seconds
for the Secondary Bullfrog to be initialized before time out. Make sure both Bullfrogs are turned
on and that you are both paired and connected with the Primary Bullfrog. Follow the on-screen
instructions to complete KICKER Double Kick.

13
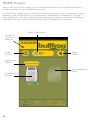
EQ Screen:
The EQ Screen features 5 equalizer presets: KICKER (The House Special), Outdoor, Voice,
Treble, and Flat. You may also adjust the Bass and Treble sliders manually. These settings are
subjective, but are quick and easy to adjust on the fl y, so don’t hesitate to pull up the EQ and
tap a preset or make a quick slide adjustment.

14
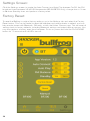
Settings Screen:
Click the Settings screen to toggle the Auto Connect and Auto Play features On/Off, the FM
broadcast band between US and EU frequencies (BF400/BF200 only), change from a 1-hour
to 36-hour Standby timer, and perform a factory reset.
Factory Reset:
To reset the Bullfrog to original factory settings, go to the Settings tab and select the Factory
Reset button. This can be useful to reset the equalizer and volume levels to default, and can
help resolve issues with Bluetooth, FM radio, or with the Kicker Connect app. This will reset all
settings back to factory defaults, including Bluetooth settings and paired device memory. You
may also perform a factory reset from hardware. To do so, press and hold the PLAY/PAUSE
button for 10 seconds until all LEDs turn off.

15
Troubleshooting
Speaker will not turn on:
• Hold the Power button.
• Make sure that the power cord has been plugged directly into a known-good wall outlet.
• Press the reset button inside the hardware panel using a paperclip or safety pin.
Bluetooth device will not connect:
• On your mobile device:
• Turn Bluetooth off, then on again.
• Remove ‘BF100 KICKER’ from the Bluetooth menu. Then pair again (see page 6).
• Move your mobile device closer to the speaker. Avoid obstacles that may block the wireless signal.
• If problems persist, follow the directions below to factory reset the speaker.
Double-Kick will not engage Primary/Secondary:
• Follow the instructions to manually enter Double-Kick mode on page 6.
• If problems persist, follow the directions below to factory reset both primary and secondary
speakers.
Factory Reset:
• With the Bullfrog turned on, press and hold the PAIR button for 10 seconds until all LEDs turn off.
This will reset all settings back to factory defaults, including Bluetooth settings and paired device
memory.
No Sound:
• Turn the speaker off, then back on again.
• Press the PAIR button until the status LEDs show the correct input mode.
Blue = Bluetooth; Green = AUX.
• Increase the volume on the speaker and on the mobile device.
• Check that music is playing on the mobile device.
• If problems persist, follow the directions above to factory reset the speaker.
Bluetooth Mode:
• Check that the status LED is solid blue.
• Open the Bluetooth menu on the mobile device, and check that ‘BF100 KICKER’ shows
connected.
• Begin playing music on mobile device. Set audio output to Bluetooth.
• Move your mobile device closer to the speaker. Avoid obstacles that may block the wireless
signal.
AUX Mode
• Check that the status LED is solid green.
• Begin playing music on mobile device. Set audio output to headphones.
• Push PLAY/PAUSE button to ensure speaker is not muted.
• Ensure the 3.5mm AUX cable is fully plugged into the AUX IN connector of the speaker’s side
hardware panel.
• The 3.5mm AUX cable may be bad. Try a new cable.
KICKER Connect cannot connect to Bullfrog:
• Confi rm mobile device compatibility. You must be running iOS 8.0 or Android 4.3 and newer
• Check that the speaker is turned on and charged.
• Only one mobile device may be connected to the speaker at a time. Check that a 2nd device is not
already connected.
• Restart the mobile device, and try again.
Portable device will not charge from the USB port:
• Check that the speaker is turned on.
• Check that speaker is charged by attaching a power cord to the speaker.
• Check that you are using a known-good charge cable.
• Restart the speaker and the mobile device (if possible), and then try again.

16
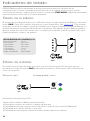
Estado de entrada:
El estado de la entrada de audio se indica con una de dos luces LED de color que se
encuentran al lado del botón PAIR (Fuente/Sincronización). Estas luces LED cambiarán de
color con la fuente:
Bluetooth: azul Entrada auxiliar: verde
Indicadores de estado
KICKER Bullfrog utiliza indicadores luminosos para reconocer los cambios en las
confi guraciones, modos y respuesta de entrada. Si no se puede tomar ninguna acción,
como bajar el volumen cuando está al mínimo, o presionar FWD/BACK (adelantar/retroceder)
mientras está en modo AUX, no habrá respuesta.
Estado de la batería:
El estado de la batería se indica con 5 LED blancas en la parte superior del Bullfrog, arriba del
botón PAIR. Estas LED también indicarán el modo Double-Kick (ver página 19). Para mostrar
el estado actual de la batería, presione cualquier botón mientras esté encendido el Bullfrog. La
pantalla de estado se apagará después de 5 segundos. Recuerde cargar el Bullfrog durante
6 horas antes de usarlo por primera vez. La carga está completa cuando las luces LED de la
batería fi
nalizan el conteo y se apagan.
LED DE ESTADO DE LA BATERÍA (1-5)
Todas constantes >80%
4 constantes 60%–80%
3 constantes 40%–60%
2 constantes 20%-40%
1 constante <20%
1 parpadeante <10%
Carga ascendente de la batería
Indicadores de estado por LED:
• Iluminadas cuando el Bullfrog está encendido
• Constantes cuando se conecta la fuente de entrada
• Parpadeantes en azul cuando se encuentra en modo de sincronización Bluetooth
• Parpadeantes cuando reciben comandos
• Parpadeantes lentamente cuando el audio está en pausa o en silencio
{
AUX
}

17
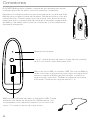
Conexiones
El KICKER Bullfrog tiene múltiples conexiones de hardware para admitir
cualquier aplicación de audio, ya sea en interiores o exteriores.
Desprenda la cubierta protectora que se encuentra en la parte lateral del
Bullfrog para acceder al panel de hardware. Recuerde volver a colocarla
cuando termine. Cuando opere cerca del agua u otras áreas de riesgo,
usted será el único responsable de mantener la integridad impermeable
del Bullfrog. Se deben retirar todas las conexiones y la tapa debe estar
fi rmemente asegurada.
Reajuste de hardware
“Line In”: ofrece entrada de audio a través de una conexión
de 3.5 mm con el modo de entrada AUX.
Banco de carga USB: la conexión USB Tipo A en el Bullfrog
actúa como banco de potencia para cargar sus dispositivos
externos cuando el Bullfrog está encendido, o cuando la
potencia está conectada. También se utiliza para actualizar
el fi rmware. Corriente de carga de hasta 2.1 A.
Bullfrog carga: Entrada de potencia que utiliza USB. Cargue
utilizando una fuente de alimentación USB existente, una
computadora u otro dispositivo externo con un banco de
cargo. 2.1A para un tiempo de carga óptimo.

18
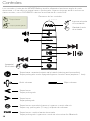
Controles
Los controles y botones del KICKER Bullfrog tendrán diferentes funciones según el modo
de entrada, o si se utiliza un toque breve o prolongado. Algunos botones están inactivos en
ciertos modos, como FWD/BACK mientras se encuentra en modo AUX.
1S
Resumen de los controles
Toque breve
Toque prolongado
Toque breve: muestra el estado de la batería (mientras está encendido)
Toque prolongado: modo Apagado/ingresar a modo Pausa (expira en 1 hora)
Subir volumen
Bajar volumen
Toque breve
Toque prolongado
Toque breve
Toque prolongado
Toque breve: reproducir/pausar o ingresar a modo silencio
Toque muy prolongado (10 seg.): reajuste de software
Toque breve: cambiar fuente de entrada
Toque prolongado: ingresar en modo de sincronización Bluetooth
Cambiar fuente
de entrada
Ingresar al modo
sincronización
Apagado/
Encendido
1
S
Toque brev
e
T
oque pro
l
onga
d
o
1S
1S
PAIR

19
Bluetooth
El KICKER Bullfrog admite entrada de audio a través del protocolo de
transferencia de Bluetooth. Recordará y conectará automáticamente a un
máximo de 5 dispositivos de audio. Utilice un reajuste de software para borrar
la lista de conexión automática, o sincronice más dispositivos para borrar el
último.
Ingrese al modo Sincronización al presionar de manera prolongada (1 segundo)
el botón PAIR. La luz LED de fuente azul parpadeará mientras esté en modo
sincronización hasta 2 minutos, luego caducará. También puede salir del modo
sincronización presionando el botón PAIR.
Cuando el Bullfrog ingrese al modo Bluetooth, automáticamente comenzará a
buscar y se conectará con el último dispositivo conectado. Si no se encuentra
ese dispositivo, seguirá buscando las demás conexiones guardadas hasta que
se establezca una conexión.
Cuando se encuentre en modo Sincronización, el Bullfrog se mostrará como
“BF100 KICKER” en su dispositivo con Bluetooth.
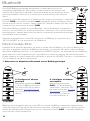
Modo Double-Kick:
Double-Kick le permite reproducir su audio a través de dos Bullfrog. Uno de los Bullfrog, el
principal, trasmitirá el audio en el Bullfrog secundario. Los ajustes del audio y del ecualizador
aplicados al Bullfrog principal, o a la aplicación KICKER Connect, se reproducirán en el Bullfrog
secundario. El modo Double-Kick es compatible con todas las fuentes de entrada de audio.
Puede ingresar al modo Double-Kick utilizando la aplicación KICKER Connect, o manualmente
con la siguiente secuencia de botones.
1. Sincronice el dispositivo Bluetooth con el Bullfrog principal
Principal Secundario
2. Confi gure el altavoz
principal
Mantenga presionado PAIR
y "+" en el Bullfrog principal.
Las luces LED de la batería
indicarán el modo Principal
con un patrón de activación
directa.
3. Confi gure el altavoz
secundario
Mantenga presionado
PAIR y "–" en el Bullfrog
secundario. Las luces LED
de batería indicarán el modo
Secundario con un patrón
de activación indirecta.
Una vez realizado, el
Bullfrog principal debería tener una luz LED constante. El Bullfrog secundario debería tener
todas las luces LED de fuente de entrada constantes. Cualquier cambio de volumen que se
realice en el Bullfrog tendrá efecto en el otro. Presione el botón P
AIR, o apague el Bullfrog,
para salir del modo Double-Kick.
=
1S
2.
1S
3.
1S
La page charge ...
La page charge ...
La page charge ...
La page charge ...
La page charge ...
La page charge ...
La page charge ...
La page charge ...
La page charge ...
La page charge ...
La page charge ...
La page charge ...
La page charge ...
La page charge ...
La page charge ...
La page charge ...
La page charge ...
La page charge ...
La page charge ...
La page charge ...
La page charge ...
La page charge ...
La page charge ...
La page charge ...
La page charge ...
La page charge ...
La page charge ...
-
 1
1
-
 2
2
-
 3
3
-
 4
4
-
 5
5
-
 6
6
-
 7
7
-
 8
8
-
 9
9
-
 10
10
-
 11
11
-
 12
12
-
 13
13
-
 14
14
-
 15
15
-
 16
16
-
 17
17
-
 18
18
-
 19
19
-
 20
20
-
 21
21
-
 22
22
-
 23
23
-
 24
24
-
 25
25
-
 26
26
-
 27
27
-
 28
28
-
 29
29
-
 30
30
-
 31
31
-
 32
32
-
 33
33
-
 34
34
-
 35
35
-
 36
36
-
 37
37
-
 38
38
-
 39
39
-
 40
40
-
 41
41
-
 42
42
-
 43
43
-
 44
44
-
 45
45
-
 46
46
-
 47
47


Kicker Bullfrog BF100 Le manuel du propriétaire
- Catégorie
- Équipement musical supplémentaire
- Taper
- Le manuel du propriétaire
dans d''autres langues
Documents connexes
-
Kicker Bullfrog BF400 Le manuel du propriétaire
-
-
-
Kicker 2019 46KMC3 Le manuel du propriétaire
-
-
-
-
-
Kicker 2017 KXM 5-Channel Amplifier Le manuel du propriétaire
-
Kicker IQ1000.1 Le manuel du propriétaire

