Robot Coupe CL 52 E Operating Instructions Manual
- Catégorie
- Robots culinaires
- Taper
- Operating Instructions Manual

CL 52 e
Robot-Coupe
®
USA Inc.
P.O. Box 16625, Jackson, MS 39236-6625
264 South Perkins St., Ridgeland, MS 39157
e-mail: [email protected] - website: www.robotcoupeusa.com
Phone : 1-800-824-1646


1
english
OPERATING INSTRUCTIONS
MANUAL DE INSTRUCCIÓN
NOTICE D’INSTRUCTION
We reserve the right to alter at any time without notice the technical specifications of this appliance.
None of the information contained in this document is of a contractual nature. Modifications may be made at any time.
© All rights reserved for all countries by: ROBOT-COUPE s.n.c.
Nos reservamos el derecho de modificar en todo momento y sin previo aviso las características técnicas de este aparato.
Las informaciones que figuran en este documento no son contractuales y pueden ser modificadas en todo momento.
© Todos los derechos reservados para todos los países por : ROBOT-COUPE s.n.c.
Nous nous réservons le droit de modifier à tous moments et sans préavis les caractéristiques techniques de cet appareil.
Les informations figurant dans ce document ne sont pas contractuelles et peuvent être modifiées à tout moment.
© Tous droits réservés pour tous pays par : Robot-Coupe s.n.c.
ESPAGNOL
FRANÇAIS

2
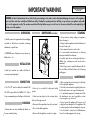
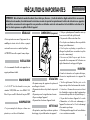
WARNING: In order to limit accidents such as electric shocks, personal injury or fire, and in order to limit material damage due to misuse of the appliance,
please read these instructions carefully and follow them strictly. Reading the operating instructions will help you get to know your appliance and enable
you to use the equipment correctly. The operation manual should be kept within easy access to all users for reference and should be read completely by all
first time users of the machine.
IMPORTANT WARNING
WARNING
Keep these instructions
in a safe place
UNPACKING
• Carefully remove the equipment from the packaging
and take out all the boxes or packets containing
attachments or specific items.
• WARNING-some of the parts are very sharp e. g.
blades, discs… etc.
INSTALLATION
• Install your machine on a stable solid base of
convenient operating height.
CONNECTION
• The CL 52 "E" must be attached to standard 120
Volt 60 Hz grounded outlet NEMA 5-15. Robot
Coupe recommends ground fault type outlet be used.
HANDLING
• Always take care when handling the blades, as
they are extremely sharp.
USE
• Never try to override the locking and safety
systems.
• Never insert any object into the container where
the food is being processed.
• Never push the ingredients down with your hand.
• Do not overload the appliance.
• Never switch the appliance on when it is empty.
CLEANING
• As a precaution, always unplug your appliance
before cleaning it.
• Always clean the appliance and its attachments at
the end of each cycle.
• Never immerse the motor unit in water.
• For parts made from aluminum, use cleaning
detergents intended for aluminum.
• For plastic parts, do not use detergents that are too
alkaline (e.g., containing too much caustic soda or
ammonia).
• Robot-Coupe can in no way be held responsible for
the user’s failure to follow the basic rules of cleaning
and hygiene.
MAINTENANCE
• Before opening the motor housing, it is absolutely
vital to unplug the appliance.
• Check the seals and washers regularly and ensure
that the safety devices are in good working order.
• It is particularly important to maintain and check
the attachments since most vegetables contain
corrosive agents, e.g. citric acid.
• Never operate the appliance if the power cord
or plug has been damaged or if the appliance fails
to work properly or has been damaged in any way.
• Do not hesitate to contact your local Maintenance
Service if something appears to be wrong.
DIMENSIONS (in inches)
27“
14“
13“

3
english
SUMMARY
WARRANTY
IMPORTANT WARNING
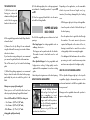
INTRODUCTION TO YOUR NEW
VEGETABLE PREPARATION MACHINE
CL 52 "E" Version
SWITCHING ON THE MACHINE
THE LEVER-OPERATED HOPPER
AND ITS TOOLS
HOPPER USE AND DISC CHOICE
CLEANING
MAINTENANCE
• Motor seal
• Blades and plates
• Grating discs
TECHNICAL SPECIFICATIONS
• Weight
• Working height
• Noise level
SAFETY
SERVICE
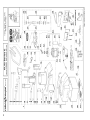
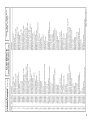
TECHNICAL DATA (page 27)
• Exploded views
• Electric and wiring diagrams

4
THE FOLLOWING ARE NOT
COVERED BY THE ROBOT COUPE
U.S.A., Inc. LIMITED WARRANTY:
1 -
Damage caused by abuse, misuse,
dropping, or other similar damage caused by
or resulting from failure to follow assembly,
operating, cleaning, user maintenance or
storage instructions.
2 - Labor to sharpen and/or replacements for
blades that have become blunt, chipped or worn
after a normal or excessive period of use.
3 - Materials or labor to replace or repair
scratched, stained, chipped, pitted, dented or
discolored surfaces, blades, knives, attachments
or accessories.
4 - Any alteration, addition, or repair that
has not been carried out by the company or an
approved service agency.
5 - Transportation of the appliance to or from
an approved service agency.
6 - Labor charges to install or test new
attachments or accessories (i.e., bowls, plates,
blades, attachments), which have been replaced
for any reason.
7 - The cost of changing direction-of-rotation
of three-phase electric motors (Installer is
responsible).
8 - SHIPPING DAMAGES. Visible and/or
hidden damage is the responsibility of the freight
carrier. The consignee must inform the carrier
and consignor immediately, or upon discovery in
the case of hidden defects.
KEEP ALL ORIGINAL CONTAINERS AND
PACKING MATERIALS FOR CARRIER
INSPECTION.
Neither ROBOT COUPE U.S.A., Inc. nor its
affiliated companies or any of its distributors,
directors, agents, employees, or insurers will be
liable for indirect damage, losses, or expenses
linked to the appliance or the inability to use it.
The ROBOT COUPE U.S.A., Inc. warranty is
given expressly and in lieu of all other
warranties, expressed or implied, for
merchantability and for fitness toward a
particular purpose and constitutes the only
warranty made by ROBOT COUPE U.S.A., Inc.
YOUR NEW ROBOT COUPE PRODUCT
IS WARRANTED TO THE ORIGINAL
PURCHASER FOR A PERIOD OF ONE
YEAR FROM THE DATE OF PURCHASE.
This LIMITED WARRANTY is against
defects in the material and/or
workmanship, and includes labor
for replacement of defective parts,
provided repairs are performed by
an authorized service agency (see
attached list).
The Customer must inform the Service
Agency of the possibility of warranty
coverage and provide a copy of the
dated sales or delivery receipt BEFORE
WARRANTY REPAIRS ARE BEGUN.
Replacement parts and accessories are
warranted for ninety (90) days from
the date of purchase when purchased
separately and will be verified by
dated sales receipt OR packing slip
which lists that item.
All parts or accessories replaced under
warranty must be returned to the
Service Agency.
ROBOT COUPE U.S.A., Inc. LIMITED WARRANTY

5
english
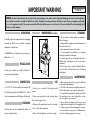
WARNING: In order to limit accidents such as electric shocks, personal injury or fire, and in order to limit material damage due to misuse of the appliance,
please read these instructions carefully and follow them strictly. Reading the operating instructions will help you get to know your appliance and enable
you to use the equipment correctly. The operation manual should be kept within easy access to all users for reference and should be read completely by all
first time users of the machine.
IMPORTANT WARNING
WARNING
Keep these instructions
in a safe place
UNPACKING
• Carefully remove the equipment from the packaging
and take out all the boxes or packets containing
attachments or specific items.
• WARNING-some of the parts are very sharp e. g.
blades, discs… etc.
INSTALLATION
• Install your machine on a stable solid base of
convenient operating height.
CONNECTION
• The CL 52 "E" must be attached to standard 120
Volt 60 Hz grounded outlet NEMA 5-15. Robot
Coupe recommends ground fault type outlet be used.
HANDLING
• Always take care when handling the blades, as
they are extremely sharp.
USE
• Never try to override the locking and safety
systems.
• Never insert any object into the container where
the food is being processed.
• Never push the ingredients down with your hand.
• Do not overload the appliance.
• Never switch the appliance on when it is empty.
CLEANING
• As a precaution, always unplug your appliance
before cleaning it.
• Always clean the appliance and its attachments at
the end of each cycle.
• Never immerse the motor unit in water.
• For parts made from aluminum, use cleaning
detergents intended for aluminum.
• For plastic parts, do not use detergents that are too
alkaline (e.g., containing too much caustic soda or
ammonia).
• Robot-Coupe can in no way be held responsible for
the user’s failure to follow the basic rules of cleaning
and hygiene.
MAINTENANCE
• Before opening the motor housing, it is absolutely
vital to unplug the appliance.
• Check the seals and washers regularly and ensure
that the safety devices are in good working order.
• It is particularly important to maintain and check
the attachments since most vegetables contain
corrosive agents, e.g. citric acid.
• Never operate the appliance if the power cord
or plug has been damaged or if the appliance fails
to work properly or has been damaged in any way.
• Do not hesitate to contact your local Maintenance
Service if something appears to be wrong.
DIMENSIONS (in inches)
27“
14“
13“

6
INTRODUCTION TO
YOUR NEW VEGETABLE
PREPARATION MACHINE
CL 52 "E" Version
The CL 52 is perfectly geared for professional
needs. It can perform a number of tasks, which you
will gradually discover as you use it.
The CL 52 is equipped with a removable lid, metal
bowl and stainless steel motor base. The full moon
hopper is ideal for cutting large products.
For CL 52 a wide range of disk and grids are
available to satisfy even the most demanding chefs
when it comes to cutting up fruit and vegetables,
i.e. slicing, grating, julienne, dicing and French
fries discs. The head has been specially designed to
handle bulky vegetables.
Thanks to its simple design, all components requiring
frequent handling for maintenance or cleaning can
be fitted and removed in a few moments without
special tools.
To make things easier for you, this manual gives a
breakdown of all the various fitting operations.
This manual contains important information
designed to help the user get the most out of this
vegetable preparation machine.
We therefore recommend that you read it
carefully before using your machine.
We have also included a few examples to help you
get the feel of your new machine and appreciate its
numerous advantages.
SWITCHING ON
THE MACHINE
Before plugging in, check that your power supply
corresponds to that indicated on the machine’s
identi fication plate.
The machine comes with a power supply cord
having an integrally molded plug.
The CL 52 should be connected to a grounded:
120 V/ 60 Hz /1 Phase power outlet.
Robot-Coupe recommends a ground fault type
outlet be used.
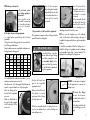
THE LEVER-OPERATED
HOPPER AND ITS TOOLS
This hopper allows you to prepare all types of
vegetables:
- the large feed hopper is used to prepare bulky
vegetables such as cabbage, celery, lettuce, etc.,
- the tube is used to prepare long or fragile fruit or
vegetables.
Two types of tool are designed for the the lever-
operated hopper:
1) the loading cone
Always use the cone except for large
sized vegetables when the removable
divider is not in place.
WARNING
This appliance must be plugged into an
grounded socket (risk of electrocution).
2) Cabbage cutter used to prepare
cabbage and lettuce and to prepare
large sized vegetables such as
potatoes and onions or other
oversized vegetables.
Wrench:
Use this tool to safely remove the
cabbage cutter.
❶ Assembly
With the motor unit
facing you, slot the black
or white ejection tool
onto the drive shaft and
check that it is correctly
positioned at the bottom
of the bowl.
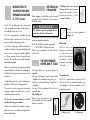
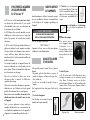
Two ejection tools:
The CL 52 is supplied with two ejection tools. The
white ejector has been specially designed to cope
with cabbage. For all other vegetables, use the
black discharge plate.
Discharge plateCabbage ejector

7
english
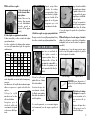
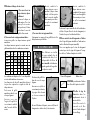
You will find all the combinations marked
•
on our
machines and accessories price list.
The dimensions of the dicing grid should always be
equal to or greater than those of the slicing disc.
Place the dicing grid in
the bowl of the vegetable
processor.
Make sure that the tab on
the grid is fully engaged
in the locking slot of the
motor unit.
❷
Position your chosen disc:
a) If you have opted
for a slicing, grating or
julienne disc:
position the disc on the
motor shaft. To ensure that
it is correctly positioned,
turn it in a clockwise
direction.
b) You have chosen a dicing equipment:
i.e. a grid and a special slicing disc for diced
vegetables.
Slicing discs and dicing grids can be mounted in
the following combinations:
Gray shaded areas are acceptable combinations of
slicing plate plus dicing grid.
Position the French fries
grid in the vegetable
preparation bowl.
Make sure that the French
fries plate is correctly
positioned in the locking
slot of the motor unit.
When the removable divider is in place, there is no
need to use additional tools, such as loading cone
and cabbage cutter.
Next, fit the correspon-
ding slicing disc (straight-
edged blade) and rotate
in a clockwise direction to
ensure that it is correctly
positioned.
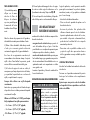
c) If you want to use the French fries equipment:
This equipment comprises a French fries grid and a
special French fries slicing disc.
WARNING
To avoid build-up of product
between disk and grid cutting
French fries, remember to insert
the removable divider in the
hopper and load the potatoes
into the left-hand compartment
(see photo opposite).
CAUTION: use the wrench supplied
with the appliance to remove the
cabbage corer.
❹
Insert the hinge
pin into the locations
provided at the back of
the motor base.
The locking handle should
now be facing you, on the
right.
Loading cone Cabbage cutter
Next fit the French Fry
slicing disk and rotate in
a clockwise direction to
check that it is correctly
positioned.
Fit the removable divider
into the feel lid when the
French Fry kit is used. Do
not use loading cone or
cabbage cutter with French Fry cutter.
❸
Then, screw the loading cone or the cabbage
cutter onto the motor shaft according to the type of
vegetable to be prepared (unless using the removable
divider).
It should be remembered that the loading cone is
suitable for all types of vegetables except for cabbage
and vegetables larger than 3 inches diameter. The
cabbage cutter is designed for that purpose.
Slicer
5x5 mm
(3/16”x 3/16”)
8x8 mm
(5/16”x 5/16”)
10x10 mm
(3/8”x 3/8”)
14x14 mm
(9/16”x 9/16”)
20x20 mm
(25/32”x 25/32”)
25x25 mm
(1”x 1”)
5 mm
(3/16”)
• • • • • •
8 mm
(5/16”)
• • • • • •
10 mm
(3/8”)
• • • • • •
14 mm
(9/16”)
• • • • • •
20 mm
(25/32”)
• • • • • •
25 mm
(1”)
• • • • • •
Dicing grid

8
WARNING
To avoid buildup between
disk and grid cutting French
fries, remember to insert
the removable divider in the
hopper and load the potatoes
into the left-hand compartment
(see photo opposite).
Push with firm pressure to get full slice and
consistent size French fries.
Depending on the application, use the removable
divider to prevent the more fragile ones (e.g.
tomatoes) from being damaged by the loading
cone.
- Fill the hopper right up to the top with vegetables.
- Lower the pusher so that it is flush with the top of
the feed opening.
- Press the pusher down to guide the food through
the machine. The exact amount of pressure
required will depend on the nature of the cut,
bearing in mind that too much force reduces
cutting quality without increasing throughput.
- Cut cabbages in half and remove the core before
processing, in order to avoid unnecessary strain
and ensure an end-product of a higher quality.
HOW TO USE THE CYLINDRICAL HOPPER
Fill the cylindrical hopper right up to the top with
vegetables. Apply a downwards pressure on the
pusher and maintain it until all the vegetables have
been processed.
Always press the vegetables down with a pusher to
improve cutting efficiency.
4) Fit the discharge plate, disc or dicing equipment
as indicated in “assembly procedures” in points
❶
and
❷
.
5) Close the veg prep lid and lock it onto the motor
unit with the locking handle.
HOPPER USE AND
DISC CHOICE
The lid of the vegetable processor features two feed
openings:
- One large hopper for cutting vegetables such as
cabbage, celeriac, etc...
This hopper can be partitioned with the divider.
This makes it easier to deal with round or oval
vegetables.
- One cylindrical hopper for long vegetables and
high-precision cutting. Cutting quality can be
optimized if the compartment is used as a cutting
guide.
- Raise the pusher to gain access to the feed opening.
HOW TO USE THE LARGE HOPPER
TO CHANGE THE DISC:
1) With the motor unit
facing you, release the
aluminium locking handle
used to lock the veg prep
head onto the motor unit.
Lift the vegetable pre paration head, tilting it back to
release the bowl.
2) Remove the disc by lifting it from underneath
using the hub and if necessary, turn in anti-clockwise
direction to release…
If you have been using a dicing unit, we recommend
you remove the grid and the disc at the same time.
This will be easier if you first rotate the discharge
plate.
3) When fitting dicing equipment, we recommend
that you clean the inside of the bowl with a sponge,
particularly the part onto which the grid is to be
fitted.
Always use a properly cleaned grid.
Never process soft foodstuffs after hard ones
without properly cleaning the grid beforehand.
Use our D-Clean Kit (ref. 39881) to clean your:
- 5 x 5 mm - 3/16” x 3/16” inch,
- 8 x 8 mm - 5/16” x 5/16” inch,
- 10 x 10 mm - 3/ 8” x 3/ 8” inch
dicing grids quickly and easily.

9
english
WARNING
As a precaution, always unplug your
appliance before cleaning it (risk of
electrocution).
After removing the head of the vegetable preparation
machine, take off the disc, followed by the grid and
discharge plate where necessary.
Dishwashers are best avoided in order to prevent
the aluminium parts from becoming tarnished.
Instead we recommend that you clean the machine
and disk by hand using washing-up liquid.
If you do put your machine in a dishwasher, we
suggest that you use a detergent designed specially
for alu minium.
Metal-Safe detergents are available from detergent
suppliers.
Never immerse the motor base in water.
Clean it with a sponge.
CLEANING
IMPORTANT
Check that the detergent you use is suitable
for cleaning aluminium parts. Popular less
expensive washing agents are highly alkaline
(e.g. high caustic soda or ammonia content)
and therefore totally incompatible with alumi-
nium, causing the parts to blacken.
MAINTENANCE
• MOTOR SEAL
The motor seal on the shaft should be lubricated
regularly using a food safe lubricant.
In order to keep the motor completely watertight,
it is advisable to check the motor seal regularly for
wear and tear and replace if necessary.
The motor seal can be easily replaced without
having to remove the motor, so we strongly advise
you to ensure that it is in good condition.
• BLADES AND PLATES
The blades on all our discs and dicing grids are
wearing parts that need to be replaced from time
to time, in order to maintain a constant high cutting
quality.
• GRATING DISCS
Grating discs deteriorate over time. We recommend
you replace them from time to time, in order to
maintain a constant high cutting quality.
TECHNICAL SPECIFICATIONS
• WEIGHT (lbs)
Net Gross
CL 52 "E" complete 56.2 61.7
Average weight
of one disc 1.1 1.3
SLICERS
S 0.8
0.031”
cabbage
S 1
1/32”
carrot/cabbage/cucumber/onion/potato/leek
S 2
5/64”
/ S 3
1/8”
lemon/carrot/mushroom/cabbage/potato/
cucumber/zucchini/onion/leek/bell pepper
S 4
5/32”
/ S 5
3/16”
eggplant/beetroot/carrot/mushroom/
cucumber/bell pepper/radish/lettuce/potato/
leek/tomato
S 8
5/16”
/ S 10
3/8”
egglant/potato/zucchini/carrot
S 14
9/16
potato/zucchini/carrot
RIPPLE CUT SLICER
R 2
5/64”
beetroot/potato/carrot/zucchini
R 3
1/8”
beetroot/potato/carrot/zucchini
R 5
3/16”
beetroot/potato/carrot/zucchini
GRATERS
G 1.5
1/16”
celeriac/cheese
G 7
9/32”
cabbage/cheese
G 2
5/64”
carrot/celeriac/cheese
G 9
11/32”
cabbage/cheese
G 3
1/8”
carrot
Parmesan/chocolate
G 6
1/4”
cabbage/cheese
Radish
JULIENNE
J 2x2
5/64”x 5/64”
carrot/celeriac/potato
J 2x4
5/64”x 5/32”
carrot/beetroot/zucchini/potato
J 2x6
5/64”x 1/4”
carrot/beetroot/zucchini/potato
J 4x4
5/32”x 5/32”
eggplant/beetroot/zucchini/potato
J 6x6
1/4”x 1/4”
eggplant/beetroot/celeriac/zucchini/potato
J 8x8
5/16”x 5/16”
celeriac/potato
DICE
D 5x5
3/16” x 3/16”
carrot/zucchini/cucumber/céleriac
D 8x8
5/16”x 5/16”
potato/carrot/zucchini/beetroot
D 10x10
3/8”x 3/8”
potato/carrot/zucchini/beetroot/turnip/oignon/
apple
D 14x14
9/16”x 9/16”
potato/carrot/zucchini/beetroot/céleri
D 20x20
25/32”x 25/32”
potato/carot/zucchini/pineapple/turnip
D 25x25
1”x 1”
potato/courgette/turnip/apple/melon/
watermelon
FRENCH FRIES
F 8x8
5/16” x 5/16”
potato
F 10x10
3/8” x 3/8”
potato

10
• WORKING HEIGHT
We recommend that you position the CL 52 on a
stable worktop so that the upper edge of the large
feed hopper is at a height of between 46 inches
and 52 inches.
• NOISE LEVEL
The equivalent continuous sound level when the
CL 52 is operating on no-load is less than 70 dB
(A).
SAFETY
The CL 52 is equipped with a magnetic safety
system which stops the motor when either the large
pusher or the feed head is opened.
To restart your machine, relock simply the feed
head.
In addition, the cover locking latch is equipped with
a safety mechanism which prevents the processor
from being used if the cover is not correctly
positioned.
The CL 52 is equipped with a thermal protection
system which automatically stops the motor if it has
been overloaded.
If this happens, allow the machine to cool completely
before restarting.
SERVICE
See warranty first then;
Should your unit requires service, check with your
distributor to see where local service is available.
If not or if you wish your unit to be serviced at the
factory, call for return instructions and ship the unit
prepaid to our factory address.
PH : 1-800-824-1646
Robot-Coupe USA, Inc
Service Department Repair
264 South Perkins Street
Ridgeland, MS 39157
For service in Canada contact the Robot-Coupe
USA factory for repair instructions.
REMINDER
Do not open the feed head until the motor
has come to a complete stop.
Never tamper with the locking and safety
systems.
Never put hand or any object in the bowl
while the machine is operating.
Never force the ingredients down with your
hands always use the food pusher.
WARNING
The discs are very sharp, handle with care.

11
ESPAGNOL
INDICE
GARANTÍA
MEDIDAS IMPORTANTES DE SEGURIDAD
INTRODUCCIÓN A SU NUEVO
CORTA- HORTALIZAS
CL 52 Versión "E"
PUESTA EN SERVICIO DE LA MÁQUINA
LA TOLVA DE PALANCA Y SUS
HERRAMIENTAS
USO DE LAS TOLVAS Y
ELECCIÓN DE LOS DISCOS
LIMPIEZA
MAINTENIMIENTO
• Junta hermetica
• Cuchillas y peines
• Discos ralladores
ESPECIFICACIÓNES TECNICAS
• Peso
• Altura de trabajo
• Nivel de ruido
SEGURIDAD
NORMAS
DATOS TÉCNICOS (Página 27)
• Vista detallada
• Esquemas eléctricos y de cableado

12
LA GARANTÍA LIMITADA DE ROBOT-COUPE U.S.A., Inc.
LA GARANTíA NO CUBRE LOS
SIGUIENTES PUNTOS:
1 - Cualquier deterioro del material derivado de
una utilización incorrecta o inadecuada o de la
caída del aparato o cualquier deterioro del mismo
tipo derivado o resultante de una mala aplicación
de las instrucciones (montaje mal efectuado, error
de funcionamiento, limpieza y/o mantenimiento
inadecuado, ubicación inadecuada, etc.).
2 - Las piezas de sustitución de un conjunto de
elementos del montaje de una cuchilla y/o la
mano de obra para afilar las hojas desafiladas,
deterioradas o gastadas tras un cierto tiempo de
utilización considerado normal o excesivo.
3 - Las piezas y/o la mano de obra para cambiar
o reparar las superficies rayadas, manchadas
deterioradas abolladas o descoloridas, las hojas,
cuchillas o los accesorios.
4 - El transporte del aparato al servicio posventa
agregado para la reparación.
5 - Los costes de mano de obra para instalar
o probar las piezas o accesorios (cubas, discos,
hojas ...) sustituidos arbitrariamente.
6 - Los costes derivados del cambio de sentido
de rotación de los motores eléctricos trifásicos (LA
RESPONSABILIDAD INCUMBE AL INSTALADOR).
7 - LOS DAÑOS DEBIDOS AL TRANSPORTE. La
responsabilidad por los vicios, ya sean visibles u
ocultos, incumbe al transportista. Un informe de
reclamación debe ser inmediatamente rellenado
con el transportista o en cuanto se descubra un
defecto, si se trata de un vicio oculto.
CONSERVE TODAS LAS CAJAS Y EMBALAJES
ORIGINALES que serán examinados durante la
inspección del transportista.
ROBOT-COUPE U.S.A., Inc., ROBOT-COUPE SA
así como todas sus filiales o sociedades afiliadas,
sus distribuidores, agentes, gerentes, empleados
o aseguradores no pueden ser considerados
como responsables de los daños, pérdidas o
gastos indirectos relacionales con la utilización
del aparato o con la imposibilidad de utilizarlo.
La garantía ROBOT-COUPE U.S.A., Inc. se da
expresamente y sustituye enteramente cualquier
otra garantía, escrita o tácita, para la venta y
el uso normal del aparato y constituye la única
garantía hecha por ROBOT-COUPE U.S.A. Inc.
SU NUEVO APARATO ROBOT-COUPE
TIENE UNA GARANTÍA DE UN AÑO A
PARTIR DE LA FECHA DE SU COMPRA:
ESTA GARANTÍA AFECTA ÚNICAMENTE AL
COMPRADOR DE ORIGEN.
LA GARANTÍA SE LIMITA a los defectos
relacionados con el material y/o la
fabricación, e incluye la mano de obra para
la sustitución de las piezas defectuosas,
en el caso en que las reparaciones sean
efectuadas por una estación de servicio
posventa agregado (véase la lista adjunta).
El CLIENTE debe informar el Servicio
Posventa de una eventual cobertura de
garantía y entregar una copia de la factura
o del bono de entrega que menciona la
fecha de compra ANTES DE EMPEZAR LAS
REPARACIONES.
Las piezas de sustitución y los accesorios
están garantizados noventa (90) días
a partir de la fecha de compra cuando
han sido compradas separadamente y se
verifican mediante el impreso de venta
fechado O del recibo de embalaje sobre el
cual figura el inventario de las piezas.
Todas las piezas o accesorios sustituidos
bajo garantía deben ser remitidos al
Servicio Posventa.

13
ESPAGNOL
ATENCION
CONSERVE ESTAS INSTRUCCIONES
ATENCIÓN: A fin de limitar el número de accidentes (cortocircuitos, heridas, etc.) y de reducir los daños materiales debidos a la utilización
inadecuada del aparato, le aconsejamos que lea atentamente las siguientes instrucciones y las siga en todo momento. Este manual le permitirá
conocer mejor su aparato y utilizarlo correctamente. Lea la totalidad de las instrucciones y haga que las lean las personas que podrían utilizar
el aparato.
PRECAUCIONES IMPORTANTES
DESEMBALAJE
• Saque el aparato de su embalaje con cuidado y
saque todas las cajas o los paquetes que contienen
los accesorios o material específico.
• Tenga CUIDADO con los accesorios cortantes
(hojas, discos etc.).
INSTALACIÓN
• Le aconsejamos que coloque su aparato sobre un
soporte totalmente estable.
CONEXIÓN
• El CL 52 "E" debe conectarse a una toma estándar
120V/60 Hz con tierra NEMA 15-5. Robot-Coupe
recomienda usar una toma DDFT.
MANIPULACIÓN
• Manipule siempre los discos y hojas con
precaución, ya que son accesorios cortantes.
UTILIZACIÓN
• Nunca trate de suprimir los sistemas de bloqueo y
de seguridad.
• No introduzca ningún objeto en el recipiente de
trabajo.
• Nunca empujer los alimentos con la mano.
• No sobrecargue el aparato.
• Nunca haga funcionar el aparato en vacío.
LIMPIEZA
• Por precaución, desenchufe siempre el aparato
antes de proceder a las operaciones de limpieza.
• Limpie sistemáticamente el aparato y sus accesorios
al final del ciclo de trabajo.
• No sumerja el bloque motor en el agua.
• Utilice un producto de lavado especial para
aluminio para las piezas de aluminio.
• No utilice un detergente demasiado alcalino (con
una concentración demasiado elevada de soda o
amoníaco) para las piezas de plástico.
• Robot-Coupe nunca podrá ser considerado
responsable en caso de incumplimiento por parte
del usuario de las reglas fundamentales de limpieza
e higiene.
MANTENIMIENTO
• Antes de manipular las partes eléctricas, desconecte
siempre el aparato de la red.
• Verifique periódicamente el estado de las juntas o
de los anillos y el funcionamiento adecuado de los
dispositivos de seguridad.
• El mantenimiento y el examen de los accesorios
deben ser aún más minuciosos si en las preparaciones
se utilizan productos corrosivos (ácido cítrico, etc.).
• No ponga en marcha el aparato si el cable de
alimentación o la clavija están deteriorados, si el
aparato funciona mal o si ha sufrido cualquier tipo
de daño.
• No dude en llamar al servicio de mantenimiento si
observa alguna anomalía.
27“
14“
13“
DIMENSIONES (en pulgadas)

14
SU NUEVO
CORTA-HORTALIZAS
CL 52 Versión "E"
El corta-hortalizas CL 52 es un aparato ideal para
cocinas profesionales. Le rendirá innumerables
servicios que Vd. irá descubriendo a medida que la
utiliza más y más.
El CL 52 está dotado de una tapadera extraíble,
de un recipiente metálico y de un bloque motor de
acero inoxidable. La tolva de media luna permite
preparar alimentos voluminosos.
El modelo CL 52 está equipado de una gama
amplia de discos y rejillas para satisfacer al
más exigente jefe de cocina cuando hay que
cortar frutas y legumbres, a saber rodajas,
cortes ondulados, ralladuras, bastoncillos, tiras,
macedonia y patatas fritas. Su cabezal permite
procesar productos voluminosos.
Gracias a su diseño sencillo, cada componente
que necesita manipulación frecuente para
mantenimiento o limpieza puede ser montado
y desmontado con un movimiento rápido de la
muñeca.
Este folleto da información importante que ayuda al
usuario a beneficiarse al máximo de su inversión en
el corta-hortalizas CL 52.
Por lo tanto le aconsejamos leer detenidamente
este folleto antes de comenzar a utilizar su
máquina.
Contiene también varios ejemplos de preparaciones
que pueden hacerse, para ayudarle a conocer la
máquina más rápidamente y valerse mejor de sus
ventajas.
PUESTA EN SERVICIO
DE LA MÁQUINA
Antes de conectar la máquina a la toma de
corriente, verifique si la del lugar es efectivamente
la indicada en la placa designatoria del motor.
ATENCION
CONECTAR OBLIGATORIAMENTE
EL APARATO A TIERRA (PELIGRO DE ELECTROCUCIÓN).
El CL 52 está equipado con un motor :
120 V / 60 Hz / 1
La máquina viene provista de un cable con clavija
monofásica.
LA TOLVA DE PALANCA
Y SUS HERRAMIENTAS
Este conducto permite trabajar todos los tipos de
legumbres :
- el conducto grande de introdución que sirve para
el trabajo de las legumbres voluminosas de tipo
col, apio, lechuga, etc.,
- el tubo que sirve para trabajar productos largos o
frágiles.
Se han previsto para el conducto con palanquita
dos tipos de herramientas, a saber :
1) el cono de carga
Su uso es necesario cuando se trabaja
sin la separación amovible.
2) el vaciador que sirve únicamente
para el trabajo de la col. Gracias a
esta herramienta, se puede cortar
o rallar una col entera sin que sea
necesario cortarla previamente.
Se ha previsto también una herra-
mienta especial para el desmontaje
de este vaciador.
❶
Fases de montaje
Con el bloque del motor
frente a usted, introducir
el disco expulsor negro o
el expulsor blanco sobre
el eje del motor y verifi-
car que esté en la posi-
ción correcta en el fondo
de la cuba.
2 herramientas de expulsión:
El CL 52 se entrega con dos herramientas de
expulsión, es decir, un disco expulsor negro y un
expulsor blanco especial para la col. Este últi-
mo sirve para efectuar una evacuación de gran
eficacia cuando se corta col. Para los otros
productos, utilizar el disco expulsor negro.
Disco evacuadorExpulsor de col

15
ESPAGNOL
Las combinaciones marcadas con un punto
•
están disponibles en nuestra tarifa de máquinas y
accesorios.
Las dimensiones de la rejilla de macedonia siempre
deben ser superiores o iguales a las del disco
expulsor.
Coloque la rejilla
macedonia en la cuba
del corta hortalizas.
Asegúrese que la
uña de la rejilla está
correctamente encajada
en la muesca del bloque
motor.
❷
Colocar el disco escogido :
a) Si ha seleccionado un
disco de rebanar, rallar o
de tipo julienne:
Colocar el disco en el eje
del motor. Para asegurar
que esté debidamente
colocado, girarlo en
dirección de las agujas
del reloj.
b) Si ha elegido un equipamiento macedonia:
A saber una rejilla y un disco cortador de rodajas
especial macedonia.
Los discos cortadores de rodajas pueden montarse
con una rejilla macedonia según las siguientes
combinaciones:
Colocar la rejilla para
patatas fritas en el tazón
del corta-hortalizas.
Cerció re se de que esté
correctamente colocado,
el rallador para patatas
fritas debe encontrarse al
nivel de expulsión.
Si se usa la separación, no es necesaria ninguna
otra herramienta (cono de carga o expulsor de
col).
Después, encaje el disco
cortador de rodajas
correspondiente (disco
lama derecha) y hágalo
girar en el sentido de las
agujas de un reloj para
asegurarse que está
correctamente colocado.
c) Usted ha escogido un equipo para patatas fritas:
El equipo consta de una rejilla para patatas fritas y
de un disco cortador especial para patatas fritas.
5x5
mm
8x8
mm
10x10
mm
14x14
mm
20x20
mm
25x25
mm
5 mm
• • • • • •
8 mm
• • • • • •
10 mm
• • • • • •
14 mm
• • • • • •
20 mm
• • • • • •
25 mm
• • • • • •
Rejilla macedonia
Cortador de rodajas
ATENCION
Para tener un resultado de
corte óptimo cuando se
preparan patatas fritas, es
indispensable utilizar la
separación amovible e
introducir las patatas por la
parte izquierda de la tolva (ver
la foto).
Cono de carga Expulsor de col
Luego colocar la redondela
apropiada para rebanar
y girarla en dirección de
las agujas del reloj para
asegurar que esté debida-
mente colocada.
Colocar la separación
amovible para preparar
patatas fritas. No utilizar
el cono de carga ni el expulsor de col para hacer
patatas fritas.
❸
Atornillar después el cono de carga o el vaciador
sobre el eje del motor, según el tipo de legumbres
trabajadas. (salvo en caso de usarse la separación
amovible).
Recordamos que el cono de carga conviene para
todos los tipos de legumbres excepto la col, para la
cual se ha previsto el vaciador.
ATENCIÓN: para desmontar el
expulsor de col, usar la llave prevista
con tal fin.
❹
Introduzca el vástago
de bisagra en los espacios
que se encuentran en la
parte posterior del eje
motor.
Bloquear la tapa sobre
el bloque motor con la
manivela de bloqueo.

16
4) Colocar la placa de descarga, el disco o el equipo
de cortar en cubitos según las indicaciones en los
"procedimientos de montaje" bajo notas
❶
y
❷
.
5) Cerrar la tapa del corta-hortalizas y bloquearlo
sobre el bloque motor con la manivela de bloqueo.
USO DE LAS TOLVAS Y
ELECCIÓN DE LOS DISCOS
a cabeza del cortador de hortalizas comprende dos
bocas de introducción:
- una gran boca de introducción que permite el
corte de hortalizas de tipo col, apio... Esta tolva
puede dividirse con una placa de separación para
trabajar con productos redondos y ovalados.
- una boca de introducción de tubo prevista para
las hortalizas largas y que garantiza una precisión
de corte extraordinaria. Esta calidad de corte se ve
optimizada cuando este compartimento se utiliza
como guía de corte.
- Levantar el apretador y liberar la entrada de la
boca de introducción.
UTILIZACION DE LA GRAN BOCA DE INTRODUCCION
PARA CAMBIAR EL DISCO :
1) Frente al bloque motor,
aflojar con la mano
derecha la llave de
bloqueo de aluminio
que sirve para bloquear
la manivela del corta-
hortalizas sobre el bloque
motor.
Alzar la cabeza de preparación de legumbres,
inclinándola hacia atrás para destrabar el tazón.
2) Quitar el disco alzándolo desde abajo usando
el cubo y si es necesario, girarlo en dirección
contraria a las agujas del reloj para destrabarlo...
En el caso de un equipamiento macedonia, le
recomendamos retirar al mismo tiempo el conjunto
rejilla + disco. Para facilitar la operación, puede
servirse del disco evacuador haciéndolo girar.
3) Al colocar el equipo de cortar en cubitos, le
aconsejamos que limpie la parte interior del tazón,
y en particular la parte donde va a colocarse la
rejilla, con paño húmedo o esponja.
Siempre debe utilizar una rejilla limpiada
correctamente.
Jamás tiene que pasar productos blandos después
de productos duros sin haber previamente limpiado
correctamente la rejilla.
Utilizar un kit D-Clean (ref. 39881) para limpiar
fácil y rápidamente las rejillas para macedonia
- 5 x 5 mm - 3/16” x 3/16” pulgada,
- 8 x 8 mm - 5/16” x 5/16” pulgada,
- 10 x 10 mm - 3/ 8” x 3/ 8” pulgada.
ATENCION
Para tener un resultado de corte
óptimo cuando se preparan
patatas fritas, es indispensable
utilizar la separación amovible e
introducir las patatas por la parte
izquierda de la tolva (ver la foto).
Para obtener un resultado de
corte óptimo y constante, ejercer
una presión firme sobre el empujador.
Según la aplicación, usar la separación amovible
para apilar correctamente los productos (patatas,
zanahorias, tomates, etc.) que podrían ser dañadas
por el cono de carga.
- Introducir las hortalizas hasta arriba.
- Volver a colocar el apretador de aplomo con la
boca de introducción.
- Accionar el pulsador. Este pulsador debe
utilizarse solamente para el corte de hortalizas.
La presión aplicada varía en función de los cortes,
pero cuidado: si la presión es demasiado fuerte,
puede afectar la calidad del corte e impedir
aumentar la producción.
- Para cortar coles es preferible cortarlas en dos
y quitar el cogollo duro para evitar esfuerzos
inútiles y garantizar una mejor calidad o producto
terminado.
USO DE LA TOLVA TUBULAR
Introducir las hortalizas hasta arriba de la boca de
introducción.
Presionar con el apretador manteniendo la presión
hasta que las hortalizas estén completamente
cortadas.
Ejerza siempre una presión sobre las hortalizas
con la ayuda de los tacos apretadores con el fin de
evitar cortes fallidos.

17
ESPAGNOL
LIMPIEZA
Después de quitar la cabeza de la máquina de
preparación de legumbres, quitar el disco, luego la
rejilla y la placa de descarga en su caso.
Es mejor evitar el uso del lavavajilla para evitar que el
aluminio pierda su brillo. En cambio, le aconsejamos
que limpie la máquina a mano usando detergente
líquido.
Si de todos modos coloca su máquina en un lavava-
jilla, sugerimos que use detergente específicamente
apropiado para uso en aluminio.
No se debe sumergir la base del motor en agua.
Limpiarla usando paño húmedo o esponja.
IMPORTANTE
Verificar que el detergente esté destinado a
las piezas de aluminio, pues algunos agentes
detergentes demasiado alcalinos (con elevada
concentración de sosa o amoniaco, por
ejemplo) son totalmente incompatibles con el
aluminio y pueden ennegrecer las piezas.
ATENCION
Como medida de seguridad, le aconsejamos
que siempre desconecte la máquina de la red
antes de comenzar la limpieza (peligro de
electrocución).
REBANADORES
Re 0.8
0.031”
col
Re 1
1/32”
zanahoria / col / cebolla / patatas / puerro
Re 2
5/64”
/Re 3
1/8”
limones / zanahoria / champiñones / col / patatas /
pepino / calabaza / cebolla / puero / pimiento
Re 4
5/32”
/Re 5
3/16”
barenjena / betabel / zanahoria / champiñones /
pepino / pimiento / rabano / lechuga / patatas /
tomate
Re 8
5/16”
/Re 10
3/8”
barenjena / patatas / calabaza / zanahoria
Re 14
9/16
patatas / calabaza / zanahoria
REBANADOR ONDulADO
Ro 2
5/64”
betabel / patatas / zanahoria / calabaza
Ro 3
1/8”
betabel / patatas / zanahoria / calabaza
Ro 5
3/16”
betabel / patatas / zanahoria / calabaza
RAllADORES
Ra 1.5
1/16”
apio /queso
Ra 7
9/32”
col / queso
Ra 2
5/64”
zanahoria / apio /queso
Ra 9
11/32”
col / queso
Ra 3
1/8”
zanahoria
Parmesano / chocolate
Ra 6
1/4”
col / queso
Rabano
BAStONcillOS
B 2x2
5/64”x 5/64”
zanahoria / apio / patatas
B 2x4
5/64”x 5/32”
zanahoria / betabel / calabaza /patatas
B 2x6
5/64”x 1/4”
zanahoria / betabel / calabaza /patatas
B 4x4
5/32”x 5/32”
berenjena / betabel / calabaza / patatas
B 6x6
1/4”x 1/4”
berenjena / betabel / apio /calabaza / patatas
B 8x8
5/16”x 5/16”
apio / patatas
MAcEDONiA
M 5x5
3/16” x 3/16”
zanahoria / calabaza / pepino / apio
M 8x8
5/16”x 5/16”
patatas / zanahoria / calabaza / renolocha / hobo
M 10x10
3/8”x 3/8”
patatas / zanahoria / calabaza / renolocha / hobo /
cebolla / manzana
M 14x14
9/16”x 9/16”
patatas / zanahoria / calabaza / renolocha / hobo
M 20x20
25/32”x 25/32”
patatas / zanahoria / calabaza / piña / nabo
M 25x25
1”x 1”
patatas / calabaza / nabo / manzana / melon /
sandía
PAtAtAS fRitAS
f 8x8
5/16” x 5/16”
patatas
f 10x10
3/8” x 3/8”
patatas
MANTENIMIENTO
• JUNTA HERMETICA
Se debe lubricar la junta del eje del motor
regularmente (usar aciete de cocina).
Para asegurar que el motor quede completamente
impermeable, verificar la junta regularmente para
indicaciones de desgaste; reemplazarla si es
necesario.
• CUCHILLAS Y PEINES
Las cuchillas y los peines de todos nuestros discos
son piezas de desgaste que hay que cambiar
periódicamente para disponer siempre de la misma
calidad de corte.
• DISCOS RALLADORES
Los discos ralladores se alteran con el tiempo y se
recomienda cambiarlos de vez en cuando para
conservar la misma calidad de corte.
ESPECIFICACIÓNES
TECNICAS
• PESO (in libra)
Neto Bruto
CL 52 "E" completo 56.2 61.7
Peso medio de
un disco 1.1 1.3

18
ATENCION
Los discos son objetos que cortan.
Hay que manipularlos con precaución.
• ALTURA DE TRABAJO
Le aconsejamos que coloque el modelo CL 52 en
una encimera estable tal que el borde superior
del conducto mayor esté a una altura de entre 46
pulgadas y 52 pulgadas.
• NIVEL DE RUIDO
El nivel equivalente de ruido contínuo al operar el
modelo CL 52 sin carga es menor de 70 dB(A).
SEGURIDAD
El CL 52 esta equipado con un sistema de
seguridad magnética que provoca la parada
del motor en cuanto se abre la gran boca
de introducción o la tapadera, impidiendo así
cualquier acceso al instrumento cortador cuando
este último esta en movimiento.
Al abrirse la tapa, se para la máquina de inmediato.
Para arrancar la máquina de nuevo, sólo hay que
volver a trabar la tapa.
Además, el taco de enclavamiento de la tapa
lleva un dispositivo de seguridad que impide el
funcionamiento del aparato cuando la tapa está
mal colocada.
El CL 52 está equipado con un protector térmico
que para automáticamente el motor en caso de
funcionamiento demasiado prolongado o de exceso
de carga.
Si esto ocurre, dejar enfriarse la máquina por
completo antes de volver a arrancarla.
RECUERDE
Nunca abra la tapa antes de que el motor se
haya parado por completo.
Nunca traten de suprimir los sistemas de
bloqueo y de seguridad.
Sólo introduzca alimentos (nunca objetos) en
las tolvas.
Nunca empuje los alimentos con la mano.
REPARACIÓN
Como primera medida, consulte la garantía.
Si el aparato requiere reparación, pregunte al
distribuidor cuál es el servicio de postventa más
cercano a su domicilio.
En caso de que no encontrar ninguno y si usted
desea que el aparato sea reparado en fábrica,
póngase en contacto con nosotros para obtener
un número de autorización de devolución de
mercancía y envíelo asegurado y con porte pago a
la dirección de la siguiente fábrica :
PH : 1-800-824-1646
Robot Coupe U.S.A. Inc.
Service Department
264 South Perkins St.,
Ridgeland, MS 39157
Para el servicio de postventa en el Canada,
contacta la fabrica de Robot-Coupe
en Estados Unidos.
La page est en cours de chargement...
La page est en cours de chargement...
La page est en cours de chargement...
La page est en cours de chargement...
La page est en cours de chargement...
La page est en cours de chargement...
La page est en cours de chargement...
La page est en cours de chargement...
La page est en cours de chargement...
La page est en cours de chargement...
La page est en cours de chargement...
La page est en cours de chargement...
La page est en cours de chargement...
La page est en cours de chargement...
La page est en cours de chargement...
La page est en cours de chargement...
La page est en cours de chargement...
La page est en cours de chargement...
-
 1
1
-
 2
2
-
 3
3
-
 4
4
-
 5
5
-
 6
6
-
 7
7
-
 8
8
-
 9
9
-
 10
10
-
 11
11
-
 12
12
-
 13
13
-
 14
14
-
 15
15
-
 16
16
-
 17
17
-
 18
18
-
 19
19
-
 20
20
-
 21
21
-
 22
22
-
 23
23
-
 24
24
-
 25
25
-
 26
26
-
 27
27
-
 28
28
-
 29
29
-
 30
30
-
 31
31
-
 32
32
-
 33
33
-
 34
34
-
 35
35
-
 36
36
-
 37
37
-
 38
38


Robot Coupe CL 52 E Operating Instructions Manual
- Catégorie
- Robots culinaires
- Taper
- Operating Instructions Manual
dans d''autres langues
- English: Robot Coupe CL 52 E
- español: Robot Coupe CL 52 E
Documents connexes
-
Robot Coupe CL 55 e Operating Instructions Manual
-
 Robot Coupe CL 40 Operating Instructions Manual
-
Robot Coupe R 101B Operating Instructions Manual
-
Robot Coupe CL60 Manuel utilisateur
-
 Robot Coupe R 2 N Manuel utilisateur
-
Robot Coupe R 301 Ultra Mode d'emploi
-
Robot Coupe Mini MP 190 V.V. Operating Instructions Manual


Autres documents
-
KitchenAid Food Processor KFP1642 Manuel utilisateur
-
Breville the Breville Sous Chef 16 Peel & Dice Manuel utilisateur
-
Hobart FP300i_FP400i Food Processors Manuel utilisateur
-
Magimix Dice & French-fry kit Mode d'emploi
-
-
Hamilton Beach 70825 Manuel utilisateur
-
GGM Gastro GSA5 Le manuel du propriétaire
-
-
-
Weston 36-3550-W Mode d'emploi