
GE-HC 18 Li T (I)
Art.-Nr.: 3410789 I.-Nr.: 11019
7
EN Original operating instructions
Cordless Telescoping Pole Chain
Saw
SP Manual de instrucciones original
Motosierra inalámbrica de altura
FR Traduction du mode d’emploi
d’origine
Scie à chaîne à manche
télescopique sans cordon
Anl_GE_HC_18_Li_T_Part1_USA_SPK7.indb 1Anl_GE_HC_18_Li_T_Part1_USA_SPK7.indb 1 19.03.2019 14:48:3419.03.2019 14:48:34

- 2 -
1
2
14
12
8
3
6
18
2
15
10
7
3
1
16
13
11
9
6
5
4
2
17
5
3 18
5 6
Anl_GE_HC_18_Li_T_Part1_USA_SPK7.indb 2Anl_GE_HC_18_Li_T_Part1_USA_SPK7.indb 2 19.03.2019 14:48:3519.03.2019 14:48:35

- 3 -
4
6 7
8 9
27
16
7
19
16
15
28 15
27
5
21
22
23
20
Anl_GE_HC_18_Li_T_Part1_USA_SPK7.indb 3Anl_GE_HC_18_Li_T_Part1_USA_SPK7.indb 3 19.03.2019 14:48:3619.03.2019 14:48:36

- 4 -
11
12 13
14
8
15
31
8
22
30
7
10
28
0.08 in. / plg / po.
(2 mm)
Anl_GE_HC_18_Li_T_Part1_USA_SPK7.indb 4Anl_GE_HC_18_Li_T_Part1_USA_SPK7.indb 4 19.03.2019 14:48:4019.03.2019 14:48:40

- 5 -
16 17
18 19
20 21
13
26
24
25
9 10 11 12
1
26
Anl_GE_HC_18_Li_T_Part1_USA_SPK7.indb 5Anl_GE_HC_18_Li_T_Part1_USA_SPK7.indb 5 19.03.2019 14:48:4219.03.2019 14:48:42

- 6 -
23
24
26 27
32
2.
1.
22
26
90°
25
34
33
Anl_GE_HC_18_Li_T_Part1_USA_SPK7.indb 6Anl_GE_HC_18_Li_T_Part1_USA_SPK7.indb 6 19.03.2019 14:48:4619.03.2019 14:48:46

- 7 -
28
v
u
L
33 ft (10m)
29
1
6 7 8 9 10 11
2 3 4 5
Anl_GE_HC_18_Li_T_Part1_USA_SPK7.indb 7Anl_GE_HC_18_Li_T_Part1_USA_SPK7.indb 7 19.03.2019 14:48:4819.03.2019 14:48:48

EN
- 8 -
Table of contents
1. Safety information
2. Layout and items supplied
3. Intended use
4. Technical data
5. Before starting the equipment
6. Operation
7. Working with the chainsaw mounting kit
8. Cleaning, maintenance and ordering spare parts
9. Disposal and recycling
10. Storage
11. Troubleshooting guide
Einhell USA LLC · Carlstadt · NJ, USA
Anl_GE_HC_18_Li_T_Part1_USA_SPK7.indb 8Anl_GE_HC_18_Li_T_Part1_USA_SPK7.indb 8 19.03.2019 14:48:4919.03.2019 14:48:49

EN
- 9 -
DANGER!
When using the equipment, a number of safety
precautions must be observed to avoid injuries
and damage. Please read the complete operating
instructions and safety information with due care.
Keep these operating instructions in a safe place
so that the information is available at all times. If
you give the equipment to any other person, hand
over these operating instructions and the safety
information as well. We cannot accept any liability
for damage or accidents which arise due to
failure to follow these instructions and the safety
information.
1. Safety information
Read All Instructions
WARNING: When using electric gardening
appliances, basic safety precautions should
always be followed to reduce the risk of fi re,
electric shock, and personal injury, including the
following:
FOR ALL APPLIANCES
•
Avoid dangerous environments - do not use
appliances in damp or wet locations.
•
Don’t use in rain.
•
Keep children away - all people and pets
should be kept at a distance from the work
area.
•
Dress properly - do not wear loose clothing or
jewelry. They can be caught in moving parts.
Wear protective clothing; use of work gloves,
long pants, a long sleeved shirt and safety
footwear is recommended when working
outdoors. Wear protective hair covering to
contain long hair.
•
Use safety glasses - always use face or dust
mask if the area in which you are working is
dusty. The purpose of the safety rules is to
attract your attention to possible dangers.
The safety symbols and the explanations
with them, require your careful attention and
understanding. The safety warnings do not
by themselves eliminate any danger. The
instruction or warnings they give are not
substitutes for proper accident prevention
measures.
•
Use right appliance - do not use appliance for
any job except that for which it is intended.
•
Do not force appliance - it will do the job
better and with less likelihood of a risk of
injury at the rate for which it was designed.
•
Do not overreach - keep proper footing and
balance at all times.
•
Stay alert. Use common sense. Do not
operate appliance when you are tired or
under the influence of drugs, alcohol or
medication.
•
When not in use, appliances should be stored
indoors in dry places out of reach of children.
•
Maintain appliance with care. Follow
instructions for lubricating and changing
accessories. Keep handles dry, clean, and
free from oil and grease.
•
Check damaged parts. Before using the
appliance, make sure the safety guards are
intact. Never use a tool without its safety
guard. Check the alignment of the moving
parts,the binding of the moving parts.
•
Check for broken or defective parts that
can affect the safe operation of your tool. A
guard or other part that is damaged should
be properly repaired or replaced by an
authorized service centre unless indicated
elsewhere in this manual.
•
Recharge only with the charger specified by
the manufacturer. A charger that is suitable
for one type of battery pack may create a risk
of fire when used with another battery pack.
•
Use appliances only with specifically
designated battery packs. Use of any other
battery packs may create a risk of injury and
fire.
•
When battery pack is not in use, keep it away
from other metal objects, like paper clips,
coins, keys, nails, screws or other small metal
objects, that can make a connection from
one terminal to another. Shorting the battery
terminals together may cause burns or a fire.
•
Under abusive conditions, liquid may be
ejected from the battery; avoid contact. If
contact accidentally occurs, flush with water.
If liquid contacts eyes, additionally seek
medical help. Liquid ejected from the battery
may cause irritation or burns. (This advice is
considered correct for conventional NiMh,
NiCd, lead acid and lithium-ion cell types. If
this advice is incorrect for a cell design that
differs from these, then the correct advice
may be substituted.)
•
Do not use a battery pack or appliance that is
damaged or modified. Damaged or modified
batteries may exhibit unpredictable behavior
resulting in fire, explosion or risk of injury.
•
Follow all charging instructions and do
not charge the battery pack or appliance
outside of the temperature range specified
Anl_GE_HC_18_Li_T_Part1_USA_SPK7.indb 9Anl_GE_HC_18_Li_T_Part1_USA_SPK7.indb 9 19.03.2019 14:48:4919.03.2019 14:48:49

EN
- 10 -
in the instructions. Charging improperly or at
temperatures outside of the specified range
may damage the battery and increase the risk
of fire.
•
Have servicing performed by a qualified
repair person using only identical
replacement parts. This will ensure that the
safety of the product is maintained.
•
Do not modify or attempt to repair the
appliance or the battery pack (as applicable)
except as indicated in the instructions for use
and care.
1. FOR ALL BATTERY-OPERATED
GARDENING APPLIANCES:
•
Do not charge appliance in rain, or in wet
locations.
•
Do not use battery-operated appliances in
the rain. Always remove or disconnect battery
pack before adjusting, cleaning, servicing or
transporting the garden appliances.
2. FOR ALL BATTERY-OPERATED
PRODUCTS EMPLOYING A DETACHABLE
OR SEPARABLE
BATTERY:
•
Use only the following type and size battery:
18V 1.5Ah P-X-C lithium-ion battery
18V 2.0Ah P-X-C lithium-ion battery
18V 2.6Ah P-X-C Plus lithium-ion battery
18V 3.0Ah P-X-C lithium-ion battery
18V 4.0Ah P-X-C lithium-ion battery
18V 5.2Ah P-X-C Plus lithium-ion battery
•
Do not dispose of the battery in a fire. The
cell may explode. Check with local codes for
possible special disposal instructions.
•
Do not open or mutilate the battery. Released
electrolyte is corrosive and may cause
damage to the eyes or skin. It may be toxic if
swallowed.
•
Exercise care in handling the battery in order
not to short it with conducting materials such
as rings, bracelets, and keys. The battery or
conductor may overheat and cause burns.
3. AVOID UNINTENTIONAL STARTING – DO
NOT INSERT BATTERY WHILE YOUR
FINGER IS ON THE SWITCH. BE SURE
SWITCH IS OFF WHEN INSERTING THE
BATTERY.
GENERAL SAFETY WARNINGS FOR THE
BATTERY PACK
•
Dispose of used battery promptly and
properly. When disposing of secondary cells
or batteries, keep cells or batteries of different
electrochemical systems separate from each
other.
•
Keep battery out of reach of children and in
original package until ready to use.
•
Never put batteries in one’s mouth. If
swallowed, contact local poison control
centre immediately.
•
CAUTION – The battery used in this device
may present a risk of fire or chemical burn
if mishandled. Replace battery with Einhell/
lawn master brand only. Use of another
battery may present a risk of fire or explosion.
•
WARNING: Do not use a visibly damaged
battery pack or appliance.
•
WARNING: Do not modify or attempt to repair
the appliance or the battery pack.
•
BATTERIES MUST BE RECYCLED.
•
Do not short-circuit a cell or battery. Do not
store cells or batteries haphazardly in a box
or drawer where they may shortcircuit each
other or be short-circuited by conductive
materials.
•
Do not subject cells or batteries to
mechanical shocks.
•
Keep cells and batteries clean and dry. Wipe
the cell or battery terminals with a clean dry
cloth if they become dirty.
•
Do not maintain secondary cells and batteries
on charge when not in use.
•
Retain the original cell and battery. Do not
use any charger other than that specifically
provided for use with the equipment.
Secondary cells and batteries need to be
charged before use. Always use the correct
charger and refer to the manufacturer’s
instructions or equipment manual for proper
charging instructions.
•
When possible, remove the battery from the
equipment when not in use.
•
Prevent unintentional starting. Ensure the
switch is in the off-position before connecting
to the battery pack, picking up or carrying the
appliance. Carrying the appliance with your
finger on the switch or energizing appliances
that have the switch on invites accidents.
•
Disconnect the battery pack from the
appliance before making any adjustments,
changing accessories, or storing appliance.
Such preventive safety measures reduce the
risk of starting the appliance accidentally.
Anl_GE_HC_18_Li_T_Part1_USA_SPK7.indb 10Anl_GE_HC_18_Li_T_Part1_USA_SPK7.indb 10 19.03.2019 14:48:4919.03.2019 14:48:49

EN
- 11 -
•
Under abusive conditions, liquid may be
ejected from the battery; avoid contact. If
contact accidentally occurs, flush with water.
If liquid contacts eyes, additionally seek
medical help. Liquid ejected from the battery
may cause irritation or burns.
•
Have servicing performed by a qualified
repair person using only identical
replacement parts. This will ensure that the
safety of the product is maintained.
IMPORTANT SAFETY INSTRUCTIONS FOR
CHARGER
WARNING: This product may contain lead,
phthalate or other chemicals known to the State
of California to cause cancer, birth defects and
other reproductive harm. Please wash your hands
after use.
Pole pruners safety warnings
1) Keep all parts of the body away from the saw
chain. Do not remove cut material or hold
material to be cut when blades are moving.
Make sure the switch is off when clearing
jammed material. Saw chain continues to
move after the switch is turned off . A moment
of inattention while operating the extended-
reach pruner may result in serious personal
injury.
2) Carry the extended-reach pruner by the
handle with the saw chain stopped. When
transporting or storing the extended-reach
pruner, always fi t the saw chain device cover.
Proper handling of the extended-reach pruner
will reduce possible personal injury from the
saw chain.
3) Hold the extended-reach pruner by insulated
gripping surfaces only, because the saw
chain may contact hidden wiring or its
own cord. A saw chain contacting a ″live″
wire may make exposed metal parts of the
extended-reach pruner ″live″ and could give
the operator an electric shock.
Exception: “or its own cord“ maybe omitted for
battery-operated appliances.
4) Do not use the extended-reach pruner in bad
weather conditions, especially when there is
a risk of lightning. This decreases the risk of
being struck by lightning.
5) To reduce the risk of electrocution, never use
near any electrical power lines. Contact with
or use near power lines may cause serious
injury or electric shock resulting in death.
6) Always use two hands when operating the
extended-reach pruner. Hold the extended-
reach pruner with both hands to avoid loss of
control.
7) Always use head protection when operating
the extended-reach pruner overhead. Falling
debris can result in serious personal injury.
This equipment is not intended to be used
by persons (including children) with reduced
physical, sensory or mental capacities or those
with a lack of experience and/or knowledge
unless they are supervised by a person who is
responsible for their safety or they have received
instructions from such a person in how to use
the equipment safely. Children must always be
supervised in order to ensure that they do not
play with the equipment.
Explanation of the symbols on the equipment
(Fig. 29):
1. Warning!
2. Wear safety goggles, a face guard and ear
protection.
3. Protect the equipment from rain and damp.
4. Maximum cutting length of the pole-mounted
pruner
5. Electric shock can cause fatal injury. Keep a
distance of at least 33 ft (10 m) from power
cables.
6. Read the directions for use before operating
the equipment.
7. Wear sturdy, non-slip footwear.
8. Watch out for falling and catapulting parts.
9. Keep your distance.
10. Direction of the chain movement and teeth of
the pole-mounted pruner
11. Wear safety gloves.
Anl_GE_HC_18_Li_T_Part1_USA_SPK7.indb 11Anl_GE_HC_18_Li_T_Part1_USA_SPK7.indb 11 19.03.2019 14:48:4919.03.2019 14:48:49

EN
- 12 -
2. Layout and items supplied
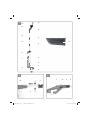
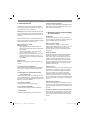
2.1 Layout (fi g. 1)
1. Grip
2. On/Off switch
3. Safety lock-off
4. Safety lock-off for the handle angle adjuster
5. Assembly nut
6. Tube
7. Shoulder strap with safety release
8. Additional handle
9. Telescopic tube 1 lock nut
10. Telescopic tube 1
11. Telescopic tube 2 lock nut
12. Telescopic tube 2 with motor housing
13. Safety lock-off for the motor housing angle
adjuster
14. Chain saw mounting kit
15. Cutter rail
16. Saw chain
17. Cutter guard
18. Handle housing
19. Carabiner
20. Strap attachment with metal loops
21. Hex screw
22. Lock
23. Handle attachment
24. Safety lock-off s
25. Motor housing
26. Lock button
27. Fastening screw
28. Sprocket wheel
29. Chain tensioning screw
30. Tank
31. Oil tank cap
32. Pushlock button
33. Battery capacity indicator
34. Battery capacity indicator button
2.2 Items supplied
Please check that the article is complete as
specifi ed in the scope of delivery. If parts are
missing, please contact our service center or the
store where you made your purchase at the latest
within 5 work days after purchasing the article and
upon presentation of a valid bill of purchase.
•
Open the packaging and take out the
equipment with care.
•
Remove the packaging material and any
packaging and/or transportation braces (if
present).
•
Check to see if all the items are supplied.
•
Inspect the equipment and accessories for
transport damage.
•
If possible, keep the packaging until the end
of the guarantee period.
Danger!
The equipment and packaging material are
not toys. Do not let children play with plastic
bags, plastic sheets and small parts. There is
a risk of choking and suff ocating!
•
Complete handle
•
Complete tube with motor unit
•
Shoulder strap with safety release
•
Chain saw mounting kit
•
Cutter rail
•
Saw chain
•
Cutter guard
•
Original operating instructions
•
Safety information
Separately available accessories
18V 1.5Ah P-X-C lithium-ion battery
18V 2.0Ah P-X-C lithium-ion battery
18V 2.6Ah P-X-C Plus lithium-ion battery
18V 3.0Ah P-X-C lithium-ion battery
18V 4.0Ah P-X-C lithium-ion battery
18V 5.2Ah P-X-C Plus lithium-ion battery
18V P-X-C charger
Explore battery + charger options at
einhellUSA.com
3. Intended use
Pole-operated pruner (chainsaw with
telescopic handle)
The chain saw mounting kit is allowed to be used
only on the supplied motor head.
The chainsaw with telescopic handle is designed
for lopping off tree branches. It is not suitable for
extensive sawing work, felling trees or sawing any
materials other than wood.
The equipment is allowed to be used only for its
prescribed purpose. Any other use is deemed to
be a case of misuse. The user/operator and not
the manufacturer will be liable for any damage or
injuries of any kind resulting from such misuse.
Please note that our equipment has not been
designed for use in commercial, trade or
industrial applications. Our warranty will be voided
if the equipment is used in commercial, trade or
industrial businesses or for equivalent purposes.
Anl_GE_HC_18_Li_T_Part1_USA_SPK7.indb 12Anl_GE_HC_18_Li_T_Part1_USA_SPK7.indb 12 19.03.2019 14:48:4919.03.2019 14:48:49

EN
- 13 -
4. Technical data
Motor power supply: ............................18 V
Cutting thickness max: ...................6.7 in. (17 cm)
Bar chain length: ............................8 in. (20.3 cm)
Chain pitch: ....................... 3/8 (9.5 mm), 33 teeth
Chain thickness: .....................0.050 in. (1.3 mm)
Saw chain: ...............................Oregon 91P033X
Cutter rail: ......................... Oregon 080NDEA041
Cutting speed
out rated rpm: ................... 12.14 ft/sec. (3.76 m/s)
Telescopic shaft: ......6 ft to 9 ft (1.83 m to 2.77 m)
Oil tank capacity: ...................... 4.23 fl oz (125 ml)
Multi-angle head: ....-60°,-40°,-20°,0°,20°,40°,60°
Multi-angle main handle: ............. -40°,-20°,0°,20°
Weight: ............................................8.8 lbs (4 kg)
Reduce noise generation and vibration to a
minimum!
•
Use only equipment that is in perfect
condition.
•
Maintain and clean the equipment regularly.
•
Adapt your way of working to the equipment.
•
Do not overload the equipment.
•
Have the equipment checked if necessary.
•
Switch off the equipment when not in use.
•
Wear gloves.
5. Before starting the equipment
Caution! Do not fi t the battery until the equipment
has been fully assembled and all the settings
have been actuated. Always wear protective
gloves when working on the equipment to protect
yourself against injury. Carefully unpack all parts
and check that they are complete (Fig. 1).
5.1 General information on assembly
a) Fig. 2-3: Push the tube (6) onto the handle
housing (18) as far as the mark and screw it
tight with the assembly nut (5).
b) Fig. 4: Hook the carabiner (19) of the shoulder
strap (7) into the strap attachment (20).
c) Fig. 5: The additional handle (8) consists
of the hexagon screw (21) and lock (22). It
is fi tted to the handle attachment (23) as
illustrated. Push the hexagon screw (21) into
the additional handle and screw it tight to the
lock (22).
5.2 Fitting the chain saw mounting kit (for
use as a pole-operated pruner)
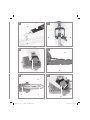
5.2.a Assembly of the cutter rail and the saw
chain
•
Undo the fastening screw (27) of the chain
wheel cover (Fig. 6).
•
Take off the chain wheel cover.
•
Lay the chain as shown in the groove which
runs around the cutter rail (Fig. 7).
•
Insert the cutter rail and chain as shown in
the mounting in the chainsaw (Fig. 8). At
the same time guide the chain around the
sprocket wheel (Fig. 8/ Item 28).
•
Attach the chain wheel cover and fasten it
hand-tight with the fastening screw (Fig. 9/
Item 27).
Do not fully tighten the fastening screw until after
you have adjusted the chain tension (see section
5.2.b.).
5.2.b Tensioning the saw chain
Caution! Always remove the battery from the
device before inspection and adjustment. Always
wear protective gloves when working on the
chainsaw to protect yourself against injury.
•
Undo the fastening screw (27) of the chain
wheel cover a few turns (Fig. 6).
•
Adjust the chain tension with the chain
tensioning screw (Fig. 10/Item 28). Turning
the screw clockwise increases the chain
tension, turning it counter-clockwise
decreases the chain tension. The saw chain
is correctly tensioned if it can be lifted approx.
0.08 in. (2 mm) in the middle of the cutter rail
(Fig. 11).
•
Tighten the fastening screw (27) of the chain
wheel cover (Fig. 9).
Important! All the chain links must lie properly in
the guide groove of the cutter rail.
Notes on tensioning the chain:
The chain must be properly tensioned to ensure
safe operation. When the saw chain can be
raised by around 0.08 in. (2 mm) in the middle
of the cutter rail, you know that the chain tension
is ideal. During cutting, the temperature of the
chain rises and its length changes. It is important
therefore to check the chain tension at least every
10 minutes and to adjust it again as required. This
applies in particular to new saw chains. When you
have fi nished working, slacken the chain again as
it will shorten when it cools down. This will help to
prevent damage to the chain.
Anl_GE_HC_18_Li_T_Part1_USA_SPK7.indb 13Anl_GE_HC_18_Li_T_Part1_USA_SPK7.indb 13 19.03.2019 14:48:4919.03.2019 14:48:49

EN
- 14 -
5.2.c Saw chain lubrication
Caution! Always remove the battery from the
device before inspection and adjustment. Always
wear protective gloves when working on the
chainsaw to protect yourself against injury.
Important! Never operate the chain if it is not
lubricated with saw chain oil. Use of the chainsaw
without saw chain oil or if the oil level is below
the viewing window will result in damage to the
chainsaw!
Important! Be aware of the temperature
conditions:
Diff erent lubricants with completely diff erent
viscosities are required at diff erent ambient
temperatures. At lower temperatures you will need
low viscosity oils in order to achieve a suffi cient
lubricating fi lm. However, if the same low viscosity
oil is used during the summer it will become even
thinner due to the ambient temperatures alone,
and as a result the lubricating fi lm could break
down, causing the chain to overheat and become
damaged. In addition, the chain oil would burn
and produce unnecessary pollutants.
Filling the oil tank (Fig. 12):
•
Place the chainsaw on a flat surface.
•
Clean the area around the oil tank cap (Fig.
12/Item 31) and then open the oil tank cap.
•
Fill the tank (Fig. 12/Item 30) with saw chain
oil. In the process, make sure that no dirt
enters the tank, as this could cause the oil
nozzle to become blocked.
•
Close the oil tank cap (Fig. 12/Item 31).
After the chain saw mounting kit has been fi tted
and when the equipment is not being used, slip
the cutter rail guard (Fig. 1/Item 17) over the
mounted cutter rail with saw chain in order to
prevent injuries.
5.3 Adjusting the additional handle (Fig. 13-
14)
a) Setting the tilt of the additional handle
Open the lock (22). Set the desired tilt of the
additional handle (8). Close the lock.
b) Shifting the additional handle
Open the lock and slide the additional handle (8)
into the required position. Close the lock.
5.4 Using the shoulder strap
Warning! Always use the shoulder strap when
working with the equipment. Switch off the
equipment before you take off the shoulder strap
(Otherwise there is a risk of injury.)
1. Hook the carabiner (Fig. 4/Item A) into the
strap attachment (20).
2. Slip the shoulder strap (Fig. 15/Item 7) over
your shoulder.
3. Adjust the length of the shoulder strap so that
the strap attachment is at waist level (Fig. 15).
4. The shoulder strap is equipped with a buckle.
Press the hooks together (Fig. 16) if you need
to put down the equipment quickly.
5. To change the strap position on the
equipment, press together the two metal
loops on the strap attachment (Fig. 4/Item 20)
and adjust the strap attachment on the tube.
5.5. Adjusting the angle of the handle
(Fig. 17)
Press the two safety lock-off s (24) and adjust
the angle of the handle (1) to any of 4 latching
positions.
5.6. Adjusting the angle of the motor housing
(Fig. 18)
Press the two safety lock-off s (24) and adjust the
angle of the motor housing (25) to any of the 7
latching positions.
5.7 Adjusting the telescopic tube (Fig. 19)
1. Undo the telescopic tube lock nuts (9 + 11) by
turning them counter-clockwise.
2. Pull out the telescopic tubes (10 + 12) to suit
the required working height.
3. Secure the telescopic tube lock nuts (9 + 11)
by them turning clockwise.
5.8 Fitting the chain saw mounting kit to the
motor head (Fig. 20 – 21)
The cutter rail guard must be slipped over the
mounted cutter rail with saw chain in order to
prevent injuries.
1. Position the chain saw mounting kit and the
motor head such that the arrows on both
parts coincide.
2. Press the chain saw mounting kit against the
motor head. This will cause the lock button
(26) to be pushed to the right. Turn the chain
saw mounting kit clockwise. The chain saw
mounting kit will lock onto the motor head and
is then secured in place. This will cause the
lock button (26) to be pushed to the left.
Anl_GE_HC_18_Li_T_Part1_USA_SPK7.indb 14Anl_GE_HC_18_Li_T_Part1_USA_SPK7.indb 14 19.03.2019 14:48:4919.03.2019 14:48:49

EN
- 15 -
5.9 Turning the chain saw mounting kit
through 90° on the motor head (Fig. 22)
The cutter rail guard must be slipped over the
mounted cutter rail with saw chain in order to
prevent injuries.
1. Pull the lock button (26) to the right.
2. Turn the chain saw mounting kit 90° counter-
clockwise. The chain saw mounting kit will
lock onto the motor head and is then secured
in place.
5.10 Removing the chain saw mounting kit
from the motor head (Fig. 20 – 21)
The cutter rail guard must be slipped over the
mounted cutter rail with saw chain in order to
prevent injuries.
1. Pull the lock button (26) to the right.
2. Turn the chain saw mounting kit to the point
where the arrows on the motor head and
chain saw mounting kit coincide, allowing the
mounting kit to be removed.
5.11 Fitting the battery (Fig. 23 – 24)
Press the side pushlock button (32) of the battery
pack as shown in Fig. 23 and push the battery
pack into the mount provided. When the battery
pack is positioned as in Fig. 24, make sure that
the pushlock button latches in place! To remove
the battery pack, proceed in reverse order.
6. Operation
Please note that the statutory regulations
governing noise abatement may diff er from one
location to another.
Caution! Always use the shoulder strap when
working with the equipment. Always switch off the
equipment before you take off the shoulder strap.
(Otherwise there is a risk of injury.)
Put on the shoulder strap as described above,
fi t the required mounting kit and adjust the
equipment to suit your needs.
Switching on/off
Switching on
•
Hold the equipment by the handles with both
hands (thumbs under the additional handle).
•
Slide the safety lock-off (Fig. 3/Item 3) to the
front and hold.
•
Switch on the equipment with the On/Off
switch (Fig. 3/Item 2). You can then release
the safety lock-off.
Switching off
Release the On/Off switch (Fig. 3/Item 2).
6.1 Charging the Li battery pack
The corresponding instructions can be found
in the original operating instructions for your
charger.
6.2 Battery capacity indicator (Fig. 25 / item
33)
Press the battery capacity indicator switch (34).
The battery capacity indicator (33) shows the
charge status of the battery using 3 LEDs.
All 3 LEDs lit:
The battery is fully charged.
2 or 1 LED(s) lit:
The battery has an adequate remaining charge.
1 LED fl ashing:
The battery is empty, recharge the battery.
All LEDs fl ashing:
The battery pack has been deep-discharged and
is defective. Do not re-use or charge a defective
battery pack.
7. Working with the chainsaw
mounting kit
Preparations
To ensure that you can work safely, check the
following points before every use and in the event
of any damage:
Condition of the chainsaw
Inspect the chainsaw before the start of work for
damage to the housing, the power cable, the saw
chain and the cutter rail. Never use a chainsaw
which is obviously damaged.
Oil container
Level of oil in the oil container: Both before and
during your work make sure that there is always
suffi cient oil in the system. To avoid damaging the
chainsaw, never run the saw if there is no oil in the
system or if the oil drops below the "min" mark.
On average, a single fi lling will last around 20
minutes depending on the number of pauses in
cutting and the loads involved.
Anl_GE_HC_18_Li_T_Part1_USA_SPK7.indb 15Anl_GE_HC_18_Li_T_Part1_USA_SPK7.indb 15 19.03.2019 14:48:4919.03.2019 14:48:49

EN
- 16 -
Saw chain
Tension of the chain, condition of the cutting
elements: The sharper the chain, the easier and
more controllable it is to operate the chainsaw.
The same also applies to the chain tension. For
greater safety you must check the chain tension
before your work and at least every 10 minutes
during your work. New chains in particular tend to
expand more.
Safety clothing
Always wear appropriate tight-fi tting safety
clothing such as special trousers which protect
against cuts, protective gloves and safety shoes.
Hearing protection and protective goggles
Wear a protective helmet with integral face and
hearing protection. This will off er protection
against falling branches and recoiling branches.
Safe working
•
To ensure that you can work in safety you
must use the equipment at a working angle of
max. 60°.
•
Never stand under the branch you want to
saw.
•
Use special caution when working with
branches under tension and splintering wood.
•
Possible risk of injury caused by falling
branches and catapulting pieces of wood.
•
When the equipment is in operation, keep
other persons and animals away from the
danger zone.
•
The equipment is not protected from electric
shock through contact with high-voltage
cables. Keep a minimum distance of 33 ft (10
m) from live cables. Electric shock can cause
fatal injury.
•
When working on slopes always stand to the
upper or left or right side of the branch you
want to cut.
•
Hold the equipment as close as possible to
your body. This will help you to keep your
balance.
Cutting techniques
•
When removing branches, hold the
equipment at an angle of max. 60° to the
horizontal to avoid being hit by a falling
branch (Fig. 28).
•
Start with the bottom branches on the tree.
This will make it easier for the cut branches to
drop.
•
After completing a cut, the weight of the saw
will abruptly increase for the operator as the
saw is no longer supported by the branch.
This can result in you losing control over the
saw.
•
Remove the saw from the cut only with the
saw chain still running. This will prevent the
saw from getting jammed.
•
Never cut with the tip of the saw.
•
Never cut into the bulging branch collar. This
will prevent the tree from healing.
Sawing off smaller branches (Fig. 26):
Place the contact surface of the saw onto the
branch. This will prevent the saw from making
jerky movements when you begin a cut. Exerting
slight pressure, guide the saw from the top to the
bottom through the branch.
Sawing off large and long branches (Fig. 27):
Carry out a relief cut when working on large
branches.
Start by sawing through 1/3 of the branch
diameter from the top to the bottom with the top
side of the cutter rail (Fig. 27/Point 1). Then saw
towards the fi rst cut from the top to the bottom
with the bottom side of the cutter rail (Fig. 27/
Point 2).
Saw off long branches in several steps to keep
control over the impact location.
Kickback
The term "kickback" describes what happens
when the running chainsaw suddenly kicks
upward and backward. Usually this is caused by
contact between the tip of the cutter rail and the
workpiece or by the saw chain becoming trapped.
In the event of kickback, large forces occur
suddenly and violently. As a result, the chainsaw
usually reacts uncontrollably. This can often result
in very serious injuries to the worker or persons in
the vicinity. The risk of kickback is at its greatest
when the saw is positioned for a cut in the region
of the tip of the cutter rail, as the leverage eff ect is
greatest there. It is therefore safest to position the
saw as fl at as possible.
Danger!
•
Make sure that the chain tension is always
correctly adjusted.
•
Only use a chainsaw if it is in perfect working
order.
•
Only work with a saw chain that has been
properly sharpened in accordance with the
instructions.
•
Never cut with the upper edge or the tip of the
cutter rail.
Anl_GE_HC_18_Li_T_Part1_USA_SPK7.indb 16Anl_GE_HC_18_Li_T_Part1_USA_SPK7.indb 16 19.03.2019 14:48:4919.03.2019 14:48:49

EN
- 17 -
•
Always hold the chainsaw firmly with both
hands.
Cutting wood which is under tension
Special care is required when cutting wood which
is under tension. Cutting wood which is under
tension can release the tension, causing the
wood to react out of control. In the worst case this
can result in severe and even fatal injuries. This
type of work must be performed only by specially
trained persons.
8. Cleaning, maintenance and
ordering spare parts
HAZARD!
Remove the battery pack before doing any
cleaning and maintenance work.
8.1 Cleaning
•
Regularly clean the tensioning mechanism by
blowing it out with compressed air or cleaning
it with a brush. Do not use any tools for
cleaning.
•
Keep the handles free of oil so that you can
maintain a firm grip.
•
If you are not going to use the chainsaw for an
extended period of time, remove the chain oil
from the tank. Briefly immerse the saw chain
and the cutter rail into an oil bath and then
wrap them in oil paper.
•
Never immerse the equipment in water or
other liquids in order to clean it.
•
Use a brush to remove deposits from the
safety guards.
•
Keep all safety devices, air vents and the
motor housing free of dirt and dust as far as
possible. Wipe the equipment with a clean
cloth or blow it down with compressed air at
low pressure.
•
We recommend cleaning the equipment
immediately each time after use.
•
Clean the equipment regularly with a damp
cloth and some soft soap. Do not use
cleaning agents or solvents; these may
be aggressive to the plastic parts in the
equipment. Ensure that no water can get into
the interior of the equipment. The ingress of
water into an electric power tool increases the
risk of an electric shock.
8.2 Maintenance
8.2.1 Chainsaw mounting kit
Replacing the chain and cutter rail
The cutter rail needs to be replaced if the guide
groove of the cutter rail is worn. Proceed as
described in the section “Assembly of the cutter
rail and the saw chain”.
Checking the automatic chain lubrication
You should check the operation of the automatic
chain lubrication system on a regular basis
in order to guard against overheating and the
damage this can cause to the cutter rail and
the chain. Point the tip of the cutter rail at a
smooth surface (a board or a cut tree face) and
allow the chainsaw to run. If you see a growing
oil stain on the smooth surface, the automatic
chain lubrication system is working properly. If no
clear oil trace is evident then please refer to the
corresponding instructions in “Troubleshooting”.
If the information contained there still fails
to remedy the situation, please contact our
service department or another similarly qualifi ed
workshop.
Important! Do not actually touch the surface with
the tip of the cutter rail when performing this test.
Keep a safe distance of approx. 7.9 in. (20 cm).
Sharpening the chain
Working eff ectively with the chainsaw is only
possible if the chain is in good condition and
sharp. This also reduces the risk of kickback. The
chain can be re-sharpened by any dealer. Do not
attempt to sharpen the chain yourself unless you
have the necessary special tools and experience.
8.3 Ordering replacement parts:
Service
1. If your power tool requires service,
contact an authorized Einhell USA dealer
or call the Einhell USA customer service
center at 1-866-EINHELL
(1-866-346-4355). Only identical
replacement parts should be utilized for
repairs. This will ensure that the safety of the
power tool is maintained.
2. If the battery charger cable is damaged, it
must be immediately replaced to avoid a
hazard. Contact the Einhell USA
®
customer
service center at 1-866-EINHELL
(1-866-346-4355) for assistance.
Anl_GE_HC_18_Li_T_Part1_USA_SPK7.indb 17Anl_GE_HC_18_Li_T_Part1_USA_SPK7.indb 17 19.03.2019 14:48:4919.03.2019 14:48:49

EN
- 18 -
9. Disposal and recycling
The equipment is supplied in packaging to
prevent it from being damaged in transit. The
raw materials in this packaging can be reused or
recycled. The equipment and its accessories are
made of various types of material, such as metal
and plastic. Never place defective equipment in
your household refuse. The equipment should
be taken to a suitable collection center for proper
disposal. If you do not know the whereabouts of
such a collection point, you should ask in your
local council offi ces.
10. Storage
Store the equipment and its accessories out
of children‘s reach in a dark and dry place at
above freezing temperature. The ideal storage
temperature is between 41°F and 86°F
(5°C and 30°C). Keep the electric tool in its
original packaging.
The reprinting or reproduction by any other
means, in whole or in part, of documentation and
papers accompanying the products is strictly
subject to the express consent of iSC GmbH.
Subject to technical changes
Anl_GE_HC_18_Li_T_Part1_USA_SPK7.indb 18Anl_GE_HC_18_Li_T_Part1_USA_SPK7.indb 18 19.03.2019 14:48:4919.03.2019 14:48:49

EN
- 19 -
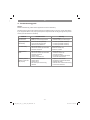
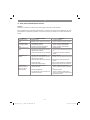
11. Troubleshooting guide
Danger!
Before troubleshooting, switch off the equipment and remove the battery.
The table below contains a list of fault symptoms and explains what you can do to remedy the problem
if your equipment fails to work properly. If the problem still persists after working through the list, please
contact your nearest service workshop.
Problem Possible cause Remedy
The equipment
does not work
- Battery empty
- Battery is not correctly inserted
- Charge battery
- Remove battery and insert again
Equipment operates
intermittently
- Loose connection (external)
- Loose connection (internal)
- ON/OFF switch defective
- Consult a specialist workshop.
- Consult a specialist workshop.
- Consult a specialist workshop.
Saw chain is dry - No oil in the tank
- Vent in the oil tank cap is blocked
- Oil outlet is blocked
- Top up with oil
- Clean the oil tank cap
- Clear the oil outlet
Chain/guide bar
is hot
- No oil in the tank
- Vent in the oil tank cap is blocked
- Oil outlet is blocked
- Chain is blunt
- Chain is overtensioned
- Top up with oil
- Clean the oil tank cap
- Clear the oil outlet
- Re-sharpen or replace the chain
- Check the chain tension
Chainsaw judders,
vibrates or does not
saw properly
- Chain is undertensioned
- Chain is blunt
- Chain is worn
- Saw teeth point in the wrong
direction
- Adjust the chain tension
- Re-sharpen or replace the chain
- Replace the chain
- Refi t the chain with the teeth facing
in the correct direction
Anl_GE_HC_18_Li_T_Part1_USA_SPK7.indb 19Anl_GE_HC_18_Li_T_Part1_USA_SPK7.indb 19 19.03.2019 14:48:5019.03.2019 14:48:50

EN
- 20 -
EINHELL CUSTOMER PROMISE
PRODUCT REGISTRATION:
Einhell strongly encourages you to register
your purchase. You can register online at
EinhellUSA.com Failure to register your product
purchase will not diminish your warranty rights.
However, registering your purchase will allow Einhell
to better serve you with any of your customer service
needs.
WHAT IS COVERED?
Einhell warrants to the owner that if this Machine
fails within 2 years from the date of purchase due to
a defect in material or workmanship or as a result of
normal wear and tear from ordinary household use,
Einhell will send a replacement part or product, as
needed, free of charge and with free shipping to the
original purchaser. If, in Einhell’s sole discretion, the
failed Machine cannot be repaired with a part, Einhell
will elect to either (A) send a new Machine at no charge
and with free shipping or (B) refund the full purchase
price to the owner.
WHO CAN SEEK WARRANTY COVERAGE?
This Warranty is extended by Einhell to the owner
of this Machine (a “Machine” consists of a product
powered by a motor) for residential and personal
household use only. This warranty is limited to thirty
(30) days from the start of original purchase of any
EINHELL brand product that is used for commercial
purposes, or any other income-producing purpose.
Should ownership of this machine change during the
coverage period, please update the Machine’s owner
information at EinhellUSA.com
WHAT IS NOT COVERED?
This warranty does not cover any product that
has been subject to misuse, neglect, negligence,
or accident, or that has been operated in any way
contrary to the operating instructions as specifi ed in
the operator’s manual. This Warranty does not cover
cosmetic changes that do not aff ect performance.
This Warranty is only valid if the Machine is used
and maintained in accordance with the instructions,
warnings and safeguards contained in the owner’s
manual. Einhell will not be responsible for the cost
of any unauthorized warranty repairs. This warranty
does not cover any cost or expense incurred by the
purchaser in providing substitute equipment or service
during reasonable periods of malfunction or non-use
of this product while waiting for a replacement part or
unit under this warranty.
Wearing parts like belts, augers, chains and tines
are not covered under this warranty, and can
be purchased at EinhellUSA.com or by calling
1-866-EINHELL (1-866-346-4355). Batteries are
covered in full for 90-days from the date of purchase.
Repair, replacement or refund of the purchase price
are the exclusive remedies of purchaser and the sole
liability of Einhell under this warranty. No employee or
representative of Einhell is authorized to make any
additional warranty or any modifi cation to this warranty
which may be binding upon Einhell. Accordingly,
purchaser should not rely upon any additional
statements made by any employee or representative
of Einhell. In no event, whether based on contract,
indemnity, warranty, tort (including negligence),
strict liability or otherwise, shall Einhell be liable for
any special, indirect, incidental, or consequential
damages, including, without limitation, loss of profi t or
revenue.
Some states do not allow limits on warranties. In such
states, the above limitations may not apply to you.
Outside the USA and Canada, other warranties may
apply.
QUALITY COMES FIRST. The Einhell name is synonymous with high-performance tools and high-quality
European craftsmanship. From cordless screwdrivers to electric lawn mowers, Einhell USA designs and develops
state-of-the-art handheld power and garden tools for DIY enthusiasts, hobby gardeners, and handymen.
Einhell USA’s quality assurance and engineering teams ensure products are subjected to stringent quality and
performance tests. We know that sometimes tough tools go through tough times. In the event that you should
experience any issue with your product, you have our commitment that we’ll do everything we can to get you
back a tool that’s ready to work as hard as you do.
Anl_GE_HC_18_Li_T_Part1_USA_SPK7.indb 20Anl_GE_HC_18_Li_T_Part1_USA_SPK7.indb 20 19.03.2019 14:48:5019.03.2019 14:48:50
La page est en cours de chargement...
La page est en cours de chargement...
La page est en cours de chargement...
La page est en cours de chargement...
La page est en cours de chargement...
La page est en cours de chargement...
La page est en cours de chargement...
La page est en cours de chargement...
La page est en cours de chargement...
La page est en cours de chargement...
La page est en cours de chargement...
La page est en cours de chargement...
La page est en cours de chargement...
La page est en cours de chargement...
La page est en cours de chargement...
La page est en cours de chargement...
La page est en cours de chargement...
La page est en cours de chargement...
La page est en cours de chargement...
La page est en cours de chargement...
La page est en cours de chargement...
La page est en cours de chargement...
La page est en cours de chargement...
La page est en cours de chargement...
La page est en cours de chargement...
La page est en cours de chargement...
La page est en cours de chargement...
La page est en cours de chargement...
La page est en cours de chargement...
La page est en cours de chargement...
-
 1
1
-
 2
2
-
 3
3
-
 4
4
-
 5
5
-
 6
6
-
 7
7
-
 8
8
-
 9
9
-
 10
10
-
 11
11
-
 12
12
-
 13
13
-
 14
14
-
 15
15
-
 16
16
-
 17
17
-
 18
18
-
 19
19
-
 20
20
-
 21
21
-
 22
22
-
 23
23
-
 24
24
-
 25
25
-
 26
26
-
 27
27
-
 28
28
-
 29
29
-
 30
30
-
 31
31
-
 32
32
-
 33
33
-
 34
34
-
 35
35
-
 36
36
-
 37
37
-
 38
38
-
 39
39
-
 40
40
-
 41
41
-
 42
42
-
 43
43
-
 44
44
-
 45
45
-
 46
46
-
 47
47
-
 48
48
-
 49
49
-
 50
50


EINHELL GE-HC 18 Li T-Solo Manuel utilisateur
- Taper
- Manuel utilisateur
- Ce manuel convient également à
dans d''autres langues
Documents connexes
-
EINHELL 3410689 Manuel utilisateur
-
 Einhell Expert Plus GE-CL 36 Li E-Solo Manuel utilisateur
-
 Einhell Expert Plus GE-LC 18 Li T-Solo Manuel utilisateur
-
 Einhell Expert Plus GE-HC 18 Li T-Solo Manuel utilisateur
-
 Einhell Expert Plus 4499947 Manuel utilisateur
-
 Einhell Expert Plus TE-AP 18 Li-Solo Manuel utilisateur
-
 Einhell Expert Plus GE-CT 18 Li-Solo Manuel utilisateur
-
-
 Einhell Expert Plus 3410871 Manuel utilisateur
-
EINHELL GE-CL 18 Li E Manuel utilisateur


Autres documents
-
Black & Decker Tronçonneuse Sans Fil 36V Manuel utilisateur
-
DeWalt DCCS623 20V Max* Pruner Manuel utilisateur
-
Parkside 327520 Translation Of The Original Instructions
-
Homelite UT34020 Le manuel du propriétaire
-
STIHL GTA 26 Manuel utilisateur
-
Scheppach 5912401903 Translation Of Original Operating Manual
-
Toro Flex-Force Power System 60V Pole Saw Manuel utilisateur
-
-
 EarthWise CVPS44010 Le manuel du propriétaire
-
FLORABEST 273489 Mode d'emploi
