
1 090102 R5
Installation & Operating Instructions
For
DIXON BAYCO “HOSE SWIVELS”
For use with petroleum & home heating oil hose
Part Numbers:
SWMF125 – 1 ¼” MALE NPT x 1 ¼” FEMALE NPT
SWMF150 – 1 ½” MALE NPT x 1 ½” FEMALE NPT
SWMF200 – 2” MALE NPT x 2” FEMALE NPT
USA:
Dixon Bayco USA
Chestertown, Maryland
Phone: 410-778-2000
Fax: 410-778-4702
Toll Free: 800-355-1991
E-mail: dixonbayco@dixonvalve.com
www.dixonbayco.com
Canada:
Dixon Group Canada Limited
Innisfil (Barrie), Ontario
Phone: 705-436-1125
Fax: 705-436-6251
Toll Free: 877-963-4966
E-mail: [email protected]
www.dixongroupcanada.com
Mexico:
Dixva, S. de R.L. de C.V.
Monterrey, N.L
Phone: 01-800-00-DIXON (34966)
Fax: 01-81-8354-8197
E-mail: [email protected]m.mx
www.dixonvalve.com
Europe:
Dixon Group Europe Ltd
Preston, England
Phone: +44 (0)1772 323529
Fax: +44 (0)1772 314664
E-mail: enqu[email protected]
www.dixoneurope.co.uk
Asia Pacific:
Dixon (Asia Pacific) Pty Ltd
Wingfield, South Australia
Phone: +61 8 8202 6000
Fax: +61 8 8202 6099
E-mail: [email protected]
www.dixonvalve.com.au
For Sales & Service Contact

2 090102 R5
IMPORTANT: To properly operate and maintain your DIXON BAYCO hose swivel the
following instructions are provided. Please read with care as improper handling or
maintenance may cause a hazardous condition.
CAUTION: Do not modify your DIXON BAYCO hose swivel for any reason. It could
result in a hazardous condition due to operating difficulties or malfunction.
Disassembly or tampering will void the product warranty.
Installation: DIXON BAYCO hose swivels are properly adjusted, tested and ready to
use upon leaving the factory. When connecting the hose swivel to the hose or pipe
fitting, apply a thin layer of a suitable thread sealant (such as DIXON “LCTS 1”) to
the male threads on both the hose swivel and the connecting fitting. Tighten each end
snugly to ensure a leak proof connection. WARNING: DO NOT over-tighten during
installation. DO NOT use a pipe wrench, which can cause distortion of the body and
possible leakage. A spanner or crescent wrench is recommended. Tightening with a
pipe wrench WILL VOID WARRANTY.
Care & Handling: DIXON BAYCO hose swivels are tested at the factory and are in
proper working condition when shipped. Hose swivels are designed to be tough and to
provide long service with reasonable care and handling. However, never drag hose
swivels across rough surfaces as this may cause damage and malfunction. Immediately
remove from service any hose swivel that is not performing satisfactorily.
Inspect for Loose Set-Screws: Hose swivels can fail to perform properly if not
maintained. Occasionally check all three set-screws for tightness. If found to be loose,
retighten securely; take care not to strip the threads. If one or more set-screws is
missing, immediately replace with a new set-screw and lock washer. Please see back
page for available repair kits.
Lubrication:
DIXON BAYCO supplies each hose swivel already lubricated. However, should the
hose swivel become difficult to rotate it is recommended to re-lubricate. The hose
swivel can be lubricated without disassembly. HOWEVER, MAKE SURE THE
HOSE SWIVEL IS NOT UNDER PRESSURE. DAMAGE TO THE COMPONENTS
OR PERSONAL INJURY MAY OCCUR!
Order repair kit SWMF-RK1.
Remove one of the three set-screws (3) from the hose swivel with a 1/8” hex key.
Insert the grease-fitting adapter into the screw hole; connect grease fitting to
adapter; be careful not to strip the threads inside the screw hole!

3 090102 R5
Apply a lubricating product until it begins to emerge through the screw holes
(loosen one additional screw to ease emerging grease) or from the dust seal end. It
is highly recommended to use such a product as DuPont Krytox GPL-204 to ensure
superior cold temperature performance and longevity of the internal seals.
Remove grease-fitting adapter; reinsert the set-screw (3) complete with lock washer
(4); tighten snug, but be careful not to strip the threads!
Inspection and Rebuild: The DIXON BAYCO hose swivel may be rebuilt while still
connected to the hose fittings. However, the hose line must be depressurized and
completely emptied prior to disassembly TO AVOID COMPONENT DAMAGE OR
PERSONAL INJURY!
Remove all three set-screws (3) and lock washers (4); gently pull swivel housing
(1A/1B and 2A/2B) apart.
Remove dust seal (13) and rear bearing (10); remove front bearing (9); remove o-
ring holder complete with o-ring seals (7, 11, 12); remove support washer (14).
At this point it may be decided to simply replace the main seals (7, 11, 12), the dust
seal (13) and the radial bearings (10, 9). If this is the case, use repair kit SWMF-RK2 /
SWMF-RK22. Then, skip the next two disassembly steps and proceed to the bottom
paragraph describing reassembly. However, if a complete rebuild is required
(including ball bearing [5, 6] and support ring [15]), use repair kit SWMF-RK3 /
SWMF-RK32 and proceed with the following instructions.
Remove retaining ring (8) with proper removal pliers, be careful NOT TO
SCRATCH any sealing surfaces on the swivel inlet (2A/2B) when pulling off.
Remove thrust washers (6) and thrust bearing (5); remove support ring (15).
Thoroughly wipe off the old grease from all removed components with a clean rag.
Visually examine all components. Remove any burrs and sharp edges that could
damage the seals during reassembly. Replace any damaged parts. Before assembly,
liberally apply lubricant (DuPont Krytox GPL-204 is recommended) to the inside
diameter of the swivel body (1A/1B), the outside diameter of the swivel inlet (2A/2B),
the o-ring holder complete with o-ring seals (7, 11, 12), and the thrust bearing (5).
Reinstall all components in reverse order as disassembly instructions.
DIXON BAYCO WARRANTY: For complete Warranty information, please refer to
the inside back cover of the latest Dixon Catalogue.

4 090102 R5
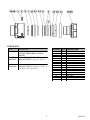
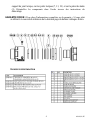
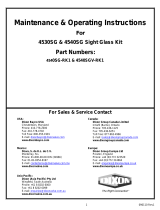
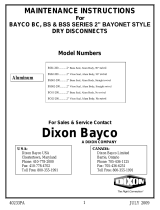
REPAIR KITS
ITEM NO. QTY. DESCRIPTION
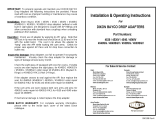
1A 1 SWIVEL BODY 1-1/4" NPT
1B 1 SWIVEL BODY 1-1/2" NPT
2A 1 SWIVEL INLET 1-1/4" NPT
2B 1 SWIVEL INLET 1-1/2" NPT
3 3 SCREW
4 3 LOCK WASHER
5 1 THRUST BEARING
6 2 THRUST WASHER
7 1 O-RING HOLDER
8 1 RETAINING RING
9 1 FRONT BEARING
10 1 REAR BEARING
11 1 O-RING
12 1 O-RING
13 1 DUST SEAL
14 1 SUPPORT WASHER
15 1 SUPPORT RING
CODE DESCRIPTION
SWMF-RK1
GREASE FITTING KIT
INCLUDES GREASE NIPPLE, SCREW
ADAPTER
SWMF-RK2
SWMF-RK22
SWIVEL SEAL AND WEAR KIT
INCLUDES ITEMS 7, 9, 10, 11, 12, 13
SWMF-RK3
SWMF-RK32
SWIVEL COMPLETE REBUILD KIT
INCLUDES ITEMS 3 (3), 4 (3), 5, 6 (2), 7,
8, 9, 10, 11, 12, 13, 14, 15

1 090102(fr) R5
Installation & Mode d’emploi
pour
“RACCORD DE BOYAU PIVOTANT” BAYCO
Pour l’utilisation avec boyau pour pétrole, mazout & chauffage à
l‘lhuile
Numéro des pièces:
SWMF125 – 1 ¼” MÂLE NPT x 1 ¼” FEMELLE NPT
SWMF150 – 1 ½” MÂLE NPT x 1 ½” FEMELLE NPT
SWMF200 – 2” MÂLE NPT x 2” FEMELLE NPT
E-U:
Dixon Bayco USA
Chestertown, Maryland
Téléphone: 410-778-2000
Fax: 410-778-4702
Sans frais: 800-355-1991
E-mail: dixonbayco@dixonvalve.com
www.dixonbayco.com
Canada:
Dixon Group Canada Limited
Innisfil (Barrie), Ontario
Téléphone: 705-436-1125
Fax: 705-436-6251
Sans frais: 877-963-4966
E-mail: [email protected]
www.dixongroupcanada.com
Mexique:
Dixva, S. de R.L. de C.V.
Monterrey, N.L
Téléphone: 01-800-00-DIXON (34966)
Fax: 01-81-8354-8197
E-mail: [email protected]m.mx
www.dixonvalve.com
Europe:
Dixon Group Europe Ltd
Preston, England
Téléphone: +44 (0)1772 323529
Fax: +44 (0)1772 314664
E-mail: [email protected]
www.dixoneurope.co.uk
Asie et Pacifique:
Dixon (Asia Pacific) Pty Ltd
Wingfield, South Australia
Téléphone: +61 8 8202 6000
Fax: +61 8 8202 6099
E-mail: [email protected]
www.dixonvalve.com.au
Pour vente & service contactez

2 090102(fr) R5
IMPORTANT: Pour un bon fonctionnement et pour bien entretenir votre raccord de
boyau pivotant Bayco les instructions suivantes sont fournies. S’il vous plaît lire avec
soin, car une manipulation incorrecte ou un mauvais entretien peut provoquer une
situation dangereuse.
ATTENTION : Ne modifiez pas votre raccord de boyau pivotant Bayco pour aucune
raison. Il peut en résulter une situation dangereuse causée par les difficultés de
fonctionnement pendant une opération. Le démontage ou une modification annulera
la garantie du produit.
Installation : Les raccords de boyau pivotant Bayco sont ajustés, testés et prêt à être
utiliser lorsqu’ils quittent la manufacture. Lorsque vous connectez votre raccord de
boyau pivotant, appliquez une couche mince d’un produit d’étanchéité à raccords sur
le filage male du raccord de boyau pivotant et le filage male de la connexion du boyau.
Serrez les deux extrémités fermement pour assurer une bonne connexion sans fuites.
AVERTISSEMENT : Ne les serrez pas trop fort durant l’installation, N’utilisez pas
une clé à tuyau, car cela pourrait déformer la pièce et causer une fuite. Une clé à
molette est recommandée. Si vous les serrez avec une clé à tuyau votre GARANTIE
SERA ANNULÉE.
Soin et manipulation : Les raccords de boyau pivotant Bayco sont testés à la
manufacture et sont en bonne conditions lorsqu’ils sont expédiés. Les raccords de
boyau pivotant sont conçus pour être résistants et offrir un long service si on en prend
soin et les utilisent raisonnablement. Ne trainez jamais votre raccord de boyau pivotant
sur des surfaces rugueuses ca cela pourrait endommager le produit et lui causé de ne
pas fonctionner proprement. Mettez tous les raccords de boyau pivotant hors service
s’ils ne fonctionnent pas de façon satisfaisante.
Inspection pour les vis relâchées : Les raccords de boyau pivotant peuvent ne pas
performer correctement s’ils ne sont pas bien entretenus. Occasionnellement, vérifiez
si les trois vis sont serrées. Si elles sont relâchées, resserrez-les en place faites
attention à ne pas endommagé les filets de la pièce. Si une ou plusieurs vis sont
manquantes, remplacez-les immédiatement avec de nouvelles vis et rondelles de
verrouillage. Regardez la dernière page pour les trousses de réparations disponible.
Lubrification:
Chaque raccord de boyau pivotant Dixon mis sur le marché est lubrifié d’avance.
Cependant, si le raccord de boyau pivotant devient difficile à tourner nous vous
recommandons de le lubrifier une autre fois. Le raccord de boyau pivotant peut être
lubrifié sans être démonté. ASSUREZ-VOUS QUE LE RACCORD DE BOYAU
PIVOTANT NE SOIT PAS SOUS PRESSION. LES COMPOSANTS PEUVENT
ÊTRE ENDOMMAGÉS OU UN ACCIDENT POURRAIT EN RÉSULTER!

3 090102(fr) R5
Commandez la trousse de réparation SWMF-RK1.
Retirez une des trois vis (3) du raccord de boyau pivotant avec une clé hexagonale
de 1/8”.
Insérez le graisseur dans le trou de la vis; connectez le graisseur à l’adaptateur
mais faites attention à ne pas endommager les filets à l’intérieur du trou de la vis.
Appliquez un lubrifiant jusqu’à ce qu’il commence à sortir du trou (relâchez une
vis additionnelle pour permettre à la graisse de sortir) ou le bout à joint anti-
poussière. Nous vous recommandons d’utiliser un produit comme Dupont Krytox
GPL-204 pour assurer une performance supérieure durant les températures froides
et pour la longévité des joints internes.
Retirez le graisseur, réinsérez la vis (3) complète avec la rondelle de verrouillage
(4) serrez-la fermement, mais faites attention pour ne pas endommager les filets!
Inspection & assemblage : Le pivot de boyau Bayco peut être reconstruit pendant
qu’il est connecté aux raccords à boyaux. Cependant, le boyau ne doit pas être sous
pression et doit être complètement vide avant le démontage AFIN D’ÉVITER AUX
COMPOSANTS D’ÊTRE ENDOMMAGÉS ET UN ACCIDENT POURRAIT EN
RÉSULTER!
Retirez les trois vis (3) et les rondelles de verrouillage (4); retirez le pivot (1A/1B
et 2A/2B) délicatement.
Retirez l’étanchéité anti-poussière (13), le roulement arrière (10), le roulement
avant (9), le support pour joint torique et les joints toriques (7, 11, 12),
l’étanchéité anti-poussière (13) et les roulements radiaux (10, 9). Dans ce cas
utilisez la trousse de réparation SWMF-RK2 / SWMF-RK22. Ensuite, passez les
deux prochaines étapes de démontage et continuez au dernier paragraphe
décrivant le remontage. Cependant, si un remontage complet est demandé
(incluant roulement à billes 5, 6 et support à anneau 15), utilisez la trousse de
réparation SWMF-RK3 / SWMF-RK32 et continuez avec les instructions
suivantes.
Retirez l’anneau de retenue (8) avec une paire de pince appropriée, faites attention
à NE PAS ÉGRATIGNER aucunes surfaces d’étanchéité à l’embouchure du pivot
(2A/2B) lorsque vous le retirez.
Retirez la rondelle de butée (6) et le palier de butée (5); retirez le support à anneau
(15). Enlevez toute la vielle graisse sur tous les composants avec un chiffon.
Examinez tous les composants visuellement. Enlevez les bavures et les bordures
aiguisée qui pourraient endommager les joints durant le rassemblement.
Remplacez toutes les pièces endommagées. Avant le remontage, appliquez un
lubrifiant anti-barrage (Dupont Krytox) à l’intérieur du diamètre du pivot
(1A/1B), à l’extérieur du diamètre de l’embouchure du pivot (2A/2B), sur le

4 090102(fr) R5
support du joint torique, sur les joints toriques (7, 11, 12) et sur le palier de butée
(5). Réinstallez les composants dans l’ordre inverse des instructions du
démontage.
GARANTIE DIXON : Pour plus d’informations complètes sur la garantie, s’il vous plait
se référer à la couverture intérieure de la dernière page du dernier catalogue Dixon.
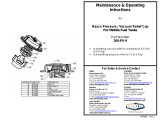
TROUSSES DE RÉPARATION
-
 1
1
-
 2
2
-
 3
3
-
 4
4
-
 5
5
-
 6
6
-
 7
7
-
 8
8


Dixon 1 1/4, 1 1/2 & 2 NPT Fuel Swivels SWMF125, 150 & 2 Manuel utilisateur
- Taper
- Manuel utilisateur
- Ce manuel convient également à
dans d''autres langues
Documents connexes
-
Dixon 1 1/4 & 1 1/2 Ball Nozzles (BL062 -BL072) Manuel utilisateur
-
 Dixon 5300SH & 5400SH-Series Short Handle API Rack Couplers Manuel utilisateur
-
 Dixon 4530SG & 4540SG-Series Sight Glass Removal Drop Adapters Manuel utilisateur
-
 Dixon 1 1/2 & 2 DBC Series Dry Disconnect Coupler Cam & Groove Manuel utilisateur
-
 Dixon 4530, 4540, and 4540SG-Series Drop Adapters Manuel utilisateur
-
 Dixon Air-Operated Sequential Vapor Valve (VR6030SQ & VR Vents Manuel utilisateur
-
 Dixon 1 1/4 & 1 1/2 BL Series Ball Nozzle Swivel (BL005) Manuel utilisateur
-
 Dixon BS Series Cam & Groove Dry Disconnect Coupler Repair Manuel utilisateur
-
 Dixon 2" Mobile Tank Vent Cap (200-PV-9) Manuel utilisateur
-
 Dixon 2180/3180-Series Dry Bulk Air Relief Valves Manuel utilisateur


