3M PELTOR WS ALERT XP MRX21A2WS6-NA Manuel utilisateur
- Catégorie
- Casques
- Taper
- Manuel utilisateur
Ce manuel convient également à

3M™ PELTOR™ WS™ ALERT™ XP Headset
MRX21A2WS6-NA, MRX21P3E2WS6-NA
The Sound Solution

g 1
g 2
g 3
g 4
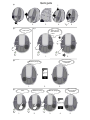
Quick guide
1
2
1. 2. 3. 4. 5.
2 s
1 s
1 s
“Bluetooth
®
pairing on”
“Pairing complete”
“Connected”
g 5
2s
1. 2.
1. 2.
x1
1s
3.
1s
1. 2. 3.
“Menu”
“Bluetooth
®
pairing on”
“Pairing complete”
“Connected”
4. 5.
“Power on/off”
“Radio, Surround,
Music, Bluetooth
®
volume”
“Bluetooth
®
pairing”

g 6
g 9
1s
x1
Or
1s
g 7
g 8
1s
x3
Or
“1, 2, 3 & 4”
1s
“Store station”
2s
“Conrmed”
1. 2. 3.
1s
x2
Or
1s
“Preset station”
1. 2.
g 10
2s
“Menu”
1s
“Bluetooth
®
pairing”
“Bass boost”
“Surround balance”
“Surround equalizer”
“Sidetone volume”
“Battery type”
“Reset to factory default”
1. 2. 3.
Or
1s
1. 2.

“Conrmed”
g 11
2s
“Menu”
1.
2. 3.
x7
4.
“Reset complete”
“Power off”
“Hold menu button
to conrm”
Reset to factory default
“Reset to factory default”
(D:9)
(D:1)
(D:2)
(D:12)
(D:11)
(D:8)(D:10)(D:5)(D:4)(D:3)
(D:7)
(D:6)
1s
1s
2s

(E:1) (E:2) (E:3)
(E:4)
(E:5)
(E:6)
(E:7)
(F:1) (F:2) (F:3)
(G:1)
(E:8)

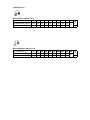
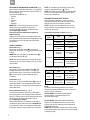
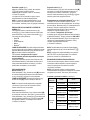
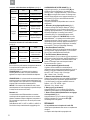
(A) ANSI S3.19-1974
MRX21A2WS6-NA ANSI S3.19-1974
A:1 Frequency (Hz) (ƒ) 125 250 500 1000 2000 3150 4000 6300 8000 NRR
CSA
Class
A:2 Mean attenuation (dB) (M
f
) 13.8 19.9 28.5 32.6 34.1 37.7 39.3 38.8 39.3
23
A:3 Standard deviation (dB) (s
f
) 2.9 2.2 2.3 2.7 3.2 2.5 2.9 2.4 3.0 A
MRX21P3E2WS6-NA ANSI S3.19-1974
A:1 Frequency (Hz) (ƒ) 125 250 500 1000 2000 3150 4000 6300 8000 NRR
CSA
Class
A:2 Mean attenuation (dB) (M
f
) 15.4 19.8 29.5 33.3 34.9 37.0 39.0 38.3 38.5
24
A:3 Standard deviation (dB) (s
f
) 1.9 2.8 2.3 2.6 2.9 2.9 3.8 4.6 5.4 A

EN 1-5
ES 6-11
FR 12-17
3M™ PELTOR™ WS™ ALERT™ XP Headset

1
3M™ PELTOR™ WS™ ALERT™ XP Headset
MRX21A2WS6-NA, MRX21P3E2WS6-NA
INTRODUCTION
Congratulations and thank you for choosing 3M™ PELTOR™
communication solutions! Welcome to the next generation of
protective communication.
INTENDED USE
These 3M™ PELTOR™ headsets are intended to provide
workers with protection against hazardous noise levels and
loud sounds while allowing the user to communicate with
built-in Bluetooth® technology, hear the surroundings via the
ambient microphones, and listen to FM radio. It is expected
that all users read and understand the provided user
instructions as well as be familiar with the use of this device.
IMPORTANT
Please read understand and follow all safety information in
these instructions prior to use. Retain these instructions for
future reference. For additional information or any questions,
contact 3M Technical Service (contact information listed on
the last page).
!
WARNING
This hearing protector helps reduce exposure to hazardous
noise and other loud sounds. Misuse or failure to wear
hearing protection at all times when exposed to
hazardous noise may result in hearing loss or injury.
For proper use, see supervisor, user instructions or call 3M
Technical Service. If your hearing seems dulled or you hear
a ringing or buzzing during or after any noise exposure
(including gunre), or for any other reason you suspect
a hearing problem, leave the noisy environment immediately
and consult a medical professional and/or your supervisor.
Failure to follow these instructions may result in serious
injury or death:
a. Listening to music or other audio communication may
reduce your situational awareness and ability to hear warning
signals. Stay alert and adjust the audio volume to the lowest
acceptable level.
b. To reduce the risks associated with igniting an explosion,
do not use this product in a potentially explosive atmosphere.
Failure to follow these instructions may reduce the
protection provided by the earmuff and may result
in hearing loss:
a. 3M strongly recommends individual t testing of hearing
protectors. If the NRR is used to estimate typical workplace
protection, 3M recommends that the noise reduction value be
reduced by 50% or in accordance with applicable regulations.
b. Ensure the hearing protector is properly selected, t,
adjusted, and maintained. Improper t of this device will reduce
its effectiveness in attenuating noise. Consult the enclosed
instructions for proper t.
c. Inspect the hearing protector before each use. If damaged,
select an undamaged hearing protector or avoid the noisy
environment.
d. When additional personal protective equipment is
necessary (e.g. safety glasses, respirators, etc.), select exible,
low prole temples or straps to minimize interference with the
earmuff cushion. Remove all other unnecessary articles (e.g.
hair, hats, jewelry, headphones, hygiene covers, etc.) that
could interfere with the seal of the earmuff cushion and reduce
the protection of the earmuff.
e. Do not bend or reshape the headband, and ensure there
is adequate force to hold the earmuffs rmly in place.
f. Earmuffs, and in particular cushions, may deteriorate with
use and should be examined at frequent intervals for cracking
and leakage, for example. When used regularly, replace the
ear cushions and foam liners at least twice a year to maintain
consistent protection, hygiene and comfort.
g. If the recommendations above are not adhered to, the
protection afforded by the ear-muffs will be severely impaired.
CAUTION
To reduce the risks associated with re, explosion and
burns, which if not avoided, could result in minor or
moderate injury or property damage:
a. Use only 3M™ PELTOR™ USB charger FR09 and 3M™
PELTOR™ USB wall adapter FR08 with 3M™ PELTOR™
LR6NM rechargeable batteries.
b. The battery may not be charged if the ambient temperature
exceeds +113 °F (45 °C).
CAUTION:
For noise environments dominated by frequencies below
500 Hz the C-weighted environmental noise level should be
used.
CAUTION:
Risk of explosion if battery is replaced by an incorrect type.
NOTE:
• When worn according to the user instructions, this hearing
protector helps reduce exposure to both continuous noises,
such as industrial noises and noises from vehicles and
aircraft, as well as very loud impulse noises. It is difcult
to predict the required and/or actual hearing protection
obtained during exposure to impulse noises. Proper
selection, t and use of hearing protection, proper care of
hearing protection, and other variables will impact
performance. To learn more about hearing protection for
impulse noise, visit www.3M.com/PELTOR.
• Although hearing protectors can be recommended for
protection against the harmful effects of impulsive noise, the
Noise Reduction Rating (NRR) is based on the attenuation
of continuous noise and may not be an accurate indicator of
the protection attainable against impulsive noise such as
gunre (wording required by EPA).
• This hearing protector limits the entertainment audio signal
to 82 dBA effective to the ear.
• Operating temperature range: –4°F (-20°C) to 131°F (55°C)
• Storage temperature range: –4°F (-20°C) to 131°F (55°C)
EN

2
EN
• In Canada, users of hard hats combined with earmuffs must
refer to CSA Standard Z94.1 on industrial protective
headwear.
LABORATORY ATTENUATION
WARNING! 3M strongly recommends individual t testing
of hearing protectors. If the NRR is used to estimate
typical workplace protection, 3M recommends that the
noise reduction value be reduced by 50% or in
accordance with applicable regulations.
Explanation of attenuation tables
ANSI S3.19-1974
A:1 Frequency (Hz)
A:2 Mean attenuation (dB)
A:3 Standard deviation (dB)
The level of noise entering a person’s ear, when hearing
protector is worn as directed, is closely approximated by the
difference between the A-weighted environmental noise level
and the NRR.
Example
1. The environmental noise level as measured at the ear is 92
dBA.
2. The NRR is 23 decibels (dB).
3. The level of noise entering the ear is approximately equal
to 69 dB(A).
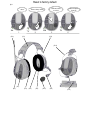
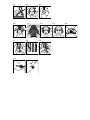
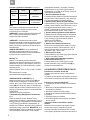
Headband MRX21A2WS6-NA
D:1 Headband (PVC, PA)
D:2 Headband wire (stainless steel)
D:3 Two-point fastener (POM)
D:4 Cushion (PVC foil and PUR foam)
D:5 Foam liner (PUR foam)
D:6 Cup (ABS)
D:7 Level-dependent microphone for ambient listening
(PUR foam)
D:8 Speech microphone (ABS, PA)
D:9 Antenna (PE, ABS, TPE)
D:10 Wind shield (foam)
D:11 Charger jack (stainless steel)
Helmet attachment/Hardhat
MRX21P3E2WS6-NA
D:12 Cup supporting arm (stainless steel)
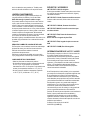
FITTING INSTRUCTIONS
Headband
E:1 Slide out the cups and tilt the top of the shell out, as the
cable must be on the outside of the headband.
E:2 Adjust the height of the cups by sliding them up or down
while holding the headband in place.
E:3 The headband should be positioned across the top of the
head as shown and should support the weight of the headset.
Safety Helmets Attachment
E:4 Insert the hard hat attachment in the slot on the
hard hat and snap it into place E:5.
E:6 Ventilation mode: To switch the unit from work mode
to ventilation mode, pull outward on the ear cups until you
hear a click E:7.
E:8 Avoid placing the cups against the hard hat as this
prevents ventilation.
OPERATING INSTRUCTIONS
CHARGING AND REPLACING THE BATTERIES (g. 1)
1. Detach the latch on the left cup with your ngers.
2. Open the cup.
3. Insert or replace the batteries. Make sure the polarity
corresponds to the markings.
4. Close the cup and lock the latch. Change the battery type
if you are switching from rechargeable to non rechargeable.
Long press (2 s) the Menu button [M] to access the
conguration menu, see “Conguring your headset”.
CAUTION: Use only 3M™ PELTOR™ USB charger
FR09 and 3M™ PELTOR™ USB wall adapter FR08
with 3M™ PELTOR™ LR6NM rechargeable batteries
(or equivalent AA Ni-MH rechargeable batteries.)
CAUTION: The battery may not be charged if the
ambient temperature exceeds +113 °F (45 °C).
NOTE:
- Do not charge alkaline batteries as this may cause damage
to the headset.
- Only use AA non-rechargeable or Ni-MH rechargeable
battery.
- Do not mix old and new batteries. Do not mix alkaline,
standard, or rechargeable batteries. To properly dispose
of the battery, follow local solid waste disposal regulations.
OPERATION TIME
Approximate use time with new AA alkaline batteries and fully
charged LR6NM rechargeable batteries (2100mAh):
- FM radio and level-dependent: approx 58 hours
- Bluetooth
®
streaming and level-dependent: approx 78 hours
NOTE:
Depending on the environment, temperature, and battery,
the operation time may vary.
POWER ON/POWER OFF (g. 2)
Long press (2 s) the Power button [ ] to power the
headset on or off.
A voice message will notify “Power on” or “Power off”.
The rst time the headset is powered on, it automatically
enters pairing mode.
NOTE: If no button has been pressed for 4 hours, the headset
will automatically be powered off. A voice message will notify
“Automatic power off”.

3
ADJUSTING THE SOUND SOURCE VOLUME LEVEL (g. 3)
Adjust the sound volume level, short press (1 s) the [
+
] or [–]
button. Change the active sound source by short press (1 s)
the Power button [ ].
The sound source can either be:
• FM radio
• Phone
• Surround
• Music
• Bluetooth
®
SMART TIP: You can congure bass boost, surround
balance, and surround equalizer. Long press (2 s)
the Menu button [M] to access the conguration menu.
See Conguring your headset.
Surround sound (Level-dependent microphone for
ambient listening)
Helping protect your hearing from potentially harmful noise
levels. Constant rumbling and other potentially harmful noises
are reduced, and you can still speak normally and make
yourself heard.
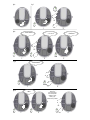
LISTEN TO FM RADIO
Search station (g. 7)
Short press (1 s) the Menu button [M] to enter search
station mode. Short press (1 s) the [
+
] or [–] button to initiate
a search.
SMART TIP: If you short press (1 s) the Menu button [M],
you will always start the FM radio.
NOTE: Radio reception depends on the topography and the
environment you are in. If the reception is poor, try to change
area if possible.
Store station (g. 8)
Short press (1 s) three times the Menu button [M], voice
message “Store station”. Short press (1 s) the [
+
] or [–]
button to select position. Long press (2 s) the Menu button
[M] to store the station. A voice message will conrm
“Conrmed”.
Preset station (g. 9)
Short press (1 s) two times the Menu button [M] to enter the
preset station mode. A voice message will conrm “Preset
station”. Short press (1 s) the [
+
] or [–] button to browse and
select preset station.
Pairing a Bluetooth
®
device (g. 2, g. 4)
The rst time the headset is powered on, it automatically
enters pairing mode. A voice message conrms, “Bluetooth
®
pairing on”. Pairing mode can also be entered from the menu.
This is necessary for pairing a second device (g. 5).
See Conguring your headset.
Make sure that Bluetooth
®
communication is activated on
your Bluetooth
®
device. Search and select “WS ALERT XP”
on your Bluetooth
®
device. A voice message conrms when
the pairing is complete, “Pairing complete” and “Connected”.
NOTE: You can always stop the pairing process by long
press (2 s) the Bluetooth
®
button [ ] (g. 6).
NOTE: The headset only supports two-way radio with 3M™
PELTOR™ Push-to-talk protocol. Any questions, please
contact your local distributor.
RECONNECTING BLUETOOTH
®
DEVICES
When the headset is powered on, it tries to reconnect
to last paired/connected device during 5 minutes. A voice
message will conrm the connection “Connected”.
NOTE: If the link is lost, the headset will try to reconnect
during 30 seconds. A voice message will inform you if you
get link loss, “Disconnect”.
Connected and operating one phone. (see g. 6)
Bluetooth
®
button
State Action
Short press
No activity Voice control
Streaming Voice control
Incoming call Answer
Outgoing call/Call
in progress
End call
Long press
No activity/
Streaming
Call the last dialed
number
Incoming call Reject
Call in progress
Toggle call between
phone/headset
Connected and operating two-way radio. (see g. 6).
Bluetooth
®
button
State Action
Press No activity
Start transmitting on
two-way radio
Release
Transmitting on
Two-way radio
Stop transmitting on
two-way radio
NOTE:
To maintain noise cancelling performance, the speech
microphone should be positioned very close to your mouth
(less than 1/8 inch or 3mm) G:1.
DID YOU KNOW: The headset supports Bluetooth
®
streaming A2DP 1.3 from different apps or from
the phone’s media player.
DID YOU KNOW: Audio playback will be automatically
paused from audio playback unit when you have a call in
progress. After end call / message the audio playback will
automatically start again.
SMART TIP: If the headset has been reset to factory default,
it automatically enters pairing mode the rst time the headset
is powered on again.
EN

4
Bluetooth
®
4.2
Bluetooth
®
wireless communication is a global standard that
connects devices together over a certain distance. Think
headset and phone, speaker and PC to smartphone and
more. Read more on www.bluetooth.com.
Bluetooth
®
proles HSP 1.2, HFP 1.6, A2DP 1.3, AVRCP 1.6.
More info on https://www.bluetooth.org/tpg/listings.cfm.
CONFIGURING YOUR HEADSET (g. 10)
Long press (2 s) the Menu button [M] to access the
conguration menu. A voice message will conrm “Menu”.
Short press (1 s) the Menu button [M] to navigate through the
menu. A voice message will conrm each menu step. Short
press (1 s) the [
+
] or [–] button to activate/deactivate/change
different congurations.
The following options exists in the conguration menu:
1. Bluetooth
®
pairing (g. 5)
When the voice message says “Bluetooth
®
pairing”, short
press (1 s) the [
+
] button to start pairing. Short press (1 s)
the [–] button to stop pairing. A voice message will conrm
“Bluetooth
®
pairing on”. Search and select “WS ALERT XP”
on your Bluetooth
®
device. A voice message will conrm when
pairing is complete “Pairing complete” and “Connected”. Short
press (1 s) the [–] button to stop the pairing. A voice message
will conrm, “Pairing off”.
2. Bass boost
Bass boost gives a fuller bass sound to streamed stereo
music. Short press (1 s) the [
+
] or [–] button to enable/disable
bass boost.
3. Surround balance
Short press (1 s) the [–] button will increase left side and
reduce right side. Short press (1 s) the [
+
] button will increase
right side and reduce left side. A voice message will notify
when the surround balance is centered, “Center”.
4. Surround equalizer
Surround equalizer changes the frequency characteristics
of the surround sound. Short press (1 s) the [–] or [
+
] button
to change the surround equalizer levels,
“Low – Normal – High – Extra high”.
5. Sidetone volume
Sidetone is audible feedback to the headset user during a
conversation. Short press (1 s) the [–] or [
+
] button to change
the sidetone volume, “Off – Low – Normal – High”.
6. Battery type
Short press (1 s) the [–] or [
+
] button to change the battery
type to either rechargeable or alkaline.
7. Reset to factory default (g. 11)
Short press (1 s) the [–] or [
+
] button, then long press (2 s)
the Menu button [M]. A voice message will guide you.
TROUBLESHOOTING
I have problem with the FM radio reception
Check that the batteries are new or fully charged.
Radio reception depends on topography and the environment
you are in. If the reception is poor, try to change area.
I have Bluetooth
®
connection problem
1. Check that the batteries are new or fully charged.
2. Remove all Bluetooth
®
devices that are synchronized
to your phone.
3. Reboot the phone (power on/off your phone).
4. Do a factory reset on the headset.
5. Pair your headset to your phone.
6. If the problem remains, try to pair another phone to see
if it helps.
I hear crackling noises during streaming/phone call.
Bluetooth
®
radio technology can be sensitive to objects
between the headset and the device it is connected to. You
should be able to have up to 10 meters of distance between
the headset and the connected device if line of sight (i.e. no
walls etc). Even the location of the phone on the body may be
of signicance.
CLEANING AND MAINTENANCE
Use a cloth wetted with soap and warm water to clean the
outer shells, headband and ear cushions.
NOTE: Do NOT immerse the hearing protector in water.
If the hearing protector gets wet from rain or sweat, turn the
earmuffs outwards, remove the ear cushions and foam liners
and allow to dry 24h before reassembly. The ear cushions
and foam liners may deteriorate with use and should be
examined at regular intervals for cracking or other damage.
When used regularly, 3M recommends replacing the foam
liners and ear cushions at least twice a year to maintain
consistent attenuation, hygiene and comfort. If an ear cushion
is damaged, it should be replaced. See Spare Parts Section
below.
REMOVING AND REPLACING THE EAR CUSHIONS
F:1 To remove the ear cushion, slide your ngers under the
inside edge of the ear cushion and rmly pull straight out.
F:2 Remove existing liner(s) and insert new foam liner(s).
F:3 Fit one side of the ear cushion into the groove of the
earcup and then press on the opposite side until ear cushion
snaps in place.
USE AND STORAGE CONDITIONS
• Remove the batteries before storing the product.
• Do not store the hearing protector at temperatures
above +131 °F (55°C) (for example on a dashboard, parcel
shelf or window sill) or at temperatures below –4 °F (-20°C).
• Do not use the hearing protector at temperatures
above +131 °F (55°C), or below –4 °F (-20°C).
EN

5
SPARE PARTS AND ACCESSORIES
3M™ PELTOR™ HY82, Hygiene Kit
Replaceable hygiene kit. Replace at least twice a year to ensure
constant attenuation, hygiene and comfort.
3M™ PELTOR™ HY100A, Single-use protectors
Single-use protector that is easy to t to the ear cushions.
3M™ PELTOR™ HYM1000, Microphone protection
3M™ PELTOR™ M995/2, Wind shield for speech
microphone
3M™ PELTOR™ FR08, Power supply with USB connector
NOTE! Only use battery charger FR09.
3M™ PELTOR™ FR09, Battery charger with
USB connector
3M™ PELTOR™ LR6NM, Rechargeable AA batteries
FCC AND ISED INFORMATION
This device complies with Part 15 of the FCC rules and
Innovation, Science and Economic Development Canada’s
license-exempt Radio Standards Specications.
Operation is subject to the following two conditions: (1) This
device may not cause harmful interference, and (2) this device
must accept any interference received, including interference that
may cause undesirable operation.
Note: This device has been tested and found to comply with the
limits for a Class B digital device, pursuant to part 15 of the FCC
Rules. These limits are designed to provide reasonable protection
against harmful interference in a residential installation. This
device generates, uses and can radiate radio frequency energy
and, if not installed and used in accordance with the instructions,
may cause harmful interference to radio communications.
However, there is no guarantee that interference will not occur
in a particular installation. If this device does cause harmful
interference, which can be determined by turning the device off
and on, the user is encouraged to try to correct the interference
by one or more of the following measures:
Reorient or relocate the receiving antenna.
Increase the separation distance between the two interfering
devices.
Consult 3M Technical Service.
CAN ICES-3 (B)/NMB-3(B)
WARRANTY AND LIMITATION OF LIABILITY
WARRANTY: In the event any 3M Personal Safety Division
product is found to be defective in material, workmanship or
not in conformity with any express warranty for a specic
purpose, 3M’s only obligation and your exclusive remedy shall
be at 3M’s option, to repair, replace or refund the purchase
price of such parts or products upon timely notication of the
issue by you and substantiation that the product has been
stored, maintained and used in accordance with 3M’s written
instructions. EXCEPT WHERE PROHIBITED BY LAW, THIS
WARRANTY IS EXCLUSIVE AND IS IN LIEU OF ANY
EXPRESS OR IMPLIED WARRANTY OF MERCHANTABIL-
ITY, FITNESS FOR A PARTICULAR PURPOSE OR OTHER
WARRANTY OF QUALITY OR THOSE ARISING FROM A
COURSE OF DEALING, CUSTOM OR USAGE OF TRADE,
EXCEPT OF TITLE AND AGAINST PATENT INFRINGE-
MENT: 3M has no obligation under this warranty with respect
to any product that has failed due to inadequate or improper
storage, handling or maintenance; failure to follow product
instructions or alteration or damage to the product caused by
accident, neglect or misuse.
LIMITATION OF LIABILITY: EXCEPT WHERE PROHIBITED
BY LAW, IN NO EVENT SHALL 3M BE LIABLE FOR ANY
DIRECT, INDIRECT, SPECIAL, INCIDENTAL OR
CONSEQUENTIAL LOSS OR DAMAGES (INCLUDING
LOST PROFITS) ARISING FROM THIS PRODUCT,
REGARDLESS OF THE LEGAL THEORY ASSERTED.
THE REMEDIES SET FORTH HEREIN ARE EXCLUSIVE.
NO MODIFICATION: Modications to this device shall not
be made without the written consent of 3M Company.
Unauthorized modications may void the warranty and the
user’s authority to operate the device.
BATTERY DISPOSAL
Many rechargeable batteries are required to be recycled by
local, state/province, and national laws. To properly recycle/
dispose of the battery or battery pack, always follow local
solid waste disposal regulations. Additionally in the United
States and Canada, 3M Company is partnering with
Call2Recycle (RBRC) to provide recycling service to you to
help ensure that the rechargeable batteries within our
products are recycled properly. To assist you in using this
service call the Call2Recycle battery recycling information
help line at 1-800-8-BATTERY (1-800-822-8837) or consult
Call2Recycle’s battery recycling guidance online at www.
call2recycle.org.
EN

6
3M™ PELTOR™ WS™ ALERT™ XP Headset
MRX21A2WS6-NA, MRX21P3E2WS6-NA
INTRODUCCIÓN
¡Felicidades y gracias por elegir soluciones de comunicación
3M™ PELTOR™! ¡Bienvenido a la siguiente generación
de comunicación protectora!
USO PREVISTO
Estas orejeras 3M™ PELTOR™ tienen por objeto
proporcionar a los trabajadores protección contra niveles
de ruido dañinos y sonidos fuertes, al mismo tiempo que
permiten al usuario comunicarse mediante tecnología
Bluetooth® integrada, escuchar a su alrededor mediante los
micrófonos ambientales y escuchar radio FM. Todos los
usuarios deben leer y comprender las instrucciones de
empleo proporcionadas y estar familiarizados con el uso de
este aparato.
¡IMPORTANTE!
Le rogamos que antes de usar la orejera lea, comprenda y
siga toda la información de seguridad de estas instrucciones.
Conserve estas instrucciones para referencia futura. Para
más información y consultas, contacte con el servicio técnico
de 3M (los datos de contacto están en la última página).
!
¡ADVERTENCIA!
Este protector auditivo ayuda a reducir la exposición a ruido
peligroso y otros sonidos fuertes. Si los protectores
auditivos se usan incorrectamente o si no se usan
siempre que se está expuesto a ruido peligroso, existe
riesgo de pérdida auditiva o lesiones en el oído. Para el
uso correcto, consultar con el supervisor, el manual de
instrucciones, o llamar al servicio técnico de 3M. Si el oído
parece atenuado o si se oye un pitido o zumbido durante
o después de la exposición al ruido (incluso disparos),
o si por cualquier otro motivo se sospecha la existencia de
un problema auditivo, abandonar inmediatamente el lugar
ruidoso y consultar a un médico y/o al supervisor.
La inobservancia de estas instrucciones comporta riesgo
de daños personales y peligro de muerte:
a. Escuchar música u otra comunicación por radio puede
reducir la percepción de la situación y la capacidad de
escuchar señales de advertencia. Permanecer alerta y regular
el volumen de audio al nivel más bajo aceptable.
b. Para reducir los riesgos de incendio y explosión, no usar
este producto en atmósferas potencialmente explosivas.
La inobservancia de estas instrucciones puede reducir
la protección proporcionada por las orejeras y comporta
riesgo de pérdida auditiva:
a. 3M recomienda encarecidamente probar el encaje de los
protectores auditivos. Si se usa NRR para estimar una
protección típica en lugar de trabajo, 3M recomienda bajar el
valor de reducción en un 50 % o según la normativa aplicable.
b. Comprobar que el protector auditivo se selecciona,
encaja, ajusta y mantiene correctamente. Un encaje
inadecuado de este aparato reducirá su ecacia atenuadora
de ruido. Consultar las instrucciones adjuntas para un encaje
adecuado.
c. Inspeccionar el producto cuidadosamente antes de cada
uso. Si el protector auditivo se daña, elegir un protector
auditivo en perfecto estado o evitar el entorno ruidoso.
d. Cuando es necesario usar equipo de protección individual
adicional (p.ej., lentes protectores, máscaras respiratorias,
etc.), usar patillas o cintas exibles de perl bajo para
minimizar la interferencia con la almohadilla de la orejera.
Quitar todos los artículos innecesarios (p.ej., cabello,
sombrero, joyas, auriculares, cubiertas higiénicas, etc.) que
puedan interferir con el sello de la almohadilla de la orejera
y reducir la protección de la misma.
e. No doblar ni cambiar la forma de la diadema, y asegurar
que haya fuerza suciente para retener la orejera rmemente
colocada.
f. La orejera, y especialmente las almohadillas, pueden
deteriorarse con el uso y deben revisarse con frecuencia para
ver si tienen grietas y fugas. Cuando la orejera se usa
regularmente, cambiar los aros de sellado y los revestimientos
de espuma por lo menos dos veces al año para mantener una
protección, higiene y comodidad constantes.
g. Si no se siguen estas recomendaciones, la protección
de la orejera puede resultar gravemente perjudicada.
PRECAUCIÓN
Para reducir los riesgos de incendio, explosión y
quemaduras que si no se evitan comportan riesgo
de daños personales pequeños o moderados o daños
materiales:
a. Con pilas recargables 3M™ PELTOR™ LR6NM, usar sólo
el cargador 3M™ PELTOR™ USB FR09 y el adaptador de
pared 3M™ PELTOR™ USB FR08.
b. Las pilas no se deben cargar si la temperatura ambiente
sobrepasa +113 °F (45 °C).
PRECAUCIÓN
Para entornos ruidosos en que predominan frecuencias de
menos de 500 Hz debería usarse el nivel de ruido ambiental
con ponderación C.
PRECAUCIÓN:
Riesgo de explosión si las pilas se sustituyen por unas
de tipo incorrecto.
NOTA:
• Este protector auditivo, cuando se usa según el manual
de instrucciones, ayuda a reducir la exposición a ruidos
continuos como ruidos industriales, ruido de vehículos
y aviones y ruidos impulsivos muy fuertes. Es difícil
pronosticar la protección auditiva necesaria y/o real
obtenida durante la exposición a ruidos impulsivos.
El rendimiento se verá afectado por la selección adecuada,
colocación y uso del protector auditivo, el cuidado adecuado
del mismo y otros factores. Para más información sobre
protección auditiva contra ruido impulsivo,
ES

7
ES
visitar www.3M.com/PELTOR.
• Aunque es posible recomendar protectores auditivos para
protección contra los efectos dañinos del ruido impulsivo, el
nivel de reducción de ruido (NRR) se basa en la atenuación
del ruido continuo y podría no ser un indicador preciso de la
protección posible contra ruido impulsivo como, por
ejemplo, disparos de armas de fuego (redacción requerida
por la Agencia de Protección Ambiental de Estados Unidos).
• Este protector auditivo limita a 82 dB(A) la señal de audio
de entretenimiento, efectiva en las orejas.
• Intervalo de temperaturas de funcionamiento:
entre –4 °F y 131 °F (–20 °C y 55 °C)
• Intervalo de temperaturas de almacenaje:
entre –4 °F y 131 °F (–20 °C y 55 °C)
• En Canadá, los usuarios de cascos de seguridad
combinados con orejeras deben referirse a la norma CSA
Standard Z94.1 sobre protecciones de cabeza de uso
industrial.
ATENUACIÓN EN LABORATORIO
¡ADVERTENCIA! 3M recomienda encarecidamente probar
el encaje de los protectores auditivos. Si se usa el nivel
de reducción de ruido (NRR) para estimar una protección
típica en lugar de trabajo, 3M recomienda bajar el valor
de reducción en un 50 % o según la normativa aplicable.
Explicación de las tablas de atenuación:
ANSI S3.19-1974
A:1 Frecuencia (Hz)
A:2 Atenuación media (dB)
A:3 Desviación normal (dB)
El nivel de ruido que entra en el oído de una persona cuando
se usa un protector auditivo tal como está indicado es muy
aproximado a la diferencia entre el nivel de ruido ambiental
con ponderación A y el valor NRR.
Ejemplo:
1. El nivel de ruido ambiental medido en el oído es de 92
dB(A).
2. El valor NRR es de 23 decibelios (dB).
3. El nivel de ruido que entra en el oído es aproximadamente
igual a 69 dB(A).
Diadema MRX21A2WS6-NA
D:1 Diadema (PVC, PA)
D:2 Cable de diadema (acero inoxidable)
D:3 Fijación de dos puntos (POM)
D:4 Almohadilla (hoja de PVC y espuma PUR)
D:5 Revestimiento de espuma (espuma PUR)
D:6 Copa (ABS)
D:7 Micrófono dependiente de nivel para escucha ambiental
(espuma PUR)
D:8 Micrófono de habla (ABS, PA)
D:9 Antena (PE, ABS, TPE)
D:10 Protección contra viento (espuma)
D:11 Jack de cargador (acero inoxidable)
Fijación de casco / casco de seguridad
MRX21P3E2WS6-NA
D:12 Brazo de soporte de copa (acero inoxidable)
INSTRUCCIONES DE COLOCACIÓN
Diadema
E:1 Abrir las copas e inclinar hacia fuera la parte superior de
la carcasa para que el cable quede en el exterior de la
diadema.
E:2 Ajustar la altura de las copas, moviéndolas hacia arriba o
abajo, manteniendo inmóvil la diadema.
E:3 La diadema debe atravesar la parte superior de la
cabeza, tal como se muestra, y aguantar el peso de la
orejera.
Fijación de casco de seguridad
E:4 Insertar la jación de casco de seguridad en la ranura
del casco y jarla a presión E:5.
E:6 Modo de ventilación: Para cambiar la unidad desde modo
de trabajo a modo de ventilación, tirar de las copas hacia
fuera hasta que suene un chasquido E:7.
E:8 No colocar las copas contra el casco de seguridad
porque impedirían la ventilación.
INSTRUCCIONES DE MANEJO
CARGA Y CAMBIO DE LAS PILAS (g 1)
1. Soltar con los dedos el cierre de la copa izquierda.
2. Abrir la copa.
3. Insertar o cambiar las pilas. La polaridad debe coincidir
con las marcas.
4. Cerrar la copa y jar el cierre. Cambiar el tipo de
pilas si se sustituyen pilas recargables por no recargables.
Mantener presionado (2 seg.) el botón de menú [M] para
acceder al menú de conguración; ver el apartado
“Conguración de la orejera”.
PRECAUCIÓN: Con pilas recargables 3M™ PELTOR™
LR6NM (o pilas recargables AA Ni-MH equivalentes, usar
sólo el cargador 3M™ PELTOR™ USB FR09 y el adaptador
de pared 3M™ PELTOR™ USB FR08.
PRECAUCIÓN: Las pilas no se deben cargar si la
temperatura ambiente sobrepasa +113 °F (45 °C).
NOTA:
- No intentar cargar pilas alcalinas. De hacerlo, se puede
dañar la orejera.
- Usar sólo pilas no recargables AA o pilas recargables
Ni-MH.
- No mezclar pilas viejas con nuevas. No mezclar pilas
alcalinas con normales o recargables. Para la eliminación
correcta de las pilas, seguir la normativa local en materia de
eliminación de residuos sólidos.
TIEMPO DE FUNCIONAMIENTO:
Tiempo de uso aproximado con pilas alcalinas AA nuevas y
pilas recargables LR6NM totalmente cargadas (2.100 mAh):
- Radio FM y dependiente de nivel: aproximadamente 58
horas
- Retransmisión por Bluetooth
®
y dependiente de nivel:
aproximadamente 78 horas
NOTA:
El tiempo de funcionamiento puede variar en función del
entorno, la temperatura y las pilas.

8
Encendido / pagado (g. 2)
Mantener presionado (2 seg.) el botón de encendido
[ ] para encender y apagar la orejera.
Un mensaje de voz informa: “Power on” (encendido)
o “Power off” (apagado).
La primera vez que se enciende la orejera, se pone
automáticamente en modo de emparejamiento.
NOTA: La orejera se apaga automáticamente si no se
pulsa un botón en un periodo de 4 horas. Un mensaje
de voz informa: “Automatic power off” (apagado automático).
REGULACIÓN DEL VOLUMEN DE LA FUENTE DE
SONIDO (g. 3)
Para regular el volumen, pulsar brevemente (1 seg.)
el botón [
+
] o [–]. Para cambiar la fuente de sonido activa,
pulsar brevemente (1 seg.) el botón de encendido [ ].
Las fuentes de sonido pueden ser:
• Radio FM
• Teléfono
• Sonido ambiental
• Música
• Bluetooth
®
CONSEJO INTELIGENTE: Se puede congurar reforzador
de bajos, balance de sonido ambiental e igualador de sonido
ambiental. Mantener presionado (2 seg.) el botón de menú
[M] para acceder al menú de conguración.
Ver el apartado “Conguración de la orejera”.
Sonido ambiental (micrófono dependiente de nivel para
escucha ambiental)
Ayuda para la protección del oído contra niveles de ruido
potencialmente dañinos. El ruido fuerte constante y otros
ruidos potencialmente dañinos se reducen, y el usuario
puede hablar normalmente y ser escuchado.
ESCUCHAR RADIO FM
Buscar emisora (g. 7)
Pulsar brevemente (1 seg.) el botón de menú [M] para entrar
en el modo de búsqueda de emisora. Pulsar brevemente
(1 seg.) el botón [
+
] o [–] para iniciar una búsqueda.
CONSEJO INTELIGENTE: Pulsando brevemente (1 seg.)
el botón de menú [M] , se activa siempre la radio FM.
NOTA: La recepción de radio depende de la topografía
y del entorno en que se está. Si la recepción es mala,
intentar cambiar de zona, si es posible.
Guardar emisora (g. 8)
Pulsar tres veces brevemente (1 seg.) el botón de menú [M];
un mensaje de voz informa: “Store station” (guardar emisora).
Pulsar brevemente (1 seg.) el botón [
+
] o [–] para seleccionar
posición. Mantener pulsado (2 seg.) el botón de menú [M]
para guardar la emisora. Un mensaje de voz conrma:
“Conrmed” (conrmado).
Programar emisora (g. 9)
Pulsar brevemente (1 seg.) dos veces el botón de menú [M]
para entrar en el modo de programación de emisora. Un
mensaje de voz conrma: “Preset station” (programar
emisora). Pulsar brevemente (1 seg.) el botón [
+
] o [–] para
examinar y seleccionar programar emisora.
Emparejamiento de un dispositivo Bluetooth
®
(g. 2, g. 4)
La primera vez que se enciende la orejera, se pone
automáticamente en modo de emparejamiento. Un mensaje
de voz conrma: “Bluetooth
®
pairing on” (emparejamiento de
Bluetooth). También se puede entrar en el modo de
emparejamiento desde el menú. Esto es necesario para
emparejar un segundo dispositivo (g. 5).
Ver el apartado “Conguración de la orejera”.
Comprobar que la comunicación Bluetooth
®
está activada en
el dispositivo Bluetooth
®
. Buscar y seleccionar “WS ALERT
XP” en el dispositivo Bluetooth
®
propio. Un mensaje de voz
conrma que el emparejamiento ha nalizado: “Pairing
complete” (emparejamiento nalizado)
y “Connected” (conectado).
NOTA: Se puede detener el proceso de emparejamiento,
pulsando largamente (2 seg.) el botón de Bluetooth
®
[ ]
(g. 6).
NOTA: La orejera sólo acepta radioteléfono con protocolo
3M™ PELTOR™ de pulsar para hablar. Para consultas,
ponerse en contacto con el distribuidor local.
RECONEXIÓN DE DISPOSITIVOS BLUETOOTH
®
Cuando se enciende la orejera, durante 5 minutos intentará
reconectarse al último dispositivo al que se emparejó o
conectó. Un mensaje de voz conrma la conexión:
“Connected” (conectado).
NOTA: Si se pierde la conexión, la orejera intentará
reconectar durante 30 segundos. Un mensaje de voz informa
si se pierde una conexión: “Disconnect” (desconectado).
Conectado y operando un teléfono. (ver la g. 6)
Botón de
Bluetooth
®
Estado Acción
Pulsación
corta
Sin actividad Control de voz
Retransmitir Control de voz
Llamada entrante Contestar
Llamada saliente /
llamada en curso
Finalizar llamada
Pulsación
larga
Sin actividad /
Retransmisión
Llamar al último
número marcado
Llamada entrante Rechazar
Llamada en curso
Alternar llamada entre
teléfono y orejera
ES

9
Conectado y operando un radioteléfono. (ver la g. 6).
Botón de
Bluetooth
®
Estado Acción
Pulsar Sin actividad
Iniciar transmisión en
radioteléfono
Liberar
Transmitiendo en
radioteléfono
Detener transmisión
en radioteléfono
NOTA:
Para mantener el rendimiento de cancelación del ruido,
colocar el micrófono de habla muy cerca de la boca
(a menos de 1/8 inch o 3 mm) G:1.
¿SABÍA QUÉ?: La orejera acepta retransmisión Bluetooth
®
A2DP 1.3 desde diferentes aplicaciones o desde el
reproductor de medios del teléfono.
¿SABÍA QUÉ?: La reproducción de audio se pausa
automáticamente desde la unidad de reproducción de audio
cuando hay una llamada en curso. Después de nalizar la
llamada o el mensaje, la reproducción de audio se reinicia
automáticamente.
CONSEJO INTELIGENTE: Si se han restablecido los
parámetros predeterminados de fábrica en la orejera,
ésta adopta automáticamente el modo de emparejamiento
la primera vez que se enciende de nuevo.
Bluetooth
®
4.2
Bluetooth
®
es un estándar global de comunicación
inalámbrica que interconecta dispositivos en una distancia
determinada. Por ejemplo: orejera y teléfono, altavoz y PC
a teléfono inteligente, etc. Para más información, consultar
www.bluetooth.com
Perles de Bluetooth
®
HSP 1.2, HFP 1.6, A2DP 1.3, AVRCP
1.6.
Para más información, consultar
https://www.bluetooth.org/tpg/listings.cfm
CONFIGURACIÓN DE LA OREJERA (g. 10)
Mantener presionado (2 seg.) el botón de menú [M] para
acceder al menú de conguración. Un mensaje de voz
conrma: “Menu” (menú). Pulsar brevemente (1 seg.) el botón
de menú [M] para navegar en el menú. Un mensaje de voz
conrma cada paso de menú. Pulsar brevemente (1 seg.) el
botón [
+
] o [–] para activar, desactivar o modicar diferentes
conguraciones.
Opciones en el menú de conguración:
1. Bluetooth® pairing (Emparejamiento de Bluetooth
®
)
(g. 5)
Cuando el mensaje de voz dice “Bluetooth
®
pairing”
(emparejamiento de Bluetooth), pulsar brevemente (1 seg.) el
botón [
+
] para iniciar el emparejamiento. Pulsar brevemente
(1 seg.) el botón [–] para detener el emparejamiento. Un
mensaje de voz conrmará: “Bluetooth
®
pairing on (Bluetooth
emparejando)”. Buscar y seleccionar “WS ALERT XP” en el
dispositivo Bluetooth
®
propio. Un mensaje de voz conrmará
que el emparejamiento ha nalizado: “Pairing complete”
(emparejamiento nalizado) y “Connected” (conectado).
Pulsar brevemente (1 seg.) el botón [–] para detener el
emparejamiento. Un mensaje de voz conrma: “Pairing off”
(emparejamiento desactivado).
2. Bass boost (Reforzador de bajos)
El reforzador de bajos amplica los bajos de la retransmisión
de música estéreo. Pulsar brevemente (1 seg.) el botón [
+
]
o [–] para activar/desactivar el reforzador de bajos.
3. Surround balance (Balance de sonido ambiental)
Pulsar brevemente (1 seg.) el botón [–] para aumentar el lado
izquierdo y reducir el derecho. Pulsar brevemente (1 seg.) el
botón [
+
] para aumentar el lado derecho y reducir el
izquierdo. Un mensaje de voz informará cuando el balance
de sonido ambiental esté centrado: “Center” (centro).
4. Surround equalizer (Igualador de sonido ambiental)
El igualador de sonido ambiental cambia las características
de la frecuencia del sonido ambiental. Pulsar brevemente
(1 seg.) el botón [–] o [
+
] para cambiar los niveles de
igualador de sonido ambiental:
“Bajo – Normal – Alto – Extra alto”.
5. Sidetone volume (Volumen de efecto local)
Efecto local es una retroalimentación audible en la orejera
durante una conversación. Pulsar brevemente (1 seg.) el
botón [–] o [
+
] para cambiar el volumen de efecto local:
“Desactivado – Bajo – Normal – Alto”.
6. Battery type (Tipo de pila)
Pulsar brevemente (1 seg.) el botón [–] o [
+
] para cambiar el
tipo de pila a recargable o alcalina.
7. Reset to factory default (Restablecer parámetros
predeterminados de fábrica) (g. 11)
Pulsar brevemente (1 seg.) el botón [–] o [
+
] , y luego
mantener presionado (2 seg.) el botón de menú [M]. Un
mensaje de voz dará instrucciones.
LOCALIZACIÓN Y CORRECCIÓN DE FALLOS
Problemas con la recepción de radio FM.
Comprobar que las pilas son nuevas o están totalmente
cargadas.
La recepción de radio depende de la topografía y del entorno
en que se está. Si la recepción es mala, intentar cambiar de zona.
Problemas con la conexión de Bluetooth
®
.
1. Comprobar que las pilas son nuevas o están totalmente
cargadas.
2. Quitar todos los dispositivos Bluetooth
®
que están
sincronizados con el teléfono.
3. Reinicializar el teléfono (encender y apagar).
4. Restablecer los parámetros predeterminados de fábrica
en el teléfono.
5. Emparejar la orejera con el teléfono.
6. Si el problema persiste, intentar emparejar otro teléfono
para ver si ayuda.
Chisporroteo durante la retransmisión o llamada
telefónica.
Bluetooth
®
es una tecnología de radio sensible a objetos
situados entre la orejera y el dispositivo al que está
conectada. Debe haber una distancia de hasta 10 metros
entre la orejera y el dispositivo conectado en línea visual; es
ES

10
decir, sin obstáculos como paredes, etc. También puede
afectar la ubicación del teléfono en el cuerpo del usuario.
LIMPIEZA Y MANTENIMIENTO
Usar un paño jabonoso y agua caliente para limpiar las
carcasas exteriores, la diadema y los aros de sellado.
NOTA: NO sumergir el protector auditivo en agua.
Si el protector auditivo se moja con lluvia o sudor: abrir las
copas y quitar los aros de sellado y los revestimientos de
espuma y dejar que se sequen durante 24 horas antes de
volver a colocarlos. Los aros de sellado y los revestimientos
de espuma pueden deteriorarse con el uso y deben revisarse
a intervalos regulares para ver si tienen grietas u otros daños.
Cuando la orejera se usa regularmente, 3M recomienda
cambiar los revestimientos de espuma y los aros de sellado
por lo menos dos veces al año para mantener una
atenuación, higiene y comodidad constantes. Si se daña un aro
de sellado, hay que cambiarlo. Ver a continuación la sección
“Repuestos”.
REMOCIÓN Y CAMBIO DE LOS AROS DE SELLADO
F:1 Para quitar un aro de sellado, introducir los dedos debajo
del borde del mismo y tirar de él con fuerza hacia fuera.
F:2 Quitar el revestimiento existente e insertar el
revestimiento de espuma nuevo.
F:3 Colocar un lado del aro de sellado en la ranura de la
copa y luego presionar el otro lado para colocarlo a presión.
CONDICIONES DE USO Y ALMACENAJE
• Quitar las pilas antes de almacenar el producto.
• No almacenar el protector auditivo a temperaturas de más
de +131 °F (55 °C) (por ejemplo: en un panel de
instrumentos de coche, en una repisa o en el umbral de una
ventana) ni a temperaturas inferiores a –4 °F (–20 °C).
• No usar el protector auditivo a temperaturas superiores
a +131 °F (55 °C) ni inferiores a –4 °F (–20 °C).
REPUESTOS Y ACCESORIOS
3M™ PELTOR™ HY82, Kit de higiene
Kit de higiene cambiable. Cambiar estas piezas como mínimo
dos veces al año para garantizar una atenuación, higiene y
comodidad constantes.
3M™ PELTOR™ HY100A, Protectores auditivos monouso
Protector auditivo monouso, fácil de colocar en los aros de
sellado.
3M™ PELTOR™ HYM1000, Protector de micrófono
3M™ PELTOR™ M995/2, Protección contra viento para
micrófono de habla
3M™ PELTOR™ FR08, Fuente de alimentación con
conector USB
NOTA: Usar sólo el cargador de pilas FR09.
3M™ PELTOR™ FR09, Cargador de pilas con conector
USB
3M™ PELTOR™ LR6NM, Pilas AA recargables
INFORMACIÓN ACERCA DE LA FCC Y LA ISED
Este dispositivo cumple con la Sección 15 de las normas de
la Comisión Federal de Comunicaciones y las
especicaciones de radio exentas de licencia de la Agencia
de Innovación, Ciencia y Desarrollo Económico de Canadá.
El funcionamiento está sujeto a las dos condiciones
siguientes: (1) Este dispositivo no debe causar interferencia
dañina, y (2) este dispositivo debe aceptar cualquier
interferencia recibida, incluso interferencias que puedan
causar funcionamiento indeseable.
Nota: Este dispositivo ha sido probado y se ha comprobado
que cumple con los límites para un dispositivo digital de clase
B, de conformidad con la parte 15 de la normativa de la
Comisión Federal de Comunicaciones (FCC). Estos límites
están diseñados para proporcionar una protección razonable
contra interferencias dañinas en instalaciones residenciales.
Este dispositivo genera, usa y puede radiar energía de
radiofrecuencia y, si no se instala y usa de acuerdo con las
instrucciones, puede causar interferencia dañina en
comunicaciones por radio. Sin embargo, no hay garantía de
que no se producirá interferencia en una instalación
particular. En caso de que este dispositivo cause interferencia
dañina, lo que se puede determinar encendiéndolo y
apagándolo, intentar arreglarlo con una de las medidas
siguientes: Reorientar o cambiar la posición de la antena
receptora. Aumentar la distancia de separación entre los dos
dispositivos que intereren.
Consultar con el servicio técnico de 3M.
CAN ICES-3 (B)/NMB-3(B)
ES

11
GARANTÍA Y LIMITACIÓN DE
RESPONSABILIDAD
GARANTÍA: En caso de que cualquier producto de 3M
Personal Safety Division tuviera defectos de material o
fabricación o no fuera de conformidad con cualquier garantía
expresa para una nalidad especíca, la única obligación de
3M y su remedio exclusivo será, por decisión de 3M, reparar,
sustituir o reembolsar el precio de compra de tales piezas o
productos previa noticación oportuna por su parte del
problema y justicación de que el producto se ha
almacenado, mantenido y usado según las instrucciones
escritas de 3M. EXCEPTO DONDE ESTÉ PROHIBIDO POR
LEY, ESTA GARANTÍA ES EXCLUSIVA Y SUSTITUTIVA DE
CUALQUIER GARANTÍA EXPRESA O IMPLÍCITA DE
COMERCIABILIDAD O IDONEIDAD PARA UN PROPÓSITO
DETERMINADO, U OTRA GARANTÍA DE CALIDAD, O
AQUELLAS QUE PUDIERAN SURGIR DE UN ACUERDO,
COSTUMBRE O USO COMERCIAL, EXCEPTO DE TÍTULO
Y CONTRA VIOLACIÓN DE PATENTE. 3M, bajo esta
garantía no tiene ninguna obligación con respecto a ningún
producto que haya fallado debido a almacenaje, manipulación
o mantenimiento inadecuado o impropio; incumplimiento de
instrucciones del producto; o alteración o daño del producto a
causa de accidente, negligencia o uso incorrecto.
LIMITACIÓN DE RESPONSABILIDAD: EXCEPTO DONDE
ESTÉ PROHIBIDO POR LEY, 3M NO SERÁ RESPONSABLE
EN NINGÚN CASO POR NINGUNA PÉRDIDA O DAÑOS
DIRECTOS, INDIRECTOS, ESPECIALES, INCIDENTALES
O CONSECUENCIALES (INCLUYENDO PÉRDIDA DE
BENEFICIOS) SURGIDOS DE ESTE PRODUCTO,
INDEPENDIENTEMENTE DE LA DOCTRINA LEGAL
AFIRMADA. LOS REMEDIOS EXPUESTOS AQUÍ SON
EXCLUSIVOS.
MODIFICACIONES NO AUTORIZADAS: No se deben
efectuar modicaciones en este dispositivo sin la autorización
por escrito de 3M. Las modicaciones no autorizadas pueden
anular la garantía y la autoridad del usuario para manejar el
dispositivo.
ELIMINACIÓN DE PILAS
Según normativas locales, estatales, regionales y nacionales,
muchas pilas recargables tienen que ser recicladas. Para el
reciclado o eliminación adecuado/a de pilas o baterías, seguir
siempre la normativa local en materia de eliminación de
residuos sólidos. Adicionalmente, en EE.UU. y Canadá, la
empresa 3M colabora con Call2Recycle (RBRC) para
proporcionar servicio de reciclado a los clientes y, así, ayudar
a asegurar que las pilas y baterías recargables de nuestros
productos se reciclan adecuadamente. Para asistencia en el
uso de este servicio, llamar al teléfono de ayuda en reciclado
de pilas de Call2Recycle, 1-800-8-BATTERY (1-800-822-
8837), o consultar la guía online sobre reciclado de pilas de
Call2Recycle, www.
call2recycle.org.
ES

12
3M™ PELTOR™ WS™ ALERT™ XP Headset
MRX21A2WS6-NA, MRX21P3E2WS6-NA
INTRODUCTION
Félicitations et merci d’avoir choisi les solutions de
communication 3M™ PELTOR™. Découvrez les protections
auditives communicantes de nouvelle génération !
USAGE PRÉVU
Ces casques 3M™ PELTOR™ sont destinés à fournir aux
travailleurs une protection contre les niveaux sonores
dangereux et les sons forts tout en permettant à l’utilisateur
de communiquer avec la technologie Bluetooth® intégrée,
d’entendre les sons ambiants via les microphones
d’ambiance et d’écouter la radio FM. Il incombe à chaque
utilisateur de lire et de comprendre les instructions
d’utilisation fournies et de se familiariser avec l’utilisation de
ce produit.
IMPORTANT
Veuillez lire, comprendre et observer toutes les informations
de sécurité gurant dans ces instructions avant toute
utilisation. Prière de conserver ces instructions en vue d’une
utilisation future. Pour plus d’informations ou pour toute
question, merci de contacter le Centre d’assistance 3M
(coordonnées gurant à la dernière page).
!
AVERTISSEMENT
Ces protections auditives permettent de limiter l’exposition
aux bruits dangereux et autres sons de forte intensité.
L’utilisation inappropriée ou la non-utilisation de
protections auditives lors de toute exposition à des
bruits dangereux peut provoquer une perte d’audition
ou des lésions auditives. Pour une utilisation correcte de
l’équipement, contactez votre supérieur, lisez les instructions
d’utilisation ou appelez le Centre d’assistance 3M. Si votre
audition semble diminuée ou si vous entendez un son
comme une sonnerie ou un bourdonnement durant ou après
toute exposition à un bruit (y compris à des coups de feu),
ou si, pour toute autre raison, vous suspectez un problème
d’audition, quittez l’environnement bruyant immédiatement
et consultez un professionnel de la santé et/ou votre
superviseur.
Le non-respect de ces instructions peut entraîner des
blessures graves voire la mort :
a. Écouter de la musique ou toute autre communication
audio peut réduire votre appréciation de la situation et votre
capacité à percevoir les signaux d’avertissement. Restez
vigilant et réglez le volume audio au plus bas niveau
acceptable.
b. Pour réduire les risques associés au déclenchement d’une
explosion, ne pas utiliser ce produit dans une atmosphère
potentiellement explosive.
Le non-respect de ces instructions peut réduire la
protection fournie par le protecteur auditif et peut entraîner
une perte auditive :
a. 3M recommande fortement un test de réglage individuel
des protections auditives. Si l’indice de bruit NRR est utilisé
pour estimer la protection typique sur le lieu de travail, 3M
recommande de réduire le taux de réduction du brui de 50 %
ou en fonction de la réglementation applicable.
b. Assurez-vous que la protection auditive est montée,
ajustée et entretenue correctement. Un port incorrect de ce
dispositif réduira son efcacité pour l’atténuation du bruit.
Se reporter aux instructions d’utilisation ci-jointes, indiquant
comment le porter correctement.
c. Examinez la protection auditive avec soin avant chaque
utilisation. Si elle est endommagée, sélectionnez un appareil
en bon état ou évitez tout environnement bruyant.
d. Lorsqu’un équipement de protection individuelle
supplémentaire est requis (par exemple des lunettes de
sécurité, un respirateur, etc.), sélectionnez des lunettes qui ont
des branches nes et plates ou des sangles qui minimisent
l’interférence avec les coussinets. Retirez tous les autres
articles inutiles (par exemple cheveux, chapeau, bijoux,
casque, housses d’hygiène, etc.) qui pourraient interférer avec
l’étanchéité du coussinet de la protection auditive et réduire
son efcacité.
e. Ne pas tordre ou déformer le serre-tête, et s’assurer que
sa tension est sufsante pour maintenir la protection auditive
fermement en place
f. Les coquilles, et en particulier les anneaux d’étanchéité,
peuvent se détériorer avec le temps et devront être examinées
fréquemment, an de détecter tout signe de ssure ou de fuite.
Lors d’utilisation régulière, remplacez les coussinets et les
doublures en mousse au moins deux fois par an pour maintenir
des niveaux de réduction du bruit, d’hygiène et de confort
uniformes.
g. Si les présentes recommandations ne sont pas observées,
la protection fournie par les coquilles antibruit risque d’être
gravement compromise.
ATTENTION
Pour réduire les risques associés à un incendie, une
explosion et des brûlures qui, s’ils ne sont pas évités,
pourraient entraîner des blessures mineures ou
modérées ou des dommages matériels :
a. Utilisez uniquement le chargeur USB 3M™ PELTOR™
FR09 et l’adaptateur mural USB 3M™ PELTOR™ FR08 avec
des piles rechargeables 3M™ PELTOR™ LR6NM.
b. La batterie risque de ne pas être rechargée si la
température ambiante dépasse +113 °F (45 °C).
ATTENTION :
Pour les environnements bruyants dominés par des
fréquences inférieures à 500 Hz, c’est le niveau de bruit
ambiant pondéré C qui doit être utilisé.
ATTENTION :
Risque d’explosion si la batterie est remplacée par une
batterie autre que celle prescrite.
FR

13
FR
REMARQUE :
• Lorsque ces protections auditives sont portées conformé-
ment aux instructions d’utilisation, elles contribuent à réduire
l’exposition, aussi bien aux bruits intenses continus, comme
les bruits industriels et les bruits provenant de véhicules et
d’avions, qu’aux bruits impulsionnels forts et brefs, comme
les coups de feu. Il est difcile de prévoir la protection
auditive requise et/ou réellement obtenue durant l’exposition
à des bruits impulsionnels. La manière dont on prend soin
de la protection auditive, ainsi que d’autres variables, auront
une incidence sur les performances. Pour en savoir plus sur
la protection auditive adaptée à des bruits impulsionnels,
consulter le site www.3M.com/PELTOR.
• Bien que les protections auditives puissent être
recom¬mandées pour la protection contre les effets
nuisibles des bruits impulsionnels, le niveau de réduction du
bruit (NRR) est basé sur l’atténuation du bruit continu et
peut ne pas représenter de façon adéquate la protection
contre les bruits impulsionnels comme les coups de feu
(formulation exigée par l’EPA).
• Cette protection auditive limite le volume sonore de la
fonction divertissement à 82 dB(A) efcace perçu à l’oreille.
• Température de service : –4 °F à 131 °F (–20 °C à 55 °C)
• Température de stockage : –4 °F à 131 °F (–20 °C à 55 °C)
• Au Canada, les utilisateurs de casques combinés avec des
protections auditives doivent se référer à la norme CSA
Z94.1 relative aux Casques de sécurité pour l’industrie.
ATTÉNUATION DE LABORATOIRE
AVERTISSEMENT ! 3M recommande vivement un test
d’ajustement individuel des protections auditives. Si
l’indice de bruit NRR est utilisé pour estimer la protection
typique sur le lieu de travail, 3M recommande de réduire
le taux de réduction du brui de 50 % ou en fonction de la
réglementation applicable.
Explication des tableaux des données d’atténuation :
ANSI S3.19-1974
A:1 Fréquence (Hz)
A:2 Atténuation moyenne (dB)
A:3 Écart type (dB)
Le niveau de bruit auquel est exposée l’oreille d’une personne
portant une protection auditive conformément aux instructions
est sensiblement égal à la différence entre le niveau de bruit
ambiant pondéré A et le NRR.
Exemple
1. Le niveau de bruit ambiant mesuré à l’entrée de l’oreille est
de 92 dB(A).
2. Le NRR est de 23 décibels (dB).
3. Le niveau de bruit entrant dans l’oreille est à peu près de
69dB(A).
Serre-tête MRX21A2WS6-NA
D:1 Serre-tête (PVC, PA)
D:2 Arceau du serre-tête (acier inox)
D:3 Fixation bipoints (POM)
D:4 Coussinet d’oreille (feuille de PVC et mousse PUR)
D:5 Doublure mousse (mousse PUR)
D:6 Coquille (ABS)
D:7 Microphone dépendant du niveau pour écoute du son
ambiant (mousse PUR)
D:8 Microphone vocal (ABS, PA)
D:9 Antenne (PE, ABS, TPE)
D:10 Protection anti-vent (mousse)
D:11 Prise chargeur (acier inox)
Attaches pour casque/Casque de sécurité
MRX21P3E2WS6-NA
D:12 Supports de coquilles (acier inoxydable)
INSTRUCTIONS DE MISE EN PLACE
Serre-tête
E:1 Faites glisser les coquilles vers l’extérieur en tournant
leur partie supérieure vers l’extérieur, le cordon devant être
à l’extérieur du serre-tête.
E:2 Réglez la hauteur des coquilles en les faisant glisser
vers le haut ou vers le bas, tout en maintenant le serre-tête
en place.
E:3 Le serre-tête doit être placé au-dessus de la tête,
comme illustré, et doit supporter le poids du casque.
Attaches pour casques de sécurité
E:4 Montez les attaches pour casque dans la fente du
casque jusqu’à encliquetage E:5.
E:6 Position d’aération : Tirez les coquilles vers l’extérieur
jusqu’à ce que vous entendiez un clic, pour passer de la
position de travail à la position d’aération E:7.
E:8 Évitez de placer les coquilles contre le casque de
sécurité, au risque d’empêcher une bonne ventilation.
MODE D’EMPLOI
CHARGEMENT ET REMPLACEMENT DES BATTERIES
(g. 1)
1. Détachez le loquet sur la coquille gauche avec vos doigts.
2. Ouvrez la coquille.
3. Insérez ou remplacez les piles. Assurez-vous que la
polarité correspond aux repères.
4. Fermez la coquille et verrouillez le loquet. Changez le type
de batterie si vous passez de rechargeable à non
rechargeable. Appuyez longuement (2 s) sur le bouton Menu
[M] pour accéder au menu de conguration, voir Congura-
tion de votre casque.
ATTENTION: Utilisez uniquement le chargeur USB 3M™
PELTOR™ FR09 et l’adaptateur mural USB 3M™ PELTOR™
FR08 avec des piles rechargeables 3M™ PELTOR™ LR6NM
(ou des bloc-piles AA Ni-MH équivalents).
ATTENTION: La batterie risque de ne pas être rechargée
si la température ambiante dépasse +113 °F (45 °C).
REMARQUE :
- Ne pas recharger des piles alcalines, car cela pourrait
endommager le casque d’écoute.
- Utiliser uniquement des piles AA non-rechargeables ou un
bloc-pile Ni-MH rechargeable.
- Ne pas mélanger des piles/batteries anciennes avec des
neuves. Ne pas mélanger des piles/batteries alcalines,
La page est en cours de chargement...
La page est en cours de chargement...
La page est en cours de chargement...
La page est en cours de chargement...
La page est en cours de chargement...
La page est en cours de chargement...
La page est en cours de chargement...
-
 1
1
-
 2
2
-
 3
3
-
 4
4
-
 5
5
-
 6
6
-
 7
7
-
 8
8
-
 9
9
-
 10
10
-
 11
11
-
 12
12
-
 13
13
-
 14
14
-
 15
15
-
 16
16
-
 17
17
-
 18
18
-
 19
19
-
 20
20
-
 21
21
-
 22
22
-
 23
23
-
 24
24
-
 25
25
-
 26
26
-
 27
27


3M PELTOR WS ALERT XP MRX21A2WS6-NA Manuel utilisateur
- Catégorie
- Casques
- Taper
- Manuel utilisateur
- Ce manuel convient également à
dans d''autres langues
Documents connexes
-
3M MRX21P3EWS5 Manuel utilisateur
-
-
3M MT17H682 Serie Mode d'emploi
-
-
-
3M MT16H21FWS5E-580SV Fiche technique
-
-
-
-
Autres documents
-
Klein Tools AESEM1S Manuel utilisateur
-
PowerStroke PSL4HP Le manuel du propriétaire
-
 left/RIGHT Headband Earmuff Le manuel du propriétaire
-
Ryobi RP9903 Guide d'installation
-
Husqvarna HP500C-01 Le manuel du propriétaire
-
Klein Tools 60532 Mode d'emploi
-
Klein Tools 6050260502 Full Brim Hard Hat Earmuffs Mode d'emploi
-
 Walkers Game Ear SF-XSEM Mode d'emploi
-
 Walkers Game Ear SF-DRSEM-BLZ Mode d'emploi
-
 Walkers Game Ear SF-DRSEM-BLZ Mode d'emploi


