GMR4055-2CK, GMR4055-2CKHS
GMR4060-2CK, GMR4060-2CKHS
GMR4088-2CKHS
9B
2
13
8
7
6
5
4
3
11
23
10
24
12
14 18
19 22
25
26
27
• 22 FRS Channels
• 7 Weather Channels
• 121 Privacy Codes
• Internal VOX Circuitry
• Up to 40 Mile Range*
• Backlit LCD Display
• Headset Jack
• 10 Selectable Call Tone Alerts
• 2 VOX earbuds
(GMR4055-2CKHS and
GMR4060-2CKHS)
• Power Boost PTT
• Roger Beep
• 2 Belt Clips
• Battery Charging Cradle
• Battery Level Meter
• 3 AA NiMH batteries per radio
(GMR4055 and GMR4088)
• Lithium Ion battery pack
(GMR4060)
• 8 Hours Battery Life
(GMRS-4055, GMR4088
typical)
• 13.5 Hours Battery Life
(GMR- 4060 typical)
• MicroUSB Charging Port
• Channel Monitor
• Channel Scan
• Vibrate
• NOAA Emergency /
Weather Channels with
ALERT
• Emergency Strobe
• Weather Resistant (IPX4)
• Camo (GMR4088)
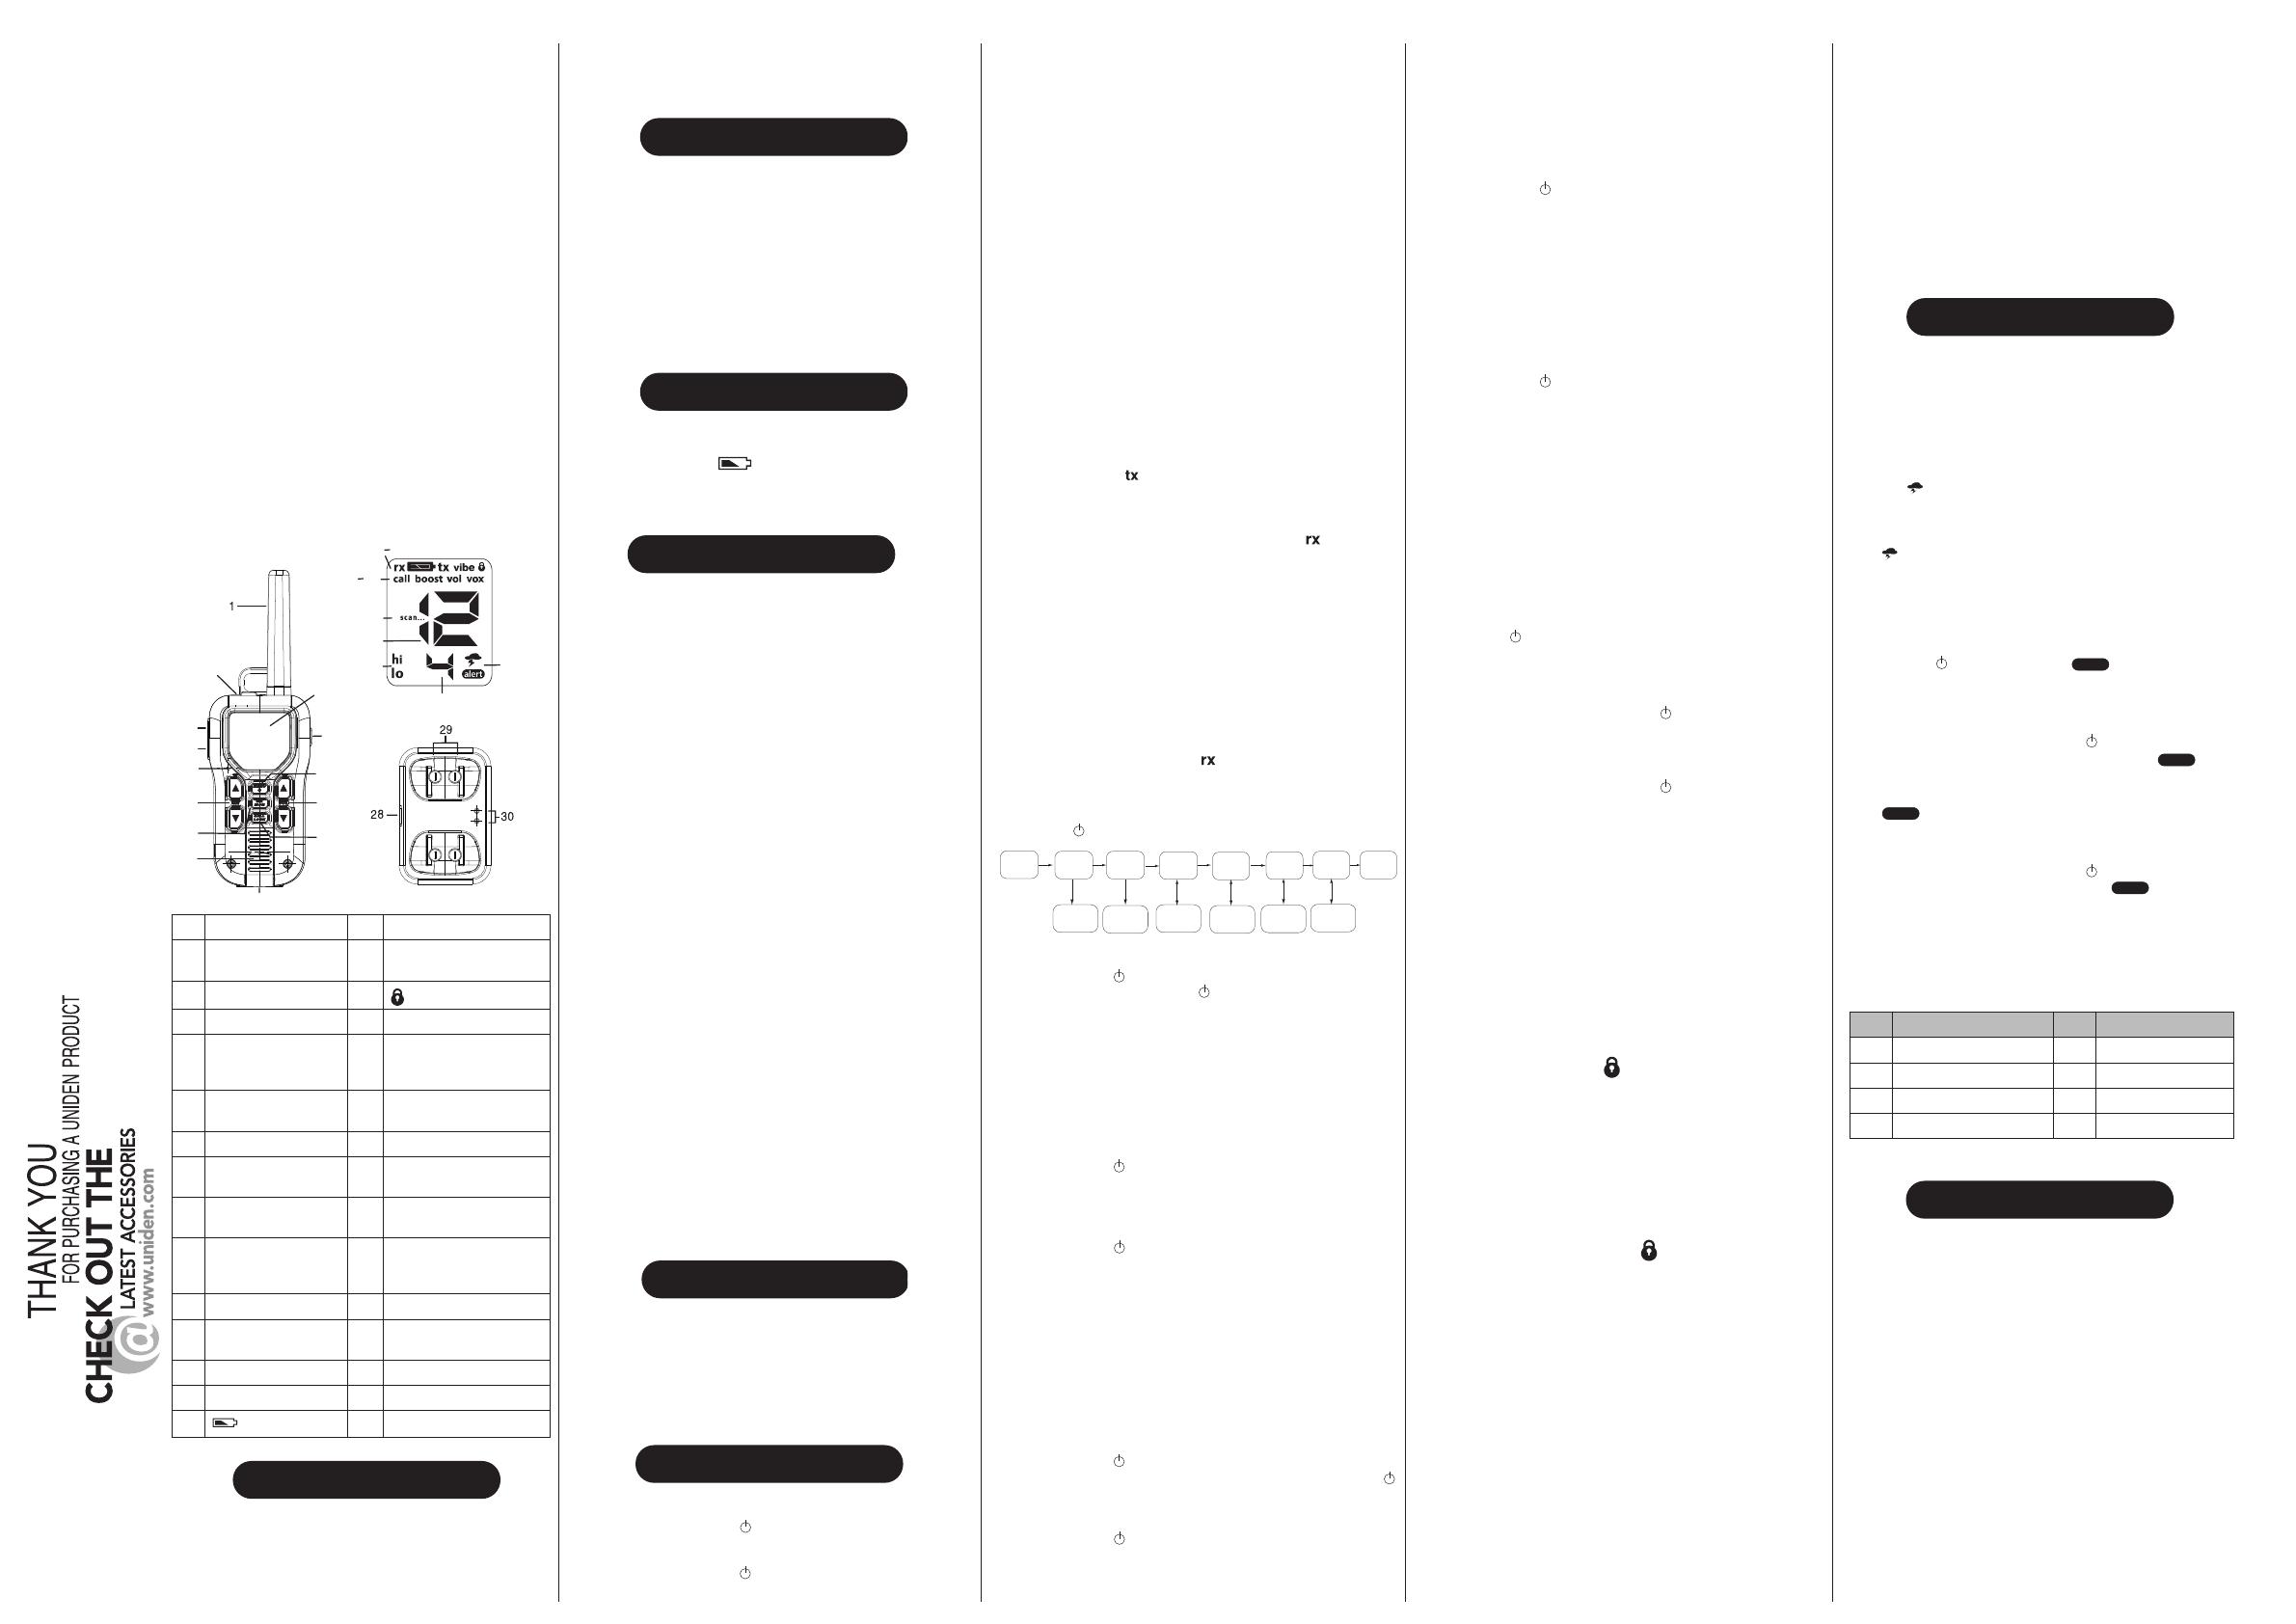
1 Antenna 16 tx - Transmitting
2 MicroUSB port and
earbud jack
17 Vibe - Silent mode on
3 Push to Talk (PTT) 18
- Key Lock
4 Boost 19 call - Transmitting
5 Microphone 20 boost - Change transmis-
sion power from 1.0W
to 2.5W.
6 Channel Up/Down 21 vol - Volume level
selected.
7 Weather/Monitor 22 vox - VOX is on.
8 Speaker 23 scan - channel scan
feature on.
9 9A - Flashlight LED
9B - Flashlight button
24 Channel Number
10 Screen 25 hi/lo - transmitting in hi
power (1W) or low power
(0.5W)
11 MENU/Power 26 Privacy Code
12 Volume Up/Down 27 Weather Channel active
Weather Channel alert
13 Call/Lock 28 miniUSB port
14 rx - Receiving 29 Charging Contacts
15
- Battery Status
30 Charging LEDs
PACKAGE CONTENTS
Your package contains two radios, 6 AA rechargeable NiMH
batteries (GMR4055 and GMR4088 models) or 2 Li-Ion battery
packs (GMR4060 models), one charging cradle, one AC
adapter with single miniUSB connector cable, two belt clips,
and this reference guide. The GMR4055-2CKHS, GMR4060-
2CKHS, and GMR4088-2CKHS also include two VOX earbuds. To
order Uniden accessories, visit our web site at www.uniden.com.
Use only Uniden accessories (AC adapter with microUSB plug).
INSTALL THE BATTERY
GMR4055 and GMR4088 models use NiMH AA rechargeable
batteries (included) or 3 AA alkaline non-rechargeable batteries
(not included). GMR4060 models use Lithium Ion battery packs
(included).
To install the batteries/battery pack:
1. Unscrew and remove the battery compartment cover.
2. Install the batteries/battery pack into the battery compartment. Be
certain to follow the instructions written on the label on the battery
pack. Installing the batteries/battery pack incorrectly will prevent
the unit from operating.
3. Replace and screw in the battery compartment cover.
BATTERY LEVEL AND
LOW BATTERY ALERT
This unit has a battery level meter on the display to indicate the
status of the batteries. When the battery in the unit is low, the
battery level meter icon flashes. Recharge the batteries/
battery pack immediately. If you are using alkaline batteries
(GMR4055 and GMR4088 models only), you must replace the
alkaline batteries in order to continue using the radio.
CHARGING THE RADIO
If using rechargeable batteries/battery packs, two radios can be
charged directly by using the supplied charging cradle. A single
radio can charge using the miniUSB port to connect to a USB
power source. For fastest charging, turn off the radio before
charging.
Warning! To avoid the risk of personal injury or property damage
from fire or electrical shock, only use the Uniden accessories
specifically designated for this product.
Warning! Do not attempt to recharge Alkaline batteries
(GMR4055 and GMR4088 models only).
Using the miniUSB Port
1. Connect the included AC adapter with miniUSB connector cable
to the radio's miniUSB port. Connect the other end to an outlet
that provides USB charging power (NOT to a USB hub).
2. Charge the batteries/battery pack for 16 hours until the battery
indicator either stops flashing (GMR4055 and GMR4088 models
only) or turns off (GMR4060 models only).
Using the Charging Cradle
1. Connect the included AC adapter with USB connector cable to the
charging cradle's miniUSB port. Connect the other end to a
standard 120V AC wall outlet.
2. Set the charging cradle on the desk or tabletop, and place the
radio in the charging cradle with the keypad facing forward.
3. Charge the battery pack for 14 hours. For GMR4055 and
GMR4088 models, the battery indicator is solid and the charger
LEDs turn off. For GMR4060 models, the battery indicator turns
off and the charger LEDs turn off.
Note:
• Use only the supplied battery and AC adapter or approved
accessories from Uniden.
• Charge time may vary depending on the battery life remaining.
• Do not attempt to recharge alkaline batteries (GMR4055 and
GMR4088 models only). Doing so can create a safety hazard or
damage the radio.
• The battery must be installed for the unit to operate, even if the unit
is also connected to external power.
• If battery power is low, you cannot operate the radio even using
external power. Allow the batteries to charge before using. If you try
to transmit while power is low, the radio will automatically turn off.
USING A HEADSET
GMR4055-2CKHS, GMR4060-2CKHS, and GMR4088-2CKHS
also come with VOX earbuds. You can use earbuds for more
private communications. To use the earbud, lift the rubber cover
from over the headset jack, then plug in the earbud.
Important: Your radio is not weather resistant when using
earbuds. After removing an earbud, be sure to fully press the jack
cover into place to restore its weather resistant capability
USING THE RADIO
Turning the Radio On and Adjusting the Volume
1. Press and hold MENU/ to turn the radio ON. Increase the
speaker volume by pressing VOL ▲. To decrease the volume,
press VOL ▼.
2. Press and hold MENU/ again to turn the radio OFF.
Adjusting the Sound (Key Beeps)
Your radio emits a beep each time one of the keys (except for the
PTT and CALL/LOCK) is pressed. To turn this sound OFF, press
and hold CALL/LOCK while turning ON the radio. Repeat to turn
the sound back ON.
Choosing a Channel
Your radio has 22 channels and 121 Privacy codes you can use to
talk to others. In order to speak to someone, each of you must be
set to the same channel and Privacy code.
With the radio in "Normal" operating mode, press the
CH ▲
/
CH ▼
key to increase or decrease the channel number displayed.
Note: Channels 1-7 have a typical range of up to 40 miles.
Channels 8-14 have a typical maximum range of up to 5 miles.
Channels 15-22 have a typical range of up to 40 miles. You can
see which channel is active by the icon. The hi icon is displayed
while on high power channels, and the lo icon is displayed while
on low power channels.
Talking on Your Radio
To talk to others using the radio:
1. Press and hold the PTT button and speak in a clear, normal voice
about 2-3 inches away from the microphone. While you are
transmitting, the icon appears on the display. To avoid cutting
off the first part of your transmission, pause slightly after pressing
the PTT button before you start talking.
2. When you have finished speaking, release the PTT button. You
can now receive incoming calls. While receiving, displays.
Monitor Mode Feature
Your radio allows you to listen for weak signals on the current
channel at the press of a key.
To turn ON Monitor mode:
Press and hold WX/MON for 2 seconds until two beeps sound.
The receiver circuit stays open, and both noise and weak signals
can be heard. The icon stops blinking and disappears.
To turn OFF Monitor mode:
Press and hold WX/MON for 2 seconds to return to "Normal"
mode; two beeps sound and the icon stops blinking and
disappears.
Advanced Functions (Menus)
Use MENU/ to access your radio's advanced functions.
Normal
Sub Code
Scan
Vibrate
VOX
Level
Call
Tone
WX
Alert
Normal
OFF, 1-121
ON/OFF
ON/OFF
OFF,
1-10
ON/OFF
1. Press MENU/ to enter the menus.
2. Additional presses of MENU/ advance you through the menus
until exiting to "Normal" operating mode (a double beep sounds).
You can also press any key except CH
▲
/ CH
▼
or
VOL ▲/VOL
▼
or tap PTT to exit Menu mode.
Privacy Code
Each of the channels 1-22 may have a Privacy code (oF or 1-121)
selected. Code oF (OFF) indicates no Privacy code selected and
your radio can receive a signal regardless of the code settings of
the transmitting radio.
1. Press MENU/ to enter Menu mode. The Privacy code
indicator flashes.
2. Press CH
▲
/ CH
▼
key to increase or decrease the Privacy
code number displayed. You can also select oF (OFF) at this
stage.
3. Press MENU/ to exit Menu mode.
4. Press any key other than CH
▲
/CH
▼
or VOL
▲/
VOL
▼
or
press PTT and the radio returns to Idle mode in 10 seconds.
Scan
Your radio has a channel scan feature that allows you to easily
scan all 22 channels. When an active channel is detected, the
radio pauses on that channel until the channel is clear. Then, after
a 2 second delay, the radio continues scanning. Pressing the PTT
button while the scan is paused on a channel allows you to
transmit on that channel.
To turn ON channel scan:
1. Press MENU/ repeatedly until the scan... icon and oF blink.
2. Press CH
▲
/ CH
▼ t
o select Scan mode and press MENU/
to start it.
To turn OFF channel scan:
1. Press MENU/ with the scan setting of oF.
2. Press any key other than CH ▲ / CH ▼, VOL ▲/VOL ▼, or
Flashlight to turn channel scan off in 10 seconds.
Voice Operated Transmission
Your radio is equipped with a user selectable Voice Operated
Transmitter (VOX) that can be used for automatic voice
transmissions. The VOX feature is designed to be used with a
headset with a microphone. Transmission is initiated by speaking
into the microphone instead of pressing PTT.
To select VOX level:
1. Press MENU/ repeatedly until the vox icon and the VOX
sensitivity level
(
oF
,
1-5
) blink
.
2. Press CH
▲
/ CH
▼
to change the VOX sensitivity levels. Use
level 1 to increase
sensitivity to voice in normally quiet
environments
, and use a higher level to reduce undesired
activation in very noisy environments.
Call Tone
Your radio is equipped with 10 selectable call tones that are
transmitted when CALL/LOCK is pressed.
To select a call tone:
1. Press MENU/ repeatedly until the CALL icon and Call Tone
start to blink on the display.
2. Press CH
▲
/ CH
▲
to move through the available call tones.
Each tone will be heard through the speaker but will not be
transmitted. Cycle through these tones and stay on the tone you
want to select.
3. Exit Call Tone to set the selected tone.
Setting Silent Mode
When you turn on Silent mode, all incoming calls are muted; if you
receive a call, the unit vibrates and the backlight flashes. If you do
not respond to the call within 15 seconds, the backlight turns off.
The radio will also vibrate to remind you that you missed a call.
Silent mode is disabled for 15 seconds when you transmit, receive,
or press any other button.
Press MENU/ repeatedly until vibe and the current setting start
to blink on the display.
To turn ON Silent mode:
1. Press CH
▲
to turn Silent mode on; on displays.
2. To exit the Menu, press the MENU/ key to advance through
the Menu until exiting to "Normal" mode. vibe appears.
To turn OFF Silent mode:
1. Press CH
▼
to display oF.
2. To exit the Menu, press the MENU/ key to advance through
the Menu until exiting to "Normal" mode. vibe disappears.
Note: To prevent unwanted silent alerts, be sure to use a Privacy
code whenever you use the Silent mode feature. You can hear the
received voice when you turn on channel scan and an active
channel is detected even during Silent mode.
Missed Call Alerts
If you receive an incoming call while Silent mode is on and do not
respond, the radio will turn on the Missed Call icon.
The radio will additionally remind you of a missed call by vibrating
every minute after the call for 3 minutes.
Key Lock
To lock the keypad:
Press and hold CALL/LOCK; displays.
These functions are not affected by Key Lock:
• Volume Adjust • Call Tone Transmission
• PTT Transmission • Boost
• Power Off • Enter Monitor Mode
• Flashlight
To unlock the keypad:
Press and hold CALL/LOCK again; disappears.
Automatic Power Save
Your radio has a circuit designed to dramatically extend the life of
the batteries. If there is
no transmission or an incoming call within
3 seconds,
your radio switches to Power Save mode. The radio is
still able to receive transmissions in this mode.
LCD Backlight
The LCD Backlight automatically turns ON when any key (except
the PTT button) is pressed. It stays lit for 10 seconds before
turning OFF.
Roger Beep
Roger Beep is a beep sound that that is sent to indicate the end of
transmission (both PTT and VOX transmission). Roger Beep can
be heard through the speaker when both Roger Beep and Key
Beep are set to ON. When Roger Beep is set to ON and Key Beep
is set to OFF, Roger Beep will not be heard from the speaker but it
will be transmitted to your party. When Roger Beep is set to OFF,
Roger Beep will neither be heard nor transmitted.
To Change Roger Beep setting:
Press and hold VOL ▲ while turning the radio on and off. If Roger
Beep is ON, it will be turned off; if it is OFF, it will be turned on.
LED Flashlight with SOS
The radio is equipped with an LED flashlight that can also flash an
SOS signal during emergencies. Press the Flashlight button to
cycle through the options.
• Press - turn on flashlight. (Quick press - turn off flashlight)
• Press and hold - turn on SOS signal.
• From SOS - Press to turn off SOS signal and return to flashlight.
• From flashlight - Press to turn off flashlight.
Note: The flashlight will also work when the radio is off.
USING THE WEATHER RADIO
Your radio can receive weather broadcasts from the NOAA
National Weather Service. When in the Weather Radio Alert mode,
the system functions as it does in standard mode but also monitors
the selected weather channel for alerts when not communicating.
While using the Weather Radio, you are not able to receive FRS
communications.
1. To turn on the Weather Radio Broadcast mode, press WX/MON.
The icon appears.
2. Press CH
▲/
CH
▼
to increase or decrease the number to the
desired Weather Channel.
3. To exit the Weather Radio Broadcast mode, press WX/MON. The
icon disappears.
Choosing an Emergency/Weather Channel
There are 7 NOAA channel frequencies available and these
frequencies are common between the US and Canada. You need
to know what frequency is being transmitted in your location.
Press MENU/ repeatedly until the
icon and the current
setting start to blink on the display.
To turn ON Weather Alert:
1. Press CH
▲
to display on.
2. To exit the Menu, press the MENU/ key to advance you
through the Menu until exiting to "Normal" mode.
icon
appears.
3. When the unit receives a warning signal, it beeps for 5 seconds.
and channel indicator flash.
To turn OFF Weather Alert:
1. Press CH
▼
to display oF.
2. To exit the Menu, press the MENU/ key advance you through
the Menu until exiting to "Normal" mode.
icon disappears.
• When Weather Alert is activated, the highest priority is given to
this function. It checks the weather alert signals every 5
seconds. When the unit finds a warning signal, it switches to
the warning receive mode automatically.
• Weather Alert is activated even if Beep Tone is turned off.
NOAA Weather Radio Frequency List
Ch. Frequency (MHz) CH. Frequency (MHz)
1 162.550 5 162.450
2 162.400 6 162.500
3 162.475 7 162.525
4 162.425
SPECIFICATIONS
Channels 22 FRS/7 Weather
Privacy Codes 38 Sub-Codes
83 DCS Codes
Operating Freq.
FRS 462.5500 - 467.7125 MHz
WX 162.4000 - 162.5500 MHz
Power Source GMR4055 and GMR4088: 3 AA
NiMH Batteries or 3 AA Alkaline bat-
teries (not included)
GMR4060: Li-Ion battery pack
Range Channels 1 -7: up to 40 miles
Channels 8 - 14: up to 5 miles
Channels 14 - 22: up to 40 miles
* Range may vary depending on environmental and/or
topographical conditions.


