SciCan HYDRIM C61w G4 Manuel utilisateur
- Taper
- Manuel utilisateur

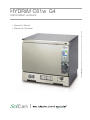
HYDRIM C61w G4
INSTRUMENT WASHER
95-113022 NA EN FR R3 HYDRIM C61w G4 Operator’s Manual © Copyright 2015 SciCan Ltd . All rights reserved.
• Operator’s Manual
• Manuel de l’utilisateur
• Manuel de l’utilisateur
•

Page 2
HYDRIM and STATIM are registered trademarks of SciCan Ltd. BRAVO, HIP™,
and SysTM are a trademarks of SciCan Ltd. All other trademarks referred to
in this manual are the property of their respective owners.
For all service and repair inquiries:
In Canada 1-800-870-7777
United States: 1-800-572-1211
Germany:
+49 (0)7561 98343 - 0
International: (416) 446-4500
Email: [email protected]
Contents
1. Introduction ................................... 3
2. Important Information .................... 4
Disclaimer
Unit overview
Touchscreen overview
Set-up menu overview
3. Setting up your HYDRIM ................ 8
Installation
Handling and installing HIP™ Ultra
cleaning solution
Water quality
Testing water quality
Disposing of packaging and
decommissioned units
Setting language
Setting country
Setting time
Setting date
Assigning unit identifier number
Resetting drying counter
Adjusting screensaver delay
Adjusting temperature delay
Turning the button sound ON or OFF
Adjusting button beep volume
Adjusting salt regeneration
Adjusting screen contrast
Changing touchscreen display themes
Creating a user name
Creating a user PIN
Setting up process enforced usage
Connecting to a network
Connecting to a wireless network
4. Using your HYDRIM ..................... 19
Instrument reprocessing recommendations
Cycle description charts
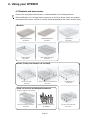
Baskets and accessories
Hints and tips for best cleaning results
Recommended load configurations
Running a cycle
Interrupting / aborting a cycle
Additional user and setup menu functions
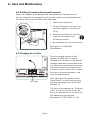
Opening the door in case of power failure
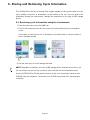
5. Storing and Retrieving
Cycle Information ......................... 28
Retrieving cycle information using
the touchscreen
Retrieving cycle information using
the USB data back up
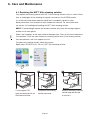
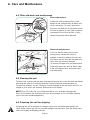
6. Care and Maintenance .................. 30
Replacing the HIP™ Ultra cleaning solution
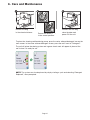
Refilling the water softening salt reservoir
Changing the air filter
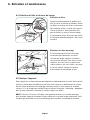
Filter and wash arm maintenance
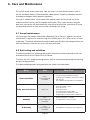
Cleaning the unit
Preparing the unit for shipping
Annual maintenance
Unit testing and validation
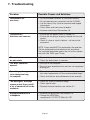
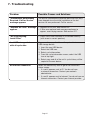
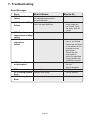
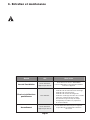
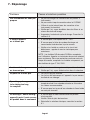
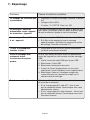
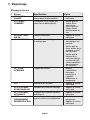
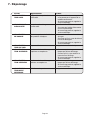
7. Troubleshooting ........................... 36
Troubleshooting general problems
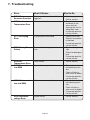
Troubleshooting error messages
8. Warranty ...................................... 40
9. Specifications .............................. 41
Manufactured by:
SciCan
1440 Don Mills Road,
Toronto ON M3B 3P9
CANADA
Phone: (416) 445-1600
Fax: (416) 445-2727
Toll free: 1-800-667-7733
EU Representative
SciCan GmbH
Wangener Strasse 78
88299 Leutkirch GERMANY
Tel.: +49 (0)7561 98343 - 0
Fax: +49 (0)7561 98343 - 699
SciCan Inc.
701 Technology Drive
Canonsburg, PA 15317 USA
Phone: +1 724 820 1600
Fax: +1 724 820 1479
Toll free: 1-800-572-1211
SciCan Medtech
Alpenstrasse 16
CH-6300 ZUG SWITZERLAND
Phone: +41 (0) 41 727 7027
Fax: +41 (0) 41 727 7029

Page 3
1 Introduction
1 Introduction
Thank you for selecting the HYDRIM C61w G4 instrument washer. The HYDRIM
complements the STATIM
®
and BRAVO
™
autoclaves by quickly and hygienically preparing
soiled instruments for sterilization. To ensure years of safe, trouble-free service, carefully
review this Operator’s Manual before operating the unit. The HYDRIM C61w G4 is suitable
only for the applications listed in this manual.
Using the HYDRIM for other purposes may
be dangerous. The manufacturer cannot be held responsible for damage caused by
improper use.
Operational, maintenance and replacement instructions must be followed for the product
to perform as designed. All trademarks referred to in this manual are the property of their
respective owners. Contents of this manual are subject to change without notice to reflect
changes and improvements to the HYDRIM product.
The HYDRIM should only be installed and serviced by a qualified contractor as the
HYDRIM C61w G4 is an Installation Category II device. Before connecting the unit, the
installer should check that the voltage and frequency of the electrical supply correspond
with the details in the installation instructions. The unit must only be plugged into a
grounded outlet. Please note that this unit is completely isolated from the electrical supply
only when it is unplugged or the circuit breaker is turned OFF. This must be done before
any repair work is carried out.
The HYDRIM C61w G4 uses HIP™ Ultra cleaning solution exclusively. The unit will not
perform as described if detergents or cleaning products not approved by SciCan are used.
Other detergents or cleaning products may damage the unit, the instruments, cause
excessive foaming, and void the warranty. Do not use solvents in this unit. Do not allow
unauthorized personnel access to this unit or its controls.
HYDRIM C61w

Page 4
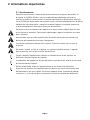
2 Important Information
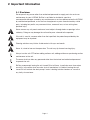
2.1 Disclaimer
Do not permit any person other than authorized personnel to supply parts for service or
maintenance for your HYDRIM. SciCan is not liable for incidental, special or
consequential damages caused by any maintenance or services performed on the HYDRIM
by unauthorized personnel, or for the use of equipment or parts manufactured by a third
party, including lost profits, any commercial loss, economic loss, or loss arising from
personal injury.
Never remove any unit panels and never insert objects through holes or openings in the
cabinetry. Doing so may damage the unit and/or pose a hazard to the operator.
If the unit is used in a manner other than that specified, the protection provided by the
equipment may be impaired.
Cleaning solutions may irritate. Avoid contact with eyes and mouth.
Never sit, stand or lean on the open door. The unit may tip forward causing injury.
Always turn the unit OFF before adding softener salt, adding solutions or performing routine
maintenance to the unit.
The owner shall not allow any personnel other than the trained and authorized personnel
to operate the unit.
SciCan recommends leaving the unit turned ON at all times, in particular over times when
no staff is in the office when no water shut-off mechanism is installed. Leaving the unit
turned ON will activate the drain pump if water is leaking into the chamber as a result of
any faulty circumstance.

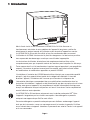
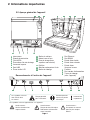
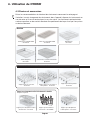
n
1
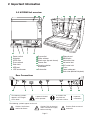
Power switch
n
1
Kickplate
n
1
HEPA filter
n
1
Dryer exhaust
n
1
Door latch
n
1
USB port
n
1
LCD touchscreen
n
1
Dryer outlet
n
1
Water softener
n
1
Wash arms (top not shown)
n
1
Coarse filter
n
1
Cleaning solution
n
1
and drawer
n
1
Drain outlet
n
1
Ethernet port
n
1
RS232 port
n
1
Cold water inlet
n
1
Hot water inlet
n
1
R/O water inlet
n
1
Fuses
Power cable port
n
1
Drain tube (behind kickplate)
Page 5
2 Important Information
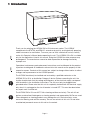
2.2 HYDRIM Unit overview
The following symbols
appear in the margins
of this book.
The following symbols appear on the unit:
A potential hazard
to the operator.
A situation that
may lead to a
mechanical failure.
Important
information
Caution: Hot Surface
and/or Hot Steam
Caution: Risk of electrical
shock. Disconnect supply
before servicing.
Caution: Refer to manual
for details.
2
Rear Connections
1
2
3
5
6
7
14
15
16
17
18
19
20
8
9
10
11
12
13
2
12
2 825 27
1 2 3 4
1714 16 1913
6
10 11
9
4
15 20
20
18
21

Page 6
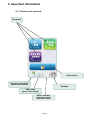
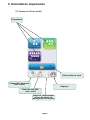
Settings
Unlock door
Water softener,
detergent level,
and door status
Network connectivity
(green when active)
Programs
USB status
(green when active)
2 Important Information
2.3 Touchscreen overview

Page 7
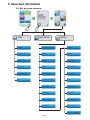
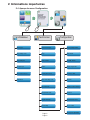
User Technician Setup
2 Important Information
2.4 Set up menu overview
Baud Rate
Set EOL CR/LF
Set Regeneration
LCD Contrast
Theme
Remote Screen
Instructions
Instructions Delay
Remote Access
Prepare for Shipping
Set PrinterLanguage Selection
Country
Date/Time
Unit No.
Network Setup
Reset Drying Counter
Screen Saver
Temperature C/F
Set Button Beep
Beep Volume
Cleaning
Set Drying Time
Set Wash Time
Cycle Count
Process Enforced
User

Page 8
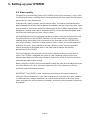
3. Setting up your HYDRIM
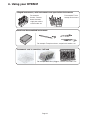
IMPORTANT INFORMATION
• To open the wash chamber door if the door is locked and the unit is not functional,
release the lever located on the top edge of the door and pull the door open. (For more
detail, see section 4.9 Opening the door in case of a power failure.)
• Ensure that HIP™ Ultra cleaning solution (instrument wash chemical) is available. All
other supplies are included with your unit.
• The HYDRIM C61w G4 is heavy (44 kg). Exercise caution when moving it.
• The HYDRIM C61w G4 must be properly grounded.
• The HYDRIM C61w G4 is equipped with an air gap / anti-suction device to prevent
backflow of dirty water into the water supply. No other air gap device is necessary.
3.1 Installation
Installation should only be undertaken by a SciCan approved technician. The use of an
unapproved installer may invalidate the warranty. A separate pre-installation checklist
should have been supplied by your dealer. Please review this prior to approving installation.
If the HYDRIM C61w G4 is installed in a sterilization center, the manufacturer of the
sterilization center should allow enough space at the top, back and both sides of the unit
to facilitate installation, leveling, and service access to the unit.
Do not move the HYDRIM C61w G4 into place by maneuvering the open wash chamber
door. This may cause the door to become misaligned and can cause leakage.
During installation, all consumables should have been added to the machine as approriate.
It is important to check that this has been undertaken before starting the machine.
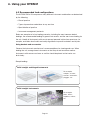
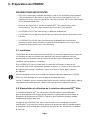
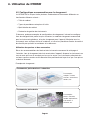
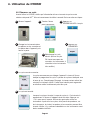
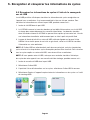
3.2 Handling and installing the HIP™ Ultra cleaning solution
The HIP™ Ultra cleaning solution is used in dilute form as a detergent for the cleaning of
surgical instruments in the HYDRIM range of washers and washer disinfectors. It is a
colourless and almost odourless liquid which is completely soluble in water.
The ph range is between 9.3 – 9.8 and the solution is therefore mildly alkaline. It is therefore
advised that certain precautionary measures are observed when handling during the loading
of the solution into the machine, and when removing and disposing of the empty bag.

Page 9
3. Setting up your HYDRIM
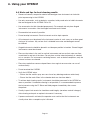
Recommended precautionary measures with regard to safe handling of HIP™ Ultra cleaning
solution.
• Always wear undamaged gloves made of natural or butyl rubber, nitrile, or neoprene
(Surgical gloves are ideal).
• Always wear eye protection.
• Protect exposed skin on arms.
• If solution is spilled on clothing, remove the item of clothing and wash affected skin with
plenty of water, in accordance with the Material Safety Data Sheet requirements.
• Use good industrial hygiene practices in handling this material. When handling,
do not eat or drink.
• After handling the product, remove and dispose of gloves and wash hands prior to
removing eye protection.
• Do not use the personal protective equipment you use for clinical activities to handle
HIP™ products.
• Always ensure that personal protective equipment, if contaminated with HIP™ Ultra
cleaning solution, is cleaned, or disposed of as appropriate.
For comprehensive data on HIP™ Ultra cleaning solution, please visit SciCan.com to view
or download a PDF of the Material Safety Data Sheet.
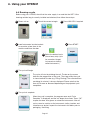
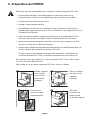
To install the HIP™ Ultra cleaning solution bag, follow these steps:
HYDRIM ULTRA
Cleaning Solution with Instrument Protection
HYDRIM is a registered trademark of SciCan Ltd.
Manufactured by SciCan Ltd., Toronto, Canada
www.scican.com
Lot number:
L0T334.11.2012
Product: CS-HIPC-U
8X 750ML /
25.4 U.S. fl. oz.
Layout #1
Turn the power
OFF, open the
door and pull out
the chemical
drawer.
Connect
the new bag,
close the door
and power
the unit ON.
Place a new bag
in the chemical
drawer.
1
2 3 4 5 6 7
1
2
3 4 5 6 7
1 2 3
4
5 6 7
1 2
3
4 5 6 7
Ensure
the nozzle is
in the correct
position.

3.3 Water quality
The quality of the water being used in the HYDRIM to clean the instruments is very critical
to achieving satisfactory cleaning results and to protecting the instruments and the internal
parts of the unit from deterioration.
Drinking water typically contains many dissolved solids. The amount of dissolved solids
greatly depends on the local natural geological conditions and they can cause stains, spots
and corrosion on instruments and on the internal parts of the HYDRIM. Among others, Iron,
Manganese, Chloride, and Calcium Carbonate (CaCO
3
) are the dominant dissolved solids
that affect the cleaning results when using a washer.
Iron and Manganese can cause orange and brown or black stains on the instruments and
on the internal parts of the HYDRIM. Chloride is usually responsible for causing stains,
spotting, pitting and scaling. If the instruments or the inner parts of the HYDRIM C61w,
such as the chamber, show any of these spots or stains, a water test may be required to
determine the cause. The installation of a water treatment system may be required to
reduce the amount of dissolved solids in the water and to improve the cleaning
performance of the HYDRIM.
Calcium Carbonate is the principle cause of water hardness and leaves white spots or
scales. The HYDRIM is equipped with a built-in water softening system that must be
adjusted according to the local water hardness. Please see section 3.4 of this manual for
recommended regeneration settings.
Before using the HYDRIM, SciCan recommends testing the water and recording the results
for water hardness, pH value, and water conductivity for future references in the pre-
installation and installation documents.
IMPORTANT: The HYDRIM's water softening system reduces the water hardness by
taking out Calcium Carbonate. If your water testing results show that your water hardness
is outside the unit's range of adjustment, or if other dissolved solids in the water cause
stains or deposits on the instruments or chamber, an external water treatment system may
be required.
Page 10
3. Setting up your HYDRIM

Page 11
3. Setting up your HYDRIM
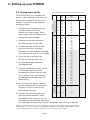
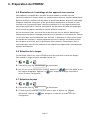
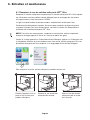
3.4 Testing water quality
The HYDRIM C61w G4 is equipped with
a built-in water softening system that must
be adjusted according to the local water
hardness. To read local water hardness,
proceed as follows:
1. The water test kit included with your
HYDRIM contains three water
hardness test strips in bags. Take a
water sample from the location where
the machine will be installed.
2. Open one of the bags, remove the
test strip and dip it into the water.
3. Compare the color of the strip with
the chart on the back of the bag
Determine the water hardness according
to the chart on the water test kit envelope.
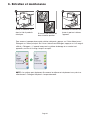
4. Power the unit on and select the
Settings key from the main menu.
5. Go to the Setup Menu and select
“Set Regeneration”.
7. Using the up and down arrows, set the
water softener regeneration level
according to the water hardness table
in this section. If your water hardness
falls between two settings, select the
higher setting.
8. Unscrew the water softener container
lid from the bottom left of the chamber
and pour 0.5 litres of water into the
water softener container.
9. Add 0.5 kg of water softening salt to
the water softener container, using
the supplied funnel to prevent any salt
from spilling into the chamber, and close
by screwing the lid tightly back into place. An improper seal can lead to corrosion.
*Please note: The water test strip is only accurate up to 250 ppm. If the reading on the test strip exceeds
250 ppm and/or if the location in which the HYDRIM is installed has known water quality problems, having
a more detailed and accurate water test done by a test lab is strongly recommended.
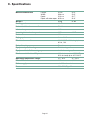
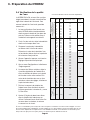
Water Hardness Conversion and salt regeneration levels
°dH
US
GPG
PPM
(mg CaCO3 / Litre)
Regen.
1 1.0 18
2 2.1 36
3 3.1 54
Very Soft
4 4.2 71
5 5.2 89
5.6 5.8 100
1
6 6.3 107
6.2 6.4 110
7 7.3 125
8 8.3 143
2
8.4 8.8 150
9 9.4 161
10 10.4 178
10.1 10.5 180
11 11.5 196
3
11.2 11.7 200
11.8 12.3 210
Typically
No Treatment
Necessary
(values from 18-143)
External Treatment
Required
(values >535)
May Require External Treatment
(values from 150-535)
12 12.5 214
13 13.6 232
4
14 14.6 250*
15 15.6 268
16 16.7 286
5
16.8 17.5 300
17 17.7 303
18 18.8 321
19 19.8 339
6
19.6 20.5 350
20 20.9 357
20.2 21.0 360
21 21.9 375
22 22.9 393
22.4 23.4 400
23 24.0 411
24 25.0 428
25 26.1 446
7
25.2 26.3 450
26 27.1 464
27 28.2 482
28 29.2 500
28.6 29.8 510
29 30.2 518
30 31. 3 535
30.3
31.6
540
>30.3
>31.6
>540
8
M2 Regeneration Levels
>540
>30.3 >31.6
Water
treatment
required
Water hardness and salt regeneration levels
(mg Ca CO
3
/Litre)
Additional
Water
treatment
required
>
54
0
>
30.3
>
31.6
Addi
t
i
ona
l
W
ater
t
rea
t
men
t
requ
i
re
d
*

Page 12
3. Setting up your HYDRIM
3.5 Disposing of packaging and decommissioned units
Your unit is shipped in a corrugated cardboard box and packed with protective material.
Please do not add these materials to your regular domestic waste. Instead, look to reduce
the amount of waste diverted to landfill by recycling these materials. Break down the
cardboard box so that it can be easily handled, and contact your municipality to learn about
its policy regarding the recycling of soft polyethylene engineered foam. Some municipalities
operate packaging collection points with dedicated disposal bins to accommodate various
materials.
A decommissioned washer should not be disposed of in the regular domestic waste. Doing
so is potentially harmful to people and the environment. It has been used in a healthcare
setting and represents a minor infection control risk. It also contains several recyclable
materials that can be extracted and reused in the manufacture of other products. Contact
your municipality to learn about its policies and programs governing the disposal of
electronic devices.
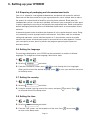
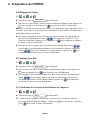
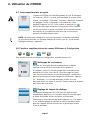
3.6 Setting the language
The messages displayed by your HYDRIM can be presented in a number of different
languages. To change the current language, follow these steps:
1.
2. Scroll to
Language
and select.
3. From the LANGUAGE screen, press to scroll through the list of languages.
When you have found the desired language, press
to save your selection and return
to the Setup menu.
3.7 Setting the country
1.
2. Scroll to
Country
and select.
3. Using the keypad, type the name of the country and press
EN
to select. Press
to save and return to the Setup menu.
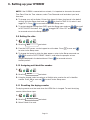
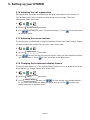
3.8 Setting the time
1.
2. Scroll to
Time
and select.
3. From the TIME screen, use the keypad to set the time. Press
EN
to save and
to return to the Setup menu.

NOTE: If the HYDRIM is connected to a network, it is important to also enter the correct
Time Zone. Enter the Time submenu, select Time Zone and scroll and select your local
time zone.
4. To change your unit to display 12-hour time format (24-hour time format is the default
setting), go to the Setup menu and use
to scroll to TIME 12/24, select it and
toggle to 12. Press
to save and return to the Setup menu.
5. To activate daylight savings time (DST), go to the Setup menu and use
to scroll
to DST ON/OFF and select. Use
to toggle DST ON or OFF and press the
to save and return to the Setup menu.
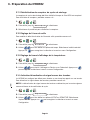
3.9 Setting the date
1.
2. Scroll to
Date
and select.
3. From the DATE screen, use the keypad to set the date. Press
EN
to save and
to return to the Setup menu.
4. To change the format in which the date appears, return to the Setup menu and use
to scroll to DATE FORMAT. Select it, and follow the prompts to have
the date displayed in the desired format. Press
to save and return to
the Setup menu.
3.10 Assigning unit identifier number
1.
2. Scroll to
Unit No
and select.
3. Using the keypad, select a maximum of 3 digits to be used as the unit’s identifier
number. Press
EN
to save and to return to the Setup menu.
3.11 Resetting the drying counter
The drying counter must be reset when the HEPA filter is changed. To reset the drying
counter, follow these steps:
1.
2. Scroll to
Reset Drying Counter
and select.
3. Select Default 0 to reset.
Page 13
3. Setting up your HYDRIM

Page 14
3. Setting up your HYDRIM
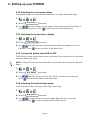
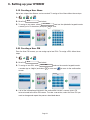
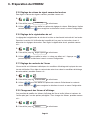
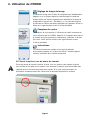
3.12 Adjusting the screensaver delay
To change the length of time before the screensaver is activated, follow these steps:
1.
2. Scroll to
Screensaver
and select.
3. Use to scroll through your time options. When you have found the amount of
time you require, press it. Press
to save and return to the Setup menu.
3.13 Adjusting the temperature display
1.
2. Scroll to
Temperature C/F
and select.
3. Use to choose between having information displayed in degrees Celsius or
Fahrenheit. Press
to save and return to the Setup menu.
3.14 Turning the button sound ON or OFF
The HYDRIM is preset to beep when a button is pressed. If you would like to turn the button
sound off, follow these steps:
NOTE: Turning OFF the button sound does NOT turn off other alarms and cycle notification
beeps.
1.
2. Scroll to
Beep ON/OFF
and select.
3. Use to scroll through your ON or OFF options and select it by pressing it.
Press
to save and move back to the Setup menu.
3.15 Adjusting the button beep volume
If you would like to adjust the beep volume, follow these steps:
1.
2. Scroll to
Beep Volume
and select.
3. Use to scroll through the volume settings. Select the one you want by
pressing it. Press
to save and move back to the Setup menu.

Page 15
3. Setting up your HYDRIM
3.16 Adjusting the salt regeneration
Salt regeneration should be set according to the local water hardness. See section 3.4
Testing Water Quality for instructions on determining correct settings. To set salt
regeneration, follow these steps:
1.
2. Scroll to
Set Regeneration
and select.
3. Use to change the value. The default setting is 1. Press to save and return
to the Setup menu.
3.17 Adjusting the screen contrast
The touchscreen is calibrated for the lighting condition of most sterilization centers. Should
you need to adjust the contrast for your office, follow these steps:
1.
2. Scroll to
LCD Contrast
and select.
3. Use to scroll through your contrast options. When you have found the contrast
you require, press it. Press
to save and return to the Setup menu.
3.18 Changing the touchscreen display themes
The touchscreen themes (i.e. icons and background colours) can be changed to one of the
preset options. To change themes follow these steps:
1.
2. Scroll to
Theme
and select.
3. In the
Change Theme
screen, use to scroll through your available options.
As you scroll, each theme will display on the touchscreen. Press
to select your
theme and return to the Setup menu.

Page 16
3. Setting up your HYDRIM
3.19 Creating a User Name
Up to four unique User Names can be created. To assign a User Name follow these steps:
1.
2. Scroll to
User
and select.
3. To assign a user name, select
User Name
and use the alphabetic keypad to enter
a name (up to 12 characters) and press
EN
to save.
3.20 Creating a User PIN
From the User PIN screen, you can assign up to four PINs. To assign a PIN, follow these
steps:
1.
2. Scroll to
User
and select.
3. To assign a user PIN, select
User PIN
and use the numeric keypad to enter
a number (up to 4 digits) and select
EN
to save and to move to the confirmation
screen.
4. If all of the information presented in the confirmation screen is correct, press OK
to be returned to the User PIN screen. To make a correction, select the User PIN you
want to change and repeat the process described above.

Page 17
3. Setting up your HYDRIM
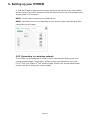
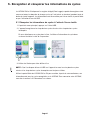
3.21 Setting up process enforced usage
When process enforced usage is activated, users are required to enter a PIN at the end of
a cycle. For process enforced usage to function, User IDs and PINs must first be assigned.
To set up User ID and PINs, refer to sections 3.19 and 3.20 on creating a user name and
PIN. To activate process enforced usage, follow these steps:
1.
2. Scroll to
Process Enforced
and select.
3. Use to toggle process enforced function ON or OFF. Press
to save your selection and return to the Setup menu.
NOTE: Any user can stop a cycle even
with process enforced usage ON.
However, the cycle data will record
that an unauthorized user
has stopped the cycle.
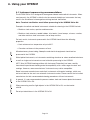
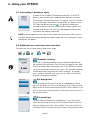
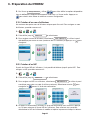
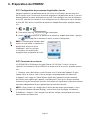
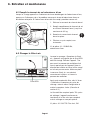
3.22 Connecting to a network
The HYDRIM C61w G4 has a 10/100Base-T Ethernet port located at the back of the unit.
To connect your HYDRIM to a network using a router, follow these steps:
1. Connect your network cable to the Ethernet port at the back of the unit. If your office
uses a router, the router should automatically assign the unit an IP address. A red X on the
network icon means the unit is not connected. A yellow check mark means the unit has
an IP address but is not connected to the Internet and cannot send emails. A green check
mark means the Internet connection is set up properly and the unit can send out emails.
NOTE: In some circumstances, where you do not have a router, for example when using
Windows Network Sharing, you may have to assign a dedicated or ‘static’ IP address.
To assign a static IP address, contact your local network administrator.
2. From the main screen, press the Network icon. The Network screen displays information
about your HYDRIM’s connectivity, including its IP address.

Page 18
3. Setting up your HYDRIM
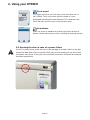
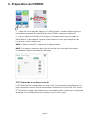
3. Type the IP address displayed on the touchscreen into the browser of any web enabled
device to access your unit’s web portal. When the Network icon is active (for example when
sending email) it will turn green.
NOTE: Use QR code if connecting to a mobile device.
NOTE: Connection time will vary depending on your network speed, and making an initial
connection can take longer.
3.23 Connecting to a wireless network
The HYDRIM can be configured for wireless use by connecting the Ethernet port to an
external wireless bridge / access point. SciCan currently recommends the use of the
D-Link
®
DAP-1522 Xtreme N
®
Duo Wireless Bridge. Contact your network administrator
to learn more about setting up a wireless bridge.

Page 19
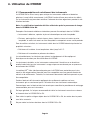
4. Using your HYDRIM
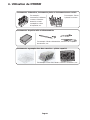
4.1 Instrument reprocessing recommendations
The HYDRIM C61w G4 is designed to clean general dental and medical instruments. When
used correctly, the HYDRIM is effective for the removal of debris on instruments that may
result in the insulation of microorganisms during terminal sterilization.
Note: Terminal sterilization must follow processing in the HYDRIM C61w G4.
Examples of medical and dental instruments suitable for cleaning in the HYDRIM include:
• Stainless steel scalers, spatulas and hemostats.
• Stainless steel retractors, needle holders, skin hooks, tissue forceps, scissors, curettes,
and other stainless steel instruments free of deep cavities.
For best results, instruments processed in the HYDRIM should have the following
properties:
• Heat resistance to a temperature of up to 60°C.
• Corrosion resistance in the presence of heat.
Microkeratomes, phaco tubing, fiberoptics and electrical equipment should not be
processed in the HYDRIM.
Nickel-plated instruments, or instruments containing aluminum or colour anodized aluminum
as well as single use instruments are not suited for processing in the HYDRIM.
HIP™ Ultra (HYDRIM cleaning solution with Instrument Protection) has been carefully
formulated to provide outstanding material compatibility with a wide range of metals and
coatings. However, some manufacturers’ instruments may not be compatible.
Some instrument manufacturers make their instruments with special coatings, which may
not be suitable for the use in an automatic instrument washer. Please consult the instrument
manufacturer for their recommended cleaning procedures of these instruments.
In general, it is not recommended to process carbon steel and chrome-plated instruments
in the HYDRIM C61w G4.
When processing small or light objects in the HYDRIM C61w G4, use the basket
with lid.
Do not put dental burrs in the HYDRIM C61w G4.

Page 20
4. Using your HYDRIM
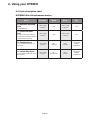
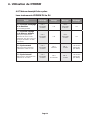
4.2 Cycle description chart
HYDRIM C61w G4 instrument washer
Cycle Prewash Wash Rinse Dry
P0 – Machine Cleaning
Cycle
No initial draining.
<30ºC (cold)
2 minutes
N/A
<30ºC (cold)
2 minutes
N/A
P1 – Rinse and Hold
Cycle
Use to prevent soil from drying
on instruments when they will not
be washed within one hour.
<30ºC (cold)
2 minutes
N/A
<30ºC (cold)
1 minutes
N/A
P2 – Regular Cycle
Use for moderately soiled loose
instruments.
<30ºC (cold)
2 minutes
50ºC
5 minutes
60ºC
1 minute
1-25 minutes
(default
10 minutes)
P3 – Heavy Duty Cycle
Use for heavily soiled instruments
and cassettes.
<30ºC (cold)
2 minutes
50ºC
9-15 minutes
60ºC
1 minute
1-25 minutes
(default
10 minutes)
La page est en cours de chargement...
La page est en cours de chargement...
La page est en cours de chargement...
La page est en cours de chargement...
La page est en cours de chargement...
La page est en cours de chargement...
La page est en cours de chargement...
La page est en cours de chargement...
La page est en cours de chargement...
La page est en cours de chargement...
La page est en cours de chargement...
La page est en cours de chargement...
La page est en cours de chargement...
La page est en cours de chargement...
La page est en cours de chargement...
La page est en cours de chargement...
La page est en cours de chargement...
La page est en cours de chargement...
La page est en cours de chargement...
La page est en cours de chargement...
La page est en cours de chargement...
La page est en cours de chargement...
La page est en cours de chargement...
La page est en cours de chargement...
La page est en cours de chargement...
La page est en cours de chargement...
La page est en cours de chargement...
La page est en cours de chargement...
La page est en cours de chargement...
La page est en cours de chargement...
La page est en cours de chargement...
La page est en cours de chargement...
La page est en cours de chargement...
La page est en cours de chargement...
La page est en cours de chargement...
La page est en cours de chargement...
La page est en cours de chargement...
La page est en cours de chargement...
La page est en cours de chargement...
La page est en cours de chargement...
La page est en cours de chargement...
La page est en cours de chargement...
La page est en cours de chargement...
La page est en cours de chargement...
La page est en cours de chargement...
La page est en cours de chargement...
La page est en cours de chargement...
La page est en cours de chargement...
La page est en cours de chargement...
La page est en cours de chargement...
La page est en cours de chargement...
La page est en cours de chargement...
La page est en cours de chargement...
La page est en cours de chargement...
La page est en cours de chargement...
La page est en cours de chargement...
La page est en cours de chargement...
La page est en cours de chargement...
La page est en cours de chargement...
La page est en cours de chargement...
La page est en cours de chargement...
-
 1
1
-
 2
2
-
 3
3
-
 4
4
-
 5
5
-
 6
6
-
 7
7
-
 8
8
-
 9
9
-
 10
10
-
 11
11
-
 12
12
-
 13
13
-
 14
14
-
 15
15
-
 16
16
-
 17
17
-
 18
18
-
 19
19
-
 20
20
-
 21
21
-
 22
22
-
 23
23
-
 24
24
-
 25
25
-
 26
26
-
 27
27
-
 28
28
-
 29
29
-
 30
30
-
 31
31
-
 32
32
-
 33
33
-
 34
34
-
 35
35
-
 36
36
-
 37
37
-
 38
38
-
 39
39
-
 40
40
-
 41
41
-
 42
42
-
 43
43
-
 44
44
-
 45
45
-
 46
46
-
 47
47
-
 48
48
-
 49
49
-
 50
50
-
 51
51
-
 52
52
-
 53
53
-
 54
54
-
 55
55
-
 56
56
-
 57
57
-
 58
58
-
 59
59
-
 60
60
-
 61
61
-
 62
62
-
 63
63
-
 64
64
-
 65
65
-
 66
66
-
 67
67
-
 68
68
-
 69
69
-
 70
70
-
 71
71
-
 72
72
-
 73
73
-
 74
74
-
 75
75
-
 76
76
-
 77
77
-
 78
78
-
 79
79
-
 80
80
-
 81
81


SciCan HYDRIM C61w G4 Manuel utilisateur
- Taper
- Manuel utilisateur
dans d''autres langues
- English: SciCan HYDRIM C61w G4 User manual
Documents connexes
-
SciCan HYDRIM L110w G4 Manuel utilisateur
-
-
-
-
-
-
-
-
-

