Waring WJX80X Manuel utilisateur
- Catégorie
- Fabricants de jus
- Taper
- Manuel utilisateur

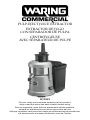
PULP-EJECT JUICE EXTRACTOR
EXTRACTOR DE JUGO
CON SEPARADOR DE PULPA
CENTRIFUGEUSE
AVEC SÉPARATEUR DE PULPE
WJX80X
For your safety and continued enjoyment of this product,
always read the instruction book carefully before using.
Para su seguridad y para disfrutar plenamente de este producto,
siempre lea atentamente las instrucciones antes del uso.
An que ce produit vous procure en toute sécurité beaucoup de satisfaction,
lire attentivement le manuel d’utilisation avant de l’utiliser.

2
For your safety and continued enjoyment of this product, always read
the instruction book carefully before using.
IMPORTANT SAFEGUARDS
When using electrical appliances, basic safety precautions should
always be taken, including the following:
1. READ ALL INSTRUCTIONS.
2. Always use the appliance on a dry, level surface.
3. D o not push produce into the feed chute with your ngers.
Always use the food pusher provided.
4. D o not touch the small cutting blades in the base of the
stainless steel lter basket.
5. Do not leave the juice extractor unattended when in use.
6. This appliance should not be used by or near children or
individuals with certain disabilities.
7. Always make sure the juice extractor is properly and completely
assembled before operating. The unit will not turn on unless
properly assembled.
8. A lways disconnect the juice extractor from the power outlet
when not in use or before moving the appliance, putting on or
removing parts and cleaning.
9. A lways make sure juice extractor cover is securely in place
before motor is turned on. Do not turn lid while juicer is in
operation.
10. Be sure to turn switch to OFF position after each use. Make
sure the motor stops completely before disassembling.
11. Do not put your ngers or any other object into the juicer
opening while it is in operation. If food becomes lodged in the
opening, use food pusher or another piece of fruit or vegetable
to push it down. When this method is not possible, turn the
motor off and disassemble juicer to remove the remaining food.
12. D o not operate any electrical appliance with a damaged cord or
plug or after the appliance has malfunctioned or been damaged
in any manner.
If damaged, immediately stop use and call Waring® Customer
Service at (800) 269-6640, in the United States, for examination,
adjustment or repair.

3
13. Do not let the cord hang over the edge of the table or counter,
or touch hot surfaces or become knotted.
14. Do not place this appliance on or near a hot gas or electric
burner, or where it could touch a heated oven.
15. F or any maintenance in the United States, other than cleaning,
call (800) 269-6640.
16. This appliance has a 3-prong grounded plug. To reduce the
risk of electric shock, this plug is intended to t into a grounded
outlet only one way. If the plug does not t, contact a qualied
electrician. Do not attempt to modify the plug in any way.
17. To protect against risk of electric shock, do not put motor, unit
housing or power cord in water or other liquids.
18. Avoid contact with moving parts.
19. The use of attachments not recommended or sold by the
manufacturer may cause re, electric shock or injury.
20. Do not use outdoors.
21. Do not use the appliance if the lter basket is damaged.
22. T his appliance is not intended for use by persons (including
children) with reduced physical, sensory, or mental capabilities,
or lack of experience and knowledge, unless they have
been given supervision or instructions concerning use of the
appliance by a person responsible for their safety.
23. Children should be supervised to ensure that they do not play
with the appliance.
24. To avoid risk of injury, do not carry the unit by the locking arm.
The locking arm is not a handle.
25. A copy of this manual can be downloaded at
waringcommercialproducts.com.
SAVE THESE INSTRUCTIONS
APPROVED FOR
COMMERCIAL USE

4
CONTENTS
Important Safeguards ........................................................................2
Grounding Instructions ....................................................................... 4
Extension Cords ................................................................................. 5
Introduction ........................................................................................5
Features and Benets ........................................................................5
Parts and Accessories .......................................................................6
Assembling ......................................................................................... 7
Operating Instructions ........................................................................ 7
Manual Thermal Protection ................................................................8
Disassembling ....................................................................................9
Cleaning & Maintenance ....................................................................9
Troubleshooting ................................................................................10
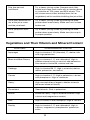
Vegetables and Their Vitamin and Mineral Content ......................... 11
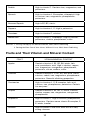
Fruits and Their Vitamin and Mineral Content ..................................12
Warranty ........................................................................................... 13
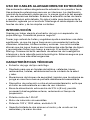
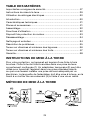
GROUNDING INSTRUCTIONS
This appliance must be grounded while in use to protect the operator
from electric shock. The appliance is equipped with a 3-conductor
cord and 3-prong grounding-type plug to t the proper grounding-
type receptacle. The appliance has a plug that looks like the plug
in drawing (1 ). An adapter, as in drawing (2), should be used for
connecting the appliance plug to two-prong receptacles. The
grounding lug, which extends from the adapter, must be connected
to a permanent ground such as a properly grounded outlet box, as
shown in drawing (3), using a metal screw.
GROUNDING METHOD

5
EXTENSION CORDS
Use only 3-wire extension cords which have 3-prong grounding-type
plugs and 3-pole cord connectors that accept the plug from the
appliance. Use only extension cords that are intended for indoor use.
Use only exten sion cords having an electrical rating not less than
the rating of the appliance. Do not use damaged extension cords.
Examine extension cord before using and replace if damaged. Do not
abuse extension cord and do not yank on any cord to disconnect.
Keep cord away from heat and sharp edges.
INTRODUCTION
Thank you for purchasing the Waring® Commercial Pulp Eject Juice
Extractor for your business.
Raw juices derived from fresh fruits and vegetables are invaluable as
an aid in maintaining a balanced diet. Raw juice contains, in its most
natural and complete form, precious vitamins, minerals, bioavonoids
and enzymes. Nutritional authorities claim that raw juice is food in
one of its most easily digestible forms. The Waring® Commercial
Juice Extractor is the result of intensive research and engineering
efforts, and we are sure you will be delighted with its performance.
FEATURES & BENEFITS
• Centrifugal-style juice extractor
• Built for use in smoothie shops, cafes, bars, restaurants, hotels,
healthcare establishments and more
• Safety interlocks ensure machine will only operate when properly
assembled
• Manual thermal protection automatically prevents machine from
overheating under heavy use
• 3.15-inch juice opening accommodates large fruits and vegetables,
so there is less prep work
• Powerful 1.25 HP motor
• Motor type: brushless induction
• Power: 120 volt, 1000 watts, 5-15 plug type
• Limited Two-Year Motor Warranty, Limited One Year Parts & Labor

6
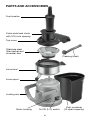
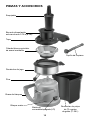
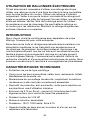
PARTS AND ACCESSORIES
Food pusher
Extra-wide feed chute
with 3.15-inch opening
Top cover
Juice bowl
Stainless steel
lter basket and
shredder disc
Juice spout
Motor housing
Pulp container
(12-quart capacity)
Cleaning brush
Locking arm
On/Off (I/O) switch

7
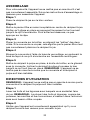
ASSEMBLING YOUR WARING® COMMERCIAL
JUICE EXTRACTOR
For your safety, the juice extractor will not operate until the machine
is properly assembled. To assemble this unit, the following steps
must be followed in the order given.
Step 1
Place juice bowl on top of the motor housing.
Step 2
Place the stainless steel lter basket inside the center of the
juice bowl. Make sure it slides into place by pressing rmly and
spinning until it locks into place. To avoid injury, do not press on
shredder disc.
Step 3
Place the top cover onto the housing by aligning the tabs on both
sides. If cover does not t, this means that the lter basket is not
properly seated onto the juice bowl.
Step 4
Lock the top cover into place with the locking arm by lifting arm up
so that it snaps the lid down onto the juicing assembly.
Step 5
Place the pulp container into place to the right of the housing by
sliding it under the top cover. Tilt and push bottom of pulp container
into unit until it is seated properly. NOTE: Unit will not operate if top
cover and pulp container are not properly positioned.
OPERATING INSTRUCTIONS
NOTE: The juice extractor will not operate until the top cover and
pulp container are locked into position.
Step 1
Wash your fruit and vegetables for juicing. NOTE: Most fruit and
vegetables such as apples, carrots and cucumbers will not need to
be cut to size, as they will t into the feed chute whole.
Step 2
Ensure that the juice extractor is correctly assembled and that a juice
collector cup is placed under the spout while juicing.

8
Step 3
Plug the power cord into a power outlet and turn the machine ON.
Step 4
With the motor running, place food into the feed chute. Using the
food pusher, gently guide food down the chute. To extract maximum
juice, always push the food pusher down slowly. Make sure at area
of food pusher is aligned to at area of feed chute.
NEVER USE FINGERS TO PUSH FOOD DOWN THE FEED CHUTE
OR TO CLEAR THE FEED CHUTE. ALWAYS USE THE FOOD
PUSHER PROVIDED.
Step 5
Juice will ow into the juice cup and the separated pulp will
accumulate in the pulp container. Do not allow the pulp container to
overll, as this may prevent correct operation or damage the unit.
NOTE: The pulp container can be emptied during juicing by turning
the juice extractor to the OFF position, then carefully removing the
pulp container. You can reserve the pulp for soups, sauces or cakes.
Or, you can discard the pulp. Replace the pulp container by tilting it
slightly until it is properly seated under the cover.
Cleanup tip: For easy cleaning, immediately after each use, wash the
juicer’s removable parts with soap under running water to remove
wet, sticky pulp. Removable parts can be air-dried or can also be
cleaned on top shelf of dishwasher.
MANUAL THERMAL PROTECTION
Your juice extractor is equipped with manual thermal protection to
guard the motor from overheating. Should the motor stop running
under heavy use, turn the power switch off and unplug the power
cord. Empty the pulp container and the lter basket of all contents
and allow approximately 5 minutes for the motor to cool down.
Press the reset button located underneath the machine, then plug
the power cord back into the outlet and continue juicing. If your
juice extractor does not function properly following this procedure,
discontinue use and contact Waring customer service.

9
DISASSEMBLING YOUR WARING® COMMERCIAL
JUICE EXTRACTOR
Step 1
Turn the Waring® Commercial Juice Extractor switch to the OFF
position. Remove the plug from the power outlet.
Step 2
Remove the pulp container by tilting it slightly to remove from base.
Step 3
Unlock the locking arm by pulling it out, away from the top cover,
so that it rests on the side housing.
Step 4
Remove the lid by pulling it up and off the juice bowl and basket.
Step 5
Remove stainless steel lter basket using the metal handles. THE
STAINLESS STEEL FILTER BASKET CONTAINS SMALL, SHARP
BLADES TO CUT AND PROCESS FRUITS AND VEGETABLES. DO
NOT TOUCH BLADES WHEN HANDLING THE FILTER BASKET.
Step 6
Remove juice bowl by lifting it up and off the housing.
CLEANING & MAINTENANCE
For easy cleaning: Rinse removable parts with hot, soapy water
immediately after each use to remove wet pulp. Rinse with clean
water. Allow parts to air-dry or, place removable parts on top shelf
only of dishwasher. The cover, juice bowl, pulp container and lter
basket are dishwasher safe (top shelf only).
Wipe the motor base with a damp cloth. DO NOT IMMERSE
THE MOTOR BASE IN WATER OR ANY OTHER LIQUIDS.
THE CENTER OF THE FILTER BASKET CONTAINS SMALL,
SHARP BLADES TO PROCESS FRUIT AND VEGETABLES
DURING THE JUICING FUNCTION. DO NOT TOUCH BLADES
WHEN HANDLING THE FILTER BASKET, AS BLADES HAVE
SHARP EDGES.

10
The included cleaning brush is the most effective way to clean the
lter basket. Using the brush, hold the lter basket under cold,
running water and brush from the outside of the basket. Then clean
the lter basket in warm, soapy water. Always treat the lter basket
with care, as it can be easily damaged. Use caution when handling,
as shredder disc is very sharp.
NOTE: To assist with cleaning, soak the stainless steel lter basket
in hot, soapy water for approximately 10 minutes immediately after
juicing is completed. If pulp is left to dry on the lter, it may clog the
ne pores of the lter mesh, thereby lessening the effectiveness of
the juicer.
Discoloration of the plastic may occur with strongly colored fruit and
vegetables. To help prevent this, wash parts immediately after use. If
discoloration does occur, the plastic parts can be soaked in bleach
and water. Using 1 tablespoon of bleach to 1 quart of water, soak
plastic parts for a maximum of 5 minutes, then rinse thoroughly. Do
not soak the lter basket in pure bleach.
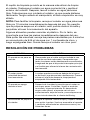
TROUBLESHOOTING
ISSUE SOLUTION
Machine will not work Make sure unit is plugged into proper power
when switched on. supply source. Make sure all parts are assembled
correctly. Check your circuit breaker or fuse panel
to make sure it is live.
Motor appears to stall Wet pulp can build up under the cover if the juicing
when juicing. action is too vigorous. Try slower juicing action by
pushing the food pusher down more slowly.
Machine shuts off while Unplug the power cord and allow approximately
in use. 5 minutes for the motor to cool down. Plug the
power cord back into the outlet and continue
juicing. If your juice extractor does not function
properly following this procedure, discontinue
use and contact Waring customer service.
Excess pulp builds up Stop the juicing process and turn machine off.
in the lter basket. Remove the juicer cover and scrape off pulp. Re-
assemble and begin juicing again. Try alternating
(soft and hard) vegetable and fruit varieties.

11
Pulp too wet and Try a slower juicing action. Remove mesh lter
insufcient. basket and clean mesh walls with a cleaning brush
in a solution of 70% water and 30% bleach. This
will remove excess ber buildup (from fruit or
vegetables) which could be inhibiting the juice ow.
Juice leaks between the Try a slower juicing action by pushing the food
rim of the juicer cover pusher down more slowly. Make sure unit is clean
and the juice bowl. before use.
Juice sprays out from Try a slower juicing action by pushing the food
spout. pusher down more slowly. Make sure juice cup is
in proper position.
Vegetables and Their Vitamin and Mineral Content
VEGETABLE VITAMIN/MINERAL CONTENT
Asparagus High in vitamins A, B1 (thiamine), C, choline, folic
acid; high potassium.
Beets and Beet Greens High in vitamins A, C, and chlorophyll. High in
alkaline minerals such as calcium and potassium.
Also contain vitamin B6, choline and iron.
Cabbage High in vitamins B6, C. High in minerals (choline,
iodine, potassium, and sulfur).
Carrots High in vitamins A, C. High in potassium, calcium,
and phosphorus. High in carotenes.
Celery High concentration of organic alkaline minerals
(balances blood pH levels).
Cucumbers Good diuretic. Rich in potassium.
Fennel Similar to celery – high in alkaline minerals. High
calcium and magnesium content.
Kale High in vitamin A and chlorophyll. High in calcium.
Parsley High in vitamins A, C, and chlorophyll. High in
calcium, magnesium, phosphorous, potassium,
sulfur.

12
Radish High in vitamin C. Contains iron, magnesium, and
potassium.
Spinach High in vitamins A, B complex, chlorophyll. High
in calcium, iron, magnesium, phosphorous,
potassium.
Summer Squash High in B1, B2, niacin.
Peppers High in vitamins A, C. High in potassium.
Tomatoes High in vitamins C, calcium.
Watercress High in vitamin C, chlorophyll. High in calcium,
potassium, choline, phosphorous, sulfur.
Sources: 1 . Juiclng Therapy by Dr. Bernard Jensen, 2000, Keats Publishing
2. Getting the Best Out of Your Juicer, William H. Lee, 1992, Keats Publishing
Fruits and Their Vitamin and Mineral Content
FRUIT VITAMIN/MINERAL CONTENT
Apples Contain vitamins A, B1, B2, B6, biotin, folic
acid, pantothenic acid. High in choline, copper,
iron, magnesium, manganese, phosphorous,
potassium, silicon, sodium, sulfur.
Cherries Contain vitamins A, C, B1, B2, folic acid, niacin,
calcium, cobalt, iron, magnesium, phosphorous,
potassium. Powerful alkalizing properties.
Cranberries High in vitamins A, C, B-complex, folic acid,
calcium, iron, phosphorous, potassium. Contain
live enzymes.
Grapes Contain vitamins A, B1, B2, C, niacin, calcium,
choline, copper, iron, magnesium, manganese,
phosphorous.
Grapefruit High in vitamin C. High in calcium, phosphorous,
potassium. Contains some vitamin B-complex, E,
K, biotin, inositol.
Lemons High in vitamin C and citric acid. Act as a very
strong cleanser.

13
Limes Same as lemons, but not as acidic.
Melons High in vitamin A, B-complex, C. High in enzymes.
Oranges High in vitamin A, C. Contain B1, B2 B6, E,
K, biotin, folic acid, niacin, calcium, choline,
copper, uorine, iron manganese, magnesium,
phosphorous, potassium, silicon, zinc.
Sources: 1 . Juiclng Therapy by Dr. Bernard Jensen, 2000, Keats Publishing
2. Getting the Best Out of Your Juicer, William H. Lee, 1992, Keats Publishing
LIMITED WARRANTY
LIMITED TWO-YEAR MOTOR WARRANTY
LIMITED ONE YEAR PARTS AND LABOR WARRANTY
(U.S. and Canada only)
Waring®Commercial warrants that this product’s motor shall be free
from defects in materials and workmanship for a period of two years
from the date of purchase when used with foodstuffs, nonabrasive
liquids (other than detergents) and nonabrasive semi-liquids,
providing it has not been subject to loads in excess of indicated
rating. All other components are warranted for a period of one year
from date of purchase.
Under this warranty, the Waring®Commercial division will repair
or replace any part which, upon our examination, is defective in
materials or workmanship, provided the product is delivered prepaid
to the Waring Service Center, 314 Ella T. Grasso Ave., Torrington, CT
06790, or any factory-approved service center.
This warranty does not: a) apply to any product that has become
worn, defective, damaged or broken due to use or due to repairs
or servicing by other than the Waring Service Center or a factory-
approved service center or due to abuse, misuse, overloading or
tampering; b) cover incidental or consequential damages of any kind.
This warranty is applicable only to appliances used in the United
States or Canada; this supersedes all other express product warranty
or guaranty statements. For Waring products sold outside of the U.S.
and Canada, the warranty is the responsibility of the local importer or
distributor. This warranty may vary according to local regulations.
This warranty is void if appliance is used on Direct Current (DC).

14
Para su seguridad y para disfrutar plenamente de este producto,
siempre lea cuidadosamente las instrucciones antes de usarlo.
MEDIDAS DE SEGURIDAD
IMPORTANTES
Al usar aparatos eléctricos, siempre debe tomar precauciones
básicas de seguridad, entre ellas las siguientes:
1. LEA TODAS LAS INSTRUCCIONES.
2. S iempre use el aparato en una superficie seca y llana/nivelada.
3. Nun ca empuje los alimentos en la boca de alimentación con los
dedos; siempre use el empujador provisto.
4. No toque los “dientes” que se encuentran en el fondo del colador
de acero inoxidable.
5. No descuide/deje el aparato sin vigilancia durante el uso.
6. Este aparato no debe ser usado por o cerca de niños o personas
con ciertas discapacidades.
7. S iempre compruebe que el aparato está debidamente
ensamblado antes de ponerlo en marcha. El aparato no se pondrá
en marcha a menos que todas las piezas estén debidamente
ensambladas.
8. S iempre desenchufe el aparato cuando no está en uso, antes de
moverlo, antes de instalar/sacar piezas, y antes de limpiarlo.
9. S iempre compruebe que la tapa está debidamente cerrada antes
de encender el aparato. No gire la tapa durante el funcionamiento.
10. S iempre apague el aparato, poniendo el botón de encendido/
apagado en “OFF”, después del uso. Espere hasta que el motor
se detenga completamente antes de desensamblar el aparato.
11. N o introduzca los dedos ni ningún objeto en la boca de
alimentación durante el funcionamiento. Si alimentos quedan
atascados en esta, empújelos con el empujador. Si esto no
soluciona el problema, apague y desenchufe el aparato antes de
desensamblarlo para desalojar los alimentos.
12. No use este aparato si el cable o el enchufe están dañados,
después de un mal funcionamiento, después de que se haya
caído o si está dañado.
En caso de daño o mal funcionamiento, interrumpa
inmediatamente el uso del aparato y llame al 1-800-269-6640

15
para conseguir información acerca de cómo devolverlo a un
centro de servicio autorizado para su revisión, reparación o
ajuste.
13. No permita que el cable cuelgue del borde de la encimera o de
la mesa, que tenga contacto con superficies calientes o que se
enrede.
14. No coloque el aparato sobre o cerca de un quemador a gas, un
hornillo eléctrico caliente o un horno caliente.
15. P ara cualquier operación de mantenimiento (excepto la limpieza)
en los Estados Unidos, llame al 1-800-269-6640.
16. E ste aparato está equipado con un enchufe con puesta a tierra.
Como medida de seguridad, aquel enchufe se podrá enchufar de
una sola manera en la toma de corriente de tierra. Si no entra en
la toma de corriente, comuníquese con un electricista. No intente
modificarla.
17. P ara reducir el riesgo de descarga eléctrica, no ponga el motor, la
carcasa, el cable ni el enchufe en agua ni en ningún otro líquido.
18. Evite el contacto con las piezas móviles.
19. El uso de accesorios no recomendados o vendidos por el
fabricante presenta un riesgo de incendio, descarga eléctrica
o heridas.
20. No lo use en exteriores.
21. No use el aparato si el filtro está dañado.
22. Los niños o las personas que carezcan de la experiencia
o de los conocimientos necesarios para manipular el aparato, o
aquellas cuyas capacidades físicas, sensoriales o mentales estén
limitadas, no deben usar el aparato sin la supervisión
o la dirección de una persona responsable por su seguridad.
23. No permita que los niños jueguen con este aparato.
24. P ara evitar el riesgo de lesiones, no transporte la unidad por
el brazo de bloqueo. El brazo de bloqueo no es un asa.
25. Para conseguir una copia de este manual de instrucciones, visite
www.waringcommercialproducts.com y descargue el manual.
GUARDE ESTAS INSTRUCCIONES
APROBADO PARA USO COMERCIAL

16
ÍNDICE
Medidas de seguridad importantes .................................................14
Instrucciones de puesta a tierra .......................................................16
Uso de extensiones .......................................................................... 17
Introducción .....................................................................................17
Características técnicas ................................................................... 17
Piezas y accesorios ..........................................................................18
Ensamblaje ....................................................................................... 19
Instrucciones de uso ........................................................................ 19
Dispositivo de protección del motor ............................................... 20
Desmontaje ..................................................................................... 21
Limpieza y mantenimiento ............................................................... 21
Resolución de problemas ............................................................... 22
Contenido vitamínica y mineral de los vegetales .............................23
Contenido vitamínica y mineral de las frutas ...................................24
Garantía ........................................................................................... 25
INSTRUCCIONES DE PUESTA A TIERRA
Para su protección, este aparato debe estar puesto a tierra. Este
aparato está equipado con un cable/enchufe con puesta a tierra,
el cual debe ser conectado a una toma de corriente debidamente
puesta a tierra (1). Si una toma de corriente puesta a tierra no está
disponible, se podrá usar un adaptador para conectar el aparato a
una toma de corriente polarizada (2). El adaptador debe ser puesto
a tierra mediante un tornillo de metal que conecte la lengüeta del
mismo a la caja eléctrica (Fig. 3).
MÉTODOS DE PUESTA A TIERRA

17
USO DE CABLES ALARGADORES/DE EXTENSIÓN
Use solamente cables alargadores/de extensión con puesta a tierra.
Use solamente extensiones para uso en interiores. La clasificación
nominal de la extensión debe ser por lo menos igual a la del aparato.
No use extensiones dañadas. Examine la extensión antes de usarla
y reemplácela si está dañada. No jale el cable para desconectar la
extensión; agárrela por el enchufe. Mantenga el cable alejado de las
fuentes de calor y de los objetos cortantes.
INTRODUCCIÓN
Gracias por haber elegido el extractor de jugo con separador de
pulpa Waring® Commercial para su negocio.
Tomar jugo natural de frutas y vegetales ayuda a mantener una dieta
equilibrada, ya que los jugos frescos son una excelente fuente de
vitaminas, minerales, bioflavonoides y enzimas. Los nutricionistas
afirman que los jugos frescos son los alimentos más fáciles de digerir
y recomiendan tomar jugo fresco a menudo. El extractor de jugo
Waring® Commercial es el resultado de esfuerzos de investigación
intensivos y de la más alta pericia tecnológica. Estamos seguros que
cumplirá con sus más altas exigencias.
CARACTERÍSTICAS TÉCNICAS
• Extractor de jugo de tipo centrífugo
• Diseñado para uso en tiendas de batidos, cafeterías, bares,
restaurantes, hoteles, establecimientos de cuidado de la salud
y más.
• Mecanismos de bloqueo de seguridad; impiden que la máquina se
ponga en marcha a menos que esté debidamente ensamblada.
• Dispositivo de protección contra el sobrecalentamiento; evita que
el motor se sobrecaliente en caso de uso intensivo
• Boca de alimentación extra-ancha de 3.15 in (8 cm); permite
procesar frutas/vegetales enteros, reduciendo el tiempo de
preparación
• Potente motor de 1.25 HP
• Motor de inducción sin escobillas
• Potencia: 120 V, 1000 vatios, enchufe 5-15
• Garantía limitada de dos años en el motor y de un año en los
materiales y la mano de obra

18
PIEZAS Y ACCESORIOS
Empujador
Boca de alimentación
extra ancha de 3.15 in (8 cm)
Tapa
Recolector de jugo
Colador/disco exprimidor
de acero inoxidable
Pico
Recolector de pulpa
de 12 cuartos
de galón (11.35 L)
Cepillo de limpieza
Brazo de bloqueo
Bloque-motor Botón de
encendido/apagado (I/O)

19
ENSAMBLAJE
Para su seguridad, el aparato no se pondrá en marcha a menos que
esté debidamente ensamblado. Siga las instrucciones de ensamblaje
a continuación para ensamblar el aparato.
Paso 1
Coloque el recolector jugo en la base.
Paso 2
Coloque el colador de acero inoxidable en el centro del recolector
de jugo. Cerciórese de que se deslice en su lugar, presionando
firmemente y girando hasta que encaje en su sitio. Para evitar las
lesiones, no presione el disco exprimidor.
Paso 3
Coloque la tapa en la base, alineando las patas en ambos lados. Si
la tapa no encaja, esto significa que el colador no está bien asentado
en el recolector de jugo.
Paso 4
Asegure la tapa en su sitio con el brazo de bloqueo, levantando el
brazo de manera que bloquee la tapa sobre el conjunto exprimidor.
Paso 5
Coloque el recolector de pulpa en su sitio, a la derecha de la
carcasa, deslizándolo debajo de la tapa. Incline el recolector de
pulpa y empuje la parte de abajo hasta que hasta que esté bien
asentado. NOTA: El aparato no se encederá a menos que la tapa
y el recolector de pulpa estén correctamente instalados.
INSTRUCCIONES DE USO
NOTA: El aparato no se pondrá en marcha a menos que la tapa y el
recolector de pulpa estén debidamente instalados.
Paso 1
Lave las frutas y/o los vegetales con los cuales desea hacer jugo.
NOTA: La mayoría de las frutas y de los vegetales, tales como
las manzanas, las zanahorias y los pepinos, cabrán en la boca de
alimentación sin necesidad de cortarlos.
Paso 2
Compruebe que el aparato está debidamente ensamblado y que hay
un recipiente bajo el pico para recoger el jugo.

20
Paso 3
Enchufe la unidad y ponga el botón de encendido/apagado en “ON”.
Paso 4
Con el aparato encendido, introduzca los alimentos en la boca
de alimentación. Empuje suavemente los alimentos, usando el
empujador provisto. Para extraer máximo jugo, siempre empuje
el empujador lentamente. Cerciórese de que la parte plana
del empujador está en contra de la parte plana de la boca de
alimentación.
NUNCA INTRODUZCA LOS DEDOS EN LA BOCA DE
ALIMENTACIÓN; SIEMPRE USE EL EMPUJADOR PROVISTO.
Paso 5
El jugo saldrá por el pico y caerá en el recolector de jugo; la pulpa se
acumulará en el recolector de pulpa. No permita que el recolector de
pulpa se llene demasiado; esto podría afectar el buen funcionamiento
del aparato o dañarlo.
NOTA: Si necesita vaciar el recolector de pulpa durante el uso,
apague (“OFF”) el aparato y retire cuidadosamente el recolector
de pulpa. Tire la pulpa o guárdela para preparar salsas, sopas o
pasteles/tortas. Vuelva a instalar el recolector de pulpa, inclinándolo
ligeramente y empujando la parte de abajo hasta que esté bien
asentado.
Consejo de limpieza: Para una fácil limpieza, lave las piezas
removibles en agua jabonosa tibia inmediatamente después del uso
para despegar la pulpa húmeda. Deje que las piezas se sequen al
aire. Nota: Todas las piezas removibles son aptas para lavavajillas
(bandeja superior solamente).
DISPOSITIVO DE PROTECCIÓN DEL MOTOR
Este aparato cuenta con un dispositivo de protección térmica que
apaga automáticamente el motor en caso de recalentamiento. En
caso de que esto suceda, apague y desenchufe el aparato. Vacíe
el recolector de pulpa y el colador, y permita que el motor se enfríe
por aprox. 5 minutos. Después de este tiempo, oprima el botón de
reinicio situado debajo del aparato, y luego vuelva a enchufarlo y
siga exprimiendo. Si, después de seguir estos pasos, el aparato no
funciona correctamente, deje de usarlo y comuníquese con nuestro
servicio de atención al cliente.
La page est en cours de chargement...
La page est en cours de chargement...
La page est en cours de chargement...
La page est en cours de chargement...
La page est en cours de chargement...
La page est en cours de chargement...
La page est en cours de chargement...
La page est en cours de chargement...
La page est en cours de chargement...
La page est en cours de chargement...
La page est en cours de chargement...
La page est en cours de chargement...
La page est en cours de chargement...
La page est en cours de chargement...
La page est en cours de chargement...
La page est en cours de chargement...
La page est en cours de chargement...
La page est en cours de chargement...
La page est en cours de chargement...
La page est en cours de chargement...
-
 1
1
-
 2
2
-
 3
3
-
 4
4
-
 5
5
-
 6
6
-
 7
7
-
 8
8
-
 9
9
-
 10
10
-
 11
11
-
 12
12
-
 13
13
-
 14
14
-
 15
15
-
 16
16
-
 17
17
-
 18
18
-
 19
19
-
 20
20
-
 21
21
-
 22
22
-
 23
23
-
 24
24
-
 25
25
-
 26
26
-
 27
27
-
 28
28
-
 29
29
-
 30
30
-
 31
31
-
 32
32
-
 33
33
-
 34
34
-
 35
35
-
 36
36
-
 37
37
-
 38
38
-
 39
39
-
 40
40


Waring WJX80X Manuel utilisateur
- Catégorie
- Fabricants de jus
- Taper
- Manuel utilisateur
dans d''autres langues
- English: Waring WJX80X User manual
- español: Waring WJX80X Manual de usuario
Documents connexes
Autres documents
-
Breville JE95XL Manuel utilisateur
-
-
ECG OS 185 Manuel utilisateur
-
Villaware FPVLJESLO1 Manuel utilisateur
-
-
Hamilton Beach 67600C Manuel utilisateur
-
Nesco JB-50 Manuel utilisateur
-
-
Black & Decker JE1200 Manuel utilisateur
-
Waring Commercial JC4000 Manuel utilisateur