Ooni Koda 16 Manuel utilisateur
- Catégorie
- Micro-ondes
- Taper
- Manuel utilisateur

Koda 16
Manual & Safety Instructions
NORTH AMERICA

EN
WARNING
To reduce the risk of fire, burn hazard or other injury, read
this safety manual carefully and completely before using this
appliance.
WARNING
Before cleaning, make sure the gas supply and control knob is
in the OFF position and that the burner and oven has cooled.
DANGER
• Never operate this appliance
unattended.
• If a fire should occur, keep away
from the appliance and immediately
call your fire department. Do not
attempt to extinguish an oil or a
grease fire with water.
Failure to follow these instructions
could result in fire, explosion or burn
hazard which could cause property
damage, personal injury or death.
DANGER
If you smell gas:
• Shut o gas to the appliance
• Extinguish any open flame
• If odor continues, keep away from
the appliance and immediately
call your gas supplier or your fire
department.
Failure to follow these instructions
could result in fire, explosion or burn
hazard which could cause property
damage, personal injury or death.
WARNING
Use in a well-ventilated location
WARNING
Spiders and insects can nest inside the burner of the appliance
and disrupt gas flow. Inspect the burner at least once a year. A
clogged tube can lead to a fire beneath the appliance.
WARNING
a. Keep the fuel supply hose away from any heated surface(s).
b. The use of alcohol, prescription or non-prescription drugs
may impair the consumer’s ability to properly assemble or
safely operate the appliance.
c. Keep children and pets away from the appliance at all times.
d. Do not move the appliance when in use.
e. This appliance is not intended for and should never be used
as a heater.
WARNING
When using a match to light the appliance, make sure to use
the included matchstick holder.
WARNING
Do not store this appliance indoors unless the gas cylinder is
disconnected.
WARNING
Gas cylinders must be stored outdoors, out of the reach of
children, and should not be stored in a building, garage, or any
other enclosed area.
WARNING
Check all gas supply fittings for leaks before each use. Do not
use the appliance until all connections have been checked and
do not leak.
WARNING
Do not smoke while leak testing. Never leak test
with an open flame.
WARNING
When lighting, keep your face and hands as far away
from the appliance as possible.
WARNING
Minimum clearance from sides of unit to combustible
construction is 610mm (24 inches).
Minimum clearance from back of unit to combustible
construction is 915mm (36 inches).
WARNING
This manual states that an oven, fryer or broiler shall
not be used on or under any apartment or condominium
balcony or deck.
WARNING
This appliance is not intended to be installed in or on a boat.
This appliance is not intended to be installed in or on a
recreational vehicle.
WARNING
This manual includes an instruction to clean and inspect the
hose before each use of the appliance. If there is evidence of
abrasion, wear, cuts, or leaks, the hose must be replaced prior
to the appliance being put into operation. The replacement
hose assembly shall be that specified by the manufacturer.
2

2.
1.
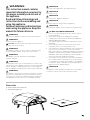
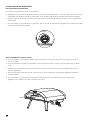
Parts List
1. BG07-100A (Ooni Koda 16)
2. Stone baking board
WARNING
This instruction manual contains
important information necessary for
the proper assembly and safe use of
the appliance.
Read and follow all warnings and
instructions before assembling and
using the appliance.
Follow all warnings and instructions
when using the appliance. Keep this
manual for future reference.
WARNING
Keep the fuel supply hose away from any heated surface(s).
WARNING
Do not modify the appliance.
CAUTION: The burner tube openings must be positioned
properly over the valve orifices
WARNING
This appliance shall be used only outdoors, and shall not be
used in a building, garage, or any other enclosed area.
WARNING
This appliance must be kept away from flammable
materials during use
WARNING
This manual includes a list of required parts necessary for the
safe operation of the appliance, directions for proper assembly
and for assembly of installed parts and accessories supplied
with the appliance, and proper procedures for gas leak testing.
WARNING
The appliance should not be located or used under overhead
unprotected combustible construction materials or surfaces.
For a grill, fryer or broiler, the minimum clearance shall be at
least 10ft (3m) from any structure or combustible material.
WARNING
Turn o the gas supply at the gas cylinder after use.
WARNING
Use outdoors only.
WARNING
Do not move the appliance during use.
WARNING
Read the instructions before using the appliance.
WARNING
Accessible parts may be very hot. Keep young children away
LP GAS CYLINDER WARNING
1. Do not store spare liquid propane gas cylinder under or
near this appliance.
2. Never fill the cylinder beyond 80 percent capacity.
3. Liquid propane cylinder must be fitted with an OVERFILL
PROTECTION DEVICE (OPD).
4. The cylinder supply system must be arranged for vapour
withdrawal.
5. If the information above is not followed exactly, a fire
resulting in death or serious injury may occur.
6. This manual states that the installation must conform with
local codes or, in the absence of local codes, with the
National Fuel Gas Code, ANSI Z223.1/NFPA 54, Storage and
Handling of Liquefied Petroleum Gases, ANSI/NFPA 58; or
Natural Gas and Propane Installation Code, CSA B149.1;
Propane Storage and Handling, CSA B149.2
7. The cylinder to be used must be constructed and marked
in accordance with the specifications for LP gas cylinders,
U.S. Department of Transportation (DOT) or the Standards
for cylinders, Spheres and Tubes for the Transportation of
Dangerous Goods, CAN/CSA-B339.
WARNING
The appliance will be hot during and after use. Use insulated
oven mitts or gloves for protection from hot surfaces.
3

Before lighting
Inspect the gas supply hose prior to turning on the gas. If there is evidence of cut, wear or abrasion, it must be
replaced prior to use. Screw the regulator onto the gas cylinder. Leak check the hose and regulator connections
with a soap and water solution before lighting the appliance. Only the pressure regulator and gas hose assembly
supplied with this appliance should be used. The hose should comply with the standard EN16436. The regulator
should comply with the standard EN16129. If replacement pressure regulators and hose assemblies are required,
they should be those specified by the appliance manufacturer, Ooni Limited.
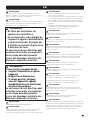
Safety practices to avoid injury
When properly cared for, your oven will provide safe, reliable service for many years. However, extreme care must
be used as the oven produces intense heat that can increase the risk of accidents.
When using this oven basic practices must be followed, including but not limited to following:
• Do not repair or replace any part of the oven unless specifically recommended in this manual. All other service
should be referred to a qualified technician.
• Children should not be left alone or unattended in an area where the oven is being used. Do not allow children
to sit, stand or play around the oven at any time.
• Never let clothing or other flammables come in contact with or too close to any burner or hot surface until it
has cooled. The fabric could ignite, causing serious personal injury.
• For personal safety, wear proper apparel. Loose fittings garments or sleeves should never be worn while using
the oven. Some synthetic fabrics are highly flammable and should not be worn while cooking.
• Do not heat unopened food containers as a build-up of pressure may cause the containers to burst. When
lighting the burner, always pay close attention to what you are doing.
• When using the oven, do not touch the outer shell, stone baking board or immediate surroundings as these
areas become extremely hot and could cause burns.
• Do not use the oven to cook extremely fatty meats or other products which increase flare-up.
• Keep the area surroundings the oven free from combustible material including fluids, trash and vapours such
as gasoline or charcoal lighter fluid.
• Do not obstruct the flow of combustion and ventilation air.
• Never use the oven in extremely windy conditions.
• The temperature under the oven is high. Do not place the oven on a table with flammable table clothes, plastic
or any other inflammable materials.
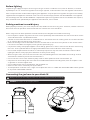
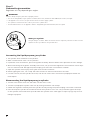
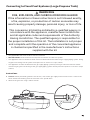
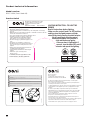
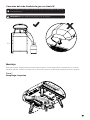
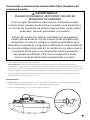
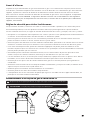
Connecting the gas hose to your Koda 16
Always route the gas hose away from the oven. The hose must not touch the oven body.
WARNING Hose pipe can be a tripping hazard
24“
35.4“
4

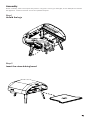
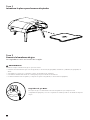
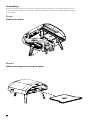
Assembly
Before assembly, make sure all parts are present. If any part is missing or damaged, do not attempt to assemble
the appliance. Contact customer service for replacement parts.
Step 1
Unfold the legs
Step 2
Insert the stone baking board
5

Step 3
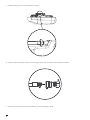
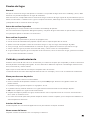
Connect to gas canister
Regulators will vary depending on region.
QCC1 gas regulator
This gas fitting is clockwise. Make sure that the tank is completely switched off and screw the
regulator as far as possible into the gas tank valve.
Connecting the liquid propane gas cylinder
1. The cylinder valve should be in OFF position.
2. Make sure the burner valve is in OFF position.
3. Inspect the valve connections, port and regulator assembly. Remove debris and inspect the hose for damage.
4. When connecting the regulator assembly to the valve, use your hand to tighten the nut clockwise until it stops.
Use of a wrench could damage the quick coupling nut and result in a hazardous situation.
5. Open the cylinder valve fully by turning the valve counter-clockwise.
6. Before lighting the oven, use a soap and water solution to check all connections for leaks.
7. If a leak is found, turn the cylinder valve OFF, and do not use the oven until local liquid propane dealer can
make repairs.
Disconnecting the liquid propane gas cylinder
1. Turn the oven burner valve OFF and make sure the oven is cool.
2. Turn the liquid propane cylinder valve OFF by turning clockwise until it stops.
3. Detach the regulator assembly from the cylinder valve by turning the quick coupling nut counter-clockwise.
4. Place dust cap for cylinder valve outlet whenever the cylinder is not in use. Only install the type of dust cap
on the cylinder valve outlet that is provided with the cylinder valve. Other types of caps or plugs may result in
leakage of propane.
WARNING
• Please always keep the gas bottle in upright position.
• The size for 13kg (28lbs) LP gas cylinder is 315mm (12.4 inches) in diameter and 580mm (22.4 inches) in height.
• If the appliance is not in use, the gas must be turned o at the supply cylinder.
• The cylinder used must include a collar to protect the cylinder valve.
• The minimum distance for the appliance and the 13kg (28lbs) gas tank is 635mm (25 inches) apart
6

Converting to Fixed Fuel Systems (Large Propane Tank)
WARNING
FIRE, EXPLOSION, AND CARBON-MONOXIDE HAZARD
If the information in these instructions is not followed exactly,
a fire, explosion, or production of carbon monoxide may
result causing property damage, personal injury, or loss of life.
This conversion kit shall be installed by a qualified agency in
accordance with the appliance ,manufactures instructions
and all applicable codes and requirements of the Authority
Having Jurisdiction. The qualified agency is responsible for
the proper installation of this kit. The Installation is not proper
and complete until the operation of the converted appliance
is checked as specified in the manufacturer’s instructions
supplied with the kit.
• Only applicable with Ooni Koda 12 and Ooni Koda 16
• NOT INCLUDED: DH22 model hose and quick connectors to Fixed Fuel System
• The appliance and its individual shuto valve must be disconnected from the gas supply piping system during
any pressure testing of that system at test pressures in excess of 1/2 psi (3.5kPa).
• The appliance must be isolated from the gas supply piping system by closing its individual manual shuto
valve during any pressure testing of the gas supply piping system at test pressures equal to or less than 1/2 psi
(3.5kPa).
Instructions
1. Caution: Before proceeding with the conversion; shut o the gas supply and ensure the oven is cool to the
touch. Remove the baking stone and turn the oven upside down.
2. Remove the gas hose using a 19mm wrench.
7

B
AA
3. Attach DH22 gas hose using a 19mm wrench.
4. Attach quick connectors at the end of the gas hose and connect to the fixed fuel system.
5. Perform a leak test to ensure connection is safe and proper. (p.10)
8

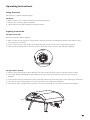
Operating instructions
Using the oven
Each burner is rated at 8.0 kW (572g/h).
To begin:
1. Make sure the oven has been leak tested and properly placed.
2. Remove any remaining packing material.
3. Light the burner using the lighting instructions below
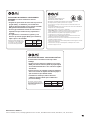
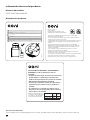
Lighting instruction
To light the burner
Read all instructions before lighting
1. Make sure the control knob is in OFF position, and then turn the liquid propane cylinder valve ON by slowly
turning counter-clockwise.
2. Push in and slowly turn the control knob anticlockwise until you hear a click and the burner ignites.
3. If burner doesn't light within 5 seconds, turn the knob OFF, wait 5 minutes and repeat the lighting.
To light with a match
1. If burner will not light after several attempts using the control knob, the burner may be lit with a match.
2. If you have already attempted to light the burner using the control knob, wait 5 minutes for any gas to
dissipate.
3 Insert a match into the matchstick holder, ignite the match and insert through the oven opening to the burner.
4. Push and turn the control knob to HI slowly, the burner should ignite immediately.
5. If the burner does not light within seconds, turn the control knob OFF and wait 5 minutes and try again.
9

Leak testing
General
Although the gas connections of the appliance are leak tested prior packing and shipment, a complete test must
be performed at the installation site.
Before each use, check all the gas connections for leak testing using the procedure listed below. If the smell of
gas is detected at any time, you should immediately stop using and check the entire system for leaks.
Before testing
Make sure all packing material has been removed from the appliance.
Make a solution of one part liquid detergent and one part water. You will need a spray bottle, brush or rag to apply
the solution to the fittings.
To test
1. Turn the burner valve OFF.
2. Turn the liquid propane cylinder valve on counter-clockwise to open the valve.
3. Apply the soap solution to all gas fittings. Soap bubbles would appear where a leak is present.
4. If a leak is present, immediately turn the gas supply OFF and tighten leaky fittings.
5. Turn the gas back ON and recheck.
6. Should the gas continue to leak from any of the fittings, turn the gas supply OFF and contact customer service.
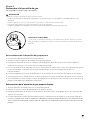
Care and maintenance
Store Ooni Koda 16 out of direct sunlight and indoors where possible and when storing for extended periods
of time. Ooni Koda 16 should not be exposed to harsh weather conditions such as snow, heavy rain and strong
winds.
Wait for Ooni Koda 16 to cool completely before moving
The outer shell of Ooni Koda 16 may fade over time and through use. This will not aect performance.
Stone baking board
1. DO NOT use the stone over an open flame
2. Avoid extreme temperature change to the stone. DO NOT place frozen foods on a hot stone
3. The stone is fragile and can break if bumped or dropped
4. The stone is very hot during use and stays hot for a long time after use.
5. DO NOT cool the stone with water when the stone is hot
6. After cleaning the stone with water, please dry the stone before use. This can be done in a conventional oven
at 60°C (140°F) for 2 hours.
7. Burnt on food can be cleaned by flipping the stone where it will clean itself due to the high oven temperatures
Oven Interior
Wipe down with a paper towel between uses to remove any debris.
Other areas of oven
Clean when required using a non abrasive sponge
10

The Ooni Customer Service can be reached via www.ooni.com or [email protected]om
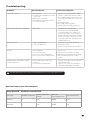
Problem Possible Cause Prevention/Solution
Burner will not light 1. No gas flow
2. Coupling nut and regulator not fully
connected
3. Obstruction of gas flow
4. Disengagement of burner to valve
5. Incorrect assembly
1. Check to see if propane tank is empty
2. Turn the coupling nut about one-half to
three quarters additional turn until solid
stop. Tighten by hand only - do not use
tools
3. Clear burner tube
4. Re-engage burner and valve
5. Check steps in assembly instructions
Sudden drop in gas flow or low flame 1. Out of gas 1. Check for gas in propane tank
2. Turn o gas control knob, wait 30
seconds and light oven. If flames are
still low, turn o gas control knob and
propane tank valve. Disconnect regulator.
Reconnect regulator and leak test. Turn
on propane tank valve, wait 30 seconds
and then light oven.
Flames blow out 1. High or gusting winds
2. Low on propane gas"
1. Turn front of oven away from wind
2. Refill propane tank
3. Refer to Sudden drop in gas flow above
Flare-up 1. Grease build up
2. Excessive fat in meat
3. Excessive cooking temperature
4. Excess flour on the cooking surface
1. Clean oven
2. Trim fats from meat before cooking
3. Adjust (lower) temperature accordingly
4. Brush remnant flour from cooking
surface
Flashback (fire in burner tube, roaring
sound from burner)
1. Burner and/or burner tubes are
blocked
2. Pressure drop during ignition
1. Turn gas control knob o. Clean burner
and/or burner tubes.
2. Turn o oven, ensure the tank valve is
fully open (if applicable) and relight.
Troubleshooting
Ooni Koda 16 - Outdoor Use Gas Grill
Gas Type Number of Burners Injector Size Main
Burner
Total Gas
Consumption BTU Gas Pressure KPa
Propane 1 1.11 29000 2.74
7iwc NG 1 1.75 29000 1.77
Nominal Hourly Gas Consumption
11

Product technical information
Model number
BG07-100A (Ooni Koda 16)
Product Label
PA-A00034
24”
35.4”
MISE EN GARDE Le tuyau peut présenter un risque de trébuchement
Coloca siempre el tubo flexible de gas alejado del horno. El tubo flexible no debe tocar el
cuerpo del horno.
ADVERTENCIA El tubo flexible puede generar riesgo de tropiezos
Éloignez toujours le tuyau à gaz du four. Le tuyau ne doit pas toucher à la structure du four.
Always route the gas hose away from the oven. The hose must not touch the oven body.
Hose pipe can be a tripping hazard
WARNING Hose pipe can be a tripping hazard
• No almacenes la bombona de gas LP de repuesto debajo o cerca del aparato.
• Nunca llenes la bombona más del 80%.
• Si no se siguen al pie de la letra las indicaciones anteriores, puede producirse un
incendio que cause la muerte o lesiones graves.
• La distancia mínima entre los laterales y la parte trasera de la unidad a la construcción
combustible debe ser de 24 pulgadas por los lados y 24 pulgadas desde la parte
delantera.
• No utilices el aparato debajo de superficies elevadas que sean combustibles.
• PRECAUCIÓN: Para usar con un regulador para aparatos de gas. Este aparato debe
utilizarse con el regulador suministrado. El regulador está configurado para una
presión de salida de 11iwc.
• Cierra el suministro de LP en la bombona cuando el aparato no esté en uso.
•Este aparato no está diseñado para uso comercial.
• El manual de instrucciones contiene información importante necesaria para el
montaje correcto y el uso seguro del aparato.
• Lee y sigue todas las advertencias e instrucciones antes de montar y utilizar el aparato.
• Sigue todas las advertencias e instrucciones cuando utilices el aparato.
• Si faltan instrucciones o piezas, ponte en contacto con support.ooni.com
Fabricante: Ooni Limited
Modelo: Ooni Koda 16
Ooni Limited, Unit 5, Bishopsgate Business Centre,
189 West Main Street, Broxburn, Reino Unido, EH52 5LH
Main Burner
202001000001
• Do not store spare LP-gas cylinder under or near the appliance.
• Never fill the cylinder beyond 80 percent full.
• If the information beyond is not followed exactly, a fire causing death or serious injury
may occur.
• Minimal clearance from sides and back of the unit to combustible construction, 24 inches
from the sides and 24 inches from the front.
• Do not use the appliance under overhead combustible surfaces.
LIGHTING INSTRUCTION - TO LIGHT THE
BURNER
Read all instructions before lighting
Components
Rate Input
(BTU/H)
Propane
29000
Orifice Size
1.11mm
ANS Z21.89-2017 CSA 1.18-2017 Outdoor Cooking
Specialty Gas Appliance. For outdoor use only. If
stored indoors, detach and leave cylinder
outdoors.
Ooni Limited, Unit 5, Bishopsgate Business Centre,
189 West Main Street, Broxburn, UK, EH52 5LH
Manufacturer: Ooni Limited Model: Ooni Koda 16
PA-A00034
• CAUTION: For use with a gas appliance regulator. The
regulator supplied must be used with this appliance..
This regulator is set for an outlet pressure of 11 iwc.
• Turn o the LP supply at cylinder when appliance is not
in use.
• This appliance is not intended for commercial use.
• The instruction manual contains important information
necessary for the proper assembly and safe use of the
appliance.
• Read and follow all warnings and instructions before
assembling and using the appliance.
• Follow all warnings and instructions when using the
appliance.
• If instruction or parts are missing contact
support.ooni.com
•Make sure the control knob is in OFF position,
and then turn the liquid propane cylinder
valve ON by slowly turning counterclockwise.
•Push in and slowly turn the control
knob anticlockwise until you hear a
click and the burner ignites.
• If burner doesn't light within 5
seconds, turn the knob OFF, wait 5
minutes and repeat the lighting.
12

Manufacturer Address:
Ooni Limited, Unit 5, Bishopsgate Business Centre, 189 West Main Street, Broxburn, UK, EH52 5LH
Quemador principal
Componentes
Tasa de
entrada
(BTU/h)
Propano
29000
Tamaño
del orificio
1.11mm
INSTRUCCIONES DE ENCENDIDO - PARA ENCENDER EL
QUEMADOR: lee todas las instrucciones antes de
encenderlo
• Asegúrate de que el mando de control esté en posición de
apagado (OFF) y, a continuación, pon la válvula de la
bombona de propano líquido en la posición de encendido
(ON) girándola lentamente hacia la izquierda.
• Presiona y gira lentamente el mando de control hacia la
izquierda hasta que escuches un clic y el quemador se
encienda.
• Si el quemador no se enciende en 5 segundos, pon el
mando en posición de apagado (OFF), espera 5 minutos y
repite el proceso de encendido.
ANS Z21.89-2017 CSA 1.18-2017 Aparato de gas
especializado para cocinar al aire libre. Solo para
uso en exteriores. Si se almacena en interiores,
desconecta la bombona y déjala al aire libre.
• Ne rangez pas le cylindre à gaz de rechange LP sous l'appareil ou à proximité.
• Ne remplissez jamais le cylindre à plus de 80 % de sa capacité.
• Le non-respect des consignes ci-dessus pourrait causer un incendie mortel ou de
blessures graves.
• Le dégagement minimum entre les côtés de l'unité et une construction combustible est
de 24 po des côtés et de 24 po du devant.
• N'utilisez pas l'appareil sous des surfaces combustibles.
• AVERTISSEMENT : Utilisez seulement le régulateur de pression à gaz fourni avec cet
appareil. Ce régulateur est conçu pour une sortie de pression de 11 pouces CE.
• Fermez l'alimentation LP au cylindre lorsque l'appareil n'est pas utilisé.
• Cet appareil n'est pas conçu pour un usage commercial.
• Ce manuel d'instruction comprend d'importantes informations nécessaires au bon
assemblage et à l'utilisation sécuritaire de l'appareil.
• Assurez-vous de lire et de suivre tous les avertissements et les instructions avant
d'assembler et d'utiliser l'appareil.
• Assurez-vous de suivre tous les avertissements quand vous utilisez l'appareil. Conservez
ce manuel à titre de référence.
• Si les instructions ou des pièces sont manquantes, communiquez avec le service
d'assistance à support.ooni.com
Le Fabricant: Ooni Limited
Modeler: Ooni Koda 16
Ooni Limited, Unit 5, Bishopsgate Business Centre,
189 West Main Street, Broxburn, UK, EH52 5LH
Brûleur principal
Composant
Taux d'entrée
(BTU/H)
Propane
29000
Taille de l'orifice
1.11mm
INSTRUCTIONS D'ALLUMAGE - POUR ALLUMER LE BRÛLEUR
Lisez bien toutes les instructions avant de procéder à
l'allumage
•Assurez-vous que le bouton de commande est en position
ARRÊT, puis activez la vanne du cylindre de propane liquide
en la tournant lentement dans le sens contraire des aiguilles
d'une montre.
•Enfoncez le bouton de commande et tournez-le lentement
dans le sens contraire des aiguilles d'une montre jusqu'à ce
qu'il s'enclenche et que le brûleur s'allume.
•Si le brûleur ne s'allume pas, fermez le bouton de
commande, attendez 5 minutes puis recommencez le
processus d'allumage.
ANS Z21.89-2017 CSA 1.18-2017 Cuisiner en
plein air spécialisés appareils à gaz. Pour une
utilisation extérieure seulement. Si l'appareil est
rangé à l'intérieur, retirez le cylindre
et laissez-le à l'extérieur.
13

ES
ADVERTENCIA
Para reducir el riesgo de incendio, el peligro de quemaduras u
otras lesiones, lee este manual de seguridad con atención y en
su totalidad antes de usar este aparato.
ADVERTENCIA
Antes de limpiarlo, asegúrate de que el suministro de gas y el
mando de control estén en la posición de apagado y de que el
quemador y el horno se hayan enfriado.
PELIGRO
• No dejes nunca desatendido este
aparato mientras esté en uso.
• Si se produce un incendio, mantente
alejado del aparato y llama
inmediatamente a los bomberos. No
intentes apagar un incendio de aceite
o grasa con agua.
No seguir estas instrucciones podría
provocar un incendio, una explosión
o un peligro de incendio que podrían
causar daños materiales, lesiones
personales o la muerte.
PELIGRO
Si hueles a gas:
• Cierra el suministro de gas al aparato.
• Apaga cualquier llama abierta.
• Si el olor persiste, mantente alejado
del aparato y llama inmediatamente
a tu proveedor de gas o a los
bomberos.
No seguir estas instrucciones podría
provocar un incendio, una explosión
o un peligro de incendio que podrían
causar daños materiales, lesiones
personales o la muerte.
ADVERTENCIA
Usar en una ubicación bien ventilada
ADVERTENCIA
Las arañas y los insectos pueden anidar dentro del quemador
del aparato e interrumpir el flujo de gas. Inspecciona el
quemador al menos una vez al año. Un tubo obstruido puede
provocar un incendio debajo del aparato.
ADVERTENCIA
a. Mantén el tubo flexible de suministro de combustible alejado
de cualquier superficie caliente.
b. El consumo de alcohol y de medicamentos con o sin receta
puede afectar a la capacidad del consumidor para montar
correctamente el aparato o manejarlo de forma segura.
c. Mantén a los niños y las mascotas alejados del aparato en
todo momento.
d. No muevas el aparato mientras esté en uso.
e. Este aparato no está pensado ni debe utilizarse nunca como
calentador.
ADVERTENCIA
Cuando utilices cerillas para encender el aparato, asegúrate de
utilizar el soporte para cerillas incluido.
ADVERTENCIA
No almacenes este aparato en interiores, a menos que la
bombona de gas esté desconectada.
ADVERTENCIA
Las bombonas de gas deben almacenarse al aire libre, fuera del
alcance de los niños, y no deben almacenarse en un edificio,
garaje o cualquier otra zona cerrada.
ADVERTENCIA
Comprueba todos los accesorios de suministro de gas en busca
de fugas antes de cada uso. No utilices el aparato hasta que se
hayan comprobado todas las conexiones y no haya fugas.
ADVERTENCIA
No fumes durante la prueba de fugas. Nunca hagas una prueba
de fugas con una llama abierta.
ADVERTENCIA
Al encenderlo, mantén la cara y las manos tan alejadas
del aparato como sea posible.
ADVERTENCIA
La distancia mínima entre los laterales de la unidad y la
construcción combustible es de 610 mm (24 pulgadas).
La distancia mínima entre la parte trasera de la unidad y la
construcción combustible es de 915 mm (36 pulgadas).
ADVERTENCIA
Este manual establece que no se debe utilizar un horno,
freidora o asador
en o debajo de cualquier balcón o cubierta de un apartamento
o condominio.
ADVERTENCIA
Este aparato no está pensado para instalarse en un barco.
Este aparato no está pensado para instalarse en un vehículo
recreativo.
ADVERTENCIA
Este manual incluye instrucciones para limpiar e inspeccionar
el tubo flexible antes de cada uso del aparato. Si hay evidencias
de abrasión, desgaste, cortes o fugas, el tubo flexible debe
reemplazarse antes de poner el aparato en funcionamiento. El
conjunto de tubo flexible de repuesto será el especificado por
el fabricante.
14

2.
1.
Lista de componentes
1. BG07-100A (Ooni Koda 16)
2. Placa para hornear de piedra
ADVERTENCIA
Este manual de instrucciones contiene
información importante necesaria para
el montaje correcto y el uso seguro del
aparato.
Lee y sigue todas las advertencias e
instrucciones antes de montar y utilizar
el aparato.
Sigue todas las advertencias e
instrucciones cuando utilices el
aparato. Guarda este manual para
futuras consultas.
ADVERTENCIA
Mantén el tubo flexible de suministro de combustible alejado de
cualquier superficie caliente.
ADVERTENCIA
No modifiques el aparato.
PRECAUCIÓN: Las aberturas del tubo del quemador deben
estar colocadas correctamente sobre los orificios de la válvula.
ADVERTENCIA
Este aparato solo debe utilizarse al aire libre y no debe utilizarse
en un edificio, garaje ni en ninguna otra zona cerrada.
ADVERTENCIA
Este aparato debe mantenerse alejado de
materiales inflamables durante el uso
ADVERTENCIA
Este manual incluye una lista de las piezas necesarias para
el funcionamiento seguro del aparato, instrucciones para el
montaje correcto y para el montaje de las piezas y accesorios
instalados suministrados con el aparato, así como los
procedimientos adecuados para la prueba de fugas de gas.
ADVERTENCIA
El aparato no debe colocarse ni utilizarse debajo de materiales
de construcción o superficies combustibles sin protección.
En el caso de una parrilla, freidora o asador, la distancia
de separación mínima de cualquier estructura o material
combustible deberá ser de al menos 3 m (10 pies).
ADVERTENCIA
Cierra el suministro de gas en la bombona después de su uso.
ADVERTENCIA
Solo para uso al aire libre.
ADVERTENCIA
No muevas el aparato durante el uso.
ADVERTENCIA
Lee las instrucciones antes de usar el aparato.
ADVERTENCIA
Las piezas accesibles pueden estar muy calientes. Mantén
alejados a los niños pequeños
ADVERTENCIA SOBRE LA BOMBONA DE
GAS LP
1. No almacenes la bombona de gas propano líquido de
repuesto debajo o cerca de este aparato.
2. Nunca llenes la bombona a más del 80 % de su capacidad.
3. La bombona de propano líquido debe estar equipada con
un DISPOSITIVO DE PROTECCIÓN CONTRA EL EXCESO DE
LLENADO (OPD).
4. El sistema de alimentación de la bombona debe estar
preparado para la extracción de vapores.
5. Si no se sigue al pie de la letra la información previa, puede
producirse un incendio que cause la muerte o lesiones
graves.
6. Este manual establece que la instalación debe cumplir
los códigos locales o, en ausencia de códigos locales, el
Código nacional de gas combustible, ANSI Z223.1/NFPA
54, Almacenamiento y manipulación de gases de petróleo
licuados, ANSI/NFPA 58; o el Código de instalación de
gas natural y propano, CSA B149.1; Almacenamiento y
manipulación de propano, CSA B149.2
7. La bombona que vaya a utilizarse debe fabricarse y
marcarse de acuerdo con las especificaciones para las
bombonas de gas LP, el Departamento de Transporte de
los Estados Unidos (DOT) o las Normas para las bombonas,
esferas y tubos para el transporte de mercancías peligrosas,
CAN/CSA-B339.
ADVERTENCIA
El aparato estará caliente durante y después de su uso. Utiliza
manoplas o guantes de horno aislados para protegerte de las
superficies calientes.
15

Antes de encenderlo
Inspecciona el tubo flexible de suministro antes de encender el gas. Si hay evidencias de cortes, desgaste
o abrasión, debe reemplazarse antes de usarlo. Enrosca el regulador a la bombona de gas. Comprueba las
conexiones del tubo flexible y del regulador con una solución de jabón y agua antes de encender el aparato. El
regulador de presión y el conjunto de tubo flexible de gas suministrados solo deben utilizarse con este aparato.
El tubo flexible debe ser conforme a la norma EN16436. El regulador debe ser conforme a la norma EN16129. Si
se requieren reguladores de presión y conjuntos de tubo flexible de repuesto, deben ser los especificados por el
fabricante del aparato, Ooni Limited.
Prácticas de seguridad para evitar lesiones
Si lo cuidas correctamente, tu horno te proporcionará un servicio seguro y fiable durante muchos años. Sin
embargo, hay que tener mucho cuidado, ya que el horno produce un calor intenso que puede aumentar el riesgo
de accidentes.
Al utilizar este horno, deben seguirse las prácticas básicas, incluidas, entre otras, las siguientes:
• No repares ni sustituyas ninguna pieza del horno, a menos que se recomiende específicamente en este
manual. Cualquier otro servicio debe remitirse a un técnico cualificado.
• No se debe dejar a los niños solos o desatendidos en una zona en la que se esté utilizando el horno. No
permitas que los niños se sienten, estén de pie ni jueguen alrededor del horno en ningún momento.
• Nunca dejes que la ropa u otros materiales inflamables entren en contacto con cualquier quemador o
superficie caliente o estén demasiado cerca de ellos hasta que se hayan enfriado. El tejido podría prenderse,
causando graves lesiones personales.
• Por tu seguridad personal, utiliza la ropa adecuada. Nunca se deben usar prendas o mangas sueltas mientras
se utiliza el horno. Algunos tejidos sintéticos son muy inflamables y no deben usarse mientras se cocina.
• No calientes los envases de alimentos sin abrir, ya que una acumulación de presión puede provocar la
explosión de los recipientes. Al encender el quemador, presta siempre mucha atención a lo que estás
haciendo.
• Al utilizar el horno, no toques la carcasa exterior, la placa para hornear de piedra o los alrededores inmediatos,
ya que estas zonas alcanzan mucha temperatura y podrían provocar quemaduras.
• No utilices el horno para cocinar carnes muy grasas u otros productos que aumenten la llama.
• Mantén la zona que rodea al horno libre de materiales combustibles, como líquidos, basura y vapores como
gasolina o líquido para encendedor de carbón.
• No obstruyas el flujo de aire de combustión y ventilación.
• Nunca utilices el horno en condiciones de mucho viento.
• La temperatura en la parte inferior del horno es alta. No coloques el horno sobre una mesa con mantel,
plástico u otros materiales inflamables.
16

Conexión del tubo flexible de gas a su Koda 16
Coloca siempre el tubo flexible de gas alejado del horno. El tubo flexible no debe tocar
el cuerpo del horno.
Montaje
Antes del montaje, asegúrate de que están todas las piezas. Si falta alguna pieza o está dañada, no intentes
montar el aparato. Ponte en contacto con el servicio de atención al cliente para obtener piezas de repuesto.
Paso 1
Despliega las patas
ADVERTENCIA El tubo flexible puede generar riesgo de tropiezos
24“
35.4“
17

Paso 3
Conecta la bombona de gas
Los reguladores varían en función de la región.
Regulador de gas QCC1
Este ajuste de gas se realiza hacia la derecha. Asegúrate de que el depósito está
completamente apagado y enrosca el regulador lo máximo posible en la válvula del depósito
de gas.
ADVERTENCIA
• Mantén siempre la bombona de gas en posición vertical.
• El tamaño de la bombona de gas LP de 13 kg (28 lbs) es de 315 mm (12,4 pulgadas) de diámetro y 580 mm (22,4 pulgadas) de
altura.
• Si el aparato no está en uso, el gas debe cerrarse en la bombona de suministro.
• La bombona utilizada debe incluir un collarín para proteger la válvula de la bombona.
• La distancia mínima entre el aparato y el depósito de gas de 13 kg (28 lbs) es de 635 mm (25 pulgadas).
Paso 2
Introduce la placa para hornear de piedra
18

Conexión de la bombona de gas propano líquido
1. La válvula de la bombona debe estar en posición de apagado (OFF).
2. Asegúrate de que la válvula del quemador esté en posición de apagado (OFF).
3. Inspecciona las conexiones de la válvula, el puerto y el montaje del regulador. Retira los residuos e inspecciona
el tubo flexible en busca de daños.
4. Al conectar el conjunto del regulador a la válvula, utiliza la mano para apretar la tuerca hacia la derecha hasta
que haga tope.
El uso de una llave inglesa podría dañar la tuerca de acoplamiento rápido y provocar una situación de peligro.
5. Abre la válvula de la bombona por completo girándola hacia la izquierda.
6. Antes de encender el horno, utiliza una solución de jabón y agua para comprobar todas las conexiones en
busca de fugas.
7. Si encuentras una fuga, pon la válvula de la bombona en posición de apagado (OFF) y no utilices el horno hasta
que el distribuidor de propano líquido local pueda realizar las reparaciones necesarias.
Desconexión de la bombona de gas propano líquido
1. Pon la válvula del quemador del horno en posición de apagado (OFF) y asegúrate de que el horno esté frío.
2. Pon la válvula de la bombona de propano líquido en posición de apagado (OFF) girándola hacia la derecha
hasta que haga tope.
3. Retira el conjunto del regulador de la válvula de la bombona girando la tuerca de acoplamiento rápido hacia la
izquierda.
4. Coloca la tapa antipolvo en la salida de la válvula de la bombona cuando no esté en uso. Instala en la salida de
la válvula de la bombona únicamente el tipo de tapa antipolvo que se suministra con la válvula de la bombona.
Otros tipos de tapones o capuchones pueden provocar fugas de propano.
Instrucciones de uso
Uso del horno
Cada quemador tiene una potencia nominal de 8,0 kW (572 g/h).
Para empezar:
1. Asegúrate de que el horno se haya sometido a una prueba de fugas y se haya colocado correctamente.
2. Retira el resto del material de embalaje.
3. Enciende el quemador siguiendo las instrucciones de encendido que se indican a continuación
19

Para encenderlo con una cerilla
1. Si el quemador no se enciende después de varios intentos con el mando de control, puede encenderse
con una cerilla.
2. Si ya has intentado encender el quemador con el mando de control, espera 5 minutos para que se disipe
el gas.
3 Introduce una cerilla en el soporte para cerillas, enciéndela e insértala a través de la abertura del horno
hasta el quemador.
4. Presiona y gira el mando de control a la posición HI (alto) lentamente, el quemador debería encenderse
inmediatamente.
5. Si el quemador no se enciende en cuestión de segundos, pon el mando de control en posición de
apagado (OFF), espera 5 minutos e inténtalo de nuevo.
Instrucciones de encendido
Para encender el quemador
Lee todas las instrucciones antes de encenderlo
1. Asegúrate de que el mando de control esté en posición de apagado (OFF) y, a continuación, pon la válvula de
la bombona de propano líquido en la posición de encendido (ON) girándola lentamente hacia la izquierda.
2. Presiona y gira lentamente el mando de control hacia la izquierda hasta que escuches un clic y el quemador
se encienda.
3. Si el quemador no se enciende en 5 segundos, pon el mando en posición de apagado (OFF), espera 5 minutos
y repite el proceso de encendido.
20
La page est en cours de chargement...
La page est en cours de chargement...
La page est en cours de chargement...
La page est en cours de chargement...
La page est en cours de chargement...
La page est en cours de chargement...
La page est en cours de chargement...
La page est en cours de chargement...
La page est en cours de chargement...
La page est en cours de chargement...
La page est en cours de chargement...
La page est en cours de chargement...
La page est en cours de chargement...
La page est en cours de chargement...
La page est en cours de chargement...
La page est en cours de chargement...
La page est en cours de chargement...
La page est en cours de chargement...
La page est en cours de chargement...
La page est en cours de chargement...
-
 1
1
-
 2
2
-
 3
3
-
 4
4
-
 5
5
-
 6
6
-
 7
7
-
 8
8
-
 9
9
-
 10
10
-
 11
11
-
 12
12
-
 13
13
-
 14
14
-
 15
15
-
 16
16
-
 17
17
-
 18
18
-
 19
19
-
 20
20
-
 21
21
-
 22
22
-
 23
23
-
 24
24
-
 25
25
-
 26
26
-
 27
27
-
 28
28
-
 29
29
-
 30
30
-
 31
31
-
 32
32
-
 33
33
-
 34
34
-
 35
35
-
 36
36
-
 37
37
-
 38
38
-
 39
39
-
 40
40


Ooni Koda 16 Manuel utilisateur
- Catégorie
- Micro-ondes
- Taper
- Manuel utilisateur
dans d''autres langues
- English: Ooni Koda 16 User manual
- español: Ooni Koda 16 Manual de usuario
Documents connexes
-
Ooni Koda 16 Manuel utilisateur
-
Ooni Koda Manuel utilisateur
-
-
-
Ooni Volt 12 Le manuel du propriétaire
-
Ooni Karu 12 Manuel utilisateur
-
Ooni Karu 16 Manuel utilisateur
-
Autres documents
-
Create Pizza Maker Pro Gas Portable Oven Manuel utilisateur
-
Create 131199-271795 Manuel utilisateur
-
Alfresco AXE-PZA Pizza Oven Plus Manuel utilisateur
-
-
Omcan CE-CN-0748 Manuel utilisateur
-
 Vida by PADERNO Portable Outdoor Pizza Oven Le manuel du propriétaire
-
Camp Chef PZOVEN Mode d'emploi
-
Twin Eagles Salamangrill TESG-24N Manuel utilisateur
-
LANDMANN 12302 Manuel utilisateur
-
OVE Decors 15PFP-SOLA40-CHD Mode d'emploi
