Haier HWD100-BD1499U1 Manuel utilisateur
- Catégorie
- Machines à laver
- Taper
- Manuel utilisateur

User manual
Washing machine
EN
User manual
Washer-Dryer
HWD100-BD1499U1

EN
2

EN
Thanks
3
Legend
Warning – Important Safety information
General information and tips
Environmental information
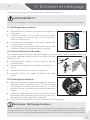
Disposal
Help protect the environment and human health. Put
the packaging in applicable containers to recycle it.
Help to recycle waste of electrical and electronic ap-
pliances. Do not dispose appliances marked with this
symbol with the household waste. Return the product
to your local recycling facility or contact your municipal
RǎFH
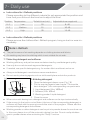
Thank you for purchasing a Haier Product.
Please read these instructions carefully before using this appliance. The instructions con-
tain important information which will help you get the best out of the appliance and ensure
safe and proper installation, use and maintenance.
Keep this manual in a convenient place so you can always refer to it for the safe and proper
use of the appliance.
If you sell the appliance, give it away, or leave it behind when you move house, make sure
you also pass this manual so that the new owner can become familiar with the appliance
and safety warnings.
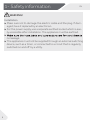
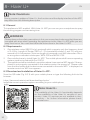
WARNING!
5LVNRILQMXU\RUVXNjRFDWLRQ
'LVFRQQHFWWKHDSSOLDQFHIURPWKHPDLQVVXSSO\&XWRNjWKHPDLQVFDEOHDQGGLVSRVH
of it. Remove the door catch to prevent children and pets to get closed in the appliance.

Content
EN
4
1- Safety information............................................................................................ 5
2- Product description .......................................................................................... 9
3- Control panel .................................................................................................. 11
4- Programmes ................................................................................................... 18
5- Consumption .................................................................................................. 20
6- Eco-friendly washing ...................................................................................... 21
7- Daily use .......................................................................................................... 22
8- Haier U+ .......................................................................................................... 30
9- Care and cleaning ........................................................................................... 33
10- Troubleshooting ........................................................................................... 36
11- Installation .................................................................................................... 41
12- Technical data ............................................................................................... 44
13- Customer service ......................................................................................... 46

EN
1- Safety information
5
%HIRUHVZLWFKLQJRQWKHDSSOLDQFHIRUWKHnjUVWWLPHUHDGWKHIRO-
lowing safety hints!:
WARNING!
%HIRUHnjUVWXVH
▶ Make sure there is no transport damage.
▶ Make sure all transportation bolts and packaging screws are re-
moved.
▶ Remove all packaging and keep out of children´s reach.
▶ Handle the appliance always with at least two persons because it
is heavy.
Daily use
▶ This appliance can be used by children aged from 8 years and
above and persons with reduced physical, sensory or mental ca-
pabilities or lack of experience and knowledge if they have been
given supervision or instruction concerning use of the appliance
in a safe way and understand the hazards involved.
▶ Keep away children under 3 years of age from the appliance un-
less they are constantly supervised.
▶ Children shall not play with the appliance.
▶ Do not let children or pets come close to the appliance when the
door is open.
▶ Store washing agents out of reach of children.
▶ 3XOOXS]LSVnj[ORRVHWKUHDGVDQGWDNHFDUHIRUVPDOOLWHPVWRSUH-
vent laundry from being entangled. If necessary, use an appropri-
ate bag or net.
▶ Do not touch or use the appliance when barefoot or with wet or
damp hands or feet.
▶ Do not cover or encase the appliance during operation or after-
wards to allow any moisture or dampness to evaporate.
▶ Do not place heavy objects or sources of heat or damp on top of
the appliance.
▶ 'RQRWXVHRUVWRUHǍDPPDEOHGHWHUJHQWRUGU\FOHDQLQJDJHQWLQ
close vicinity to the appliance.
▶ 'RQRWXVHDQ\ǍDPPDEOHVSUD\VLQFORVHYLFLQLW\WRWKHDSSOLDQFH

1- Safety information
EN
6
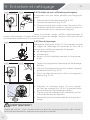
WARNING!
Daily use
▶ Do not wash any garments treated with solvents in the appliance
without having dried them previously in the air.
▶ 'RQRWUHPRYHRULQVHUWWKHSOXJLQWKHSUHVHQFHRIǍDPPDEOHJDV
▶ Do not hot wash foam rubber or sponge-like materials.
▶ 'RQRWZDVKDQ\ODXQGU\ZKLFKLVSROOXWHGZLWKǍRXU
▶ Do not open detergent drawer during any wash cycle.
▶ Do not touch the door during the washing process, it gets hot.
▶ Do not open the door if the water level is visibly over the porthole.
▶ 'RQRWIRUFHWKHGRRUWRRSHQ7KHGRRULVnjWZLWKDVHOIORFNGH-
vice and will open shortly after the washing procedure is ended.
▶ 'RQRWRSHQWKHZDWHURXWOHWnjOWHURUHPHUJHQF\GRRUULQJGXULQJ
washing programmes.
▶ Do not touch the inner drum, metal parts, door, control panel or
metal buttons on the clothing shortly after washing programme
at high temperature or the water outlet hose when draining out
hot water.
▶ 6ZLWFKRNjWKHDSSOLDQFHDIWHUHDFKZDVKSURJUDPPHDQGEHIRUH
undertaking any routine maintenance and disconnect the appli-
ance from the electrical supply to save electricity and for safety.
▶ Hold the plug, not the cable, when unplugging the appliance.
▶ Do make sure the room is dry and well ventilated. The ambient
temperature should be between 5 °C and 35 °C.
▶ Do not cover any ventilation openings in the base by a carpet or
similar object.
▶ Keep the area around the appliance free of dust and lint.
▶ Do make sure that there is only laundry inside the appliance and
no pets or children before you use it.
▶ Do make sure not to load more than nominal load.
▶ Remove all items such as lighters and matches from pockets.
▶ 8VH IDEULF VRIWHQHUV RU VLPLODU SURGXFWV DV VSHFLnjHG E\ WKH
manufacturer´s packaging.

EN
1- Safety information
7
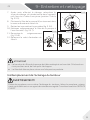
WARNING!
Maintenance / cleaning
▶ Make sure children are supervised if they carry out cleaning and
maintenance.
▶ Disconnect the appliance from the electrical supply before under-
taking any routine maintenance.
▶ Keep the lower part of the porthole clean and open door and de-
tergent drawer if appliance is not in use to prevent odours.
▶ Do not use water spray or steam to clean the appliance.
▶ Replace a damaged supply cord only by the manufacturer, its ser-
YLFHDJHQWRUVLPLODUO\TXDOLnjHGSHUVRQVLQRUGHUWRDYRLGKD]DUGV
▶ Do not try to repair the appliance by yourself. In case of repair,
please contact our customer service.
Installation
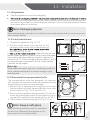
▶ Ensure a location which allows opening the door fully. Do not in-
stall the appliance behind a lockable door, a sliding door or a door
with hinges on the opposite side of the appliance door as this lim-
its the full opening of the appliance door.
▶ The appliance should be placed in a well-ventilated place. Ensure a
location which allows opening the door fully.
▶ Never install the appliance outdoors in a damp place, or in an area
which may be prone to water leaks such as under or near a sink
unit. In the event of a water leak, cut the power supply and allow
the machine to dry naturally.
▶ Install and use the appliance only in places where the temperature
is above 5 °C.
▶ Do not place the appliance directly on a carpet, or close to a wall
or furniture.
▶ Do not install the appliance in direct sunlight or near heat sources
(e.g. stoves, heaters).
▶ Make sure that the electrical information on the rating plate agrees
with the power supply. If it does not, contact an electrician.
▶ Do not use multi-plug adapters and extension cables.
▶ Make sure only the delivered electric cable and hose set are used.

1- Safety information
EN
8
WARNING!
Installation
Ω
Make sure not to damage the electric cable and the plug. If dam-
aged, have it replaced by an electrician.
Ω
For the power supply, use a separate earthed socket which is eas
-
ily accessible after installation. The appliance must be earthed.
Ω
Ω
no leakage.
The appliance must not be supplied through an external switching
device, such as a timer, or connected to a circuit that is regularly
VZLWFKHGRQDQGRNjE\DXWLOLW\

EN
2- Product description
9
2.1 Intended use
This appliance is intended for washing machine-washable laundry only. Always follow the
instructions given on the label of each garment label. The appliance is designed exclu-
sively for domestic use inside the house. It is not intended for commercial or industrial use.
and loss of all warranty and liability claims.
Note: Deviations
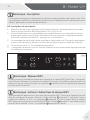
2.2 Picture of appliance
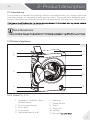
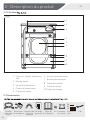
2.2.1 Front (Fig. 2.2.1)
2.2.1
2
6
8
10
9
11
7
3
4
5
1
1 Detergent / Softener / disin-
fectant drawer
2 Touch screen display
3 Drum door
4 Front panel
5 Adjustable feet (4 in all)
6 Worktop
7 Power button
8 Drum
9 Door lock
10 Sealing
11 Service Ǎ

2- Product description
EN
10
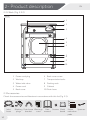
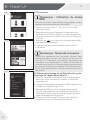
2.2.2 Back (Fig. 2.2.2)
2.2.2
1
2
3
4
5
6
7
8
9
1 Power cord plug
2 Worktop
3 Water inlet valve
4 Power cord
5 Back cover
6 Back cover screw
7 Transportation bolts
8 Packing rods
9 Cabinet
10 Drain hose
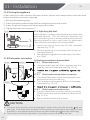
2.3 Accessories
Check the accessories and literature in accordance with this list (Fig. 2.3):
Inlet
hose
Blanking
plugs
Drain hose
bracket
Warranty
card
User
manual
Screws Metal
board
10
Spanner
[
[
[
Noise
reduction
pads

EN
3- Control panel
11
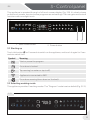
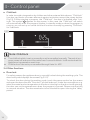
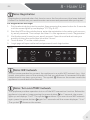
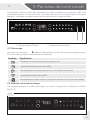
This appliance is operated through a full touch screen display (Fig. 3.0). It’s clearly shown
on the touch screen, how to choose programmes and settings.The user gets access to all
functions with one slight touch.
3.0
Temp.
DetergentStains Softener
Allergen
Delay
lock
Child
hold on 3s
min
min.
Wash SpinRinse Dry
Function
Option
Mytime
Program
Smart Sport Dry
Spin
Cotton Synthetic
Wool Delicate
Duvet
Eco Cotton
i-Refresh Self Clean
Quick 15’
Mix
1 Start/Pause button
2 Power button
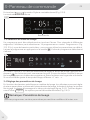
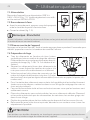
3.1 Starting up
Touch this button
IRUVHFRQGVWRVZLWFKRQWKHDSSOLDQFHDQGWRXFKLWDJDLQIRUbVHF-
RQGVWRVZLWFKLWRNj
Symbol Meaning
Start or pause the program.
Drum door is locked.
7DSZDUQLQJQRZDWHURUWDSLVRNj
Appliance is connected to WIFI.
Drum door warning (drum door isn’t locked).
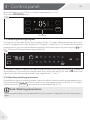
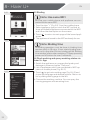
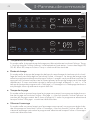
3.2 Selecting washing mode
This appliance provides 2 washing modes. The “Program” mode is set as default(Fig.3.2.1).
21
Temp.
DetergentStains Softener
Allergen
Delay
lock
Child
hold on 3s
min
min.
Wash SpinRinse Dry
Function
Option
Mytime
Program
Smart
Sport Dry
Spin
Cotton Synthetic
Wool Delicate
Duvet
Eco Cotton
i-Refresh Self Clean
Quick 15’
Mix
3.2.1

3- Control panel
EN
12
By touching
Mytime
, “Mytime“ mode is selected (Fig. 3.2.2).
The selected mode lights up.
Function
Option
Mytime
Program
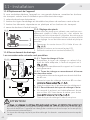
3.3 Selecting washing program
$SURJUDPFDQEHVHOHFWHGE\WRXFKLQJWKHVFUHHQ7RPHHWGLNjHUHQWUHTXLUHPHQWVWKH-
re are 14 programs for user to select in “Program” mode (Fig. 3.3). If there are no special
requirements, you can use the default settings. Start the program by touching the
but-
ton. The icon of the selected program lights up.
Function
Option
Mytime
Program
Smart
Sport Dry
Spin
Cotton Synthetic
Wool Delicate
Duvet
Eco Cotton
i-Refresh Self Clean
Quick 15’
Mix
In “Mytime” mode, if there is no need to adjust wash time, also just touch button to
start washing. If you want to change wash time, press the touch bar and slide to left and
ULJKW,I\RXZDQWWRnjQHDGMXVWZDVKWLPHVOLJKWWRXFKţŤDQGţŤ
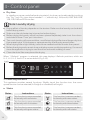
3.4 Adjusting washing parameters
$FFRUGLQJWRVSHFLnjFZDVKLQJQHHGVXVHUVFDQDGMXVWVHYHUDOZDVKLQJSDUDPHWHUVLQFOX-
ding wash temperature, wash time, rinse times, spin speed and dry time (Fig. 3.4.1). Slight-
ly touch the icon
Option
, the options can be folded (Fig. 3.4.2).
Note: Washing parameters
Not every parameter can be adjusted for each program. It depends on the selected pro-
gram.
3.2.2
3.3
Touchbar

EN
3- Control panel
13
▶
Temp.
DetergentStains Softener
Allergen
Delay
lock
Child
hold on 3s
min
min.
Wash SpinRinse Dry
Function
Option
Mytime
Program
Wash temperature
In standby mode, wash temperature can be adjusted by touching the icon “Temp.”.
Once it is touched, the icon lights up. The temperature loops between --(without hea-
ting), 20, 30, 40, 60 and 90, when the “Temp.” icon continues to be touched.
▶ Wash time
,QVWDQGE\PRGHZDVKWLPHH[FOXGLQJLQǍRZDQGKHDWLQJGXUDWLRQFDQEHDGMXVWHG
E\WRXFKLQJWKHLFRQţ:DVKŤ:DVKWLPHORRSVZLWKLQWKHVSHFLnjFOLPLWVRIWKHVHOHFWHG
program when the “Wash” icon continues to be touched. By pressing and sliding on the
WRXFKEDUZDVKWLPHFRXOGEHVHWTXLFNO\,I\RXZDQWWRnjQHDGMXVWZDVKWLPHVOLJKW
WRXFKţŤDQGţŤ:DVKWLPHRIţ'U\Ťţ6SLQŤDQGţ6HOI&OHDQŤLVSUHVHWQRDGMXVWPHQW
is allowed.
▶ Rinse times
In standby or pause mode (before the last time of rinse starts), rinse times can be ad-
justed by touching the icon “Rinse”. Once it is touched, the icon lights up. The rinse
times loops between 0 (without rinse) to the maximum time of the selected program
when the “Rinse” icon continues to be touched.
▶ Spin speed
In standby or pause mode (before spin starts), spin speed can be adjusted by touching
the icon “Spin”. Once it is touched, the icon lights up. The spin speed loops within the
VSHFLnjFOLPLWVRIWKHVHOHFWHGSURJUDPZKHQWKHţ6SLQŤLFRQFRQWLQXHVWREHWRXFKHG
3.4.1
3.4.2
DetergentStains Softener
Allergen
Delay
lock
Child
Function
Option
Mytime
Program
hold on 3s

3- Control panel
EN
14
▶ Dry time
In standby or pause mode (before drying starts), dry time can be adjusted by touching
the “Dry” icon. Dry time loops between ---( without dry), AU(smart), 030, 060, 090,
120, 150, 180 and 210 minutes.
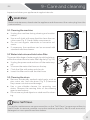
Note: Laundry drying
▶ 'U\LQJHNjHFWRIODXQGU\GHSHQGVRQWKHWH[WXUH0DNHVXUHWKHODXQGU\FDQEHGULHG
before drying starts.
▶ Make sure the cold water tap is turned on before drying.
▶ Before drying the laundry which has been spinned sepatately, take it out from drum
and shake it loose. Then, put it into drum.
▶ 7RRPXFKODXQGU\ZLOOFDXVHZULQNOHVXQVXǎFLHQWGU\LQJHNjHFWVDQGORQJHUGU\WLPH
than preset value. If this happens, separate and dry the laundry several times.
▶ When drying little or light laundry, actual time needed could be shorter than preset.
▶ Before the drying ends, remain time on display screen could stop reducing. It’s normal
since the appliance is trying to cool the drum and avoid scalding of users.
▶ &OHDQWKHGUDLQnjOWHUHYHU\WLPHDIWHUGU\LQJ
When “i-Refresh” program is selected, this area displays i-Refresh positions, which are
H-1, H-2, H-3. And H-3 is set as default (Fig.3.4.3).
lock
Child
hold on 3s
min.
Dry
Function
Option
Mytime
Program
Smart Sport Dry
Cotton Synthetic
Wool Delicate
i-Refresh
Quick 15’
Mix
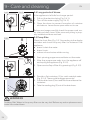
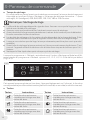
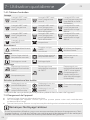
3.5 Selecting functions
This appliance provides several functions. Slightly touch the function icon, the corre-
spondfunction can be selected (full bright) or canceled (half bright).
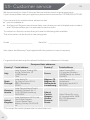
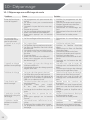
▶ Stains
Stains ,QVWUXFWLRQV Stains ,QVWUXFWLRQV
This function is recommended
for laundry with soil stains.
This function is recommended
for laundry with wine stains.
This function is recommended
for laundry with fruit stains.
This function is recommended
for laundry with blood stains.
This function is recommended
for laundry with grass stains.
This function is recommended
for laundry with milk stains.
3.4.3

EN
3- Control panel
15
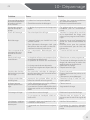
▶ Detergent
Automatic detergent dosage is supported for some programs where this function is
VZLWFKHGRQE\GHIDXOW7RVZLWFKLWRNjWRXFKWKHţ'HWHUJHQWŤLFRQ/RZRUQRIRDP
detergent should be used. Excessive detergent will produces a lot of foam, which cau-
VHVRYHUǍRZDQGULQVHGLǎFXOW\7KHPD[LPXPVWRUDJHRIGHWHUJHQWLVPO,ILWLV
LQVXǎFLHQWWKHLFRQZLOOEOLQNZLWKSURPSWWRQH
▶
Note: Powder detergent
If you choose to use powder detergent and other detergents, put recommended
amount of detergent into the powder detergent chamber
DQGVZLWFKRNjDXWRPDW-
ic detergent dosage function.
Softener
Softener automatic delivery is supported for some programs. And this function is swit-
FKHGRQE\GHIDXOW7RVZLWFKLWRNjWRXFKWKHţ6RIWHQHUŤLFRQ3OHDVHIROORZWKHLQVW-
ructions on the softener package. Excessive softener will harm laundry textures. The
PD[LPXPVWRUDJHRIVRIWHQHULVPO,ILWLVLQVXǎFLHQWWKHLFRQZLOOEOLQNZLWKSURPSW
tone.
▶ Allergen
In standby or pause mode, touch “Allergen” icon to select or cancel allergen function.
By selecting allergen funtion, parameters of several programs can be controled intelli-
gently, enhancing rinse performance and reducing detergent residue.
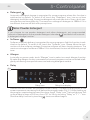
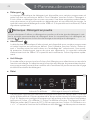
▶ Delay
Temp.
DetergentStains Softener
Allergen
Delay
lock
Child
hold on 3s
min
min.
Wash SpinRinse Dry
Function
Option
Mytime
Program
3.5
Delay icon Delay time display
Use this function to start the programme with a delay. The delay time displayed on the
screen represents remaining time before the program ends (Fig.3. 5). After setting up
the program, required options and functions, touch “Delay” icon. The icon lights up. Set
XSWLPHGHOD\LQVWHSVRIKRXUIURP2))WRKE\WRXFKLQJţ'HOD\ŤRUţŤţŤLFRQ
Start the delay function by touching
, time countdown begins.

3- Control panel
EN
16
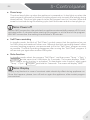
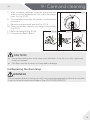
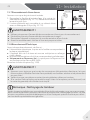
▶ Child lock
In order to avoid misoperation by children and other external disturbance, “Child lock”
function can blocks all screen elements against activation except the power button.
(Fig.3.5.2) After starting a program, the “Child lock” function is activated after 1 mi-
nute. The symbol
appears on the screen. In this case, the “Child lock” will switch
RNjDXWRPDWLFDOO\DIWHUWKHSURJUDPnjQLVKHV,QVWDQGE\PRGHRUZKHQWKHSURJUDPLV
running, you can set up or cancel child lock function manually by pressing “Child lock”
for 3 seconds.
Delay
lock
Child
hold on 3s
min.
Spin Dry
Function
Option
Mytime
Program
Smart
Sport
Cotton Synthetic
Quick 15’
Mix
3.5.2
Child lock Door lock
Note: Child lock
▶ The child lock which is set up manually must be cancelled manually. The end of pro-
JUDPSRZHURNjDQGHUURULQIRUPDWLRQZRQšWFDQFHOFKLOGORFN,WVWLOOZRUNVZKHQWKH
applicance is powered on next time.
▶ &KLOGORFNFDQšWEHVHWXSRUFDQFHOOHGWKURXJK+DLHU8$33
3.6 Other functions
▶ Door lock
For safety reason the appliance door is normally locked during the washing cycle. The
door lock symbol displays the screen(Fig.3.5.2).
To unlock the door during the washing cycle, touch the pause symbol on the screen
and open the door after the “Door lock” symbol fades out. Under some conditions, e.g.
when the water level or temperature in the drum is too high or the drum is still spinning,
the door can not be opened even when the program is paused. Please note that this
is a normal situation. The door needs also to be unlocked to open it during the “delay”
period.

EN
3- Control panel
17
▶ Drum lamp
The drum lamp lights up when the appliance is powered on. It also lights up when the
ZDVKSURJUDPLVSDXVHGRUnjQLVKHGSURYLGLQJRSSRUWXQLW\WRZDWFKWKHODXQGU\GXULQJ
these periods. The drum light goes out after the program runs for 2 minites. When the
screen is touched during the washing cycle, both the screen and drum lamp lights up.
▶
1RWH3RZHURNj
:LWKRXW:,),FRQQHFWLRQWKHVZLWFKHGRQDSSOLDQFHDXWRPDWLFDOO\SRZHUVRNjLILWLVQRW
activated within 2 minutes before starting the program or at the end of the program.
With WIFI connection, the waiting time duration is 10 minutes.
Self Clean reminding
In standby mode, the blink of “Self Clean” symbol means that the appliance has run
IRUF\FOHVDQGQHHGVVHOIFOHDQQRZ$OWKRXJKWKHEOLQNUHPLQGLQJGRHVQšWDNjHFW
common washing programs, we recommand to run the “Self Clean” program as soon
as possible. The blink reminding disappears after running the “Self Clean” program. It
will reminds you again after another 100 cycles.
▶ Mute function
,QVWDQGE\PRGHVHOHFWWKHSURJUDPţ6HOI&OHDQŤDQGWKHQSUHVVţ7HPSŤŤ6SLQŤ
Program
at the same time. Hold them for 3 seconds. The screen displays “bE0n”,
which means mute function is activatied. To deactivate mute function, again press
ţ7HPSŤŤ6SLQŤ
Program
and hold for 3 seconds. The screen will display “bE0F”
Note: Display
'LVSOD\PD\EODFNRXWLQFDVHRIFRQVWDQWVWDWLFHOHFWULFLW\HNjHFWGXULQJDSSOLDQFHUXQ
2QFHWKLVKDSSHQVSOHDVHWXUQRNjDQGRQDJDLQWKHDSSOLDQFHDIWHUUHVWDUWSURJUDP
can continue.
.

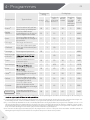
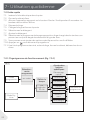
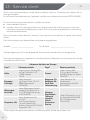
4- Programmes
EN
18
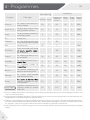
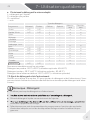
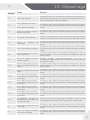
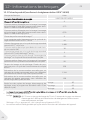
Program Fibre type
Max. load in kg
Presetting
Washing Drying
Programme
runtime
in min
1)
“Wash”
in min
“Rinse”
cycles
“Speed”
in rpm
Smart
2)
for cotton, linen and syn-
thetic clothes
10 6 AU 10 2 800
Quick 15´
3)
for less dirty cotton, linen
and synthetic clothes
2.5 1 15 3 1 1000
Sport
for sportswear suitable for
machinery wash
5 - 25 5 1 800
Dry drying only - 6 - - - -
i-Refresh
for dry clothing with less
dust, wrinkle and moisture
- 1 30 - - -
Spin spinning only 10 - 7 - - 1000
Self Clean
inner and outer self-clean
-
gent needed
- - 60 - 1 600
Cotton
for clothing made of cot-
ton and linen
10 6 59 10 2 1400
Synthetic
for clothing made of syn-
6 2 106 60 2 1200
Mix
for clothing made of
10 6 49 10 2 1000
Wool
4)
for woolen clothing suit-
able for machinery wash
2 - 41 20 1 800
Delicate
for “hand wash”marked
and delicate laundry
2.5 - 56 20 2 600
Duvet
clothing suitable for ma-
chinery wash
2.5 - 45 5 2 800
Eco Cotton
standard programme for
clothing made of cotton
and linen
10 6 119 65 2 1400
1)
Due to multiple distribution, inlet waiting, spin waiting and drainage waiting, the actual displayed runtime can
vary from the preset time.
2) Smart program will adjust the data of Temp. washing time, rinse time, spin speed and so on automatically. It is
suggested to use special program for Wool & duvet.
3) There is small probability of creating unbalance during the “Quick 15” program. The time to redistribute the un-
balance is not included in default time. Please, don´t overdose the detergent to avoid it´s residues after “Quick
15” program. “Quick 15” program with dry function is suitable for synthetic material only.
4) Auto dosing function in “Wool” program is not recommened. Please, dose special wool detergent to powder
drawer.

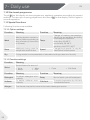
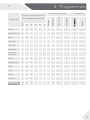
EN
4- Programmes
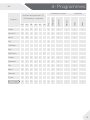
19
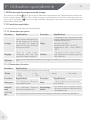
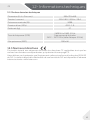
Program
Available temperature in °C
(P:Presetting; •:available)
Available functions •:available
Dry
Detergent
Softener
Allergen
Delay
Stains
OFF 20 30 40 60 90
Smart • • P • • • • • • • •
Quick 15´ P • • • • • • •
Sport • P • • • • • •
Dry •
i-Refresh •
Spin •
Self Clean P
Cotton • • P • • • • • • • • •
Synthetic • • P • • • • • • • •
Mix • • P • • • • • • • •
Wool P • • • • • •
Delicate • • P • • •
Duvet • • P • • • •
Eco Cotton
• • P • • • • • • • • •

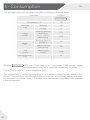
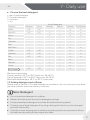
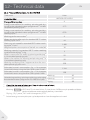
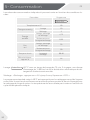
5- Consumption
EN
20
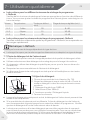
7KHLQGLFDWHGFRQVXPSWLRQYDOXHVPD\GLNjHUDFFRUGLQJWRORFDOFRQGLWLRQV
Parameter Program
Eco Cotton
Temperature in °C 60
Max. load
in kg
Washing 10
Drying 6
Energy
in kWh
Washing, spinning
and drying
6.72
Only for washing
and spinning
0.99
Water
LQ/
Washing, spinning
and drying
99
Only for washing
and spinning
50
Time
in h:min
Washing and
drying
8:40
Spin performance
in %
44
Washing:
Eco Cotton
60°C with 75 min wash time, 2 rinse times, 1400 rpm spin speed
and detergent and softener automatically delivery cancelled.
Drying: “Dry”, press “AU” until it changes to “ECO”.
The standard 60 °C cotton washing program is suitable to clean normally soiled cotton
ODXQGU\7KH\DUHWKHPRVWHǎFLHQWSURJUDPVLQWHUPVVRIFRPELQHGHQHUJ\DQGZDWHU
FRQVXPSWLRQIRUFRWWRQODXQGU\7KHXVHGZDWHUWHPSHUDWXUHPD\GLNjHUIURPGHFODUHG
cycle temperature
La page est en cours de chargement...
La page est en cours de chargement...
La page est en cours de chargement...
La page est en cours de chargement...
La page est en cours de chargement...
La page est en cours de chargement...
La page est en cours de chargement...
La page est en cours de chargement...
La page est en cours de chargement...
La page est en cours de chargement...
La page est en cours de chargement...
La page est en cours de chargement...
La page est en cours de chargement...
La page est en cours de chargement...
La page est en cours de chargement...
La page est en cours de chargement...
La page est en cours de chargement...
La page est en cours de chargement...
La page est en cours de chargement...
La page est en cours de chargement...
La page est en cours de chargement...
La page est en cours de chargement...
La page est en cours de chargement...
La page est en cours de chargement...
La page est en cours de chargement...
La page est en cours de chargement...
La page est en cours de chargement...
La page est en cours de chargement...
La page est en cours de chargement...
La page est en cours de chargement...
La page est en cours de chargement...
La page est en cours de chargement...
La page est en cours de chargement...
La page est en cours de chargement...
La page est en cours de chargement...
La page est en cours de chargement...
La page est en cours de chargement...
La page est en cours de chargement...
La page est en cours de chargement...
La page est en cours de chargement...
La page est en cours de chargement...
La page est en cours de chargement...
La page est en cours de chargement...
La page est en cours de chargement...
La page est en cours de chargement...
La page est en cours de chargement...
La page est en cours de chargement...
La page est en cours de chargement...
La page est en cours de chargement...
La page est en cours de chargement...
La page est en cours de chargement...
La page est en cours de chargement...
La page est en cours de chargement...
La page est en cours de chargement...
La page est en cours de chargement...
La page est en cours de chargement...
La page est en cours de chargement...
La page est en cours de chargement...
La page est en cours de chargement...
La page est en cours de chargement...
La page est en cours de chargement...
La page est en cours de chargement...
La page est en cours de chargement...
La page est en cours de chargement...
La page est en cours de chargement...
La page est en cours de chargement...
La page est en cours de chargement...
La page est en cours de chargement...
La page est en cours de chargement...
La page est en cours de chargement...
La page est en cours de chargement...
La page est en cours de chargement...
La page est en cours de chargement...
La page est en cours de chargement...
La page est en cours de chargement...
La page est en cours de chargement...
-
 1
1
-
 2
2
-
 3
3
-
 4
4
-
 5
5
-
 6
6
-
 7
7
-
 8
8
-
 9
9
-
 10
10
-
 11
11
-
 12
12
-
 13
13
-
 14
14
-
 15
15
-
 16
16
-
 17
17
-
 18
18
-
 19
19
-
 20
20
-
 21
21
-
 22
22
-
 23
23
-
 24
24
-
 25
25
-
 26
26
-
 27
27
-
 28
28
-
 29
29
-
 30
30
-
 31
31
-
 32
32
-
 33
33
-
 34
34
-
 35
35
-
 36
36
-
 37
37
-
 38
38
-
 39
39
-
 40
40
-
 41
41
-
 42
42
-
 43
43
-
 44
44
-
 45
45
-
 46
46
-
 47
47
-
 48
48
-
 49
49
-
 50
50
-
 51
51
-
 52
52
-
 53
53
-
 54
54
-
 55
55
-
 56
56
-
 57
57
-
 58
58
-
 59
59
-
 60
60
-
 61
61
-
 62
62
-
 63
63
-
 64
64
-
 65
65
-
 66
66
-
 67
67
-
 68
68
-
 69
69
-
 70
70
-
 71
71
-
 72
72
-
 73
73
-
 74
74
-
 75
75
-
 76
76
-
 77
77
-
 78
78
-
 79
79
-
 80
80
-
 81
81
-
 82
82
-
 83
83
-
 84
84
-
 85
85
-
 86
86
-
 87
87
-
 88
88
-
 89
89
-
 90
90
-
 91
91
-
 92
92
-
 93
93
-
 94
94
-
 95
95
-
 96
96


Haier HWD100-BD1499U1 Manuel utilisateur
- Catégorie
- Machines à laver
- Taper
- Manuel utilisateur
dans d''autres langues
- English: Haier HWD100-BD1499U1 User manual
Documents connexes
-
Haier HW150-BP14986E Manuel utilisateur
-
Haier HW80-BP1439N Manuel utilisateur
-
Haier HWD80-B14959EU1 Manuel utilisateur
-
Haier HW010-CP1439N Le manuel du propriétaire
-
-
-
Haier HWD90-BP14636N Manuel utilisateur
-
Autres documents
-
Bellavita WF 712 A+++ W701T Le manuel du propriétaire
-
-
FORS WA9469 Manuel utilisateur
-
-
Costway EP24460DE Manuel utilisateur
-
Kenmore 796.41393 Le manuel du propriétaire
-
LG 41303 Le manuel du propriétaire
-
-
Electrolux WASL6E300 Guide de démarrage rapide
-