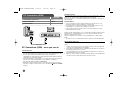
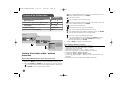
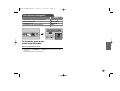
LG PF 391 Le manuel du propriétaire
- Catégorie
- Cadres photo numériques
- Taper
- Le manuel du propriétaire

PF391
P/NO : MFL42173806(R1)
ENGLISH
DEUTSCH
FRANÇAIS
NEDERLANDS
PF391P-P-ABELLLW-ENG 11/19/07 4:39 PM Page 1

2
CAUTION: TO REDUCE THE RISK OF ELECTRIC SHOCK. DO NOT REMOVE
COVER (OR BACK). NO USER-SERVICEABLE PARTS INSIDE. REFER SERVIC-
ING TO QUALIFIED SERVICE PERSONNEL.
This lightning flash with arrowhead symbol within an equilateral triangle is
intended to alert the user to the presence of uninsulated dangerous voltage
within the product’s enclosure that may be of sufficient magnitude to consti-
tute a risk of electric shock to persons.
The exclamation point within an equilateral triangle is intended to alert the
user to the presence of important operating and maintenance (servicing)
instructions in the literature accompanying the product.
WARNING: TO PREVENT FIRE OR ELECTRIC SHOCK HAZARD, DO NOT
EXPOSE THIS PRODUCT TO RAIN OR MOISTURE.
WARNING: Do not install this equipment in a confined space such as a book case or
similar unit.
CAUTION: Do not block any ventilation openings. Install in accordance with the man-
ufacturer's instructions. Slots and openings in the cabinet are provided for ventilation
and to ensure reliable operation of the product and to protect it from over heating.
The openings should be never be blocked by placing the product on a bed, sofa, rug
or other similar surface. This product should not be placed in a built-in installation
such as a bookcase or rack unless proper ventilation is provided or the manufactur-
er's instruction has been adhered to.
CAUTION: The apparatus should not be exposed to water (dripping or splashing) and
no objects filled with liquids, such as vases, should be placed on the apparatus.
CAUTION concerning the Power Cord
Most appliances recommend they be placed upon a dedicated circuit;
That is, a single outlet circuit which powers only that appliance and has no additional
outlets or branch circuits. Check the specification page of this owner's manual to be
certain.Do not overload wall outlets. Overloaded wall outlets, loose or damaged wall
outlets, extension cords, frayed power cords, or damaged or cracked wire insulation
are dangerous. Any of these conditions could result in electric shock or fire.
Periodically examine the cord of your appliance, and if its appearance indicates dam-
age or deterioration, unplug it, discontinue use of the appliance, and have the cord
replaced with an exact replacement part by an authorized service center.
Protect the power cord from physical or mechanical abuse, such as being twisted,
kinked, pinched, closed in a door, or walked upon. Pay particular attention to plugs,
wall outlets, and the point where the cord exits the appliance.
To disconnect power from the mains, pull out the mains cord plug. When installing the
product, ensure that the plug is easily accessible.
Disposal of your old appliance
1. When this crossed-out wheeled bin symbol is attached to a product it
means the product is covered by the European Directive 2002/96/EC.
2. All electrical and electronic products should be disposed of separately from
the municipal waste stream via designated collection facilities appointed by
the government or the local authorities.
3. The correct disposal of your old appliance will help prevent potential nega-
tive consequences for the environment and human health.
4. For more detailed information about disposal of your old appliance, please
contact your city office, waste disposal service or the shop where you pur-
chased the product.
This product is manufactured to comply with the EEC DIRECTIVE
2004/108/EC, and 2006/95/EC.
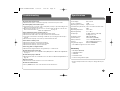
Safety Precaution
CAUTION
RISK OF ELECTRIC SHOCK
DO NOT OPEN
PF391P-P-ABELLLW-ENG 11/19/07 4:39 PM Page 2

3
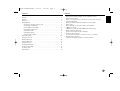
Contents
Safety Precaution . . . . . . . . . . . . . . . . . . . . . . . . . . . . . . . . . . . . . . . . . . . . .2
Contents . . . . . . . . . . . . . . . . . . . . . . . . . . . . . . . . . . . . . . . . . . . . . . . . . . . .3
Features . . . . . . . . . . . . . . . . . . . . . . . . . . . . . . . . . . . . . . . . . . . . . . . . . . . .3
Main Unit . . . . . . . . . . . . . . . . . . . . . . . . . . . . . . . . . . . . . . . . . . . . . . . . . . . .4
Getting Started . . . . . . . . . . . . . . . . . . . . . . . . . . . . . . . . . . . . . . . . . . . . . . .5
• Inserting or removing a memory card . . . . . . . . . . . . . . . . . . . . . . . . . . .5
• Connecting an USB Device . . . . . . . . . . . . . . . . . . . . . . . . . . . . . . . . . . .5
• Connecting the Power Cable . . . . . . . . . . . . . . . . . . . . . . . . . . . . . . . . . .6
• Turning On or Off the Unit . . . . . . . . . . . . . . . . . . . . . . . . . . . . . . . . . . . .6
• Power Save mode . . . . . . . . . . . . . . . . . . . . . . . . . . . . . . . . . . . . . . . . . .6
• Installing the Stand . . . . . . . . . . . . . . . . . . . . . . . . . . . . . . . . . . . . . . . . .6
• Using the Device Menu . . . . . . . . . . . . . . . . . . . . . . . . . . . . . . . . . . . . . .7
Adjust the settings . . . . . . . . . . . . . . . . . . . . . . . . . . . . . . . . . . . . . . . . . . .7-8
Viewing a Photo file . . . . . . . . . . . . . . . . . . . . . . . . . . . . . . . . . . . . . . . . . . . .9
Playing a Movie file . . . . . . . . . . . . . . . . . . . . . . . . . . . . . . . . . . . . . . . . . . .10
Playing a Music file . . . . . . . . . . . . . . . . . . . . . . . . . . . . . . . . . . . . . . . . . . .11
Using a File menu . . . . . . . . . . . . . . . . . . . . . . . . . . . . . . . . . . . . . . . . . . . .12
Viewing the Calendar . . . . . . . . . . . . . . . . . . . . . . . . . . . . . . . . . . . . . . . . . .13
PC Connection (USB) . . . . . . . . . . . . . . . . . . . . . . . . . . . . . . . . . . . . . . . . .14
Troubleshooting . . . . . . . . . . . . . . . . . . . . . . . . . . . . . . . . . . . . . . . . . . . . . .15
Specifications . . . . . . . . . . . . . . . . . . . . . . . . . . . . . . . . . . . . . . . . . . . . . . .15
Features
• Live picture gallery:
High resolution and deep digital color from LCD wide screen.
• Easy power save mode:
Better 1 second power save mode than 15 seconds power off and on.
• Portable digital album:
Share your memories with built-in battery for easy mobility
• Plug-in viewer:
Easy viewing photos via memory card slot and USB port
• 2,000 photo storage:
2,000 precious memories with 256MB built-in flash memory
• Digital calendar & alarm clock:
For your efficient date and time scheduling
• Convenient photo explorer:
Coolest interface navigation for easiest access to your memory
• Premium interior decorator
3 different changeable faceplate to suit various interior
PF391P-P-ABELLLW-ENG 11/19/07 4:39 PM Page 3

4
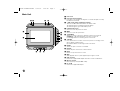
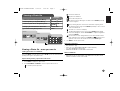
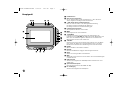
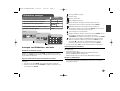
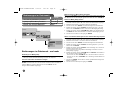
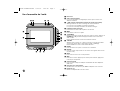
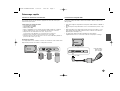
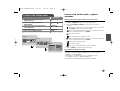
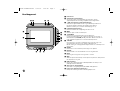
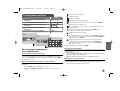
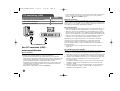
Main Unit
a LCD screen
b Faceplate (interchangeable)
Four edges of the faceplate are magnetic, so that the faceplate can easily
be attached or detached.
c 1 BAT. (Power button and Battery indicator)
Turns the unit ON or OFF and indicates the battery status.
The indicator lights in red during charging the battery.
The indicator lights in green when battery is full.
d P-SAVE (Power Save)
Accesses or exits the power save mode.
e MENU
Accesses or exits the option menu.
f b VOLUME B
Adjusts the volume of the unit. To adjust the volume, press and hold
VOLUME (b or B) during playback of the movie or music file.
Left and Right buttons for selecting an item on the menu.
g b PAGE B
Press and hold for 2 seconds to move to the previous or next page on the
[Photo], [Movie] or [Music] menu.
Up and Down buttons for selecting an item on the menu.
h ENTER
Selects an option or executes a command.
i ROTATE
Rotates the photo in full screen counterclockwise.
j BACK
Returns to a previous menu or screen.
k NX
Starts playback. Press to pause playback; press again to restart.
l USB connector
Connect the supplied USB adapter cable then connect an USB device.
m Memory card slot
Insert a memory card (SD, MMC or MS).
n DC 12V IN
Connect the supplied AC adapter.
cd e f
nml
b
a
g
h
i
j
k
PF391P-P-ABELLLW-ENG 11/19/07 4:39 PM Page 4

5
Getting Started
Inserting or removing a memory card
Insert a memory card to the memory card slot on the unit.
To withdraw the memory card from the slot, press on the center of the memory
card then withdraw it carefully.
Card useable on this unit
• Secure Digital Card (SD)
• Multi Media Card (MMC)
• Memory Stick (MS)
• Compatible with: FAT 12, FAT 16, or FAT 32
• Only use the memory cards recommended above.
• The card will only fit in one direction; do not force it.
The card should fit snugly when properly inserted.
• Any memory card may not be available on the unit.
• Do not extract the memory card in operating (play, copy, etc.).
Regarding Write Protect
For cards that have a write protect switch, it will not be possible to write, erase
or format the card if the switch is on.
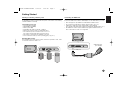
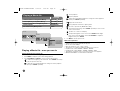
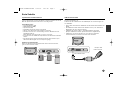
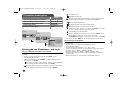
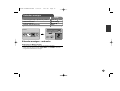
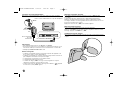
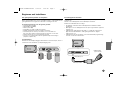
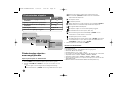
Connecting an USB Device
Connect the small end of the USB adapter cable to the USB port on the unit.
Connect an USB Device and the USB adapter. Use an USB cable, if you need.
• This unit supports only USB Device with FAT16 or FAT32 format.
• Do not extract the USB Device during operation (play, copy, etc.).
• USB Device: USB Device that support USB 1.1 and USB 2.0.
(For example: USB Flash Drive, Memory Card Reader, Digital Camera, etc.)
• An USB Device which requires additional program installation when you
have connected it to a PC, is not supported.
USB Flash Drive
(For example)
USB Adapter Cable
To USB port
SD
or or
MMC
MS
PF391P-P-ABELLLW-ENG 11/19/07 4:39 PM Page 5

6
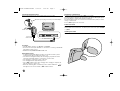
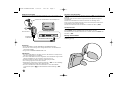
Connecting the Power Cable
Connect the supplied power cable from the unit to a power outlet.
AC adapter
• This AC adapter operates on 100-240V~ 1A 50/60Hz.
• Contact an electrical parts distributor for assistance in selecting a suitable AC
plug adapter or AC cord set.
• Manufactured by WANLIDA GROUP CO., LTD
Rechargeable battery
• Its internal rechargeable battery provides you with the freedom to pass it
around and play the files without the power cord.
• The internal rechargeable battery will start charging only when the unit is
turned off and the AC adapter is connected to a power outlet.
• The charging is stopped if you turn on the unit.
• The charging will take approximately 2 hour.
• The 1 BAT. indicator turns red in charging. If the charging is complete, the
indicator changes to green color.
• When the remaining time of the battery power is under 10 minutes, “ ”
will appear on the screen and the 1 BAT. indicator flashes.
Turning On or Off the Unit
To turn on the unit, press and hold 1 BAT. for 2 seconds.
The demonstration slideshow will start and then the [Device Menu] will appear.
Press any button to skip the demonstration slideshow.
The demonstration photos are located in the internal memory, and you cannot
change or delete them.
Press 1 BAT. again to turn off the unit.
Power Save mode
You can set up the unit into an economic power save mode. Press P-SAVE
and the LCD screen is turned off. To exit the power save mode, press P-SAVE
or 1 BAT.
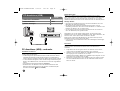
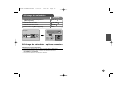
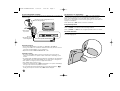
Installing the Stand
Attach the detachable stand on the back of the unit as below.
To “DC 12V IN” jack
Attach the power plug to the body of the AC adapter.
Power cord
release knob
To AC outlet
PF391P-P-ABELLLW-ENG 11/19/07 4:39 PM Page 6

7
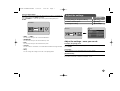
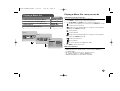
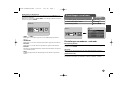
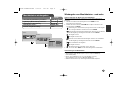
Using the Device Menu
The Device Menu will appear when the unit is turned on and you can display the
Device Menu by pressing BACK repeatedly.
Use b VOLUME B to select an option on the [Device Menu] then press
ENTER.
• USB-C ..... USB-Z
You can play a file(s) in the connected USB device.
• SD/MMC/MS
You can play a file(s) in the external memory card.
• Flash
You can play a file(s) in the internal memory card.
• Calendar
You can view the current date, clock and alarm information through calendar
screen.
• Setup
You can change the settings of the unit on the [Setup] menu.
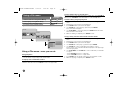
Adjust the settings - more you can do
To display the [Setup] menu
Use b VOLUME B to select the [Setup] option on the [Device Menu] then
press ENTER.
[Language]
Select a language for the Setup menu and on-screen display.
[Slideshow time]
Specify how long each picture is displayed in a slideshow; 3 seconds,
5 seconds, 15 seconds, 1 minutes, 15 minutes, 1 hour.
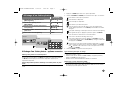
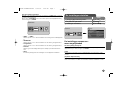
Device Menu
USB-C Flash SetupCalendar
Device Menu
USB-C Flash SetupCalendar
Setup
Language
Slideshow time 5s:
Slideshow mode Random:
Display mode Normal:
Time format 24h:
Time 2007 / 11 / 22 21 : 17:
Auto On 2007 / 11 / 22 00 : 00 Off:
Auto Off 2007 / 11 / 22 00 : 00 Off:
Alarm 00 : 00 Ring1 Off:
Default Reset:
English
Adjust the settings
1 Select [Setup] on the [Device Menu]:
bb
VOLUME
BB
, ENTER
2 Select a desired option:
bb
PAGE
BB
3 Change the setting:
bb
VOLUME
BB
BUTTON
PF391P-P-ABELLLW-ENG 11/19/07 4:39 PM Page 7

[Slideshow mode]
Specify the transition style between pictures in a slideshow; Random, Fading,
Off, Bottom-To-Top, Top-To-Bottom, Left-To-Right, Right-To-Left, Door-Close,
Door-Open, Hori-Cross, Verti-Cross.
If you select [Off], the slideshow does not work and the screen is fixed with one
picture.
[Display mode]
Specify the display mode for viewing photo file; Normal, Fit.
[Normal]: Retains the original aspect ratio of the image.
[Fit]: Optimizes the image to fit the screen
[Time format]
Specify the time format for displaying the clock ; 12h, 24h
[12h]: 12-hour display type with am or pm
[24h]: 24-hour display type without am or pm
[Time]
Specify the time and date of the unit to use the various timer features of the
unit.
1. Select [Time] option then press VOLUME B.
2. Enter the necessary information for date and time.
b VOLUME B (left/right): Moves the cursor to the previous or next column.
b PAGE B (up/down): Changes the setting at the current cursor position.
3. Press ENTER to confirm your setting.
[Auto On]
Specify when the unit turns on automatically.
1. Select [Auto On] option then press VOLUME B.
2. Follow step 2 as shown in [Time] above.
3. Choose a desired repeat mode; [Off], [Once] or [Everyday].
Select [Off] if you do not use this function.
4. Press ENTER to confirm your setting.
[Auto Off]
Specify when the unit turns off automatically.
1. Select [Auto Off] option then press VOLUME B.
2. Follow step 2 as shown in [Time] above.
3. Choose a desired repeat mode; [Off], [Once] or [Everyday].
Select [Off] if you do not use this function.
4. Press ENTER to confirm your setting.
[Alarm]
Specify the clock for alarm function. If you set the alarm, the unit will be turned
on automatically at the alarm time and the alarm will sound. To turn off the
alarm sound, press any button on the unit.
1. Select [Alarm] option then press VOLUME B.
2. Enter the necessary information for clock.
b VOLUME B (left/right): Moves the cursor to the previous or next column.
b PAGE B (up/down): Changes the setting at the current cursor position.
3. Choose a ring option; [Ring1], [Ring2] or [Ring3].
For example, if you select [Ring2];
Alarm sound (1 min.) c Mute (15 sec.) c Alarm sound (1 min.) c
Mute (15 sec.) c Normal mode
4. Choose a desired repeat mode; [Off], [Once] or [Everyday].
Select [Off] if you do not use this function.
[Off]: Alarm function is not activated.
[Once]: Alarm function is activated once after setting the alarm.
[Everyday]: Alarm function is activated everyday.
5. Press ENTER to confirm your setting.
[Default]
Reset the unit to its original factory settings. Select [Default] option then press
ENTER.
8
PF391P-P-ABELLLW-ENG 11/19/07 4:39 PM Page 8

9
Viewing a Photo file - more you can do
Viewing photo files as a slideshow
On the [Photo] menu, use b VOLUME B and b PAGE B to select a photo file
then press NX to start the slideshow. Press NX to pause the slideshow tem-
porarily, press again to exit pause mode.
Options during viewing a photo file in full screen
You can use various features during viewing a picture in full screen.
1. Press MENU to display the option menu.
2. Use b VOLUME B and ENTER to select an option and execute it.
To view the previous photo file.
To start the slideshow.
To pause the slideshow.
To view the next photo file.
To rotate the photo in 90 degrees clockwise. Press ENTER repeatedly
to select a degrees.
To stop viewing the photo in full screen and returns to [Photo] menu.
To enlarge the photo image. Press ENTER repeatedly to select a zoom
mode or normal mode.
To switch on or off the clock display.
To adjust the brightness of the screen. Press ENTER and the bright-
ness menu will appear, and use b VOLUME B to adjust the brightness
then press ENTER.
You can listen to music during slideshow, if the current media contain
music and photo files together. Press ENTER and will appear lower-
right side of the screen. To exit this function, press ENTER again.
3. Use MENU to exit the option menu.
Photo file requirement
JPEG file compatibility with this unit is limited as follows:
• File extensions: “.jpg”
• Photo size: Less than 8,000 x 8,000 (W x H) pixel (baseline)
Less than 100,000 pixel (progressive)
• Maximum Files/Media: Less than 650 recommended
Notes on JPEG file
• Lossless compression JPEG image files are not supported.
• Depending on the size and number of the JPEG files, it may take several
minutes to read the contents of the media.
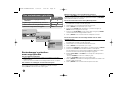
Viewing a Photo file
1 Select a device on the [Device Menu]:
bb
VOLUME
BB
, ENTER
2 Select [Photo] on the [Media Menu]:
bb
VOLUME
BB
, ENTER
3 Select a photo file on the [Photo] menu:
bb
VOLUME
BB
,
bb
PAGE
BB
4 Display the selected file in full screen: ENTER, NX
5 To return to the [Photo] menu: BACK
BUTTON
Device Menu
USB-C Flash SetupCalendar
Media Menu
Movie
Music
Photo
File
Photo
1/2
DSC_0029.jpg 2007/11/22 12:00:00
PF391P-P-ABELLLW-ENG 11/19/07 4:39 PM Page 9

Playing a Movie file - more you can do
Options during playing a movie file
You can use various features during playing a movie file.
1. Press MENU to display the option menu during playback.
2. Use b VOLUME B and ENTER to select an option and execute it.
To return to the beginning of the current file. Press ENTER twice briefly
to play the previous movie file.
To play fast reverse during playback. To change the various playback
speed, press ENTER repeatedly.
To start playback.
To pause playback.
To play fast forward during playback. To change the various playback
speed, press ENTER repeatedly.
To play the next movie file.
To stop playback and returns to [Movie] menu.
To select a repeat mode (TRACK, ALL, OFF).
To enlarge the video image. Press ENTER repeatedly to select a zoom
mode or normal mode.
To switch on or off the clock display.
To adjust the brightness of the screen. Press ENTER and the bright-
ness control menu will appear, and use b VOLUME B to adjust the
brightness then press ENTER.
3. Use MENU to exit the option menu.
Movie file requirement
Movie file compatibility with this unit is limited as follows:
• Available resolution size: 720x576 (W x H) pixel.
• Bit rate: Less than 15 Mbps
• Movie file extensions: “.avi”, “.mpg”, “.mpeg”
• This unit does not support to display the subtitle of the movie file.
• Playable Codec format: “MPEG1”, “MPEG2”, “MJPEG”
• Playable Audio format: “MPEG1”, “MPEG2”, “MPEG3”, “PCM”
• “Not Support” will appear on the screen if the movie file is not playable.
• Maximum Files/Media: Less than 650 recommended
10
Playing a Movie file
1 Select a device on the [Device Menu]:
bb
VOLUME
BB
, ENTER
2 Select [Movie] on the [Media Menu]:
bb
VOLUME
BB
, ENTER
3 Select a movie file on the [Movie] menu:
bb
PAGE
BB
4 Start playback: ENTER, NX
5 To return to the [Movie] menu: BACK
BUTTON
Device Menu
USB-C Flash SetupCalendar
Media Menu
Movie
Music
Photo
File
Movie
Movie 1.avi
Movie 2.avi
Movie 3.avi
Movie 4.avi
Movie 5.avi
Movie 6.avi
Movie 7.avi
File Name Movie 1.avi
File Size 14MB
File Type AVI
PF391P-P-ABELLLW-ENG 11/19/07 4:39 PM Page 10

11
Playing a Music file - more you can do
Options during playing a music file
You can use various features during playing a music file.
1. Press MENU to display the option menu during playback.
2. Use b VOLUME B and ENTER to select an option and execute it.
To return to the beginning of the current file. Press ENTER twice briefly
to play the previous movie file.
To play fast reverse during playback. To change the various playback
speed, press ENTER repeatedly.
To start playback.
To pause playback.
To play fast forward during playback. To change the various playback
speed, press ENTER repeatedly.
To play the next music file.
To stop playback.
To select a repeat mode. (TRACK, ALL, OFF)
3. Use MENU to exit the option menu.
Music file requirement
• File extensions: “.mp3”
• Sampling frequency: 8 - 48 kHz (Layer 1, Layer 2, Layer 3, MPEG 2.5),
8 - 96 kHz (PCM)
• Bit rate: 32 - 448 kbps (Layer 1), 32 - 384 kbps (Layer 2),
32 - 320 kbps (Layer 3), 8 - 160 kbps (MPEG 2.5)
• Maximum Files/Media: Less than 650 recommended
Playing a Music file
1 Select a device on the [Device Menu]:
bb
VOLUME
BB
, ENTER
2 Select [Music] on the [Media Menu]:
bb
VOLUME
BB
, ENTER
3 Select a music file on the [Music] menu:
bb
PAGE
BB
4 Start playback: ENTER, NX
5 To return to the [Media Menu]: BACK
BUTTON
Device Menu
USB-C Flash SetupCalendar
Media Menu
Movie
Music
Photo
File
Music
Music 01.mp3
Music 02.mp3
Music 03.mp3
Music 04.mp3
Music 05.mp3
Music 06.mp3
Music 07.mp3
File Name Music 01.mp3
File Size 3MB
File Type MP3
PF391P-P-ABELLLW-ENG 11/19/07 4:39 PM Page 11

12
Using a File menu - more you can do
Using [File] menu
• You can view a list of folders and files in the current media.
• You can delete or copy a file(s) in the current media.
To display a list of subfolders and files
Use b PAGE B to select a folder then press ENTER. The list of the files and
subfolders within the folder. Press BACK to move to the upper folder.
To select multiple files on the [File] menu
You can select not only single file but also multiple files using
VOLUME B
button. Press VOLUME B at the desired files to select multiple files.
To delete a file(s) using the [File] menu
1. Select a file then press VOLUME B and “B” appear on the right of the file
name.
2. Repeat step 1 if you need to select multiple files.
3. Press ENTER and the option menu will appear.
4. Use b PAGE B to select [Delete>] option then press ENTER.
The confirm menu will appear.
5. Use b VOLUME B to select [Yes] then press ENTER and the file will be
deleted from the current media.
6.
When the deleting is completed,
press ENTER to finish.
To copy a file(s) from the current media to another media
1. Select a file then press VOLUME B and “B” appear on the right of the file
name.
2. Repeat step 1 if you need to select multiple files.
3. Press ENTER and the option menu will appear.
4. Use b PAGE B to select [Copy >] option then press ENTER.
5. Use b PAGE B to select a media that you would like to copy to.
The free space of the selected media will be displayed on the upper-right
side of the [File] menu.
6. Use b VOLUME B and b PAGE B to select a folder that you would like
to copy to.
- Press VOLUME B to move to a subfolder.
- Press b VOLUME to move to a upper folder.
7. Press ENTER. The files will be copied to the selected media or folder.
8.
When the copying is completed,
press ENTER to finish.
Using a File menu
1 Select a device on the [Device Menu]:
bb
VOLUME
BB
, ENTER
2 Select [File] on the [Media Menu]:
bb
VOLUME
BB
, ENTER
3 Select a file on the [File] menu:
bb
PAGE
BB
4 To return to the previous screen: BACK
BUTTON
Device Menu
USB-C Flash SetupCalendar
Media Menu
Movie
Music
Photo
File
File
D:/
Folder 1
Folder 2
Movie 02.mov
Music 04.mp3
Photo 07.jpg
Photo 09.jpg
Modify Date 22 / 11 / 2007
File type Folder
PF391P-P-ABELLLW-ENG 11/19/07 4:39 PM Page 12

13
Viewing the Calendar - more you can do
Using [Calendar] menu
• You can view the current time and date with slideshow.
• You can change the month and year using b VOLUME B and b PAGE B.
• You can view the alarm information.
Viewing the Calendar
1 Select [Calendar] on the [Device Menu]:
bb
VOLUME
BB
, ENTER
2 Select a month:
bb
VOLUME
BB
3 Select a year:
bb
PAGE
BB
4 To return to the [Device Menu] menu: BACK
BUTTON
Device Menu
USB-C Flash SetupCalendar
SUN MON TUE WED THU FRI SAT
PF391P-P-ABELLLW-ENG 11/19/07 4:39 PM Page 13

14
PC Connection (USB) - more you can do
Connecting a PC
Connect the unit to your PC using an optional USB cable. Upon connection:
• Your PC will automatically recognize any memory cards installed in the unit.
An icon representing your installed memory cards will appear as
“PF39 Memory” (Internal memory) and “Removable Disks” (External memory
card) when you open “My Computer”.
• It may take Windows several minutes to recognize and set up the device the
first time it is connected depending on your hardware configuration.
• Plug and Play Support: Windows 2000/ME/XP
• PC monitor image will appear on the screen when the unit is connected to
PC and you cannot use any buttons on the unit (Except
11
BAT. and P-SAVE
buttons).
Transferring Files
The USB 2.0 High-Speed connection makes it easy to transfer music, video, or
photo files (or any other data) quickly between the unit and PC.
Simply use the unit as you would a USB Flash Drive using basic operating sys-
tem commands.
Important Notice:
• If you need further assistance with transferring files, please refer to your
operating system’s instruction manual or on-screen help.
• Do not disconnect or otherwise interrupt the unit during transmission - this
could damage or corrupt the unit’s firmware or your files.
• If you want to format the internal memory of the unit using PC, you must
format it with FAT file system.
Double-click the “My Computer” icon on your desktop and then double-click the
“PF39 Memory” or “Removable Disks” icon that corresponds with the unit’s
internal or external memory card.
Drag your media files (or other files) to the “PF39 Memory” or “Removable
Disks”.
• You may choose to use folders/subfolders to organize your media and data.
Disconnecting from a PC
Disconnect the unit as instructed below to prevent data loss or file/firmware cor-
ruption.
1. Double-click the green arrow in the task bar located on the lower-right side
of the PC screen (Safely Remove Hardware).
2. Safely Remove Hardware: Select “USB Mass Storage Device” from the list
that appears and then click on “Stop”.
Stop a Hardware Device: Select “USB Mass Storage Device” from the list
that appears and then click on “OK”.
3. When the “Safe to Remove Hardware” window appears, click the OK button
and disconnect the USB cable from the unit and your PC.
PC Connection (USB)
1 Connect the unit and PC: –
2 Turn on the unit: 1 BAT.
3 Transfer Files: –
BUTTON
USB Cable
PF391P-P-ABELLLW-ENG 11/19/07 4:39 PM Page 14

15
Power Supply DC 12 V, 2 A
Power consumption 10 W
Operating time on battery: Approx. 1 hour
Set dimensions (W x H x D) 213 x 147 x 103.5 mm with stand
Net Weight 630g
Operating temperature 5˚C to 45˚C
Operating humidity 5 % to 90 %
Display Type 8” Wide (Full-Color TFT LCD)
Viewing area: 7.18”
Display Resolution 800 x 480 (WVGA)
Internal Memory Flash Memory (256MB*)
Memory Card Slot 1 slot for SD/MMC/MS Card
Interface USB 2.0 High-Speed (device)
Plug and Play Support Windows 2000/ME/XP
* The 21MB is assigned for the unit’s software.
Accessory
• AC Adapter (MPA-630)
• USB Adapter Cable
• USB Cable
• Detachable Stand
• 3 different changeable faceplate
Specifications
Troubleshooting
The power does not turned on.
b Ensure that the power cord has been properly connected to the power outlet.
The sound quality of the music is poor.
b Try playing the file on your PC. If the sound quality is still poor, try downloading the file
again or re-encoding the file yourself.
b Ensure that the bit rate of the file is not too low. The higher the bit rate of the file, the
better it will sound. Refer to “
Music file requirement”
on page 11.
Cannot transfer files to the unit from your PC.
b Ensure that your PC is running a supported operating system.
b Ensure that the USB cable is securely attached to the unit and the PC.
b If you have connected the unit through a USB hub, try connecting the unit directly to
your PC.
b Ensure that the capacity of the memory cards installed in the unit.
Cannot select a memory card.
b Ensure that a memory card has been installed.
b Ensure that the memory card is properly installed.
b Ensure that the memory card is not defective.
Cannot copy files to a target location.
b Ensure that the target media has enough memory to contain the file.
The unit will not play a music file.
b Ensure that the file is in a compatible format (MP3). Refer to “
Music file requirement”
on page 11.
The unit will not play a video file.
b Ensure that the video file is available on the unit. Refer to “
Movie file requirement”
on
page 10.
There is no sound.
b Ensure that the volume has been set to a reasonable level.
The unit has malfunctioned.
b Press 1 BAT. button to turn off the unit then turn the unit back on.
• Designs and specifications are subject to change without prior
notice.
PF391P-P-ABELLLW-ENG 11/19/07 4:39 PM Page 15

PF391P-P-ABELLLW-ENG 11/19/07 4:39 PM Page 16

PF391
P/NO : MFL42173806(R1)
DEUTSCH
PF391P-P-ABELLLW-GER 11/19/07 4:41 PM Page 1

2
VORSICHT: ZUR VERMEIDUNG VON STROMSCHLÄGEN DIE ABDECKUNG
(BZW. RÜCKWAND) NICHT ABNEHMEN. KEINE VOM BENUTZER ZU
WARTENDEN BAUTEILE IM INNERN. WARTUNGSARBEITEN NUR VON
FACHPERSONAL DURCHFÜHREN LASSEN.
Das Blitzsymbol innerhalb eines gleichseitigen Dreiecks warnt den Benutzer
vor nicht isolierter gefährlicher Spannung im Innern des Produktgehäuses, die
so stark sein kann, dass für Personen die Gefahr von Stromschlägen besteht.
Das Ausrufungszeichen innerhalb eines gleichseitigen Dreiecks weist den
Benutzer auf wichtige Anleitungen zu Betrieb und Wartung in der mit den
Gerät gelieferten Literatur hin.
ACHTUNG: ZUR VERMEIDUNG VON BRÄNDEN ODER STROMSCHLÄGEN DAS
GERÄT NIEMALS REGEN ODER FEUCHTIGKEIT AUSSETZEN.
ACHTUNG: Das Gerät nicht an einem beengten Ort einbauen, wie z. B. in einem
Bücherregal o.ä.
VORSICHT: Belüftungsöffnungen dürfen nicht verdeckt werden. Das Gerät muss
gemäß den Herstellerangaben aufgestellt werden. Schlitze und Öffnungen im
Gehäuse dienen zur Belüftung, gewährleisten einen ordnungsgemäßen Betrieb des
Produktes und schützen das Gerät vor Überhitzung. Die Öffnungen sollten niemals
verdeckt werden, indem das Produkt auf ein Bett, ein Sofa, einen Teppich oder eine
ähnliche Oberfläche gestellt wird. Dieses Produkt sollte nicht in einen eingelassenen
Bereich, wie z. B. einem Bücherschrank oder einem Regal, aufgestellt werden, falls
keine ordnungsgemäße Belüftung gewährleistet werden kann oder falls die
Richtlinien des Herstellers nicht befolgt werden können.
VORSICHT: Das Gerät sollte keinem Wasser ausgesetzt werden (Tropf- oder
Spritzwasser) und es sollten keine mit Flüssigkeiten gefüllte Behälter auf das Gerät
gestellt werden, wie z. B. Vasen.
VORSICHTSHINWEISE zum Netzkabel
Die meisten Geräte sollten an einen eigenen Stromkreis angeschlossen
werden.
D. h. eine einzelne Steckdose, an die ausschließlich das jeweilige Gerät
angeschlossen wird und die keine weiteren Steckdosen oder Zweigschaltkreise
besitzt. Beachten Sie hierzu die technischen Daten des Gerätes in diesem
Benutzerhandbuch. Steckdosen niemals überlasten. Überlastete, lockere oder
beschädigte Steckdosen, Verlängerungskabel, beschädigte Stromkabel oder rissige
Leitungsisolationen bergen Gefahren und können Stromschläge oder Brände
verursachen. In diesen Fällen besteht die Gefahr von Stromschlägen oder Bränden.
Überprüfen Sie regelmäßig die Kabel des Gerätes. Bei Schäden oder Verschleiß das
entsprechende Kabel abziehen, das Gerät nicht mehr verwenden und das Kabel von
einem zugelassenen Kundendienst durch ein gleichwertiges Kabel ersetzen lassen.
Vermeiden Sie eine unsachgemäße physikalische oder mechanische Nutzung des
Stromkabels, wie z. B. Verdrehen, Knicken, Zerstechen, Einklemmen in einer Tür
oder Darauftreten. Achten Sie besonders auf Stecker, Steckdosen und auf die
Punkte, an denen das Kabel aus dem Gerät heraustritt. Das Netzkabel beim
Abziehen immer am Netzstecker selbst festhalten. Achten Sie bei der Montage des
Gerätes darauf, dass der Netzstecker leicht zugänglich ist.
Entsorgung des Altgerätes
1. Falls an einem Produkt das Symbol eines durchgestrichenen
Abfallbehälters angebracht ist, unterliegt es der EU-Richtlinie 2002/96/EC.
2. Alle elektrischen und elektronischen Produkte sollten getrennt vom
Hausmüll bei einer Sammelstelle eines staatlichen oder lokalen
Entsorgungsunternehmens entsorgt werden.
3. Eine ordnungsgemäße Entsorgung des Altgerätes hilft bei der Vermeidung
von Umwelt- und Gesundheitsschäden.
4. Informationen zur Entsorgung Ihrer Altgeräte erhalten Sie bei Ihrer
Stadtverwaltung, Ihrem Entsorgungsunternehmen oder beim Händler, bei
dem Sie das Produkt erworben haben.
Dieses Produkt wurde gemäß den Anforderungen der EEC RICHTLINIEN
2004/108/EC und 2006/95/EC hergestellt.
Sicherheitshinweise
ACHTUNG
GEFAHR VON STROMSCHLÄGEN.
NICHT ÖFFNEN.
PF391P-P-ABELLLW-GER 11/19/07 4:41 PM Page 2

3
Inhalt
Sicherheitshinweise . . . . . . . . . . . . . . . . . . . . . . . . . . . . . . . . . . . . . . . . . . . .2
Inhalt . . . . . . . . . . . . . . . . . . . . . . . . . . . . . . . . . . . . . . . . . . . . . . . . . . . . . . .3
Funktionen . . . . . . . . . . . . . . . . . . . . . . . . . . . . . . . . . . . . . . . . . . . . . . . . . .3
Hauptgerät . . . . . . . . . . . . . . . . . . . . . . . . . . . . . . . . . . . . . . . . . . . . . . . . . .4
Erste Schritte . . . . . . . . . . . . . . . . . . . . . . . . . . . . . . . . . . . . . . . . . . . . . . . . .5
• Speicherkarte einsetzen/entfernen . . . . . . . . . . . . . . . . . . . . . . . . . . . . . .5
• USB-Gerät anschließen . . . . . . . . . . . . . . . . . . . . . . . . . . . . . . . . . . . . . .5
• Netzkabel anschließen . . . . . . . . . . . . . . . . . . . . . . . . . . . . . . . . . . . . . .6
• Gerät ein- und ausschalten . . . . . . . . . . . . . . . . . . . . . . . . . . . . . . . . . . .6
• Stromsparmodus . . . . . . . . . . . . . . . . . . . . . . . . . . . . . . . . . . . . . . . . . . .6
• Montage des Standfußes . . . . . . . . . . . . . . . . . . . . . . . . . . . . . . . . . . . .6
• Bedienungen im Gerätemenü . . . . . . . . . . . . . . . . . . . . . . . . . . . . . . . . .7
Einstellungen vornehmen . . . . . . . . . . . . . . . . . . . . . . . . . . . . . . . . . . . . . .7-8
Bilddateien anzeigen . . . . . . . . . . . . . . . . . . . . . . . . . . . . . . . . . . . . . . . . . . .9
Filmdateien wiedergeben . . . . . . . . . . . . . . . . . . . . . . . . . . . . . . . . . . . . . . .10
Musikdateien wiedergeben . . . . . . . . . . . . . . . . . . . . . . . . . . . . . . . . . . . . . .11
Bedienungen im Dateimenü . . . . . . . . . . . . . . . . . . . . . . . . . . . . . . . . . . . . .12
Kalender anzeigen . . . . . . . . . . . . . . . . . . . . . . . . . . . . . . . . . . . . . . . . . . . .13
PC-Anschluss (USB) . . . . . . . . . . . . . . . . . . . . . . . . . . . . . . . . . . . . . . . . . .14
Störungsbehebung . . . . . . . . . . . . . . . . . . . . . . . . . . . . . . . . . . . . . . . . . . . .15
Technische Daten . . . . . . . . . . . . . . . . . . . . . . . . . . . . . . . . . . . . . . . . . . . .15
Funktionen
• Lebendiges Bild:
Hochauflösende und originalgetreue Farbbilder über einen Breitbild-LCD-
Bildschirm.
• Effektiver Stromsparmodus:
Stromsparbetrieb nach einer Sekunde, Ausschalten nach 15 Sekunden usw.
• Tragbares Digital-Album:
Transportieren Sie Ihre Bilder mit Hilfe der integrierten Batterie
• Plugin-Betrachter:
Einfache Anzeige von Bildern über den Speicherkartensteckplatz oder den
USB-Anschluss
• Speicher für bis zu 2000 Bilder:
Im integrierten 256 MB Flash-Speicher können Sie bis zu 2000 Ihrer Bilder
speichern
• Digitaler Kalender und Wecker:
Für einfaches Eintragen Ihrer Termine nach Datum und Uhrzeit
• Bedienungsfreundlicher Bildbetrachter:
Moderne Benutzeroberfläche für den einfachen Zugriff auf gespeicherte
Daten
• Passende Dekorblenden
Drei austauschbare Oberschalen zum Einfügen in Ihre Inneneinrichtung
PF391P-P-ABELLLW-GER 11/19/07 4:41 PM Page 3

4
Hauptgerät
a LCD-Bildschirm
b Oberschale (austauschbar)
Die vier Ecken der Oberschale sind magnetisch, so dass die Schale
einfach angebracht und abgenommen werden kann.
c 1 BAT. (Netzschalter und Batterieanzeige)
Gerät ein- und ausschalten sowie Anzeige der Batterieladung.
Die Anzeige leuchtet beim Aufladen der Batterie rot.
Die Anzeige leuchtet bei voller Batterieladung grün.
d P-SAVE (Stromsparbetrieb)
Stromsparmodus aktivieren oder beenden.
e MENU
Einstellungsmenü ein- und ausblenden.
f b VOLUME B
Lautstärke des Gerätes einstellen. Halten Sie zum Einstellen der
Lautstärke die Taste VOLUME (b oder B) während der Wiedergabe eines
Films oder einer Musikdatei gedrückt. Drücken Sie zur Auswahl eines
Menüeintrages die Tasten Links und Rechts.
g b PAGE B
Halten Sie diese Tasten zwei Sekunden lang gedrückt, um in den Menüs
[Foto], [Film] oder [Musik] zur vorherigen/nächsten Seite zu wechseln.
Drücken Sie zur Auswahl eines Menüeintrages die Tasten Auf und Ab.
h ENTER
Option auswählen oder Funktion ausführen.
i ROTATE
Bild in der Vollbildansicht entgegen dem Uhrzeigersinn drehen.
j BACK
Zurück zum vorherigen Menü oder Bildschirm.
k NX
Wiedergabe starten. Zur Pause erneut drücken. Zur normalen Wiedergabe
nochmals drücken.
l USB-Anschluss
Anschluss des mitgelieferten USB-Adapterkabels zum Anschluss eines
USB-Gerätes.
m Speicherkartensteckplatz
Einschub für Speicherkarte (SD, MMC oder MS).
n DC 12V-Eingang
Anschluss des mitgelieferten Netzadapters.
cd e f
nml
b
a
g
h
i
j
k
PF391P-P-ABELLLW-GER 11/19/07 4:41 PM Page 4
La page est en cours de chargement...
La page est en cours de chargement...
La page est en cours de chargement...
La page est en cours de chargement...
La page est en cours de chargement...
La page est en cours de chargement...
La page est en cours de chargement...
La page est en cours de chargement...
La page est en cours de chargement...
La page est en cours de chargement...
La page est en cours de chargement...
La page est en cours de chargement...
La page est en cours de chargement...
La page est en cours de chargement...
La page est en cours de chargement...
La page est en cours de chargement...
La page est en cours de chargement...
La page est en cours de chargement...
La page est en cours de chargement...
La page est en cours de chargement...
La page est en cours de chargement...
La page est en cours de chargement...
La page est en cours de chargement...
La page est en cours de chargement...
La page est en cours de chargement...
La page est en cours de chargement...
La page est en cours de chargement...
La page est en cours de chargement...
La page est en cours de chargement...
La page est en cours de chargement...
La page est en cours de chargement...
La page est en cours de chargement...
La page est en cours de chargement...
La page est en cours de chargement...
La page est en cours de chargement...
La page est en cours de chargement...
La page est en cours de chargement...
La page est en cours de chargement...
La page est en cours de chargement...
La page est en cours de chargement...
La page est en cours de chargement...
La page est en cours de chargement...
La page est en cours de chargement...
La page est en cours de chargement...
-
 1
1
-
 2
2
-
 3
3
-
 4
4
-
 5
5
-
 6
6
-
 7
7
-
 8
8
-
 9
9
-
 10
10
-
 11
11
-
 12
12
-
 13
13
-
 14
14
-
 15
15
-
 16
16
-
 17
17
-
 18
18
-
 19
19
-
 20
20
-
 21
21
-
 22
22
-
 23
23
-
 24
24
-
 25
25
-
 26
26
-
 27
27
-
 28
28
-
 29
29
-
 30
30
-
 31
31
-
 32
32
-
 33
33
-
 34
34
-
 35
35
-
 36
36
-
 37
37
-
 38
38
-
 39
39
-
 40
40
-
 41
41
-
 42
42
-
 43
43
-
 44
44
-
 45
45
-
 46
46
-
 47
47
-
 48
48
-
 49
49
-
 50
50
-
 51
51
-
 52
52
-
 53
53
-
 54
54
-
 55
55
-
 56
56
-
 57
57
-
 58
58
-
 59
59
-
 60
60
-
 61
61
-
 62
62
-
 63
63
-
 64
64


LG PF 391 Le manuel du propriétaire
- Catégorie
- Cadres photo numériques
- Taper
- Le manuel du propriétaire
dans d''autres langues
- English: LG PF 391 Owner's manual
- Deutsch: LG PF 391 Bedienungsanleitung
- Nederlands: LG PF 391 de handleiding
Documents connexes
Autres documents
-
Palsonic DPF7128 Le manuel du propriétaire
-
Lenco DF-1520 Le manuel du propriétaire
-
Insignia Digital Photo Frame NS-DPF10A Manuel utilisateur
-
Pandigital PAN7000DWFR Manuel utilisateur
-
Impecca DFM1043 Mode d'emploi
-
-
-
ViewSonic DF88W Manuel utilisateur
-
Hama 00118564 Le manuel du propriétaire
-