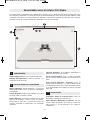
Dremel 3D40 Idea Builder Mode d'emploi
- Catégorie
- Imprimantes 3D
- Taper
- Mode d'emploi
Ce manuel convient également à

1-844-4DRML3D (1-844-437-6533) www.dremel.com
P.O. Box 081126 Racine, WI 53408-1126
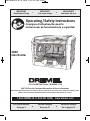
3D40
Idea Builder
Operating/Safety Instructions
Consignes d’utilisation/de sécurité
Instrucciones de funcionamiento y seguridad
For English Version
See page 2
Version française
Voir page 37
Versión en español
Ver la página 73
IMPORTANT
Read Before Using
IMPORTANT
Lire avant usage
IMPORTANTE
Leer antes de usar
Call Toll Free for Consumer Information & Service Locations
Pour obtenir des informations et les adresses de nos centres de service après-vente, appelez ce numéro gratuit
Llame gratis para obtener información para el consumidor y ubicaciones de servicio
DM 2610039151 01-16_3D40 1/7/16 9:33 AM Page 1

2
Safety Symbols....................................................................................2
General Safety Warnings..................................................................3-5
Additional Safety Warnings..................................................................5
Symbols ...............................................................................................5
Dremel Remote and Mobile Services ..................................................5
FCC Compliance .................................................................................6
Information on Intellectual Property .....................................................6
Specifications.......................................................................................7
Resources............................................................................................8
Glossary of Terms.............................................................................8-9
Introduction ........................................................................................10
Kit Contents .......................................................................................10
Unpacking ..........................................................................................11
Getting To Know Your Dremel 3D40.............................................12,13
Touch Screen................................................................................14-20
Initial Setup ........................................................................................21
Getting Started with Your Dremel 3D App .........................................22
Print Studio Software Overview .........................................................23
Getting Ready to Build..................................................................24-28
Building.........................................................................................29-30
Removing Your Object .......................................................................31
Maintenance ......................................................................................32
Troubleshooting .................................................................................33
Best Practices....................................................................................34
Dremel
®
Consumer Limited Warranty ................................................35
Table of Contents
Safety Symbols
The definitions below describe the level of severity for each signal word. Please read the
manual and pay attention to these symbols.
!
This is the safety alert symbol. It is used to alert you to potential
personal injury hazards. Obey all safety messages that follow this
symbol to avoid possible injury or death.
DANGER indicates a hazardous situation which, if not avoided, will
result in death or serious injury.
WARNING indicates a hazardous situation which, if not avoided, will
result in death or serious injury.
CAUTION, used with the safety alert symbol, indicates a hazardous
situation which, if not avoided, will result in minor or moderate injury.
DM 2610039151 01-16_3D40 1/7/16 9:33 AM Page 2

3
Work Area Safety
Keep work area clean and well lit. Cluttered
or dark areas invite accidents.
Do not operate Dremel 3D40 in the
presence of flammable liquids, gases or
dust. Dremel 3D40 creates high
temperatures which may ignite the dust or
fumes.
Store idle 3D40 out of reach of children
and other untrained persons. Injury can
occur in hands of untrained users.
Electrical Safety
Always use the Dremel 3D40 with a
properly grounded outlet. Do not modify
Dremel 3D40 plug. Improper grounding and
modified plugs increase risk of electric shock.
Do not use Dremel 3D40 in damp or wet
locations. Do not expose Dremel 3D40 to
rain. Presence of moisture increases risk of
electric shock.
Do not abuse the cord. Never use the cord
for pulling or unplugging the Dremel 3D40.
Keep cord away from heat, oil, sharp
edges or moving parts. Damaged or
entangled cords increase the risk of electric
shock.
Avoid using this product during an
electric storm. There may be a remote risk
of a power surge from lightning that may
result in electric shock hazard.
In case of emergency unplug Dremel 3D40
from outlet.
Personal Safety
Stay alert, watch what you are doing and
use common sense when operating a
Dremel 3D40. Do not use Dremel 3D40
while you are tired or under the influence
of drugs, alcohol or medication. A moment
of inattention while operating Dremel 3D40
may result in personal injury.
Use personal protective equipment. The
use of protective equipment such as heat
resistant gloves and safety glasses will
reduce the risk of personal injuries.
Dress properly. Do not wear loose clothing
or jewelry. Keep your hair, clothing and
gloves away from moving parts. Loose
clothes, jewelry or long hair can be caught in
moving parts.
Dremel 3D40 Use and Care
Before every use check Dremel 3D40 for
misalignment or binding of moving parts,
breakage of parts and any other condition
that may affect the Dremel 3D40’s
operation. If damage is suspected have
the Dremel 3D40 repaired by authorized
Dremel service center before use. Use of
Dremel 3D40 when damaged may result in
poor quality of object creation, further
equipment damage, property damage or
personal injury.
Do not touch the extruder tip during
Dremel 3D40 operation or until it has
cooled down to at least 60°C (140°F).
Contact with the extruder tip during or after
operation before tip has cooled may result in
personal injury.
Set up the Dremel 3D40 in a well-ventilated
area. Place Dremel 3D40 printer on flat
nonflammable surface and away from
flammable materal. Provide at least 8
inches of unobstructed spacing around
Dremel 3D40. Dremel 3D40 melts plastic
during building. Plastic odors emitted during
Dremel 3D40 operation may irritate eyes and
airways. Locating Dremel 3D40 close to
surrounding objects prevents proper
ventilation.
Do not reach inside the Dremel 3D40 while
it is in operation. Contact with Dremel 3D40
moving parts during operation may result in
poor build quality, equipment damage or
personal injury.
Always monitor the Dremel 3D40 during
operation. Use of Dremel 3D40 by persons
unfamiliar with these warnings and
instructions may result in equipment or
property damage and personal injury.
Read all instructions in this manual and familiarize yourself with the
Dremel 3D40 before setup and use. Failure to comply with the warnings
and instructions may result in fire, equipment damage, property damage, or personal
injury.
READ ALL INSTRUCTIONS
SAVE ALL WARNINGS AND INSTRUCTIONS FOR FUTURE REFERENCE
!
WARNING
General Safety Warnings
DM 2610039151 01-16_3D40 1/7/16 9:33 AM Page 3

4
Use only DREMEL filament. Use of filament
n
ot authorized by Dremel may result in
equipment and property damage.
Ensure small objects created by Dremel
3D40 are not accessible to young children.
Small objects are potential choking hazards
for young children.
Do not create illegal or inappropriate
objects using Dremel 3D40.
Do not use Dremel 3D40 to create objects
intended for use with candles, liquid fuels,
and other heat sources. Plastic may melt
when exposed to fire or other heat sources.
Such use of objects created by Dremel 3D40
may result in fire, property damage and
personal injury.
Do not use Dremel 3D40 to create objects
intended for food or drink applications
such as preparation, decoration, storage,
or consumption. Such use of objects
created by Dremel 3D40 may result in illness
or personal injury.
Do not use Dremel 3D40 to create objects
intended with use with electrical
components or housings of electrical
components. PLA plastic is not suitable for
electrical applications. Such use of objects
created by Dremel 3D40 may result in
property damage and personal injury.
Do not put plastic objects in or around
your mouth. PLA plastic is not suitable for
food or drink preparation and food utensils.
Such use of objects created by Dremel 3D40
may result in illness or personal injury.
Do not use Dremel 3D40 to create objects
intended for chemical storage. PLA plastic
is not suitable for chemical storage. Such use
of objects created by Dremel 3D40 may result
in property damage and personal injury.
Do not modify Dremel 3D40 or alter factory
settings. Modifications may result in
equipment and property damage, and
personal injury.
Do not expose Dremel 3D40 to
temperatures exceeding 70°C (158°F).
Dremel 3D40 may become damaged.
Dremel 3D40 is intended to operate in
temperature between 16-29° C (60 - 85° F).
Do not move or bump Dremel 3D40 or the
extruder during operation. The object may
build incorrectly.
Do not change filament spool unless the
building process is completed, stopped,
or paused. Changing the filament during
building will cancel the object and may
d
amage the extruder.
Do not pull the filament out. Doing so may
damage the extruder.
Use extra care not to damage the extruder
tip when clearing debris. Dremel 3D40 will
not work properly with damaged extruder tip
and will require replacement.
Before every build make sure that the
build platform is covered with Dremel
specified build tape. Use of improper build
tape may result in equipment damage and
poor object build quality.
Be aware of your body position when
using hand tools to remove objects from
the build platform. Sudden tool slip and
improper body position during object removal
from the build platform may result in personal
injury.
Avoid scratching the build platform when
removing objects. Scratches in the build
platform will result in improper object creation.
Do not drop the build platform. Tempered
glass plate may break and result in personal
injury.
Do not remove tempered glass plate from
plastic holder. Contact with tempered glass
plate edge may result in personal injury.
Do not twist or bend the build platform
while removing objects. Tempered glass
plate may separate from plastic holder and
result in personal injury.
Dremel is not responsible for structural
integrity or utility of objects created using
Dremel 3D40. Structural models created by
inexperienced designers may result in
property damage and personal injury.
Service
Always unplug Dremel 3D40 from its
power before performing any service
procedures. Failure to do so may result in
personal injury and equipment damage.
Have your Dremel 3D40 serviced only by
an authorized Dremel service center using
only Dremel replacement parts. This will
ensure that proper operation and safety of
Dremel 3D40 is maintained.
Use only Dremel approved materials and
components. Use of filament or 3D objects
other than Dremel
®
approved filament and
genuine Dremel
®
components may void
warranty.
DM 2610039151 01-16_3D40 1/7/16 9:33 AM Page 4

5
This product may contain or discharge chemicals known to the State of
California to cause cancer and birth defects or other reproductive harm.
!
WARNING
Additional Safety Warnings
SAVE THESE INSTRUCTIONS
Dremel remote and mobile services provide you
with information and services regarding your
Dremel 3D products. The type of information
provided by Dremel remote and mobile services
may change from time to time. All product
information and services are provided for your
convenience, “As is” and “As Available”.
Dremel does not guarantee that the information
or services will be available, accurate, or
reliable, or that product information or services
will provide safety in your home. You use all
product information, services, and products at
your discretion and risk. The product
information and services are not intended as a
substitute for direct means of obtaining
information.
Network connectivity requires an access point
and high speed internet connection. Internet
service provider charges may apply.
Mobile printing requires a compatible mobile
device and data plan. Carrier charges may
apply.
Dremel Remote and Mobile Services
Symbols
IMPORTANT: Some of the following symbols may be used on your 3D40. Please study them
and learn their meaning. Proper interpretation of these symbols will allow you to operate the
tool better and safer.
Symbol Designation / Explanation
V Volts (voltage)
A Amperes (current)
Hz Hertz (frequency, cycles per second)
ø
Diameter
0 Off position
Alternating current (type or a characteristic of current)
Hot surface hazard symbol. Contact may cause burn. Allow to cool before
servicing.
Alerts user to read manual.
This symbol designates that this tool is listed by Underwriters Laboratories,
to United States and Canadian Standards.
DM 2610039151 01-16_3D40 1/7/16 9:33 AM Page 5

6
FCC COMPLIANCE
NOTE: This equipment has been tested and
found to comply with the limits for a Class B
digital device, pursuant to Part 15 of the FCC
Rules. These limits are designed to provide
reasonable protection against harmful
interference in a residential installation. This
equipment generates, uses, and can radiate
radio frequency energy and, if not installed
and used in accordance with the instructions,
may cause harmful interference to radio
communications. However, there is no
guarantee that interference will not occur in a
particular installation. If this equipment does
cause harmful interference to radio or
television reception, which can be
determined by turning the equipment off and
on, the user is encouraged to try to correct
the interference by one or more of the
following measures:
• Reorient or relocate the receiving antenna.
• Increase the separation between the
equipment and receiver.
• Connect the equipment into an outlet on a
circuit different from that to which the
receiver is connected.
• Consult the dealer or an experienced
radio/TV technician for help.
Changes and Modifications not expressly
approved by the manufacturer or registrant of
this equipment can void your authority to
operate this equipment under Federal
Communications Commission’s rules.
INDUSTRY CANADA (IC)
This device complies with Industry Canada’s
licence-exempt RSSs. Operation is subject to
the following two conditions:
(1) This device may not cause interference;
and
(2) This device must accept any interference,
including interference that may cause
undesired operation of the device.
The device meets the exemption from the
routine evaluation limits in section 2.5 of RSS
102 and compliance with RSS-102 RF
exposure, users can obtain Canadian
information on RF exposure and compliance.
FCC and IC Compliance
Information on Intellectual Property
The Dremel 3D40 is intended for 3D printing
objects from digital files that you create or
own, or have the right to print using the
Dremel 3D40. When making objects using
the Dremel 3D40, it is your responsibility to
ensure that you do not infringe any third
party intellectual property rights or violate
any applicable laws or regulations, such as
U.S. or foreign intellectual property laws.
The Dremel 3D40 may not be used to make
objects protected by intellectual property
rights owned by third parties without such
third parties’ permission. Using the Dremel
3D40 to do any of the following may require
the permission of third parties: to make a
duplicate or facsimile (in whole or in part) of
any object not created by you, to make an
object from a digital file you do not own, or to
make an object from a scan of a physical
object that you did not create. It is your
responsibility to obtain such permission. In
some cases, you may not be able to obtain
such permission. Where such permission
cannot be obtained, you should not 3D print
such object, or you do so at your own risk.
You may not modify, reverse engineer,
decompile, or disassemble the Dremel 3D40
or its software or firmware, except as
permitted by applicable law.
If you use the Dremel 3D40 in any way other
than as recommended and described in
these Operating/Safety Instructions, you do
so at your own risk. Using the Dremel 3D40
to make objects that infringe any intellectual
property rights owned by third parties could
result in civil or criminal prosecution and
penalties, and you could be liable for money
damages, fines, or imprisonment.
DM 2610039151 01-16_3D40 1/7/16 9:33 AM Page 6

7
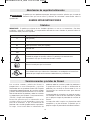
Specifications
BUILDING
Extruder: Single extrusion
E
xtruder temperature: Up to 230°C (397°F)
Operating Interface: 3.5” full color IPS touch
screen
Maximum Build Volume: 10” x 6” x 6.7”
(255mm x 155mm x 170mm)
Layer Thickness: 4 mil | 0.004 inches 100
microns | 0.10 mm
Filament Colors: See Dremel3D.com for
color choices
Internal Storage: 4GB
External Storage: USB Flash Drive
WEIGHT & DIMENSIONS
Weight (without spool): 16kg (35lbs)
Dimensions: 20.25” x 16” x 15.9” (515mm x
406mm x 394mm)
FILAMENT
ONLY works with Dremel 1.75mm filament
FILAMENT STORAGE
All polymers degrade with time. Do not
unpack until filament is needed. Filament
should be stored at room temperature:
16-29° C (60-85° F) and in dry conditions.
SOFTWARE
Dremel 3D40 comes with complimentary
Autodesk Print Studio software for Windows
and Mac OSX. This application converts your
3D digital files into buildable files.
SUPPORTED OPERATING SYSTEMS
• Apple
®
Mac
®
OS
®
X v10.9 or later
(
Mavericks)
• Microsoft
®
Windows
®
8.1
• Microsoft
®
Windows
®
7 SP1
MINIMUM SYSTEM SPECIFICATIONS
• CPU: 64-bit processor (32-bit not
supported)
• Memory: 3 GB RAM (4 GB or more
recommended)
• Disk space: ~2 GB free disk space for
installation
• Display card: 1,024 MB GDDR RAM or
more. Microsoft
®
Direct3D
®
11 capable
graphics card or higher
• Pointing device: Three-button mouse
ELECTRICAL REQUIREMENTS
3D40 input rating: 100-240V, 47-60Hz,
0.8A-1.8A
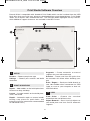
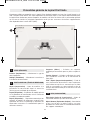
OPERATING ENVIRONMENT
Room Temperature: 16-29° C (60 - 85° F)
Level workspace
Dry workspace environment
16” (406mm)
20.25” (515mm) 15.5” (394mm)
WALL
8” (203mm)
8” (203mm)8” (203mm)
14” (356mm)
DM 2610039151 01-16_3D40 1/7/16 9:33 AM Page 7

8
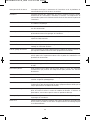
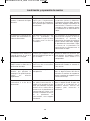
Glossary of Terms
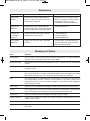
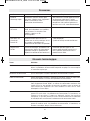
Resources
Resource Description Location
Quick Start
Guide
Provides illustrated walkthrough of
how to un-box your 3D40 and start
building out of the box.
Printed version of the Quick Start
Guide is located in the rectangular
component carton. It is also
available on www.dremel3d.com
Dremel 3D
Website
Provides the latest 3D40 software,
product information, customer support,
and 3D model and project downloads.
www.dremel3d.com
Dremel 3D
Customer
Support
Contact Dremel for product support,
maintenance, and service.
1-844-4DRML3D
(1-844-437-6533)
www.dremel3d.com
Print Studio
Software
Allows you to upload, edit, and build
3D files.
Installed from www.dremel3d.com
or from USB flash drive provided
with the Dremel 3D40.
Term Definition
Build Platform The flat surface used by your Dremel 3D40 to build objects. The build platform is
comprised of a tempered glass plate with a plastic holder.
Build Platform Clip Clip located at the front of the build platform base that is used to secure the build platform
in place.
Build Tape Adhesive tape that improves the consistency of your objects and helps them stick to the
build plate surface.
Build Volume The three dimensional (3D) amount of space that an object will use once it is completed.
Your Dremel 3D40 has a maximum build volume which means that objects with a larger
build volume cannot be built unless they are resized or broken into sub-objects.
Door Your Dremel 3D40 has a door located on the front panel. This allows for easy access to
the build platform, extruder, filament, and your objects. This door is made with a
transparent material so you can monitor the progress of your objects while keeping the
build environment stable.
Ethernet Port A local area wired networking technology that allow electronic devices to communicate.
Extruder An assembly that uses gears to pull filament through the extruder intake, heat the filament
to the build temperature, and push the heated filament out of the extruder tip.
Extruder Fan A fan used to cool the outer assembly of the extruder and gear motor.
Extruder Fan Baffle A plastic piece that directs air from the extruder fan onto the build platform to assist in
cooling the active build.
Extruder Intake An opening located at the top of the extruder where filament is inserted for building.
Extruder Lever A lever located on the side of the extruder that is used to loosen the grip of the extruder
gear motor.
DM 2610039151 01-16_3D40 1/7/16 9:33 AM Page 8

9
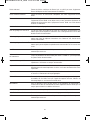
Extruder Tip A nozzle located at the bottom of the extruder where heated filament is forced out for
building.
Filament A threadlike strand of plastic material.
Filament Guide Tube A plastic piece that guides the filament from the filament spool through a passage in
the outer housing of your Dremel 3D40.
Filament Jam Sensor A sensor in the extruder that pauses your printer if filament stops extruding properly.
Filament Runout Sensor A sensor in the extruder intake that pauses your printer if it runs out of filament
during a build.
Filament Spool A cylindrical piece on which a long strand of filament is wound for storage and
continuous use.
.G3Drem/.G4Drem A buildable file format compatible with your Dremel 3D40.
Leveling Knobs Knobs located under the build platform base that are used to create proper spacing
between the extruder tip and the build platform.
Leveling Sensor A sensor that detects the height of the build platform and assists in proper leveling.
Lid Your Dremel 3D40 has a pivoting lid on the top. This allows for more access to the
build platform, extruder, filament, and objects when necessary.
Needle Nose Pliers Common tool used to hold small objects and to grab excess material that may be too
hot to touch directly.
OBJ File A common digital file format used in a wide range of 3D model software. This file is
created in 3rd party 3D software or downloaded from Dremel3D.com.
Object Removal Tool A tool used to separate your objects from the build platform.
PLA A bioplastic derived from renewable resources such as corn starch.
Spool Holder A plastic piece located to the left of the build platform inside your Dremel 3D40 build
area that is designed to hold a filament spool.
Spool Door A removable door which locks the filament spool to the spool holder.
Stepper Motor A brushless DC electric motor used to drive the guide rails and extruder gears.
.STL File A common digital file format used in a wide range of 3D model software. This file is
created in 3rd party 3D software or downloaded from Dremel3D.com.
Touch Screen Full color display that is touch activated. It allows you to monitor your Dremel 3D40
and objects while also providing commands directly to your Dremel 3D40 without the
use of a computer.
USB Flash Drive A portable memory card used on a wide array of devices.
WIFI A local area wireless networking technology that allow electronic devices to
communicate.
X-Axis Guide Rails A set of rails on either side of the extruder that allow a stepper motor to move the
extruder to the left or right side of the build area.
Y-Axis Guide Rails A set of rails on either side of the build area that allow a stepper motor to move the
extruder to the front or back of the build area.
Z-Axis Guide Rails A set of rails located at the back of the build area that allow a stepper motor to move
the build platform up or down.
DM 2610039151 01-16_3D40 1/7/16 9:33 AM Page 9

10
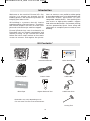
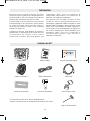
Kit Contents*
Introduction
Welcome to the world of Dremel 3D. Our
mission is to mentor you through the 3D
b
uilding process and share best practices for
bringing your ideas to life.
3D building is a process that will involve
experimentation and persistence. Thankfully,
the Dremel experts are here to make your
job easier with online tips and live support.
Dremel 3D40 brings new functionality to
Dremel3D such as network connectivity and
remote printing. To get started with 3D40
follow the initial setup routine on the touch
screen to connect and register the printer.
You can create a user profile by either going
to www.dremel3d.com or by downloading the
D
remel3D mobile application on your
compatible mobile device. Your profile gives
you access to high-quality models, support
and software downloads, and remote printing
services powered by Spark. Once setup and
registration is complete you are ready to start
building.
1
-
8
4
4
-
4
D
R
M
L
3
D
(
1
-
8
4
4
-
4
3
7
-
6
5
3
3
)
w
w
w
.
d
r
e
m
e
l
.
c
o
m
P
.
O
.
B
ox
081126
R
ac
i
ne,
W
I
53408-
1126
3
D
4
0
I
d
e
a
B
u
i
l
d
e
r
O
pe
r
a
t
in
g
/
S
a
f
e
t
y
I
n
st
r
uc
t
io
n
s
C
o
n
s
i
gn
e
s
d
’
u
t
i
l
i
s
a
t
i
o
n
/
d
e
s
é
c
u
r
i
t
é
I
n
s
t
r
u
c
c
i
o
n
e
s
d
e
fu
n
c
i
o
n
a
m
i
e
n
t
o
y
s
e
gu
r
i
d
a
d
For
Engl
i
s
h
V
er
s
i
on
S
ee
page
2
V
er
s
i
on
f
r
anç
ai
s
e
V
oi
r
page
16
V
er
s
i
ón
en
es
pañol
V
er
l
a
pági
na
30
I
M
P
O
R
T
A
N
T
R
ead
B
ef
or
e
U
s
i
ng
I
M
P
O
R
T
A
N
T
Li
r
e
av
ant
us
age
I
M
P
O
R
T
A
N
TE
Leer
ant
es
de
us
ar
C
a
l
l
T
o
l
l
F
r
e
e
f
o
r
C
o
n
s
u
me
r
I
n
f
o
r
ma
tio
n
&
S
e
r
v
ic
e
L
o
c
a
tio
n
s
Po
u
r
o
b
t
e
n
i
r
d
e
s
i
n
f
o
r
m
a
t
i
o
n
s
e
t
l
e
s
a
d
r
e
s
s
e
s
d
e
n
o
s
c
e
n
t
r
e
s
d
e
s
e
r
v
i
c
e
a
p
r
è
s
-
v
e
n
t
e
,
a
p
p
e
l
e
z
c
e
n
u
m
é
r
o
g
r
a
t
u
i
t
Ll
a
m
e
g
r
a
t
i
s
p
a
r
a
o
b
t
e
n
e
r
i
n
f
o
r
m
a
c
i
ó
n
p
a
r
a
e
l
c
o
n
su
m
i
d
o
r
y
u
b
i
c
a
c
i
o
n
e
s
d
e
se
r
v
i
c
i
o
3
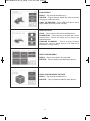
D40 Quick Start Guide
WARNINGWARNING
R
EAD ALL OPERATING/SAFETY INSTRUCTIONS IN THE MANUAL AND FAMILIARIZE YOURSELF WITH THE
D
REMEL 3D20 BEFORE SETUP AND USE. FAILURE TO COMPLY WITH THE WARNINGS AND INSTRUCTIONS
M
AY RESULT IN FIRE, EQUIPMENT DAMAGE, PROPERTY DAMAGE, OR PERSONAL INJURY.
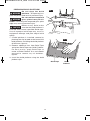
Dremel 3D40 Instruction Manual Quick Start Guide
Filament Spool** Power Cable USB Cable
Build Tape Object Removal Tool USB Flash Drive
Unclog Tool
*Quantities may vary depending on kit.
**Do not store in moist or hot environment.
DM 2610039151 01-16_3D40 1/7/16 9:33 AM Page 10

11
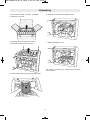
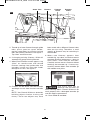
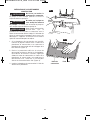
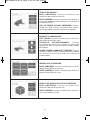
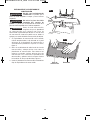
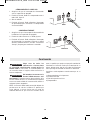
1. Place box on table, cut tape, and open.
2. Remove top insert.
3. Remove 3D40 and place on table.
4. Open lid and remove top insert.
5. Raise build plate by lifting from both sides.
6. Open door and remove middle insert.
7. Remove bottom insert.
Tip: Keep packaging for future transportation
and storage.
Unpacking
DM 2610039151 01-16_3D40 1/7/16 9:33 AM Page 11

12
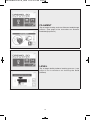
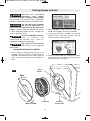
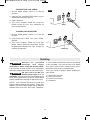
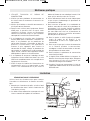
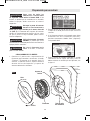
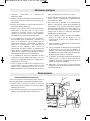
Getting To Know Your 3D40
1. Lid
2. Extruder
3. Z-Axis Guide rail
4. Door
5. Gripping Handles
6. USB A Port
7. Leveling Knobs
8. Build Platform Clip
9. Touch Screen
10. Build Platform
11. Filament Spool Holder
12. Filament Spool
13. Y-Axis Guide Rail
14. Stepper motor
15. Filament Guide Tube
16. Extruder Lever
17. Filament Guide Clip
18. Extruder Intake
19. Extruder Fan
20. Ribbon Cable
21. X-Axis Guide Rail
22. Leveling Sensor
23. Extruder Tip
24. Power Switch
25. USB B Port
26. Ethernet Port
27. Nameplate
28. Power Input
1
4
9
6
12
10
2
11
5
8
7
3
DM 2610039151 01-16_3D40 1/7/16 9:33 AM Page 12

13
M
o
d
e
l
3
D
4
0
F
0
1
3
3
D
4
0
0
0
1
0
0
V
–
2
4
0
V
~
4
7
–
6
3
H
z
0
.
8
–
1
.
8
A
Ø
1
.
7
5
m
m
(
0
.
0
6
9
"
)
L
I
S
T
E
D
3
D
P
R
I
N
T
E
R
E
4
6
9
3
1
1
1
U
1
S
N
K
O
N
I
J
N
E
N
B
E
R
G
6
0
,
4
8
2
5
B
D
B
R
E
D
A
-
N
L
M
M
/
Y
Y
Y
Y
X
X
X
X
X
X
X
X
X
D
r
e
m
e
l
M
o
u
n
t
P
r
o
s
p
e
c
t
,
I
L
M
a
d
e
i
n
C
h
i
n
a
14 15 16 20
21
23
24 25 26 28
22
19
27
13
17
18
DM 2610039151 01-16_3D40 1/7/16 9:33 AM Page 13

14
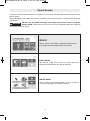
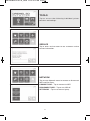
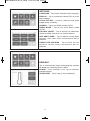
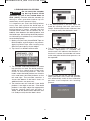
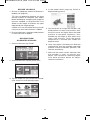
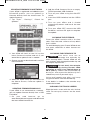
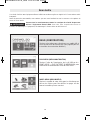
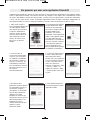
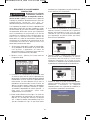
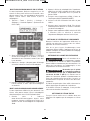
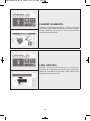
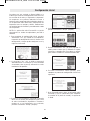
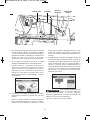
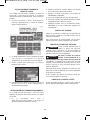
Touch Screen
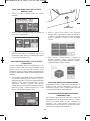
Using your Dremel 3D40 without a computer is easy with the onboard software and full color
touch screen.
Before building your model we want to familiarize you with the touch screen menu structure
and options.
Observe all provided warnings and safety instructions when using the
Dremel 3D40. Failure to do so may result in fire, equipment damage, property
damage or personal injury.
!
WARNING
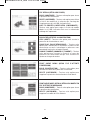
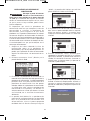
BUILD
Tap to select a 3D model and begin build process.
(see page 28 for detailed build instructions)
BUILD MENU
Tap Printer, USB Flash Drive, or Print Queue to
choose the destination of your desired file.
MODEL MENU
Tap to select the desired model or use arrows to
scroll through pages to find your model.
DM 2610039151 01-16_3D40 1/7/16 9:33 AM Page 14

15
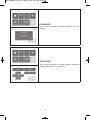
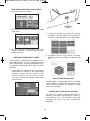
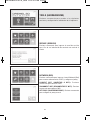
FILE DETAILS
BUILD – Tap to begin build process.
DELETE – Tap to remove model file from on-printer
storage or USB flash drive.
COPY TO PRINTER – From USB flash drive, tap to
copy model file to on-printer storage.
BUILD STATUS
STOP – Tap to cancel the current build process.
PAUSE/PLAY – Tap to pause or resume the current
build process. Pause will allow you to access the
filament button.
CHANGE FILAMENT – Tap to change filament
during the current build process to add more
filament or change colors.
PRINT QUEUE MENU
BUILD – Tap to view details of next build.
DELETE – Tap to remove next build from queue.
PRINT QUEUE MODEL DETAILS
BUILD – Tap to begin build process.
DELETE – Tap to remove model file from queue.
DM 2610039151 01-16_3D40 1/7/16 9:33 AM Page 15

16
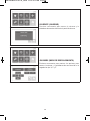
FILAMENT
Tap to begin heating and start filament load/change
process. (See page 24 for instructions on filament
load/change process)
LEVEL
Tap to begin build platform leveling process. (see
page 27 for instructions on leveling the build
platform)
DM 2610039151 01-16_3D40 1/7/16 9:33 AM Page 16

17
TOOLS
Tap to access the following individual printer
functions and settings.
SERVICE
Tap to enter service menu to see customer service
contact information.
NETWORK
Tap to enter Network menu to connect or disconnect
WiFi and Set Proxy.
CONNECT WIFI – Tap to connect to WiFi.
DISCONNECT WIFI – Tap to turn Wifi off.
SET PROXY – Tap to set manual proxy.
DM 2610039151 01-16_3D40 1/7/16 9:33 AM Page 17

18
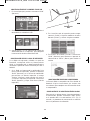
JOG MODE
Tap to display options to move extruder and build
platform along the X, Y, and Z-axis.
CALIBRATE
Tap to move extruder and build platform to zero
position.
DM 2610039151 01-16_3D40 1/7/16 9:33 AM Page 18

19
SETTINGS
LANGUAGE – Tap to pick alternate menu language.
DISPLAY – Tap to customize cabinet LEDs or main
menu hotkeys.
Z-AXIS OFFSET – Used to calibrate build plate
height during assembly.
SOUNDS – Tap to turn 3D40 sounds On/Off.
DEMO MODE – Tap to turn retail demo mode
On/Off.
FACTORY RESET – Tap to remove all information
stored on 3D40 and return it to factory defaults.
GET NEW TOKEN – Tap to release current token
and get a new token when connected to Wifi or
Ethernet.
CHECK FOR UPDATES – Tap to check for new
firmware version when connected to Wifi or
Ethernet.
PREHEAT
Tap to automatically begin preheating the extruder
for building or removing excess debris.
PURGE – Once extruder is hot, tap to manually
extrude filament.
STOP/START – Tap to stop or start preheating.
DM 2610039151 01-16_3D40 1/7/16 9:33 AM Page 19

20
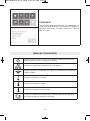
ABOUT
Tap to see 3D40 information such as firmware
version, usage counter, printer status, MAC
address, and token.
!
Indicates that there is an error such as filament empty or door open.
Indicates that Ethernet is connected.
Indicates WiFi signal strength and if connected to WiFi symbol
will be blue.
Indicates that the extruder is cool.
Indicates that the extruder is warm.
Indicates that the extruder is hot.
Indicates that the printer is connected to Spark 3D printing services
and that it can receive remote commands.
Touch Screen Icons
DM 2610039151 01-16_3D40 1/7/16 9:33 AM Page 20
La page est en cours de chargement...
La page est en cours de chargement...
La page est en cours de chargement...
La page est en cours de chargement...
La page est en cours de chargement...
La page est en cours de chargement...
La page est en cours de chargement...
La page est en cours de chargement...
La page est en cours de chargement...
La page est en cours de chargement...
La page est en cours de chargement...
La page est en cours de chargement...
La page est en cours de chargement...
La page est en cours de chargement...
La page est en cours de chargement...
La page est en cours de chargement...
La page est en cours de chargement...
La page est en cours de chargement...
La page est en cours de chargement...
La page est en cours de chargement...
La page est en cours de chargement...
La page est en cours de chargement...
La page est en cours de chargement...
La page est en cours de chargement...
La page est en cours de chargement...
La page est en cours de chargement...
La page est en cours de chargement...
La page est en cours de chargement...
La page est en cours de chargement...
La page est en cours de chargement...
La page est en cours de chargement...
La page est en cours de chargement...
La page est en cours de chargement...
La page est en cours de chargement...
La page est en cours de chargement...
La page est en cours de chargement...
La page est en cours de chargement...
La page est en cours de chargement...
La page est en cours de chargement...
La page est en cours de chargement...
La page est en cours de chargement...
La page est en cours de chargement...
La page est en cours de chargement...
La page est en cours de chargement...
La page est en cours de chargement...
La page est en cours de chargement...
La page est en cours de chargement...
La page est en cours de chargement...
La page est en cours de chargement...
La page est en cours de chargement...
La page est en cours de chargement...
La page est en cours de chargement...
La page est en cours de chargement...
La page est en cours de chargement...
La page est en cours de chargement...
La page est en cours de chargement...
La page est en cours de chargement...
La page est en cours de chargement...
La page est en cours de chargement...
La page est en cours de chargement...
La page est en cours de chargement...
La page est en cours de chargement...
La page est en cours de chargement...
La page est en cours de chargement...
La page est en cours de chargement...
La page est en cours de chargement...
La page est en cours de chargement...
La page est en cours de chargement...
La page est en cours de chargement...
La page est en cours de chargement...
La page est en cours de chargement...
La page est en cours de chargement...
La page est en cours de chargement...
La page est en cours de chargement...
La page est en cours de chargement...
La page est en cours de chargement...
La page est en cours de chargement...
La page est en cours de chargement...
La page est en cours de chargement...
La page est en cours de chargement...
La page est en cours de chargement...
La page est en cours de chargement...
La page est en cours de chargement...
La page est en cours de chargement...
La page est en cours de chargement...
La page est en cours de chargement...
La page est en cours de chargement...
La page est en cours de chargement...
-
 1
1
-
 2
2
-
 3
3
-
 4
4
-
 5
5
-
 6
6
-
 7
7
-
 8
8
-
 9
9
-
 10
10
-
 11
11
-
 12
12
-
 13
13
-
 14
14
-
 15
15
-
 16
16
-
 17
17
-
 18
18
-
 19
19
-
 20
20
-
 21
21
-
 22
22
-
 23
23
-
 24
24
-
 25
25
-
 26
26
-
 27
27
-
 28
28
-
 29
29
-
 30
30
-
 31
31
-
 32
32
-
 33
33
-
 34
34
-
 35
35
-
 36
36
-
 37
37
-
 38
38
-
 39
39
-
 40
40
-
 41
41
-
 42
42
-
 43
43
-
 44
44
-
 45
45
-
 46
46
-
 47
47
-
 48
48
-
 49
49
-
 50
50
-
 51
51
-
 52
52
-
 53
53
-
 54
54
-
 55
55
-
 56
56
-
 57
57
-
 58
58
-
 59
59
-
 60
60
-
 61
61
-
 62
62
-
 63
63
-
 64
64
-
 65
65
-
 66
66
-
 67
67
-
 68
68
-
 69
69
-
 70
70
-
 71
71
-
 72
72
-
 73
73
-
 74
74
-
 75
75
-
 76
76
-
 77
77
-
 78
78
-
 79
79
-
 80
80
-
 81
81
-
 82
82
-
 83
83
-
 84
84
-
 85
85
-
 86
86
-
 87
87
-
 88
88
-
 89
89
-
 90
90
-
 91
91
-
 92
92
-
 93
93
-
 94
94
-
 95
95
-
 96
96
-
 97
97
-
 98
98
-
 99
99
-
 100
100
-
 101
101
-
 102
102
-
 103
103
-
 104
104
-
 105
105
-
 106
106
-
 107
107
-
 108
108


Dremel 3D40 Idea Builder Mode d'emploi
- Catégorie
- Imprimantes 3D
- Taper
- Mode d'emploi
- Ce manuel convient également à
dans d''autres langues
- English: Dremel 3D40 Idea Builder User guide
- español: Dremel 3D40 Idea Builder Guía del usuario
Documents connexes
-
Dremel 3D40 FLEX Operating and Safety Instructions
-
-
-
Dremel 3D20 Idea Builder Original Instructions Manual
-
-
-
-
-
Autres documents
-
Olivetti 3D S2 Le manuel du propriétaire
-
-
Polaroid ROOT Play PL-2002-00 Guide de démarrage rapide
-
-
Creality Ender-5 Plus Manuel utilisateur
-
Creality Sermoon V1 Manuel utilisateur
-
 3Doodler PRO 3Doodler PRO Manuel utilisateur
-
-
