Lindy 5 Port Seamless Multiview KVM Switch Manuel utilisateur
- Catégorie
- Commutateurs KVM
- Taper
- Manuel utilisateur

© LINDY Group - FIRST EDITION (October 2023)
5 Port HDMI 4K60 Seamless Multiview
KVM Switch
User Manual English
Benutzerhandbuch Deutsch
Manuel Utilisateur Français
Manuale Italiano
Manual de Usuario Español
No. 32330
lindy.com

User Manual English
Safety Instructions
WARNING
Please read the following safety information carefully and always keep this document with
the product.
Failure to follow these precautions can result in serious injuries or death from electric
shock, fire or damage to the product.
Touching the internal components or a damaged cable may cause electric shock, which
may result in death.
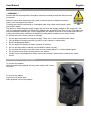
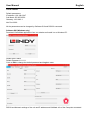
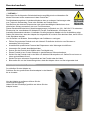
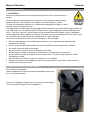
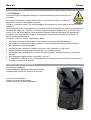
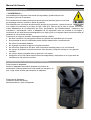
This device is a switching type power supply and can work with supply voltages in the range 100 - 240
VAC For worldwide usability four different AC adapters are enclosed: Euro type, UK type, US/Japan type
and Australia/New Zealand type. Use the appropriate AC adapter as shown in the picture and ensure it
is firmly secured in place and does not detach by pulling before installing into a power socket.
To reduce risk of fire, electric shocks or damage:
Do not open the product nor its power supply. There are no user serviceable parts inside.
Only qualified servicing personnel may carry out any repairs or maintenance.
Never use damaged cables.
Do not expose the product to water or places of moisture.
Do not use this product outdoors it is intended for indoor use only.
Do not place the product near direct heat sources. Always place it in a well-ventilated place.
Do not place heavy items on the product or the cables.
Please ensure any adapters are firmly secured and locked in place before inserting into a wall
socket.
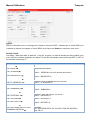
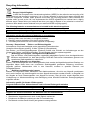
Instructions for Use of Power Supply
To connect the adapter
Slide the desired plug adapter into the power supply until it locks
into place.
To remove the adapter
Press the push button latch.
While pressed, remove the adapter.

User Manual English
Introduction
Thank you for purchasing the 5 Port HDMI 4K60 Seamless Multiview KVM Switch. This product has been
designed to provide trouble free, reliable operation. It benefits from both a LINDY 2 year warranty and free
lifetime technical support. To ensure correct use, please read this manual carefully and retain it for future
reference.
This advanced KVM switch allows the control of four HDMI and one Type C sources such as computers,
laptops, game consoles and so on from a single HDMI 4K display simultaneously with the screen split in
many different Multiview modes; the user can interact with each HDMI device from a console with mouse
and keyboard connecting the respective USB ports to the sources, also in any Multiview mode by simply
moving the mouse pointer from one quadrant to another. Thanks to seamless feature, switching from one
source to another happens instantly without any lag or black screen, making it perfect for any critical
application such as control rooms, broadcasting, E-Sports and security.
User can easily manage the switch via front panel buttons, IR remote control, hot-keys, RS-232 or TCP/IP
commands and control software while a second HDMI mirrored output can be used for additional local
monitoring or for video capture adding a HDMI to USB video capture device.
Package Contents
5 Port HDMI 4K60 Seamless Multiview KVM Switch
IR remote control
4-Pin Terminal Block
2 x Mounting Ears with screws
12VDC 2.5A Multi-country Power Supply (UK, EU, US & AUS), DC Jack: 5.5/2.1mm
Lindy Manual
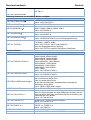
Features
Supports resolutions up to 3840x2160@60Hz 4:4:4 8bit
KVM function to allow the connection of keyboard and mouse to control the inputs
Seamless inputs switching
2 mirrored HDMI outputs
5 different Multiview modes
Support USB mouse roaming
EDID management
Audio Pass-through of all HDMI audio formats including LPCM, AC3, DD+, DTS, DTS-HD up to 7.1
3.5mm and TosLink (optical) Audio outputs, support volume control and independent Audio selection
Manageable via front panel buttons with OSD, IR remote control, control software (for Windows),
keyboard hot-keys (for KVM selection), RS-232 or TCP/IP commands
Specification
HDMI 2.0b, 18Gbps compliant
HDCP 2.2/1.4 pass-through
ESD Protection: ± 8kV (air-gap discharge)
Human Body Model: ± 4kV (contact discharge)
Operating Temperature: 0°C - 40°C (32°F - 104°F)
Storage Temperature: -20°C - 60°C (-4°F - 140°F)
Relative Humidity: 10 - 70% RH (Non-condensing)
Metal Housing
Colour: Black
Power Requirements: AC100-240V 50/60Hz
Power Consumption: 15W

User Manual English
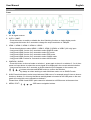
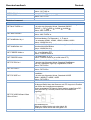
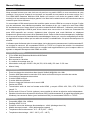
Installation
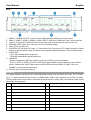
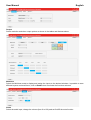
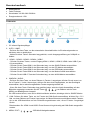
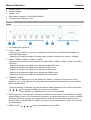
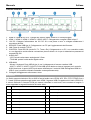
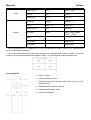
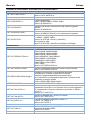
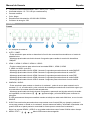
Front
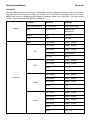
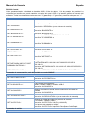
1. IR: IR signal receiver.
2. AUTO / 1080P:
- Press this button to enable or disable the Auto Switching function on single display mode.
- Long press this button for 3 seconds to change the output resolution to 1080p60.
3. HDMI 1 / HDMI 2 / HDMI 3 / HDMI 4 / USB-C:
- Press these buttons to select HDMI 1, HDMI 2, HDMI 3, HDMI 4 or USB-C (AV only) input.
- Long press HDMI 1 button for 3 seconds to select SINGLE mode.
- Long press HDMI 2 button for 3 seconds to select PIP mode.
- Long press HDMI 3 button for 3 seconds to select PBP mode.
- Long press HDMI 4 button for 3 seconds to select 3xWIN mode.
- Long press USB-C button for 3 seconds to select 4xWIN mode.
4. WINDOW / AUDIO:
- Press this button to show a border on window 1, press again to show it on window 2, 3 or 4; then
press one input button to select the source signal to be displayed in the current selected window.
- Long press this button for 3 seconds, an Audio selection list will appear on the screen; use
buttons to browse and MENU button to confirm the selection.
The LED will stay always on when working on each Multiview mode, not on SINGLE mode.
5. KVM: Press this button to select one window as KVM source; for example press 2 times to show a
border on window 2, in this way the Mouse and Keyboard connected to the USB ports on the rear
panel will control the source showed on window 2.
Please Note: HDMI 4 and USB-C ports cannot be selected as a KVM source at the same time.
6. MENU / EXIT / : OSD menu navigation buttons.

User Manual English
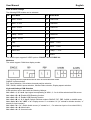
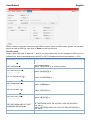
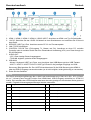
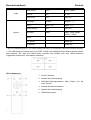
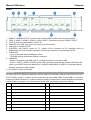
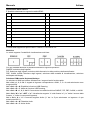
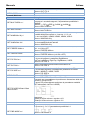
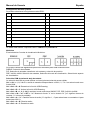
Rear
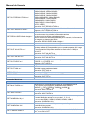
1. HDMI A / HDMI B OUTPUT: Connect to two HDMI displays, HDMI A is the main output.
2. HDMI 1 / HDMI 2 / HDMI 3 / HDMI 4 / USB-C INPUT: Connect to HDMI and Type C source devices.
3. 12V DC: Connect the 12VDC 3A PSU to an AC wall outlet and securely connector to the unit.
4. SERVICE: USB Type A port. Connect to a PC for firmware update.
5. LAN: TCP/IP control port.
6. CONTROL: RS-232 port (5V output, Tx, Ground and Rx). Connect to a PC, Serial Controller or Serial
device via phoenix block 4-way connection for the pass-through transmission of RS-232 commands.
7. AUDIO OUT:
- L/R: 3.5mm analog stereo output port.
- TOSLINK: digital audio optical output port.
8. USB-KVM:
- Mouse / Keyboard: USB Type A ports, connect to a USB mouse and keyboard.
- HOST1 / HOST2 / HOST3 / HOST4: USB Type B ports related to each respective input for KVM
control. Please Note: HOST4 port can be used for KVM control of HDMI 4 or USB-C input (not
possible to use both at the same time).
9. Connect the housing to the ground.
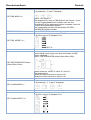
Operation
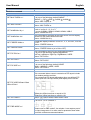
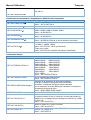
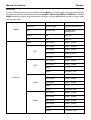
The Switch supports resolutions up to 4K60 and audio formats such as LPCM, AC3, DD+, DTS, DTSHD,
up to 7.1 channel (pass-through function via HDMI cable, USB-C input supports only LPCM 2.0 audio).
LPCM format audio volume can be controlled as shown below in many ways, the following video output
resolutions are supported:
No.
Output Resolution
No.
Output Resolution
1
4096x2160p 60Hz
9
1920x1080p 50Hz
2
4096x2160p 50Hz
10
1360x768p 60Hz
3
3840x2160p 60Hz
11
1280x800p 60Hz
4
3840x2160p 50Hz
12
1280x720p 60Hz
5
3840x2160p 30Hz
13
1280x720p 50Hz
6
3840x2160p 25Hz
14
1024x768 60Hz
7
1920x1200p 60Hz RB
15
AUTO
8
1920x1080p 60Hz
16
USER

User Manual English
EDID & HDCP settings
The following EDID modes can be selected:
No. EDID Mode No. EDID Mode
1 4K60 – 2.0CH 10 1600x1200
2 4K60 – 5.1CH 11 1440x900
3 4K30 – 2.0CH 12 1360x768
4 4K30 – 5.1CH 13 1280x1024
5 1080p – 2.0CH 14 1024x768
6 1080p – 5.1CH 15 AUTO
7 720p 16 4K60 – 7.1CH
8 1920x1200 17 4K30 – 7.1CH
9 1680x1050 18 1080p – 7.1CH
19 USER
The HDMI output supports 2 HDCP options: FORCE-1.4 and FORCE-2.2.
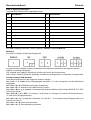
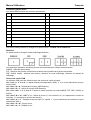
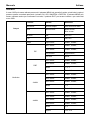
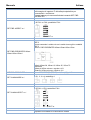
Multiview
The switch support 5 Multiview display modes:
The following different operations can be done for each Multiview mode:
SINGLE: Inputs selection.
PIP: Inputs selection, Sub window size and position selection.
PBP, 3xWIN, 4xWIN: Inputs selection, Window Ratio selection, Display aspect selection.
Keyboard-Hotkeys KVM Selection
KVM selection can be done with the following Hotkeys:
Ctrl + Ctrl + 1, 2, 3 or 4: Input signal corresponding to WIN1, 2, 3 or 4 will be selected as KVM source.
Ctrl + Ctrl + R + N: Disable USB Roaming function.
Ctrl + Ctrl + R + Y: Enable USB Roaming function.
Ctrl + Ctrl + M + 1, 2, 3, 4 or 5: Switch multiview mode to SINGLE, PIP, PBP, 3xWIN, or 4xWIN mode.
Ctrl + Ctrl + W + “m” + SET + “n”: Display source “n” on window “m” (“m” stands for window number, “n”
stands for input number).
Ctrl + Ctrl + A + “n”: Switch Audio source (“n” stands for 1, ..5 to select an input or A to select WIN 1).
Ctrl + Ctrl + A + N: Mute Audio.
Ctrl + Ctrl + A + Y: Unmute Audio.

User Manual English
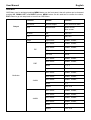
OSD Menu
OSD Menu can be activated pushing MENU button on the front panel, then all options can be browsed
pushing UP, DOWN, LEFT and RIGHT buttons. MENU button can be used also to confirm the choice,
EXIT button to go one step back or to exit from OSD Menu.
Output
Function Default Choices
Resolution 3840x2160p60 See Resolution table
VKA Black screen Black screen,
Blue screen
4K-Auto ON ON, OFF
ITC* OFF ON, OFF
Multiview
Single Input select HDMI1, HDMI2,..
PIP
Win1 select HDMI1, HDMI2,..
Win2 select HDMI1, HDMI2,..
PIP position Right bottom,..
PIP size Small,..
PBP
Win1 select HDMI1, HDMI2,..
Win2 select HDMI1, HDMI2,..
Mode 1, 2, 3
Aspect Full, 16:9
3xWIN
Win1 select HDMI1, HDMI2,..
Win2 select HDMI1, HDMI2,..
Win3 select HDMI1, HDMI2,..
Mode 1, 2
Aspect Full, 16:9
4xWIN
Win1 select HDMI1, HDMI2,..
Win2 select HDMI1, HDMI2,..
Win3 select HDMI1, HDMI2,..
Win4 select HDMI1, HDMI2,..
Mode 1, 2
Aspect Full, 16:9

User Manual English
Audio
Audio select Win1 Win1, HDMI1,..
Volume 100 0..100
Audio-mute OFF ON, OFF
System
Language English English, 中文
EDID 4K60 - 2.0 4K60 - 2.0,..
USB roaming** OFF ON, OFF
Baud rate 9600 9600, 19200, 38400,
57600, 115200
Reset
FW version Read only
IP Address Read only
*: as ITC setting, OFF is suggested for video display and ON for PC (specially for desktop display).
**: USB roaming function can be enabled only on PBP, 3xWIN or 4xWIN Multiview modes. Please note
that KVM function can be assigned to HDMI4 or USB-C port, not both together.
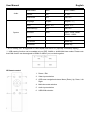
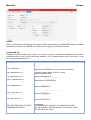
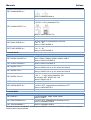
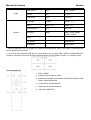
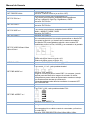
IR Remote control
1. Return / Exit
2. Video input selection
3. OSD menu navigation buttons: Menu (Enter), Up, Down, Left
Right
4. Multiview mode selection
5. Audio input selection
6. USB-KVM selection
TCP/IP Control

User Manual English
TCP/IP control
Default parameters
IP address: 192.168.0.247
Sub Mask: 255.255.255.0
Gateway: 192.168.0.1
Net Port: 2000
All the parameters can be changed by Software GUI and RS-232 command.
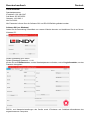
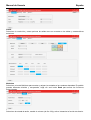
Software GUI (Windows only)
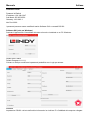
Download ViewerMate application from our website and install it on a Windows PC.
Default User: admin
Default Password: 111111
Click on Edit to change the default password and Login to enter.
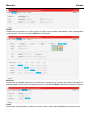
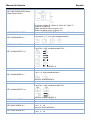
Connect
RS232 and Network settings of the unit and IP address and SubMask info of the Computer connected.

User Manual English
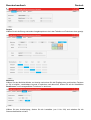
Output
Select resolution and other output options as shown in the tables and features above.
Multiview
Select the Multiview mode to display and assign the inputs to the desired windows. Is possible to save
different layouts and recall them, click on Read button to activate the functions selected.
Audio
Select the audio input, change the volume (from 0 to 100) and set On/Off the mute function.

User Manual English
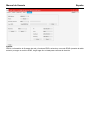
System
RS232, Network Firmware information and EDID functions; select an EDID mode (please see the table
above) or load an EDID file, then click on Read to confirm the choice.
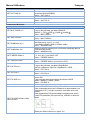
RS-232 Control
Default: Baud rate 9600, 8 data bits, 1 stop bit, no parity. Baud rate can be changed via OSD menu or
software GUI. All the commands begin with SET or GET, end always with new line character (CR).
Command
Details
GET HELP
Get the Commands list
SET RESET
Recover to default setting
GET VERSION
Get firmware version
Return: VERSION w (w is version number)
SET BAUDRATE w
w is 9600, 19200, 38400, 57600 or 115200
Return: BAUDRATE w
GET BAUDRATE w
Return: BAUDRATE w
SET IP ADDRESS w
For example: SET IP ADDRESS 192.168.0.247
Return: IP ADDRESS w
GET IP ADDRESS
Return: IP ADDRESS w
SET SUBMASK w
For example: SET SUBMASK 255.255.255.0
Return: SUBMASK w
GET SUBMASK
Return: SUBMASK w
SET GATEWAY w
For example: SET GATEWAY 192.168.0.1
Return: GATEWAY w
GET GATEWAY
Return: GATEWAY w
SET NETPORT w
For example: SET NETPORT 2000
Return: NETPORT w
GET NETPORT
Return: NETPORT w
SET NETWORK-INFO IP PORT
SUBMASK GATEWAY
For Example:
SET NETWORK-INFO 192.168.0.247 2000 255.255.255.0
192.168.0.1
Return: NETWORK-INFO 192.168.0.247 2000 255.255.255.0
192.168.0.1
GET NETWORK-INFO
Return: NETWORK-INFO IP PORT SUBMASK GATEWAY

User Manual English
Switching command, only available on SINGLE mode
Commands
Details
SET AUTO SWITCH w
w is ON or OFF, default OFF
Return: AUTO SWITCH w
GET AUTO SWITCH
Return: AUTO SWITCH w
SET IN SOURCE w
w is one of the following:
HDMI1, HDMI2, HDMI3, HDMI4, USB-C
Return: IN SOURCE w
GET IN SOURCE
Get current input channel selection information
Return: IN SOURCE w
GET IN RESOLUTION
Get current input resolution
Return: IN RESOLUTION w (w is input resolution)
GET IN STATUS
Get status of all input ports
x is HDMI1…HMDI4, USB-C
Return: IN STATUS x VALID (or INVALID)
If input port is vaild,
Return: IN STATUS x InputRes ColorSpace ColorDepth
Output command
Commands
Details
SET OUT RESOLUTION w
w is one of the following, default: 3840x2160p60
4096x2160p60, 4096x2160p50,
3840x2160p60, 3840x2160p50,
3840x2160p30, 3840x2160p25,
1920x1200p60RB, 1920x1080p60,
1920x1080p50, 1360x768p60,
1280x800p60, 1280x720p60,
1280x720p50, 1024x768p60,
AUTO, USER
Return: OUT RESOLUTION w
GET OUT RESOLUTION
Get current output resolution setting
Return: OUT RESOLUTION w
SET RESO-USER Width Height
Set user define output resolution
Width is horizontal active pixels
Height is vertical active lines
For user define output resolution, the frame rate is always 60Hz
Return: RESO-USER Width Height
GET RESO-USER
Return: RESO-USER Width Height
SET OUT 4K-AUTO w
w is ON or OFF, default ON
If we set 4K output to a displayer which can’t support 4K, then the
ON setting can change the resolution to 1080p or 4K-4:2:0
Return: OUT 4K-AUTO w
GET OUT 4K-AUTO
Get current OUT 4K-AUTO mode
Return: OUT 4K-AUTO w
SET OUT HDCP w
w is one of the following, default FORCE-1.4
FORCE-1.4, FORCE-2.2
Return: OUT HDCP w
GET OUT HDCP
Return: OUT HDCP w
SET OUT VKA w
w is BLUESCREEN or BLACKSCREEN.
Default BLACKSCREEN. It is for no signal display
Return: OUT VKA w
GET OUT VKA
Return: OUT VKA w
SET OUT ITC w
w is ON or OFF, default OFF
Return: OUT ITC w

User Manual English
GET OUT ITC
Return: OUT ITC w
Multiview command
Commands
Details
SET MULTIVIEW w
Select one Multiview mode for current display
w is one of the following, default SINGLE
SINGLE , PIP , PBP , 3xWIN , 4xWIN
Return: MULTIVIEW w
GET MULTIVIEW
Get the current Multiview mode
Return: MULTIVIEW w
SET WINDOWx IN y
Select one input for one display window for the current Multiview
mode. x is one of 1, 2, 3 or 4
y is one of HDMI1, HDMI2, HDMI3, HDMI4, USB-C
Return: WINDOWx IN y
GET WINDOWx IN
This command to get which is the input source for one display
window for the current Multiview mode
Return: WINDOWx IN y
SET FREEZE-WINx w
Freeze the display window,x is one of 1, 2, 3 ,4 or ALL, w is ON
or OFF
Return: FREEZE-WINx w
GET FREEZE-WINx
x is one of 1, 2, 3 ,4.
Return: FREEZE-WINx w (w is ON or OFF)
SET PIP POS w
This command to select the PIP sub window position.
w is one of the following, default RightBottom
LeftTop, LeftBottom, RightTop, RightBottom, USER
Return: PIP POS w
GET PIP POS
This command to get the PIP sub window position
Return: PIP POS w
SET PIP SIZE w
This command to select the PIP sub window size.
w is one of the following, default LARGE
SMALL, MIDDLE, LARGE, USER
Return: PIP SIZE w
GET PIP SIZE
Return: PIP SIZE w
SET PIP USER HStart VStart
HSize VSize
Return: PIP USER HStart VStart HSize VSize
This command allows users to customize a PIP layout include
sub window position and size.
This customized PIP layout will replace other pre-defined PIP
modes (such as LeftTop,LARGE) and display on the screen
Please note
HStart plus HSize less than or equal to 101
VStart plus VSize less than or equal to 101
GET PIP USER
Return: PIP USER HStart VStart HSize VSize
SET PBP MODE w
Set the PBP display mode
w is one of 1,2 or 3, default 1
Return: PBP MODE w
Please note for PBP mode 3, the window 1 can capture part of
the input image area. It is main used for presenter show when
work with conference camera situations

User Manual English
The capture area can be defined by SET PBP-PRESENTER
command
GET PBP MODE
Return: PBP MODE w
SET PBP ASPECT w
Set the PBP window display aspect
w is FULL or 16:9, default FULL
Return: PBP ASPECT w
GET PBP ASPECT
Return: PBP ASPECT w
SET PBP-PRESENTER HStart
VStart HSize VSize
Set window 1 capture area for PBP mode 3
This command only valid when the switch is on PBP mode 3
Return: PBP-PRESENTER HStart VStart HSize VSize
Default HStart 38, VStart 13, HSize 25, VSize 75
Please note
HStart plus HSize less than or equal to 101
VStart plus VSize less than or equal to 101
GET PBP-PRESENTER
Return: PBP-PRESENTER HStart VStart HSize VSize
SET 3xWIN MODE w
Set the 3xWIN display mode
w is one of 1,2,3 or 4, default 1
Return: 3xWIN MODE w
GET 3xWIN MODE
Return: 3xWIN MODE w
SET 3xWIN ASPECT w
Set the 3xWIN window display aspect
w is FULL or 16:9, default FULL
Return: 3xWIN ASPECT w
GET 3xWIN ASPECT
Return: 3xWIN ASPECT w
SET 4xWIN MODE w
Set the 4xWIN display mode
w is 1 or 2, default 1

User Manual English
Return: 4xWIN MODE w
GET 4xWIN MODE
Return: 4xWIN MODE w
SET 4xWIN ASPECT w
Set the 4xWIN window display aspect
w is FULL or 16:9, default FULL
Return: 4xWIN ASPECT w
GET 4xWIN ASPECT
Return: 4xWIN ASPECT w
GET MULTIVIEW-SYNC
Return Multiview layout information
SET SAVE SCENE w
Save current display scene
w is 1, 2,…20
Return: SAVE SCENE w
SET LOAD SCENE w
Load display scene
w is 1, 2,…20
Return: LOAD SCENE w
Audio command
Commands
Details
SET AUDIO SOURCE w
w is one of the following:
WIN1, HDMI1, HDMI2, HDMI3, HDMI4, USB-C
Return: AUDIO SOURCE w
GET AUDIO SOURCE
Return: AUDIO SOURCE w
SET AUDIO VOL+
Increase audio out volume
Return: AUDIO VOL w (w is the volume value)
SET AUDIO VOL-
Decrease audio out volume
Return: AUDIO VOL w (w is the volume value)
SET AUDIO VOL w
Set audio volume value
w is 0,1…, or 100, default 100
For example: SET AUDIO VOL 100
Return: AUDIO VOL w
GET AUDIO VOL
Return: AUDIO VOL w
SET AUDIO-MUTE w
Mute or unmute audio output
Here w is ON or OFF, default OFF
Return: AUDIO-MUTE w
GET AUDIO-MUTE
Return: AUDIO-MUTE w
KVM command
Commands
Details
SET KVM w
w is one of WIN1, WIN2, WIN3, WIN4
Return: KVM w
SET USB ROAMING w
w is ON or OFF, default OFF
Return: USB ROAMING w
GET USB ROAMING
Return: USB ROAMING w
Please note when work on SINGLE display mode, the KVM function of current selected source is always
activated.

User Manual English
EDID command
The following commands are used to set EDID mode for the inputs
Commands
Details
SET IN EDIDMODE w
w is one of the following:
4K60-2.0, 4K60-5.1, 4K60-7.1, 4K30-2.0,
4K30-5.1, 4K30-7.1, 1080p60-2.0,1080p60-5.1,
1080p60-7.1,1920x1200, 1680x1050, 1600x1200, 1440x900,
1360x768, 1280x1024, 1024x768, 720p, AUTO, USER
Default: 4K60-2.0
Return: IN EDIDMODE w
SET EDID-USER w
Switcher can only support 256 bytes EDID-USER data.
w is 256 bytes EDID data.
Return: EDID-USER OK
GET IN EDIDMODE
Return: IN EDIDMODE w
Troubleshooting
There is no image displayed on the screen.
Please check the max. resolution supported by the source and the screen and if the output resolution
is set to 4K and the 4K-AUTO setting is OFF.
Long press the AUTO button on the front panel to change the output resolution to the needed one and
set 4K-AUTO to ON.
There is no audio signal.
Since audio selection is separated from the video selection, please check if the audio selection comes
from the required source. By default is set on Win1.
Please check if Audio-Mute is enabled.
Please check if Audio Volume value is more than 0; if there is no feedback adjusting the volume it
should be because the audio source is a non-LPCM format such as AC3 or DTS 5.1. The volume can
be changed only with LPCM format.
Please check if the audio format selected is supported by the audio device connected.
There is no TCP/IP connection.
Please check the IP address, NetPort, Baud rate settings. The switch and the router connected must
be in the same network segment.

Benutzerhandbuch Deutsch
Sicherheitshinweise
GEFAHR
Bitte lesen Sie die folgenden Sicherheitshinweise sorgfältig durch und bewahren Sie
dieses Dokument immer zusammen mit dem Produkt auf.
Die Nichtbeachtung dieser Vorsichtsmaßnahmen kann zu schweren Verletzungen oder
zum Tod durch Stromschlag, Feuer oder Schäden am Produkt führen.
Das Berühren der internen Komponenten oder eines beschädigten Kabels kann einen
elektrischen Schlag verursachen, der zum Tod führen kann.
Dieses Schaltnetzteil arbeitet mit Anschlussspannungen im Bereich von 100…240 VAC. Für weltweiten
Einsatz sind vier verschiedene AC-Adapter für Europa, Großbritannien, USA/Japan und
Australien/Neuseeland enthalten. Verwenden Sie den geeigneten Adapter wie es die Abbildung zeigt.
Stellen Sie bitte sicher, dass der Adapter fest eingerastet ist und sich nicht abziehen lässt, bevor Sie ihn
in die Steckdose stecken.
Um die Gefahr von Bränden, Stromschlägen oder Schäden zu verringern:
Öffnen Sie weder das Produkt noch sein Netzteil. Es befinden sich keine vom Benutzer zu
wartenden Teile im Inneren.
Ausschließlich qualifiziertes Personal darf Reparaturen oder Wartungen durchführen.
Verwenden Sie niemals beschädigte Kabel.
Setzen Sie das Produkt nicht Wasser oder Feuchtigkeit aus.
Dieses Produkt ist nur für den Gebrauch in geschlossenen Räumen bestimmt.
Stellen Sie das Produkt nicht in der Nähe von direkten Wärmequellen auf. Stellen Sie es immer an
einem gut belüfteten Ort auf.
Stellen Sie keine schweren Gegenstände auf das Produkt oder die Kabel.
Bitte stellen Sie vor der Verwendung sicher, dass alle Adapter sicher und fest eingerastet sind
Anwendungshinweise für das Netzteil
So schließen Sie den Adapter an:
Schieben Sie den gewünschten Steckeradapter in das Netzteil,
bis er einrastet.
Um den Adapter zu entfernen drücken Sie die
Druckknopfverriegelung.
Halten Sie den Druckknopf gedrückt und ziehen Sie den
Adapter heraus.

Benutzerhandbuch Deutsch
Einführung
Wir freuen uns, dass Ihre Wahl auf ein LINDY-Produkt gefallen ist und danken Ihnen für Ihr Vertrauen. Sie
können sich jederzeit auf unsere Produkte und einen guten Service verlassen. Dieser 5 Port HDMI 4K60
Seamless Multiview KVM Switch unterliegt einer 2-Jahres LINDY Herstellergarantie und lebenslangem
kostenlosen, technischen Support. Bitte lesen Sie diese Anleitung sorgfältig und bewahren Sie sie auf.
Dieser professionelle KVM-Switch ermöglicht die Steuerung von vier HDMI- und einer Typ-C-Quelle wie
Computer, Laptops, Spielkonsolen usw. von einem einzigen HDMI 4K-Display aus, wobei der Bildschirm
in viele verschiedene Multiview-Modi aufgeteilt werden kann. Der Benutzer kann mit jedem HDMI-Gerät
von einer Konsole aus mit Maus und Tastatur interagieren, indem er die jeweiligen USB-Ports mit den
Quellen verbindet, auch in jedem Multiview-Modus, indem er einfach den Mauszeiger von einem
Quadranten zum anderen bewegt. Dank der ‚Seamless‘-Funktion erfolgt der Wechsel von einer Quelle zur
anderen sofort und ohne Verzögerung oder schwarzen Bildschirm - perfekt für alle kritischen
Anwendungen wie Kontrollräume, Rundfunk, E-Sport und Sicherheitsanwendungen.
Der Benutzer kann den Switch ganz einfach über die Tasten an der Vorderseite, die IR-Fernbedienung,
Hot-Keys, RS-232- oder TCP/IP-Befehle und Steuersoftware verwalten. Ein zweiter gespiegelter HDMI-
Ausgang kann für zusätzliches lokales Monitoring oder für Videoaufnahmen verwendet werden, indem ein
HDMI-auf-USB-Videoaufnahmegerät hinzugefügt wird.
Lieferumfang
5 Port HDMI 4K60 Seamless Multiview KVM Switch
IR-Fernbedienung
4-polige Klemmleiste
2 x Montagebügel mit Schrauben
12VDC 2.5A Multi Country Netzteil (UK, EU, US & AUS), DC-Buchse: 5.5/2.1mm
Lindy Handbuch
Eigenschaften
Unterstützt Auflösungen bis zu 3840x2160@60Hz 4:4:4 8bit
KVM-Funktion, die den Anschluss von Tastatur und Maus zur Steuerung der Eingänge ermöglicht
Verzögerungsfreies Umschalten der Eingänge
2 gespiegelte HDMI-Ausgänge
5 verschiedene Multiview-Modi
Unterstützung von USB-Maus-Roaming
EDID-Verwaltung
Audio-Pass-Through aller HDMI-Audioformate einschließlich LPCM, AC3, DD+, DTS, DTS-HD bis zu
7.1
3.5-mm- und TosLink-Audioausgänge (optisch), Unterstützung von Lautstärkeregelung und
unabhängiger Audioauswahl
Verwaltbar über Tasten an der Vorderseite mit OSD, IR-Fernbedienung, Steuerungssoftware (für
Windows), Tastatur-Hotkeys (für KVM-Auswahl), RS-232 oder TCP/IP-Befehle
Spezifikationen
HDMI 2.0b, 18Gbit/s-konform
HDCP 2.2/1.4 Pass-through
ESD-Schutz: ± 8 kV (Luftspaltentladung)
Human Body Model: ± 4 kV (Kontaktentladung)
Betriebstemperatur: 0°C - 40°C (32°F - 104°F)
Lagertemperatur: -20°C - 60°C (-4°F - 140°F)
Relative Luftfeuchtigkeit: 10 - 70% RH (nicht kondensierend)

Benutzerhandbuch Deutsch
Metallgehäuse
Farbe: Schwarz
Strombedarf: AC100-240V 50/60Hz
Energieverbrauch: 15W
Installation
Vorderseite:
1. IR: Infrarot-Signalempfänger
2. AUTO / 1080P:
- Drücken Sie diese Taste, um die automatische Umschaltfunktion im Einzelanzeigemodus zu
aktivieren oder zu deaktivieren.
- Halten Sie diese Taste 3 Sekunden lang gedrückt, um die Ausgangsauflösung auf 1080p60 zu
ändern.
3. HDMI 1 / HDMI 2 / HDMI 3 / HDMI 4 / USB-C:
- Drücken Sie diese Tasten, um den Eingang HDMI 1, HDMI 2, HDMI 3, HDMI 4 oder USB-C (nur
AV) auszuwählen.
- Drücken Sie die Taste HDMI 1 drei Sekunden lang, um den SINGLE-Modus auszuwählen.
- Drücken Sie die Taste HDMI 2 drei Sekunden lang, um den PIP-Modus auszuwählen.
- Drücken Sie die Taste HDMI 3 drei Sekunden lang, um den PBP-Modus auszuwählen.
- Drücken Sie die Taste HDMI 4 drei Sekunden lang, um den Modus 3xWIN auszuwählen.
- Drücken Sie die USB-C-Taste drei Sekunden lang, um den 4xWIN-Modus auszuwählen.
4. WINDOW / AUDIO:
- Drücken Sie diese Taste, um einen Rahmen in Fenster 1 anzuzeigen, drücken Sie sie erneut, um
ihn in Fenster 2, 3 oder 4 anzuzeigen; drücken Sie dann eine Eingangstaste, um das Quellsignal
auszuwählen, das im aktuell ausgewählten Fenster angezeigt werden soll.
- Wenn Sie diese Taste 3 Sekunden lang gedrückt halten, wird eine Audio-Auswahlliste auf dem
Bildschirm angezeigt; verwenden Sie die Tasten zum Blättern und die Taste
MENU zum Bestätigen der Auswahl.
Die LED leuchtet immer, wenn Sie im Multiview-Modus arbeiten, allerdings nicht im SINGLE-Modus.
5. KVM: Drücken Sie diese Taste, um ein Fenster als KVM-Quelle auszuwählen; drücken Sie z. B. 2
Mal, um einen Rahmen auf Fenster 2 anzuzeigen. Auf diese Weise steuern die Maus und die Tastatur,
die an die USB-Anschlüsse auf der Rückseite angeschlossen sind, die auf Fenster 2 angezeigte
Quelle.
Bitte beachten Sie: HDMI 4 und USB-C-Ports können nicht gleichzeitig als KVM-Quelle ausgewählt
werden.
6. MENU / EXIT / : OSD-Menü-Navigationstasten

Benutzerhandbuch Deutsch
Rückseite:
1. HDMI A / HDMI B OUTPUT: Anschluss an zwei HDMI-Bildschirme, HDMI A ist der Hauptausgang.
2. HDMI 1 / HDMI 2 / HDMI 3 / HDMI 4 / USB-C INPUT: Anschluss an HDMI- und Typ-C-Quellgeräte.
3. 12V DC: Schließen Sie das 12VDC 3A Netzteil an einer Steckdose an und verbinden Sie es fest mit
dem Gerät.
4. SERVICE: USB Typ A Port. Anschluss an den PC für ein Firmwareupdate.
5. LAN: TCP/IP-Kontrollport.
6. CONTROL: RS-232 Port (5V-Ausgang, Tx, Masse und Rx). Anschluss an einen PC, seriellen
Controller oder ein serielles Gerät über eine Phoenixblock-Verbindung (4 Pin) zum Pass-through von
RS-232-Befehlen.
7. AUDIO OUT:
- L/R: 3.5mm Analog-Stereo-Ausgangsport.
- TOSLINK: digitaler, optischer Audio-Ausgangsport.
8. USB-KVM:
- Mouse / Keyboard: USB Typ A Ports, zum Anschluss einer USB-Maus und einer USB-Tastatur.
- HOST1 / HOST2 / HOST3 / HOST4: USB Typ B Ports für die jeweiligen Eingänge zur KVM-
Steuerung. Bitte beachten Sie: Der HOST4-Anschluss kann für die KVM-Steuerung des HDMI-4-
oder des USB-C-Eingangs verwendet werden (es ist nicht möglich, beide gleichzeitig zu verwenden).
9. Erden Sie das Gehäuse.
Betrieb
Der Switch unterstützt Auflösungen bis zu 4K60 und Audioformate wie LPCM, AC3, DD+, DTS, DTSHD,
bis zu 7.1-Kanal (Pass-Through-Funktion über HDMI-Kabel, USB-C-Eingang unterstützt nur LPCM 2.0
Audio). Die Lautstärke des LPCM-Audioformats kann wie unten gezeigt auf verschiedene Weise gesteuert
werden. Folgende Videoausgangsauflösungen werden unterstützt:
No.
Output Resolution
No.
Output Resolution
1
4096x2160p 60Hz
9
1920x1080p 50Hz
2
4096x2160p 50Hz
10
1360x768p 60Hz
3
3840x2160p 60Hz
11
1280x800p 60Hz
4
3840x2160p 50Hz
12
1280x720p 60Hz
5
3840x2160p 30Hz
13
1280x720p 50Hz
6
3840x2160p 25Hz
14
1024x768 60Hz
7
1920x1200p 60Hz RB
15
AUTO
8
1920x1080p 60Hz
16
USER
La page est en cours de chargement...
La page est en cours de chargement...
La page est en cours de chargement...
La page est en cours de chargement...
La page est en cours de chargement...
La page est en cours de chargement...
La page est en cours de chargement...
La page est en cours de chargement...
La page est en cours de chargement...
La page est en cours de chargement...
La page est en cours de chargement...
La page est en cours de chargement...
La page est en cours de chargement...
La page est en cours de chargement...
La page est en cours de chargement...
La page est en cours de chargement...
La page est en cours de chargement...
La page est en cours de chargement...
La page est en cours de chargement...
La page est en cours de chargement...
La page est en cours de chargement...
La page est en cours de chargement...
La page est en cours de chargement...
La page est en cours de chargement...
La page est en cours de chargement...
La page est en cours de chargement...
La page est en cours de chargement...
La page est en cours de chargement...
La page est en cours de chargement...
La page est en cours de chargement...
La page est en cours de chargement...
La page est en cours de chargement...
La page est en cours de chargement...
La page est en cours de chargement...
La page est en cours de chargement...
La page est en cours de chargement...
La page est en cours de chargement...
La page est en cours de chargement...
La page est en cours de chargement...
La page est en cours de chargement...
La page est en cours de chargement...
La page est en cours de chargement...
La page est en cours de chargement...
La page est en cours de chargement...
La page est en cours de chargement...
La page est en cours de chargement...
La page est en cours de chargement...
La page est en cours de chargement...
La page est en cours de chargement...
La page est en cours de chargement...
La page est en cours de chargement...
La page est en cours de chargement...
La page est en cours de chargement...
La page est en cours de chargement...
La page est en cours de chargement...
La page est en cours de chargement...
La page est en cours de chargement...
La page est en cours de chargement...
La page est en cours de chargement...
La page est en cours de chargement...
-
 1
1
-
 2
2
-
 3
3
-
 4
4
-
 5
5
-
 6
6
-
 7
7
-
 8
8
-
 9
9
-
 10
10
-
 11
11
-
 12
12
-
 13
13
-
 14
14
-
 15
15
-
 16
16
-
 17
17
-
 18
18
-
 19
19
-
 20
20
-
 21
21
-
 22
22
-
 23
23
-
 24
24
-
 25
25
-
 26
26
-
 27
27
-
 28
28
-
 29
29
-
 30
30
-
 31
31
-
 32
32
-
 33
33
-
 34
34
-
 35
35
-
 36
36
-
 37
37
-
 38
38
-
 39
39
-
 40
40
-
 41
41
-
 42
42
-
 43
43
-
 44
44
-
 45
45
-
 46
46
-
 47
47
-
 48
48
-
 49
49
-
 50
50
-
 51
51
-
 52
52
-
 53
53
-
 54
54
-
 55
55
-
 56
56
-
 57
57
-
 58
58
-
 59
59
-
 60
60
-
 61
61
-
 62
62
-
 63
63
-
 64
64
-
 65
65
-
 66
66
-
 67
67
-
 68
68
-
 69
69
-
 70
70
-
 71
71
-
 72
72
-
 73
73
-
 74
74
-
 75
75
-
 76
76
-
 77
77
-
 78
78
-
 79
79
-
 80
80


Lindy 5 Port Seamless Multiview KVM Switch Manuel utilisateur
- Catégorie
- Commutateurs KVM
- Taper
- Manuel utilisateur
dans d''autres langues
Autres documents
-
Philips BDM4350UC/01 Manuel utilisateur
-
Philips 436M6VBPAB/01 Manuel utilisateur
-
-
Philips 27B1U5601H/00 Manuel utilisateur
-
-
-
-