
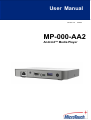
MP-000-AA2
Android™ Media Player
User Manual
Version 3.0 2022/3

1
About This Document
No part of this publication may be reproduced, transmitted, transcribed, stored in a
retrieval system, or translated into any language or computer language, in any form or
by any means, including, but not limited to, electronic, magnetic, optical, chemical,
manual, or otherwise without prior written permission of MicroTouchTM a TES Company.
The information in this document is subject to change without notice. MicroTouch a TES
Company makes no representations or warranties with respect to the contents herein,
and specifically disclaims any implied warranties of merchantability or fitness for a
particular purpose. MicroTouch a TES Company reserves the right to revise this
publication and to make changes from time to time in the content hereof without
obligation of MicroTouch a TES Company to notify any person of such revisions or
changes. Windows is a registered trademark of Microsoft, Inc. Other brand or product
names are trademarks of their respective holders.

2 |
Compliance Information
For FCC (USA)
This equipment has been tested and fund to comply with the limits for a Class A digital
device, pursuant to part 15 of the FCC Rules. There limits are designed to provide
reasonable protection against harmful interference when the equipment is operated in a
commercial environment. This equipment generates, uses, and can radiate radio
frequency energy and, if not installed and used in accordance with the instruction manual,
may cause harmful interference to radio communications. Operation of this equipment in a
residential area is likely to cause harmful interference in which case the user will be
required to correct the interference at his own expense.
This device complies with part 15 of the FCC Rules. Operation is subject to the following
two conditions: (1) this device may not cause harmful interference, and (2) this device
must accept any interference received, including interference that may cause undesired
operation.
For IC (Canada)
CAN ICES-3(A)/NMB-3(A)
For CE (EU)
The device complies with the EMC Directive 2014/30/EU and Low Voltage Directive
2014/35/EU
Disposal Information
Waste Electrical and Electronic Equipment
This symbol on the product indicates that, under the European Directive 2012/19/EU
governing waste from electrical and electronic equipment, this product must not be
disposed of with other municipal waste. Please dispose of your waste equipment by
handing it over to a designated collection point for the recycling of waste electrical and
electronic equipment. To prevent possible harm to the environment or human health from
uncontrolled waste disposal, please separate these items from other types of waste and
recycle them responsibly to promote the sustainable reuse of material resources.
For more information about recycling of this product, please contact your local city office or
your municipal waste disposal service.

3 |
Renseignements relatifs à la conformité
Pour la FCC (États-Unis).
Ce matériel a fait l’objet d’essais qui ont déterminé qu’il respectait les limites d’un appareil
de classe A selon la partie 15 des règlements de la FCC. Ces limites sont établies pour
assurer une protection raisonnable contre les parasites nuisant à un fonctionnement dans
un environnement commercial. Ce matériel génère, utilise et peut émettre des ondes radio
électriques, et lorsqu’il n’est pas installé et utilisé selon le manuel d’instructions, peut
causer des parasites nuisant aux communications radio. L’utilisation de ce matériel dans
une zone résidentielle est susceptible de causer des parasites auquel cas l’utilisateur est
tenu de corriger le problème des parasites à ses propres frais.
L’appareil respecte la partie 15 des règlements de la FCC. Le fonctionnement doit
respecter les deux conditions suivantes : 1) cet appareil ne doit pas causer de parasites et
(2) cet appareil doit accepter tous les parasites reçus, notamment ceux pouvant causer un
fonctionnement non voulu.
Pour Industrie Canada
Norme canadienne NMB-3(A)
Pour la CE (UE)
L’appareil respecte la directive 2014/30/UE relative à la compatibilité électromagnétique et
la directive 2014/35/EU sur les limites de basse tension
Informations sur l'élimination
Déchets d'équipements électriques et électroniques
Ce symbole sur le produit indique que, conformément à la directive européenne
2012/19/UE régissant les déchets d'équipements électriques et électroniques, ce produit
ne doit pas être jeté avec les autres déchets municipaux. Veuillez éliminer vos déchets
d'équipement en les remettant à un point de collecte désigné pour le recyclage des
déchets d'équipements électriques et électroniques. Pour éviter d'éventuels dommages à
l'environnement ou à la santé humaine dus à une élimination incontrôlée des déchets,
veuillez séparer ces articles des autres types de déchets et les recycler de manière
responsable afin de promouvoir la réutilisation durable des ressources matérielles.
Pour plus d'informations sur le recyclage de ce produit, veuillez contacter votre mairie ou
votre service municipal d'élimination des déchets.

4 |
Usage Notice
Precautions
Please follow all warnings, precautions and maintenance as recommended in this user’s
manual to maximize the life of your unit.
Do
:
Turn off the product before cleaning.
Use a soft cloth moistened with mild detergent to clean the product housing.
Use only the qualified power adapter that comes with your device.
Disconnect the power plug from AC outlet if the product is not going to be used for an
extended period.
Don’t
:
Do not use abrasive cleaners, waxes or solvents for your cleaning.
Do not operate the product under the following conditions:
- Extremely hot, cold or humid environment.
- Areas susceptible to excessive dust and dirt.
- Near any appliance generating a strong magnetic field.
Caution
Risk of explosion if battery is replaced by an incorrect type. Dispose of used batteries
according to the instructions.
! Warning - To prevent the risk of fire or shock hazards, and do not
expose the product to moisture.
! Warning - Please do not open or disassemble the product as this may
cause electric shock.
! Warning - Power cord shall be connected to a socket-outlet with
earthing connection.
! Warning - Stability Hazard. The touch monitor may fall, causing
serious personal injury or death. To prevent injury, this
touch monitor must be securely attached to the wall in
accordance with the installation instructions.

5 |
Avis d’utilisation
Précautions
Veuillez suivre toutes les mises en garde, précautions et entretiens recommandés dans
ce manuel d’utilisation pour maximiser la durée de vie de votre unité.
À faire :
Éteindre l’appareil avant de le nettoyer.
Utiliser un chiffon humidifié par une solution savonneuse pour nettoyer le boîtier du
produit.
Utiliser uniquement l’adaptateur d’alimentation prescrit pour votre appareil.
Débrancher l’appareil lorsqu’il n’est pas utilisé pendant une période prolongée.
À éviter :
Ne pas utiliser de nettoyants abrasifs, de cires ou de solvants pour le nettoyage
Ne jamais utiliser l’appareil dans les conditions suivantes :
– des conditions environnementales extrêmes (chaud, froid ou humidité)
– des endroits remplis de poussières et de saletés.
– à proximité d’appareils produisant un fort champ magnétique.
Mise en garde
Risque d'explosion si la batterie est remplacée par un type incorrect. Jetez les piles
usagées conformément aux instructions.
! Mise en garde — Pour prévenir les risques d’incendie ou
d’électrocution, ne pas exposer le produit à l’humidité.
! Mise en garde — Prière de ne pas ouvrir ou démonter le produit, car
cela pourrait entraîner l’électrocution.
! Mise en garde – Le cordon d’alimentation doit être branché à une
prise pourvue d’une mise à la terre.
! Mise en garde — Risque de renversement. Le moniteur tactile peut se
renverser et causer de graves blessures corporelles, voire la mort.
Pour prévenir les blessures, ce moniteur tactile doit être solidement
fixé au mur selon les instructions d’installation.

6 |
Table of Contents
Chapter 1 ........................................................................................................................ 7
1.1 Overview .................................................................................................................... 8
1.2 Feature ....................................................................................................................... 8
1.3 Specifications ............................................................................................................. 8
1.4 Block Diagram............................................................................................................ 9
1.5 User Controls and Indicators ..................................................................................... 9
1.6 Interface Connectors ................................................................................................ 13
1.7 Package Overview ................................................................................................... 13
Chapter 2 ...................................................................................................................... 14
2.1 Dimension ................................................................................................................ 15
2.2 Battery installation .................................................................................................... 16
2.3 Side Mount for your monitor ................................................................................... 17
2.4 Installation .............................................................................................................. 18

7 |
Chapter 1
Product Introduction

8 |
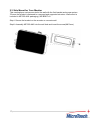
1.1 Overview
The versatility, reliability, and performance of MP-000-AA2 makes it an exceptional choice
for applications in all business sectors.
1.2 Feature
Support Rockchip RK3399 processor.
USB Type C with DP ALT Mode Support.
Ideal for Signage and Interactive Media Solutions.
1.3 Specifications
System
CPU
Rockchip RK3399, Dual-core Cortex-A72 up to 1.8GHz,
Quad-core Cortex-A53 up to 1.4GHz
GPU Mail-T860 MP4
Memory 4GB dual channel LPDDR4
Storage 32GB eMMC
Input Power DC in 12V/3A 2PIN
Network
Gigabit Ethernet
Wi-Fi 802.11a/b/g/n/ac
Bluetooth 4.0 (Support BLE)
External IO Ports
1 x TF slot (Support SDHC 2.0)
1 x Micro SIM
1 x LAN (Support 10/100/1000Mbps)
1 x HDMI (Main display, Support 4K@60Hz)
1 x Earphone
2 x USB2.0 Type-A
1 x USB3.0 Type-A
1 x USB3.0 Type-C OTG (Support DP1.2, 5V/1A)
1 x GPIO
OS version Android 9.0 or later | AOSP only
Operation temp. 0~40°C
Storage temp. -20°C to 60°C
Operation humidity 20~80%
Storage humidity 10~90%

9 |
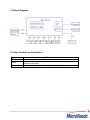
1.4 Block Diagram
1.5 User Controls and Indicators
Function
Description
Power on
Press the power button 3~5 sec
Sleep
Press the power button to enter sleep mode, and press again to
resume from sleep
Power off
Press the power button 2 sec and click power off.

10 |
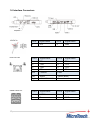
1.6 Interface Connectors
12V DC in
Pin # Signal Name Pin # Signal Name
1 12V 2 GND
RJ45 for LAN
Pin # Signal Name Pin # Signal Name
1 TP1+ 2 TP1-
3 TP2+ 4 TP3-
5 TP3+ 6 TP2-
7 TP4+ 8 TP4-
LED Function Color
Left Active Yellow (Blink)
Right 10M/100M/1000M Green
USB2.0 Dual x 2
Pin # Signal Name Pin # Signal Name
1 USB5V 2 D-
3 D+ 4 GND

11 |
USB3.0
Pin #
Signal Name Pin # Signal Name
1 USB5V 2 D-
3 D+ 4 GND
5 SSRX- 6 SSRX+
7 GND_DRAIN 8 SSTX-
9 SSTX+
USB-C
Pin # Signal Name Pin # Signal Name
A1 GND B12 GND
A2 SSTXp1 B11 SSRXp1
A3
SSTXn1
B10
SSRXn1
A4 VBUS B9 VBUS
A5 CC1 B8 SBU2
A6 Dp1 B7 Dn2
A7 Dn1 B6 Dp2
A8 SBU1 B5 CC2
A9 VBUS
B4 VBUS
A10 SSRXn2 B3 SSTXn2
A11 SSRXp2 B2 SSTXp2
A12 GND
B1 GND

12 |
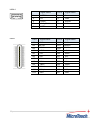
HDMI
Pin #
Signal Name
Pin #
Signal Name
1 TMDS Data2+ 2
TMDS Data2
Shield
3
TMDS Data2-
4
TMDS Data1+
5
TMDS Data1
Shield
6
TMDS Data1-
7 TMDS Data0+ 8
TMDS Data0
Shield
9
TMDS Data0-
10
TMDS Clock+
11
TMDS Clock
Shield
12 TMDS Clock-
13
CEC(N.C on
device)
14
Reserved(N.C.
on device)
15
SCL 16 SDA
17
DDC/CEC
Ground
18 +5V Power
19
Hot Plug Detect
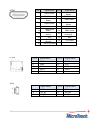
TF card
Pin # Signal Name Pin # Signal Name
1
DAT2
2
DAT3
3
CMD
4
VCC
5
CLK
6
GND
7
DAT0
8
DAT1
9
CD
GPIO
Pin #
Signal Name Pin # Signal Name
1
GND
2
3.3V
3
G2_B1
4
G2_B2
5
G2_B3
6
G2_B4

13 |
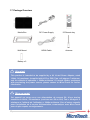
1.7 Package Overview
Media Box DC Power Supply IR Remote key
Wall Mount HDMI Cable Antenna
Battery x 2
! Mise en garde!
Cet appareil est conçu avec une alimentation de cou
rant CA, d’une tension
nominale de 12Vdc, 2A maximum. (conforme au LPS ou PS2) Tma = 40 degrés C
minimum et l’altitude de l’utilisation = 3048m minimum. Pour d’autres conseils
pour l’installation de la source d’alimentation, communiquer avec MicroTouch
pour de plus amples renseignements.
! Warming!
This product is intended to be supplied by a UL Listed Power Adapter, rated
12Vdc, 2A maximum. (complied with LPS or PS2) Tma = 40 degree C minimum,
and the altitude of operation = 3048m minimum. If it needs further assistance
with purchasing the power source, please contact to MicroTouch for further
information.

14 |
Chapter 2
Product Installation

15 |
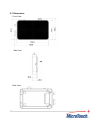
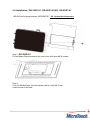
2.1 Dimension
Front View
Side View
Rear View

16 |
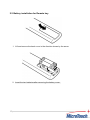
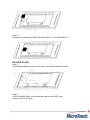
2.2 Battery installation for Remote key
1. Lift and remove the back cover in the direction shown by the arrow.
2. Insert the two batteries after removing the battery cover.

17 |
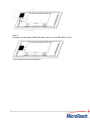
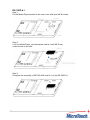
2.3 Side Mount for Your Monitor
This media player can be mounted to the wall with the first bracket and screw system.
*Ensure the bracket is fastened to a secured and supported structure. Wall mount is
included in MP-000-AA2 packaging | MP-BRKT-A1
Step1: Secure the bracket on the wooden or concrete wall.
Step2: Assembly MP-000-AA2 into the wall hole and insert the screw(M4*6mm).

18 |
2.4 Installation | DS-320P-A1, DS-430P-A1(A2), DS-550P-A1
MP-000-AA2 signage bracket, MP-BRKT-B1* “B1” Bracket Sold Separately
Step 1. DS-550P-A1
Fix the Media Player bracket to the rear cover with 4pcs M4*8 screws.
Step 2.
Lock the Media Player into the bracket and fix it with M4*6 star
socket screw on the side.

19 |
Step 3.
Complete the assembly of MP-000-AA2 and fix it on the DS-550P-A1.
DS-430P-A1(A2)
Step 1.
Fix the Media Player bracket to the rear cover with 4pcs M4*8 screws.
Step 2.
Lock the Media Player into the bracket and fix it with M4*6 star
socket screw on the side.
La page est en cours de chargement...
La page est en cours de chargement...
La page est en cours de chargement...
La page est en cours de chargement...
-
 1
1
-
 2
2
-
 3
3
-
 4
4
-
 5
5
-
 6
6
-
 7
7
-
 8
8
-
 9
9
-
 10
10
-
 11
11
-
 12
12
-
 13
13
-
 14
14
-
 15
15
-
 16
16
-
 17
17
-
 18
18
-
 19
19
-
 20
20
-
 21
21
-
 22
22
-
 23
23
-
 24
24


MicroTouch MP-000-AA2 Android Media Player Manuel utilisateur
- Taper
- Manuel utilisateur
- Ce manuel convient également à
dans d''autres langues
Documents connexes
-
 MicroTouch IC-100P-AA1 Manuel utilisateur
-
 MicroTouch DS-320P-A1 Manuel utilisateur
-
 MicroTouch IC-215P-AW3 Touch Computer Mode d'emploi
-
 MicroTouch IC-156P-AW3 All -In-One Touch Computer Mode d'emploi
-
 MicroTouch OF-150P-A1 Manuel utilisateur
-
 MicroTouch IC-215P-AA2 Manuel utilisateur
-
 MicroTouch DT-215P-M1 Medical-Grade Desktop Monitor Manuel utilisateur
-
 MicroTouch SK-150P-A1 Slimline Kiosk Touch Monitor Manuel utilisateur
-
 MicroTouch M1-156IC Manuel utilisateur


