
3-861-841-32 (1)
IC Recorder
1997 by Sony Corporation
ICD-70
Operating Instructions
Mode d’emploi
EN
F

2
EN
EN
Table of Contents
What is the ICD-70 IC recorder? ........................................................................ 4
Features .................................................................................................................. 5
Getting Started
1 Installing the Batteries ...................................................................................... 6
2 Setting the clock ................................................................................................. 8
Basic Operations
Recording messages ........................................................................................... 10
Playing back messages....................................................................................... 13
Erasing messages ................................................................................................ 16
Various Ways of Recording
Starting recording automatically in response to the sound (Advanced VOR
function) ............................................................................................................... 18
Adding a recording to previously recorded messages ................................. 20
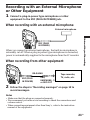
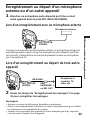
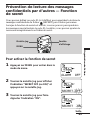
Recording with an external microphone or other equipment ..................... 21

3
EN
Organizing the Files
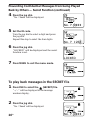
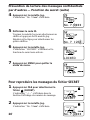
Renumbering the messages according to their priority
— Priority marks ................................................................................................ 22
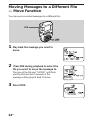
Moving messages to a different file — Move function ................................. 24
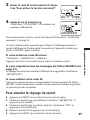
Preventing confidential messages from being played back by others
—Secret function................................................................................................. 25
Other Functions
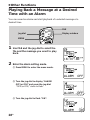
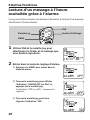
Playing back a messages at a desired time with an alarm
— Alarm function ............................................................................................... 28
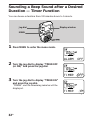
Sounding a beep sound after a desired duration — Timer function .......... 32
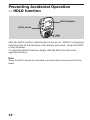
Preventing accidental operation — HOLD function ..................................... 34
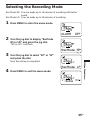
Selecting the recording mode ........................................................................... 35
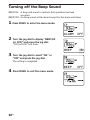
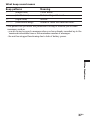
Turning off the beep sound............................................................................... 36
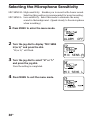
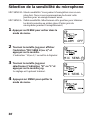
Selecting the microphone sensitivity ............................................................... 38
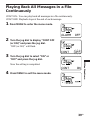
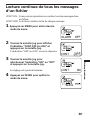
Playing back all messages in a file continuously ........................................... 39
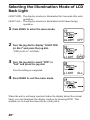
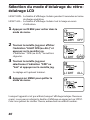
Selecting the illumination mode of LCD back light ...................................... 40
Additional Information
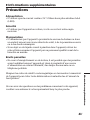
Precautions .......................................................................................................... 41
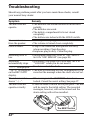
Troubleshooting.................................................................................................. 42
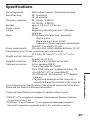
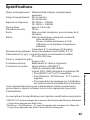
Specifications....................................................................................................... 43
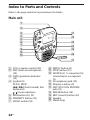
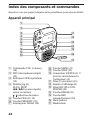
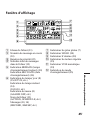
Index to parts and controls ............................................................................... 44
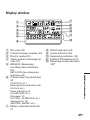
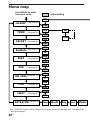
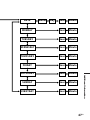
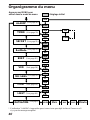
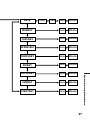
Menu map............................................................................................................ 46
Index ..................................................................................................................... 48
EN

4
EN
Message 4
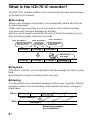
What is the ICD-70 IC recorder?
The ICD-70 IC recorder enables you to record and play back oral messages
in the built-in IC memory.
r Recording
When a new messages is recorded, it is automatically added after the last
recorded messages.
Unlike with tape recorders, you do not need to worry about recording
over previously recorded messages by mistake.
Since you do not need to search for the end of the last recording, you can
start recording quickly whenever you wish.
r Playback
With this IC recorder, you can quickly locate the message you want to play
back.
Reviewing the current recording is also very easy.
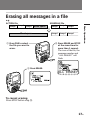
r Erasing
You can quickly erase unwanted messages with an easy operation. When a
message is erased, the next message automatically advances, leaving no
blank space.
Before
Meet Mr. Brown at
2 p.m. tomorrow.
11:30, November 1
12:00, November 1
10:00, November 2
Don’t forget
to call Mary
Make remittance
at ABC bank
9:00, November 4
Send a card to
Miss Smith
Erase Message 3
After
Remaining messages
are renumbered.
Message 1
Message 2
Message 3
Message 1
Message 2
Message 3
Message 1
Message 2
Message 3
Message 5
Message 4
Message 1
Message 2
Message 3
Message 4

5
EN
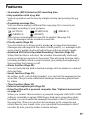
Features
•16 minutes (SP)/24 minutes (LP) recording time
•Easy operation with a jog dial
Various operation can be done by simply turning and pressing the jog
dial.
•Organizing message files
You can choose among 5 different files (see page 11) to record your
messages according to your purpose:
(ACTION) (SCHEDULE) (MEMO-1)
(MEMO-2) (SECRET)
You can move messages from one file to another (See page 24).
Up to 99 messages can be recorded in each file.
•Priority marks (Page 22)
You can attach up to three priority marks ( ) to important messages.
Messages are rearranged in the order of their priority, i.e. messages with
more priority marks are placed before those with less priority marks.
•Advanced VOR (Voice Operated Recording ) function (Page 18)
When this function is activated, the recorder automatically starts and
stops recording in response to the sound. This advanced function starts
recording instantly when a sound is heard, preventing the beginning of
the recording from being cut off.
•Alarm function (Page 28)
You can start playing back a desired message with an alarm on a desired
date and time.
•Secret function (Page 25)
By setting an ID code (4-digit number), you can lock the messages in the
secret file. This prevents confidential messages from being played back
by others.
•Timer function (Page 32)
•External microphone jack (Page 21)
•Using the files with a personal computer (See “Optional accessories”
on page 43.)
When you connect this recorder to a personal computer with WAV LINK
software (available in spring 1998; floppy disk and a connecting cable)
installed, you can transfer the messages recorded in this IC recorder to
the computer. Then you can store the messages in the computer and
attach them to your e-mail. Also, you can search the messages in the IC
recorder by date, priority marks or alarm settings.

6
EN
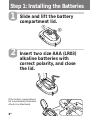
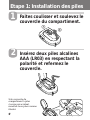
Step 1: Installing the Batteries
Slide and lift the battery
compartment lid.
Insert two size AAA (LR03)
alkaline batteries with
correct polarity, and close
the lid.
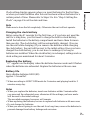
If the battery compartment
lid is accidentally detached,
attach it as illustrated.
1
1
2
2

7
EN
Getting Started
Clock setting display appears when you insert batteries for the first time,
or when you insert batteries after the unit has been without batteries for a
certain period of time. Please refer to Steps 2 to 4 in “Step 2: Setting the
Clock” on page 8 to set the date and time.
Note
Make sure to close the lid completely. Otherwise the unit will not operate.
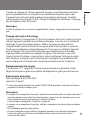
Charging the clock battery
Before using the IC recorder for the first time, or if you have not used the
unit for a long time, you first need to charge the built-in clock battery.
Install the batteries in the battery compartment and leave them for more
than one day. The clock battery will be automatically charged. (You can
use the unit while charging.) If you remove the batteries while charging
the clock battery, the unit will be reset to the initial setting. Once you have
charged the clock battery, you do not have to recharge it, as long as
batteries are installed. When the clock battery is recharged, settings such as
clock setting are maintained for about 3 minutes.
Replacing the battery
“i“ appears on the display when the batteries become weak and it flashes
when the batteries are exhausted. Replace the batteries with new ones.
Battery life
Sony alkaline batteries LR03 (SG)
approx. 1.5 months*
* When recording in LIGHT OPR mode for 2 minutes and playing back for 3
minutes every day.
Notes
• When you replace the batteries, insert new batteries within 3 minutes after
you removed the exhausted ones, otherwise all the settings you have made
will be reset to the initial settings.
The recorded messages, however, will remain.
• When replacing the batteries, be sure to replace both batteries with new ones.
• Do not charge dry batteries.
• When you are not going to use the unit for a long time, remove the batteries to
prevent damage from battery leakage and corrosion.

8
EN
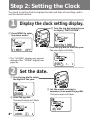
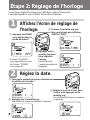
Step 2: Setting the Clock
You need to set the clock to display the date and time of recording, and to
use the alarm function.
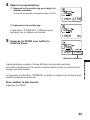
Display the clock setting display.
Set the date.
1 Press MENU to enter
the menu mode.*
1 Turn the jog dial to select
the digits of the year.
1
DATE&TIME
2 Turn the jog dial upward once
to display “DATE & TIME”.
3 Press the jog dial to flash the year.
The year digits will flash.
2 Press the jog dial.
The month digits will flash.
3 Set the month and day in
sequence, then press the jog dial.
The hour digits will flash.
⁄997. ⁄. ⁄
⁄998. ⁄. ⁄
⁄998. ⁄. ⁄
‚:‚‚
2
* The “ALARM” display may appear
instead of the “TIMER” display (see
page 46).
TIMER OFF

9
EN
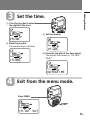
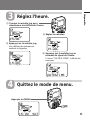
Set the time.
Exit from the menu mode.
1 Turn the jog dial to select
the digits of the hour.
Press MENU.
3
2 Press the jog dial.
The minute digits will flash.
3 Set the minute.
4 Press the jog dial at the time signal.
The display will return to “DATE &
TIME”.
4
⁄5:‚‚
⁄5:‚‚
⁄5:2‚
DATE&TIME
⁄5:2‚ SAT
Getting Started

10
EN
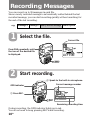
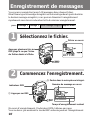
Recording Messages
You can record up to 99 messages in each file.
Since a newly recorded message is automatically added behind the last
recorded message, you can start recording quickly without searching for
the end of the last recording.
Select the file.
Start recording.
During recording, the OPR indicator lights up in red.
You do not need to keep pressing REC while recording.
1
Press FILE repeatedly until
the icon of the desired file
is displayed.
Current file
1 Press REC.
Current message number
Remaining recording time
2 Speak to the built-in microphone.
2
ACTION
OPR indicator
RECORD
e.g.
Message 1 Message 2
Blank space
Newly recorded message

11
EN
Basic Operations
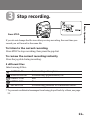
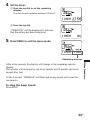
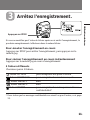
Stop recording.
If you do not change the file icon after you stop recording, the next time you
record you will record in the same file.
To listen to the current recording
Press STOP to stop recording, then press the jog dial.
To review the current recording instantly
Press the jog dial during recording.
5 different files
Select among 5 files:
ACTION file for recording action plans
SCHEDULE file for recording appointments, etc.
MEMO-1 file free
MEMO-2 file free
SECRET file for recording personal or confidential notes*
* To prevent confidential messages from being played back by others, see page
25.
3
Press STOP.

12
EN
Recording Messages (continued)
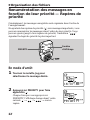
Notes
• When the remaining time of recording reaches 1 minute, “NEAR END” will
flash in the display window. When the memory is full, recording
automatically stops and “MemoryFull” will flash in the display window with
an alarm sound. To continue recording, first erase some of the messages. (Page
16)
• If you press REC when the memory is full, “MemoryFull” will flash with an
alarm sound. Erase some of the messages before you start recording again.
(Page 16)
• If you press REC after you have recorded 99 messages, “INDEX FULL” will
flash with an alarm sound. Select another file or erase some of the messages.
(Page 16)
¡ Tips
• You can record for up to 16 minutes in SP (standard play) mode and
24 minutes in LP (long play) mode. If you record messages in a
mixture of SP and LP modes, the recordable time varies from 16 to
24 minutes. To change the recording mode, see page 35.
• You can select the microphone sensitivity. See page 38.
• You can record with an external microphone. See page 21.

13
EN
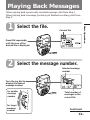
Playing Back Messages
When playing back a previously recorded message, start from Step 1.
When playing back a message you have just finished recording, start from
Step 3.
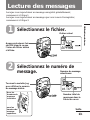
Select the file.
Select the message number.
1
Press FILE repeatedly
until the icon of the
desired file is displayed.
2
Turn the jog dial to
display the desired
message number
for smaller
message
number
for larger
message
number
Selected message
number
Total number of
messages in the
current file
ACTION
Current file
Continued
⁄6:37:4‚
Basic Operations

14
EN
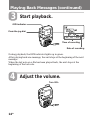
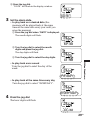
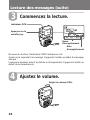
Start playback.
During playback, the OPR indicator lights up in green.
After playing back one message, the unit stops at the beginning of the next
message.
When the last note on a file has been played back, the unit stops at the
beginning of the last note.
Adjust the volume.
Playing Back Messages (continued)
3
4
Press the jog dial.
OPR indicator
Time of recording
Date of recording
Turn VOL.
⁄6:37:45

15
EN
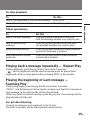
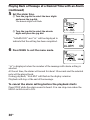
Playing back a message repeatedly — Repeat Play
During playback, press the jog dial for more than 2 seconds.
“ “ will be displayed and the selected message will be played back
repeatedly until you stop playback by pressing STOP or the jog dial.
Playing the beginning of each message —
Scanning Play
During stop mode, press the jog dial for more than 2 seconds.
“SCAN” will be displayed in the display window and the first 5 seconds of
each message in the selected file will be played back.
When you find the desired message, press the jog dial. The message will be
played back until the end.
For private listening
Connect an earphone (not supplied) to the @ jack.
The built-in speaker will be automatically disconnected.
To stop playback
To Do this
stop at the beginning of the current message Press STOP.
stop at the current position Press the jog dial.
Other operations
To Do this
skip to the next message Turn the jog dial downward until you
find the message number you want to play.
skip to the previous Turn the jog dial upward until you find
message the message number you want to play.
search forward during Turn the jog dial downward while playback
pressing it and keep it pressed.
search backward during Turn the jog dial upward while pressing
playback it and keep it pressed.
Basic Operations

16
EN
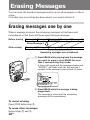
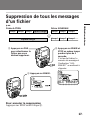
Erasing Messages
You can erase the recorded messages one by one or all messages in a file at
a time.
Note that once a recording has been erased, you cannot retrieve it.
Erasing messages one by one
When a message is erased, the remaining messages will advance and
renumbered so that there will be no space between messages.
Erase Message 3
Message 1 Message 2
Message 3 Message 4
Before erasing
After erasing
Remaining messages are renumbered.
To cancel erasing
Press STOP before step 2.
To erase other messages
Repeat steps 1 and 2.
Message 1 Message 3
Message 4 Message 5Message 2
1 Press ERASE while playing back the message
you want to erase or press ERASE for more
than 1 second during stop mode.
A beep will sound and the message number and
“ERASE?” will flash while the first and last 5
seconds of the message is played back 10 times.
2 Press ERASE while the message is being
played back.
The message is erased and the remaining
messages will be renumbered.
ERASE?

17
EN
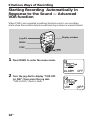
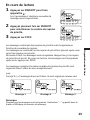
Erasing all messages in a file
e.g.
ACTION file
Message 1
Message 2
Message 3
Blank space
Blank space
1 Press FILE to select
the file you want to
erase.
2 Press ERASE and STOP
at the same time for
more than 1 second.
The icon of the file, the
message number and
“ALL ERASE?” will
flash.
To cancel erasing
Press STOP before step 3.
Message 1
Message 2
Message 1
Message 2
ALL ERASE?
3 Press ERASE.
Basic Operations
SCHEDULE file
Message 3
Message 3

18
EN
”Various Ways of Recording
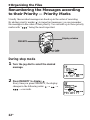
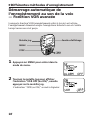
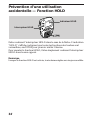
Starting Recording Automatically in
Response to the Sound — Advanced
VOR function
When VOR (voice operated recording) function is set to on, recording
starts when the recorder detects sound and stops when no sound is heard.
STOP
Display window
Jog dial
MENU
1 Press MENU to enter the menu mode.
2 Turn the jog dial to display “VOR OFF
(or ON)”, then press the jog dial.
“OFF (or ON)” starts to flash.
ALARM OFF
VOR OFF

19
EN
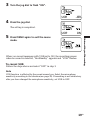
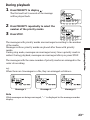
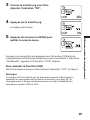
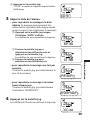
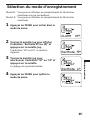
3 Turn the jog dial to flash “ON”.
4 Press the jog dial.
The setting is completed.
5 Press MENU again to exit the menu
mode.
When you record messages with VOR set to ON, the recording pauses
when no sound is detected, “RecStandby” appears and “VOR” flashes.
To cancel VOR
Follow the steps above and select “OFF” in step 3.
Note
VOR function is affected by the sound around you. Select the microphone
sensitivity according to the situation(see page 38). If recording is not satisfactory
after you have changed the microphone sensitivity, set VOR to OFF.
VOR ON
VOR ON
Various Ways of Recording

20
EN
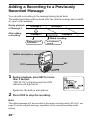
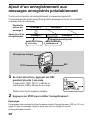
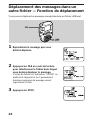
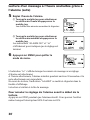
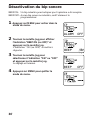
Adding a Recording to a Previously
Recorded Message
You can add a recording to the message being played back.
The added recording will be placed after the current message and counted
as a part of the message.
During playback
of Message 3
After adding
a recording
Message 3
Message 4
Meeting at 2 o’clock
on December 1.
at Conference
room A
Added recording
STOP
REC
Built-in microphone
1 During playback, press REC for more
than 1 second.
“REC PLUS” is displayed and the OPR
indicator will light in red.
Speak into the built-in microphone.
2 Press STOP to stop the recording.
Note
The added message will be recorded in the same recording mode (SP or LP; see
page 35) as the original message, regardless of the current recording mode
setting.
Message 3
Message 4
REC PLUS
La page est en cours de chargement...
La page est en cours de chargement...
La page est en cours de chargement...
La page est en cours de chargement...
La page est en cours de chargement...
La page est en cours de chargement...
La page est en cours de chargement...
La page est en cours de chargement...
La page est en cours de chargement...
La page est en cours de chargement...
La page est en cours de chargement...
La page est en cours de chargement...
La page est en cours de chargement...
La page est en cours de chargement...
La page est en cours de chargement...
La page est en cours de chargement...
La page est en cours de chargement...
La page est en cours de chargement...
La page est en cours de chargement...
La page est en cours de chargement...
La page est en cours de chargement...
La page est en cours de chargement...
La page est en cours de chargement...
La page est en cours de chargement...
La page est en cours de chargement...
La page est en cours de chargement...
La page est en cours de chargement...
La page est en cours de chargement...
La page est en cours de chargement...
La page est en cours de chargement...
La page est en cours de chargement...
La page est en cours de chargement...
La page est en cours de chargement...
La page est en cours de chargement...
La page est en cours de chargement...
La page est en cours de chargement...
La page est en cours de chargement...
La page est en cours de chargement...
La page est en cours de chargement...
La page est en cours de chargement...
La page est en cours de chargement...
La page est en cours de chargement...
La page est en cours de chargement...
La page est en cours de chargement...
La page est en cours de chargement...
La page est en cours de chargement...
La page est en cours de chargement...
La page est en cours de chargement...
La page est en cours de chargement...
La page est en cours de chargement...
La page est en cours de chargement...
La page est en cours de chargement...
La page est en cours de chargement...
La page est en cours de chargement...
La page est en cours de chargement...
La page est en cours de chargement...
La page est en cours de chargement...
La page est en cours de chargement...
La page est en cours de chargement...
La page est en cours de chargement...
La page est en cours de chargement...
La page est en cours de chargement...
La page est en cours de chargement...
La page est en cours de chargement...
La page est en cours de chargement...
La page est en cours de chargement...
La page est en cours de chargement...
La page est en cours de chargement...
La page est en cours de chargement...
La page est en cours de chargement...
La page est en cours de chargement...
La page est en cours de chargement...
La page est en cours de chargement...
La page est en cours de chargement...
La page est en cours de chargement...
La page est en cours de chargement...
-
 1
1
-
 2
2
-
 3
3
-
 4
4
-
 5
5
-
 6
6
-
 7
7
-
 8
8
-
 9
9
-
 10
10
-
 11
11
-
 12
12
-
 13
13
-
 14
14
-
 15
15
-
 16
16
-
 17
17
-
 18
18
-
 19
19
-
 20
20
-
 21
21
-
 22
22
-
 23
23
-
 24
24
-
 25
25
-
 26
26
-
 27
27
-
 28
28
-
 29
29
-
 30
30
-
 31
31
-
 32
32
-
 33
33
-
 34
34
-
 35
35
-
 36
36
-
 37
37
-
 38
38
-
 39
39
-
 40
40
-
 41
41
-
 42
42
-
 43
43
-
 44
44
-
 45
45
-
 46
46
-
 47
47
-
 48
48
-
 49
49
-
 50
50
-
 51
51
-
 52
52
-
 53
53
-
 54
54
-
 55
55
-
 56
56
-
 57
57
-
 58
58
-
 59
59
-
 60
60
-
 61
61
-
 62
62
-
 63
63
-
 64
64
-
 65
65
-
 66
66
-
 67
67
-
 68
68
-
 69
69
-
 70
70
-
 71
71
-
 72
72
-
 73
73
-
 74
74
-
 75
75
-
 76
76
-
 77
77
-
 78
78
-
 79
79
-
 80
80
-
 81
81
-
 82
82
-
 83
83
-
 84
84
-
 85
85
-
 86
86
-
 87
87
-
 88
88
-
 89
89
-
 90
90
-
 91
91
-
 92
92
-
 93
93
-
 94
94
-
 95
95
-
 96
96


dans d''autres langues
- English: Sony ICD 70 Operating instructions
Documents connexes
-
Sony ICD V21 Mode d'emploi
-
-
-
Sony ICD-55 Le manuel du propriétaire
-
-
-
-
-
-