Silvercrest 37102 Le manuel du propriétaire
- Catégorie
- Fers
- Taper
- Le manuel du propriétaire
Ce manuel convient également à

STEAM IRON SDBK 2400 C2
IAN 37102
STEAM IRON
Operating instructions
ÅNGSTRYKJÄRN
Bruksanvisning
FER À REPASSER VAPEUR
Mode d’emploi
DAMPFBÜGELEISEN
Bedienungsanleitung
HÖYRYSILITYSRAUTA
Käyttöohje
DAMPSTRYGEJERN
Betjeningsvejledning
STOOMSTRIJKIJZER
Gebruiksaanwijzing
RP37102_Dampfbuegeleisen_LB3.indd 2 06.09.13 11:23

English..................................................................................... 2
Suomi.................................................................................... 14
Svenska ................................................................................ 26
Dansk.................................................................................... 38
Français................................................................................. 52
Nederlands............................................................................ 66
Deutsch ................................................................................. 80
ID: SDBK 2400 C2_13_V1.6
__RP37102_Dampfbügeleisen_B3.book Seite 1 Montag, 2. September 2013 8:00 20

Overview / Yleiskatsaus / Översikt / Oversigt / Aperçu de l'appareil
Overzicht / Übersicht
B
12 4356 87
910
12
11
13
14
18
16
20
21
22
19
17
23
15
C
E
A
D
__RP37102_Dampfbügeleisen_B3.book Seite 2 Montag, 2. September 2013 8:00 20

2
GB
Contents
1. Overview ........................................................................................ 3
2. Intended purpose ............................................................................ 4
3. Safety information ........................................................................... 4
4. Items supplied ................................................................................. 7
5. Normal or cable-free ironing ........................................................... 7
6. Before using for the first time ........................................................... 7
7. Operation ........................................................................................ 8
7.1 Filling the water tank ............................................................................. 8
7.2 Set iron temperature.............................................................................. 8
7.3 Spray function ...................................................................................... 9
7.4 Ironing without steam ............................................................................ 9
7.5 Ironing with steam................................................................................. 9
7.6 Steam burst function .............................................................................. 9
8. Cleaning ........................................................................................ 10
9. Storage ......................................................................................... 11
10. Disposal ........................................................................................ 11
11. Trouble-shooting ............................................................................ 11
12. Technical specifications .................................................................. 12
13. Warranty of the HOYER Handel GmbH ........................................... 12
__RP37102_Dampfbügeleisen_B3.book Seite 2 Montag, 2. September 2013 8:00 20

3
GB
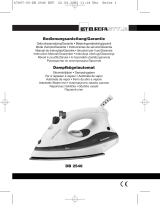
1. Overview
1 Spray nozzle
2 Lid (of the water tank)
3 Steam flow rate controller: from no steam to a lot of steam
4 Spray button
5 Steam burst button
6 Non-slip rubber grip
7 Handle
8 Electrical contacts
9 Moving protective sleeve for power cable
10 Power cable with mains plug
11 Cable base
12 Switch on stand
13 Stand
14 Cable spool in base of stand
15 Temperature control lamp
16 Position mark for setting the temperature controller
17 Water tank
18 Rest for sole plate, heat-resistant
19 Sole plate with holes for steam jet
20 Temperature controller
21 SELF-CLEAN Self-cleaning button
22 max Marking of the maximum filling level of the water tank
23 Measuring beaker
__RP37102_Dampfbügeleisen_B3.book Seite 3 Montag, 2. September 2013 8:00 20

4
GB
Thank you for your trust!
Congratulations on your new cable-free
steam iron
.
For a safe handling of the product and in or-
der to get to know the entire scope of fea-
tures:
• Thoroughly read these operat-
ing instructions prior to initial
commissioning.
• Above all, observe the safety in-
structions!
• The device should only be used
as described in these operating
instructions.
• Keep these operating instruc-
tions for reference.
• If you pass the device on to
someone else, please include
these operating instructions.
We hope you enjoy your new cable-free
steam iron!
2. Intended purpose
The steam iron is suitable for ironing items of
laundry.
The device is designed for private home use
and must not be used for commercial purpos-
es.
The device must only be used indoors.
Foreseeable misuse
DANGER - Risk of fire!
Even during short interruptions,
always place the steam iron in the
stand 13 and never on its sole plate
19.
3. Safety information
Warnings
If necessary, the following warnings will be used in these operating instructions:
DANGER! High risk: failure to observe this warning may result in injury to life and
limb.
WARNING! Moderate risk: failure to observe this warning may result in injury or serious
material damage.
CAUTION: Low risk: failure to observe this warning may result in minor injury or material
damage.
NOTE: Circumstances and specifics that must be observed when handling the device.
Instructions for safe operation
• This device can be used by children from the age
of 8 and people with restricted physical, sensory
or intellectual abilities or people without adequate
experience and/or understanding, if they are su-
pervised or instructed on how to use this device
__RP37102_Dampfbügeleisen_B3.book Seite 4 Montag, 2. September 2013 8:00 20

5
GB
safely and if they are aware of the resulting risks.
Children must not play with the device. Cleaning
and user maintenance must not be performed by
children unless they are older than 8 years and su-
pervised.
• While switched on or cooling down, the iron and
its power cable must be kept out of the reach of
children younger than 8 years.
• The iron must not be left unattended when it is con-
nected to the power mains.
• The plug must be pulled out of the socket before
the water container is filled with water.
• The filling opening must not be opened during op-
eration.
• The iron must be used on a flat surface.
• The iron must only be used together with the corre-
sponding stand.
• Ensure that the stand is always placed on a level,
stable surface.
• The iron must not be used if it has been dropped,
if visible damage can be seen, or if it leaks.
DANGER for children
• Packing materials are not children's
toys. Children should not be allowed to
play with the plastic bags: there is a risk
of suffocation.
DANGER! Risk of electric
shock due to moisture
• Never place the device anywhere that it
could fall into water while plugged in.
• Protect the device from moisture, water
drops and water spray.
• The device, the cable and the mains
plug must not be immersed in water or
any other liquids.
__RP37102_Dampfbügeleisen_B3.book Seite 5 Montag, 2. September 2013 8:00 20

6
GB
• If liquid gets into the device (except in
the water tank), pull out the mains plug
immediately. Have the device checked
before reusing.
• If the device (steam iron or stand) never-
theless falls into water, pull out the pow-
er plug immediately and only then
remove the device from the water. Do
not use the device again, and have it
checked by a specialist.
• The water tank must not be filled with
water above the max marking, other-
wise it may overflow.
• Never touch the device with wet hands.
DANGER! Risk of electric
shock
• Lay the power cable such that no one
can step on it, get caught on it, or trip
over it.
• Only connect the mains plug to a prop-
erly installed and easily accessible wall
socket whose voltage corresponds to
the specifications on the rating plate.
The wall socket must continue to be eas-
ily accessible after the device is
plugged in.
• Ensure that the power cable cannot be
damaged by sharp edges or hot points.
Do not wrap the power cable around
the device (risk of cable damage!).
• Ensure that the power cable cannot be
trapped or crushed.
• To pull the mains plug out of the wall
socket, always pull on the mains plug,
and never on the power cable.
• Disconnect the mains plug from the wall
socket…
… after every use
… if there is a fault,
… when you are not using the device,
… before you clean the device, and
… during thunderstorms.
• To avoid any risk, do not make modifi-
cations to the product. You also must
not replace the power cable yourself.
Repairs must be carried out by a spe-
cialist workshop or the Service Centre.
• If the power cable or the device is dam-
aged, immediately pull the mains plug
out of the wall socket.
DANGER! Fire hazard!
• Use the device on a stable, level and
heat-resistant surface.
• Even during short interruptions, always
place the steam iron in the stand and
never on its sole plate. It must be placed
on a stable and heat-resistant surface.
Pull out the mains plug during longer in-
terruptions or if you leave the room.
DANGER! Risk of injury
through burning!
• Do not touch the hot surfaces of the de-
vice.
• Allow the device to cool down com-
pletely before you clean it or put it
away.
• Danger due to sudden evaporation.
Allow the device to cool down com-
pletely before you refill it with fresh
water.
• Warning: risk of burns from steam and
sprayed hot water when using the
steam burst button. When using the
steam burst, always point the sole plate
towards the item of laundry or ironing
board.
• The sole plate becomes very hot during
operation. Only touch the handle and
control elements of the steam iron dur-
ing operation.
Never iron items of clothing on a per-
son's body.
WARNING! Risk of material damage
• Only use the original accessories.
• Do not use any astringent or abrasive
cleaning agents.
• Do not iron over e.g. zippers, metal but-
tons or applications that could damage
the sole plate.
__RP37102_Dampfbügeleisen_B3.book Seite 6 Montag, 2. September 2013 8:00 20

7
GB
• Do not put vinegar, limescale remover
or any other additives into the water
tank. Additives can damage the device.
4. Items supplied
1 steam iron
1 stand 13
1 measuring beaker 23
1 set of operating instructions
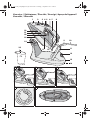
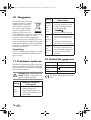
5. Normal or cable-free
ironing
The steam iron can be operated cable-free.
This makes the steam iron a little lighter, and
the cable is no longer in the way during iron-
ing.
As soon as the steam iron is replaced on the
stand 13, the sole plate is heated up again.
The temperature control lamp 15 lights up
until the set temperature is reached.
Settings on the stand
The slide switch 12 on the stand 13 allows
you to choose between 3 options:
= cable-free ironing
= ironing with cable
= storage
Cable-free ironing
Figure A: lift the steam iron out forwards
and upwards. The cable base 11 remains in
the stand 13.
Ironing with cable
Figure B: lift the steam iron out forwards
and upwards. The cable base 11 remains
on the steam iron.
NOTE: If you want to work with a great
many bursts of steam in quick succession,
ironing with cable is more suitable. This is
better because the sole plate 19 may fall be-
low the set temperature faster than normal
as a result of the many steam bursts.
Storage
Figure C: the steam iron is locked in place
on the stand 13.
6. Before using for the
first time
1. Ensure that you have pulled out the
mains plug.
2. The switch 12 is in the top position
. Remove the steam iron from the
stand 13. The cable base 11 remains
in the stand.
3. Peel the protective foil off the
sole plate 19.
4. Open the lid 2 (of the water tank).
5. Half-fill the water tank 17.
6. Place the steam iron in the stand 13.
7. Insert the mains plug into a wall socket
corresponding to the technical data.
8. Set the temperature controller 20 to
MAX.
The temperature control lamp 15 lights
up.
9. When the device has reached the de-
sired temperature (temperature control
lamp 15 goes out), iron an old cotton
towel in steam mode until the water tank
17 is empty.
__RP37102_Dampfbügeleisen_B3.book Seite 7 Montag, 2. September 2013 8:00 20

8
GB
7. Operation
DANGER! The sole plate 19 be-
comes very hot during operation.
Only touch the handle 7 and control
elements of the steam iron during
operation.
• Even during short interruptions, always
place the steam iron in the stand 13
and never on its sole plate 19. There is
a fire hazard!
• NOTE: You may notice an odour when
using for the first time. This is a result of
the manufacturing process and is not a
defect with the device. Ensure adequate
ventilation.
The sole plate cools down slightly during
ironing. In order to reach the set temperature
again, the device heats the sole plate up
again, during which the temperature control
lamp 15 lights up. The temperature control
lamp 15 goes out again when the set tem-
perature is reached. This process repeats it-
self during ironing.
Ironing with cable: simply continue iron-
ing during the heating phase.
Cable-free ironing: the steam iron stands
on the stand 13.
Wait until the temperature control lamp 15
goes out.
7.1 Filling the water tank
DANGER! Pull the mains plug out
of the socket before you fill up the
water tank 17.
• Use clean tap water without any addi-
tives (e.g. vinegar, limescale remover,
starch, perfume, softener).
• The integrated anti-limescale protection
reduces limescale deposits for average
water hardness, and thus extends the
service life of the device. If your tap wa-
ter is hard, use distilled water. Where
the water is moderately hard, mix dis-
tilled water and tap water at a ratio of
1:1.
1. Disconnect the mains plug from the wall
socket.
2. Turn the steam flow rate controller 3 left
to .
3. The switch 12 is in the top position
. Remove the steam iron from the
stand 13. The cable base 11 remains
in the stand.
4. Open the lid 2 (of the water tank) and
hold the device at an angle to fill it.
5. Use the measuring beaker 23 to pour in
water up to the mark 22 max, but at
least up to one quarter. Hold the steam
iron upright to check.
6. Close the lid 2 (of the water tank).
7. Place the steam iron on the stand 13
and set the steam flow rate controller 3
to the desired position.
7.2 Set iron temperature
NOTE: The steam iron must be connected to
the cable base in order to heat up.
1. Set the desired temperature using the
temperature controller 20:
- MIN the device is not getting hot
-
÷ Temperature: up to approx.
110 °C
-
÷÷ Temperature: up to approx.
150 °C
-
÷÷÷ Temperature: up to approx.
210 °C
- MAX maximum temperature:
2. The temperature control lamp 15 is lit
for as long as the steam iron is heating.
It goes out when the set temperature has
been reached. You can then begin iron-
ing.
__RP37102_Dampfbügeleisen_B3.book Seite 8 Montag, 2. September 2013 8:00 20

9
GB
7.3 Spray function
Use the spray function in order to dampen
dry items of laundry. This option is available
irrespective of the set temperature. For this
purpose, the water tank 17 must be at least
one quarter full.
• Press the spray button 4 repeatedly.
While doing so, hold the steam iron
over the item of laundry. Ensure that no
water sprays onto the ground.
7.4 Ironing without steam
Sensitive fabrics are ironed at lower temper-
atures and without steam. In order to damp-
en them, the spray function is available.
1. Set the steam flow rate control 3 to
and set the temperature controller 20 to
MIN.
2. Fill the water tank 17 if you wish to use
the spray function.
3. Place the steam iron in the stand 13.
4. Connect the mains plug with the wall
socket.
5. Set the desired temperature using the
temperature controller 20. The tempera-
ture control lamp 15 lights up.
6. Start ironing as soon as the ironing tem-
perature has been reached 15 and the
temperature control lamp goes out.
7. Finish ironing, set the temperature con-
troller 20 to MIN and pull out the
mains plug.
8. Allow the steam iron to cool down, and
pour off any remaining water from the
water tank 17 through the filling open-
ing in the water tank (under the lid 2).
7.5 Ironing with steam
Steam ironing requires a high temperature,
at least the temperature setting for . In or-
der to additionally dampen items of cloth-
ing, the spray function is also available.
1. Set the steam flow rate control 3 to
and set the temperature controller 20 to
MIN.
2. Fill the water tank 17.
3. Place the steam iron in the stand 13.
4. Connect the mains plug with the wall
socket
5. Set the temperature controller 20 to the
desired temperature (at least ). The
temperature control lamp 15 lights up.
6. As soon as the ironing temperature has
been reached and the temperature con-
trol lamp 15 goes out, adjust the steam
flow rate controller 3 to the desired
steam flow rate and start
ironing.
The steam will...
… start to come out as soon as you hold
the steam iron horizontal, and
… stop as soon as:
- you hold the steam iron vertical,
- you place the steam iron in the stand
13,
- the temperature falls too low,
- the water tank is empty,
or
- you set the steam flow rate controller
3 to .
7. Finish ironing, set the temperature con-
troller 20 to MIN, set the steam flow
rate controller 3 to and pull out the
mains plug.
8. Allow the steam iron to cool down, and
pour off any remaining water from the
water tank 17 through the filling open-
ing in the water tank (under the lid 2).
7.6 Steam burst function
The steam burst function requires a high tem-
perature. Select a temperature setting be-
tween and MAX. For this purpose, the
water tank 17 must be at least one quarter
full.
__RP37102_Dampfbügeleisen_B3.book Seite 9 Montag, 2. September 2013 8:00 20

10
GB
• Press the steam burst button 5 while
the steam iron glides over the item of
laundry.
• Wait a few seconds before you press
the steam burst button 5 again.
NOTE: For smoothing items of clothing that
are hanging up, you can use the steam burst
in a vertical position.
8. Cleaning
DANGER! Pull the mains plug out
of the wall socket before you clean
the steam iron.
• Allow the device to cool down before
cleaning.
CAUTION: Do not use any astringent or
abrasive cleaning agents.
Cleaning the device
• For cleaning the device, use a soft,
moistened cloth.
• Dirt can be removed from the sole plate
19 using commercially available clean-
ing agents for chrome, silver or stainless
steel.
• Residues that have melted on can be re-
moved by heating the steam iron up to
the MAX setting and then ironing an
old cotton cloth.
Self-cleaning
CAUTION: Do not put vinegar, limescale
remover or any other additives into the wa-
ter tank 17. Additives can damage the de-
vice.
If you use tap water, you should run the self-
cleaning cycle after every use. Otherwise use
the self-cleaning cycle at least twice per
month.
1. Fill the water tank 17.
2. Place the steam iron in the stand 13.
3. Connect the mains plug with the wall
socket.
4. Set the steam flow rate control 3 to
and set the temperature controller 20 to
MAX.
5. Wait until the temperature control lamp
15 goes out.
6. The switch 12 is in the bottom position
. Remove the steam iron from the
stand 13. The cable base 11 remains
on the steam iron.
7. While doing so, hold the device hori-
zontally over a heat-resistant household
dish.
8. Press the 21 SELF-CLEAN button and
hold it down. Limescale residues will
then be ejected with steam and hot wa-
ter from the steam holes in the sole plate
19. Hold the button down until no more
steam or water emerges.
9. Repeat steps 1 to 8 until no more resi-
dues are coming out.
10.Pull out the mains plug, allow the device
to cool down, and pour off any remain-
ing water.
__RP37102_Dampfbügeleisen_B3.book Seite 10 Montag, 2. September 2013 8:00 20

11
GB
9. Storage
DANGER!
Store the steam iron out of the reach
of children.
1. Set the temperature controller 20 to
MIN.
2. Place the iron on the stand 13 and set
the switch 12 to the middle position .
3. Allow the device to cool down.
4. Set the steam flow rate controller 3 to
.
5. Set the switch 12 to the upper position
.
6. Remove the iron from the stand 13 and
pour off any remaining water through
the filling opening of the water tank (un-
der the lid 2).
7. Place the iron on the stand 13 and set
the switch 12 to the middle position .
8. Figure E: coil up the power cable in
the base of the stand.
9. Store the iron and the stand 13 in an
upright position.
10. Disposal
The symbol showing a
wheelie bin crossed through
indicates that the product re-
quires separate refuse collec-
tion in the European Union.
This applies to the product
and all accessories marked
with this symbol. Products identified with this
symbol may not be discarded with normal
household waste, but must be taken to a col-
lection point for recycling electric and elec-
tronic appliances. Recycling helps to reduce
the consumption of raw materials and pro-
tect the environment.
Packaging
When disposing of the packaging, make
sure you comply with the environmental reg-
ulations applicable in your country.
11. Trouble-shooting
If your device fails to function as required,
please try this checklist first. Perhaps there is
only a minor problem, and you can solve it
yourself.
DANGER! Risk of electric
shock! Do not attempt to repair the
device yourself under any
circumstances.
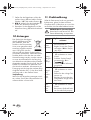
Fault Possible causes/Action
No
function
• Connect the device to the
mains power supply.
• Use the temperature control-
ler 20 to turn up the temper-
ature.
Little or
no steam
• Fill the water tank 17 to at
least one quarter full.
• Switch on the steam flow
rate controller 3
().
• Run the self-cleaning cycle.
Steam
burst is
not work-
ing.
• Fill the water tank 17 to at
least one quarter full.
• Set the right temperature.
• Leave a pause of a few sec-
onds between steam bursts.
Spray
burst is
not work-
ing.
• Fill the water tank 17 to at
least one quarter full.
• For the first spray burst, you
need to pump several times.
__RP37102_Dampfbügeleisen_B3.book Seite 11 Montag, 2. September 2013 8:00 20

12
GB
12. Technical
specifications
Subject to technical modification
13. Warranty of the
HOYER Handel
GmbH
Dear Customer,
your device is provided with a 3 year war-
ranty starting with the purchase date. In the
event of product defects, you are entitled to
statutory rights against the vendor. These
statutory rights are not restricted by our war-
ranty presented in the following.
Warranty conditions
The warranty period starts with the purchase
date. Please keep the original purchase re-
ceipt in a safe place. This document is re-
quired to verify the purchase.
If within three years from the purchase date
of this product a material or factory defect
occurs, the product will be repaired or re-
placed by us – at our discretion – free of
charge to you. This warranty implies that
within the period of three years the defective
device and the purchase receipt are present-
ed, including a brief written description of
the defect and the time it occurred.
If the defect is covered by our warranty, the
repaired or a new product will be returned
to you. No new warranty period starts with
a repair or replacement of the product.
Warranty period and statutory
claims for defects
The warranty period is not extended when
the warranty has been claimed. This also ap-
plies to replaced and repaired parts. Any
damages and defects already existing at the
time of purchase must be reported immedi-
ately upon unpacking. Repairs arising after
the expiration of the warranty period are
subject to a charge.
Warranty coverage
The device was produced carefully according
to strict quality guidelines and tested diligent-
ly prior to delivery.
The warranty applies to material or factory
defects. This warranty does not include prod-
uct parts that are subject to standard wear
and therefore can be considered wear parts;
the same applies to damages at fragile parts,
e.g. switches, rechargeable batteries or parts
made of glass.
This warranty expires if the product is dam-
aged, not used as intended or not serviced.
For the proper operation of the product, all in-
structions listed in the operating instructions
must be observed carefully. Any form of use
and handling that is advised against in the
operating instructions or warned against
must always be avoided.
The product is only intended for private and
not for commercial use. In the case of incor-
rect and improper treatment, use of force and
interventions not performed by our author-
ised Service Centre, the warranty shall cease.
Handling in case of a warranty
claim
In order to ensure prompt processing of your
matter, please observe the following notes:
• Please keep the article number
IAN: 37102
and the purchase receipt
as a purchase verification for all inquiries.
Model: SDBK 2400 C2
Mains voltage: 220-240 V ~50/60 Hz
Protection class: I
Power rating: 2,000 - 2,400 W
__RP37102_Dampfbügeleisen_B3.book Seite 12 Montag, 2. September 2013 8:00 20

13
GB
• If faulty operation or other defects occur,
first contact the Service Centre listed in
the following by telephone or email.
• Then, you are able to send a product re-
ported as defective free of charge to the
service address specified to you, includ-
ing the purchase receipt and the infor-
mation on the defect and when it
occurred.
Please visit www.lidl-service.com to
download this and many other
manuals, product videos and soft-
ware.
Service Centre
Service Great Britain
Tel.: 0871 5000 720 (£ 0.10/Min.)
E-Mail: hoyer@lidl.co.uk
Service Ireland
Tel.: 1890 930 034
(0,08 EUR/Min., (peak))
(0,06 EUR/Min., (off peak))
E-Mail: hoyer@lidl.ie
IAN: 37102
Supplier
Please note that the following address is no
service address. First contact the afore-
mentioned Service Centre.
HOYER Handel GmbH
Kühnehöfe 5
22761 Hamburg
Germany
GB
IE
__RP37102_Dampfbügeleisen_B3.book Seite 13 Montag, 2. September 2013 8:00 20

14
FI
Sisältö
1. Yleiskatsaus .................................................................................. 15
2. Määräystenmukainen käyttö ......................................................... 16
3. Turvaohjeita .................................................................................. 16
4. Toimituksen sisältö ........................................................................ 19
5. Normaali tai johdoton silitys .......................................................... 19
6. Ennen ensimmäistä käyttöä ........................................................... 19
7. Toimintaohjeet ............................................................................... 20
7.1 Vesisäiliön täyttäminen ........................................................................ 20
7.2 Silityslämpötilan säätäminen ................................................................. 20
7.3 Suihketoiminto .................................................................................... 21
7.4 Silitys ilman höyryä ............................................................................. 21
7.5 Silitys höyryllä .................................................................................... 21
7.6 Höyrysuihkutoiminto ............................................................................ 22
8. Puhdistus ....................................................................................... 22
9. Säilytys ......................................................................................... 23
10. Käytetyn materiaalin hävittäminen ................................................ 23
11. Häiriötapauksessa ......................................................................... 23
12. Tekniset tiedot ............................................................................... 24
13. Takuun antaja on HOYER Handel GmbH ........................................ 24
__RP37102_Dampfbügeleisen_B3.book Seite 14 Montag, 2. September 2013 8:00 20

15
FI
1. Yleiskatsaus
1 Suihkesuutin
2 Vesisäiliön kansi
3 Höyrynsäädin: ilman höyryä - paljon höyryä
4 Suihke painike
5 Höyrysuihkun painike
6 Pitävä kumikahva
7 Kahva
8 Sähkökontaktit
9 Liikkuva liitosjohdon suojus
10 Liitosjohto verkkopistokkeella
11 Johtojalusta
12 Silitysaseman kytkin
13 Silitysasema
14 Johtokela silitysaseman pohjassa
15 Lämpötilan merkkivalo
16 Kohdistusmerkki lämpötilansäätimen asetusta varten
17 Vesisäiliö
18 Silityspohjan alusta, lämmönkestävä
19 Silityspohja, jossa höyryn poistumisaukot
20 Lämpötilansäädin
21 SELF CLEAN Itsepuhdistus-painike
22 max Merkintä vesisäiliön enimmäistäyttömäärää varten
23 Mitta-astia
__RP37102_Dampfbügeleisen_B3.book Seite 15 Montag, 2. September 2013 8:00 20

16
FI
Sydämellinen kiitos
luottamuksestasi!
Onnittelumme uuden johdottoman
höyrysili-
tysrautasi
johdosta.
Tuotteen turvallista käyttöä ja kaikkiin toimin-
toihin tutustumista varten on huomioitava
seuraavaa:
• Ennen ensimmäistä käyttöönot-
toa on tämä käyttöohje luettava
huolellisesti läpi.
• Turvaohjeita on välttämättä nou-
datettava!
• Laitetta saa käyttää vain tässä
käyttöohjeessa kuvatulla taval-
la.
• Tämä käyttöohje on säilytettävä
huolellisesti.
• Jos laite annetaan toiselle henki-
lölle, tulisi tämän käyttöohjeen
olla mukana.
Toivomme, että uudesta johdottomasta höy-
rysilitysraudastasi on paljon iloa!
2. Määräystenmukainen
käyttö
Höyrysilitysrauta on tarkoitettu vaatteiden si-
littämiseen.
Laite on suunniteltu yksityisessä kotitaloudes-
sa käytettäväksi eikä sitä saa käyttää kaupal-
lisiin tarkoituksiin.
Laitetta saa käyttää vain sisätiloissa.
Ennakoitava väärinkäyttö
VAARA - Palovaara!
Aseta höyrysilitysrauta myös
hetkittäisten taukojen ajaksi aina
silitysasemaan 13, äläkä
silityspohjan 19 päälle.
3. Turvaohjeita
Varoituksiin liittyvää
Tarpeen mukaan käytetään tässä käyttöohjeessa seuraavia varoitusmerkintöjä:
VAARA! Suuri riski: varoituksen laiminlyönnistä voi aiheutua tapaturman vaara.
VAROITUS! Keskimääräinen riski: varoituksen huomiotta jättämisestä voi seurata louk-
kaantumisia tai vakavia aineellisia vahinkoja.
VARO: Alhainen riski: varoituksen huomiotta jättämisestä voi seurata lieviä loukkaantumi-
sia tai aineellisia vahinkoja.
OHJE: Seikkoja ja erityiskohtia, jotka on huomioitava laitteen käytön yhteydessä.
Ohjeita turvallista käyttöä varten
• Tätä laitetta voivat käyttää vähintään 8 vuotta täyt-
täneet lapset ja sellaiset henkilöt, joiden fyysiset,
sensoriset tai henkiset kyvyt tai kokemus ja/tai tie-
dot ovat riittämättömät, jos heitä valvotaan tai mi-
__RP37102_Dampfbügeleisen_B3.book Seite 16 Montag, 2. September 2013 8:00 20

17
FI
käli heidät on opastettu käyttämään laitetta
turvallisesti ja ymmärtämään sen käyttöön liittyvät
vaarat. Lapset eivät saa leikkiä laitteella. Lapset ei-
vät saa suorittaa laitteen puhdistusta ja käyttäjä-
huoltoa, elleivät he ole yli 8-vuotiaita ja valvonnan
alaisina.
• Silitysraudan ja sen liitosjohdon on päällekytken-
nän ja jäähtymisen aikana oltava 8 vuotta nuo-
rempien lasten ulottumattomissa.
• Silitysrautaa ei saa jättää ilman valvontaa sen
ollessa verkkoon kytkettynä.
• Pistoke on irrotettava pistorasiasta, ennen kuin
vesisäiliöön täytetään vettä.
• Täyttöaukkoa ei saa avata käytön aikana.
• Silitysrautaa on käytettävä tasaisen pinnan päällä.
• Silitysrautaa saa käyttää vain vastaavan silitysase-
man kanssa.
• Varmista, että silitysasema asetetaan ainoastaan
tasaiselle ja tukevalle pinnalle.
• Silitysrautaa ei saa käyttää, jos se on päässyt pu-
toamaan ja siinä on näkyviä vaurioita tai se vuo-
taa.
VAARA lapsille
• Pakkausmateriaali ei kuulu lasten leik-
keihin. Lasten ei pidä antaa leikkiä muo-
vipusseilla. Niistä voi aiheutua
tukehtumisvaara.
VAARA sähköiskusta
kosteuden takia
• Älä aseta laitetta koskaan siten, että se
voi pudota veteen ollessaan kytkettynä.
• Laite on suojattava kosteudelta sekä tip-
pu- ja roiskevedeltä.
• Laitetta, johtoa ja verkkopistoketta ei
saa upottaa veteen tai muihin nesteisiin.
__RP37102_Dampfbügeleisen_B3.book Seite 17 Montag, 2. September 2013 8:00 20

18
FI
• Jos laitteeseen (vesisäiliötä lukuunotta-
matta) pääsee nestettä, on verkkopisto-
ke välittömästi irrotettava. Sen jälkeen
laite on annettava tarkastaa, ennen kuin
se otetaan uudelleen käyttöön.
• Jos laite (höyrysilitysrauta tai silitysase-
ma) on päässyt putoamaan veteen, irro-
ta heti verkkopistoke ja ota laite vasta
sitten pois vedestä. Älä ota laitetta täl-
löin enää käyttöön, vaan anna se ensin
ammattimaisen korjaamon tarkastetta-
vaksi.
• Vesisäiliötä ei saa täyttää vedellä mer-
kintää max enempää ylivuodon estä-
miseksi.
• Älä käytä laitetta märin käsin.
VAARA sähköiskusta
• Asettele liitosjohto siten, ettei kukaan
voi astua sen päälle, jäädä siihen kiinni
tai kompastua siihen.
• Liitä verkkopistoke vain säännönmukai-
sesti asennettuun ja helposti saavutetta-
vaan pistorasiaan, jonka jännite vastaa
tyyppikilvessä olevaa arvoa. Pistorasian
on oltava myös liittämisen jälkeen hyvin
saavutettava.
• Pidä huolta siitä, ettei liitosjohto pääse
vaurioitumaan terävien kulmien tai kuu-
mien paikkojen takia. Älä kierrä liitos-
johtoa laitteen ympärille (vaara johdon
murtumisesta!).
• Pidä huolta siitä, ettei liitosjohto joudu
puristuksiin eikä litistetyksi.
• Irrottaaksesi verkkopistokkeen pistorasi-
asta, vedä aina verkkopistokkeesta, älä-
kä koskaan liitosjohdosta.
• Irrota verkkopistoke pistorasiasta, …
… jokaisen käyttökerran jälkeen,
… jos sattuu häiriö,
… kun et käytä laitetta,
… ennen kuin puhdistat laitteen ja
… aina ukonilmalla.
• Turvateknisistä syistä tuotteen rakentee-
seen ei saa tehdä muutoksia. Myöskään
liitäntäjohtoa ei pidä uusia itse. Vie lai-
te kunnostettavaksi aina ammattitaitoi-
seen korjaamoon tai valmistajan
huoltokeskukseen.
• Jos liitosjohto tai laite on vaurioitunut, ir-
rota välittömästi verkkopistoke pistorasi-
asta.
VAARA palovaara
• Käytä laitetta tukevalla, tasaisella ja
lämmönkestävällä pinnalla.
• Aseta höyrysilitysrauta myös hetkittäis-
ten taukojen ajaksi aina silitysasemaan
eikä silityspohjan päälle. Alustan on ol-
tava tukeva ja lämmönkestävä. Irrota
verkkopistoke pitempien taukojen ajaksi
tai kun poistut huoneesta.
VAARA palovammoista
• Älä koske laitteen kuumiin pintoihin.
• Anna laitteen jäähtyä kokonaan ennen
sen puhdistamista tai säilytyspaikkaan
asettamista.
• Vaara puuskittaisesta höyrystymisestä.
Anna laitteen jäähtyä, ennen kuin lisäät
raikasta vettä.
• Varoitus palovammoista höyryn ja kuu-
mien ruiskahdusten takia höyrysuihkun
painiketta käytettäessä. Kohdista silitys-
pohja höyrysuihkun aikana aina vaate-
kappaletta tai silitysalustaa kohti.
• Silityspohja kuumenee käytössä voimak-
kaasti. Koske höyrysilitysrautaan käytön
aikana vain kahvasta ja säätimistä.
Älä koskaan silitä päälle puettuja vaat-
teita.
VAROITUS aineellisista vahingoista
• Käytä vain alkuperäisiä varusteita.
• Väkeviä tai hankaavia puhdistusaineita
ei saa käyttää.
• Älä silitä esim. vetoketjujen, metallinap-
pien tai koristeiden yli, jotka voivat va-
hingoittaa silityspohjaa.
• Älä laita vesisäiliöön etikkaa, kalkin-
poistoainetta tai muita lisäaineita. Lisä-
aineet voivat vahingoittaa laitetta.
__RP37102_Dampfbügeleisen_B3.book Seite 18 Montag, 2. September 2013 8:00 20
La page charge ...
La page charge ...
La page charge ...
La page charge ...
La page charge ...
La page charge ...
La page charge ...
La page charge ...
La page charge ...
La page charge ...
La page charge ...
La page charge ...
La page charge ...
La page charge ...
La page charge ...
La page charge ...
La page charge ...
La page charge ...
La page charge ...
La page charge ...
La page charge ...
La page charge ...
La page charge ...
La page charge ...
La page charge ...
La page charge ...
La page charge ...
La page charge ...
La page charge ...
La page charge ...
La page charge ...
La page charge ...
La page charge ...
La page charge ...
La page charge ...
La page charge ...
La page charge ...
La page charge ...
La page charge ...
La page charge ...
La page charge ...
La page charge ...
La page charge ...
La page charge ...
La page charge ...
La page charge ...
La page charge ...
La page charge ...
La page charge ...
La page charge ...
La page charge ...
La page charge ...
La page charge ...
La page charge ...
La page charge ...
La page charge ...
La page charge ...
La page charge ...
La page charge ...
La page charge ...
La page charge ...
La page charge ...
La page charge ...
La page charge ...
La page charge ...
La page charge ...
La page charge ...
La page charge ...
La page charge ...
La page charge ...
La page charge ...
La page charge ...
La page charge ...
La page charge ...
La page charge ...
La page charge ...
La page charge ...
La page charge ...
-
 1
1
-
 2
2
-
 3
3
-
 4
4
-
 5
5
-
 6
6
-
 7
7
-
 8
8
-
 9
9
-
 10
10
-
 11
11
-
 12
12
-
 13
13
-
 14
14
-
 15
15
-
 16
16
-
 17
17
-
 18
18
-
 19
19
-
 20
20
-
 21
21
-
 22
22
-
 23
23
-
 24
24
-
 25
25
-
 26
26
-
 27
27
-
 28
28
-
 29
29
-
 30
30
-
 31
31
-
 32
32
-
 33
33
-
 34
34
-
 35
35
-
 36
36
-
 37
37
-
 38
38
-
 39
39
-
 40
40
-
 41
41
-
 42
42
-
 43
43
-
 44
44
-
 45
45
-
 46
46
-
 47
47
-
 48
48
-
 49
49
-
 50
50
-
 51
51
-
 52
52
-
 53
53
-
 54
54
-
 55
55
-
 56
56
-
 57
57
-
 58
58
-
 59
59
-
 60
60
-
 61
61
-
 62
62
-
 63
63
-
 64
64
-
 65
65
-
 66
66
-
 67
67
-
 68
68
-
 69
69
-
 70
70
-
 71
71
-
 72
72
-
 73
73
-
 74
74
-
 75
75
-
 76
76
-
 77
77
-
 78
78
-
 79
79
-
 80
80
-
 81
81
-
 82
82
-
 83
83
-
 84
84
-
 85
85
-
 86
86
-
 87
87
-
 88
88
-
 89
89
-
 90
90
-
 91
91
-
 92
92
-
 93
93
-
 94
94
-
 95
95
-
 96
96
-
 97
97
-
 98
98


Silvercrest 37102 Le manuel du propriétaire
- Catégorie
- Fers
- Taper
- Le manuel du propriétaire
- Ce manuel convient également à
dans d''autres langues
- English: Silvercrest 37102 Owner's manual
- Deutsch: Silvercrest 37102 Bedienungsanleitung
- Nederlands: Silvercrest 37102 de handleiding
- dansk: Silvercrest 37102 Brugervejledning
- svenska: Silvercrest 37102 Bruksanvisning
- suomi: Silvercrest 37102 Omistajan opas
Documents connexes
-
Silvercrest SDBK 2400 F5 Operating Instructions Manual
-
Silvercrest SDBK 2400 E4 Operating Instructions Manual
-
Silvercrest 331979 1907 Operating Instructions Manual
-
Silvercrest SDBE 2600 A1 Operating Instructions Manual
-
Silvercrest SDB 2400 B3 - IAN 302667 Le manuel du propriétaire
-
-
Silvercrest SDB 2200 D2 Operating Instructions Manual
-
-
Silvercrest SDBS 2400 A1 Le manuel du propriétaire
Autres documents
-
LERVIA KH 1281 Le manuel du propriétaire
-
 EUROPASTYLE DB 2546 Le manuel du propriétaire
-
Aeg-Electrolux DB1100 Manuel utilisateur
-
-
Clatronic DBS 2580 Le manuel du propriétaire
-
-
BOMANN DBS 6033 CB Mode d'emploi
-
Electrolux EDB8590 Manuel utilisateur
-
 Yoo Digital Home VAPYOO 900BLEU Manuel utilisateur
-
Black & Decker IR1375SC Manuel utilisateur

