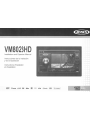
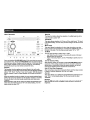
Jensen VM8023HD - DVD Receiver Mode d'emploi
- Catégorie
- Récepteurs multimédia de voiture
- Taper
- Mode d'emploi

r
Ilil
1
[JLJnkD~l
~
.'ADY
VM8023
D
Installation
and
Operation Manual
Instrucciones
de
la
Instalaci6n
y
de
la
Operaci6n
Instructions
d'installation
et
d'operation

VM8023HD
Q.:''''~S>
TABLE
OF
CONTENTS
Introduction 1
Installation 1
Wiring 3
Remote Control Operation 4
Remote Control Functions
5
Operation 6
Satellite Radio Operation
c
•••••••••••••••••••••••••••••••••••••••••••
9
Radio Operation
11
DISCIMP3IWMA
Playback 13
Controlling Your iPod
17
Setup Menu
18
Care and Maintenance
19
Troubleshooting
20
Specifications ,
21
CONTENIDO
Introducci6n 23
Instalaci6n 23
Cableado
25
Operaci6n de Control Remoto
26
Funciones de Control Remoto
27
Operaci6n
29
Operaci6n de Radio Satelital
32
Operaci6n de Radio 34
Reproducci6n.de
DISCOIMP3IWMA
36
Como controlar Su iPod
40
Menu de Configuraci6n
41
Cuidado y Mantenimiento
42
Resoluci6n de Problemas
43
Especificaciones 44
TABLE
DES
MATIERES
Introduction
45
Installation
45
Cablage
47
Operation telecommande
48
Fonctions atelecommande
49
Operation
51
Operation radio satellite 54
Operation radio
56
Reproduction
DISCIMP3IWMA
58
Commander votre iPod
62
Menu configuration
63
Soin et maintenance
64
Depannage
65
Specifications
66

VM8023HD
<I~_\S~S>
HD Radio
TM
Technology Manufactured Under License From iBiquity Digital
Corporation. U.S. and Foreign Patents.
HD
Radio
TM
and the HD and
HD
Radio logos are proprietary trademarks
of
iBiquity Digital Corporation.
INTRODUCTION
Congratulations on your purchase
of
the Jensen VM8023HD Mobile
Multimedia Receiver. It's a good idea to read all
of
the instructions before
beginning the installation. We recommend having your Jensen
VM8023HD
installed by a reputable installation shop.
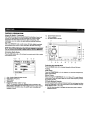
INSTALLATION
This unit is designed for installation in cars, trucks and vans with an existing
radio opening. In many cases, a special installation kit will be required
to
mount the radio to the dashboard. These kits are available at electronics
supply stores and car stereo specialty shops. Always check the kit
application before purchasing to make sure the kit works with your vehicle.
If
you have trouble locating a kit
or
need installation assistance, contact
Technical Support at 1-800-323-:4815 from 9:00am to 6:00pm EST Monday
through Friday.
Tools
and
Supplies
The following tools and supplies are needed to install the radio:
Torx type, flathead and Philips screwdrivers
Wire cutters and strippers
Tools to remove existing radio (screwdriver, socket wrench set
or
other
tools)
Electrical tape
Crimping tool
Volt meter/test light
Crimp connections
18 gauge wire for power connections
16-18
gauge
speaker wire
Preparation
1.
Disconnect
Battery
Before you begin, always disconnect the battery negative terminal.
NOTE:
If
the
VM8023HD
is
to
be
installed
in
a
car
equipped
with
an
on-
board
drive
or
navigation
computer,
do
not
disconnect
the
battery
cable.
If
the
cable
is
disconnected,
the
computer
memory
may
be
lost.
Under
these
conditions,
use
extra
caution
during
installation
to
avoid
causing
a
short
circuit.
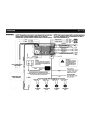
1
2.
Remove
Transport
Screws
~
TRANSPORTSCREWS
,
3.
Remove
Radio
from
Sleeve
Remove the four screws on the front
of
the radio to remove the
half
. sleeve (save screws
if
using the
half
sleeve for installation).
Mounting
Sleeve
Installation
1.
Check
the dashboard opening size by sliding the mounting sleeve into
it.
E
E
'"
"'
If
the opening is too small, carefully cut
or
file as necessary until the
sleeve easily slides into the opening. Do
not
force the sleeve into the
opening
or
cause it to bend
or
bow. Check for sufficient space behind
the dashboard for the radio chassis.
2. Locate the series
of
bend tabs along the top, bottom, and sides
of
the
mounting sleeve. With the sleeve fully inserted into the dashboard

<!!,s"S>
VM8023HD
opening, bend
as
many
of
the
tabs outward as necessary
to
firmly
secure
the
sleeve
to
the
dashboard.
CAUTION:
For
proper
operation
of
the
DVD
player,
the
chassis
must
be
mounted
within
20°
of
horizontal.
Make
sure
the
unit
is
mounted
within
this
limitation.
3.
Place
the
radio in front
of
the dashboard opening
so
the
wiring can be
brought through
the
mounting sleeve. Follow the wiring diagram
carefully and make certain all connections are secure and insulated
with wire nuts
or
electrical tape. See "Wiring" on page 3. After
completing
the
wiring connections, turn the unit on
to
confirm operation
(vehicle ignition
must
be on).
If
the
unit
does
not operate, re-check all
wiring until
the
problem is corrected.
4.
Make
sure the radio is right-side up, then carefully slide
the
radio into
the
mounting sleeve and secure with
the
four
half
sleeve screws.
5.
Secure
the
rear
of
the
unit to
the
car body using
the
mounting bolt and
rubber cushion.
6. Test
the
radio using
the
"Operation" instructions that follow.
Kit
Installation
----rw---+----:>.,...__-
RUBBER
CUSHION
/'o..,
__
~
__
MOUNTING
BOLT
TRIM RING
If
your
vehicle requires
the
use
of
an installation kit to
mount
this radio,
follow the instructions included with the installation kit to attach the radio
to
the mounting plate supplied with the kit.
1.
Wire
and test the radio
as
outlined in
the
Mounting Sleeve Installation
instructions.
2. Install
the
radio/mounting plate assembly
to
the sub-dashboard
according
to
the
instructions in the installation kit.
3.
Replace
the
dashboard
trim panel.
2
ISO
Installation
This unithasthreaded holesin the chassis
side panels which may be used with
the
original factory mounting brackets
of
some
vehicles
to
mount
the
radio
to
the
dashboard. Please consult with
your
local
car stereo
shop
for assistance on this
type
of
installation.
1. Remove the existing factory radio
from the dashboard
or
center console
mounting. Save all hardware and
brackets as they will be used
to
mount
the
new
radio.
2. Carefully unsnap the plastic frame from the front
of
the
new
radio
chassis. Remove and discard
the
frame.
3.
Remove the factory mounting brackets and hardware from the existing
radio and attach
them
to
the
new
radio. Do not exceed
M5
x
9mm
maximum
screw size.
Longer
screws
may
damage
components inside
the chassis.
4. Wire the
new
radio as outlined in
the
Mounting Sleeve Installation
instructions.
5.
Mount
the
new
radio assembly to
the
dashboard or center console
using the reverse procedure
of
step
1.
Fuses
When replacing a fuse,
make
sure
the
new
fuse
is
the
correct type and
amperage. Using an incorrect fuse could
damage
the
radio.
Reconnect
Battery
When wiring is complete, reconnect
the
battery negative terminal.
Removing
the
Radio
To
remove the radio after installation, first remove the face plate. Next,
remove the trim ring by firmly grasping one side and pulling. Insert
the
removal keys straight
back
until they lock, then pull
the
radio out.
If
the
removal keys are inserted
at
an angle,
they
will
not
lock properly and will not
release the unit.
Technical
Assistance
If
you require assistance, contact Technical
Support
at 1-800-323-4815
from 9:00am to
6:00pm
EST
Monday
through Friday.

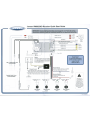
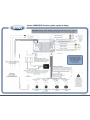
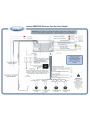
WIRING
NOTE: The
amplifier
In
this
radio
Is
only
designed
for
use
with
four
speakers.
Never
combine
(bridge)
outputs
for
use
with
two
speakers.
Never
ground
negative
speaker
leads
to
chassis
ground.
NOTE:
Only
connect
speakers
with
a
nominal
impedance
of
4
ohms.
Speakers
with
a
load
impedance
less
than
4
ohms
could
damage
the
unit.
Power
Antenna
Connectto power antenna
or
amplifier. If
not
used,
tape bare end
of
wire.
IMPORTANTI
The pink parking
wirl~
MUST
be connected
to
the switched
side
of
the
parking
break
circuit (the part
that
becomes
grounded
when
the brake is
applied).
Blue
Accessory/Ignition
1!l1==========;R='e=d7=====
Connectto existing radio
wire or radio fuse.
...
1F='IF-r.;;."l"."""it'....::;;=.:~~=.l...:::.;:.:..._--r:r:::::J
(Blue)
.....
-II-I-
__
-~=~:.:....:....----or:c::J
(Yellow)
~~"""~~_-....I.I.~II:.lIi~-----.-:J::::J
(Yellow)
(Yellow)
(Greenl
l/IIhite)
rT""~~:;---
Fuse (15A)
Battery
Connect the yellow wire tothe battery
or
12 volt power source that is always live.
Thl.
wi,..
MUST
be
connected
for
the
radio
to work.
Yellow
+'
--
-
Chassis
Ground
Connect the black wire to the factory ground wire. If a
factory ground wire
is not provided. locate a clean.
unpainted metal part
ofthe
dash and secure the ground wire
with a "ring" terminal and a sheet metal screw.
~A",."".
IPod
(Sold
5eparalllly)
FRONT REAR
lMliteJBlack
lMlite
GraylBlack
GreenlBlack Green
PurpleJBlack
Purple
Stripe
Stripe
Gray
Stripe
Stripe
.S!
(-) (+)
(-)
(+)
(-)
(+) (-) (+)
.a
lJ
~
~
0 0
~
f
~
:5
c
~
Left
Speaker
Right
Speaker
Left
Speaker
Right
Speaker
~
(Front) (Front) (Rear)
(Rear)
3
SAT BUS
Satellite Radio Tuner
(sold separately)

<[.""'.'5>
VM8023HD
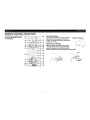
REMOTE
CONTROL
OPERATION
3D·
1
Operating
Range
The remote control sensor (19) is located near
the bottom
of
the front panel, left
of
the LCD
screen. The remote control can operate within
a distance
of
3-5m.
Replacing
the
Battery
When the range
of
operation
of
the remote
control becomes short
or
stops functioning,
replace the battery with a new lithium battery.
Be sure to observe the proper polarity, as indicated below.
The remote control will allow you to
control the advanced functions
of
the VM8023HD.
4

VM8023HD
<E,~~_S>
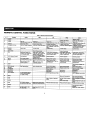
REMOTE
CONTROL
FUNCTIONS
Table 1:
Remote
Control
Functions
#
Button
Tuner
SAT
CD
IPod
DVD
1
ZOOM
MagnIfy Image
2 TITLE Select Video Mode View DVD Title Screen
3 Power
Power On; Power
On;
Power On; Power On; Power On;
Press andholdto Power Off Press andholdto Power Off
Press
and
holdto Power Off
Press andholdto Power Off
Press and holdto Power Off
4 SETUP
Display Setup Menu Display Setup Menu Display Setup Menu
Display Setup Menu
Display Setup Menu
5 Navigation Arrows
Down/Up: Preset Navigation Down/Up: Preset NaVigation Down/Up: Screen Naviga- Down/Up: Screen NaVigation
left/Right: Fast Reverse/Fast
tion; left/Right: Folder Navi- Forward; Up/Down: Slow
gatlon Reverse/Slow Forward
6 ENTER
Confirm Entry Confirm Entry Confirm Entry Confirm Entry Confirm Entry
7
CLEAR
8
Direct Entry
Direct Channel Entry Direct Track Entry
9
SEl
Audio Mode: Select BAS, Audio Mode: Select BAS,
Audio Mode: Select BAS, Audio Mode: Select BAS, Audio Mode: Select BAS,
TRE,
BAl,
FAD; Press
and
TRE,
BAl,
FAD; Press and TRE,
BAl,
FAD; Press and TRE,
BAl,
FAD; Press and
TRE,
BAl,
FAD; Press
and
holdfor System Menu
holdfor System Menu;
holdfor System Menu
hold for System Menu holdfor System Menu
ENTER in Category Mode
10 VOL (Volume Control) Volume up/down Select next/previous item in Volume up/down Volume up/down Volume up/down
Category Mode
11
MUTE
Silence Audio Output Silence Audio Output Silence Audio Output Silence Audio Output Silence Audio Output
12 SEEK
Search Next/Previous Chan- Search Next/Previous Chan- Next/Previous Track; Next/Previous Track; Next/PreviousTrack;
nel;
nel;
Press andholdto Fast For- Press
and
holdto Fast For-
Press andholdto Fast For-
Press andholdto Scan
Press andholdto Scan
ward/Reverse
ward/Reverse ward/Reverse
Channels up/down Channels up/down
13
SUB.T
View/Change Subtitle
lan-
guage
14 SRC (Source)
Select Playing Mode Select Playing Mode Select Playing Mode Select Playing Mode Select Playing Mode
15 REPEAT
Repeat Current Track Repeat Current Track Repeat Current Chapter
16
A-B Repeat
Repeat Section
Repeat Section
17
Stop/Return
Stop/Return
Stop/Return Stop/Return
18 Play/Pause
Play/Pause Play/Pause
Play/Pause
19 GOTO Search
View HD Multicast stations; GOTO Specific Area
of
Disc GOTO Specific Area
of
Disc
Press
and
holdto select:
Auto, Digital, Analog
20 MENU
Return to Previous Menu View DVD Setup Menu;
PBC for VCD 2.0 and up
21
ROM
PI~
all Tracks in Random
PI~
all Tracks in Random
PI~
all Chapters in Random
Or
er
Or
er
Or
er
22
AUDIO
Select Audio Mode View/Change discAudio
lan-
guage
23 DISP Enter pr09ram Search;
Display Direct Entry Menu;
Press andholdto set clock Press
and
holdto set clock Press andholdto set clock
Press
an
holdto set clock Press
and
holdto set clock
24 ANGLE
Show alternate angles,
if
available
25 BAND Select Band
~M1,
AM2,
Select Band (SAT1, SAT2, Select PAL, NTSC, AUTO
FM1, FM2, F 3) SAT3)
5

OPERATION
Power
Press the
<!>
(power) button (1) to turn the unit on. Press
and
hold
the
power
button again
to
turn the unit off.
NOTE:
LCD
panels
may
take
longer
to
respond
when
subjected
to
cold
temperatures
for
an
extended
period
of
time.
In
addition,
the
visibility
of
the
numbers
on
the
LCD
may
decrease
slightly.
The
LCD
display
will
return
to
normal
when
the
temperature
increases
to
a
normal
range.
Source
Press the
SRC
button (6) repeatedly to scan the various
sources.
A source
is only displayed when accessible (optional equipment required for some
sources). Available modes include Radio (FM, AM),
SAT,
OVO, SO, USB,
iPod and auxiliary (AUX IN).
External
Devices
External peripheral devices, including a
game
console, camcorder,
navigation unit, iPod. Zune, etc. can be connected to the
AN
connector (18)
on the front
of
this unit using the 3.5mm Media Cable (included). Select
"SOURCE »
AUX
IN"
to
access auxiliary devices. You cannot directly
control external devices connected to the
AN
IN inputs.
Audio
Mute
. Press the
<!>
(power) button (1)
to
silence the audio volume.
"M"
appears
on the display. Press
<!>
(power) again to restore volume to the previous
setting.
Volume
Control
To
increase the volume, turn the
VOUSEUMENU
(rotary encoder) (2)
clockwise.
To
decrease the volume, turn
t~
rotary encoder counter-
clockwise. When volume is adjusted, the volume level will
be shown on
the
display panel as a number ranging from "0" (lowest)
to
"40" (highest).
Steering
Wheel
Control
(SWC)
The VM8023HO
is
compatiblewith
the
PAC (Pacific Accessory Corporation)
steering wheel control adapter SWI-PS. A 3.5mm female connector
(labeled "SWC Interface") on
the
back
ofthe
head unitallows connectivity
to
the PAC adapter. Please refer
to
the instructions included with the PAC
adapterfor detailed installation information.
The following controls are available for most vehicles:
6
1. Vol Down
2. Vol
Up
3. Mute
4.
Seek
Down I Previous Track
5.
Seek
Up
I Next Track
6. SRC (Source)
7. Band
Audio
Menu
Press the
VOUSEUMENU
button (2) to access the audio menu. Press the
VOUSEUMENU
button repeatedly to move through the list
of
menu
options.
Sub_w: When the Low Pass Filter is activated (see "Menu Operation"
on page 7), you can use the
VOUSEUMENU
rotary encoder
to
adjust
the subwoofervolume from "-14"
to
"0".
Bass: Turn
the
VOUSEUMENU
rotary encoder (2) to adjust the bass
level from "+7"
to
"-7".
Treble: Turn the
VOUSEUMENU
rotary encoder to adjust the treble
level from
"+
7"
to
"-7".
Balance: Turn the
VOUSEUMENU
rotary encoder to adjust the
balance from "R7" (full right) to "L7" (full left).
Fader: Turn the
VOUSEUMENU
rotary encoder
to
adjust the fader
from "F7" (full front)
to
"R7" (full rear).
The unit automatically saves
your
changes and exits the audio control menu
after five seconds
of
inactivity.
NOTE:
This
model
is
equipped
with
source
tone
memory.
Any
changes
to
the
Bass,
Treble,
and
Sub-ware
reflected
only
in
the
active
source.

VM8023HD
<l!\,SI-5>
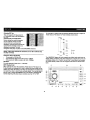
Menu
Operation
0)
~-@
Q-------+-r----
I
VM8023HD I,
~--~---
~-----
I-
.~
~
3""
=;2
....
:;::_,~?
6._;
'
..
j!~
i
---:.
@ @ @ @
Press
and
hold
the
VOUSEUMENU
button (2) for more than two seconds
to access the menu. Press the
VOUSEUMENU
button to move through the
following menu options: Equalizer, Loud Set, Beep Set,
12/24
Mode (clock),
Mirror Image, Vol Mode, A-VOL, Sub LPF and Area Set. The following
procedures assume you have already accessed the menu.
Equalizer
The Equalizer function applies preset sound effects to the unit's audio
output signal. Turn the rotary encoder
to
select from the following equalizer
options: "Off', "Rock", "Hip Hop", "Dance" and "Acoustic". With the equalizer
function activated,
if
bass or treble is adjusted, the EQ Mode will revert to
"Off'.
When the equalizer function is activated, the most recently selected bassi
treble levels cannot be adjusted. When the equalizer function is not active,
the unit will return to the most recently selected bass and treble levels.
Loud
Set
When listening to music at low volumes, this feature will selectively boost
certain bass and treble frequencies. "Off' is the default setting. Turn the
rotary encoder to select "On".
7
Beep
Set
The beep tone feature allows the selection
of
an audible beep tone to be
heard each time the menu is accessed. "On" is the default setting. Turn the
rotary encoder to select "Off'.
12124
Mode
This option allows selection
of
a 12 hour or 24 hour clock format. "12 Hours"
is the default setting. Turn the rotary encoderto change to the 24 hour clock
format.
Mi"orlmage
This option allows for selection
of
a mirror image viewwhen a rear view
backup camera (sold separately) is connected to the CAMERA IN input
on
the back
of
the radio. Turn the rotary encoder to select "On" or "Off'.
Vol
Mode
Turn the rotary encoder to select "Last" or "Adjust".
Last: When the unit is turned on, the volume will resume at the level
selected when last turned off.
Adjust:
If
choosing "Adjust", use the A-VOL setting to specify a turn-on
volume.
Tum-On
Volume (A-VOL)
After selecting "Adjust" for Vol Mode, press the
VOUSEUMENU
button to
access the A-VOL setting and then turn the rotary encoder to select the
desired turn-on volume level. When this option is selected, the unitwill
revert to the adjusted volume each time the unit is turned on.
Sub
LPF
(Low
Pass
Frequency)
After connecting a subwooferto the back
ofthe
unit, turn the rotary encoder
to select a crossover frequency: OFF, 80, 120 or 160Hz.
Area
Set
This option allows you to select the appropriate frequency spacing for your
area. "U.S.A." is the default setting. Turn the rotary encoder to select
"EUROPE".
Dimmer
Press the DIM button (15)
on
the front panel to dimthe screen by
112.
Press
again to darken the screen completely. Press a third time to resume full
brightness.

<H\~"D
VM8023HD
Clock
Set
1.
Press andholdthe DISP button (7) until the clock blinks.
2.
Tum the
VOUSEUMENU
rotary encoder (2) to set the minutes.
3.
Press the
VOUSEUMENU
button (2) to confirm and move to the hour
field.
4.
Tum the
VOUSEUMENU
rotary encoder to set the hour.
5.
Press the DISP button to set the clock and exit the clock set function.
Reset
Button
The RESET button (22) is located on the front panel under the power
button. Resetting the unit will erase the time and preset memories. It should
only be activated upon initial installation after all wiring is complete,
or
if
there is a malfunction
of
any
of
the switches on the unit.
In
these
circumstances. pressing the RESET button will clear the system and retum
the unitto default operation.
8

SATELLITE
RADIO
OPERATION
Listeners
can
subscribe
to
x1tf11
Radio
on the Web
by
visiting
www.xmradio.com.
or
by
calling
(800) 967-2346.
Customers
should
have
their
Radio ID
ready
(see
"Dlsplaylng
the
Identification
(ID)
Code").
Customers
can
receive
a
limited
number
of
free-to-air
channels
without
activation.
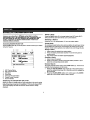
Accessing
Satellite
Radio
Mode
Press the SRC button (6) on the front panel or remote control (14) to switch
to the SAT source.
CHAN:
XM
Preview
P1
XM
Preview
P2 XM
Preview
•
1.
SAT Channel Name
2.
SAT Channel Number
3.
SAT Band
4.
lime/Clock
5.
Artist and
litle
Information
6.
Current Preset Channels
7.
Source Indicator
Displaying
the
Identification
(ID)
Code
Before you listen to satellite radio, you must subscribe to the service using
your radio's identification number.
To
display the radio ID, press the DISP
button three times oruse the
1«
tuning button (17) to tune to channel "000".
The screen displays the radio ID where the channel name is usually
displayed.
9
Select
a
Band
Press the
BAND
button (3) to change between three SAT bands (SAT1,
SAT2 and SAT3). Each band stores up to six preset stations.
Selecting
a
Station
Press the »1 or
1«
tuning button (17) to tune to another station.
Preset
Mode
Six numbered preset buttons store and recall stations for each band. All six
stored stations (P1-P6) for the current band can be viewed
on
the screen.
Use the remote control up/down arrow buttons (5) to scroll through the list.
Storing
a Station
1. Select a band (if needed), then select a station.
2.
Press
and
holda preset button (numbers 1-6)
on
the front panel or
remote control.
3.
The preset number and station appears highlighted.
Recalling
a Station
1. Select a band (if needed).
2. Press a front panel or remote control preset button (numbers 1-6) to
select the corresponding stored station.
Channel
Search
To
access Channel Search mode, press the DISP button (7). The list
of
all
available channels appears on the screen.
1. Rotate the
VOUSEUMENU
rotary encoder (2) on the control panel or
press the up/down arrow keys (5) on the remote control to navigate the
list
of
channels.
2. Press the
VOUSEUMENU
button on the control panel or the ENTER
button (6)
on
the remote control to select a channel.

Category
Search
1.
To
access Category Search mode, press
the
DISP button (7) twice.
The
list
of
available categories
appears
on
the
screen.
e
SAT1
CHOO1~ol~~
CHAN:
XM
Preview
(
01
News
)
02
Sports
_.
(
Title:
_.xmradlo.com
)
2. Rotate
the
VOUSEUMENU
rotary
encoder
(2) on
the
control panel
or
press
the
up/down
arrow
keys (5) on
the
remote control
to
navigate
the
list
of
categories.
3. Press
the
VOUSEUMENU
button on
the
control panel
or
the
ENTER
button (6) on
the
remote
control
to
select
the
desired category. A list
of
stations in
the
selected category
appears
on
the
screen.
4. Rotate
the
VOUSEUMENU
rotary
encoder
on
the
control panel
or
press
the
up/down
arrow
keys on
the
remote control
to
navigate
the
list
of
stations in
the
selected
category.
5. Press
the
VOUSEUMENU
button on
the
control panel
or
the
ENTER
button (6) on
the
remote control
to
select
a station.
Direct
Channel
Input
1.
To
enter a radio station directly, press
the
DISP button on
the
front
panel
(7)
or
remote control (23) three
times
to
display
the
DIRECT
channel
input
screen.
I[
CHANN~~~ECT
) I
Enter
the
desired radio station using
the
remote control
number
pad (8)
followed by
the
ENTER button,
or
perform
the
following steps:
1. Turn
the
VOUSEUMENU
rotary
encoder
to
select
the
third digit
of
the
desired channel (0-9).
2. Press
the
VOUSEUMENU
button
to
enter
the
number
and
move
to
the
second
position.
10
3. Turn
the
rotary
encoder
again
to
select
the
second
digit
of
the desired
channel
(0 - 9).
4.
Press
VOUSEUMENU
to
enter
the
second
number
and move
to
the
first position. (Press
and
hold
if
channel
is
only
2 digits and you are
ready
to
tune
to
the
channel.)
5. Turn
the
rotary
encoder
again
to
select
the
first digit
of
the
channel you
want
to
tune
to
(0 - 2).
6.
Press
the
VOUSEUMENU
button
to
tune
to
the
selected station.

VM8023HD
Q'~"~
RADIO
OPERATION
About
HD
Radio™
Technology
HD Radio technology allows CD-quality digital broadcasting
of
your local
AM and FM radio stations. HD Radio broadcasts can include multiple
channels
on
the same frequency, which is called multicasting. With
multicasting, you can receive up to eight additional multicast channels:
HD1-HD8.
With your VM8023HD radio, you will receive HD Radio digital broadcasts
automatically when tuned to a station that offers HD Radio technology.
NOTE:
Not
all
FM
or
AM
stations
offer
HD
Radio
(digital)
broadcasting.
You
can
receive
both
analog
and
digital
stations
with
the
VM8023HD.
Accessing
Radio
Mode
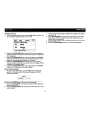
Press the SRC button (6) on the front panel or remote control (14) to switch
to the RADIO source.
FM1
P1
AUTO
P1
87.50MHz
P2 90.10MHz
PS:
SO
SMALL
1. Auto, Analog, Digital Reception Indicator
2.
Radio Station Frequency
3.
AM/FM Band
4. Time/Clock
5.
Program Information: Artist, Title, Type
NOTE: The amount
of
information displayed when receiving an
HD
Radio signalis dependentupon whatis beingbroadcast. Some stations
broadcasttheircall letters (name), the artist's name, song title,
and
category
of
music.
11
6. Current Preset Channels
7. Source Indicator
8.
HD Radio Station Indicator
Selecting
the
AMI
FM
Band
Press the
BAND
button (3) to change betweenthe AM and FM band.
Tuning
Seek
Tuning
Press the TUNEITRACK
»1
or
1«
buttons (17) to seek the next/previous
station automatically.
Manual
Tuning
Press
and
hold
the TUNEITRACK
»1
or
1«
buttons (17) to enter Manual
tuning mode. Press the buttons again to move the radio frequency number
up or down one step.
HD
Radio
Multicast
Channels
To
tune to an HD Radio multicast channel, tune to the main signal and then
press the PGM button (14)
on
the control panel. A list
of
multicast channels
will be displayed (HD-1, HD-2 etc).
Use the rotary encoder to navigate the list and then press to select a
multicast channel.

Use
the
remote control arrow keys and
ENTER
button to select a
multicast channel.
Press
and
hold
the PGM button to change between "Auto", "Digital" and
"Analog". When
set
to •AUTO", the station will first be received in Analog
but
will change to Digital
when
a digital signal is detected and the
HD
icon
will illuminate.
If
the digital signal becomes unavailable, the unit will revert
to
Analog reception.
Program
Search
To
view
the Program Type categories when listening to
HD
Radio
broadcasting, press the DISP button on
the
control panel (7)
or
remote
control (23). Program type categories are listed, allowing listeners to find
similar programming
by
genre. When a Program Type category is selected,
the radio will start scanning for stations broadcasting in the selected
category.
Use
the
TUNEITRACK
»1
or
1«
buttons;(17) to change the
category.
Preset
Stations
You can store
up
to
18
presets
for
FM and 6 presets forAM, which can then
be instantly recalled by pressing the associated preset button (8-13).
To
store a station, turn the radio on and select the desired band and station.
Press
and
hold
the
desired preset button (numbered one through six on the
face
of
the
radio
or
remote control)
for
more
than
two
seconds. When
stored,
the
preset
number
will appear in the display. The station is
now
stored and can be recalled by pressing
the
corresponding preset button.
Repeat
for
the remaining five presets on the current band and for presets on
the other four bands.
NOTE:
Multicast
stations
can
be
stored
as
presets,
but
the
unit
must
be
In
Digital
or
Auto
reception
mode
to
receive
them.
Preview
Scan
Press the
+-'
button (16) to scan and play all strong stations for 5 seconds
each. Press
+-'
again to
stop
scanning and play the current station.
Automatic
Store
Press
and
hold
the
+-'
button (16) to select either 18 strong FM stations
or
6 AM and store
them
for
quick
access using the Automatic Store (AS)
feature.
AS
only stores stations for the current band. After entering the
stations into memory, the unit will automatically stop
at
each station for five
seconds, allowing you
to
preview each selection. When using the
AS
feature, the
new
stations replace any stations already stored in preset
memory.
1..2
NOTE: You
can
stop
the
Automatic
Store
function
at
any
time
by
pressing
the
+-'
button
again.

VM8023HD
<l
..
,
......
i>
DISC/MP3IWMA
PLAYBACK
Inserting
and
Ejecting
a
Disc
Insert a disc, label side up, into the disc slot (20).To stop disc play and eject
the disc, press the eject button (21).
NOTE: The
unit
is
designed
for
play
of
standard
5"
(12 cm.)
discs
only.
Do
not
attempt
to
use
3"
(8
cm.)
CD
singles
in
this
unit.
either
with
or
.
without
an
adaptor.
as
damage
to
the
player
and/or
the
disc
may
occur.
Such
damage
will
not
be
covered
by
the
warranty
on
this
product.
Loading
an
SD
Card
Insert the
SO
card into the
SO
Card slot (4). The unit will read the files on
the card automatically.To remove the card, first press the SRC button (6) to
switch to another mode and stop
SO
playback. Press the SO card to pop
it
out, then remove the card.
Loading
a
USB
Device
Insert the USB device into the USB connector (5) on the front
of
the unit.
The unit will read the files on the USB device automatically.
To
remove the USB device, press the SRC button (6) to switch to another
mode and then remove the USB device from the USB connector.
Notes
on
MP3/WMA
Play
MP3 and
WWlA
(Windows Media Audio) music files are digital audio files
that are compressed to allow more files on a single CD. This unit can play
MP3IWMA and video directly from files contained on a CD-R/RW, DVD-
ROM, DVD+RW, DVD-RW, DVD+R, DVD-R and DVD-VIDEO, or an
SO
card or USB Device using the buttons on the receiver (or remote control) as
described below.
Many types
of
software are available for converting audio files into
MP3/
WMA formats. Jensen recommends Nero or Roxio Easy CD Creator.
This unit can play MP3 (MPEG1,
2,
2.5 Audio Layer 3). However, the MP3
recording media and accepted formats are limited. When writing MP3/
WMA, pay attention to the following restrictions.
Acceptable
Media
The MP3IWMA recording media acceptable to this unit are CD-ROM, CD-
R,
and CD-RW. The unit will also play MP3, WMA, or photo files written to
SO
Cards, USB Devices.
13
Depending on the media type and recording method, some CD-RlRWs may
be incompatible with this unit. When using CD-RW, use full format rather
than quick format to prevent malfunction.
This unit supports playback
of
MP3IWMA and CODA (CDA), Mixed-Mode
CDs and CD-Extra (including multi-session discs). Discs
on
which the
session has not been closed will not play.
NOTE:
This
unit
supports
FAT
16
and
FAT
32
file
systems.
The
unit
supports
USB
1.1
only,
but
will
play
USB
2.0
devices
at
USB
1.1
speed.
Acceptable
Medium
Formats
The folloWing formats are available for the media used in this unit. The
maximum number
of
characters used for file name, including the delimiter
r.")
and three-character extension, are ir'!dicated in parentheses.
ISO 9660 Level 1
(11
characters)
ISO 9660 Level 2
(31
characters)
Joliet
(31
characters)
• Romeo
(31
characters)
Up to 200 characters can be displayed in the long file name format. For a
list
of
available characters, see the instruction manual
of
the writing
software and the section "Entering File and Folder Names" that follows. The
media reproducible on this unit has the following limitations:
Maximum number
of
nested folders: 8
Maximum number
of
files per disc: 1500
Maximum number
of
folders per disc: 255
MP3IWMA files written in formats other than those listed above will not play
successfully and their file or folder names will not display properly.
MP3IWMA
Encoder
and
CD
Writer
Settings
Use the following settings when compressing audio data with the MP3
encoder.
Transfer bit rate: 8 - 320 kbps
Sampling frequency:
8,11.025,12,16,22.05,24,32,44.1,48
kHz
When using a CD writer to record MP3IWMA up to the maximum disc
capacity, disable additional writing.
To
record an empty disc up to the
maximum capacity at once, select the "disc at once" option.

DFolde,
J>
Fi"
4
o---Jox
~Jo~_,
~Jo~;
r--J-(i~
~Jo<"
-Cf-----
Jo<).
L.-Jo1'
l.ewt2
Lwei"
It
-=-1/
1
-
I
~
,~
II~
e:================::J
:..
I
II
-.J
4
-
....
For
example. a medium with the following folderlfile hierarchy is subject to
Folder Search, File Search
or
Folder Select as shown below.
The VM8023HO player will only recognize three folder levels and does not
display folders containing only other folders. In the example above, the unit
will display folders 3, 4, 6, and 8, but
not
2 and 7 since they
do
not contain
any tracks directly.
Folder
5 is not recognized
at
all since
it
is at the fourth
level.
NOTE:
A
file
name
entered
with
characters
not
on
the
code
list
may
not
play
correctly.
Entering
103 Tag
This unit supports 103 tag version 2.0.
For character codes, referto the table to
the right.
Entering
File
and
Folder
Names
Names using the code list characters
are the only file names and folder
names
that
can be entered and
displayed. Using any othercharacterwill
cause the file and folder names to be
displayed incorrectly. The unit
recognizes and plays only files with the
MP3IWMA
extension.
Electronic
Shock
Protect/on
10seconds for CO-OA (COA)
>45 seconds for
MP3
recorded at 44.1 kHz, 128kbps
>90 seconds for
WMA
recorded
at
44.1 kHz, 128kbps
Bit
Rates
The
unit supports bit rates from 32 -
320kbps.
MP3
Playing
Order
When selected for play, files and folders (Folder Search, File Search
or
Folder Select) are accessed in the order in which they were written to the
media. As a result, the orderin which they are expected to be played may
not match the order in which they are actually played. You may be able to
set
the order in which
MP3IWMA
files are to be played by assigning file
names beginning with play sequence numbers such as "01" to "99".
14

VM8023HD
<I"'s,,-,,;>
Changing
the
Source
If
a disc is already in the disc slot but is not playing, press the SRC button
(6) on the front panel or remote control (14) to switch to the DISC source.
To
play files from an SD or USB that is already inserted, choose the CARD or
USB source. The MP3 playback screen is indicated below:
~D(ROOT)
P3 001/141 02:19
~
01.
Manson,
Marilyn
~-+-l.1
~
P2·
The
Smashing
PIJR'--~I
•
1.
CDIMP3IWMA Indicator
2. Current
of
Total Tracks
3.
Current Folder Level
4. Time/Clock
5.
ID3 Artist and
litle
Information (MP3 only)
6. Songs on Disc
7. Source Indicator
8. Elapsed Playing
lime
for Current Song
Controlling
Disc
or
File
Playback
Pause
Press the
11>/11
button (8) to suspend playback. Press the
11>/11
button
again to resume playback. Tracks are played in the order they arewritten to
the disc/card, unless another operation is requested.
Stop
Press
and
hold
to stop playback.
If
viewing video or photos, the system
returns to the file menu.
15
Track
Select
Press the TUNEITRACK
»1
or
1«
buttons (17) for less than one second to
advance to the next track/file. The selected track number will appear on the
display.
Navigate
Files
The
51DN
(12) and 6/UP buttons (13) are used to navigate up and down
within the file menu.
Press
and
hold
to move down/up a folder level. The
current folder name is displayed at the top
of
the screen.
Fast
Forward/Reverse
Press
and
hold
the TUNEITRACK »1 or
1«
buttons (17) to fast forward or
fast reverse.
Press
and
hold
once for 2X. Press
and
hold
additional times
for 4X, 8X, 20X or
PLAY.
Press the play/pause
>/11
button (8) to end fast
forward or reverse and resume normal playback.
Intro
Scan
(INT)
During playback, press the 2/INT button (9) to select "INTRO" and play the
first 10 seconds
of
each track/file, as indicated
by
the
'00.
symbol. When the
desired track is reached, press
2/1NT
again to end the scan and play the
selected track.
Repeat
(RPT)
Press the 3IRPT button (10) multiple times during playback to select from
the following repeat play options:
VCD/CD: RPT ONE (track), RPT ALL (disc), RPT OFF
DVD: RPT CHAPTER, RPT TITLE, RPT OFF
MP3IWMA: Repeat File, Repeat Directory/Folder, Repeat All (disc),
Repeat
Off
Random
(ROM)
Press the 4IRDM button (11) during playbackto select "RANDOM" and play
all tracks/files in random, shuffled order. Press 4IRDM again to stop random
play.
Section
Repeat
(A-B)
To
repeat a specified section
of
a track, perform the following steps:
1. Press the
A->B
button (16) on the remote controlto selectthe starting
point. The display will show "REPEAT A-".
2. Press
A->B
when you reach the desired ending point. The display
shows "REPEAT A-B" and the selected section will play repeatedly.
To
cancel section repeat, press the
A->B
button again. "A-B CANCEL"
appears on the display.

I
<i. ,
.....
~
VM8023HD
GOTO
Track
Time
Access
Use
the
GOTO
function to access a specific position on a track directly.
1. Press the GOTO button (19) on the remote control. The Search
(lime
-:-:-)
window
will appear.
2.
Use
the number keys on the remote control
to
enterthe exacttime on
the current track from which you would like playback to begin.
3.
Press the
ENTER
button to confirm and begin playback from the
selected track time.
VCD
PlayBack
Control
eVCD
Only)
If
you insert a
VCD
with playback control, playback automatically starts
at
the
beginning.ofthe
firsttrack.
Press the MENU button (20) on the remote
control
to
to turn playback control on/off.
Additional
DVD/Video
Playback
-Features
NOTE: You
cannot
view
video
while
driving
the
car. When
attempting
to
view
video
while
the
parking
break
Is
not
engaged.
the
following
message
will
appear
on
the
screen:
WARNING
II
Engage
Parking
Brake
to
VIew VIdeo.
The following remote control features are available during
DVD
playback:
• AUDIO: Press
to
choose an alternate audio language,
if
available. This
button may also
show
different surround sound options encoded on the
DVD.
• SUB-T: Press
to
select an alternate subtitle language,
if
available.
TITLE: Press
to
display the title
or
chapter list. Use
the.,
.,
~
or
..
cursor buttons
or
the numeric buttons to enter a title
or
chapter number,
and then press
ENTER
to play.
ANGLE: Press
to
select an alternate viewing angle,
if
available.
•
ZOOM:
Press
to
zoom
the picture
at
X2, X3, X4, X1/4, X1/2,
or
select
OFF
to return to normal view.
Slow
Forward/Slow Reverse: Press the
./.
buttons on the remote
control
or
the 5/6 buttons (10, 13) on the control panel to
slow
rewind/
slow
reverse. Press once for 1/2speed. Press additional times for 1/4,
1/6,
or
1/8speed. Press the play/pause
>/11
button (8)
to
end fast
. forward
or
reverse and resume normal playback.
NOTE:
Feature
availability
Is
dependent
on
DVD
embedded
Infonnatlon.
16
NOTE: The VM8023HD
does
not
support
Su"ound
Sound
decoding.

VM8023HD
<1~\"'I-_S::>
CONTROLLING
YOUR
iPod
The unit will automatically switch to iPod mode when an iPod is plugged
into the iPod cable.
To
return to the iPod screen from any other source,
press the SRC button (6) on the front panel and select SOURCE
» iPod.
After sWitching to iPod source, the iPod menu appears on the screen.
NOTE:
Be
sure
your
IPod
has
the
latest
Apple
firmware
installed
to
avoid
connectivity
Issues.
The following remote control buttons are used to access the iPod menus:
Menu Remote
Control
Music AUDIO
PhotosNideos
TITLE
Use the navigation arrows on the remote control (5) or the 5 DN/6 UP
buttons on the control panel
to
navigate the iPod menus. Press the ENTER
(
.....
) button on the front panel (16) or remote control (6) to select the
highlighted menu option.
IPod
Music
Playback
The iPod music menu is automatically accessed when
an
iPod is connected
to the unit
or
the source is changed to iPod while the iPod is connected.
Press
the>
II
button on the front panel (8) or remote control (18) to play
or pause the selected track.
Press the
»1
button on the front panel (17) or remote control (12)
to
play the next file.
• Press the
1«
button on the front panel (17) or remote control (12) to
play the previous file.
Press the ENTER (
.....
) button on the front panel (16)
or
remote control
(6)
to
select the highlighted menu option.
Press the
BAND
button on the front panel (3) or remote control (25) to
return to the previous menu.
Fast
Forward/Fast
Reverse
Press
and
hold
the
1«
or
»1
buttons on the control panel (17) or remote
control (12) for 1 second and continue
to
hold for fast forward or fast
reverse. Release
to
resume normal playback.
17
PhotoMdeo
Playback
While iPod photos and videos can
be
viewed
on
the VM8023HD screen,
you must use the iPod
to
control photo and video playback options.
Press the TITLE button (2) on the remote control and the VM8023HD will
release control back to the iPod so you can select video media to be
displayed on the TFT monitor.
To
return to iPod music mode, press the
PGM button (14)
on
the front panel orthe AUDIO button (22)
on
the remote
control.
You can also
press
and
hold
the PGM button
on
the front panel to access
photolvideo playback from the iPod to the radio TFT screen.
NOTE:
Requires
5th
Generation
or
later
iPod
for
PhotoMdeo
Support.
Compatible
with
IPod
5
or
5.5,
iPod
Classic,
iPod
Touch,
IPhone
and
IPod
Nano
with
Video.

<I~
''''~_5:>
VM8023HD
SETUP
MENU
During disc play, press
the
SETUP button (4) on the remote control
to
access the SYSTEM SETUP menu.
0)
SETUP MENU
~O1:02
AM
[
~GUAGE
1
G G
EJ G
(
Language
Menu
)
Use the
A,
'Y,
...
or
~
cursor buttons to choose between LANGUAGE,
VIDEO, AUDIO, RATING
or
MiSe
setup options.
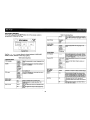
Table 2:
System
Setup
Menu
LANGUAGE
MENU
OSD language English
Select the appropriate on-screen language for the
Espanol
DVD
Subtitle English
Choose the language you would like subtitles to
French
appear in (if available)
Spanish
Portuguese
German
Off
Turn subtitles off
DVD menu
English
Choose the
langua~e
you would like DVD menu
French
to appear in (ifavai able)
Spanish
German
Portuguese
VIDEO MENU
Aspect Ratio 4:3 Image is presented with 4:3 aspect ratio.
16:9 Image is presented in wide view with a 16:9
aspect ratio.
Video Format NTSC The colorsignals are output in the standard NTSC
format.
PAL
The color signalsare output in the standard PAL
format.
18
Table 2:
System
Setup
Menu
AUTO The color signal output is switched automatically
based on the current video input signal - NTSC
or
PAL.
Smart Picture Standard
Bright
Soft
AUDIO MENU
Audio Menu
English Select the appropriate audio language for the
French
DVD.
Spanish
German
Portuguese
RATING MENU
Set Password
----
Enter a 4-digit password to activate the "Rating"
feature. The original password is "0000" and must
be entered before you can change the password
to a different 4-dlgitcode.
Parental CTR 1 KID SAFE Select the appropriate rating level forthe intended
2G
audience.
3 PG
You may override higher ratings by using your
4PG13
password.
S PG-R
6R
7 NC-17
8 ADULT
MiSe
MENU
Use Default Yes/No
Select "Yes" to restore the factory default settings.
Settings
Demo Run
Demo Mode scrolls through the various source
screens, simulating activity on the display. "Demo
Mode"
is
discreetly
di~layed
in yellowtext (below
the clock), to indicate e unit
is
in Demo Mode.
To
stop Demo Mode, press and hold the SRC button.
Auto Run On
VVhen
"Demo Auto Run" is On, the unit will
automatically display Demo Mode when powered
on.
Off
VVhen
"Auto Run"
is
Off, you can select
"Demo>
Run" to start Demo Mode.
La page est en cours de chargement...
La page est en cours de chargement...
La page est en cours de chargement...
La page est en cours de chargement...
La page est en cours de chargement...
La page est en cours de chargement...
La page est en cours de chargement...
La page est en cours de chargement...
La page est en cours de chargement...
La page est en cours de chargement...
La page est en cours de chargement...
La page est en cours de chargement...
La page est en cours de chargement...
La page est en cours de chargement...
La page est en cours de chargement...
La page est en cours de chargement...
La page est en cours de chargement...
La page est en cours de chargement...
La page est en cours de chargement...
La page est en cours de chargement...
La page est en cours de chargement...
-
 1
1
-
 2
2
-
 3
3
-
 4
4
-
 5
5
-
 6
6
-
 7
7
-
 8
8
-
 9
9
-
 10
10
-
 11
11
-
 12
12
-
 13
13
-
 14
14
-
 15
15
-
 16
16
-
 17
17
-
 18
18
-
 19
19
-
 20
20
-
 21
21
-
 22
22
-
 23
23
-
 24
24
-
 25
25
-
 26
26
-
 27
27
-
 28
28
-
 29
29
-
 30
30
-
 31
31
-
 32
32
-
 33
33
-
 34
34
-
 35
35
-
 36
36
-
 37
37
-
 38
38
-
 39
39
-
 40
40
-
 41
41


Jensen VM8023HD - DVD Receiver Mode d'emploi
- Catégorie
- Récepteurs multimédia de voiture
- Taper
- Mode d'emploi
dans d''autres langues
Documents connexes
-
Jensen VM8013HD - Screen MultiMedia Receiver Manuel utilisateur
-
-
Jensen SD1513 Le manuel du propriétaire
-
-
-
-
-
-
-
Jensen MGH300 Manuel utilisateur
Autres documents
-
Alpine CDE-147BT Quick Reference Manual
-
Alpine SSP-800 - V3.3 Le manuel du propriétaire
-
Alpine CDE-124SXM/ Le manuel du propriétaire
-
-
Alpine CDA-9885R Manuel utilisateur
-
Audiovox CADNAV1 Warranty Card
-
-
Acoustic Research ART7 Manuel utilisateur
-
-