
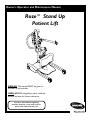
Owner’s Operator and Maintenance Manual
DEALER: This manual MUST be given to
the user of this product.
USER:
BEFORE using this product, read this
manual and save for future reference.
For more information regarding
Invacare products, parts, and services,
please visit www.invacare.com
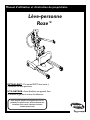
Roze™ Stand Up
Patient Lift

SYMBOL LEGEND
Roze™ Stand Up Patient Lift 2 Part No. 1150703
WARNING
DO NOT OPERATE THIS EQUIPMENT WITHOUT FIRST READING AND
UNDERSTANDING THIS MANUAL. IF YOU ARE UNABLE TO UNDERSTAND
THE WARNINGS, CAUTIONS AND INSTRUCTIONS CONTACT A
QUALIFIED DEALER OR INVACARE TECHNICAL SUPPORT BEFORE
ATTEMPTING TO USE THIS EQUIPMENT - OTHERWISE INJURY OR
DAMAGE MAY RESULT.
ACCESSORIES WARNING
Invacare products are specifically designed and manufactured for use in conjunction with Invac-
are accessories. Accessories designed by other manufacturers have not been tested by Invacare
and are not recommended for use with Invacare products.
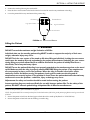
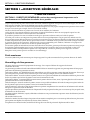
SYMBOL LEGEND
"ATTENTION, see instructions for use".
WARNING - ALWAYS be aware of the
Lift Arms. Injury to the patient and/or
assistant may occur.
WARNING - ALWAYS be
aware of the Footrest,
especially the patient’s
position on the footrest.
Injury to the patient and/or
assistant may occur.
YYYY
"Date of Manufacture"
Device contains Lead Acid
batteries. DO NOT dispose of
batteries in normal household
waste. They MUST be taken
to a proper disposal site.
Contact your local waste
management company for
information.

TABLE OF CONTENTS
Part No. 1150703 3 Roze™ Stand Up Patient Lift
TABLE OF CONTENTS
SYMBOL LEGEND .............................................................................................. 2
SPECIAL NOTES ................................................................................................ 5
LABEL LOCATION ............................................................................................. 6
PRODUCT PARAMETERS .................................................................................. 7
Roze Stand Up Patient Lift...................................................................................................................................................7
SECTION 1—GENERAL GUIDELINES ................................................................... 8
Weight Limitation ..................................................................................................................................................................8
Assembling the Lift.................................................................................................................................................................8
Using the Sling.........................................................................................................................................................................8
Operating the Lift...................................................................................................................................................................8
Lifting the Patient ...................................................................................................................................................................9
Transferring the Patient........................................................................................................................................................9
Performing Maintenance.......................................................................................................................................................9
SECTION 2—ASSEMBLY ................................................................................... 10
Assembling the Patient Lift................................................................................................................................................ 10
Assembling the Mast Assembly to the Base............................................................................................................. 10
Assembling the Knee Pad to the Mast Assembly.................................................................................................... 10
Assembling the Foot Plate to the Mast Assembly................................................................................................... 10
Attaching the Battery Charger Mounting Bracket to the Wall................................................................................ 11
Attaching the Battery Charger to the Mast Assembly ............................................................................................... 11
SECTION 3— OPERATION ............................................................................... 12
Operating the Patient Lift.................................................................................................................................................. 12
Locking/Unlocking the Rear Casters.......................................................................................................................... 12
Raising/Lowering the Patient Lift................................................................................................................................. 12
Closing/Opening the Legs............................................................................................................................................. 12
Using the Emergency Stop............................................................................................................................................ 12
Activating a Mechanical Emergency Release................................................................................................................. 13
Primary Emergency Release ...................................................................................................................13
Secondary Emergency Release ...............................................................................................................13
Charging the Battery .......................................................................................................................................................... 13
SECTION 4—LIFTING THE PATIENT ................................................................. 14
Positioning the Stand Up Lift............................................................................................................................................ 14
Lifting the Patient ................................................................................................................................................................ 15
Moving the Patient .............................................................................................................
................................................. 17
SECTION 5—TRANSFERRING THE PATIENT ..................................................... 18
Transferring to a Commode............................................................................................................................................. 19
Transferring to a Wheelchair........................................................................................................................................... 20
Transferring to a Bed ......................................................................................................................................................... 20

TABLE OF CONTENTS
Roze™ Stand Up Patient Lift 4 Part No. 1150703
TABLE OF CONTENTS
SECTION 6—TROUBLESHOOTING .................................................................... 21
SECTION 7—MAINTENANCE ........................................................................... 22
Maintenance Safety Inspection Checklist....................................................................................................................... 22
Cleaning the Sling and the Lift.......................................................................................................................................... 23
Detecting Wear and Damage........................................................................................................................................... 23
Lubricating the Lift .............................................................................................................................................................. 23
Replacing the Electric Actuator ....................................................................................................................................... 23
Replacing the Leg Actuators............................................................................................................................................. 24
Adjusting the Knee Pad Height........................................................................................................................................ 25
LIMITED WARRANTY ..................................................................................... 26

SPECIAL NOTES
Part No. 1150703 5 Roze™ Stand Up Patient Lift
SPECIAL NOTES
Signalwordsareusedinthismanualandapplytohazardsorunsafepracticeswhichcouldresultinpersonalinjuryor
propertydamage.Refertothetablebelowfordefinitionsofthesignalwords.
NOTICE
THE INFORMATION CONTAINED IN THIS DOCUMENT IS SUBJECT TO CHANGE
WITHOUT NOTICE.
RADIO FREQUENCY INTERFERENCE
Most electronic equipment is influenced by Radio Frequency Interference (RFI). CAUTION
should be exercised with regard to the use of portable communication equipment in the area
around such equipment. If RFI causes erratic behavior, PUSH the RED Emergency Stop Button
IMMEDIATELY. DO NOT turn the Red Emergency Stop Button OFF while transmission is in
progress.
MAINTENANCE
Maintenance MUST be performed ONLY by qualified personnel.
SIGNAL WORD MEANING
DANGER
Danger indicates an imminently hazardous situation which, if not avoided, will result in
death or serious injury.
WARNING
Warning indicates a potentially hazardous situation which, if not avoided, could result in
death or serious injury.
CAUTION
Caution indicates a potentially hazardous situation which, if not avoided, may result in
property damage or minor injury or both.

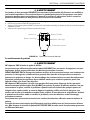
LABEL LOCATION
Roze™ Stand Up Patient Lift 6 Part No. 1150703
LABEL LOCATION
Small
Navy
Medium
Purple
Large
Green
XL
Blue
XXL
Black
WARNING
USE ONLY INVACARE
SLINGS and LIFT
ACCESSORIES.
Sling Sizes
1154553 REV. A
NOTE:SlingSizelabelislocatedoncrossbar(notshown).

PRODUCT PARAMETERS
Part No. 1150703 7 Roze™ Stand Up Patient Lift
PRODUCT PARAMETERS
Roze Stand Up Patient Lift
*NOTE:Variesdependinguponloadandstroke.
Height at Sling Hook-up - MAX.: 63.5 inches
Height at Sling Hook-up - MIN.: 37 inches
Base Width OPEN: 45 inches
Base Width CLOSED: 26 inches
Base Height (Clearance): 4.8 inches
Base Length: 40.8 inches
Overall Height: 49.1 inches
Overall Length: 44 inches
Overall Width: 26 inches
Caster Size (FRONT/REAR): 4.0 inches
Sling Options: Standing or Transfer
Sling Material: Polyester
Weight Capacity: 450 lbs
Weight Out of Carton: 117 lbs
Battery: 24V DC (RCHBL)
Charger Input: 100-240V AC
Charger Output/Charging Time: 29.5V DC Max 6 hours
Audio/Visual Low Battery Alarm: Yes
Motor Safety Devices: Anti-Entrapment
*Approx. Lifts per Charge: *100-200 Cycles per charge
Limited Warranty Lift/Electronics: 3 Years/2 Years
Emergency Stop Button: Yes

SECTION 1—GENERAL GUIDELINES
Roze™ Stand Up Patient Lift 8 Part No. 1150703
SECTION 1—GENERAL GUIDELINES
WARNING
SECTION 1 - GENERAL GUIDELINES contains important information for the safe operation
and use of this product.
Checkallpartsforshippingdamagebeforeusing.Incaseofdamage,DONOTusetheequipment.ContacttheDealerfor
furtherinstructions.
TheInvacarepatientliftisNOTatransportdevice.Itisintendedtotransferanindividualfromoneseatedsurfacetoanother
(suchasabedtoa
wheelchair).
DONOTattemptanytransferwithout approvalofthepatient’sphysician,nurseormedicalassistant.Thoroughlyreadthe
instructionsinthisOwner’sManual,observeatrainedteamofexpertsperformtheliftingproceduresandthenperformthe
entireliftprocedureseveraltimeswithpropersupervisionandacapableindividualacting
asapatient.
InvacareStandAssistandTransferslingsarespecificallydesignedtobeusedinconjunctionwithInvacarepatientlifts.
SlingsandaccessoriesdesignedbyothermanufacturersarenottobeutilizedasacomponentofInvacare’spatientlift
system.Useoftheseproductsisprohibitedandwillvoidthe
lift’swarranty.Usetheslingthatisrecommendedbythe
individual’sdoctor,nurseormedicalassistant forthecomfortandsafetyoftheindividualthatisbeinglifted.
Ifthe patientliftisusedintheareaofashowerorbath,ensurethatthe patientliftiswipedcleanof
anymoisture afteruse. DO
NOTstoretheliftinadampareaorinadampcondition.Periodicallyinspectallcompone ntsofthepatientliftforsignsof
corrosion.Replaceallpartsthat arecorr odedordamaged.
Weight Limitation
DONOTexceedmaximumweightlimitationofthepatientlift.TheweightlimitationfortheRozePatientLiftis450lbs.
Assembling the Lift
DONOTovertightenmountinghardware.Thiswilldamagemountingbrackets.
Using the Sling
IndividualsthatusetheStandAssistSlingMUSTbeabletosupportthemajorityoftheirownweight,otherwiseinjurymay
occur.
StandAssistSlings:DONOTusethestandassistslingincombinationwiththepatientliftasatransportdevice.Itis
intendedtotransferanindividualfromone
restingsurfacetoanother(suchasabedtoawheelchair).
StandAssistSlings:Beforeliftingthepatient,makesurethebottomedgeofthestandassistslingispositionedonthelower
backofthepatientandthepatient’sarmsareoutsidethestandassistsling.
StandAssistSlings:Thebelt
MUSTbesnug,butcomfortableonthepatient,otherwisethepatientcanslideoutofthesling
duringtransfer,possiblycausinginjury.
TransferSlings:Beforeliftingthepatient,makesurethebottomedgeofthetransferslingisatthebaseofthespineandthe
patient’sarmsareoutsidethe
transfersling.
TransferSlings:DONOTraisethepatienttoafullstandingpositionwhileusingthetransfersling,otherwiseinjurymay
occur.
Aftereac hlaun deri ng(inaccordancewith instructionsonthe sling),inspectsling(s)forwear,tears,andloosestitching.
Bleached,torn,cut,frayed,orbrokenslingsareunsafeand could
resultininjury.Discardimmediately.
DONOTalterslings.
Besuretochecktheslingattachmentseachtimetheslingis removedandreplaced,toensurethatitisproperlyattachedbefore
thepatientisremo v edfromastationaryobject(bed,chairorcom mode).
Ifthe patientisin awheelchair,secure
thewheellocksinplacetoprev entthechairfrommovingforw ardsorbackw ards.
Operating the Lift
Makesurethereisanaudibleclickwhenmountingbatteryonthebatterychargertoconfirmpropermounting.Otherwise,
injuryordamagemayoccur.
Usethehandlestopushorpullthepatientlift.

SECTION 1—GENERAL GUIDELINES
Part No. 1150703 9 Roze™ Stand Up Patient Lift
Lifting the Patient
Beforepositioningthelegsofthestandupliftaroundthepatient,makesur ethatthepatient’sfeetare outofthewayofthefoot
plate,otherwiseinjurymayoccur.
Adjustmentsforsafetyandcomfortshouldbemadebeforemovi ngthepatient.Patientʹsarmsshoul dbeoutsideofthe
sling
straps.
Beforeliftingapa tientfromastationaryobjec t(wheelchair ,commodeorbed),slightlyraisethe patientoffthestationaryobj ect
andchec kthatallslingattachmentsaresecure.Ifany a ttachmentisnotcorrect,low erthepatientandcorrecttheproblem,then
raisethepatientandcheckagain.
Duringtransfer,
withthepatientsuspendedinaslinga ttachedtothelift,DONOTrollcasterbaseov e runev ensurfacesthat
wouldcreateanimbalanceofthepatientliftandcouldcausethepatientlifttotipov er.UsesteeringhandleonthemastatALL
timestopushorpull
thepatientlift.
Inv acarerecommendslockingtherearswivelcastersONLYwhenpositioningorremovingthesling(standassistortransfer)from
aroundthepatient.
Inv acaredoesNO Trecommendlockingoftherearcastersofthepatien tliftwhenliftingan individual.Doin gsoco uldcausethe
lifttotipandendanger
thepatientandassistants.Inv acareDOESrecommendthattherearcastersbeleftunlockedduringlifting
procedurestoallowthepatientlifttostabilizeitselfwhenthepatientisinitiallyliftedfromachair,bedoranystationaryobject.
Transferring the Patient
Beforetransferring,checkthatthepro duct’sweightcapacitycanwithstandthepatientʹsweight.
Wheelchairwheellocks MUSTbeinalockedpositionbeforelow eringthepatientintothewheelchairfortransport.
Performing Maintenance
Regularmainte nanceofpatientliftsandaccessoriesisnecessarytoassureproperoperation.
Afterthe first12monthsofoperation,inspectallpivotpointsandfastenersforwear .Ifthemetalisworn,thepartsMUSTbe
replaced.Performthisinspectionev erysixmont hsthereafter.
DONOTov ertightenmountinghardware.Thiswill
da magemountingbrackets.
Castersand axleboltsrequireinspectionsev erysixmonthstocheckfortightnessandwear .

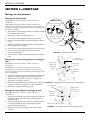
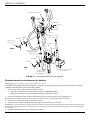
SECTION 2—ASSEMBLY
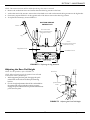
Roze™ Stand Up Patient Lift 10 Part No. 1150703
SECTION 2—ASSEMBLY
Assembling the Patient Lift
Assembling the Mast Assembly to the Base
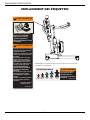
NOTE:Themastassemblymayberemovedfromthebasefor
storageortransporting.ThemastassemblyMUSTbeproperly
securedtothebaseassemblybeforeuse.
NOTE:Forthisprocedure,refertoFIGURE 2.1.
1. Putthebaseonalevelsurfacesoallcastersmake
contactwiththefloor.
2. Locktherear
casters(Detail“A”).
3. Unscrewthetopknobandremoveitfromthebase.
4. Loosenthebottomknob,butleaveitscrewedintothe
base.
5. Connectthemastassemblycable(notshown)tothe
basecable(notshown).
6. Putthetubeofthemastassemblyintotheholeinthe
base.
7. Whilesupportingthe
mastassembly,tightenthe
bottomplasticknob.
8. Screwthetopplasticknobintotheholeinthebase.
Assembling the Knee Pad to the Mast
Assembly
NOTE:Forthisprocedure,refertoFIGURE 2.2.
NOTE:Thekneepadmayberemovedfromthepatientliftfor
storageortransporting.ThekneepadMUST beproperlysecured
tothemastassemblybeforeuse.
1. Pushthekneepaddownintopositiononthekneepad
mountingbracketonthemastassembly.
2. Putthefixblockinplaceonthekneepadmounting
bracket.
3. Insertthequickreleaseknobthroughthemounting
bracket,kneedpadandfixblock.
4. Tightenthequickreleaseknob.
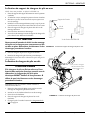
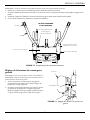
Assembling the Foot Plate to the Mast Assembly
NOTE:Forthisprocedure,refertoFIGURE 2.3.
1. Rotatethefootplateupandplacethehooksonthefoot
plateonto thetopmountingboltsinthemastassembly.
2. Rotatethefootplatedowntowardsthemastassembly.
Thebottomofthefootplatewillrestagainstthebottom
boltsonthe
mastassembly.
3. Ensurethatthe footplateislevelandsecure.
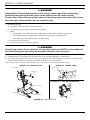
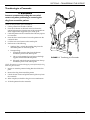
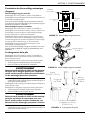
FIGURE 2.1 Assembling the Mast Assembly to the Base
FIGURE 2.2 Assembling the Knee Pad to the Mast Assembly
FIGURE 2.3 Assembling the Foot Plate to the Mast Assembly
Top Knob
Base
Bottom Knob
DETAIL “A”
Push tab down
to LOCK.
Push tab UP
to UNLOCK.
Caster
Mast Assembly
Knee Pad
Knee Pad
Mounting Bracket
Quick Release
Knob
Fix Block
Foot Rest
(shown in place)
Top Mounting
Bolt
Bottom Mounting Bolt
Mast Assembly

SECTION 2—ASSEMBLY
Part No. 1150703 11 Roze™ Stand Up Patient Lift
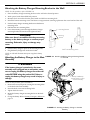
Attaching the Battery Charger Mounting Bracket to the Wall
NOTE:Forthisprocedure,refertoFIGURE 2.4.
1. Placethebatterychargermountingbracketonthewallatthedesiredposition.
2. Withapencil,markthemiddleholeposition.
3. Measuredown6½inchesfromthepencilmarkanddrillonemountinghole.
4. Installthebottommountingscrewuntilthereisanapproximate1/8‐inch
gapbetweenthescrewheadandthewall.
5. Putthebatterychargermountingbracketontothebott om
mountingscrew.
6. Drilltheothertwomounting holes.
7. Screwthemountingscrewsthroughthebatterycharger
mountingbracketandintothew all.Tightensecurely.
CAUTION
Make sure there is an audible click when mounting
battery on the battery charger to confirm proper
mounting. Otherwise, injury or damage may
occur.
8. Putthebatterychargerinplaceonthemountingbracket.
9. Plugthebatterychargerintoanelectricaloutlet.
NOTE:AnLEDwillilluminatewhenpowerisappliedtoba ttery
charger.
Attaching the Battery Charger to the Mast
Assembly
WARNING
If the battery charger is attached to the mast
assembly and is plugged into a wall outlet, make
sure to unplug the battery charger from the wall
outlet BEFORE using the patient lift. Failure to
unplug the battery charger may result in injury or
damage.
NOTE:Forthisprocedure,refertoFIGURE 2.5.
1. Removethetwomylarpiecescov erin gthemountingholes
onthebackofthemastassembly.
2. Insertthehookscrewsintomountingholes.
3. Tightenthehookscrews.
4. Mountthebatterychargermountingbracketonthehook
screws.
5. Chargethebattery.RefertoPrimaryEmergencyRelease
on
page 13.
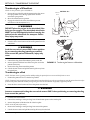
FIGURE 2.4 Attaching the Battery Charger Mounting Bracket
to the Wall
FIGURE 2.5 Attaching the Battery Charger to the Mast
Assembly
Mounting Bracket
Mounting
Screws
BOTTOM Mounting Screw
Battery and Battery
Charger shown in place
on mast assembly

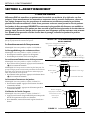
SECTION 3—OPERATION
Roze™ Stand Up Patient Lift 12 Part No. 1150703
SECTION 3— OPERATION
WARNING
DO NOT attempt to transfer a patient without approval of the patient’s physician, nurse, or medical
assistant. Thoroughly read the instructions in this owner’s manual, observe a trained team of experts
performing the lifting procedures and then perform the entire lift procedure several times with
proper supervision and a capable individual acting as a patient.
The legs of the stand up lift MUST be in the maximum open position for optimum stability and
safety. If the patient is in a sling and it becomes necessary to move through a narrow passage, close
the legs of the stand up lift only as long as it takes to move through the passage. When the stand up
lift is through the passage, return the legs to the maximum open position.
NOTE:Theuseofthepatientliftbyoneassistantshouldbebasedonthe
evaluationofthehealthcar e pr ofessionalforeachindividualcas e.
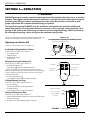
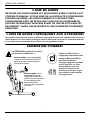
Operating the Patient Lift
NOTE:Forthisprocedure,refertoFIGURE 3.1.
Locking/Unlocking the Rear Casters
NOTE:Forthisprocedure,refertoDe ta il “A”.
•ToLocktheCaster:
Pushtabdown.
•ToUnlocktheCaster:
Pushtabup.
Raising/Lowering the Patient Lift
NOTE:Forthisprocedure,refertoDe ta il “B”.
•ToRaisethePatientLift:
Presstheup() buttonon thehandcontrol.
NOTE:Ifthepatientlift isra isedtothehighestlevel,itmay be
necessarytopulldowngentlyontheliftarmsbeforethemastwillbegin
tolower.
Pulldowngentlyonbothar msatthesametimeto avoid
makingtheliftunstable.
•ToLow erthePatientLift:
Pressthedownbutton() onthehandcontrol.
Closing/Opening the Legs
NOTE:Forthisprocedure,refertoDe ta il “B”.
•ToClosetheLegs:
Presstheclosebuttonon thehan dcontrol.
•ToOpentheLegs:
Presstheopenbuttononthehandcontrol.
Using the Emergency Stop
NOTE:Forthisprocedure,refertoDe ta il “C”.
•PushtheREDem erge ncybuttonintostoptheliftarmsfrom
raisingorlow e ring.
•Toreset,rotatetheemerge ncybuttonclockwise.
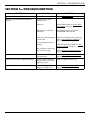
FIGURE 3.1 Operating the Patient Lift
Push tab DOWN to LOCK
Push tab UP to UNLOCK
Caster
DETAIL “A”
LOCKING/UNLOCKING THE REAR CASTERS
DETAIL “B” - HAND CONTROL DETAILS
DETAIL “C” - EMERGENCY STOP
Down Button
Up Button
Hand Control
Emergency Button
Legs Open
Button
Legs Close
Button
Push in to stop,
turn clockwise
to reset.

SECTION 3—OPERATION
Part No. 1150703 13 Roze™ Stand Up Patient Lift
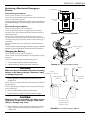
Activating a Mechanical Emergency
Release
Primary Emergency Release
NOTE:Forthisprocedure,refertoFIGURE 3.2.
NOTE:Thisprocedurewillbringtheboomdownorliftitupifthehand
controlis notfunctioningproperly.
Toactiv atetheprimaryemergencyrelease,insertapenintothe
holelabeledEmergencyUporEmergencyDo wnonthecontrol
box.
Secondary Emergency Release
NOTE:Forthisprocedure,refertoFIGURE 3.3.
NOTE:Allpatientliftactuatorsareequippedwithamechanical
emergencyrelease.Themechanicalreleasewillenablethe actuatorto
retractwithoutpower.
NOTE:Useth eprimaryemerge ncyreleasefirstbefor eusingthe
secondaryemer gencyreleasepr ocedur e.Thisprocedureshouldonlybe
usedifthe
primaryemergencyreleaseprocedureisnotfunctioningoris
unreachable.
NOTE:TheliftMUSTbeunderaloadforthemechanicalreleaseto
function.
Toactivatethesecondaryemergencyrelease,pullupontheRED
emergencygripandpulldownontheboomatthesametime.
Charging the Battery
NOTE:Forthisprocedure,refertoFIGURE 3.4.
NOTE:Invacarerecommendsthebatterybe rechargeddailytoprolong
batterylife.
NOTE:Anaudiblealarmwillsoundwhenbatteryislow.
1. LiftUPonthehandleonthebac kofthebattery.
2. Liftthebatteryupandawayfromthecontrolbox.
CAUTION
Make sure there is an audible click when mounting
battery on the battery charger. Otherwise, injury
or damage may occur.
3. Placethebatteryonthebatterycharger.Pushthetopofthe
batteryagainstthemountingbracketuntilthereisan
audibleclick.
NOTE:ThechargeLEDwillilluminate. Whencharged,theLEDwill
stopilluminating.
NOTE:Itwilltakeappr oximatelyfourhourstochar geabattery that
requiresafullchar ge.
4. LiftUPonthehandleonthebac kofthebattery.
5. Liftthebatteryupandawayfromthebatterycharger.
CAUTION
Make sure there is an audible click when mount-
ing battery on the battery charger. Otherwise,
injury or damage may occur.
6. Placethebatteryonthecontrolbox.Pushthetopofthe
batteryagainstthemountingbracketuntilthereisan
audibleclick.
FIGURE 3.2 Primary Emergency Release
FIGURE 3.3 Primary Emergency Release
FIGURE 3.4 Primary Emergency Release
Emergency Up
Hole
Emergency Down
Hole
Control Box
RED Emergency
Grip
Battery Charger
(STEP 3)
Control Box
(STEP 6)
An audible “click”
will be heard when
properly installed
(STEPS 3 and 6)
Handle
(STEPS 1, 2, 4 and 5)
Battery

SECTION 4—LIFTING THE PATIENT
Roze™ Stand Up Patient Lift 14 Part No. 1150703
SECTION 4—LIFTING THE PATIENT
WARNING
DO NOT exceed the maximum weight limitation of 450 lbs.
DO NOT attempt to any transfer without approval of the patient’s physician, nurse or medical
assistant.
ALWAYS keep hands and fingers clear of moving parts to avoid injury.
Invacare patient slings are made specifically for use with Invacare patient lifts. For the safety of the
patient, DO NOT intermix patient slings and patient lifts of different manufacturers.
Individuals that use the standing patient sling MUST be able to support the majority of their own
weight, otherwise injury may occur.
Before lifting the patient, make sure the bottom edge of the standing patient sling is positioned on
the lower back of the patient and the patient’s arms are outside the standing patient sling. The belt
MUST be snug, but comfortable on the patient, otherwise the patient can slide out of the patient
sling during transfer possibly causing injury.
After EACH laundering (in accordance with laundering instructions on the patient sling), inspect the
patient sling for wear, tears and loose stitching. Discard any patient sling that meets these criteria
IMMEDIATELY.
Bleached, torn, cut, frayed or broken slings are unsafe and their use could result in injury or damage.
Discard any patient sling that meets these criteria IMMEDIATELY.
DO NOT alter patient slings.
DO NOT move the patient if the patient sling is not properly connected to the attachment points on
the patient lift. Check that the patient sling is properly connected to the attachment points BEFORE
lifting the patient.
During transfer, with the patient suspended in the patient sling, DO NOT roll the base of the patient
lift over any uneven surfaces that would cause the patient lift to become unstable.
Use the steering handle on the mast assembly at all times to push or pull the stand up lift.
NOTE:Refer tothe patientslingOwner’sManual,P/N102891,formoreinformation.
Positioning the Stand Up Lift
NOTE:Forthisprocedure,refertoFIGURE 4.1onpage15.
NOTE:RefertoGeneralGuidelinesonpage 8beforeproceedingandobserveallwarningsindicated.
NOTE:Beforepositioningthelegsofthepatientliftunderabed,makesurethattheareaisclearofanyobstructions.
WARNING
The legs of the stand up lift MUST be in the maximum open position for optimum stability and
safety. If it is necessary to close the legs to maneuver the stand up lift under a bed, close the legs only
as long as it takes to position the stand up lift over the patient and lift the patient off the surface of the
bed. When the legs of the stand up lift are no longer under the bed, return the legs to the maximum
open position.
1. Pressthelegsopenbuttonontheha ndcontroltoope nthelegsofthestanduplifttothemaximu mopenposition.

SECTION 4—LIFTING THE PATIENT
Part No. 1150703 15 Roze™ Stand Up Patient Lift
2. P osition thestand upliftus i ngthemasthandle.
3. Pressthedownarrowbutton onthehandcontroltolow ertheliftarmsforeasy attachmenttothesling.
4. Lowerthepatientliftforeasyattachmentofthepatientsling.
FIGURE 4.1 Hand Control Buttons
Lifting the Patient
WARNING
DO NOT exceed the maximum weight limitation of 450 lbs.
Individuals that use the standing patient sling MUST be able to support the majority of their own
weight, otherwise injury may occur.
DO NOT lock the rear casters of the stand up lift when lifting an individual. Locking the rear casters
could cause the stand up lift to tip and endanger the patient and assistants. Unlocking the rear casters
during lifting procedures allows the lift to stabilize itself while the patient is initially lifted from a
wheelchair, bed of any stationary object.
DO NOT move the patient if the sling is not properly attached to the attachment points on the stand
up lift. Make sure that the sling is properly attached BEFORE lifting the patient. If any attachments
are not properly in place, correct the problem. When the sling is elevated a few inches off the
stationary surface and before moving the patient, check again to make sure the sling and all
attachments are securely in place. If any problem is found, lower the patient back onto the stationary
surface and correct the problem - otherwise, injury or damage may occur.
Adjustments for safety and comfort should be made before moving the patient.
Invacare patient slings are made specifically for use with Invacare patient lifts. For the safety of the
patient, DO NOT intermix patient slings and patient lifts of different manufacturers.
NOTE:Forthisprocedure,refertoFIGU RE 4.2onpage16.
NOTE:ThepatientMUSTbeinaseated positionfirst.Usetheheadsectionofthebedtogetthepatientuprightthe nmovelegsovertheside
ofthebed.
1. Instructthepatienttoholdontothehan dgripsonboth
si des ofthestanduplift(Detail“A”ofFI GURE 4.2).
2. Instructthepatienttoleanbackintothestandingortransfersling.
DOWN Button
UP Button
Hand Control
Legs Open Button
Legs Close Button

SECTION 4—LIFTING THE PATIENT
Roze™ Stand Up Patient Lift 16 Part No. 1150703
WARNING
Standing Slings - Before lifting the patient, make sure the bottom edge of the standing sling is
positioned on the lower back of the patient and the patient’s arms are outside the sling.
Transfer Slings - Before lifting the patient, make sure the bottom edge of the transfer sling is at the
base of the spine and the patient’s arms are outside the sling.
3. Ensurethefollowing:
A. Thepatient’skneesaresecureagainstthekneepad.
B. Thepatient’sfeetareproperlypositionedonthefootplate.
C. Slings:
• StandingSling‐thebottomedgeofthestandi ngslingispositionedon thepatient’slow erback.
•TransferSling‐thebottomedgeofthetransferslingisatthebaseof
thepatient’sspi ne.
•EitherSlingStyle‐thepatient’sarmsareoutsidethesling.
D. Therearcastersareunlocked.
E. Thelegsareinthemaximumopenposition.
WARNING
If transferring a patient from a wheelchair, the wheelchair wheel locks MUST be in the locked posi-
tion before lowering the patient into the wheelchair. Otherwise, injury may occur.
4. Iftransferringfromawheelchair,lockthewhe ellocksonthewhee lchair (Detail“B”ofFIGURE 4.2).
5. PresstheUParrowbuttonontheha ndcontroltoraisethepatientabov ethesurface(bed, wheelchairorcommode).The
patient’sweightwillbefullysupportedbythestanduplift(Detail“C”of
FIGURE 4.2).
NOTE:Thelowercenterofgravityprovidesstabilitymakingthepatientfeelmo r e secureandthelifteasiertomove.
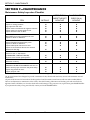
FIGURE 4.2 Lifting the Patient
Handgrip
Casters
Knee Pad
Foot Plate
DETAIL “A” - STAND UP LIFT
DETAIL “C” - LIFTING THE PATIENT
DETAIL “B” - WHEEL LOCK
Wheel Lock
Mast Handle
Sling

SECTION 4—LIFTING THE PATIENT
Part No. 1150703 17 Roze™ Stand Up Patient Lift
Moving the Patient
WARNING
The legs of the stand up lift MUST be in the maximum open position for optimum stability and
safety. If the patient is in a sling and it becomes necessary to move through a narrow passage,
close the legs of the stand up lift only as long as it takes to move through the passage. When the
stand up lift is through the passage, return the legs to the maximum open position.
DO NOT, during transfer of a patient suspended in the lift sling, roll caster base over uneven sur-
faces that would create an imbalance of the lift. This could cause the lift to tip over. Use the mast
handle at all times to push or pull the lift.
1. Ensurethelegsofthestandupliftareinthemaximumopenposition.Ifnot,presstheOPENLEGSbuttononthehand
controltomovethelegstothemaximumopenposition.
2. Movethestandupliftawayfromthesurfacetheywereliftedfrom.
3. Slowlymovethepatientto
thedesiredsurface.

SECTION 5—TRANSFERRING THE PATIENT
Roze™ Stand Up Patient Lift 18 Part No. 1150703
SECTION 5—TRANSFERRING THE PATIENT
WARNING
DO NOT attempt any transfer of a patient without the approval of the patient’s physician, nurse
or medical assistant.
DO NOT move the patient if the sling is not properly connected to the attachment points of the
stand up lift. Check that the sling is properly connected to the attachment points prior to lifting a
patient. If any attachments are not properly in place, correct the problem. When the sling is elevated
a few inches off the stationary surface and before moving the patient, check again to make sure that all
sling attachments are secure. If any attachments are not properly in place, lower the patient back onto
the stationary surface and correct this problem - otherwise, injury or damage may occur.
Adjustments for safety and comfort should be made before moving the patient. The patient's
arms should be outside the straps.
DO NOT use slings and stand up lifts of different manufacturers. Invacare slings are made
specifically for use with Invacare stand up lifts. Otherwise, injury or damage may occur.
DO NOT lock the rear casters of the stand up lift when lifting an individual. Locking the rear
casters could cause the stand up lift to tip and endanger the patient and assistants.
The legs of the stand up lift MUST be in the maximum open position for optimum stability and
safety. If the patient is in a sling and it becomes necessary to move through a narrow passage,
close the legs of the stand up lift only as long as it takes to move through the passage. When the
stand up lift is through the passage, return the legs to the maximum open position. If it is
necessary to close the legs to maneuver the stand up lift under a bed, close the legs only as long
as it takes to position the stand up lift over the patient and lift the patient off the surface of the
bed. When the legs of the stand up lift are no longer under the bed, return the legs to the
maximum open position.
Be sure to check the sling attachments each time the sling is removed and replaced to ensure that it
is properly attached before the patient is removed from a surface.
Theuseofoneassistantisbasedontheevaluationofthehealthcareprofessionalforeachindividualcase.

SECTION 5—TRANSFERRING THE PATIENT
Part No. 1150703 19 Roze™ Stand Up Patient Lift
Transferring to a Commode
WARNING
Invacare recommends locking the rear swivel
casters only when positioning or removing the
sling from around the patient.
NOTE:Forthisprocedure,refertoFIGURE 5.1.
1. Liftthepatientfrom thesideofthebed.
2. PresstheUPbuttononthehandcontro ltoelevatethe
patienthighenoughtoclearthearmsofthecommodechair.
Theirweightwillbesupportedbythestanduplift.
3. Guidethepatientonto
thecommodechair.Thismayrequire
twoassistants.
4. Pressthedownarrowbutton to low erthepat ientontothe
commodechair .
5. Locktherearswivelcastersonthestanduplift.
6. P erformoneofthefollowing:
• StandingSling‐unhook thestandingslingfromthe
attachmentpo intsonthestanduplift.
• TransportSling
‐
i. Unhookthetransportslingfromthebottom
attachmentpo intsonthestanduplift.
ii. Liftuponthepatient’slegsandremovethethigh
supportsfromunderneaththepatient.
iii. Ifde si red, unhook thetransportslingfromthetop
attachmentpo intsonthestanduplift.
NOTE:Thepatientcanremainin
theupperportionofthetransfersling
whileus ingthecommode.
7. Instructorassistthepatientinliftingtheirfeetoff thefoot
plate.
8. Removetheslingfrom aroundthepatient.
9. Unlocktherearcastersandpullthestandupliftawayfrom
thecommod e.
10. Whencomplete, rechecktheslingforcorrectattachments.
11. Toliftthepatientfromthecommode.
FIGURE 5.1 Transferring to a Commode

SECTION 5—TRANSFERRING THE PATIENT
Roze™ Stand Up Patient Lift 20 Part No. 1150703
Transferring to a Wheelchair
NOTE:Forthisprocedure,refertoFIGURE 5.2.
1. Ensurethelegsoftheliftwiththepatientintheslingarein
theopenposition. Pressthelegsopenbuttonuntilin
maximumopenposition.
2. Movethewheelchairintoposition.
3. Engagethewheellocks ofthewheelchairtoprev ent
mov ement ofthechair
(Detail“A”).
WARNING
DO NOT place the patient in the wheelchair if the
locks are not engaged. The wheelchair wheel locks
MUST be in a locked position before lowering the
patient into the wheelchair for transport. Other-
wise, injury may result.
4. P osition thepatientoverthewhee lchair (Detail“B”).
5. Pressthedownarrowbuttonandlowerthepatientintothe
wheelchair.
WARNING
Lock the rear swivel casters ONLY when position-
ing or removing the sling (standing or transfer)
from around the patient. Otherwise, injury may
occur.
6. Locktherearswivelcasters.
7. Unhooktheslingfromallattachmentpointsonthelift.
8. Instructpatienttolifttheirfeetoffthefootplate.Assistthe
patientifnecessary.
9. Removetheslingfrom aroundthepatient.
10. Unlocktherearcastersandpullthestandupliftawayfrom
thewheelchair.
FIGURE 5.2 Transferring the Patient to a Wheelchair
Transferring to a Bed
NOTE:Thelowercenterofgravityprovidesstabilitymakingthepatientfeelmo r e secureandthelifteasiertomove.
1. P osition thepatientasfarov erthebedaspossible.
NOTE:Ifpatientisbeingtransferredfr omasurfacethatislowerthanthebed,presstheuparrowbuttontoraise
thepatientabovethe surface
ofthebed.Thepatientshouldbe e levat edjusthighenoughto clearthebedwiththeirweightfullysupportedbythelift.
2. Pressthedownarrowbutton andlow erthepatien tontothebed.
WARNING
Invacare recommends locking the rear swivel casters ONLY when positioning or removing the sling
from around the patient.
3. Locktherearswivelcasters.
4. Unhookthestanding ortransportslingfromallattachment pointsonthe standuplift.
5. Instructthepatienttolifttheirfeetoffofthefoot plate.
NOTE:Assistthepatientifnecessary.
6. Removethestandingor transportslingfromaroundthepatient.
7. Unlocktherearcastersand
pullthestandupliftaw ayfromthebed.
Wheel
Lock
DETAIL “A”
DETAIL “B”
La page est en cours de chargement...
La page est en cours de chargement...
La page est en cours de chargement...
La page est en cours de chargement...
La page est en cours de chargement...
La page est en cours de chargement...
La page est en cours de chargement...
La page est en cours de chargement...
La page est en cours de chargement...
La page est en cours de chargement...
La page est en cours de chargement...
La page est en cours de chargement...
La page est en cours de chargement...
La page est en cours de chargement...
La page est en cours de chargement...
La page est en cours de chargement...
La page est en cours de chargement...
La page est en cours de chargement...
La page est en cours de chargement...
La page est en cours de chargement...
La page est en cours de chargement...
La page est en cours de chargement...
La page est en cours de chargement...
La page est en cours de chargement...
La page est en cours de chargement...
La page est en cours de chargement...
La page est en cours de chargement...
La page est en cours de chargement...
La page est en cours de chargement...
La page est en cours de chargement...
La page est en cours de chargement...
La page est en cours de chargement...
-
 1
1
-
 2
2
-
 3
3
-
 4
4
-
 5
5
-
 6
6
-
 7
7
-
 8
8
-
 9
9
-
 10
10
-
 11
11
-
 12
12
-
 13
13
-
 14
14
-
 15
15
-
 16
16
-
 17
17
-
 18
18
-
 19
19
-
 20
20
-
 21
21
-
 22
22
-
 23
23
-
 24
24
-
 25
25
-
 26
26
-
 27
27
-
 28
28
-
 29
29
-
 30
30
-
 31
31
-
 32
32
-
 33
33
-
 34
34
-
 35
35
-
 36
36
-
 37
37
-
 38
38
-
 39
39
-
 40
40
-
 41
41
-
 42
42
-
 43
43
-
 44
44
-
 45
45
-
 46
46
-
 47
47
-
 48
48
-
 49
49
-
 50
50
-
 51
51
-
 52
52


dans d''autres langues
- English: Invacare ROZE Owner's manual
Documents connexes
-
Invacare I-Lift ILIFTHM Manuel utilisateur
-
-
-
-
-
-
-
-
-
