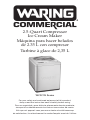
Waring Commercial WCIC25 Series Manuel utilisateur
- Taper
- Manuel utilisateur

2.5-Quart Compressor
Ice Cream Maker
Máquina para hacer helados
de 2.35 L con compresor
Turbine à glace de 2,35 L
WCIC25 Series
For your safety and continued enjoyment of this product,
always read the instruction book carefully before using.
Para su seguridad y para disfrutar plenamente de este producto,
siempre lea cuidadosamente las instrucciones antes de usarlo.
An que cet appareil vous procure en toute sécurité beaucoup
de satisfaction, lire attentivement le mode d’emploi avant de l’utiliser.

2
IMPORTANT SAFEGUARDS
When using an electrical appliance, basic safety precautions should
always be followed to reduce the risk of re, electric shock, and/or
injury, including the following:
1.
R
EAD ALL INSTRUCTIONS BEFORE USING.
Always unplug from outlet when not in use, before putting on or
taking off parts, and before cleaning.
2. Ensure the voltage is compliant with the voltage range stated on
the rating label, and ensure the socket is in good condition.
3. If the supply cord is damaged, it must be replaced by the
manufacturer or its service agent or a similarly qualied person
in order to avoid a hazard.
4. To protect against risk of electric shock, do not pour water on
cord, plug or ventilation, immerse the appliance in water or any
other liquids.
5. Unplug the appliance after using or before cleaning.
6. Do not use accessories that are not recommended by the
manufacturer.
7. This appliance can be used by persons with reduced physical,
sensory or mental capabilities or lack of experience and
knowledge only if they are supervised or have been instructed
on the safe use of the appliance and understand the hazards
involved. Cleaning and user maintenance must not be done by
any of the persons listed above without supervision.
8. Do not use the appliance close to open ames, hot plates or
stoves.
9. Do not press START/PAUSE prior to installing the removable
bowl or mixing paddle.
10. Do not remove the removable bowl or paddle when the
appliance is on.
11. Do not use outdoors.
12. Never clean any parts with scouring powders or sharp objects.
13. Do not use the removable bowl of this appliance to store
processed foods or beverages.
14. This product is intended to be used only in commercial
applications.
15. D o not place ngers inside bowl when “Mix In” ingredient lid is
removed and unit is running.
16. Do not upend this product or incline it over a 45˚ angle.

3
17. Keep the appliance at least 3 inches from other objects to
ensure motor ventilation.
18. Do not operate your appliance in an appliance garage or under
a wall cabinet.
When storing in an appliance garage always unplug the unit
from the electrical outlet. Not doing so could create a risk of re,
especially if the appliance touches the walls of the garage or the
door touches the unit as it closes.
19. Keep hands and utensils out of mixing bowl while in use to
reduce the risk of injury to persons or to the appliance itself.
DO NOT USE SHARP OBJECTS OR UTENSILS INSIDE THE
MIXING BOWL! Sharp objects will scratch and damage the
inside of the bowl. A rubber spatula or wooden spoon may be
used when the appliance is in the off position.
20. Do not let cord hang over edge of table or counter, or touch
hot surfaces.
21. Avoid contact with moving parts. Keep hands, hair, clothing,
as well as spatulas and other utensils away from unit during
operation to reduce the risk of injury and/or damage to the
appliance.
22. Do not switch on the power button frequently (ensure 5 min.
interval at least) to avoid the damage of compressor.
23. Metal sheet or other electric objects are not allowed to be
inserted into the appliance to avoid re and short circuit.
24. When removing the ice cream, be careful to not damage the
batch bowl edge.
25. Do not switch the power on prior to installing the batch bowl
and paddle.
26. The initial temperature of the ingredients should be between
77˚F (25˚C) and 41˚F (-5˚C). Do not place ingredients into the
freezer to pre-freeze, as this will increase the chances of
ingredients to reach ideal consistency without the appropriate
amount of air incorporated.
27. “Standby” or “Night” modes are not to be used in lieu of proper
cleaning and sanitization procedures at the frequency required
by federal, state and local regulatory agencies.
28. This appliance is intended to be used in household and similar
applications such as
– staff kitchen areas in shops, ofces and other working
environments;

4
– farm houses and by clients in hotels, motels and other
residential type environments;
– bed and breakfast type environments;
– catering and similar non-retail applications
Warning: Do not store explosive substances such as aerosol
cans with a flammable propellant in this appliance.
Warning: Keep ventilation openings, in the appliance enclosure
or in the built-in structure, clear of obstruction
Warning: Do not use mechanical devices or other means
to accelerate the defrosting process, other than those
recommended by the manufacturer
Warning: Do not damage the refrigerant circuit.
Warning: Do not use electrical appliances inside the food
storage compartments of the appliance, unless they are of the
type recommended by the manufacturer
SAVE THESE INSTRUCTIONS
APPROVED FOR
COMMERCIAL USE
SPECIFICATIONS
Model: WCIC25
Capacity: 2.5 Quarts
Voltage: 120V/60Hz
Power Consumption: 250W
Unit Dimensions: 12.4 X 10.7 X 16 inches (LWH)
Weight: 36 lbs.
WARNING:
Do not store explosive substances such as aerosol cans with a
ammable propellant in this appliance. Keep ventilation openings,
in the appliance enclosure or in the built-in structure, clear of
obstruction. Do not damage the refrigerant circuit.

5
GROUNDING INSTRUCTIONS
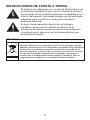
The lightning ash with arrowhead symbol within an
equilateral triangle is intened to alert the user to the
presence of uninsulated dangerous voltage within the
product’s enclosure that may be of sufcient magnitude
to constitute a risk of re or electric shock to persons.
The exclamation point within an equilateral triangle is
intended to alert the user to the presense of important
operating and maintenance (servicing) instruction in the
literature accompanying the appliance.
Correct Disposal of This Product
T his marking indicates that this product should not be disposed of
with other household wastes throughout the EU. To prevent possible
harm to the environment or human health from uncontrolled waste
disposal, recycle it responsibly to promote the sustainable reuse of
material resources. To return your used device, please use the return
and collection systems or contact the retailer where the product
was purchased. They can take this product for environmentally safe
recycling.

6
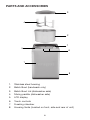
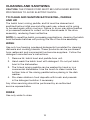
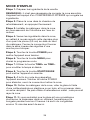
PARTS AND ACCESSORIES
1
8
2
7
4
6
5
3
1. Stainless steel housing
2. Batch Bowl (handwash only)
3. Batch Bowl Lid (dishwasher safe)
4. Mixing paddle (dishwasher safe)
5. LCD display
6. Touch controls
7. Freezing chamber
8. Housing Vents (located on front, side and rear of unit)

7
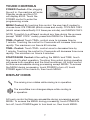
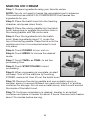
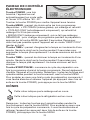
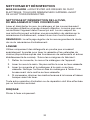
TOUCH CONTROLS
POWER Control: After plugging
the unit in, the machine will enter
Standby mode and the LCD
will display 60:00. Touch the
POWER control to enter the
programming mode.
MENU Control: By touching this control, the user has 3 modes to
choose from: ICE CREAM (which mixes and cools), COOLING ONLY
(which mixes intermittently 2-3 times per minute), and MIXING ONLY.
NOTE: To switch to a different mode at any time during the process
(except “KEEP COOL” mode), press/hold MENU for 3 seconds.
TIME+ Control: Touch TIME+ control once to increase time by
1 minute. Touching the control for 2 seconds will increase time more
rapidly. The maximum run time is 60 minutes.
TIME– Control: Touch TIME– control once to decrease time by
1 minute. Touching the control for 2 seconds will decrease time more
rapidly. The minimum run time is 5 minutes.
START/PAUSE Control: After setting the MENU and TIME, touch
this control to start operation. Touching this control during operation
will pause both operation and the time countdown. All touch control
buttons are accessible during processing except MENU. To access
the MENU during processing, touch POWER to turn off, touch
POWER again to turn back on, then touch MENU.
DISPLAY ICONS
The mixing icon rotates while mixing is in operation.
The snowake icon changes shape while cooling is
in operation.
All touch control buttons are accessible during processing except
MENU. To access the MENU during processing, touch POWER to
turn off, touch POWER again to turn back on, then touch MENU.

8
BEFORE FIRST USE
Thoroughly clean and sanitize all parts that will come into contact
with ice cream, including the batch bowl, mixing paddle and lid.
See Sanitizing instructions.
Warning: Be sure the power cord is unplugged during this process.
Important: Always place the Ice Cream Maker upright on a at and
level surface for 24 hours prior to use to ensure the compressor
provides optimum performance.
GENERAL OPERATION
When the Ice Cream, Sorbet, or Gelato is ready and has reached
ideal consistency for dispensing from the batch bowl the mixing
paddle will stop to avoid over churning but it will continue to
chill for the duration of the timer setting chosen.
Plug in the unit. The LCD will ash 60:00. The unit is now in standby
mode.
Touch POWER. The LCD will show 3 programming mode choices.
When you touch MENU, you can select the mode you prefer: ICE
CREAM, COOLING ONLY or MIXING ONLY. Once you’ve made your
selection, the default processing time for that mode will display, along
with the appropriate icon for mixing and/or cooling. At this point and
during processing, you can adjust your processing time by touching
TIME+ or TIME–.
When processing is complete, 00:00 will appear in the display and
3 audible alert will beep.
The unit will enter the COOL mode if no control has been touched
within 10 minutes following the completion of processing. This
ensures the product in the removable bowl stays cool. In the COOL
mode, all touchpad controls except POWER will become inactive.
After an additional 10 minutes, if no other function has been selected,
the unit will go into standby mode (LCD displays 00).
For optimum consistency, chill all mixtures for a minimum of 2 hours,
or up to 3 days. Always re-whisk the mixture after chilling to be sure
all ingredients are well combined. While chilling the mixture is not
required, this step will prevent any “ice” or “fat” crystals from forming
during the freezing process for resting it in a chilled environment
helps bind the ingredients together.
If a rmer consistency is desired, transfer to an airtight container
and place in freezer for about 2 hours. Remove from freezer about
15 minutes before serving.

9
Motor Protection Function
To help protect the machine’s motor from overheating or damage,
the unit will stop mixing when the motor temperature reaches about
115°C/239°F. The unit will automatically reset itself once the motor
temperature drops below 115°C/239°F. You are not required to unplug
or turn off the machine.
COMPRESSOR PROTECTION FUNCTION
If Cooling mode is paused or turned off, there will be a 3 minute
delay for the compressor to turn back on and begin cooling again.
The cooling icon will still be displayed but no cooling will be taking
place.Thisdelay protects the compressor from damage and ensures
optimum performance..
Controlling the Volume of the Ingredients
To avoid overow and waste, keep ingredients about ¼" under the
top of the mixing paddle. Ice cream expands to different degrees
depending on the recipe as it’s processing.
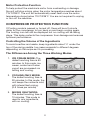
The Differences Among the Three Working Modes
1. I CE CREAM MODE: The
default working time is 60
minutes. In this mode, ice
cream, sorbet and frozen
yogurt are processed via
mixing and cooling.
2. C OOLING ONLY MODE:
The default working time is
30 minutes. In this mode, the
unit keeps the contents cold,
with intermittent mixing.
(2-3 times per minute)
3. M IXING ONLY MODE:
The default working time is
10 minutes. This mode is
used to mix ingredients,
with no cooling.

10
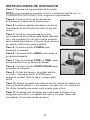
MAKING ICE CREAM
Step 1. Prepare ingredients using your favorite recipe.
NOTE: You do not need to freeze the removable bowl in advance.
This machine has a BUILT-IN COMPRESSOR that freezes the
ingredients for you.
Step 2. Place the batch bowl into the freezing
chamber, and press down rmly.
Step 3. Place the mixing paddle into the batch
bowl, being sure to engage the bottom hole in
the mixing paddle with the motor axis.
Step 4. Pour the ingredients into the batch
bowl. Keep ingredients about ¼" under the
top of the mixing paddle. Place the lid onto the
machine and turn it counterclockwise to lock
into place.
Step 5. Touch POWER to turn unit on.
Step 6. Touch MENU to choose the desired
mode.
Step 7. Touch TIME+ or TIME– to set the
processing time.
Step 8. Touch START/PAUSE to start
processing.
Step 9. When processing is complete, an alert
will beep. Turn off the machine by touching
POWER, remove lid, then lift out the batch bowl.
Step 10. Remove the mixing paddle and use a plastic scoop or
wooden spoon to remove nished ice cream and place it in another
container for storage. Do not use a metal scoop, which could scratch
the inside of the batch bowl.
Step 11. If a rmer consistency is desired, transfer to an airtight
container and place in freezer for about 2 hours. Remove from freezer
about 15 minutes before serving.

11
CLEANING AND SANITIZING
CAUTION: THE POWER CORD MUST BE UNPLUGGED BEFORE
PROCEEDING TO AVOID ELECTRIC SHOCK.
TO CLEAN AND SANITIZE BATCH BOWL, PADDLE
AND LID
The batch bowl, mixing paddle, and lid must be cleaned and
sanitized before initial use and after each use, unless unit is going
to be used again within one hour. Failure to do so may allow residue
of processed material to collect on the internal seals of the drive
assembly, rendering them ineffective.
NOTE: In repetitive batch-processing applications, cleaning the batch
bowl between batches will prolong the life of the drive assembly.
WASH
Use only low-foaming powdered detergents formulated for cleaning
dishware and cooking utensils. These products can be purchased
from restaurant and commercial food service suppliers. Follow the
detergent manufacturer’s instructions.
1. Remove lid, batch bowl and paddle from unit.
2. Hand-wash the batch bowl with detergent. Do not put batch
bowl in the dishwasher.
3. The lid and mixing paddle can be washed by hand or in a
commercial dishwasher. Use the brush to clean inside the
bottom hole of the mixing paddle before placing in the dish
washer.
4. Pre-clean stubborn food deposits with brush and presoak
in the detergent solution if necessary.
Any other servicing should be performed by an authorized
service representative.
RINSE
Use only water to rinse.

12
SANITIZE
Use regular, unscented bleach diluted with water between 50°F
and 120ºF. The sanitizing dilutions are based on the hypochlorite
concentration of the bleach. The dilutes for 2 commonly available
bleach concentrations are:
• Hypochlorite: 5.25%–3 teaspoons bleach per gallon of water
• Hypochlorite 8.25%–2 teaspoons bleach per gallon of water
1. Wet a soft cloth or sponge with a bleach dilution listed above.
2. Wipe down interior and exterior of lid, batch bowl and mixing
paddle.
3. Place batch bowl into freezing chamber, install paddle and ll
with sanitizing solution to above the mixing paddle. Cover with
lid (to prevent splashing) and run on MIXING ONLY for
2 minutes. Empty batch bowl.
4. Immerse lid in sanitizing solution and soak for 2 minutes.
AIR-DRY
Do not rinse after sanitizing is completed. Drain sanitizing solution
and allow parts to air-dry.
TO CLEAN AND SANITIZE HOUSING BASE
AND FREEZING CHAMBER
The housing and freezing chamber must be cleaned and sanitized
before rst use, and whenever unit has come into contact with food.
Remove the vent cover on the rear of the unit.
1. To clean: Wipe down exterior housing and freezing chamber
with wet cloth. Remove and clean under the vent cover if
necessary.
2. To sanitize; Wipe entire exterior housing and freezing chamber
with a soft cloth or sponge that has been dampened with
sanitizing solution* and wrung out to avoid any excess solution
running into housing vents in base. DO NOT IMMERSE
HOUSING IN WASHING SOLUTION, RINSE WATER OR
SANITIZING SOLUTION.
3. Allow to air-dry.
4. Reinstall the vent cover on the rear of the unit.
*Use only sanitizing solutions recommended above.

13
LIMITED ONE YEAR WARRANTY
Waring warrants every new Waring® Commercial Ice Cream Maker
to be free from defects in material and workmanship for a period
of one year from the date of purchase when used with foodstuffs,
nonabrasive liquids (other than detergents) and nonabrasive
semiliquids, provided it has not been subject to loads in excess of
the indicated rating. In addition, the motor in this appliance has a full
three-year warranty. Under this warranty, the Waring Commercial
Division will repair or replace any part that, upon our examination,
is defective in materials or workmanship, provided the product is
delivered prepaid to the Waring Service Center at: 314 Ella T. Grasso
Ave., Torrington, CT 06790, or any Factory Approved Service Center.
This warranty does not: a) apply to any product that has become
worn, defective, damaged or broken due to use or due to repairs
or servicing by other than the Waring Service Center or a Factory
Approved Service Center, or due to abuse, misuse, overloading
or tampering; or b) cover incidental or consequential damages of
any kind.
The one-year warranty is applicable only to appliances used in the
United States or Canada; this supersedes all other express product
warranty or warranty statements. For Waring products sold outside
of the U.S. and Canada, the warranty is the responsibility of the local
importer or distributor. This warranty may vary according to local
regulations. Warning: This warranty is void if appliance is used on
Direct Current (DC).
SERVICE
Should service on this product in USA or Canada be required at any
time, call or write to:
Waring Service Center • P.O. Box 3201 • 314 Ella T. Grasso Ave.
• Torrington, CT 06790
Tel. 1-800-492-7464 • FAX (860) 496-9017 or nearest Authorized
Service Center replacement parts for Waring out-of-warranty repairs
are obtainable at the above address.

14
MEDIDAS DE SEGURIDAD
IMPORTANTES
Al usar aparatos eléctricos, siempre debe tomar precauciones
básicas de seguridad para reducir el riesgo de incendio, descarga
eléctrica o heridas, entre ellas las siguientes:
1.
L
EA TODAS LAS INSTRUCCIONES
ANTES DE USARLO.
Siempre desenchufe el aparato cuando no esté en uso, antes
de instalar/sacar piezas y antes de limpiarlo.
2. Cerciórese de que el voltaje y la frecuencia de la toma de
corriente coinciden con el voltaje y la frecuencia indicados en la
placa de especificaciones técnicas del aparato y de que la toma
de corriente está en buen estado.
3. Para su seguridad, el cable debe ser reemplazado por el
fabricante, un centro de servicio autorizado u otra persona
calificada.
4. Para reducir el riesgo de descarga eléctrica, no moje el cable,
el enchufe, ni las ventilaciones, ni sumerja el aparato en agua u
otro líquido.
5. Siempre desenchufe el aparato después del uso y antes de
limpiarlo.
6. Solo use los accesorios/aditamentos recomendados por el
fabricante.
7. Este aparato puede ser usado por personas que carecen
de la experiencia o de los conocimientos necesarios
para manipularlo, o personas cuyas capacidades físicas,
sensoriales o mentales están limitadas, siempre que una
persona responsable por su seguridad le haya explicado el
funcionamiento y los riesgos, o supervise el uso del aparato.
La limpieza y el mantenimiento no deben ser llevados a cabo
por aquellas personas nombradas anteriormente, a menos que
sean supervisadas.
8. No utilice el aparato cerca de llamas, hornillos o estufas.
9. No oprima el botón START/PAUSE a menos que el bol
removible y la paleta mezcladora están debidamente instalados.
10. No saque el bol removible ni la paleta mezcladora mientras el
aparato está encendido.
11. No lo utilice en exteriores.
12. Nunca limpie el aparato con productos/materiales abrasivos o
utensilios punzantes/afilados.

15
13. No guarde alimentos o líquidos en el bol removible.
14. Este aparato ha sido diseñado para uso comercial.
15. N o meta los dedos en el bol ni en la boca de alimentación
durante el funcionamiento.
16. No vuelque ni incline el aparato a un ángulo superior a 45˚.
17. Mantenga el aparato a un mínimo de 3pulgadas (8cm) de otros
objetos para asegurar una ventilación adecuada del motor.
18. No haga funcionar el aparato debajo o dentro de un armario/
gabinete.
Siempre desenchufe el aparato antes de guardarlo en un
armario/gabinete. Dejar el aparato enchufado representa un
riesgo de incendio, especialmente si este toca las paredes o la
puerta del armario/gabinete cuando cierra.
19. Para reducir el riesgo de heridas o daños a la máquina,
mantenga las manos y utensilios lejos del tazón durante
el funcionamiento. ¡NUNCA INTRODUZCA OBJETOS O
UTENSILIOS PUNZANTES/AFILADOS EN EL BOL! Esto puede
rayar y dañar el interior del bol. Puede utilizar una espátula de
goma o una cuchara de madera, siempre que la máquina esté
apagada.
20. No permita que el cable cuelgue del borde de la encimera o de
la mesa, ni que tenga contacto con superficies calientes.
21. Evite el contacto con las piezas móviles. Para evitar el riesgo
de heridas o daños a la máquina, mantenga los dedos, cabello,
ropa, espátulas y otros utensilios lejos del aparato durante el
funcionamiento.
22. Después de apagar el aparato, espere 5 minutos antes de
encenderlo otra vez para evitar los daños al compresor.
23. Para evitar el riesgo de incendio o cortocircuito, no introduzca
objetos de metálicos o eléctricos en el aparato.
24. Tenga cuidado de no dañar la orilla del bol al sacar el helado del
mismo.
25. No encienda la unidad antes de haber instalado el bol y la
paleta mezcladora.
26. La temperatura inicial de los ingredientes debe estar entre
77 ˚F (25 ˚C) y 41 ˚F (-5 ˚C). No congele los ingredientes antes
de la preparación; esto aumenta la posibilidad de que los
ingredientes alcancen su consistencia final sin que la cantidad
de aire adecuada sea incorporada.
27. Nunca utilice el modo de espera o el modo nocturno en vez de
limpiar y sanear el aparato a la frecuencia establecida por los
organismos reguladores federales, estatales y locales.

16
28. Este aparato ha sido diseñado para uso doméstico y otras
aplicaciones similares, como, por ejemplo:
– las cocinas reservadas para los empleados de oficina y
tienda;
– las alquerías/fincas, los cuartos de hotel, motel y otros
entornos residenciales;
– los entornos tipo pensiones/hostales/“bed and breakfast”;
– los servicios de comida y aplicaciones no comerciales
similares.
Advertencia: no guarde sustancias explosivas, tales como latas
de aerosol que contengan un agente propulsor inflamable, en
este aparato.
Advertencia: mantenga las ventilaciones de aire internas y
externas libres de obstrucciones
Advertencia: no utilice ningún dispositivo mecánico u otros
medios, excepto los recomendados por el fabricante para
acelerar el proceso de descongelación.
Advertencia: no dañe el circuito refrigerante.
Advertencia: no utilice ningún aparato eléctrico dentro del bol, a
menos que sean aparatos recomendados por el fabricante.
GUARDE ESTAS INSTRUCCIONES
APROBADO PARA
USO COMERCIAL
ESPECIFICACIONES TÉCNICAS
Modelo: WCIC25
Capacidad: 2.5 cuartos de galón (2.35 L)
Voltaje: 120 V/60 Hz
Consumo de energía: 250W
Dimensiones de la unidad: 12.4 x 10.7 x 16 in. (31.5 x 27 x 40.5 cm)
Peso: 36 lb (16.3 kg)
ADVERTENCIA:
no guarde sustancias explosivas, tales como latas de aerosol
que contengan un agente propulsor inflamable, en este aparato.
Mantenga las ventilaciones de aire internas y externas libres de
obstrucciones. No dañe el circuito refrigerante.

17
INSTRUCCIONES DE PUESTA A TIERRA
El símbolo de relámpago con punta de flecha dentro de
un triángulo equilátero tiene como fin alertar al usuario
de la presencia de voltajes peligrosos no aislados en el
interior del aparato, los cuales pueden ser de suficiente
magnitud para constituir un riesgo de incendio o
descarga eléctrica.
El signo de exclamación dentro de un triángulo
equilátero tiene como fin alertar al usuario de la
presencia de instrucciones importantes de operación
y mantenimiento (servicio) en la documentación que
acompaña al equipo.
Reciclaje
E ste símbolo indica que este producto no debe eliminarse junto con los
desechos domésticos en ningún país de la U.E. Para proteger el medio
ambiente, evitar perjuicios a la salud pública resultantes de la eliminación
de desechos no controlada y promover la utilización sostenible de los
recursos materiales, recíclelo. Lleve el producto a un centro de reciclaje
o un punto de recogida designado para su reciclado, o póngase en
contacto con el establecimiento donde adquirió el producto. Ellos se
asegurarán que el producto sea reciclado de manera ecológica.

18
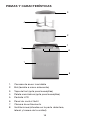
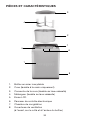
PIEZAS Y CARACTERÍSTICAS
1. Carcasa de acero inoxidable
2. Bol (lavable a mano solamente)
3. Tapa del bol (apta para lavavajillas)
4. Paleta mezcladora (apta para lavavajillas)
5. Pantalla LCD
6. Panel de control táctil
7. Cámara de enfriamiento
8. Ventilaciones (situadas en la parte delantera,
lateral y trasera de la unidad)
1
8
2
7
4
6
5
3

19
PANEL DE
CONTROL TÁCTIL
Botón POWER: al enchufar
el cable, la máquina ingresará
automáticamente al modo de
espera y “60: 00” aparecerá en la
pantalla LCD. Oprima el botón POWER para alimentar el aparato.
Botón MENU: permite elegir entre los 3 programas disponibles:
• ICE CREAM (helado), que mezcla y enfría
• COOLING ONLY (enfriamiento solamente), que enfría y mezcla
2 a 3 veces por minuto
• MIXING ONLY (mezcla solamente), que mezcla solamente
NOTA: para cambiar el programa durante el ciclo de preparación,
mantenga oprimido el botón MENU por 3 segundos. Nota: hacer esto
no es posible cuando el aparato está en el modo “KEEP COOL”.
Botón TIME+: oprímalo para aumentar el tiempo en incrementos
de 1 minuto. Manténgalo oprimido por 2 segundos para aumentar
el tiempo más rápido. El tiempo máximo es de 60 minutos.
Botón TIME–: oprímalo para disminuir el tiempo en incrementos
de 1 minuto. Manténgalo oprimido por 2 segundos para disminuir
el tiempo más rápido. El tiempo mínimo es de 5 minutos.
Botón START/PAUSE: empieza el ciclo de preparación después de
haber elegido el programa y programado el tiempo. También permite
apagar el aparato y el temporizador. Nota: todos los botones están
operacionales durante el funcionamiento, excepto el botón MENU.
Para acceder al menú una vez empezado el ciclo de preparación,
deberá apagar y volver a encender la unidad (oprimiendo el botón
POWER), y luego oprimir el botón MENU.
ÍCONOS
Este ícono indica que el modo de mezcla está activo.
Este ícono indica que el modo de enfriamiento está activo.
Nota: todos los botones están operacionales durante el
funcionamiento, excepto el botón MENU. Para acceder al menú una
vez empezado el ciclo de preparación, deberá apagar y volver a
encender la unidad (presionando el botón POWER), y luego oprimir
el botón MENU.

20
ANTES DEL PRIMER USO
Lave y desinfecte el bol, la paleta mezcladora y la tapa
(véase la sección “Limpieza y desinfección”).
Advertencia: asegúrese de que el aparato está desenchufado.
Importante: deje la máquina en una superficie llana y estable
por 24 horas antes de enchufar el aparato para asegurar el buen
funcionamiento del compresor.
FUNCIONAMIENTO
Nota: cuando el helado, el sorbete o el helado haya alcanzado
su consistencia final, la paleta mezcladora dejará de girar,
pero el ciclo de enfriamiento continuará hasta el final tiempo
programado.
Enchufe el cable en una toma de corriente. “60: 00” aparecerá en
la pantalla LCD, lo que significa que la unidad está en el modo de
espera.
Oprima el botón POWER; los tres programas disponibles aparecerán
en la pantalla. Oprima el botón MENU para elegir el programa
deseado: ICE CREAM (helado), COOLING ONLY (enfriamiento
solamente) o MIXING ONLY (mezcla solamente). El tiempo por
defecto del programa y el ícono correspondiente aparecerán en la
pantalla. Use los botones TIME+ o TIME– para aumentar/disminuir el
tiempo si desea.
Al final del ciclo de preparación “00:00” aparecerá en la pantalla y la
unidad emitirá 3 pitidos.
Después de 10 minutos sin oprimir ningún botón, el modo de
enfriamiento se activará automáticamente para conservar la
consistencia de la mezcla. Cuando la unidad está en el modo de
enfriamiento, todos los botones están operacionales excepto el
botón POWER. Después de 10 minutos más sin oprimir ningún
botón, la unidad regresará al modo de espera y la pantalla LCD
mostrará “00”.
Para obtener una consistencia óptima, refrigere la mezcla por 2
horas o más (hasta 3 días) antes de empezar la preparación. Siempre
revuelva la mezcla antes de empezar la preparación. Nota: aunque
refrigerar la mezcla antes de la preparación no es necesario, esto
ayuda a unir los ingredientes, lo que evita la formación de cristales
de hielo o de grasa durante la preparación.
Si desea que el helado sea más firme, póngalo en un recipiente
hermético y congélelo por aprox. 2 horas. Saque el helado del
congelador 15 minutos antes de servir.
La page est en cours de chargement...
La page est en cours de chargement...
La page est en cours de chargement...
La page est en cours de chargement...
La page est en cours de chargement...
La page est en cours de chargement...
La page est en cours de chargement...
La page est en cours de chargement...
La page est en cours de chargement...
La page est en cours de chargement...
La page est en cours de chargement...
La page est en cours de chargement...
La page est en cours de chargement...
La page est en cours de chargement...
La page est en cours de chargement...
La page est en cours de chargement...
La page est en cours de chargement...
La page est en cours de chargement...
La page est en cours de chargement...
La page est en cours de chargement...
-
 1
1
-
 2
2
-
 3
3
-
 4
4
-
 5
5
-
 6
6
-
 7
7
-
 8
8
-
 9
9
-
 10
10
-
 11
11
-
 12
12
-
 13
13
-
 14
14
-
 15
15
-
 16
16
-
 17
17
-
 18
18
-
 19
19
-
 20
20
-
 21
21
-
 22
22
-
 23
23
-
 24
24
-
 25
25
-
 26
26
-
 27
27
-
 28
28
-
 29
29
-
 30
30
-
 31
31
-
 32
32
-
 33
33
-
 34
34
-
 35
35
-
 36
36
-
 37
37
-
 38
38
-
 39
39
-
 40
40


