
STIHL KB-KM, KW-KM
Instruction Manual
Notice d’emploi


Original Instruction ManualPrinted on chlorine-free paper
Printing inks contain vegetable oils, paper can be recycled.
© ANDREAS STIHL AG & Co. KG, 2020
0458-479-8221-A. VA2.J20.
0000002188_013_GB
KB-KM, KW-KM
English
1
This instruction manual is protected by copyright. All rights reserved, especially the rights to reproduce, translate and process
with electronic systems.
Contents
Dear Customer,
Thank you for choosing a quality
engineered STIHL product.
It has been built using modern
production techniques and
comprehensive quality assurance.
Every effort has been made to ensure
your satisfaction and trouble-free use of
the product.
Please contact your dealer or our sales
company if you have any queries
concerning this product.
Your
Dr. Nikolas Stihl
KombiSystem 2
Guide to Using this Manual 2
Safety Precautions and Working
Techniques 2
Using the Unit 5
Approved KombiEngines 7
Assembling the Unit 8
Mounting the KombiTool 9
Fitting the Harness 10
Balancing the Machine 11
Starting / Stopping the Engine 11
Storing the Machine 12
Replacing the Sweeping
Attachments 12
Maintenance and Care 13
Main Parts 14
Specifications 15
Maintenance and Repairs 15
Disposal 16

KB-KM, KW-KM
English
2
In the STIHL KombiSystem a number of
different KombiEngines and KombiTools
can be combined to produce a power
tool. In this instruction manual the
functional unit formed by the
KombiEngine and KombiTool is referred
to as the power tool.
Therefore, the separate instruction
manuals for the KombiEngine and
KombiTool should be used together for
the power tool.
Always read and and make sure you
understand both instruction manuals
before using your power tool for the first
time and keep them in a safe place for
future reference.
Pictograms
All the pictograms attached to the
machine are shown and explained in this
manual.
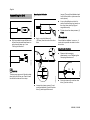
Symbols in text
WARNING
Warning where there is a risk of an
accident or personal injury or serious
damage to property.
NOTICE
Caution where there is a risk of
damaging the machine or its individual
components.
Engineering improvements
STIHL's philosophy is to continually
improve all of its products. For this
reason we may modify the design,
engineering and appearance of our
products periodically.
Therefore, some changes, modifications
and improvements may not be covered
in this manual.
The machine should only be provided or
loaned to people familiar with this model
and its operation. The KombiEngine and
KombiTool User Manuals should always
be handed over with the machine.
Use the bristle brush only for sweeping
areas and paths, including uneven and
jointed surfaces, and natural stone
paving.
Use the sweeper drum assembly only
for sweeping areas and paths, moving
wet materials, such a leaves or dirt to a
central point, clearing snow and
removing standing water from solid
surfaces.
The machine must not be used for any
other purposes – risk of accidents!
Only mount accessories that are
explicitly approved for this power tool
model by STIHL or are technically
identical. If you have any questions in
this respect, consult a servicing dealer.
KombiSystem Guide to Using this Manual Safety Precautions and
Working Techniques
Special safety precau-
tions must be observed
when working with the
sweeper drum assembly
and bristle brush.
Both user manuals (Kom-
biEngine and KombiTool)
must be read through
attentively before using
the unit for the first time
and kept in a safe place
for future reference. Non-
compliance with the user
manuals may cause seri-
ous or even fatal injury.

KB-KM, KW-KM
English
3
Use only high quality parts and
accessories. in order to avoid the risk of
accidents and damage to the machine.
STIHL recommends the use of original
STIHL tools and accessories. They are
specifically designed to match the
product and meet your performance
requirements.
Never attempt to modify your power tool
in any way since this may increase the
risk of personal injury. STIHL excludes
all liability for personal injury and
damage to property caused while using
unauthorized attachments.
Do not use a high-pressure washer to
clean the power tool. The solid jet of
water may damage parts of the unit.
Clothing and equipment
Wear proper protective clothing and
equipment.
Do not wear clothing which could
become trapped in wood, brush or
moving parts of the machine. Do not
wear a scarf, necktie or jewelry. Tie up
and confine long hair above your
shoulders.
WARNING
Wear "personal" sound protection, e.g.
ear defenders.
STIHL can supply a comprehensive
range of personal protective equipment.
Transporting the machine
Always stop the engine.
Carry the machine by the carrying
handle, sweeping attachment in front of
you, hot muffler away from your body.
By vehicle: When transporting in a
vehicle, properly secure your machine to
prevent turnover, damage and fuel
spillage.
Before starting
Check that your power tool is properly
assembled and in good condition – refer
to appropriate chapters in the
KombiEngine and KombiTool user
manuals.
– Tool: correctly fitted, secure and in
perfect condition
– Both sweeping attachments must
be mounted.
– Never attempt to modify the controls
or safety devices
– Inspect the deflectors for damage
and wear. Do not operate the
machine with a damaged deflector –
replace damaged parts.
– Keep the handles dry and clean –
free from oil and dirt – this is
important for safe control of the
machine
– Adjust carrying harness and
handles in accordance with user's
body height. Observe the chapter
"Fitting the Harness"
To reduce the risk of personal injury, do
not operate your power tool if it is
damaged or not properly assembled!
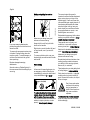
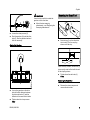
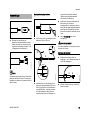
Clothing must be sturdy
but allow complete free-
dom of movement. Wear
close-fitting clothes such
as a boiler suit, not a
loose jacket.
Wear sturdy shoes with
non-slip soles.
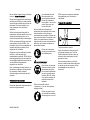
To reduce the risk of eye
injuries, wear close-fit-
ting safety glasses in
accordance with Euro-
pean Standard EN 166.
Make sure the safety
glasses are a snug fit.
Wear sturdy protective
gloves made of a resist-
ant material (e. g.
leather).
223BA000 KN

KB-KM, KW-KM
English
4
If you use sweeping attachments,
position the gearbox so that the axle is
above the shaft.
To prepare for emergencies when using
a harness: Practice setting down the
machine quickly. To avoid damage, do
not throw the machine to the ground
when practicing.
Replace damaged sweeping
attachments.
See also notes on "Before Starting" in
the user manual of the KombiEngine you
are using.
Holding and guiding the machine
Make sure you always have good
balance and secure footing.
Always hold the unit firmly with both
hands on the handles.
Right hand on control handle, left hand
on loop handle, even if you are left-
handed.
To ensure reliable control, wrap your
thumbs tightly around the control handle
and handle.
While working
In the event of impending danger or in
an emergency, switch off the engine
immediately by moving the slide control
/ stop switch/button to 0 or STOP.
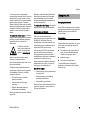
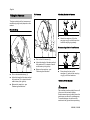
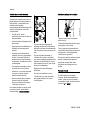
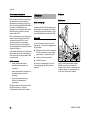
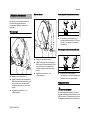
To reduce the risk of injury from ejected
objects, do not allow any other persons
within 5 meters of your own position.
This distance must also be maintained in
relation to objects (vehicles, window
panes) – risk of property damage!
The correct engine idle speed is
important to ensure that the attachment
stops moving when you let go of the
throttle trigger. Check and correct the
idle speed setting at regular intervals. If
the sweeping attachment still rotates
when the engine is idling, have your
dealer check your machine and make
proper adjustments or repairs – see
KombiEngines user manual.
Electrostatic charges may build up when
working on synthetic surfaces – risk of
electric shock and accidents!
Take special care in slippery, wet
conditions, in snow and on slopes,
uneven ground, etc. – Risk of slipping!
Watch out for obstacles: tree stumps,
roots – risk of tripping or stumbling!
Make sure you always have good
balance and secure footing.
Be particularly alert and cautious when
wearing hearing protection because
your ability to hear warnings (shouts,
alarms, etc.) is restricted.
Take breaks when you start getting tired
or feeling fatigue – risk of accidents!
Work calmly and carefully – in daylight
conditions and only when visibility is
good. Proceed with caution, do not put
others in danger.
To reduce the risk of a dust explosion,
spray very dusty surfaces with water
before sweeping.
002BA080 KN
5m (16ft)
Dust, fumes and smoke
produced while working
may be hazardous to
health! If dust levels are
high, wear a suitable
respirator.

KB-KM, KW-KM
English
5
If your power tool is subjected to
unusually high loads for which it was not
designed (e.g. heavy impact or a fall),
always check that it is in good condition
before continuing work – see also
"Before Starting". Make sure the safety
devices are working properly. Never use
a power tool that is no longer safe to
operate. In case of doubt, contact a
dealer.
To reduce the risk of injuryfrom thrown
objects, never operate the unit without a
properly mounted deflector designed
specifically for the unit and the
attachment.
Special care must be taken when
working in overgrown terrain.
When clearing leaves, take care not to
harm small animals.
Check the sweeping attachments at
regular short intervals during operation
or immediately if there is a sudden
change in behavior:
– Shut off the engine, hold the
machine securely.
– Check condition and proper
mounting.
– Replace damaged sweeping
attachments immediately.
Before you leave the machine: Shut the
engine off.
Regularly clean the cutting attachment
mounting and remove any blockages
and material that has accumulated
between the sweeping attachments or
around the deflector.
To reduce the risk of injury, shut off the
engine before changing attachments.
Maintenance and Repairs
Only carry out the maintenance
operations and repairs described in the
KB-KM, KW-KM KombiTool and
KombiEngine instruction manuals. All
other repairs must be performed by an
authorized STIHL service shop.
Only use original STIHL replacement
parts for maintenance and repairs.
Using replacement parts from other
manufacturers may result in damage to
the machine or personal injury.
Never attempt to modify the sweeping
attachments in any way. You may be
putting your own safety at risk.
Shut off the engine
– before carrying out any maitenance
or repair work
– before removing and installing
sweeping attachments
– before rectifying problems.
Store the power tool as described in the
instruction manuals – see chapter on
"Storing the Machine".
Sweeping Attachments
KombiTools for sweeping and cleaning
operations are available in two versions:
KB-KM bristle brush and KW-KM
PowerSweep.
Preparations
If the surface to be cleaned is dry, spray
it with water to reduce the amount of
dust created.
N To reduce the risk of accidents or
injury, remove all obstacles and
objects from the work area.
N Start the engine.
N Put on the shoulder strap.
The KombiEngine with sweeping
attachment is operated in the forward
direction only.
Check the work site –
rocks, metal objects etc.
may be caught up and
ejected – risk of injury!
Using the Unit

KB-KM, KW-KM
English
6
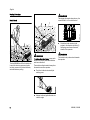
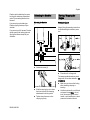
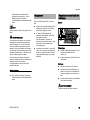
Working Technique
Bristle Brush
The the KB-KM KombiTool bristle brush
is used for cleaning areas and paths,
including uneven and jointed surfaces,
and natural stone paving.
WARNING
To reduce the risk of injury, never work
without the properly mounted deflector
and two extensions.
These devices divert material away from
the machine and the operator.
N Push the bristle brush steadily at
walking pace.
N Always hold and guide the tool at a
shallow angle.
WARNING
The steeper the angle shown above, the
more difficult it is to control the tool.
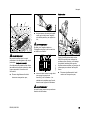
N Guide the bristle brush at right
angles to the direction of travel (1).
Sweepings are thrown forwards,
ahead of the operator.
WARNING
The bristle brush pushes back towards
the operator.
479BA017 KN
1

KB-KM, KW-KM
English
7
PowerSweep
The KW-KM PowerSweep KombiTool is
used for sweeping areas and paths,
moving wet materials, such a leaves or
dirt to a central point, clearing snow and
removing standing water from solid
surfaces.
N Push the PowerSweep steadily at
walking pace.
N Always hold and guide the tool at a
shallow angle.
WARNING
The steeper the angle shown above, the
more difficult it is to control the tool.
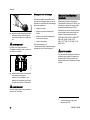
N Guide the PowerSweep at right
angles to the direction of travel (1).
Sweepings are thrown forwards,
ahead of the operator.
WARNING
The PowerSweep pushes back towards
the operator.
Cleaning the Sweeping Attachment
Clean away any dirt and debris that has
accumulated between the sweeping
attachments, around the gearbox or
between the sweeping attachments and
the deflector:
– Shut off the engine.
– Pull the hitch pins out of the axle.
– Remove the sweeping attachments
from the axle and clean them.
– Clean away dirt and debris from the
machine.
Refit the sweeping attachments – see
“Replacing the Sweeping Attachments”.
Only use KombiEngines supplied or
explicitly approved by STIHL for use with
the attachment.
This KombiTool may be operated only in
combination with the following
KombiEngines:
STIHL KM 55 R, KM 56 R, KM 85 R
1)
,
KM 90 R, KM 94 R, KM 100 R,
KM 110 R
1)
, KM 130 R, KMA 130 R,
KMA 135 R
WARNING
Loop-handled machines must be
equipped with a barrier bar.
479BA017 KN
1
Approved KombiEngines
1)
Only outside EU

KB-KM, KW-KM
English
8
N Pull the protective caps off the ends
of the drive tube and keep them in a
safe place for later use – see
"Storing the Machine".
NOTICE
The plug may come out of the drive tube
when you pull off the cap. Push it back
into the drive tube as far as stop.
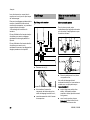
Mounting the Deflector
N Apply a mark at distance A
(125 mm) from the end of the drive
tube.
N Loosen the clamp screws (1) and
push the deflector (2) onto the drive
tube (3) and beyond the mark
(arrow). Then pull the deflector back
until it is flush with or just covers the
mark (arrow).
N Line up the deflector so that it is
vertical and the fixing lug (arrow) on
the drive tube points up (upper
magnified arrow).
N Tighten down the clamp screws (1)
firmly.
WARNING
Check that the deflector is secure – it
must not be possible to rotate it on the
drive tube.
Mounting the Gearbox
N Remove both sweeping
attachments – see "Replacing the
Sweeping Attachmenrs".
N Push the sleeve (4) onto the drive
tube (3) as far as stop.
Assembling the Unit
413BA014 KN
002BA248 KN
1
1
2
3
479BA018 KN
3
479BA021 KN
4

KB-KM, KW-KM
English
9
N Loosen the clamp screws (5).
N Push the gearbox (6) onto the drive
tube (3), turn the gearbox back and
forth as necessary.
Aligning the Gearbox
N Line up the gearbox on the drive
tube so that the distance between
the horizontal axles (7) and the
deflector is the same at both sides.
N Tighten down the clamp screws
firmly.
WARNING
It must not be possible to rotate the
gearbox on the drive tube.
N Mount the two sweeping
attachments – see "Replacing the
Sweeping Attachmenrs".
N Push the lug (1) on the drive tube
into the slot (2) in the coupling
sleeve as far as stop.
When correctly installed, the red line (3)
(arrow point) must be flush with the end
of the coupling sleeve.
N Tighten down the star knob (4)
firmly.
Removing the KombiTool
N Reverse the above sequence to
remove the drive tube.
3
479BA019 KN
5
5
6
Mounting the KombiTool
1
002BA326 KN
2
3
002BA327 KN
4

KB-KM, KW-KM
English
10
The type and style of the harness and
carabiner (spring hook) depend on the
market.
Shoulder Strap
N Put on the shoulder strap (1).
N Adjust the length of the strap so that
the carabiner (2) is about a hand’s
width below your right hip.
N Balance the machine – see
"Balancing the Machine".
Full Harness
N Put on the full harness (1).
N Adjust the length of the strap so that
the carabiner (2) is about a hand’s
width below your right hip.
N Balance the machine – see
"Balancing the Machine".
Attaching Machine to Harness
N Attach the carabiner (1) to the
carrying ring (2) on the drive tube –
hold the carrying ring steady.
Disconnecting Machine from Harness
N Press down the bar on the
carabiner (1) and pull the carrying
ring (2) out of the carabiner.
Throwing Off the Machine
WARNING
The machine must be quickly thrown off
in the event of imminent danger.
Practice removing and putting down the
machine as you would in an emergency.
To avoid damage, do not throw the
machine to the ground when practicing.
Fitting the Harness
1
002BA374 KN
2
1
002BA375 KN
2
1
002BA308 KN
2
1
2
1
002BA310 KN
2
1
2

KB-KM, KW-KM
English
11
Practice quickly detaching the power
tool from the carabiner as described
under "Disconnecting Machine from
Harness".
If you are using a shoulder strap:
Practice slipping the strap off your
shoulder.
If you are using a full harness: Practice
quickly opening the locking plate and
slipping the harness straps off your
shoulders.
Balancing the Machine
N Loosen the screw (3).
N Slide the carrying ring up or down
the drive tube until the sweeping
attachments touch the ground.
N Tighten down the screw on the
carrying ring firmly.
Starting the Engine
Always follow the operating instructions
for the KombiEngine and basic power
tool.
N Place the unit on the ground.
The sweeping attachments may touch
the ground, but no other obstacles – risk
of accidents.
N Make sure you have a firm footing,
either standing, stooping or
kneeling.
N Hold the machine with you left hand
and press it down firmly – do not
touch the controls on the control
handle – see KombiEngine or basic
power tool instruction manual.
Balancing the Machine
002BA309 KN
3
Starting / Stopping the
Engine
406BA007 KN
406BA008 KN

KB-KM, KW-KM
English
12
NOTICE
Do not stand or kneel on the drive tube.
WARNING
The sweeping attachments may begin to
rotate and cause the machine to move
as soon as the engine starts. For this
reason, blip the throttle after starting –
the engine returns to idling speed.
The starting procedure is now as
described in the instruction manual of
the KombiEngine or basic power tool
you are using.
Stopping the Engine
N See instruction manual of the
KombiEngine or basic power tool.
For periods of 3 months or longer
N Remove and clean the sweeping
attachments, inspect them for
damage and wear.
N If the KombiTool is removed from
the KombiEngine and stored
separately: Fit the protective cap on
the drive tube to avoid dirt getting
into the coupling.
N Store the machine in a dry, high or
locked location – out of the reach of
children and other unauthorized
persons.
Bristle Brush
Removing
N Remove the hitch pin (1) from the
end of the axle (2).
N Pull the bristle brush (3) off the axle.
Installing
N Push the bristle brush (3) onto the
axle.
N Insert the hitch pin (1) in the hole at
the end of the axle and fold it flat.
N Use the same procedure to mout
the other bristle brush.
WARNING
Always mount both bristle brushes.
Storing the Machine Replacing the Sweeping
Attachments

KB-KM, KW-KM
English
13
PowerSweep
Removing
N Remove the hitch pin (1) from the
end of the axle (2).
N Pull the sweeper drum (3) off the
axle.
Installing
N Push the sweeper drum (3) onto the
axle.
N Insert the hitch pin (1) in the hole at
the end of the axle and fold it flat.
N Use the same procedure to mout
the other sweeper drum.
WARNING
Always mount both sweeper drums.
The following intervals apply to normal
operating conditions only. If your daily
working time is longer or operating
conditions are difficult (very dusty work
area, etc.), shorten the specified
intervals accordingly.
All accessible screws and nuts
N Retighten if necessary
Sweeping attachments and deflectors
N Visual inspection, check tightness
before starting work and after every
refueling stop
N Replace if damaged
Safety labels
N Replace illegible safety labels
Maintenance and Care

KB-KM, KW-KM
English
14
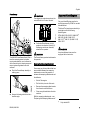
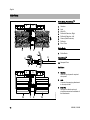
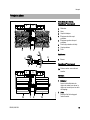
Bristle Brush, PowerSweep
TM
1 Gearbox
2 Axle
3 Hitch Pin
4 Deflector Extension, Right
5 Deflector Extension, Left
6 Sleeve (Shaft Protector)
7 Deflector
8 Drive Tube
Bristle Brush
9 Roller Brush
PowerSweep
TM
10 Sweeper Drum
Definitions
1Gearbox
Reduces input speed to required
axle speed.
2Axle
Connects the sweeping attachment
to the output shaft.
3Hitch Pin
Secures the attachments and
simplifies removal and installation of
the attachments.
Main Parts
7
8
1
479BA022 KN
2
3
9
9
4 5
10
10
3
21
1
6
2
4 5

KB-KM, KW-KM
English
15
4 Deflector Extension, Right
Helps divert removed material and
debris away from the machine and
operator.
5 Deflector Extension, Left
Helps divert removed material and
debris away from the machine and
operator.
6 Sleeve (Shaft Protector)
Designed to protect drive tube from
wear caused by rubber paddles of
sweeper drum, maintains minimum
clearance between gearbox and
deflector.
7 Deflector
Deflector with extensions fitted.
8 Drive Tube
Encloses and protects the drive
shaft between the coupling sleeve
and gearbox.
9 Roller Brush
Tool for sweeping and cleaning.
10 Sweeper Drum
Tool for sweeping and cleaning.
Sweeping Attachments
KB-KM
KW-KM
Weight
Users of this machine may only carry out
the maintenance and service work
described in this user manual. All other
repairs must be carried out by a
servicing dealer.
STIHL recommends that you have
servicing and repair work carried out
exclusively by an authorized STIHL
servicing dealer. STIHL dealers are
regularly given the opportunity to attend
training courses and are supplied with
the necessary technical information.
When repairing the machine, only use
replacement parts which have been
approved by STIHL for this power tool or
are technically identical. Only use high-
quality replacement parts in order to
avoid the risk of accidents and damage
to the machine.
STIHL recommends the use of original
STIHL replacement parts.
Original STIHL parts can be identified by
the STIHL part number, the {
logo and the STIHL parts symbol K
(the symbol may appear alone on small
parts).
Specifications
Two roller brushes
Diameter: 250 mm
Working width: 600 mm
Two sweeping drums
Diameter: 270 mm
Working width: 600 mm
Complete with deflector and drive tube
KB-KM: 6.4 kg
KW-KM: 7.4 kg
Maintenance and Repairs

KB-KM, KW-KM
English
16
Observe all country-specific waste
disposal rules and regulations.
STIHL products must not be thrown in
the garbage can. Take the product,
accessories and packaging to an
approved disposal site for environment-
friendly recycling.
Contact your STIHL servicing dealer for
the latest information on waste disposal.
Disposal
000BA073 KN

Notice d'emploi d'origineImprimé sur papier blanchi sans chlore
L'encre d'imprimerie contient des huiles végétales, le papier
est recyclable.
© ANDREAS STIHL AG & Co. KG, 2020
0458-479-8221-A. VA2.J20.
0000002188_013_F
KB-KM, KW-KM
français
17
La présente Notice d'emploi est protégée par des droits d'auteur. Tous droits réservés, en particulier tout droit de copie, de tra-
duction et de traitement avec des systèmes électroniques quelconques.
Table des matières
Chère cliente, cher client,
nous vous félicitons d'avoir choisi un
produit de qualité de la société STIHL.
Ce produit a été fabriqué avec les
procédés les plus modernes et les
méthodes de surveillance de qualité les
plus évoluées. Nous mettons tout en
œuvre pour que cette machine vous
assure les meilleurs services, de telle
sorte que vous puissiez en être
parfaitement satisfait.
Pour toute question concernant cette
machine, veuillez vous adresser à votre
revendeur ou directement à
l'importateur de votre pays.
Dr. Nikolas Stihl
CombiSystème 18
Indications concernant la présente
Notice d'emploi 18
Prescriptions de sécurité et
techniques de travail 18
Utilisation 22
Moteurs CombiSystème autorisés 24
Assemblage 25
Montage de l'outil CombiSystème 26
Utilisation du harnais 27
Équilibrage 28
Mise en route / arrêt du moteur 28
Rangement 29
Remplacement de l'outil de
balayage 29
Instructions pour la maintenance et
l'entretien 30
Principales pièces 31
Caractéristiques techniques 32
Instructions pour les réparations 32
Mise au rebut 33

KB-KM, KW-KM
français
18
Le CombiSystème STIHL offre la
possibilité de combiner différents
moteurs CombiSystème et outils
CombiSystème pour composer un
dispositif à moteur complet. Dans la
présente Notice d'emploi, l'ensemble –
en ordre de marche – d'un moteur
CombiSystème et d'un outil
CombiSystème est dénommé dispositif
à moteur ou machine.
Par conséquent, les Notices d'emploi du
moteur CombiSystème et de l'outil
CombiSystème constituent, ensemble,
la Notice d'emploi intégrale du dispositif
à moteur ou de la machine.
Il faut donc toujours lire attentivement
les deux Notices d'emploi avant la
première mise en service et les
conserver précieusement pour pouvoir
les relire lors d'une utilisation ultérieure.
Pictogrammes
Tous les pictogrammes appliqués sur le
dispositif sont expliqués dans la
présente Notice d'emploi.
Repérage des différents types de textes
AVERTISSEMENT
Avertissement contre un risque
d'accident et de blessure ainsi que de
graves dégâts matériels.
AVIS
Avertissement contre un risque de
détérioration du dispositif ou de certains
composants.
Développement technique
La philosophie de STIHL consiste à
poursuivre le développement continu de
toutes ses machines et de tous ses
dispositifs ; c'est pourquoi nous devons
nous réserver tout droit de modification
de nos produits, en ce qui concerne la
forme, la technique et les équipements.
On ne pourra donc en aucun cas se
prévaloir des indications et illustrations
de la présente Notice d'emploi à l'appui
de revendications quelconques.
Ne prêter ou louer la machine qu'à des
personnes familiarisées avec ce modèle
et sa manipulation – et toujours y joindre
les Notices d'emploi du moteur
CombiSystème et de l'outil
CombiSystème.
Utiliser le balai brosse uniquement pour
nettoyer les surfaces et les chemins,
également les surfaces inégales ou
entrecoupées de joints, ainsi que les
sols en pierre naturelle.
Utiliser le balai racleur uniquement pour
nettoyer les surfaces et les chemins,
pour balayer les saletés humides telles
que les feuilles mortes mouillées, ou la
neige, de même que pour enlever les
flaques d'eau.
CombiSystème Indications concernant la
présente Notice d'emploi
Prescriptions de sécurité et
techniques de travail
Pour travailler avec le
balai brosse ou le balai
racleur, il faut respecter
des règles de sécurité
particulières.
Avant la première mise
en service, lire attentive-
ment et intégralement les
deux Notices d'emploi
(celle du moteur Com-
biSystème et celle de
l'outil CombiSystème).
Les conserver précieuse-
ment pour pouvoir les
relire lors d'une utilisa-
tion ultérieure. Le fait de
ne pas respecter les ins-
tructions des Notices
d'emploi peut entraîner
un danger de mort.
La page est en cours de chargement...
La page est en cours de chargement...
La page est en cours de chargement...
La page est en cours de chargement...
La page est en cours de chargement...
La page est en cours de chargement...
La page est en cours de chargement...
La page est en cours de chargement...
La page est en cours de chargement...
La page est en cours de chargement...
La page est en cours de chargement...
La page est en cours de chargement...
La page est en cours de chargement...
La page est en cours de chargement...
La page est en cours de chargement...
La page est en cours de chargement...
-
 1
1
-
 2
2
-
 3
3
-
 4
4
-
 5
5
-
 6
6
-
 7
7
-
 8
8
-
 9
9
-
 10
10
-
 11
11
-
 12
12
-
 13
13
-
 14
14
-
 15
15
-
 16
16
-
 17
17
-
 18
18
-
 19
19
-
 20
20
-
 21
21
-
 22
22
-
 23
23
-
 24
24
-
 25
25
-
 26
26
-
 27
27
-
 28
28
-
 29
29
-
 30
30
-
 31
31
-
 32
32
-
 33
33
-
 34
34
-
 35
35
-
 36
36


dans d''autres langues
- English: STIHL KB-KM, KW-KM User manual
Documents connexes
-
STIHL BF-KM Manuel utilisateur
-
-
STIHL FH-KM Manuel utilisateur
-
STIHL BG-KM Manuel utilisateur
-
-
-
-
STIHL KB-MM, KW-MM Manuel utilisateur
-
-
STIHL MM 56 Manuel utilisateur