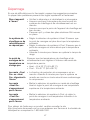
Honeywell RTHL2410 series Le manuel du propriétaire
- Catégorie
- Thermostats
- Taper
- Le manuel du propriétaire
Ce manuel convient également à

Owner’s Manual
Read and save these
instructions.
For help please visit
yourhome.honeywell.com
RTHL2510/RTHL2410
Series
Programmable
Thermostat
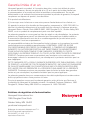
Identify System Type
This thermostat is compatible with the following systems:
• Gas, oil or electric furnace
• Central air conditioner
• Hot water system with or without pump
• Millivolt system
• Central heating and cooling system
• Heat pump without auxiliary/backup heat
• Heat pump with auxiliary/backup heat
Do you need assistance? We are here to help.
Call 1-800-468-1502 for wiring assistance before returning
the thermostat to the store.
This thermostat cannot be used on multistage systems.

2
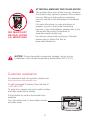
NOTICE: To avoid possible compressor damage, do not run air
conditioner if the outside temperature drops below 50°F (10°C).
ATTENTION: MERCURY RECYCLING NOTICE
This product does not contain mercury. However,
this product may replace a product that contains
mercury. Mercury and products containing
mercury should not be discarded in household
trash.
For more information on how and where to
properly recycle a thermostat containing
mercury in the United States, please refer to the
Thermostat Recycling Corporation at
www.thermostat-recycle.org.
For mercury thermostat recycling in Canada,
please refer to Switch the Stat at
www.switchthestat.ca
NO MERCUR
Y
NE PAS JETER
LE MERCURE
Hg
RTHXXXX
M32707
Customer assistance
For assistance with this product, please visit
http://yourhome.honeywell.com.
Or call Honeywell Customer Care toll-free at
1-800-468-1502.
To save time, please note your model number
and date code before calling.
Pull at bottom to remove thermostat from
wallplate.
Turn thermostat over to find model number
and date code.

3
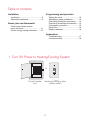
Installation
Installation ............................................3
Advanced Installation ...........................9
About your new thermostat
Controls and Home screen
quick reference ...................................11
Preset energy-saving schedules ........12
Programming and operation
Setting the clock ................................. 12
Adjusting program schedules ............. 13
Overriding schedules temporarily ......14
Overriding schedules permanently ....14
Compressor protection .......................15
Early Start ..........................................15
Replace batteries ...............................16
Appendices
Troubleshooting .................................. 17
Limited warranty ................................. 18
Table of contents
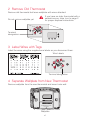
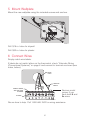
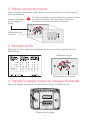
1 Turn Off Power to Heating/Cooling System
or
M31535
Circuit breaker
box
Heating/cooling system
power switch

4
Do not remove wallplate yet
3 Label Wires with Tags
Label the wires using the supplied wire labels as you disconnect them.
Wire Labels
M28100
C
C
MCR33823
Terminal
designation
If you have an older thermostat with a
sealed mercury tube, turn to page 2
for proper disposal instructions.
Terminal designation
C
C
MCR31537
2 Remove Old Thermostat
Remove old thermostat but leave wallplate with wires attached.
4 Separate Wallplate from New Thermostat
Remove wallplate from the new thermostat and mount onto wall.
M32731
TO REMOVE WALLPLATE
PULL HERE
Wallplate

5
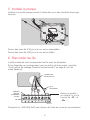
5 Mount Wallplate
Mount the new wallplate using the included screws and anchors.
Drill 3/16-in. holes for drywall
Drill 3/32-in. holes for plaster
6 Connect Wires
Simply match wire labels.
If labels do not match letters on the thermostat, check “Alternate Wiring
(Conventional Systems)” on page 6 and connect to terminal as shown (see
notes, below).
M32715
SCREW
INSERT WIRES
AND TIGHTEN
SCREWS
WIRE
HOLE
LABELED
WIRES
W/
Aux
W
Y
G
R
Not
Used
Remove metal
jumper if you
have both
R and
Rc wires.
We are here to help. Call 1-800-468-1502 for wiring assistance.
W/
Aux
Not
Used
M32714

6
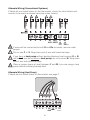
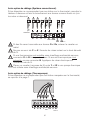
Alternate Wiring (Conventional Systems)
If labels do not match letters on the thermostat, check the chart below and
connect to terminal as shown here (see notes, below).
If wires will be connected to both R and Rc terminals, remove metal
jumper.
Do not use C or X. Wrap bare end of wire with electrical tape.
If you have a heat pump without auxiliary/backup heat connect O or B,
not both. If you do not have a heat pump, do not connect B. Wrap bare
end of wire with electrical tape.
Place a jumper (piece of wire) between Y and W if you are using a heat
pump without auxiliary/backup heat.
M32727
GW/
AUX
OBY
Y
G
O
R
R
Rc
Aux
Alternate Wiring (Heat Pump)
If labels do not match letters on thermostat, see page 7.
B O G Y
W/
AUX
NOT
USED
R Rc
M32726
44

7
7 Install Batteries
Install two AAA alkaline batteries.
Back of thermostat
RTHXXXX
M32707
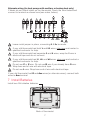
Alternate wiring (for heat pumps with auxiliary or backup heat only)
If labels do not match letters on the thermostat, check the chart below and
connect to terminal as shown here (see notes, below).
Leave metal jumper in place, connecting R & Rc terminals.
If your old thermostat had both V and VR wires, stop now and contact a
qualified contractor for help.
If your old thermostat had separate O and B wires, wrap the B wire in
electrical tape and do not connect.
If your old thermostat had Y1, W1 and W2 wires, stop now and contact a
qualified contractor for help.
Do not use C or X wire. Do not use B wire if you already have O wire.
Wrap bare end of wire with electrical tape.
Do not use L wire. Wrap bare end of wire with electrical tape.
If your old thermostat had E and Aux wires (or alternate wires), connect both
wires to Aux terminal.
5
6
M32728
2
7
4
AUX
W
W1
W2
F
B
OG
H
C
RC
V
VR
B
X
R
M
Y1
Y
E
7
X
X2
L
F
6
5
3
2
1
B O G Y
W/
AUX
NOT
USED
R Rc

8
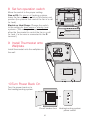
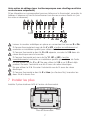
8 Set fan operation switch
Move the switch to the proper setting:
Gas or Oil: For gas or oil heating systems,
leave the fan operation switch in this factory-set
position (for systems that control the fan in a call
for heat).
Electric or Heat Pump: Change the switch
to this setting for heat pump or electric heat
systems. (This setting is for systems that
allow the thermostat to control the fan in a call
for heat, if a fan wire is connected to the G
terminal.)
9 Install Thermostat onto
Wallplate
Install thermostat onto the wallplate on
the wall.
RTHXXXX
M32716
GAS OR OIL
ELECTRIC OR HEAT PUMP
GAS OR OIL
ELECTRIC OR HEAT PUMP
10 Turn Power Back On
Turn the power back on to
the heating/cooling system.
W/
Aux
Not
Used
Heat Off Cool Auto On
Fan
M32705
M31544
or
Circuit breaker box Heating/cooling system
power switch

9
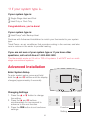
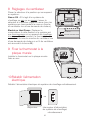
11 If your system type is...
If your system type is:
q Single Stage Heat and Cool
q Heat Only or Cool Only
Congratulations, you’re done!
If your system type is:
q Heat Pump* with Backup Heat
Continue with Advanced Installation to match your thermostat to your system
type.
*Heat Pump—an air conditioner that provides cooling in the summer, and also
runs in reverse in the winter to provide heating.
If you are not sure of your system type or if you have other
questions, call us toll-free at 1-800-468-1502.
This thermostat works on 24 volt or 750 mV systems. It will NOT work on multi-
stage conventional systems.
Advanced Installation
Enter System Setup
To enter system setup, press and hold
both the s and t buttons until the display
changes (approximately 5 seconds).
Changing Settings
1. Press the s or t button to change
the setting.
2. Press the s and t buttons
simultaneously for one second to
advance to the next function.
3. Press the RUN button to exit and save
settings.
M32713
Heat Off Cool Auto On
Fan
Function
Setting
5
5
M32779

10
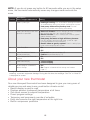
NOTE: If you do not press any button for 60 seconds while you are in the setup
menu, the thermostat automatically saves any changes made and exits the
menu.
Function
Description
Press the s or t button to Setting
1 select system type
0 Heating & cooling: Gas, oil or electric heating with central
air conditioning or heat pump without auxiliary/back-up heat.
1 Heat pump with auxiliary/backup heat: Outside
compressor provides both heating and cooling.
5 select your heating system and
optimize its operation
5 Gas or oil furnace: Use this setting if you have a standard
gas or oil furnace that is less than 90% efficient.
6 Electric furnace: Use this setting if you have any type of
electric heating system.
3 Heat pump, hot water or high-efficiency furnace:
Use this setting if you have a hot water system or a gas
furnace of greater than 90% efficiency.
2 Gas/oil steam or gravity system: Use this setting if you
have a steam or gravity heat system.
13 select Early Start
1 On
0 Off
14 select Fahrenheit or Celsius
temperature display
0 Fahrenheit temperature display (°F)
1 Celsius temperature display (°C)
15* select Compressor Protection
settings
1 On
0 Off
20 select clock display
0 12-hour display
1 24-hour display
40 restore program schedule to
default settings
0 Off
1 On: Program schedule default settings are listed on
page12.
* Compressor Protection: This feature forces the compressor to wait approximately 5 minutes before
restarting, to prevent equipment damage. During the wait time, the message “Cool On” or “Heat On”
is displayed on screen.
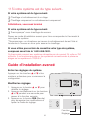
About your new thermostat
Your new Honeywell thermostat has been designed to give you many years of
reliable service and easy-to-use, push-button climate control.
• Backlit display is easy to read
• Displays ambient (measured) temperature at all times
• One-touch access to setpoint temperature
• Preset program settings
• Temporary and permanent override of schedule
• Early start ensures the right temperature at the right time
• Built-in compressor protection

11
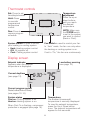
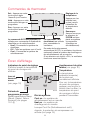
Thermostat controls
M32700
Heat Off Cool Auto On
Fan
Set: Press to set
time/day/schedule.
Hold: Press
to override
programmed
temperature
control.
Run: Press to
resume program
schedule.
Temperature
adjustment
Press the up or
down buttons
until you reach
the desired
temperature.
NOTE: Make sure
the SYSTEM switch
is set to the system
you want to control
(Heat or Cool).
Fan Switch is used to control your fan.
In “Auto” mode, the fan runs only when
the heating or cooling system is on.
If set to “On,” the fan runs continuously.
System Switch is used to control
your heating or cooling system.
• Heat: Heating system control.
• Off: All systems off.
• Cool: Cooling system control.
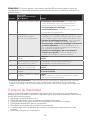
Display screen
M32701
We
Lo
Batt
Wake
Set
am
Heat
75
On
6
:
30
Low battery warning
(see page 16)
Setpoint indicator
Appears when the setpoint
temperature is displayed.
Temperature
The ambient (measured)
temperature is normally displayed.
To view the setpoint temperature,
press the Up or Down button
once. The setpoint temperature will
appear for five seconds.
System status
Cool on: Cooling system is on.
Heat on: Heating system is on.
When Cool On is flashing, compressor
protection is engaged (see page 15).
Current day/time
(see page 12)
Current program period
Wake/Leave/Return/Sleep
(see pages 12–14)

12
Set Time
am
6
:
30
M32702
Set Day
We
M32703
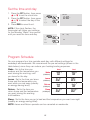
Set the time and day
1. Press the SET button, then press
s or t to set the clock time.
2. Press the SET button, then press
s or t to select the day of the
week.
3. Press RUN to save & exit.
NOTE: If the clock flashes, the
thermostat will follow your settings
for the Monday “Wake” time period
until you reset the time and day.
Program Schedule
You can program four time periods each day, with different settings for
weekdays and weekends. We recommend the pre-set settings (shown in the
table below), since they can reduce your heating/cooling expenses.
Wake - Set to the time you
awaken and the temperature you
want during the morning, until
you leave for the day.
Leave - Set to the time you leave
home and the temperature you
want while you are away (usually
an energy-saving level).
Return - Set to the time you
return home and the temperature
you want during the evening,
until bedtime.
Sleep - Set to the time you go to bed and the temperature you want overnight
(usually an energy-saving level).
NOTE: Leave and Return periods can be canceled on weekends.
Heat Cool
Wake
(6:00 am)
70
°
78
°
Leave
(8:00 am)
62
°
85
°
Return
(6:00 pm)
70
°
78
°
Sleep
(10:00 pm)
62
°
82
°

13
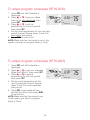
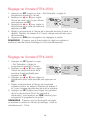
To adjust program schedules (RTHL2510)
To adjust program schedules (RTHL2410)
1. Press SET until Set Schedule is
displayed.
2. Press s or t to set your weekday
Wake time (Mo-Fr), then press SET.
3. Press s or t to set the
temperature for this time period,
then press SET.
4. Set time and temperature for the
next time period (Leave). Repeat
steps 2 and 3 for each weekday
time period.
5. Press SET to set weekend time
periods (Sa & Su), then press RUN
to save & exit.
NOTE: Make sure the thermostat is set
to the system you want to program
(Heat or Cool).
1. Press SET until Set Schedule is
displayed.
2. Press s or t to set your Wake
time for the day displayed, then
press SET.
3. Press s or t to set the
temperature for this time period,
then press SET.
4. Set time and temperature for the next time
period (Leave). Repeat steps 2 and 3 for
each day’s time period.
5. Press RUN to save & exit.
NOTE: Make sure the thermostat is set to the
system you want to program (Heat or Cool).
Mo
Wake
Set Schedule
Set
am
75
6
:
30
M32704
Mo Tu We Th Fr
Wake
Set Schedule
Set
am
75
6
:
30
M32706

14
Temporary
Wake
Set
am
70
6
:
30
M32708
Set
am
75
6
:
30
M32709
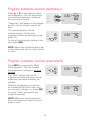
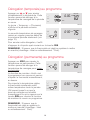
Program schedule override (temporary)
Press s or t to immediately adjust
the temperature. This will temporarily
override the temperature setting for
the current time period.
“Temporary” will appear on the display
and the current program period will
flash.
The new temperature will be
maintained only until the next
programmed time period begins (see
page 12).
To cancel the temporary setting at any
time, press RUN.
NOTE: Make sure the thermostat is set
to the system you want to control (heat
or cool).
Hold
Set
am
70
6
:
30
M32710
Set
am
75
6
:
30
M32709
Program schedule override (permanent)
Press HOLD to permanently adjust
the temperature. This will override
the temperature settings for all time
periods.
The “Hold” feature turns off the
program schedule and allows you to
adjust the thermostat manually, as
needed.
Whatever temperature you set will
be maintained 24 hours a day, until
you manually change it, or press RUN
to cancel “Hold” and resume the
program schedule.
NOTE: Make sure the thermostat is
set to the system you want to control
(heat or cool).

15
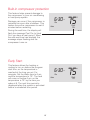
Program schedule override (permanent)
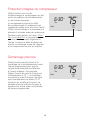
Built-in compressor protection
This feature helps prevent damage to
the compressor in your air conditioning
or heat pump system.
Damage can occur if the compressor is
restarted too soon after shutdown. This
feature forces the compressor to wait 5
minutes before restarting.
During the wait time, the display will
flash the message Cool On (or Heat
On if you have a heat pump). When
the safe wait time has elapsed, the
message stops flashing and the
compressor turns on.
We
Wake
am
Cool
75
On
6
:
30
M32711
Early Start
This feature allows the heating or
cooling to turn on before the program
start time, so the temperature is
reached at the time you set. For
example: Set the Wake time to 6 am,
and the temperature to 70°. The heat
will come on before 6 am, so the
temperature is 70° by the time you
wake at 6. The next time period is
displayed when the system is activated
before a scheduled time period.
We
Wake
am
Cool
75
On
6
:
30
M32712

16
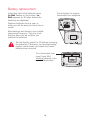
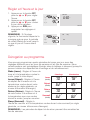
Battery replacement
Install two fresh AAA batteries when
Lo Batt flashes on the screen. Lo
Batt appears for 60 days before the
batteries are depleted.
Replace batteries once a year, or
when you will be away for more than a
month.
Most settings are stored in non-volatile
(permanent) memory. Only the clock
and the day must be set after you
replace the batteries.
Pull at bottom to remove
thermostat from wallplate.
Turn thermostat over,
insert fresh AAA
alkaline batteries, then
reinstall thermostat.
Set the System switch to Off before removing
the batteries. Otherwise, the heating/cooling
system could remain activated even when
batteries are removed.
RTHXXXX
M32707
W/
Aux
Not
Used
Heat Off Cool Auto On
Fan
M32705

17
Troubleshooting
If you have difficulty with your thermostat, please try the following suggestions.
Most problems can be corrected quickly and easily.
Display is
blank
• Check circuit breaker and reset if necessary.
• Make sure power switch at heating & cooling system is on.
• Make sure furnace door is closed securely.
• Make sure fresh AAA alkaline batteries are correctly
installed.
Heating
or cooling
system does
not respond
• Set system switch to Heat. Make sure the temperature is
set higher than the Inside temperature.
• Set system switch to Cool. Make sure the temperature is
set lower than the Inside temperature.
• Wait 5 minutes for the system to respond.
Temperature
settings do
not change
Make sure heating and cooling temperatures are set to
acceptable ranges:
• Heat: 40° to 90°F (4.5° to 32°C).
• Cool: 50° to 99°F (10° to 37°C).
“Cool On” or
“Heat On” is
flashing
• Compressor protection feature is engaged. Wait 5 minutes
for the system to restart safely, without damage to the
compressor.
“Heat On” is
not displayed
• Set the System switch to Heat, and set the temperature
level above the current room temperature.
“Cool On” is
not displayed
• Set the System switch to Cool, and set the temperature
level below the current room temperature.
For assistance with this product, please visit http://yourhome.honeywell.com or
call Honeywell Customer Care toll-free at 1-800-468-1502.

Automation and Control Solutions
Honeywell International Inc.
1985 Douglas Drive North
Golden Valley, MN 55422
yourhome.honeywell.com
® U.S. Registered Trademark.
© 2015 Honeywell International Inc.
33-00126EF—01 M.S. 07-15
Printed in U.S.A.
33-00126EF-01
1-year limited warranty
Honeywell warrants this product, excluding battery, to be free from defects in the
workmanship or materials, under normal use and service, for a period of one (1) year
from the date of purchase by the consumer. If at any time during the warranty period the
product is determined to be defective or malfunctions, Honeywell shall repair or replace it
(at Honeywell’s option).
If the product is defective,
(i) return it, with a bill of sale or other dated proof of purchase, to the place from which
you purchased it; or
(ii) call Honeywell Customer Care at 1-800-468-1502. Customer Care will make the
determination whether the product should be returned to the following address:
Honeywell Return Goods, Dock 4 MN10-3860, 1885 Douglas Dr. N., Golden Valley, MN
55422, or whether a replacement product can be sent to you.
This warranty does not cover removal or reinstallation costs. This warranty shall not apply
if it is shown by Honeywell that the defect or malfunction was caused by damage which
occurred while the product was in the possession of a consumer.
Honeywell’s sole responsibility shall be to repair or replace the product within the terms
stated above. HONEYWELL SHALL NOT BE LIABLE FOR ANY LOSS OR DAMAGE
OF ANY KIND, INCLUDING ANY INCIDENTAL OR CONSEQUENTIAL DAMAGES
RESULTING, DIRECTLY OR INDIRECTLY, FROM ANY BREACH OF ANY WARRANTY,
EXPRESS OR IMPLIED, OR ANY OTHER FAILURE OF THIS PRODUCT. Some states
do not allow the exclusion or limitation of incidental or consequential damages, so this
limitation may not apply to you.
THIS WARRANTY IS THE ONLY EXPRESS WARRANTY HONEYWELL MAKES ON
THIS PRODUCT. THE DURATION OF ANY IMPLIED WARRANTIES, INCLUDING THE
WARRANTIES OF MERCHANTABILITY AND FITNESS FOR A PARTICULAR PURPOSE, IS
HEREBY LIMITED TO THE ONE-YEAR DURATION OF THIS WARRANTY.
Some states do not allow limitations on how long an implied warranty lasts, so the above
limitation may not apply to you. This warranty gives you specific legal rights, and you may
have other rights which vary from state to state.
If you have any questions concerning this warranty, please write Honeywell Customer
Relations, 1985 Douglas Dr, Golden Valley, MN 55422 or call 1-800-468-1502.

RTHL2510/RTHL2410
Série
Veuillez lire le mode
d’emploi et le conserver
en lieu sûr.
Pour obtenir de l’aide
veuillez visiter
yourhome.honeywell.com
Manuel du
propriétaire
Thermostat
programmable
Identifier le type de système
Ce thermostat est compatible avec les systèmes suivants:
• À gaz, mazout ou électrique
• Climatiseur central
• Système à eau chaude avec ou sans pompe
• Système millivolts
• Système de chauffage-refroidissement central
• Thermopompe sans chauffage de secours/auxiliaire
• Thermopompe avec chauffage de secours/auxiliaire
Besoin d’aide? Nous sommes à votre service
Composer le 1-800-468-1502 pour obtenir de l’aide au
raccordement avant de retourner le thermostat au magasin.
Ce thermostat ne peut pas être utilisé sur les systèmes à
plusieurs étages.

2
AVIS : Pour éviter d’endommager le compresseur, ne faites pas
fonctionner le climatiseur si la température extérieure est inférieure à
10 °C (50 °F).
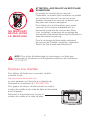
ATTENTION : AVIS RELATIF AU RECYCLAGE
DU MERCURE
Ce produit ne contient aucun mercure.
Cependant, ce produit peut remplacer un produit
qui contient du mercure. Le mercure et les
produits contenant du mercure ne doivent pas
être jetés aux ordures ménagères.
Pour obtenir plus d›informations pour savoir
comment et où recycler adéquatement un
thermostat contenant du mercure aux États-
Unis, consultez l›organisme de recyclage des
thermostats (Thermostat Recycling Corporation) à
www.thermostat-recycle.org.
Pour le recyclage de thermostats contenant
du mercure au Canada, consultez l›organisme
Switch the Stat à www.switchthestat.ca
NO MERCUR
Y
NE PAS JETER
LE MERCURE
Hg
RTHXXXX
M32707
Services à la clientèle
Pour obtenir de l’aide avec ce produit, veuillez
consulter le site
http://yourhome.honeywell.com.
ou vous adresser aux Services à la clientèle de
Honeywell en composant le 1-800-468-1502.
Pour gagner du temps, veuillez prendre en note le
numéro de modèle et de code de date du thermostat
avant d’appeler.
Retourner le thermostat pour trouver le
numéro de modèle et le code de date.
La page est en cours de chargement...
La page est en cours de chargement...
La page est en cours de chargement...
La page est en cours de chargement...
La page est en cours de chargement...
La page est en cours de chargement...
La page est en cours de chargement...
La page est en cours de chargement...
La page est en cours de chargement...
La page est en cours de chargement...
La page est en cours de chargement...
La page est en cours de chargement...
La page est en cours de chargement...
La page est en cours de chargement...
La page est en cours de chargement...
La page est en cours de chargement...
-
 1
1
-
 2
2
-
 3
3
-
 4
4
-
 5
5
-
 6
6
-
 7
7
-
 8
8
-
 9
9
-
 10
10
-
 11
11
-
 12
12
-
 13
13
-
 14
14
-
 15
15
-
 16
16
-
 17
17
-
 18
18
-
 19
19
-
 20
20
-
 21
21
-
 22
22
-
 23
23
-
 24
24
-
 25
25
-
 26
26
-
 27
27
-
 28
28
-
 29
29
-
 30
30
-
 31
31
-
 32
32
-
 33
33
-
 34
34
-
 35
35
-
 36
36


Honeywell RTHL2410 series Le manuel du propriétaire
- Catégorie
- Thermostats
- Taper
- Le manuel du propriétaire
- Ce manuel convient également à
dans d''autres langues
Documents connexes
-
Honeywell RTHL221 series Manuel utilisateur
-
Honeywell RTHL2510 series Le manuel du propriétaire
-
Honeywell RTH4300B Manuel utilisateur
-
Honeywell TH2000 Manuel utilisateur
-
-
-
-
-
Honeywell RTH7600 Manuel utilisateur
-
Honeywell RTH2520 Le manuel du propriétaire
Autres documents
-
 Honeywell Home RTHL221B1008/K1 Mode d'emploi
-
 Gemtech GTP211D Mode d'emploi
-
UPM THM101B Le manuel du propriétaire
-
 Honeywell Home RTH7560E Manuel utilisateur
-
-
Bryant T2-PAC Legacy Touch n Go Le manuel du propriétaire
-
Carrier TC-PAC01 Le manuel du propriétaire
-
Robertshaw RS3110C Manuel utilisateur
-


