MULTIPLEX Panda 1 3268 Building Instructions
- Catégorie
- Jouets télécommandés
- Taper
- Building Instructions
Ce manuel convient également à

# 1 3268
Panda
# 1 3269
Panda
# 26 4268
Panda Sport
Bauanleitung 2 ... 9
Building instructions 10 ... 17
Notice de construction 18 ... 29
Instruzioni di montaggio 30 ... 37
Instrucciones de montaje 38 ... 45
46 + 47
D
F
GB
I
ES
© Copyright by MULTIPLEX 2013 Version 1.0
Ersatzteile
Replacement parts
Pièces de rechanges
Parti di ricambio
Repuestos
Abbildungen
Illustrations
Illustrations
Illnstrazioni
Iiustraciónes
... 24 + 25
# 26 4272
Panda Sport
# 1 3268
Panda
# 1 3269
Panda
# 21 4268
Panda Sport
Erhältliche Varianten / Available versions / Version D disponible / Varianti disponibili / Variantes disponibles
# 26 4269
Panda

2
Sicherheitshinweise für MULTIPLEX-Flugmodelle
Das Modell ist KEIN SPIELZEUG im üblichen Sinne.
Mit Inbetriebnahme des Modells erklärt der Betreiber, dass er den Inhalt der Betriebsanleitung, besonders zu Sicher-
heitshinweisen, Wartungsarbeiten, Betriebsbeschränkungen und Mängel kennt und inhaltlich nachvollziehen kann.
Dieses Modell darf nicht von Kindern unter 14 Jahren betrieben werden. Betreiben Minderjährige das Modell unter der
Aufsicht eines, im Sinne des Gesetzes, fürsorgepichtigen und sachkundigen Erwachsenen, ist dieser für die Umsetzung
der Hinweise der BETRIEBSANLEITUNG verantwortlich.
DAS MODELL UND DAZUGEHÖRIGES ZUBEHÖR MUSS VON KINDERN UNTER 3 JAHREN FERNGEHALTEN
WERDEN! ABNEHMBARE KLEINTEILE DES MODELLS KÖNNEN VON KINDERN UNTER 3 JAHREN VERSCHLUCKT
WERDEN. ERSTICKUNGSGEFAHR!
Beim Betrieb des Modells müssen alle Warnhinweise der BETRIEBSANLEITUNG beachtet werden. Die Multiplex Mo-
dellsport GmbH & Co. KG ist nicht haftungspichtig für Verluste und Beschädigungen jeder Art, die als Folge falschen
Betriebes oder Missbrauches dieses Produktes, einschließlich der dazu benötigten Zubehörteile entstehen. Dies beinhaltet
direkte, indirekte, beabsichtigte und unabsichtliche Verluste und Beschädigungen und jede Form von Folgeschäden.
Jeder Sicherheitshinweis dieser Anleitung muss unbedingt befolgt werden und trägt unmittelbar zum sicheren Betrieb
Ihres Modells bei. Benutzen Sie Ihr Modell mit Verstand und Vorsicht, und es wird Ihnen und Ihren Zuschauern viel
Spaß bereiten, ohne eine Gefahr darzustellen. Wenn Sie Ihr Modell nicht verantwortungsbewusst betreiben, kann dies
zu erheblichen Sachbeschädigungen und schwerwiegenden Verletzungen führen. Sie alleine sind dafür verantwortlich,
dass die Betriebsanleitungen befolgt und die Sicherheitshinweise in die Tat umgesetzt werden.
Bestimmungsgemäße Verwendung
Das Modell darf ausschließlich im Hobbybereich verwendet werden. Jede weitere Verwendung darüber hinaus ist nicht
erlaubt. Für Schäden oder Verletzungen an Menschen und Tieren aller Art haftet ausschließlich der Betreiber des Modells
und nicht der Hersteller.
Zum Betrieb des Modells darf nur das von uns empfohlene Zubehör verwendet werden. Die empfohlenen Komponenten
sind erprobt und auf eine sichere Funktion passend zum Modell abgestimmt. Werden andere Komponenten verwendet
oder das Modell verändert, erlöschen alle Ansprüche an den Hersteller bzw. den Vertreiber.
Um das Risiko beim Betrieb des Modells möglichst gering zu halten, beachten Sie folgende Punkte:
Das Modell wird über eine Funkfernsteuerung gelenkt. Keine Funkfernsteuerung ist sicher vor Funkstörungen.
Solche Störungen können dazu führen, dass Sie zeitweise die Kontrolle über Ihr Modell verlieren. Deshalb müs-
sen Sie beim Betrieb Ihres Modells zur Vermeidung von Kollisionen immer auf große Sicherheitsräume in allen
Richtungen achten. Schon beim kleinsten Anzeichen von Funkstörungen müssen Sie den Betrieb Ihres Modells
einstellen!
Sie dürfen Ihr Modell erst in Betrieb nehmen, nachdem Sie einen kompletten Funktionstest und einen Reichwei-
tentest, gemäß der Anleitung Ihrer Fernsteuerung, erfolgreich ausgeführt haben.
Das Modell darf nur bei guten Sichtverhältnissen geogen werden. Fliegen Sie nicht in Richtung Sonne, um
nicht geblendet zu werden, oder bei anderen schwierigen Lichtverhältnissen.
Ein Modell darf nicht unter Alkoholeinuss oder Einuss von anderen Rauschmitteln oder Medikamenten betrie-
ben werden, die das Wahrnehmungs- und Reaktionsvermögen beeinträchtigen.
Fliegen Sie nur bei Wind- und Wetterverhältnissen, bei denen Sie das Modell sicher beherrschen können. Be-
rücksichtigen Sie auch bei schwachem Wind, dass sich Wirbel an Objekten bilden, die auf das Modell Einuss
nehmen können.
Fliegen Sie nie an Orten, an denen Sie andere oder sich selbst gefährden können, wie z.B. Wohngebiete, Über-
landleitungen, Straßen und Bahngleise.
Niemals auf Personen und Tiere zuiegen. Anderen Leuten dicht über die Köpfe zu iegen ist kein Zeichen für
wirkliches Können, sondern setzt andere Leute nur ein unnötiges Risiko aus. Weisen Sie auch andere Piloten
in unser aller Interesse auf diese Tatsache hin. Fliegen Sie immer so, dass weder Sie noch andere in Gefahr
kommen. Denken Sie immer daran, dass auch die allerbeste Fernsteuerung jederzeit gestört werden kann. Auch
langjährige, unfallfreie Flugpraxis ist keine Garantie für die nächste Flugminute.
D

3
Restrisiken
Auch wenn das Modell vorschriftsmäßig und unter Beachtung aller Sicherheitsaspekten betrieben wird, besteht immer
ein gewisses Restrisiko.
Eine Haftpichtversicherung ist daher obligatorisch. Falls Sie in einen Verein oder Verband eintreten, können Sie diese
Versicherung dort abschließen. Achten Sie auf ausreichenden Versicherungsschutz (Modellugzeug mit Antrieb). Halten
Sie Modelle und Fernsteuerung immer absolut in Ordnung.
Folgende Gefahren können im Zusammenhang mit der Bauweise und Ausführung des Modells auftreten:
Verletzungen durch die Luftschraube: Sobald der Akku angeschlossen ist, ist der Bereich um die Luftschraube
freizuhalten. Beachten Sie auch, dass Gegenstände vor der Luftschraube angesaugt werden können oder Ge-
genstände dahinter weggeblasen werden können. Das Modell kann sich in Bewegung setzen. Richten Sie es
daher immer so aus, dass es sich im Falle eines ungewollten Anlaufen des Motors nicht in Richtung anderer
Personen bewegen kann. Bei Einstellarbeiten, bei denen der Motor läuft oder anlaufen kann, muss das Modell
stets von einem Helfer sicher festgehalten werden.
Absturz durch Steuerfehler: Kann dem besten Piloten passieren, deshalb nur in sicherer Umgebung iegen; ein
zugelassenes Modelluggelände und eine entsprechende Versicherung sind unabdingbar.
Absturz durch technisches Versagen oder unentdeckten Transport- oder Vorschaden. Die sorgfältige Überprüfung
des Modells vor jedem Flug ist ein Muss. Es muss jedoch immer damit gerechnet werden, dass es zu Material-
versagen kommen kann. Niemals an Orten iegen, an denen man Anderen Schaden zufügen kann.
Betriebsgrenzen einhalten. Übermäßig hartes Fliegen schwächt die Struktur und kann entweder zu plötzlichem
Materialversagen führen, oder bei späteren Flügen das Modell aufgrund von „schleichenden“ Folgeschäden
abstürzen lassen.
Feuergefahr durch Fehlfunktion der Elektronik. Akkus sicher aufbewahren, Sicherheitshinweise der Elektronik-
komponenten im Modell, des Akkus und des Ladegerätes beachten, Elektronik vor Wasser schützen. Auf aus-
reichende Kühlung bei Regler und Akku achten.
Die Anleitungen unserer Produkte dürfen nicht ohne ausdrückliche Erlaubnis der Multiplex Modellsport GmbH
& Co. KG (in schriftlicher Form) - auch nicht auszugsweise in Print- oder elektronischen Medien reproduziert
und / oder veröffentlicht werden.
D

4
RTF Panda # 1 3268 / # 1 3269
Machen Sie sich mit dem Bausatz vertraut!
MULTIPLEX - Modellbaukästen unterliegen während der Produktion einer ständigen Materialkontrolle. Wir hoffen, dass
Sie mit dem Baukasteninhalt zufrieden sind. Wir bitten Sie jedoch, alle Teile (nach Stückliste) vor Verwendung zu prüfen,
da bearbeitete Teile vom Umtausch ausgeschlossen sind. Sollte ein Bauteil einmal nicht in Ordnung sein, sind wir nach
Überprüfung gern zur Nachbesserung oder zum Umtausch bereit. Senden Sie das Teil, bitte ausreichend frankiert, an
unseren Service ein und fügen Sie unbedingt die vollständig ausgefüllte Reklamationsmeldung (Formular) bei. Wir ar-
beiten ständig an der technischen Weiterentwicklung unserer Modelle. Änderungen des Baukasteninhalts in Form, Maß,
Technik, Material und Ausstattung behalten wir uns jederzeit und ohne Ankündigung vor. Bitte haben Sie Verständnis
dafür, dass aus Angaben und Abbildungen dieser Anleitung keine Ansprüche abgeleitet werden können.
Achtung!
Ferngesteuerte Modelle, insbesondere Flugmodelle, sind kein Spielzeug im üblichen Sinne. Ihr Bau und Betrieb
erfordert technisches Verständnis, ein Mindestmaß an handwerklicher Sorgfalt sowie Disziplin und Sicherheits-
bewusstsein.
Fehler und Nachlässigkeiten beim Bau und Betrieb können Personen- und Sachschäden zur Folge haben. Da der
Hersteller keinen Einuß auf ordnungsgemäßen Zusammenbau, Wartung und Betrieb hat, weisen wir ausdrücklich auf
diese Gefahren hin.
Lesen Sie vor Fertigstellung und Inbetriebnahme die Bauanleitung und beachten unbedingt auch die Sicherheitshinweise
und Tipps.
Wichtiger Hinweis
Das Modell hat, wie jedes Flugzeug, statische Grenzen! Sturzüge und unsinnige Manöver im Unverstand können zum
Verlust des Modells führen. Beachten Sie: In solchen Fällen gibt es von uns keinen Ersatz. Tasten Sie sich also vorsichtig
an die Grenzen heran. Das Modell ist auf den von uns empfohlenen Antrieb ausgelegt, kann aber nur einwandfrei gebaut
und unbeschädigt den Belastungen standhalten. Weitere Tuningmaßnahmen setzen Sachverstand und entsprechend
sinnvolle Maßnahmen zur weiteren Verstärkung voraus.
Lieferumfang:
ELAPOR®-Modell 100% fertig gebaut,PERMAX 400/6V, Regler / Empfängereinheit RX-3 cont M-Link ID 8, montiertem
Klapp-Propeller 6x3“, 2 Servos Nano-S, Antriebsakku Li-BATT FX 2/1-950, Sender SMART SX M-LINK, Senderbatterien,
Lader 110-240 V MULTIcharger L-703 EQU, lackierter Kabinenhaube, aufgebrachtem Dekor (orange) und ausführlicher
Anleitung.
Optionales Zubehör:
Akkuempfehlung:
Antriebsakku Li-BATT FX 2/1-950 (M6) => Panda! Best. Nr. 15 7320
Klebstoff:
Zacki ELAPOR ® 20g Best.-Nr. 59 2727
Zacki ELAPOR ® Super liquid 10g Best.-Nr. 59 2728
Ladegerät: Best.-Nr. 9 2545
Combo MULTIcharger LN-3008 EQU mit Netzgerät AC/DC 230V/12V 5,0A
Model Service Box => (div. Reparatur und Kleinteile) Best.-Nr. 8 5500
Technische Daten: Panda Panda Sport
Spannweite 1160 mm 1160 mm
Länge über alles 800 mm 800 mm
Fluggewicht ab 470 g ab 520 g
Flächeninhalt ca.19 dm² (FAI) ca.19 dm² (FAI)
Flächenbelastung ab 24,7 g/dm² ab 27 g/dm²
RC-Funktionen:
Höhenruder, Seitenruder, Motorsteuerung
Hinweis: Bildseiten aus der Mitte der Bauanleitung heraustrennen!
D

5
Wichtiger Hinweis
Dieses Modell ist nicht aus Styropor ™! Daher sind Verklebungen mit Weißleim, Polyurethan oder Epoxy nicht möglich.
Diese Kleber haften nur oberächlich und platzen im Ernstfall einfach ab. Verwenden Sie nur Cyanacrylat-/Sekunden-
kleber mittlerer Viskosität, vorzugsweise Zacki -ELAPOR® # 59 2727, der für ELAPOR® Partikelschaum optimierte und
angepasste Sekundenkleber. Bei Verwendung von Zacki-ELAPOR® können Sie auf Kicker oder Aktivator weitgehend
verzichten. Wenn Sie jedoch andere Kleber verwenden, und auf Kicker/Aktivator nicht verzichten können, sprühen Sie
aus gesundheitlichen Gründen nur im Freien. Vorsicht beim Arbeiten mit allen Cyanacrylatklebern. Diese Kleber härten
u.U. in Sekunden, daher nicht mit den Fingern und anderen Körperteilen in Verbindung bringen. Zum Schutz der Augen
unbedingt Schutzbrille tragen! Von Kindern fernhalten! An einigen Stellen ist es auch möglich Heißkleber zu verwenden.
Wir weisen in der Anleitung ggf. darauf hin!
Arbeiten mit Zacki ELAPOR®
Zacki ELAPOR® wurde speziell für die Verklebung für unsere Schaummodelle aus ELAPOR® entwickelt.
Um die Verklebung möglichst optimal zu gestalten, sollten Sie folgende Punkte beachten:
• Vor allem bei großächiger Verklebung empfehlen wir, die Teile 24 h trocken zu lassen.
• Aktivator ist lediglich zum punktuellen Fixieren zu verwenden. Sprühen Sie nur wenig Aktivator einseitig auf.
• Lassen Sie den Aktivator ca. 30 Sekunden ablüften.
• Für eine optimale Verklebung rauhen Sie die Oberäche mit einem Schleifpapier (320 er Körnung) an.
• Eine ganz wenig mit Wasser angefeuchtete Fläche beschleunigt die Aushärtung des Klebers und auf Aktivator kann
dann weitgehend verzichtet werden. Dazu die dem Kleber gegenüberliegende Fläche mit einem feuchten Tuch oder
Schwamm ganz dünn benetzen.
Krumm - gibt es eigentlich nicht. Falls mal etwas z.B. beim Transport verbogen wurde, kann es wieder gerichtet
werden. Dabei verhält sich ELAPOR® ähnlich wie Metall. Etwas überbiegen, das Material federt ein Stück zurück
und behält dann aber die Form. Alles hat natürlich auch seine Grenzen - übertreiben Sie also nicht!
Krumm - gibt es schon!
Wenn Sie Ihr Modell lackieren wollen, reiben Sie die Oberäche leicht mit MPX Primer # 60 2700 ab, so als wollten Sie
das Modell putzen. Die Lackschichten dürfen keinesfalls zu dick oder ungleichmäßig aufgetragen werden, sonst ver-
zieht sich das Modell. Es wird krumm, schwer und oft sogar unbrauchbar! Mattlacke bringen optisch das beste Ergebnis.
Wir empfehlen Farben aus unserem „ELAPOR® Color“ Sprühfarbensortiment # 60 2701 - # 60 2712“ (Vorbehandlung
mit MULTIPrimer # 60 2700 erforderlich).
1. Sender und Modell auspacken
Beiliegende Dokumente sichern
Mode 1/3 oder Mode 2/4
=> 7.8 Modeumschaltung => Senderanleitung SMART SX
beachten!
Prüfen Sie den Inhalt Ihres RTF Sets.
Dazu sind die Abb. 1 und die Stückliste hilfreich.
2. Batterien einsetzen
Achten Sie unbedingt auf richtige Polung. Durch Verpol-
ung können der Sender und / oder die Zellen zerstört wer-
den.
Abb. 2
Beim Einschalten
Immer zuerst den Sender einschalten, dann den An-
triebsakku anstecken bzw. die Empfangsanlage einschal-
ten.
Beim Ausschalten
Immer zuerst den Antriebsakku trennen bzw. die Emp-
fangsanlage ausschalten, dann erst den Sender ausschal-
ten.
Die SMART SX erkennt durch die M-LINK
ID-Empfänger das jeweilige Modell und ak-
tiviert automatisch die dazugehörige Einstel-
lung aus seinem enormen Modellspeicher.
3. Akkueinbau Panda
Mit der Positionierung der Komponenten im Modell kön-
nen Sie die richtige Schwerpunktlage geringfügig beein-
ussen. Das nale Auswiegen geschieht dann durch ein-
füllen von Ballastkugeln in die Löcher im Seitenleitwerk.
Achtung: Die runden Aufkleber 2.1 (4x) werden später
nach dem Auswiegen des Schwerpunkts zum Verschlies-
sen der Ballastkammern benötigt - diese also nicht weg-
werfen!
Antriebsakku Li-BATT FX 2/1-950 mit Klettband an der
Rumpfseitenwand befestigen.
Abb. 3
Hinweis: Da die Klettkraft des Klettbandes besser als der
Selbstkleber auf der Schaumoberäche hält, empfehlen
wir das Klettband zusätzlich mit Heisskleber oder Zacki
ELAPOR ® festzukleben.
Binding
Zum erstmaligen Herstellen der Verbindung zwischen
Sender und Empfänger müssen die beiden Komponenten
gebunden werden. Wenn das Binding erfolgreich abge-
schlossen ist, geht die Empfangsanlage sofort in Betrieb.
Sender fürs Binden vorbereiten
Schalten Sie den Sender mit gedrückter Multifunktions-
Taste ein und lassen danach die Taste wieder los. Die
Status LED blinkt gelb im schnellen Rhythmus.

6
Empfänger fürs Binden vorbereiten
Bringen Sie Sender und Empfänger nahe zueinander
dann den Antriebsakku anstecken. Die Sendeleistung ist
während des Binding stark verringert. Möglicherweise
muss der Abstand auf 20 cm oder weniger reduziert wer-
den. Sobald Sender und Empfänger sich „gefunden“ ha-
ben wechselt an beiden Komponenten der Rhythmus auf
langsames Blinken. Angeschlossene Servos folgen jetzt
den jeweiligen Bewegungen der Steuerknüppel.
Die Binding-Informationen werden dauerhaft im Empfän-
ger abgespeichert, so dass beim nächsten Start kein er-
neutes Binding notwendig ist.
Bei Verwendung eines ID-Empfängers ertönt nach dem
Binding ein akustisches Signal und der Sender lädt auto-
matisch die passenden Einstellungen.
4. Aktivieren / Deaktivieren der Gasfunktion
Für maximale Betriebssicherheit ist die Gasfunktion beim
Einschalten des Senders zunächst unabhängig von der
Gasknüppelstellung deaktiviert.
Der Motor Ihres Modells bleibt aus. Um den Motor Ihres
Modells ansteuern zu können, müssen Sie das Gas frei-
schalten und aktivieren.
Nach der Landung können Sie das Gas auch wieder de-
aktivieren.
Um die Gasfunktion zu aktivieren müssen Sie die Gas-
knüppeltaste einmal kurz drücken und den Gasknüppel
vollständig nach hinten in Stellung „Aus“ bringen. Dabei
ertönt ein aufsteigendes Signal.
Um die Gasfunktion zu deaktivieren, drücken Sie die Gas-
knüppeltaste erneut. Es ertönt ein absteigendes Signal
und der Motor wird bis zur nächsten Aktivierung abge-
schaltet.
5. Erster Probelauf des Motors
Hinweis: Den Verbindungsstecker Antriebsakku / Regler-
erst einstecken, wenn Ihr Sender eingeschaltet ist und Sie
sicher sind, dass das Bedienelement für die Motorsteue-
rung auf „AUS“ steht!
In Verbindung mit Ihrer Fernsteuerung und dem An-
triebsakku die Drehrichtung prüfen. In Flugrichtung gese-
hen, muss sich die Antriebswelle im Uhrzeigersinn (rechts
herum) drehen.
Motorabschaltart: Motorleistungsreduzierung
Eine sinkende Motordrehzahl ist ein Anzeichen dafür,
dass der Antriebsakku leer wird. Die Landung sollte dann
eingeleitet werden.
6. Höhenleitwerk montieren
Nun das Höhenleitwerk probeweise am Rumpf montieren.
Schieben Sie dazu die beiden Höhenleitwerkshälften so
weit zusammen dass diese verriegeln.
Abb. 4
Zur Demontage drücken Sie auf die mit „X“ gekennzeich-
nete Stelle am Leitwerk 8 um die Arretierung zu lösen.
Abb. 5
Hinweis: Achten Sie darauf, dass sich das Leitwerk leicht-
gängig bewegen lässt. Ggf. kann es notwendig sein den
Schaum an der Stirnseite der Leitwerke geringfügig zu-
sammenzudrücken. Dies funktioniert am einfachsten wenn
Sie die Leitwerkshälfte mit der Stirnseite auf die Tischkan-
te stellen und unter mässigem Druck hin und herschieben.
Der Schaum kann auch mit dem Messer minimal nachge-
schnitten werden.
7. Tragächen montieren
Schieben Sie dazu die beiden Tragächenhälften so weit
zusammen dass diese verriegeln.
Zur Demontage der Tragächen die Lasche mit einem
Finger nach vorne zur Flügelvorderkante ziehen, bis die
Verzahnung geöffnet ist.
Abb. 6
Hinweis: Wird später beim Betrieb des Modells die Ar-
retierung der Tragächen zu lose, kann durch festes zu-
sammendrücken um einen Zahn wieder ein sicherer Halt
erfolgen.
8. Kontrolle des Modells
Vergewissern Sie sich, dass das Modell gerade ist und
alle Fernsteuerungskomponenten richtig eingebaut und
angeschlossen sind. Prüfen Sie Rudereinstellungen,
Drehrichtungen der Servos und Freigängigkeit der Ruder-
mechaniken.
Abb. 7
Kanalzuordnung: RX3 cont M-LINK
Kanal 2: Höhenruder
Kanal 3: Seitenruder
Gasfunktion fest
9. Ruderausschläge kontrollieren (Richtwerte!)
Die Ausschläge werden jeweils an der tiefsten Stelle der
Ruder gemessen.
Höhenruder: 10 / 10 mm +/-
Seitenruder: 15 / 15 mm +/-
Das Höhenleitwerk steht neutral, wenn durch die seitliche
Öffnung im Rumpf der Inbus-Gewindestift zu sehen ist.
Abb. 8
10. Schwerpunkt auswiegen
Mit der Position des Flugakkus und ggf. etwas Zusatzbal-
last wird der Schwerpunkt eingestellt. Dieser liegt 55 mm
von der “Flügelnase” am Rumpf nach hinten gemessen.
Die Position ist mit kleinen Warzen auf der Unterseite der
Tragächen markiert. Auf den Fingern unterstützt das Mo-
dell so auspendeln, dass die Rumpfnase ganz leicht nach
unten zeigt.
Abb. 9
Der Zusatzballast 30 wird in die Kammern eingefüllt und
mit den runden Aufklebern 2.1 (4x) vom Dekorbogen ab-
gedeckt.
Abb. 10
11. Vorbereitungen für den Erstug
Für den Erstug warten Sie einen möglichst windstillen
Tag ab. Besonders günstig sind oft die Abendstunden.
Wenn Sie noch keine Erfahrung im Modellug haben, su-
chen Sie sich einen geübten Helfer. Ganz allein geht es
sehr wahrscheinlich „schief“. Kontakte nden Sie bei den

7
örtlichen Modellugvereinen. Nach Adressen können Sie
Ihren Händler befragen.
Vor dem ersten Flug unbedingt einen Reichweitentest
durchführen! Halten Sie sich dabei an die Vorgaben des
Herstellers Ihrer Fernsteuerung!
Sender- und Flugakku sind frisch und vorschriftsmäßig
geladen.
Falls etwas unklar ist, sollte auf keinen Fall ein Start erfol-
gen. Geben Sie die gesamte Anlage (mit Akku, Schalterka-
bel, Servos) in die Serviceabteilung des Geräteherstellers
zur Überprüfung.
12. Erstug …
Das Modell wird aus der Hand mit laufendem Motor gestar-
tet (immer gegen den Wind werfen!).
Machen Sie sich in ausreichender Höhe vertraut, wie das
Modell reagiert, wenn der Motor ausgeschaltet ist. Trimmen
Sie das Modell so aus, dass es geradeaus iegt und eine
gleichmässige Fluggeschwindigkeit beibehält.
Simulieren Sie in jedem Fall Landeanüge in ausreichen-
der Höhe, so sind Sie vorbereitet, wenn der Antriebsakku
leer wird.
Versuchen Sie in der Anfangsphase, insbesondere bei der
Landung, keine „Gewaltkurven“ dicht über dem Boden.
Landen Sie sicher und nehmen besser ein paar Schritte
in Kauf, als mit Ihrem Modell bei der Landung einen Bruch
zu riskieren.
13. Flug am Hang
Der Hangug ist eine besonders reizvolle Art des Modellse-
geluges. Fliegen im Hangwind ohne Antriebshilfe gehört
mit zu den schönsten Erlebnissen. Die Krönung ist das
Thermikiegen vom Hang aus. Das Modell abwerfen, hin-
ausiegen über das Tal, Thermik suchen, Thermik nden,
hochkreisen bis an die Sichtgrenze (Vorsicht das Modell
ist klein!), das Modell im Kunstug wieder herunterbrin-
gen um das Spiel wieder neu zu beginnen ist Modellug in
Vollendung. Durch den Elektroantrieb kann das Modell bei
ausbleibendem Aufwind jederzeit wieder zurückgeogen
werden. Das Risiko das Modell bei einer Aussenlandung
im Tal zu beschädigen ist somit nicht gegeben.
14. Lehrer / Schüler Betrieb
Der Panda / Panda Sport ist aufgrund seiner gutmütigen
Flugeigenschaften und der langen Flugzeit auch ideal als
Schulungsugzeug geeignet. Mit dem kabellosen Funk-
Lehrer-Schüler Stick # 4 5183, zwei MULTIPLEX Sendern
und einem geübten Lehrer kann der Schüler das Fliegen
materialschonend erlernen. Nach kurzer Zeit wird der
Schüler das Modell selbstständig steuern können.
Als Schüler-Sender können alle Sender mit 2,4 GHz M-
LINK Technologie verwendet werden. Als Lehrer-Sender
eignen sich alle MULTIPLEX-Sender mit DIN-Multifunk-
tionsbuchse und Lehrer-Funktionalität, gleichgültig ob
2,4 GHz M-LINK*- oder xx MHz-Ausrüstung. Lehrer und
Schüler können bei Bedarf auch 20 – 30 Meter voneinan-
der entfernt stehen und es gibt keine Behinderung wegen
des Verbindungskabels mehr.
15. Sicherheit
Sicherheit ist das oberste Gebot beim Fliegen mit Flug-
modellen. Eine Haftpichtversicherung ist obligatorisch.
Falls Sie in einen Verein oder Verband eintreten, können
Sie diese Versicherung dort abschließen. Achten Sie auf
ausreichenden Versicherungsschutz (Modellugzeug mit
Antrieb). Halten Sie Modelle und Fernsteuerung immer
absolut in Ordnung. Informieren Sie sich über die Lade-
technik für die von Ihnen verwendeten Akkus. Benutzen
Sie alle sinnvollen Sicherheitseinrichtungen, die angeboten
werden. Informieren Sie sich in unserem Hauptkatalog oder
auf unserer Homepage www.multiplexrc.de
MULTIPLEX-Produkte sind von erfahrenen Modelliegern
aus der Praxis für die Praxis gemacht. Fliegen Sie verant-
wortungsbewusst! Anderen Leuten dicht über die Köpfe zu
iegen ist kein Zeichen für wirkliches Können, der wirkliche
Könner hat dies nicht nötig. Weisen Sie auch andere Piloten
in unser aller Interesse auf diese Tatsache hin. Fliegen Sie
immer so, dass weder Sie noch andere in Gefahr kommen.
Denken Sie immer daran, dass auch die allerbeste Fern-
steuerung jederzeit durch äußere Einüsse gestört werden
kann. Auch langjährige, unfallfreie Flugpraxis ist keine
Garantie für die nächste Flugminute.
Prüfen Sie vor jedem Start den sicheren Sitz des Akkus,
der Flügel und Leitwerke. Kontrollieren Sie auch die
Funktion aller Ruder!
Wir, das MULTIPLEX -Team, wünschen Ihnen beim Bauen
und später beim Fliegen viel Freude und Erfolg.
MULTIPLEX Modellsport GmbH & Co. KG

8
Erhältliche Varianten
# 21 4268 KIT Panda Sport (grün) Baukasten (vorgesehen für Motor BL-O 2812-1100)
# 26 4268 RR Panda Sport (grün) Fertigmodell, Servos, Regler, Motor BL-O 2812-1100
# * 26 4272 *RR+ Panda Sport (grün) Fertigmodell, Servos, Regler, Motor BL-O 2812-1100, Empfänger, Akku
# 26 4269 RR+ Panda (orange) Fertigmodell, Servos, Regler / Empfänger, Motor 400 6V, Akku
# 1 3268 RTF Panda Mode 1 und 3 (orange) Fertigm. Servos, Regler / Empfänger, Motor 400 6V, Sender, Akku, Ladegerät
# 1 3269 RTF Panda Mode 2 und 4 (orange) Fertigm. Servos, Regler / Empfänger, Motor 400 6V, Sender, Akku, Ladegerät
Mit einem farbigen Textmarker können Sie sich zur besseren Übersicht ihre Variante in der untenstehenden Stückliste markieren!
Stückliste Panda / *Panda Sport
Lfd. Stückzahl Bezeichnung Material Abmessungen
KIT RR RR+ RTF
1 1 1 1 1 Bauanleitung KIT
1.1 0 1 0 0 Zusatzanleitung RR
1.2 0 0 1 0 Zusatzanleitung RR+
1.3 0 0 0 1 Zusatzanleitung RTF
1.4 0 1 *1/0 0 Anleitung Antriebssatz "Panda SPORT"
1.5 0 1 *1/0 0 Anleitung BL-Regler
1.7 1 1 1 1 Reklamationsbearbeitung Modelle
2.1 0 0 *0/1 1 Dekorbogen Panda (orange) bedruckte Klebefolie 300 x 1000mm
2.2 1 1 *1/0 0 Dekorbogen Panda Sport (grün) bedruckte Klebefolie 400 x 800mm
3 1 1 1 1 Rumpfhälfte links Elapor geschäumt
4 1 1 1 1 Rumpfhälfte rechts Elapor geschäumt
5 1 1 1 1 Tragäche links Elapor geschäumt
6 1 1 1 1 Tragäche rechts Elapor geschäumt
7 1 1 1 1 Höhenleitwerk links Elapor geschäumt
8 1 1 1 1 Höhenleitwerk rechts Elapor geschäumt
9 1 1 1 1 Seitenleitwerk Elapor geschäumt
KIT RR RR+ RTF Kleinteilesatz (montiert ausser beim KIT)
20 3 3 3 3 Klettband Pilzkopf Kunststoff 25 x 60mm
21 3 3 3 3 Klettband Velours Kunststoff 25 x 60mm
22 1 1 1 1 Ruderhorn "Twin" Kunststoff Fertigteil
23 1 1 1 1 Kardanbolzen Metall Fertigteil Ø6mm
24 2 2 2 2 Inbus-Gewindestift Metall M3 x 3mm
25 1 1 1 1 Gestängeanschluß Metall Fertigteil Ø6mm
26 1 1 1 1 U-Scheibe Metall M2
27 1 1 1 1 Mutter Metall M2
28 1 1 1 1 Inbusschlüssel Metall SW 1,5
29 2 2 2 2 Senkschraube (Lagerdeckel) Metall M2 x 10mm
30 50 50 50 50 Trimmgewicht Metallkugel Ø 4mm / ca.15g
31 1 1 1 1 Blech-Linsenschraube (Holmverbinder) Metall Ø 2,2 x 6,5mm
KIT RR RR+ RTF Kunststoffteilesatz (montiert ausser beim KIT)
40 0 0 *0/1 1 Rumpfrahmen (orange) Kunststoff Fertigteil
40.1 1 1 *1/0 0 Rumpfrahmen (grün) Kunststoff Fertigteil
41 0 0 *0/1 1 Rumpfdeckel (orange) Kunststoff Fertigteil
41.1 1 1 *1/0 0 Rumpfdeckel (grün) Kunststoff Fertigteil
42 0 0 *0/1 1 Rumpfverkleidung (orange) mit Motorspant Kunststoff Fertigteil
42.1 1 1 *1/0 0 Rumpfverkleidung (grün) mit Motorspant Kunststoff Fertigteil
43 2 2 2 2 Servorahmen "Nano" stehend Kunststoff Fertigteil
44 1 1 1 1 Holmverbinder Kunststoff Fertigteil
45 1 1 1 1 Flächenarretierung Kunststoff Fertigteil
46 1 1 1 1 HLW Lagergehäuse Kunststoff Fertigteil
47 1 1 1 1 HLW Lagerdeckel Kunststoff Fertigteil
48 1 1 1 1 HLW Steckung mit Achse Kunststoff Fertigteil
49 1 1 1 1 HLW Steckung mit Arretierung Kunststoff Fertigteil
50 1 1 1 1 HLW Hebel Kunststoff Fertigteil
KIT RR RR+ RTF Drahtsatz und Holme (montiert ausser beim KIT)
60 2 2 2 2 Holm Tragäche ALU-4-kt. 8 x 6 x 300mm
61 1 1 1 1 Stahldraht für HR m. Z. Metall Ø0.8 x 535mm
62 1 1 1 1 Stahldraht für SR m. Z. Metall Ø0.8 x 565mm
63 1 1 1 1 Bowdenzugrohr HR Kunststoff Ø2/1 x 470mm
64 1 1 1 1 Bowdenzugrohr SR Kunststoff Ø2/1 x 500mm
65 1 1 1 1 Rumpf.Verstärkungsrohr ALU-4-kt. 8 x 6 x 380mm
D

9
Lfd. Stückzahl Bezeichnung Material Abmessungen
KIT RR RR+ RTF Propeller, Mitnehmer, Spinner Panda
70 0 0 *0/1 1 Propellermitnehmer (Panda) orange Kunststoff Fertigteil
71 0 0 *0/1 1 Spinner (Panda) orange Kunststoff Ø 39mm
72 0 0 *0/1 1 Mitnehmer mit Spannkonus Metall Ø2,3 / M6 / 6kt SW13
73 0 0 *0/2 2 Klappluftschraubenblatt Kunststoff 6 x 3"
74 2 2 2 2 Blech-Linsenschraube Metall Ø 2,2 x 6,5mm
75 0 0 *0/2 2 Senkschraube Metall M2 x 12mm
KIT RR RR+ RTF Propeller, Mitnehmer, Spinner-Set Panda Sport (montiert beim RR)
80 1 1 *1/0 0 Propellermitnehmer Panda Sport (grün) Kunststoff Fertigteil
81 1 1 *1/0 0 Spinner Panda Sport (grün) Kunststoff Ø 39mm
82 1 1 *1/0 0 Mitnehmer mit Spannkonus Metall Ø3,2 / M6 / 6kt SW13
83 2 2 *1/0 0 Stoppmutter Metall M3
84 2 2 *1/0 0 Zylinderschraube Metall M3 x 18mm
85 2 2 *1/0 0 Klappluftschraubenblatt Kunststoff 7 x 4"
86 1 1 1 1 Mutter Metall M6 DIN 934
87 1 1 1 1 U-Scheibe Metall Øi 6,4
88 1 1 1 1 Zahnscheibe Federstahl Øi 6,4
KIT RR RR+ RTF Servos für Rumpf (montiert, ausser beim KIT)
90 0 1 1 1 Servo für Seitenruder Nano-S
91 0 1 1 1 Servo für Höhenruder Nano-S
KIT RR RR+ RTF Antrieb PERMAX BL-O 2812-1100 für Panda Sport (montiert beim RR)
95 0 1 *1/0 0 Antriebsmotor (Wellen-Ø4mm) PERMAX BL-O 2812-1100
96 0 1 *1/0 0 Regler MULTIcont BL-20 SD
97 0 2 *1/0 0 Zylinderschraube (für Motor) Metall M3 x 6mm
98 0 0 *1/0 1 Empfänger RX-3 cont M-Link ID 8
KIT RR RR+ RTF Antrieb PERMAX 400 6V für Panda (montiert beim RR+ und RTF)
100 0 0 1 1 Antriebsmotor (Wellen-Ø2,3mm) Permax 400 6V
101 0 0 1 1 Empfänger / Regler Einheit RX-5 M-Link ID 10
102 0 0 2 2 Zylinderschraube (für Motor) Metall M2,5 x 6mm
KIT RR RR+ RTF Akkus
103 0 0 *0/1 1 Akku für PERMAX 400 6V Li-BATT FX 2/1-950 (M6) für Panda
104 0 0 *1/0 0 Akku für PERMAX BL-O 2812-1100 Li-BATT FX 3/1-950 (M6) für Panda Sport
KIT RR RR+ RTF Sender, Ladegerät und Zubehör
105 0 0 0 1 Sender Smart SX Mode 1/3
106 0 0 0 1 Sender Smart SX Mode 2/4
107 0 0 0 1 Batterien (3er Pack) 1,5V AA
108 0 0 0 1 Anleitung Smart SX
109 0 0 0 1 Ladegerät MULTIcharger L-703 EQU

10
GB
Safety Information for MULTIPLEX model aircraft
This model is NOT A TOY in the usual sense of the term.
By operating the model the owner afrms that he is aware of the content of the operating instructions, especially those
sections which concern safety, maintenance, operating restrictions and faults, and is capable of fullling these requirements.
This model must not be operated by any child under fourteen years of age. If a person below this age operates the model
under the supervision of a competent adult who is acting as the child’s guardian within the legal sense of the term, this
individual is responsible for the implementation of the information in the OPERATING INSTRUCTIONS.
THE MODEL AND ASSOCIATED ACCESSORIES MUST BE KEPT OUT OF THE REACH OF CHILDREN UNDER THREE
YEARS OF AGE! MODELS CONTAIN SMALL DETACHABLE PARTS WHICH MAY BE SWALLOWED BY CHILDREN
UNDER THREE YEARS. CHOKING HAZARD!
All the warnings in the OPERATING INSTRUCTIONS must be observed whenever the model is operated. Multiplex
Modellsport GmbH & Co. KG accepts no liability for loss or damage or any kind which occurs as a result of incorrect
operation or misuse of this product, including the accessories required for its operation. This includes direct, indirect,
deliberate and accidental loss and damage, and all forms of consequent damage.
Every safety note in these instructions must always be observed, as all the information contributes to the safe opera-
tion of your model. Use your model thoughtfully and cautiously, and it will give you and your spectators many hours of
pleasure without constituting a hazard. Failure to operate your model in a responsible manner may result in signicant
property damage and severe personal injury. You alone bear the responsibility for the implementation of the operating
instructions and the safety notes.
Approved usage
The model is approved exclusively for use within the modelling hobby. It is prohibited to use the model for any other
purpose than that stated. The operator of the model, and not the manufacturer, is responsible for damage or injury of
any kind resulting from non-approved use.
The model may only be operated in conjunction with those accessories which we expressly recommend. The recom-
mended components have undergone thorough testing, are an accurate match to the model, and ensure that it functions
safely. If you use other components, or modify the model, you operate it at your own risk, and any claim under guarantee
is invalidated.
To minimise the risk when operating the model, please observe the following points:
The model is guided using a radio control system. No radio control system is immune to radio interference, and
such interference may result in loss of control of the model for a period of time. To avoid collisions, you must
therefore ensure at all times that there is a wide margin of safety in all directions when operating your model. At
the slightest sign of radio interference you must cease operating your model!
Never operate your model until you have successfully completed a thorough check of the working systems, and
carried out a range-check as stipulated in the instructions supplied with your transmitter.
The model may only be own in conditions of good visibility. You can avoid being temporarily blinded by not ying
towards the sun, or in other difcult light conditions.
A model must never be operated by a person who is under the inuence of alcohol, drugs or medication which
have an adverse effect on visual acuity and reaction time.
Only y your model in conditions of wind and weather in which you are able to maintain full control of the model.
Even when the wind is light, bear in mind that turbulence can form at and around objects which may have an
effect on the model.
Never y in any location where you may endanger yourself of others, e.g. close to residential areas, overhead
cables, open roads and railway lines.
Never y towards people or animals. You may think that ying low over other people’s heads is proof of your
piloting skill, but all it does is place others at unnecessary risk. It is in all our interests that you let other pilots
know that this is what you think. Always y in such a way that you do not endanger yourself or others. Bear in
mind that even the best RC system in the world is subject to outside interference. No matter how many years of
accident-free ying you have under your belt, you have no idea what will happen in the next minute.

11
Residual risks
Even if the model is operated in the correct manner, and you observe all safety aspects, there is always a certain residual
risk.
For this reason it is mandatory to take out third-party liability insurance. If you join a club or ying association, insurance
is usually available or included in the annual fee. Make sure that your insurance cover is adequate (i.e. that it covers
powered model aircraft). Always keep your models and your radio control equipment in perfect order.
The following hazards may occur owing to the model’s construction and type:
Injury caused by the propeller: you must keep well clear of the area around the propeller from the moment that
the battery is connected. Please bear in mind that objects in front of the propeller may be sucked into it, and
objects behind the propeller may be blown away by it. The model may start moving when the propeller starts
to turn. You must therefore position the model in such a way that it cannot move towards other persons if the
motor should unexpectedly start running. When you are carrying out adjustment work involving the running
motor, you must ensure that the model is always held securely by an assistant.
Crash caused by pilot error: this can happen even to the best of pilots, so it is essential to y exclusively in a
safe environment: an approved model ying site and suitable insurance are basic essentials.
Crash caused by technical failure or unnoticed damage in transit or in the workshop. A thorough check of the
model before every ight is essential. However, you should also take into account at all times that material
failures can and do occur. Never y in a location where your model may damage or injure others.
Keep within the stated operating limits. Excessively violent ying will weaken the airframe, and may result in
sudden material failure, or may cause the model to crash during a subsequent ight due to “creeping” conse-
quent damage.
Fire hazard caused by electronic failure or malfunction. Store batteries safely, and always observe safety
notes which apply to the airborne electronic components, the battery and the battery charger. Protect all elec-
tronic equipment from damp. Ensure that the speed controller and battery are adequately cooled.
The instructions which accompany our products must not be reproduced and / or published, in full or in part, in
print or any electronic medium, without the express written approval of Multiplex Modellsport GmbH & Co. KG.
GB

12
RTF Panda # 1 3268 / # 1 3269
Examine your kit carefully!
MULTIPLEX model kits are subject to constant quality checks throughout the production process, and we sincerely hope
that you are completely satised with the contents of your kit. However, we would ask you to check all the parts (referring
to the Parts List) before you start construction, as we cannot exchange components which you have already modied. If
you nd a part is not acceptable for any reason, we will gladly correct the defect or replace the item in question once we
have inspected it. Please send the component to our Service Department, with adequate postage pre-paid, being sure to
include the completed complaints form. We are constantly working on improvements to our models, and for this reason
we must reserve the right to change the kit contents in terms of shape or dimensions of parts, technology, materials and
ttings, without prior notication. Please understand that we cannot entertain claims against us if the kit contents do not
agree in every respect with the instructions and the illustrations.
Caution!
Radio-controlled models, and especially model aircraft, are by no means playthings in the usual sense of the
term. Building and operating them safely requires a certain level of technical competence and manual skill,
together with discipline and a responsible attitude at the ying eld.
Errors and carelessness in building and ying the model can result in serious personal injury and damage to property.
Since we, as manufacturers, have no control over the construction, maintenance and operation of our products, we are
obliged to take this opportunity to point out these hazards and to emphasise your personal responsibility.
Please take the time to read through the Instructions before completing and ying the model, paying particular attention
to the Safety Notes and Tips.
Warning:
Like every aeroplane, this model has static limits. Steep dives and senseless manoeuvres inappropriate to the type
may result in the loss of the aircraft. Please note: we will not replace the model in such cases. It is your responsibility to
approach the airframe’s limits gradually. It is designed for the power system recommended in these instructions, but is
only capable of withstanding the ight loads if built exactly as described and if it is in an undamaged state.
Set contents:
ELAPOR® model, 100% completely assembled,PERMAX 400/6V, RX-3 cont M-Link ID speed controller / receiver unit,
assembled 6 x 3” folding propeller, two Nano-S servos, Li-BATT FX 2/1-950 ight battery, SMART SX M-LINK transmitter,
dry cells for transmitter, 110-240 V MULTIcharger L-703 EQU battery charger, painted canopy, decals (orange) applied,
comprehensive instructions.
Optional accessories:
Recommended battery:
Li-BATT FX 2/1-950 (M6) ight battery => Panda! Order No. 15 7320
Adhesives:
Zacki ELAPOR ® 20 g Order No. 59 2727
Zacki ELAPOR ® Super liquid 10 g Order No. 59 2728
Battery charger:
MULTIcharger LN-3008 EQU and AC / DC 230V / 12V 5.0A PSU combo Order No. 9 2545
Model Service Box Order No. 8 5500
Specication: Panda Panda Sport
Wingspan 1160 mm 1160 mm
Overall length 800 mm 800 mm
All-up weight min. 470 g min. 520 g
Wing area approx.19 dm² (FAI) approx.19 dm² (FAI)
Wing loading min. 24.7 g/dm² min. 27 g/dm²
RC functions:
Elevator, rudder, throttle
Note: please separate the illustration pages from the centre of the building instructions.
GB

13
Important note
This model is not made of Styrofoam™, and it is not possible to glue the material using white glue, polyurethane or
epoxy; these adhesives only produce supercial joints, and simply break away under stress. Please be sure to use
medium-viscosity cyano-acrylate glue exclusively, preferably Zacki ELAPOR® # 59 2727, which is optimised specically
for ELAPOR® particle foam. If you se Zacki ELAPOR® there is usually no need for cyano ‘kicker’ or activator. However,
if you wish to use a different adhesive which requires the use of activator, please note that these materials are injurious
to health, and should always be applied in the open air. Take care when handling all cyano-acrylate adhesives, as they
harden in seconds, so don’t get them on your ngers or other parts of the body. We strongly recommend the use of
goggles to protect your eyes. Keep the adhesive out of the reach of children! For certain joints it is also possible to use
hot-melt adhesive; the instructions indicate where this is the case.
Working with Zacki ELAPOR®
Zacki ELAPOR® has been developed specically for glued joints in our models which consist of moulded ELAPOR®
foam parts.
Please observe the following points in order to obtain perfect joints:
• We advise leaving joined parts for 24 hours to obtain maximum strength, particularly when the glued area is large.
• Activator should only be used for temporary, small-area joints (‘tacking’). Spray a little activator on one surface, and
allow it to air-dry for about thirty seconds.
• To obtain maximum joint strength you should lightly sand the surface with 320-grit abrasive paper before applying glue.
• The adhesive will harden more quickly if you moisten one surface very slightly; in most cases activator (kicker) is then
not required. All you have to do is moisten the mating surface very lightly with a damp cloth or sponge.
Bent parts - actually don’t exist. If you nd that a component has taken up a curve, perhaps after being transported,
it is easy to straighten again. In this respect ELAPOR® behaves in a similar way to metal: bend the component
back slightly beyond the correct position, and the material will then spring back to its proper shape when released,
and maintain it. There are limits, however - don’t overdo it!
Bent parts - really do exist. If you wish to paint your model, apply MPX Primer # 60 2700 to the surfaces, wiping it on
very lightly as if you were cleaning the model. Paint must always be applied thinly and evenly, otherwise the component
will warp. Then you really will have bent parts, and they will also be heavy and perhaps even unusable. We have found
that matt-nish paints produce the best visual effect.
We recommend using our “ELAPOR® Color” range of spray cans #60 2701 - # 60 2712 (surfaces must be given a coat
of MULTIPrimer # 60 2700 beforehand).
1. Unpack the transmitter and model
Store the documents safely.
Mode 1/3 oder Mode 2/4
=> 7.8 Mode switching => SMART Operating instructions!
Check the contents of your RTF set. You will nd Figs. 1
and the Parts List helpful at this stage.
2. Insert the batteries
It is essential to maintain correct polarity. Reversed polari-
ty may ruin the transmitter and / or the cells.
Fig. 2
When switching on
Always switch the transmitter on before connecting the
ight battery or switching the receiving system on.
When switching off
Always disconnect the ight battery or switch the receiving
system off before switching the transmitter off.
The presence of the M-LINK ID receiver en-
ables the SMART SX to detect the specic
model, and automatically activate the asso-
ciated settings from its enormous reserve of
model memories:
3. Installing the drive battery
The positioning of the battery has a minor but useful effect
on the model’s Centre of Gravity. Final balancing is carried
out later by tting trim ballast (metal balls) in the holes in
the n.
Caution: the circular stickers 2.1 (4x) are used later to seal
the ballast chambers once you have set the correct Centre
of Gravity - so don’t throw them away!
The Li-BATT FX 2/1-950 ight battery can be xed to the
fuselage side at the front, using hook-and-loop tape.
Fig. 3
Note: since the “grip” of the hook-and-loop tape is greater
than the adhesion between the sticky coating and the foam
surface, we recommend gluing the tape in place using hot-
melt adhesive or Zacki ELAPOR® (cyano-acrylate).
Binding
The rst time you make the connection between transmitter
and receiver the two components must be ‘bound’. For
safety’s sake remove the propeller before doing this. When
binding is complete, the receiving system immediately starts
operating.
Prepare the transmitter for binding
Switch the transmitter on with the multi-function button

14
pressed in, and then release the button again. The Status
LED ashes yellow at a high rate.
Prepare the receiver for binding
Place the transmitter and receiver close to each other.
Transmitter power is greatly reduced for the binding process;
the distance between the two units may need to be 20cm
or less. As soon as the transmitter and receiver have
“found” each other, the ashing rhythm on both components
changes to a slow rate. The servos connected to the receiver
will now follow the movement of the corresponding sticks.
The binding information is stored permanently in the
receiver, i.e. the binding procedure only needs to be carried
out once.
If you are using an ID receiver, you will hear an audible
signal when binding is complete, and the transmitter
automatically loads the appropriate settings.
4. Activating / disabling the throttle function
Regardless of the throttle stick position, the throttle channel
is initially disabled when the transmitter is rst switched on:
your model’s motor remains off. To control the motor in your
model you must rst unlock and activate the throttle channel.
You can also disable the throttle again after the landing.
To activate the throttle function you must press the throttle
stick button once briey, and move the throttle stick fully
back to the “Off” position. You will a rising signal.
To disable the throttle function, press the throttle stick button
again. You will hear a rising signal, and the motor is switched
off until the throttle channel is re-activated.
5. Initial test-run of the motor
Note: do not connect the ight battery to the speed controller
until you have switched on your transmitter, and are certain
that the control which operates the motor is at the “OFF”
position.
Check now the direction of rotation of the motor using
your radio control transmitter and the ight battery: when
viewed from the tail, the motor shaft must spin clockwise
(to the right).
Motor cut-off type: motor power reduction
=> A steady decline in motor speed is a indication that the
ight battery is almost discharged; you should initiate the
landing as soon as you become aware of this.
6. Tailplane panels
Temporarily t the tailplane panels on the fuselage by
pushing them together until the latch engages.
Fig. 4
To dismantle the system, locate the point marked “X” on the
tailplane 8, and press it in to release the retainer.
Fig. 5
Note: it is essential that the tailplane should pivot freely.
If the panels rub against the n, it may be necessary to
compress the foam slightly at the root face of the tailplane
panels. The easiest method of doing this is to place the
root face of the tailplane panel on the edge of a table, and
slide it to and fro using moderate pressure. Alternatively the
foam can be trimmed back very slightly using a balsa knife.
7. Wings
Temporarily t the wings on the fuselage by pushing them
together until the teeth engages.
The wings are separated by pulling the lug forward towards
the wing leading edge with one finger, until the teeth
disengage.
Fig. 6
Note: if the wing retainer system should become loose
after you have own the model for a while, push the wings
together slightly more rmly: this will engage one further
tooth, and the joint will become rm again.
8. Checking the model
Assemble the model completely, and ensure that the
airframe is “straight and square”. All the receiving system
components must be installed and connected correctly.
Check the control surface travels and the direction of
rotation of the servos. Ensure that all the mechanical control
systems are free-moving.
Fig. 7
Channel assignment
Channel 2: Elevator
Channel 3: Rudder
Throttle xed
9. Check the control surface travels (recommended
values only!)
The travels are measured at the widest point of each control
surface.
Elevator: 10 / 10 mm +/-
Rudder: 15 / 15 mm +/-
The tailplane is at the correct neutral point when the socket-
head grubscrew is visible through the hole in the side of
the fuselage.
Fig. 8
10. Setting the Centre of Gravity
The correct Centre of Gravity can be set by adjusting the
position of the ight battery, and by adding ballast if required.
The CG should be located 55 mm back from the wing
leading edge, measured where the wings meet the fuselage;
the position is indicated by small raised pimples on the
underside of the wings. Support the fully assembled model
on two ngertips: if balanced correctly, the fuselage should
now remain horizontal, with the nose inclined slightly down.
Fig. 9
If necessary, add trim ballast 30 to the chambers in the n,
then cover the recesses with the circular stickers from the
decal sheet.
Fig. 10
11. Pre-ight preparations
For the first flight please wait for a day with as little
breeze as possible; it is often worth waiting for the quieter
evening hours. If you are a beginner to radio-controlled
model aircraft, we strongly recommend that you ask an
experienced modeller to help you, as it is extremely likely
that things will go wrong if you try to “go it alone”. If in
doubt, contact your local model ying club. Your nearest
model shop will also be able to supply the address of clubs
in your area.

15
It is essential to carry out a range-check before ying the
model for the rst time. When you do this it is important to
keep to the procedure recommended by the radio control
system manufacturer.
Be sure to give your transmitter battery and ight battery a
full charge in accordance with the battery manufacturer’s
recommendations before ying the model.
If you are unsure of anything, please don’t risk a ight. It is
far better to pack up the whole system (including battery,
switch harness and servos) and send it to the manufacturer’s
Service department for checking.
12. Maiden ight …
The aircraft is designed to be hand-launched (always into
wind).
If you are a beginner to model ying, we strongly recommend
that you ask an experienced modeller to help you for the
rst few ights. Once the model has reached a safe height,
adjust the control surfaces using the trims on the transmitter,
so that the model ies straight and level “hands-off”.
Powered version: with the aircraft ying at an adequate
altitude, check how it responds when the motor is switched
off, so that you are familiar with its behaviour on the glide.
Carry out repeated simulated landing approaches at a safe
height, as this will prepare you for the real landing when the
battery is discharged.
Avoid ying tight turns at rst, especially close to the ground,
and in particular during the landing approach. It is always
better to land safely some distance away than to risk a crash
by forcing the model back to your feet.
13. Slope soaring
Ridge soaring is an extremely attractive form of model ying.
Staying aloft for hours on end in slope lift, without needing
any outside aid for launching, must be one of the nest
of modelling experiences. The last word in model ying
is thermal ying from the slope: launch the model, y out
over the valley, search for a thermal, locate the lift, circle
up, “milking” it to the limits of vision (take care - the model is
small!), and then bring it down again in a continuous series
of aerobatic manoeuvres, and then repeat the whole show
- that must surely be one of the greatest of all pleasures
in modelling. At the same time the electric power system
provides a means of bringing the model “back home” at any
time if the lift should fail, thereby eliminating the old fear of
“landing out” in the valley.
14. Trainer mode operations
The good-natured ying characteristics of the Panda / Panda
Sport, combined with the long ight times it offers, make
the model ideal as a practice machine. With the wireless
Trainer Stick # 4 5183, two MULTIPLEX transmitters and
an experienced tutor, the beginner can swiftly learn the art
of model ying without wrecking model after model. Most
pupils are capable of controlling the model by themselves
after just a short period of tuition.
Any 2.4 GHz M-LINK transmitter can be used as Pupil
transmitter, while the Teacher transmitter can be any
MULTIPLEX transmitter featuring a DIN multi-function
socket and Teacher functionality - regardless of the
frequency band, i.e. 2.4 GHz M-LINK* or xx MHz. There
is no connecting lead to hinder the pilots’ movements, and
the teacher and pupil can even stand apart (20 - 30 metres)
if necessary.
15. Safety
Safety is the First Commandment when ying any model
aircraft. Third party insurance is mandatory. If you join a
model club, suitable cover will usually be available through
the organisation. It is your personal responsibility to ensure
that your insurance is adequate (i.e. that its cover includes
powered model aircraft). Make it your job to keep your
models and your radio control system in perfect order at all
times. Check and observe the correct charging procedure
for the batteries you are using. Make use of all sensible
safety systems and precautions which are advised for
your system. An excellent source of practical accessories
is the MULTIPLEX main catalogue or our website www.
multiplex.de
MULTIPLEX products are designed and manufactured
exclusively by active modellers for practising modellers.
Always y with a responsible attitude. You may think that
ying low over other people’s heads is proof of your piloting
skill; others know better. The real expert does not need to
prove himself in such childish ways. Let other pilots know
that this is what you think too, as it is in all our interests.
Always y in such a way that you do not endanger yourself
or others. Bear in mind that even the best RC system in
the world is subject to outside interference. No matter how
many years of accident-free ying you have under your
belt, you have no idea what will happen in the next minute.
Before every ight, check that the battery, the wings
and the tailplane are attached and rmly seated. Check
in turn that each control surface is operating correctly!
We - the MULTIPLEX team - hope you have many hours of
pleasure building and ying your new model.
MULTIPLEX Modellsport GmbH &Co. KG

16
Available versions
# 21 4268 KIT Panda Sport (green) Kit (intended for BL-O 2812-1100 motor)
# 26 4268 RR Panda Sport (green) Ready-built model, servos, controller, BL-O 2812-1100 motor
#*26 4272 *RR+ Panda Sport (green) Ready-built model, servos, controller, BL-O 2812-1100 motor, receiver, battery
# 26 4269 RR+ Panda (orange) Ready-built model, servos, controller / receiver, 400 6V motor, battery
# 1 3268 RTF Panda Mode 1 and 3 (orange) Ready-built, servos, controller / receiver, 400 6V motor, transmitter, battery, charger
# 1 3269 RTF Panda Mode 2 and 4 (orange) Ready-built, servos, controller / receiver, 400 6V motor, transmitter, battery, charger
To help you when assembling the model it is a good idea to use a coloured highlighter to mark your own version in the Parts List below.
Parts List - Panda / *Panda Sport
Part No. Quantity Description Material Dimensions
KIT RR RR+ RTF
1 1 1 1 1 KIT building instructions
1.1 0 1 0 0 RR supplementary instructions
1.2 0 0 1 0 RR+ supplementary instructions
1.3 0 0 0 1 RTF supplementary instructions
1.4 0 1 *1/0 0 “Panda SPORT” power set instructions
1.5 0 1 *1/0 0 BL speed controller instructions
1.7 1 1 1 1 Model complaint processing form
2.1 0 0 *0/1 1 Panda decal sheet (orange) Printed adhesive lm 300 x 1000 mm
2.2 1 1 *1/0 0 Panda Sport decal sheet (green) Printed adhesive lm 400 x 800 mm
3 1 1 1 1 L.H. fuselage shell Moulded Elapor foam
4 1 1 1 1 R.H fuselage shell Moulded Elapor foam
5 1 1 1 1 L.H. wing panel Moulded Elapor foam
6 1 1 1 1 R.H. wing panel Moulded Elapor foam
7 1 1 1 1 L.H. tailplane panel Moulded Elapor foam
8 1 1 1 1 R.H. tailplane panel Moulded Elapor foam
9 1 1 1 1 Fin Moulded Elapor foam
KIT RR RR+ RTF Small parts set (factory-tted, except for KIT version)
20 3 3 3 3 Hook-and-loop tape, “hook” Plastic 25 x 60 mm
21 3 3 3 3 Hook-and-loop tape, “loop” Plastic 25 x 60 mm
22 1 1 1 1 “Twin” control surface horn Plastic Ready made
23 1 1 1 1 Articulated swivel connector barrel Metal Ready made, 6 mm Ø
24 2 2 2 2 Socket-head grubscrew Metal M3 x 3 mm
25 1 1 1 1 Swivel pushrod connector Metal Ready made, 6 mm Ø
26 1 1 1 1 Washer Metal M2
27 1 1 1 1 Nut Metal M2
28 1 1 1 1 Allen key Metal 1.5 mm A/F
29 2 2 2 2 Countersunk screw (pivot housing cover) Metal M2 x 10 mm
30 50 50 50 50 Trim ballast Metal balls 4 mm Ø, approx.15 g
31 1 1 1 1 Mushroom-head self-tapping screw (spar joiner) Metal 2.2 Ø x 6.5 mm
KIT RR RR+ RTF Plastic parts set (factory-tted, except for KIT version)
40 0 0 *0/1 1 Fuselage hatch frame (orange) Plastic Ready made
40.1 1 1 *1/0 0 Fuselage hatch frame (green) Plastic Ready made
41 0 0 *0/1 1 Fuselage hatch (orange) Plastic Ready made
41.1 1 1 *1/0 0 Fuselage hatch (green) Plastic Ready made
42 0 0 *0/1 1 Nose fairing (orange) with motor bulkhead Plastic Ready made
42.1 1 1 *1/0 0 Nose fairing (green) with motor bulkhead Plastic Ready made
43 2 2 2 2 “Nano” servo mount, upright Plastic Ready made
44 1 1 1 1 Spar joiner Plastic Ready made
45 1 1 1 1 Wing retainer Plastic Ready made
46 1 1 1 1 Tailplane pivot housing Plastic Ready made
47 1 1 1 1 Tailplane pivot housing cover Plastic Ready made
48 1 1 1 1 Tailplane joiner and shaft Plastic Ready made
49 1 1 1 1 Tailplane joiner and retainer Plastic Ready made
50 1 1 1 1 Tailplane crank Plastic Ready made
KIT RR RR+ RTF Wire and spar set (factory-tted, except for KIT version)
60 2 2 2 2 Wing spar Square aluminium 8 x 6 x 300 mm
61 1 1 1 1 Wire elevator pushrod, pre-formed Metal 0.8 Ø x 535 mm
62 1 1 1 1 Wire rudder pushrod, pre-formed Metal 0.8 Ø x 565 mm
63 1 1 1 1 Elevator snake sleeve Plastic 2/1 Ø x 470 mm
64 1 1 1 1 Rudder snake sleeve Plastic 2/1 Ø x 500 mm
65 1 1 1 1 Fuselage stiffener tube Square aluminium 8 x 6 x 380 mm
GB

17
Part No. Quantity Description Material Dimensions
KIT RR RR+ RTF Panda propeller, prop driver, spinner
70 0 0 *0/1 1 Panda propeller hub, orange Plastic Ready made
71 0 0 *0/1 1 Panda spinner, orange Plastic 39 mm Ø
72 0 0 *0/1 1 Prop driver and taper collet Metal 2.3 Ø / M6 / hex. 13 A/F
73 0 0 *0/2 2 Folding propeller blade Plastic 6 x 3”
74 2 2 2 2 Mushroom-head self-tapping screw Metal 2.2 Ø x 6.5 mm
75 0 0 *0/2 2 Countersunk screw Metal M2 x 12 mm
KIT RR RR+ RTF Panda Sport propeller, prop driver, spinner set (factory-tted, RR version only)
80 1 1 *1/0 0 Panda Sport propeller hub (green) Plastic Ready made
81 1 1 *1/0 0 Panda Sport spinner (green) Plastic 39 mm Ø
82 1 1 *1/0 0 Prop driver and taper collet Metal 3.2 Ø / M6 / hex. 13 A/F
83 2 2 *1/0 0 Self-locking nut Metal M3
84 2 2 *1/0 0 Cheesehead screw Metal M3 x 18 mm
85 2 2 *1/0 0 Folding propeller blade Plastic 7 x 4”
86 1 1 1 1 Nut Metal M6 DIN 934
87 1 1 1 1 Washer Metal 6.4 I.D.
88 1 1 1 1 Shakeproof washer Spring steel 6.4 I.D.
KIT RR RR+ RTF Fuselage-mounted servos (factory-tted, except for KIT version)
90 0 1 1 1 Rudder servo Nano-S
91 0 1 1 1 Elevator servo Nano-S
KIT RR RR+ RTF PERMAX BL-O 2812-1100 motor for Panda Sport (factory-tted, RR version only)
95 0 1 *1/0 0 Electric motor (shaft Ø 4 mm) PERMAX BL-O 2812-1100
96 0 1 *1/0 0 Speed controller MULTIcont BL-20 SD
97 0 2 *1/0 0 Cheesehead screw (for motor) Metal M3 x 6 mm
98 0 0 *1/0 0 Receiver RX-5 M-Link ID 10
KIT RR RR+ RTF PERMAX 400 6V motor for Panda (factory-tted, RR+ and RTF only)
100 0 0 1 1 Electric motor (shaft Ø 2.3 mm) Permax 400 6V
101 0 0 1 1 Receiver / speed controller unit RX-3 cont M-Link ID 8
102 0 0 2 2 Cheesehead screw (for motor) Metal M2.5 x 6 mm
KIT RR RR+ RTF Flight batteries
103 0 0 *0/1 1 Battery for PERMAX 400 6V Li-BATT FX 2/1-950 (M6) for Panda
104 0 0 *1/0 0 Battery for PERMAX BL-O 2812-1100 Li-BATT FX 3/1-950 (M6) for Panda Sport
KIT RR RR+ RTF Transmitter, charger, accessories
105 0 0 0 1 Transmitter Smart SX Mode 1/3
106 0 0 0 1 Transmitter Smart SX Mode 2/4
107 0 0 0 1 Dry cells (pack of 3) 1.5V AA
108 0 0 0 1 Instructions Smart SX
109 0 0 0 1 Battery charger MULTIcharger L-703 EQU

18
Consignes de sécurités pour les modèles volants MULTIPLEX
Le modèle n’est PAS UN JOUET.
En utilisant ce modèle, le propriétaire de celui-ci déclare avoir pris connaissance du contenu de la notice d’utilisation,
particulièrement concernant les consignes de sécurités, l’entretien ainsi que les restrictions et défauts d’utilisations, et
qu’il a bien compris le sens de ces consignes
Ce modèle ne doit pas être utilisé par des enfants de moins de 14 ans. Si des personnes mineures devaient utiliser ce
modèle sous la surveillance d’une personne responsable, au sens légal du terme, et expérimentée, celui-ci porte donc
la responsabilité concernant le respect des consignes contenu dans la NOTICE D’UTISATION!
LE MODÈLE AINSI QUE TOUT L’ÉQUIPEMENT NÉCESSAIRE DOIT ÊTRE ÉLOIGNÉ DES ENFANTS DE MOINS DE
3 ANS! LES PARTIES AMOVIBLES DU MODÈLE PEUVENT ÊTRES AVALÉES PAR LES ENFANTS DE MOINS DE 3
ANS. DANGER D’ÉTOUFFEMENT!
Lors de l’utilisation de votre modèle il est impératif de respecter toutes les indications relatives aux dangers décrits dans
la NOTICE D’UTISATION. La société Multiplex Modellsport GmbH & Co. KG ne peut pas être tenue pour responsable
concernant la perte ou tout type d’endommagement de votre modèle résultant à un abus ou une mauvaise utilisation de
ce produit, ainsi que des accessoires. Cela comprend également la perte ou les dommages directs ou indirects, ainsi
que de toute forme de dommages résultants
Chaque consigne de sécurité contenue dans la notice doit obligatoirement être respectée et contribue directement à une
utilisation sécurisée de votre modèle. Utilisez votre modèle intelligemment et avec prudence, cela procurera beaucoup
de plaisir à vous et à vos spectateurs sans pour autant les mettre en danger. Si vous n’utilisez pas correctement votre
modèle, ceux-ci peut conduire à des dommages sur lui-même ou des blessures plus ou moins graves sur vous ou autrui.
Vous seul êtes responsables de la transposition correcte des indications contenues dans la notice
Utilisation conforme
Ce modèle doit exclusivement être utilisé dans le domaine du modèle réduit. Toute utilisation dans un autre domaine
est absolument interdite. Pour tout dommage ou blessure sur des personnes ou des animaux résultant d’une utilisation
non conforme, c’est l’utilisateur qui en porte la responsabilité et non le fabricant.
N’utilisez votre modèle qu’avec les accessoires conseillés. Les composants/accessoires conseillés sont testés sur leur
fonctionnalité et compatibilité par rapport au modèle. Si vous deviez en utiliser d’autres ou modier le modèle, vous
utiliserez celui-ci à vos risques et périls, sans oublier que les différentes garanties constructeur / revendeur ne sont plus
valables.
An de minimiser les risques lors de l’utilisation de votre modèle, il est important de respecter les points suivants:
Le modèle est piloté au travers d’un émetteur. Malheureusement aucun émetteur n’est à l’abri de problèmes
d’émissions. Ce genre de perturbations peut entraîner une perte momentanée du contrôle de votre modèle.
De ce fait, et an de minimiser au maximum les collisions potentielles, il est vital d’utiliser votre modèle d’une
manière la plus sécurisé possible à tout point de vue. Dès que vous semblez détecter la moindre anomalie de
fonctionnement il faut absolument arrêter de l’utiliser!
Vous ne devez réutiliser votre modèle qu’après avoir effectué un test complet de toutes les fonctions ainsi qu’un
test de portée, en fonction des indications de la notice de votre émetteur.
Le modèle ne doit être utilisé que par temps clair et avec une bonne visibilité. Ne volez pas dans le soleil an
de ne pas être ébloui, ou, si la lumière environnante devait être trop faible pour assurer la bonne visibilité de
votre modèle.
Le modèle ne doit pas être utilisé si vous êtes sous l’inuence d’alcool, autres drogues ou médicaments pouvant
alterner votre perception et vos réexes, entraînant ainsi une diminution de votre vitesse de réaction.
Ne volez que par un temps sans vent et par lequel vous ne rencontrez pas de problème pour garder en per-
manence votre modèle sous contrôle. Pensez toujours que, même par faible vent, il peut y avoir des tourbillons
induits par le relief pouvant avoir des inuences sur votre modèle.
Ne volez jamais à des endroits où vous pourriez mettre en danger autrui ou vous-même, par exemple près des
habitations, lignes à haute tension, routes ou vois ferrée.
F

19
Ne volez jamais directement vers les personnes ou animaux. Volez le plus près possible au-dessus de per-
sonnes n’est pas une preuve de votre savoir-faire, mais expose ces personnes inutilement à un danger. Dans
l’intérêt de tous, veillez en informer également les autres pilotes. Volez toujours de telle manière à ce que vous
ne mettiez personne en danger. Pensez toujours que même la meilleure radiocommande peut être perturbée
par des phénomènes externes. Avoir beaucoup d’expérience et des années de vols sans problèmes derrière soi
ne garantie pas qu’il n’y en aura pas dans les prochaines minutes de vol.
Risques
Même si votre modèle respecte toutes les consignes de sécurités et est utilisé conformément il persiste toujours un
risque potentiel.
De ce fait une assurance est obligatoire. Si vous vous inscrivez dans un club ou une association, il est possible de
souscrire une telle assurance auprès de ceux-ci. Veillez à ce que celle-ci vous assure sufsamment (modèle avec pro-
pulsion). Veillez à toujours bien entretenir votre modèle et votre émetteur.
Les dangers suivants peuvent survenir en relation avec la construction ou la mise en œuvre du modèle:
Blessures par hélice: dès que l’accu de propulsion est branché il faut avoir dégager la zone autour de l’hélice.
Veillez également observer, que tout objet non xé peut être aspiré si posé devant ou soufé si posé derrière
l’hélice par celle-ci. Le modèle peut se mettre en mouvement. De ce fait diriger votre modèle toujours de telle
manière à ce que celui-ci n’aille jamais vers les personnes dans le cas ou le moteur venait à démarrer. Lors
de travaux de réglages, pour lesquels le moteur est en marche ou peut démarrer, il est impératif qu’une tierce
personne tienne votre modèle.
Crash suite à une erreur de pilotage: cela peut arriver au meilleur pilote, de ce fait il faut évoluer dans une zone
sécurisée comme un terrain de modélisme par exemple, et en ayant obligatoirement souscrit une assurance
avec une bonne couverture.
Crash suite à un problème technique ou dommages cachés à cause d’un mauvais transport ou autre raison. La
vérication soigneuse de votre modèle avant chaque vol est une obligation. Néanmoins il faut toujours garder en
mémoire qu’une défaillance du matériel peut survenir à tout moment. De ce fait ne volez jamais à des endroits
où vous risquez de nuire à autrui.
Respectez les limites d’utilisations. Effectuer des manœuvres trop brutales entraîne un stress inutile de votre
modèle et peut avoir comme conséquence une défaillance subite, ou par la suite au travers de dommages
‘’sournois’’, de la structure ou du matériel.
Danger de combustion par défaillance de l’électronique. Stockez vos accus toujours dans un lieu sécurisé,
respectez les consignes de sécurités des composants électroniques dans votre modèle, des accus ainsi que
du chargeur utilisé et protégez l’électronique de toute projection d’eau. Assurez-vous que le régulateur et l’accu
aient un refroidissement sufsant.
Toute reproduction / publication sous forme papier ou électronique, même partielle, des notices de nos différents
produits sont strictement interdit sauf par autorisation exclusive de le société Multiplex Modellsport GmbH &
Co. KG (sous forme écrite).

20
RTF Panda # 1 3268 / # 1 3269
Familiarisez-vous avec le kit d’assemblage!
Les kits d’assemblages MULTIPLEX sont soumis pendant la production à des contrôles réguliers du matériel. Nous
espérons que le contenu du kit répond à vos espérances. Nous vous prions de vérier le contenu (suivant la liste des pi-
èces) du kit avant l’assemblage, car les pièces utilisées ne sont pas échangées. Dans le cas où une pièce ne serait pas
conforme, nous sommes disposés à la rectier ou à l’échanger après contrôle. Veuillez retourner la pièce à notre unité
de production sans omettre de joindre le coupon de caisse ainsi qu’une petite description du défaut (formulaire de récla-
mation). Nous essayons toujours de faire progresser technologiquement nos modèles. Nous nous réservons le droit de
modications de la forme, dimensions, technologie, matériel et contenu sans préavis. De ce fait, nous ne prenons donc
pas en compte toutes réclamations au sujet des images ou de données ne correspondantes pas au contenu du manuel.
Attention!
Les modèles radiocommandés, surtout volants, ne sont pas des jouets au sens propre du terme. Leur assemb-
lage et utilisation demande des connaissances technologiques, un minimum de dextérité manuelle, de rigueur,
de discipline et de respect de la sécurité.
Les erreurs et négligences, lors de la construction ou de l’utilisation, peuvent conduire à des dégâts corporels ou maté-
riels. Du fait que le fabricant du kit n’a plus aucune inuence sur l’assemblage, la réparation et l’utilisation correcte, nous
déclinons toute responsabilité concernant ces dangers.
Néanmoins, lisez attentivement la notice avant l’assemblage et l’utilisation et respectez les remarques ainsi que les
conseils de sécurités.
Avertissement:
Comme tous les appareils volants votre modèle possède également ses limites statiques! Des vols en piqués ou des
manœuvres irresponsables peuvent entraîner la perte de votre modèle. Veillez noter que dans de tels aucun remplace-
ment sera consenti. Essayez de trouver progressivement les limites de votre modèle. Celui-ci est adapté pour accueillir
la propulsion que nous vous conseillons, néanmoins que suite à un assemblage irréprochable et exempt de tout dom-
mage an de pouvoir résister aux contraintes.
Contenu:
Modèle en ELAPOR®, terminé à 100% avec moteur PERMAX 400/6V, ensemble variateur/récepteur RX-3 cont M-Link
ID, hélice à pales repliables montée 6x3”, 2 servos Nano-S, accu de propulsion Li-BATT FX 2/1-950, émetteur SMART
SX M-LINK, accu d’émission, chargeur 110-240 V MULTIcharger L-703 EQU, verrière peinte, motifs de la décoration
posés (orange) et notice détaillée.
Accessoires en option:
Accu conseillé :
Accu de propulsion Li-BATT FX 2/1-950 (M6) => Panda! Nr. Com. 15 7320
Colle :
Zacki ELAPOR ® 20g Nr. Com. 59 2727
Zacki ELAPOR ® Super liquid 10g Nr. Com. 59 2728
Chargeur :
Combo MULTIcharger LN-3008 EQU avec alimentation AC/DC 230V/12V 5,0A
Nr. Com. 9 2545
Model Service Box Nr. Com. 8 5500
Données techniques : Panda Panda Sport
Envergure 1160 mm 1160 mm
Longueur hors tout 800 mm 800 mm
Poids en vol à partir de 470 g 520 g
Surface alaire env.19 dm² (FAI) env.19 dm² (FAI)
Charge alaire à partir de 24,7 g/dm² 27 g/dm²
Fonctions RC:
Profondeur, dérive, moteur
Remarque : enlevez les pages comportant des images de la notice!
F
La page est en cours de chargement...
La page est en cours de chargement...
La page est en cours de chargement...
La page est en cours de chargement...
La page est en cours de chargement...
La page est en cours de chargement...
La page est en cours de chargement...
La page est en cours de chargement...
La page est en cours de chargement...
La page est en cours de chargement...
La page est en cours de chargement...
La page est en cours de chargement...
La page est en cours de chargement...
La page est en cours de chargement...
La page est en cours de chargement...
La page est en cours de chargement...
La page est en cours de chargement...
La page est en cours de chargement...
La page est en cours de chargement...
La page est en cours de chargement...
La page est en cours de chargement...
La page est en cours de chargement...
La page est en cours de chargement...
La page est en cours de chargement...
La page est en cours de chargement...
La page est en cours de chargement...
La page est en cours de chargement...
La page est en cours de chargement...
-
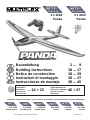 1
1
-
 2
2
-
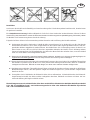 3
3
-
 4
4
-
 5
5
-
 6
6
-
 7
7
-
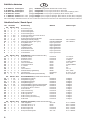 8
8
-
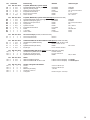 9
9
-
 10
10
-
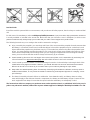 11
11
-
 12
12
-
 13
13
-
 14
14
-
 15
15
-
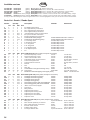 16
16
-
 17
17
-
 18
18
-
 19
19
-
 20
20
-
 21
21
-
 22
22
-
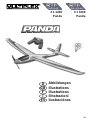 23
23
-
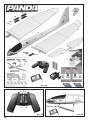 24
24
-
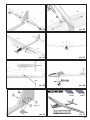 25
25
-
 26
26
-
 27
27
-
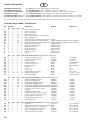 28
28
-
 29
29
-
 30
30
-
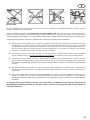 31
31
-
 32
32
-
 33
33
-
 34
34
-
 35
35
-
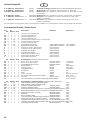 36
36
-
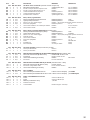 37
37
-
 38
38
-
 39
39
-
 40
40
-
 41
41
-
 42
42
-
 43
43
-
 44
44
-
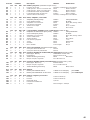 45
45
-
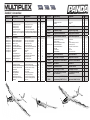 46
46
-
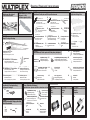 47
47
-
 48
48


MULTIPLEX Panda 1 3268 Building Instructions
- Catégorie
- Jouets télécommandés
- Taper
- Building Instructions
- Ce manuel convient également à
dans d''autres langues
- italiano: MULTIPLEX Panda 1 3268
- English: MULTIPLEX Panda 1 3268
- español: MULTIPLEX Panda 1 3268
- Deutsch: MULTIPLEX Panda 1 3268
Documents connexes
-
MULTIPLEX RR Panda Sport Mode d'emploi
-
-
-
-
-
HiTEC Twinstar Nd Kit Rr Le manuel du propriétaire
-
-
-
-
MULTIPLEX Smart Sx Le manuel du propriétaire
Autres documents
-
 Rimax 10010 Guide d'installation
-
 Fischer Panda Panda 5000i.Neo PMS Le manuel du propriétaire
-
 Fischer Panda Panda 15000i-400V PMS Le manuel du propriétaire
-
 Fischer Panda Panda 45i PMS Le manuel du propriétaire
-
 Fischer Panda Panda 10000i PMS Le manuel du propriétaire
-
 Fischer Panda Panda 25i-400V PVMV-N Le manuel du propriétaire


