Ninja OP101C Inspiration Guide
- Catégorie
- Autocuiseurs
- Taper
- Inspiration Guide

15 mouthwatering
recipes and charts for
unlimited possibilities
Please make sure to read the enclosed Ninja® Owner’s Guide prior to using your unit.

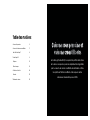
Table of Contents
Pressure Lid 2
Crisping Lid 3
The Art of TenderCrisp™ 4
TenderCrisp 101 6
Breakfast 12
Lunch & Dinner 16
Snacks & Sides 26
Desserts 32
Cooking Charts 36
Pressure, meet Crisp
TenderCrisp™ Technology allows you
to harness the speed of pressure cooking
to quickly cook ingredients, then the revolutionary
crisping lid gives your meals a crispy, golden finish
that other pressure cookers can only dream of.

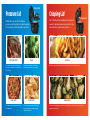
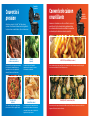
Pressure Lid
With this lid on, the Foodi™ is the ultimate
pressure cooker. Transform the toughest ingredients
into tender, juicy, and flavorful meals in an instant.
Cook low and slow to create your favorite
chilis and stews.
Five stovetop temperature settings allow
you to build flavor by searing, sautéing,
simmering, and more.
SLOW COOK SEAR/SAUTÉ
Pressurized steam infuses moisture into
ingredients and quickly cooks them from
the inside out.
Steam infuses moisture, seals in flavor,
and maintains the texture of your food.
PRESSURE COOK STEAM
Crisping Lid
Start or finish recipes by dropping this top to unleash
super-hot, rapid-moving air around your food to crisp
and caramelize to golden-brown perfection.
Want that crispy, golden, texture without all the fat and oil? Air Crisping is for you.
AIR CRISP
Don’t waste time waiting for your oven to preheat. Make your favorite casseroles and roasted
veggies in way less time.
BAKE/ROAST
Crisping Lid
Pressure Lid

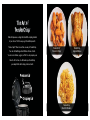
The Art of
TenderCrisp
™
Start with pressure cooking. Finish with the crisping method
of your choice. That’s how you get TenderCrisp results.
The best part? There’s more than one way to TenderCrisp.
You can start with ingredients that are frozen or fresh.
You can cook chicken, veggies, or fish. You can prepare your
favorite chili or stew, too. But when you TenderCrisp,
you always finish with a crispy, delicious twist.
Crisping Lid
Pressure Lid
TenderCrisp™
Frozen to Crispy
TenderCrisp
Apps & Entrees
TenderCrisp
One-Pot Wonders

TenderCrisp 101
7
6
Questions? ninjakitchen.com
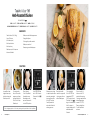
DIRECTIONS
Pour mixture into
the pot. Place whole
peppercorns, thyme,
and garlic in the pot.
Place Cook & Crisp
TM
Basket in pot.
In a small bowl, mix
together lemon juice,
hot water, honey, and
2 tablespoons salt.
Place chicken in
Cook & Crisp Basket.
Assemble pressure
lid, making sure the
pressure release valve
is in the SEAL position.
Select PRESSURE and
set to LOW. Set time to
20 minutes. Select
to begin.
When pressure cooking
is complete, quick release
pressure by moving the
pressure release valve
to the VENT position.
Carefully remove lid
when unit has finished
releasing pressure.
Brush chicken with
canola oil or spray with
cooking spray. Season
with salt and pepper.
Close crisping lid.
Select
AIR CRISP, set
temperature
to 375°F
(190°C), and set time to
15 minutes. Select
to
begin. Cook until desired
level of crispness is
reached, adding up to 10
additional minutes
if desired.
For best results, let
chicken rest for 5–10
minutes before serving.
Cooking is complete when
internal temperature
reaches 165°F (75°C).
Remove chicken from
Cook & Crisp Basket
and serve.
INGREDIENTS
1 whole chicken (1,6 à 1,8kg)
Juice of 2 lemons
(60ml lemon juice)
60ml cup hot water
60ml cup honey
2 tablespoons plus 2 teaspoons
kosher salt, divided
1 tablespoon whole black peppercorns
5 sprigs fresh thyme
5 cloves garlic, peeled, smashed
1 tablespoon canola oil
2 teaspoons ground black pepper
TIP Use cooking spray in place of oil to evenly coat large cuts of protein in the Cook & Crisp Basket.
TenderCrisp
™
101
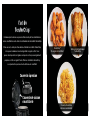
Herb-Roasted Chicken
BEGINNER RECIPE
PREP: 10 MINUTES | TOTAL COOK TIME: 41 MINUTES | MAKES: 4 SERVINGS
APPROX. PRESSURE BUILD: 6 MINUTES | PRESSURE COOK: 20 MINUTES | AIR CRISP: 15 MINUTES

8 TenderCrisp 101
9
Questions? ninjakitchen.com
DIRECTIONS
Place baking soda and
lemon juice in the pot.
Stir until dissolved and
bubbling has stopped.
Add the water and
dry pasta, stirring
to incorporate.
Assemble pressure
lid, making sure the
pressure release valve
is in the SEAL position.
Select PRESSURE and set
to low (LO). Set time to
0 minutes (the time the
unit takes to pressurize
is long enough to cook
the pasta). Select
to begin.
When pressure cooking
is complete, allow
pressure to natural
release for 10 minutes.
After 10 minutes, quick
release remaining
pressure by moving the
pressure release valve
to the VENT position.
Carefully remove lid
when unit has finished
releasing pressure.
Add remaining
ingredients, except
bread crumbs and
butter, to the pot.
Stir well to melt
cheese and ensure
all ingredients are
combined.
In a bowl, stir together
the bread crumbs
and melted butter.
Cover pasta evenly
with the mixture.
Close the crisping lid.
Select AIR CRISP, set the
temperature to 360°F
(182°C), and set the time
to 7 minutes. Select
to begin.
When cooking is
complete, serve
immediately.
TenderCrisp
™
101
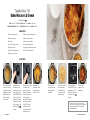
Baked Macaroni & Cheese
BEGINNER RECIPE
PREP: 10 MINUTES | TOTAL COOK TIME: 14 MINUTES | MAKES: 6–8 SERVINGS
APPROX. PRESSURE BUILD: 7 MINUTES | PRESSURE COOK: 0 MINUTES | AIR CRISP: 7 MINUTES
INGREDIENTS
1 tablespoon baking soda
125ml cup lemon juice
750ml water
1 box (500g) dry elbow pasta
250ml heavy cream
1 bag (500g) shredded cheese
2 tablespoons kosher salt
1 tablespoon ground black pepper
1 tablespoon onion powder
1 tablespoon garlic powder
1 teaspoon mustard powder
200g panko or Italian bread crumbs
1 stick (230g) butter, melted
TIP To make this mac & cheese more kid friendly,
remove onion powder, garlic powder, and mustard
powder, and serve the kids before adding the
bread crumb topping.

10 TenderCrisp 101
DIRECTIONS
INGREDIENTS
125ml water
750g frozen uncooked
chicken wings
2 tablespoons canola oil
60ml Buffalo sauce
1 tablespoon unsalted butter, softened
1 tablespoon brown sugar
1 teaspoon kosher salt
TenderCrisp
™
101
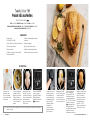
Buffalo Chicken Wings
BEGINNER RECIPE
PREP: 5 MINUTES | TOTAL COOK TIME: 35 MINUTES | MAKES: 4 SERVINGS
APPROX. PRESSURE BUILD: 10 MINUTES | PRESSURE COOK: 5 MINUTES | AIR CRISP: 20 MINUTES
Select PRESSURE and
set to HIGH. Set time to
5 minutes. Select
to begin.
Place Cook & Crisp
TM
Basket in pot, then pour
water into pot. Place
wings in Cook & Crisp
Basket. Assemble the
pressure lid, making
sure the pressure
release valve is in the
SEAL position.
When pressure cooking
is complete, quick release
the pressure by moving
the pressure release valve
to the VENT position.
Carefully remove lid
when unit has finished
releasing pressure.
Pat wings dry with
paper towels and toss
with 2 tablespoons oil
in the basket.
11
Questions? ninjakitchen.com
When cooking is
complete, transfer
wings to the bowl
with Buffalo sauce
and toss to coat.
Serve immediately.
After 10 minutes, open
lid, then lift basket and
shake wings or toss
them with silicone-
tipped tongs. Lower
basket back into
pot and close lid
to resume cooking.
While the wings are
cooking, stir together
Buffalo sauce, butter,
brown sugar, and salt
together in a large
mixing bowl. Stir
well to combine.
Close crisping lid.
Select AIR CRISP,
set temperature to
390°F (200°C), and set
time to 20 minutes.
Select
to begin.

BREAKFAST BISCUITS & GRAVY
PREP: 5 MINUTES | COOK: 30 MINUTES | MAKES: 5 SERVINGS
INTERMEDIATE RECIPE
DIRECTIONS
1 Select SEAR/SAUTÉ and set to 5 (high). Select
to begin. Allow to preheat for 3 minutes.
2 After 3 minutes, add the sausage, salt, and
pepper to the pot. Allow meat to brown for
5 minutes, breaking apart sausage with a
wooden spoon.
3 After 5 minutes, add butter and melt completely,
then add flour and stir to combine. Cook for
2 minutes, then whisk in milk. Bring to a simmer,
then cook for 5 minutes, or until thickened.
4 Separate the rounds of biscuit dough and place
them on top of the gravy, spacing evenly.
5 Crack one egg into a small bowl. Pour egg on
top of the biscuits. Repeat with remaining eggs,
spacing evenly.
6 Select BAKE/ROAST, set temperature to 325°F
(165°C), and set time to 15 minutes. Select
to begin.
7 After 10 minutes, check eggs for desired doneness.
Continue cooking for up to 5 additional minutes,
as desired.
8 Cooking is complete when eggs are set and
biscuits are cooked through. Allow to cool
slightly before serving.
INGREDIENTS
1 package (375g) uncooked ground
breakfast sausage
1 tablespoon kosher salt
2 teaspoons ground black pepper
2 tablespoons unsalted butter
4 tablespoons all-purpose flour
750ml whole milk
1 tube (500g) refrigerated biscuit dough
5 eggs
Breakfast
13
Questions? ninjakitchen.com

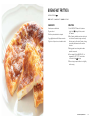
BREAKFAST FRITTATA
PREP: 5 MINUTES | COOK: 12 MINUTES | MAKES: 6–8 SERVINGS
INTERMEDIATE RECIPE
DIRECTIONS
1 Select SEAR/SAUTÉ and set to 4 (medium-
high). Select to begin. Allow to preheat
for 3 minutes.
2 After 3 minutes, add butter and onion to pot and
cook for about 3 minutes, stirring occasionally.
Add onion and cook for about 3 minutes, stirring
occasionally. Add ham and cook for another
2 minutes.
3 Add eggs and cheese, stirring with a rubber
spatula to incorporate.
4 Close crisping lid. Select BAKE/ROAST, set
temperature to 350°F (175°C), and set time
to 7 minutes. Select to begin.
5 When cooking is complete, allow to cool slightly
before serving.
INGREDIENTS
2 tablespoons unsalted butter
35g onion, diced
250ml honey ham, shredded or chopped
7 eggs, lightly beaten with 3 tablespoons water
110g Swiss or Gruyère cheese, shredded or diced
15
Questions? ninjakitchen.com

Lunch & Dinner
17
Questions? ninjakitchen.com
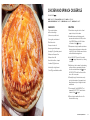
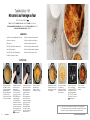
SWEDISH MEATBALLS
PREP: 10 MINUTES | TOTAL COOK TIME: 37 MINUTES | MAKES: 4–6 SERVINGS
PRESSURE BUILD: 6 MINUTES | PRESSURE COOK: 3 MINUTES | AIR CRISP: 8 MINUTES
INTERMEDIATE RECIPE
DIRECTIONS
1 In a large bowl, combine beef, pork, onion,
bread crumbs, egg, salt, pepper, garlic, nutmeg,
and allspice. Form mixture into about 20
2.5cm meatballs.
2 Select SEAR/SAUTÉ and set to 4 (medium-
high). Select to begin. Allow to preheat for
3 minutes.
3 After 3 minutes, add oil and half the meatballs
to the pot. Cook meatballs for 8 to 10 minutes,
turning occasionally until all sides are browned.
Transfer browned meatballs to plate; set aside.
4 Repeat step 3 with remaining meatballs.
5 Add 2 tablespoons butter, beef stock, and egg
noodles to pot. Assemble pressure lid, making
sure the pressure release valve is in the SEAL
position. Select PRESSURE and set to HIGH. Set
time to 3 minutes. Select to begin.
6 When pressure cooking is complete, quick
release the pressure by moving the pressure
release valve to the VENT position. Carefully
remove lid when unit has finished releasing
pressure. Add sour cream, remaining 2
tablespoons butter, and browned meatballs to
the pot. Stir gently to combine.
7 Close crisping lid. Select ROAST, set temperature
to 350°F (175°C), and set time to 10 minutes.
Select to begin.
8 When cooking is complete, garnish with parsley
and serve immediately.
INGREDIENTS
250g uncooked ground beef
250g pound uncooked ground pork
1 medium yellow onion, peeled, grated
50g panko bread crumbs
1 egg, lightly beaten
1
/2 teaspoon kosher salt
1
/2 teaspoon ground black pepper
1
/2 teaspoon garlic powder
1
/2 teaspoon ground nutmeg
1
/2 teaspoon ground allspice
1 tablespoon extra virgin olive oil
1
/2 stick (115g) unsalted butter, divided
500g beef broth
1
/2 package (250g) dry wide egg noodles
125ml or 120g sour cream
1 tablespoon fresh parsley, chopped, for garnish

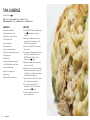
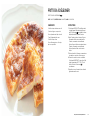
TUNA CASSEROLE
PREP: 15 MINUTES | TOTAL COOK TIME: 22 MINUTES | MAKES: 4–6 SERVINGS
APPROX. PRESSURE BUILD: 6 MINUTES | PRESSURE COOK: 3 MINUTES | AIR CRISP: 8 MINUTES
INTERMEDIATE RECIPE
DIRECTIONS
1 Select SEAR/SAUTÉ and set to 4 (medium-high).
Select to begin. Allow to preheat for
3 minutes.
2 After 3 minutes, add mushrooms, onion, red
pepper, thyme, salt, and pepper to pot. Cook
for 5 minutes, stirring occasionally.
3 Add soup, broth, half & half, noodles, and tuna.
Stir to combine.
4 Assemble pressure lid, making sure the pressure
release valve is in the SEAL position. Select
PRESSURE and set to HIGH. Set time to
3 minutes. Select to begin.
5 Meanwhile, in a small bowl, stir together bread
crumbs and oil. Set aside.
6 When pressure cooking is complete, quick release
the pressure by moving the pressure release valve
to the VENT position. Carefully remove lid when
unit has finished releasing pressure.
7 Add peas and cheese to the pot. Stir to combine.
Top evenly with bread crumb mixture.
8 Close crisping lid. Select AIR CRISP, set
temperature to 400°F (205°C), and set time
to 8 minutes. Select to begin.
9 Cooking is complete when top is golden
brown. Serve immediately.
INGREDIENTS
2 tablespoons unsalted butter
250g button mushrooms, sliced
1 medium yellow onion, peeled, diced
1
/2 red bell pepper, diced
1 teaspoon dried thyme
1 teaspoon kosher salt
1
/2 teaspoon ground black pepper
180ml condensed cream of mushroom soup
375ml chicken broth
250ml half & half
1
/2 package (250g) dry wide egg noodles
3 cans (125g each) albacore tuna, drained
50g seasoned bread crumbs
1 tablespoon extra virgin olive oil
65g frozen peas
55g shredded Monterey Jack cheese
18 Lunch & Dinner

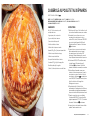
CHICKEN AND SPINACH CASSEROLE
PREP: 15 MINUTES | TOTAL COOK TIME: 28 MINUTES | MAKES: 4–6 SERVINGS
APPROX. PRESSURE BUILD: 7 MINUTES | PRESSURE COOK: 22 MINUTES | BAKE/ROAST: 6 MINUTES
BEGINNER RECIPE
DIRECTIONS
1 Place chicken, onion, garlic, stock, salt, and
pepper in the pot; stir to combine.
2 Assemble the pressure lid, making sure the
pressure release button is in the SEAL position.
Select PRESSURE and set to HIGH. Set time
to 20 minutes. Select to begin.
3 When pressure cooking is complete, quick release
the pressure by moving the pressure release valve
to the VENT position. Carefully remove lid when
unit has finished releasing pressure.
4 Select SEAR/SAUTÉ and set to 3 (medium).
Select to begin. Add spinach to pot, stirring
to combine.
5 Add flour to pot; stir to combine. Continue stirring
until sauce thickens, approximately 2 minutes.
Once the sauce has thickened, select to turn
off SEAR/SAUTÉ. Add dill, scallions, and feta
cheese. Stir to incorporate.
6 Place phyllo dough, 2 sheets at a time, evenly
over the chicken mixture. Using a pastry brush,
liberally brush each layer of dough sheets with
melted butter.
7 Close crisping lid. Select BAKE/ROAST, set
temperature to 350°F (175°C), and set time to
6 minutes. Select to begin.
8 When cooking is complete, allow to cool for
5 minutes before serving.
INGREDIENTS
750g uncooked boneless,
skinless chicken thighs
1 yellow onion, peeled, diced
3 cloves garlic, peeled, minced
125ml chicken stock
2 teaspoons kosher salt
1 teaspoon ground black pepper
1 package (500g) fresh baby spinach
1 tablespoon all-purpose flour
1 tablespoon fresh dill
1 bunch fresh scallions, chopped
1 container (185g) feta cheese
6 sheets phyllo dough, thawed
1
/2 stick (115g) unsalted butter, melted
21
Questions? ninjakitchen.com

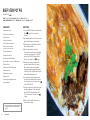
BEEF STEW POT PIE
PREP: 15 MINUTES | TOTAL COOK TIME: 36 MINUTES | MAKES: 6 SERVINGS
APPROX. PRESSURE BUILD: 6 MINUTES | PRESSURE COOK: 20 MINUTES | AIR CRISP: 10 MINUTES
BEGINNER RECIPE
DIRECTIONS
1 Select SEAR/SAUTÉ and set to 4 (medium-high).
Select
to begin. Allow to preheat for
3 minutes.
2 After 3 minutes, add oil, onions, celery, carrots, and
garlic. Sauté for 5 minutes, or until softened.
3 Add meat and cook until browned on all sides,
about 3 additional minutes.
4 Add seasonings, potatoes, stock, and
Worcestershire. Assemble pressure lid, making
sure the pressure release valve is in the SEAL
position. Select PRESSURE and set to HIGH.
Set time to 20 minutes. Select
to begin.
5 When pressure cooking is complete, allow
pressure to naturally release for 10 minutes.
After 10 minutes, quick release remaining
pressure by moving the pressure release valve
to the VENT position. Carefully remove lid when
unit has finished releasing pressure.
6 In a separate bowl, whisk together milk and
cornstarch until combined. Slowly incorporate
into stew. Allow sauce to thicken, then select
to turn off SEAR/SAUTÉ.
7 Lay the pie dough over the stew evenly, tucking
the edges underneath. Close the crisping lid.
Select AIR CRISP, set temperature to 400°F
(205°C) and set time to 7 minutes. Select
to begin.
8 When cooking is complete, allow to rest for
5 minutes before serving.
22 Lunch & Dinner
INGREDIENTS
2 tablespoons olive oil
1 yellow onion, peeled, diced
1 rib celery, diced
2 carrots, peeled, diced
2 cloves garlic, peeled, minced
750g uncooked stew meat
or sirloin, cut in 1-inch cubes
1 teaspoon dried thyme
2 teaspoons kosher salt
1 teaspoon ground black pepper
2 russet potatoes, peeled, cut in 12mm cubes
250ml beef stock
2 tablespoons Worcestershire sauce
2 tablespoons milk
2 tablespoons cornstarch
65g frozen peas
1 store bought refrigerated pie crust,
room temperature
TIP For an extra-golden crust, brush before and during
cooking with 60ml heavy cream mixed with an
egg yolk.

25
Questions? ninjakitchen.com
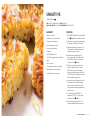
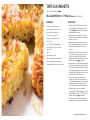
SPAGHETTI PIE
PREP: 10 MINUTES | COOK: 15 MINUTES | MAKES: 8 SERVINGS
APPROX. PRESSURE BUILD: 10 MINUTES | PRESSURE RELEASE: NATURAL 10 MINUTES
INTERMEDIATE RECIPE
DIRECTIONS
1 Select SEAR/SAUTÉ and set to 4 (medium-high).
Select to begin. Allow to preheat for 2 minutes.
2 Add canola oil, onion, garlic, salt, and pepper and
cook, stirring occasionally, for 2 to 3 minutes.
3 Add ground beef and stir to incorporate. Cook
for 3 minutes, then add water, marinara sauce,
and pasta. Stir again to combine.
4 Assemble pressure lid, making sure the
pressure release valve is in the SEAL position.
Select PRESSURE and set to LOW. Set time
to 2 minutes. Select to begin.
5 When pressure cooking is complete, allow
pressure to naturally release for 10 minutes.
After 10 minutes, quick release remaining
pressure by moving the pressure release valve
to the VENT position. Carefully remove lid when
unit has finished releasing pressure.
6 In a mixing bowl, combine eggs, ricotta cheese,
110g mozzarella cheese, and 50g Parmesan
cheese. Stir cheese mixture into the pasta.
Then top pasta with remaining mozzarella and
Parmesan cheeses.
7 Close crisping lid. Select AIR CRISP, set
temperature to 375°F (190°C), and set time
to 8 minutes. Select to begin.
8 When cooking is complete, let pie cool for
10 minutes. Garnish with basil before serving.
INGREDIENTS
1 tablespoon canola oil
1 medium yellow onion, peeled, diced
3 cloves garlic, peeled, minced
Kosher salt and pepper, to taste
500g uncooked ground beef
500ml water
1 jar (750g) marinara sauce
/ box (250g) angel hair pasta, broken in half
2 eggs
1 cup ricotta cheese
220g shredded mozzarella cheese, divided
110g grated Parmesan cheese, divided
1 bunch fresh basil, torn, for garnish

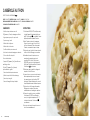
CREAMY SPINACH GRATIN
PREP: 10 MINUTES | TOTAL COOK TIME: 18 MINUTES | MAKES: 6 SERVINGS
APPROX. PRESSURE BUILD: 8 MINUTES | PRESSURE COOK: 1 MINUTE | AIR CRISP: 6 MINUTES
INTERMEDIATE RECIPE
DIRECTIONS
1 Place frozen spinach and water in pot.
2 Assemble the pressure lid, making sure the
pressure release valve is in the SEAL position.
Select PRESSURE and set to LOW. Set time
to 1 minute. Select to begin.
3 When pressure cooking is complete, quick release
the pressure by moving the pressure release
valve to the VENT position. Carefully remove
lid when unit has finished releasing pressure.
4 Transfer spinach to a colander and press to
release as much liquid as possible; set aside.
Wipe out pot.
5 Select SEAR/SAUTÉ and set to 3 (medium).
Select to begin and allow 3 minutes to
preheat. After 3 minutes, add butter and melt.
Once butter is melted, add shallot and garlic.
Cook until softened, about 3 minutes.
6 Select to turn off SEAR/SAUTÉ. Whisk in
cream cheese and milk until cream cheese is
melted and smooth. Stir in drained spinach, salt,
and nutmeg, spreading in an even layer.
7 Sprinkle grated cheese on top of spinach mixture.
8 Close crisping lid. Select AIR CRISP, set
temperature to 400°F (205°C) and set time
to 7 minutes. Select to begin.
9 Cooking is complete when cheese is golden
brown. Allow to cool slightly before serving.
INGREDIENTS
2 bags (500g) frozen spinach
125ml water
2 tablespoons unsalted butter
1 large shallot, peeled, diced
2 cloves garlic, peeled, minced
1
/2 package (125g) cream cheese, softened
125ml whole milk
1
/4 teaspoon kosher salt
1
/4 teaspoon ground nutmeg
110g Swiss or Gruyère cheese, grated
Snacks & Sides
27
Questions? ninjakitchen.com

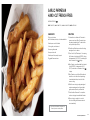
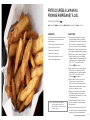
GARLIC PARMESAN
HAND-CUT FRENCH FRIES
PREP: 15 MINUTES | SOAK: 30 MINUTES | COOK: 24–26 MINUTES | MAKES: 4 SERVINGS
INTERMEDIATE RECIPE
DIRECTIONS
1 Soak raw fries in cold water for 30 minutes to
remove excess starch. After 30 minutes, strain
fries and pat completely dry. The drier the fries
are, they better they will crisp.
2 Place fries and 1 tablespoon canola oil in a large
mixing bowl; toss to combine.
3 Place Cook & Crisp™ Basket in pot. Close crisping
lid. Preheat unit by selecting AIR CRISP, setting
the temperature to 360°F (180°C), and setting the
time to 5 minutes. Select to begin.
4 After 5 minutes, open lid and add fries to basket.
Select AIR CRISP, set temperature to 180°C
(360°F), and set time to 26 minutes. Select
to begin.
5 After 12 minutes, open lid, then lift basket and
shake fries or toss with silicone-tipped tongs.
Lower basket back into pot and close lid to
resume cooking.
6 While fries are cooking, in a large mixing bowl,
combine remaining canola oil, minced garlic,
garlic powder, salt, parsley, and Parmesan.
7 Check fries after 24 minutes. For crispier fries,
continue cooking up to an additional 2 minutes.
8 When cooking is complete, toss cooked
fries in bowl with garlic-Parmesan mix and
serve immediately.
INGREDIENTS
500g russet potatoes
(about 3 medium potatoes), cut in thin matchsticks
2 tablespoons canola oil, divided
2 cloves garlic, peeled, minced
1 teaspoon garlic powder
1 teaspoon kosher salt
2 tablespoons fresh parsley, chopped
25g grated Parmesan cheese
TIP For best results (and best-looking fries), use
a French fry cutter to cut the potatoes.
29
Questions? ninjakitchen.com

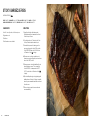
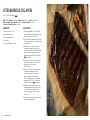
STICKY BARBECUE RIBS
PREP: 5 MINUTES | MARINATE: 1–8 HOURS | TOTAL COOK TIME: 45 MINUTES | MAKES: 4–6 SERVINGS
APPROX. PRESSURE BUILD: 12 MINUTES | PRESSURE COOK: 19 MINUTES | AIR CRISP: 14 MINUTES
INTERMEDIATE RECIPE
DIRECTIONS
1 Liberally rub the ribs with barbecue rub.
Refrigerate and allow to marinate for at least
1 hour and up to 8 hours.
2 Pour the beer into pot. Place ribs in the Cook
& Crisp
TM
Basket, and place basket in pot.
3 Assemble the pressure lid, making sure the
pressure release valve is in the SEAL position.
Select PRESSURE and set to HIGH. Set time
to 19 minutes. Select to begin.
4 When pressure cooking is complete, quick
release pressure by moving the pressure release
valve to the VENT position.
5 Remove pressure cooking lid and liberally coat
ribs with barbecue sauce. Close crisping lid.
Select AIR CRISP, set temperature to 400°F
(205°C), and set time to 14 minutes. Select
to begin.
6 Flip ribs halfway through cooking, basting with
additional sauce if desired. Cooking is complete
when they are caramelized and have a nice bark
from the sauce.
7 When cooking is complete, remove ribs and
serve immediately.
INGREDIENTS
1 rack St. Louis-style ribs, cut in 2-bone pieces
42g barbecue rub
250ml beer
500ml barbecue sauce, divided
30 Snacks & Sides

33
Questions? ninjakitchen.com
AIR-FRIED CAKE BATTER COOKIES
PREP: 10 MINUTES | FREEZE: 1–2 HOURS | COOK: 15 MINUTES | MAKES: 4 SERVINGS
INTERMEDIATE RECIPE
DIRECTIONS
1 Liberally coat a sheet pan with cooking spray;
set aside.
2 In a bowl, whisk together the cake mix, egg
whites, whole egg, oil, and water until well
incorporated and all cake mix has dissolved.
3 Working one at a time, dunk cookies in cake
batter until coated. Quickly transfer to prepared
sheet pan. Repeat with remaining cookies.
4 Freeze coated cookies up to 2 hours, until cake
batter is tacky and beginning to solidify.
5 Place Cook & Crisp™ Basket in pot. Preheat unit
by selecting AIR CRISP, setting temperature to
200°C (390°F), and setting time to 5 minutes.
6 Once unit has preheated, spray basket with
cooking spray. Quickly place 4 cookies in basket.
7 Select AIR CRISP, set temperature to 390°F
(200°C), and set time to 20 minutes. Select
to begin.
8 After 5 minutes, remove cookies from basket.
Repeat with remaining cookies.
9 When cooking is complete, serve immediately.
Cookies are best served warm.
INGREDIENTS
Cooking spray
1 box (500g) white cake mix
3 egg whites
1 whole egg
125ml canola oil
250ml water
12 chocolate sandwich cookies
TIP To make these even more fun, add up to
250ml of rainbow sprinkles in step 1.
Desserts

FROZEN CHERRY PIE
PREP: 10 MINUTES | TOTAL COOK TIME: 30 MINUTES | MAKES: 4–6 SERVINGS
APPROX. PRESSURE BUILD: 5 MINUTES | PRESSURE COOK: 10 MINUTES | BAKE/ROAST: 15 MINUTES
INTERMEDIATE RECIPE
DIRECTIONS
1 In a large mixing bowl, stir together the cherries,
125ml water, brown sugar, lemon juice, and
cornstarch. Pour into the Ninja® multi-purpose
pan* (or an 8-inch baking pan); set aside.
2 Roll a sheet of aluminum foil to create a ring about
6 inches in diameter; place ring in center of pot.
3 Pour remaining 375ml water into pot. Cover
pan with aluminum foil and place it inside pot,
on top of foil circle.
4 Assemble pressure lid, making sure the
pressure release valve is in the SEAL position.
Select PRESSURE and set to HIGH. Set time
to 10 minutes. Select to begin.
5 When pressure cooking is complete, quick release
the pressure by moving the pressure release valve
to the VENT position. Carefully remove lid when
unit has finished releasing pressure.
6 Remove foil cover from pan and top cherries with
the pie crust. Fold corners of the crust to ensure
it sits directly on top of the pan. Cut a slit in the
center of the crust to vent, then brush with egg
and sprinkle evenly with raw sugar.
7 Close crisping lid. Select BAKE/ROAST, set
temperature to 375°F (190°C), and set time to
15 minutes. Select to begin.
8 When cooking is complete, allow pie to cool
completely before serving.
INGREDIENTS
1 bag (1kg) frozen cherries
500ml water, divided
4 tablespoons brown sugar
1 tablespoon lemon juice
4 tablespoons cornstarch
1 refrigerated store-bought pie crust
1 egg, lightly beaten
2 tablespoons raw sugar
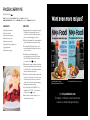
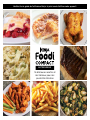
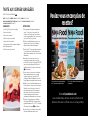
Visit ninjacookbooks.com
f
or a library of ocially licensed Foodi-themed
cookbooks created and designed by Ninja.
Want even more recipes?
Created by Ninja's Culinary
Marketing & Innovation Director
100 fast and flavorful one-pot recipes

36
37
Questions? ninjakitchen.com
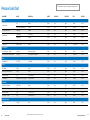
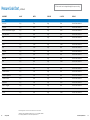
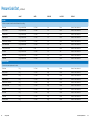
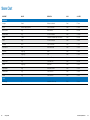
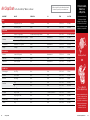
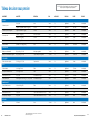
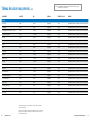
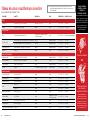
Cooking Charts
INGREDIENT AMOUNT
PREPARATION
WATER ACCESSORY PRESSURE TIME RELEASE
POULTRY
Chicken breasts
1kg Bone in 250ml N/A High 15 mins Quick
6 small or 4 large (about 1kg) Boneless 250ml N/A High 8–10 mins Quick
Chicken breasts (frozen) 4 large (1kg) Boneless 250ml N/A High 25 mins Quick
Chicken thighs
8 thighs (2kgs) Bone in/skin on 250ml N/A High 20 mins Quick
8 thighs (1kg) Boneless 250ml N/A High 20 mins Quick
Chicken, whole Up to 2.5kg Bone in/legs tied 250ml Cook & Crisp™ Basket High 25–30 mins Quick
Turkey breast 1 breast (3–4kg) Bone in 250ml N/A High 40–50 mins Quick
GROUND MEAT
Ground beef, pork, or turkey 500g–1kg Ground (not in patties) 125ml N/A High 5 mins Quick
Ground beef, pork, or turkey (frozen) 500g–1kg Frozen, ground (not in patties) 125ml N/A High 20–25 mins Quick
RIBS
Pork baby back 1.25–1.75kg Cut in thirds 250ml N/A High 20 mins Quick
ROASTS
Beef brisket 1.5–2kg Whole 250ml N/A High 1
1
/2 hrs Quick
Boneless beef chuck-eye roast 1.5–2kg Whole 250ml N/A High 1
1
/2 hrs Quick
Boneless pork butt 2kg Season as desired 250ml N/A High 1
1
/2 hrs Quick
Pork tenderloin 2 tenderloins (500-750mg each) Season as desired 250ml N/A High 3–4 mins Quick
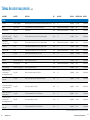
STEW MEAT
Boneless beef short ribs 6 ribs (1.5kg) Whole 250ml N/A High 25 mins Quick
Boneless leg of lamb 1.5kg Cut in 2.5cm pieces 250ml N/A High 30 mins Quick
Boneless pork butt 1.5kg Cut in 2.5cm pieces 250ml N/A High 30 mins Quick
Chuck roast, for stew 1kg Cut in 2.5cm pieces 250ml N/A High 25 mins Quick
HARD-BOILED EGGS
Eggs† 1–12 eggs None 125ml N/A High 4 mins Quick
Pressure Cook Chart
TIP Use hot water for pressure cooking to build pressure quicker.
†Remove immediately when complete and place in ice bath.
La page est en cours de chargement...
La page est en cours de chargement...
La page est en cours de chargement...
La page est en cours de chargement...
La page est en cours de chargement...
La page est en cours de chargement...
La page est en cours de chargement...
La page est en cours de chargement...
La page est en cours de chargement...
La page est en cours de chargement...
La page est en cours de chargement...
La page est en cours de chargement...
La page est en cours de chargement...
La page est en cours de chargement...
La page est en cours de chargement...
La page est en cours de chargement...
La page est en cours de chargement...
La page est en cours de chargement...
La page est en cours de chargement...
La page est en cours de chargement...
La page est en cours de chargement...
La page est en cours de chargement...
La page est en cours de chargement...
La page est en cours de chargement...
La page est en cours de chargement...
La page est en cours de chargement...
La page est en cours de chargement...
La page est en cours de chargement...
La page est en cours de chargement...
La page est en cours de chargement...
La page est en cours de chargement...
La page est en cours de chargement...
La page est en cours de chargement...
La page est en cours de chargement...
-
 1
1
-
 2
2
-
 3
3
-
 4
4
-
 5
5
-
 6
6
-
 7
7
-
 8
8
-
 9
9
-
 10
10
-
 11
11
-
 12
12
-
 13
13
-
 14
14
-
 15
15
-
 16
16
-
 17
17
-
 18
18
-
 19
19
-
 20
20
-
 21
21
-
 22
22
-
 23
23
-
 24
24
-
 25
25
-
 26
26
-
 27
27
-
 28
28
-
 29
29
-
 30
30
-
 31
31
-
 32
32
-
 33
33
-
 34
34
-
 35
35
-
 36
36
-
 37
37
-
 38
38
-
 39
39
-
 40
40
-
 41
41
-
 42
42
-
 43
43
-
 44
44
-
 45
45
-
 46
46
-
 47
47
-
 48
48
-
 49
49
-
 50
50
-
 51
51
-
 52
52
-
 53
53
-
 54
54


Ninja OP101C Inspiration Guide
- Catégorie
- Autocuiseurs
- Taper
- Inspiration Guide
Documents connexes
-
Ninja OP301C Inspiration Guide
-
-
-
Ninja SP101C Inspiration Guide
-
-
-
-
-
-