Krups XP201050 Manuel utilisateur
- Catégorie
- Cafetières
- Taper
- Manuel utilisateur

www.krups.com
06
02
7

05
11
18
L
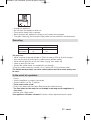
F088
XS1000
h
f
e
d
a
b
c
i
g
E
F
D
G
H
I
M
B
A
C
B
A
C
CafféEspresso
CafféEspresso
P
O
j
N
J
K
1 cup

IMPORTANT SAFEGUARDS
When using electrical appliances, basic safety precautions should always be
followed to reduce the risk of fire, electric shock and/or injury to persons,
including the following:
1- Read all instructions.
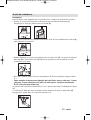
2- Do not touch hot surfaces. Use handles or knobs.
3- To protect against fire, electric shock and injury to persons, do not
immerse cord, plugs or appliance in water or other liquid.
4-
This appliance is not intended for use by persons (including children)
with reduced physical, sensory or mental capacities, or lack of
experience and knowledge, unless they have been given supervision or
instruction concerning use of the appliance by a person responsible for
their safety. Children should be supervised to ensure that they do not
play with the appliance.
5- Unplug from outlet when not in use and before cleaning. Allow to cool
before putting on or taking off parts, and before cleaning the appliance.
6- Do not operate any appliance with a damaged cord in order to avoid a
hazard or plug in after the appliance malfunctions, or has been damaged
in any manner. Return appliance to your nearest authorized KRUPS
Service Center for examination, repair or adjustment (see Limited
Warranty).
7- The use of accessory attachments not recommended by KRUPS may
result in fire, electric shock or injury to persons.
8- Do not use outdoors.
9- Do not let cord hang over edge of table or counter or touch hot surfaces.
10- Do not place on or near a hot gas or electric burner, or in a heated oven.
11- There is a risk of burns if the lid of the coffee maker is removed while the
coffee is brewing.
12- Never pour cold water into the coffee maker tank immediately after the
brewing cycle. Let the appliance cool down before refilling the tank.
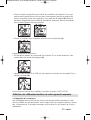
13- If you are unable to use the filter cartridges recommended by Krups, only
pour water and the descaling solutions specified in the manual into the
espresso and coffee maker water tanks.
14- To disconnect, turn the machine “OFF”, then remove plug from wall
outlet.
15- Do not use appliance for other than intended use.
16- Use extreme caution when dispensing hot steam.
17- Appliance for household use only, do not immerse in water.
4 KRUPS
English
XP2000US.qxd:XP2000US.qxd10/10/0814:15Page4

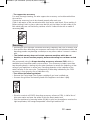
• Appliance with Glass carafe.
A. The carafe is designed for use only with this appliance. It must never be
used on a range top.
B. Do not set a hot carafe on a wet or cold surface.
C. Do not use a cracked carafe or a carafe having a loose or weakened
handle.
D. Do not clean carafe with harsh cleansers, steel wool pads, or other
abrasive material.
SAVE THESE INSTRUCTIONS
CAUTION
• This appliance is for household use only. Any servicing other than routine
cleaning and user maintenance should be performed by authorized
KRUPS service personnel only (see Limited Warranty).
• Do not immerse base in water.
• To reduce the risk of fire or electric shock, do not remove the base of the
machine. There are no user serviceable parts inside. Repairs should be
performed by authorized KRUPS service personnel only.
SHORT CORD INSTRUCTIONS
regarding your Cord Set :
A. A short power-supply cord is provided to reduce risks resulting from
becoming entangled in or tripping over a longer cord.
B. Longer extension cords are available and may be used if care is exercised
in their use.
C. If a long extension cord is used, (1) the marked electrical rating of the
extension cord should be at least as great as the electrical rating of the
appliance, (2) the longer cord should be arranged so that it will not drape
over the counter top or table top where it can be pulled on by children or
tripped over.
This appliance has a polarized plug (one blade is wider than the other). To
reduce the risk of electric shock, this plug is intended to fit into a polarized
outlet only one way. If the plug does not fit fully in the outlet, reverse the
plug. If it still does not fit, contact a qualified electrician. Do not attempt
to modify the plug in any way.
5 KRUPS
XP2000US.qxd:XP2000US.qxd10/10/0814:15Page5

Your new Krups espresso machine has been constructed to make café quality espres-
so, cappuccino, and latte at home.
Espresso is a style of coffee that comes from a unique process, not a particular type of
coffee bean. Hot water, under pressure, is passed through tightly packed, finely ground
coffee. The resulting liquid is rich, dark, and extremely flavorful: the concentrated
essence of the coffee bean.
Espresso is not served in regular coffee cups, but in small 1.5-oz «shots». The perfect
espresso shot is topped by beautiful, thick, golden foam known as crema, a product of
the natural oils in the coffee bean, and the source of its rich flavor and aroma.
It is important to note that your espresso coffee must be both well roasted coffee and
correctly ground. If you cannot buy ground espresso coffee, use a coffee grinder to
grind the beans. The coffee must not be ground too fine. It must be slightly granulated,
with a consistency somewhat between flour and sugar. Too fine a grind results in bitter,
over-extracted espresso and a risk of blocking the grid of the brewing head and the fil-
ter; too coarse and the espresso will be weak and under-extracted.
In addition to the coffee you use, the other three factors that determine perfect espres-
so results are water, temperature and pressure. Your Krups machine ensures all three
are precision-controlled by expertly designed technology. What you must ensure is that
the water you use is freshly-drawn (so that it has not had time to stagnate in the air),
without any chlorine odor and at a fairly cold temperature.
We recommend that you filter your water using a commercially available KRUPS
Claris - Aqua Filter System cartridge (reference F088) (sold separately).
There are a number of misconceptions surrounding espresso. The first is that espresso
should be bitter and burnt tasting. In fact, the ideal espresso shot should be aromatic,
bittersweet (not bitter) and assertive, with a lingering aftertaste.
The second myth is that drinking espresso will keep you awake all night. Actually,
despite its strong flavor, espresso contains less caffeine than regular coffee; typically
60-80 mg per shot compared to 80-100 mg per cup of regular coffee due to espresso’s
longer, darker roasting.
And finally, many people think that espresso takes too long to prepare. The truth is, as
the name implies, an espresso is intended to be served quickly, without elaborate pre-
paration. As you will discover, your Krups espresso machine has been intuitively desi-
gned for easy use and built for the long term.
6 KRUPS
Espresso Coffee
XP2000US.qxd:XP2000US.qxd10/10/0814:15Page6

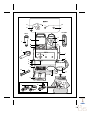
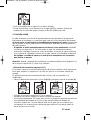
Espresso :
A : Espresso lid with filter basket storage
B : Removable water tank
C : Cup warming tray
D : Brew head
E : Steam nozzle
F : Cappuccino accessory for frothing milk
G : Drip tray grid
H : Drip tray
I : Filter holder
J : 1 & 2 cup ground espresso filter baskets
K : Espresso filter for ESE pods (Easy Serving Espresso)
L : “CLARIS” water filter -Aqua Filter System F088 (accessory sold separately)
M : Measuring spoon
N : Power button for espresso
O : Espresso selector knob
P : Orange temperature control light
Coffee :
a : Coffee maker lid – access to the tank and filter holder
b : Coffee maker water reservoir
c : Filter-holder housing
d : Filter basket with carrying handle
e : Water level indicator for the coffee maker tank
f : Hinged lid of coffee caraffe
g : Coffee caraffe
h : Coffee warming plate
i : ”Duo Filter XS 1000” water filter (accessory sold separately)
j : Coffee power button
To successfully enjoy the full benefits of your new Krups espresso machine, please
carefully read these instructions in their entirety before using this product.
• Place your espresso machine on a stable, heat resistant surface away from water
splashes and sources of heat such as, an electrical heating plate or near a flame.
• Ensure the drip tray and drip tray grid are in place when using the machine.
Espresso
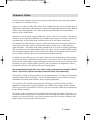
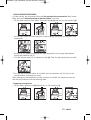
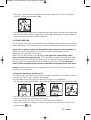
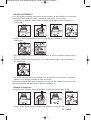
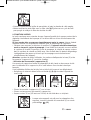
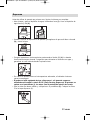
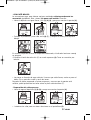
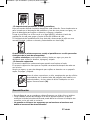
Before using your machine for the first time, clean the system completely as follows:
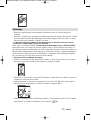
• Open the lid and lift out the water container using the handle (1). Fill the water
container with fresh, cold water (2).
7 KRUPS
Description
Getting Started
Before First Use
XP2000US.qxd:XP2000US.qxd10/10/0814:15Page7

• Place the water container back into the machine by positioning it firmly in the water
container compartment (3) and close the lid.
• Turn on the machine by pressing button (N) (4). The pump will work for 2 seconds to
fill the system with hot water for a cup of hot coffee from the start.
• As soon as the appliance reaches the right temperature, the orange temperature
control light switches off (P).
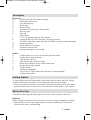
• Your espresso maker is equipped with three filters designed for 1 cup, or for 2
cups of espresso using ground coffee, or for E.S.E. (Easy Serving Espresso)
pods. The first is in the filter holder (I), the other two are found in the
applianceʼs transport packaging.
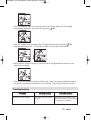
• Choose the filter that you wish to use and place it in the filter holder (5). Store the
2 others in the espresso lid (A).
• Then place the filter holder under the appliance’s brewing head. To ensure that the
filter holder is in the correct position, turn the handle so it points to the left at a
45 degree angle (6), place the filter holder flat against the brewing head, then turn
the handle towards the right (7) as far as it can go.
8 KRUPS
Espresso
1
2
Espresso
3
CafféEspresso
4
5
XP2000US.qxd:XP2000US.qxd10/10/0814:15Page8

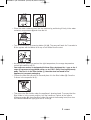
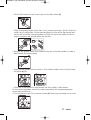
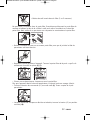
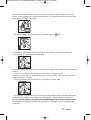
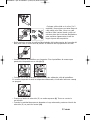
• Place a container, as large as possible, beneath the filter holder (8).
The machine is ready to operate.
• By turning the selector knob (O) to the right to espresso mode; the water will flow
through the pipes of the appliance (9).
• Let approximately 8 oz (250 ml) flow through, then turn the selector knob (O) back to
the central position (10).
To start the coffee maker side, see the FILTER COFFEE section.
1. MAKING ESPRESSO
The appliance will pre-brew the espresso before making each cup in order to bring out
the full flavor for a satisfying cup of coffee. The pump will work for 3 seconds, stop for
3 seconds, then continue with the cycle until the end of the process.
9 KRUPS
Using the various functions of your espresso machine
Espresso
6
Espresso
7
8
Espresso
9
Espresso
10
XP2000US.qxd:XP2000US.qxd10/10/0814:15Page9

. USING GROUND ESPRESSO
For best results, we recommend that you first pre-heat the accessories (filter holder,
filters and cups) without putting in ground coffee. To do this:
• Fill the water container with fresh, cold water (1) (2) (3) and turn on the machine (4).
• Put the filter holder and an empty filter in place (6) (7), and place the espresso cups
underneath.
• As soon as the appliance reaches the right temperature, the orange temperature
control light switches off (P).
• Turn the selector knob (O) to espresso mode (9). Take the pre-brewing into account.
• The cups will fill with hot water. Once filled, turn the selector knob (O) back to the
central position and empty the cups.
After making your first espresso and the machine is warmed, the espresso cups can
then be pre-heated on the cup warming plate.
. Preparing an espresso:
• Fill the water container (1) (2) (3) and turn on the machine (4).
10 KRUPS
Espresso
1
2
Espresso
3
CafféEspresso
4
Espresso
6
Espresso
7
Espresso
9
Espresso
1
2
Espresso
3
CafféEspresso
4
XP2000US.qxd:XP2000US.qxd10/10/0814:15Page10

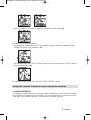
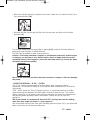
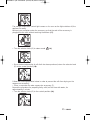
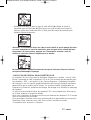
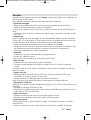
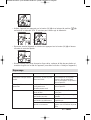
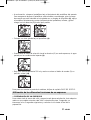
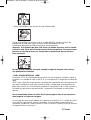
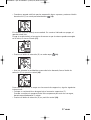
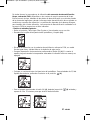
• Put the filter basket for one or two cups into the filter holder (5).
• Place some ground coffee in the filter (1 or 2 measuring scoops). Do Not Tamp the
coffee into the coffee filter. Fill the ground coffee to the top of the filter handle and
use the flat end of the measuring spoon to Polish the top of the coffee but do not
tamp or compress the ground coffee into the filter.
• Remove any ground coffee from around the top rim of the filter handle to create a
good seal to the brewing head.
• Insert the filter holder into the machine. Turn the filter holder until it is firmly locked
into place (6) (7).
• Place one or two espresso cups beneath the filter holder’s coffee outlets.
As soon as the appliance reaches the right temperature, the orange temperature
control light switches off.
• Turn the selector knob (O) to espresso mode (9). Take the pre-brewing into account.
11 KRUPS
5
x1
=
=
x2
11
12
Espresso
6
Espresso
7
Espresso
9
XP2000US.qxd:XP2000US.qxd10/10/0814:15Page11

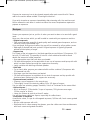
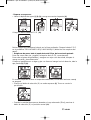
• When the desired quantity of espresso has been made, turn the selector knob (O) to
the central position (10).
• Remove the filter holder and the filter from the machine and take out the coffee
grounds (14).
Put the filter holder with the empty filter in place (6) (7) and push the brew button to
purge and clean the filter of coffee sediment.
The filter can be refilled to make more espressos.
Caution: if the water container is empty or positionned incorrectly and the pump
is running, you will hear a very distinct noise, which is louder than the normal
operating sound. If this happens, press the start/stop switch (4). Check the water
container and refill as needed.
Never let the machine run when the water container is empty as this can damage
the pump.
. USING THE SPECIAL “ E.S.E. “ FILTER
The E.S.E. system was designed for making Italian-style “espresso ristreto”
(squeezed). The amount of coffee is 35 ml and the water should take 20 seconds to
run through.
"ESE", which stands for "Easy Serving Espresso", is a selected measure of coffee,
ground and pressed between two filter papers making it ready for use. This system
makes it easy for you to prepare your espresso because you avoid the measurement
and tamping down operations and it also makes it easier for you to clean the
appliance.
We do not intend, or recommend, that the E.S.E. servings be used for making
more then one single serving or a “long espresso”.
We recommend that you take care when handling and storing the E.S.E. pre-portioned
pods so that they do not become deformed.
12 KRUPS
Espresso
10
14
CafféEspresso
4
XP2000US.qxd:XP2000US.qxd10/10/0814:15Page12

For best results, we recommend that you pre-heat the accessories (filter holder, filter
basket and cups) without any coffee. To do this, see section entitled “Espresso
Making” above.
. Preparing an espresso:
• Fill the water tank (1) (2) (3) and turn on the machine (4).
Positioning the E.S.E. pod (18).
Tear excess paper from pod at perforated edge. Place the E.S.E. pod with the RED
MARKING FACE DOWN (bend the paper corners down) in the E.S.E. filter holder fitted
with its own filter.
• Take care to put all the paper inside the filter basket to prevent water dripping.
Placing the E.S.E. pod correctly will create a richer, thicker crema.
Locking the handle tightly and properly will also help avoid leakage from the filter
holder and ensure a better brewing cycle.
Place the filter holder inside the brewing head and firmly turn the handle as far right as
possible (6) (7) (8).
As soon as the appliance reaches the right temperature, the orange temperature
control light switches off.
• Turn the selector knob (O) to espresso mode (9). Take the pre-brewing into account.
13 KRUPS
Espresso
1
2
Espresso
3
CafféEspresso
4
18
Espresso
6
Espresso
7
8
Espresso
9
XP2000US.qxd:XP2000US.qxd10/10/0814:15Page13

• When the desired quantity of espresso has been made (35 ml), turn the selector
knob (O) to the central position (10).
• Remove the filter holder from the brewing head and throw away the used coffee pod.
• Put the filter holder with the empty filter in place (6) (7) and push the brew button to
purge and clean the filter of coffee sediment.
2. STEAM FUNCTION
The thumping noise which occurs while steam is being produced comes from the inter-
mittent regulation of the pump and has no effect on the proper working of the machine.
If you wish to make an espresso immediately after using the steam function, the
appliance must first be allowed to cool down in order to achieve the correct
temperature for preparing an espresso.
When you turn the selector to the O setting, the appliance automatically cools
down, launching 3 pumping cycles. The cold water pumped in this way cools down
the heating system. During the pumping cycles, the excess steam contained in the
heating system is released along with hot water into the drip tray. The release of
steam and the accompanying noise are required for the appliance to cool down.
Caution: during and after use, the metal parts of the nozzle (E) and the cappuccino
accessory (F) are very hot.
. Using the Cappuccino accessory (F)
The cappuccino accessory makes it easy to produce hot milk or frothy milk for making
a cappuccino, latte or hot chocolate, for example.
It is preferable to use very cold, very fresh, milk (kept in the refrigerator).
• Fill the water container with fresh, cold water (1) (2) (3) and turn on the machine (4).
• Put the cappuccino accessory in place on the steam nozzle.
• Place a cup under the cappuccino accessory.
• Pour about 30 oz (1/2 cup or 100 ml) of cold milk into a container.
• When your appliance is ready to make an espresso, turn the selector knob (O) to
preheat mode (15).
14 KRUPS
Espresso
10
Espresso
1
2
Espresso
3
CafféEspresso
4
XP2000US.qxd:XP2000US.qxd10/10/0814:15Page14

The orange temperature control light comes on. As soon as the light switches off, the
appliance is ready.
Next put your container under the accessory so that the end of the accessory is
plunged into the milk, without touching the bottom (17).
• Turn the selector knob (O) to steam mode (16).
• Once the desired quantity of milk froth has been produced, return the selector knob
(O) to the central position (10).
Follow the cleaning operation below in order to prevent the milk from drying on the
cappuccino accessory:
• Place a cup under the auto cappuccino accessory (F).
Repeat the procedure for preparing frothy milk, but this time with water, for
approximately 1 minute.
• Turn the selector knob (O) to the central position (10).
15 KRUPS
15
Espresso
Espresso
10
17
16
2
Espresso
Espresso
10
XP2000US.qxd:XP2000US.qxd10/10/0814:15Page15

Cappuccino accessory has to be cleaned properly after each use with milk. Please
refer to the section below entitled "Cleaning the machine".
If you wish to make an espresso immediately after steaming milk, the machine must
first be allowed to cool down in order to achieve the correct temperature required to
prepare an espresso.
Savour your espresso just as you like it: when you want to relax or to round off a good
meal.
Here are a few recipes which you will be able to create with your espresso machine.
. Original espresso
• Take one measuring spoonful of good quality well roasted ground espresso, and run
it directly into the pre-heated cup.
If you use good, finely ground coffee, the cup will be crowned by a fine golden crema.
• Add sugar if desired and treat yourself. Original espresso is typically prepared
without milk but plenty of sugar.
. Cappuccino
For a state of the art cappuccino, the ideal quantities are as follows: 1/3 espresso, 1/3
hot milk, 1/3 milk froth. The quantity of hot milk + froth obtained should be about
double the amount of coffee prepared.
• Use appropriate cups that have been pre-heated.
• Fill them with espresso to the equivalent of one cup of espresso and top up with milk
which has been frothed up using the cappuccino accessory.
• Lastly, sprinkle with drinking chocolate powder.
. Café latte
• For a classic latte, prepare your steamed milk and the combine 1/3 espresso with
2/3 steamed hot milk.
• Use large cups that have been pre-heated.
• Fill them with espresso to equivalent of one shot of espresso and top up with milk
that have been frothen using the cappuccino accessory.
. Espresso-based cocktail *
• Prepare a cup of espresso in the normal way.
• Then slightly ‘correct’ the taste by adding 1/4 or 1/2 glass of cognac.
You can also use anisette, grappa, Sambuco, Kirsch or Cointreau for the same effect.
. Coffee Liqueur *
• Mix in an empty 0.75 litre bottle: 3 cups of espresso, 250 g brown cane sugar,
1/2 litre cognac or Kirsch.
• Leave the mixture to soak for at least 2 weeks.
You will then have a delicious liqueur, especially for coffee lovers.
. Iced coffee à lʼitalienne
4 vanilla ice cubes, 2 cups of cold sugared espresso, 1/8 litre milk, fresh cream, grated
chocolate.
• Mix the cold espresso with milk.
• Distribute the ice cubes among the glasses, pour the coffee over them and decorate
with fresh cream and grated chocolate.
16 KRUPS
Recipes
XP2000US.qxd:XP2000US.qxd10/10/0814:15Page16

. Friesian coffee *
• Add a small glass of rum to a sugared cup of espresso.
• Decorate with a good layer of fresh cream and serve.
. Espresso flambé *
2 cups of espresso, 2 small glasses of cognac, 2 teaspoonfuls of brown sugar, fresh
cream.
• Pour the cognac into heat-resistant glasses, heat and flame.
• Add sugar, mix, pour the coffee and decorate with fresh cream.
If you like, the espresso can also be diluted with a little boiling water.
(*: The abuse of alcohol is dangerous to your health).
- Never wash your espresso machine accessories in the dishwasher.
After use, the water tank must be emptied.
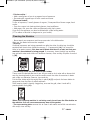
. Drip tray
If several espressos are being prepared one after the other, the drip tray should be
emptied from time to time (about once every 7 - 8 espressos) (19). It is normal for
there to be water present; this does not indicate that there is a leak, but that your
machineʼs thermoblock is being purged. If necessary, clean the drip tray and drip
tray grid with water and a little non-abrasive cleanser, rinse and dry. Replace it correct-
ly (20).
. The brewing head, the filter and the filter holder
These must be cleaned after each use. All you need to do is wipe with a damp cloth
over the brewing head of your machine and to wash the other accessories in water
and a little non-abrasive cleanser, rinse and dry.
Put the filter holder with the empty filter in place (6) (7) and push the brew button to
purge and clean the filter of coffee sediment.
If the brewing head is heavily clogged up, unscrew the grid, clean it and refit it,
pressing down firmly (21).
When your espresso machine is not being used, do not leave the filter holder on
the machine as it will cause unnecessary wear of the gasket.
. The cup warming plate: remove this to clean it with water and a little non-abrasive
dish soap, rinse and dry.
17 KRUPS
Cleaning the Machine
19
21
20
XP2000US.qxd:XP2000US.qxd10/10/0814:15Page17

. The cappuccino accessory
For more thorough cleaning, the auto cappuccino accessory can be dismantled from
the machine.
Cappuccino accessory has to be cleaned properly after each use.
Clean it with water, a little non-abrasive dish soap and a small brush. Rinse and dry it.
Before putting it back in place, make sure that the air inlet holes (on both sides of the
little metal tube) are not blocked by residues of milk. Unblock them with a needle if
necessary (22).
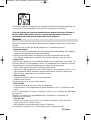
• Descaling of your espresso should be done fairly frequently with citric or tartaric acid.
• Use caution when descaling your espresso machine as the acid substance within the
descaling powder may damage countertops or any other surface it comes in contact
with.
• The limited warranty does not include espresso machines which do not
function, or do not function properly, because descaling has not been carried
out.
We recommend using the Krups descaling accessory, reference F054, which is
available from Krups after-sales service centers. This accessory includes, apart from
two descaling doses, a testing strip for water hardness to assess the frequency of des-
caling of your appliance in normal use. Descaling depends on the hardness of the
water, but also on the use cycle. The frequently of descaling indicated by the F054
accessory is thus given by way of indication only.
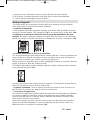
- Then follow the following method:
• Remove the Claris-Aqua Filter System cartridge if you have installed one.
• Unscrew the grid from the brewing head of the appliance and clean it (21).
• Dissolve a sachet of KRUPS descaling accessory, reference F054, in half a litre of
luke warm water and pour the whole lot into the empty water tank.
• Start the appliance by pressing button (N) (4). As soon as the appliance reaches the
right temperature, the orange temperature control light switches off.
21
18 KRUPS
Descaling
!!
1
2
22
XP2000US.qxd:XP2000US.qxd10/10/0814:15Page18

• Place a container under the brewing head. Run through about 1/3 of the liquid
immediately, setting the selector to the position (9).
• Stop the appliance by pressing button (N) (4) and leaving the position (9)
engaged and wait for 10 – 15 minutes to allow the descaler to take effect.
• Next, start the machine again by pressing button (N) (4) and allow the rest of the
liquid to run through.
• Then rinse with two water tanks of fresh water, clean the brewing head and replace
the grid on the head of the appliance (Consult the “Cleaning the Machine” section).
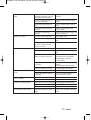
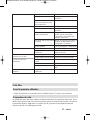
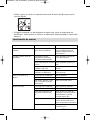
PPrroobblleemmss PPrroobbaabbllee ccaauusseess CCoorrrreeccttiivvee aaccttiioonnss
Espresso not hot enough. Cups, filter and filter holder Preheat the accessories (cups,
are cold. filter, filter holder) .See paragraph
"Preparing an espresso".
19 KRUPS
05
06
22
05
14
CafféEspresso
4
05
06
22
05
14
x1
CafféEspresso
9
05
06
22
05
14
CafféEspresso
4
05
06
22
05
14
x1
CafféEspresso
9
Troubleshooting
05
06
22
05
14
CafféEspresso
4
XP2000US.qxd:XP2000US.qxd10/10/0814:15Page19

Coffee leaks around the filter The filter holder is not See paragraph "Preparing an
holder. mounted correctly or has not espresso".
been tightened sufficiently.
There are coffee grounds on Clean around the filter and the
the edge of the filter. gasket.
The brewing head gasket is Clean the gasket with a damp
dirty. cloth.
The brewing head gasket is Contact an approved Krups
defective. service center.
ESE pod not positioned Be sure that the paper edges are
correctly. inside the basket.
Pump is very noisy. No water in the water tank. Fill the water tank.
Water tank incorrectly inserted. Press firmly down on the water
tank.
Coffee grounds too old or very Use fresh coffee.
dry and the pump cannot
produce pressure.
Water does not run through. No water in the water tank. Fill the water tank.
Water tank incorrectly inserted. Press firmly down on the water
tank.
The filter is blocked or the Clean the filter and the grid on
coffee grounds are too fine the head.See the paragraph
"Maintenance" and try a
coarser coffee.
Brewing head grid is Put the grid to soak in descaling
encrusted. solution.
See paragraph "Maintenance".
Appliance needs descaling. See paragraph "Descaling".
Water runs through too Coffee grounds too coarse. Try a finer coffee.
quickly.
Quantity of ground coffee is Use the spoon provided to
insufficient. measure out the coffee.
The espresso has no froth Coffee grounds too coarse. Try a finer ground coffee.
(froth on coffee).
Coffee grounds stale or too dry.Use fresh coffee.
The milk is not very frothy. Cappuccino accessory blocked.See paragraph "Maintenance".
Milk not fresh. Use very fresh milk.
Milk not suitable. Try another brand of milk.
Lots of water on the coffee Insufficient quantity of ground Increase the quantity of ground
coffee. coffee.
20 KRUPS
XP2000US.qxd:XP2000US.qxd10/10/0814:15Page20

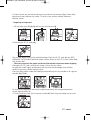
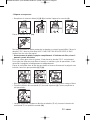
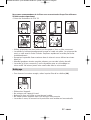
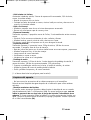
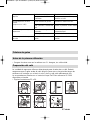
• Operate the coffee machine for the first time with 1 litre of water, without any
grounds.
The quality of the water that you use determines the taste of your coffee. You must
ensure that the water is freshly drawn from the tap (so that it has not had the time to
stagnate in the air), that it does not smell of chlorine and that it is at a fairly cold
temperature.
We recommend that you filter your water using a Krups Duo Filter cartridge,
reference XS 1000 (sold separately).
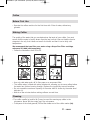
• Follow the illustrations from 23 to 29.
• Use only cold water and a N° 4 filter paper or a permanent filter.
• The coffee maker is fitted with a drip-stop device, allowing you to serve coffee before
the water has finished running through. Replace the jug quickly to avoid overflow.
• Do not exceed the maximum capacity of the water tank as shown by the water level
indicator (e).
• Wait for a few minutes before making coffee a second time.
• The coffee caraffe (g) and its lid (f) may be used for warming up coffee in the
microwave. Never put the empty jug in the microwave.
• To dispose of the used grounds, lift the filter holder out of the coffee maker (30).
21 KRUPS
Coffee
Before First Use
Making Coffee
05
06
14
24
CafféEspresso
05
06
14
25
05
06
14
23
CafféEspresso
05
06
14
1x4
26
05
06
14
x 1 =1
27
05
06
14
28
CafféEspresso
05
06
14
CafféEspresso
29
Cleaning
XP2000US.qxd:XP2000US.qxd10/10/0814:15Page21
La page est en cours de chargement...
La page est en cours de chargement...
La page est en cours de chargement...
La page est en cours de chargement...
La page est en cours de chargement...
La page est en cours de chargement...
La page est en cours de chargement...
La page est en cours de chargement...
La page est en cours de chargement...
La page est en cours de chargement...
La page est en cours de chargement...
La page est en cours de chargement...
La page est en cours de chargement...
La page est en cours de chargement...
La page est en cours de chargement...
La page est en cours de chargement...
La page est en cours de chargement...
La page est en cours de chargement...
La page est en cours de chargement...
La page est en cours de chargement...
La page est en cours de chargement...
La page est en cours de chargement...
La page est en cours de chargement...
La page est en cours de chargement...
La page est en cours de chargement...
La page est en cours de chargement...
La page est en cours de chargement...
La page est en cours de chargement...
La page est en cours de chargement...
La page est en cours de chargement...
La page est en cours de chargement...
La page est en cours de chargement...
La page est en cours de chargement...
La page est en cours de chargement...
La page est en cours de chargement...
La page est en cours de chargement...
La page est en cours de chargement...
La page est en cours de chargement...
La page est en cours de chargement...
La page est en cours de chargement...
La page est en cours de chargement...
La page est en cours de chargement...
La page est en cours de chargement...
La page est en cours de chargement...
La page est en cours de chargement...
La page est en cours de chargement...
-
 1
1
-
 2
2
-
 3
3
-
 4
4
-
 5
5
-
 6
6
-
 7
7
-
 8
8
-
 9
9
-
 10
10
-
 11
11
-
 12
12
-
 13
13
-
 14
14
-
 15
15
-
 16
16
-
 17
17
-
 18
18
-
 19
19
-
 20
20
-
 21
21
-
 22
22
-
 23
23
-
 24
24
-
 25
25
-
 26
26
-
 27
27
-
 28
28
-
 29
29
-
 30
30
-
 31
31
-
 32
32
-
 33
33
-
 34
34
-
 35
35
-
 36
36
-
 37
37
-
 38
38
-
 39
39
-
 40
40
-
 41
41
-
 42
42
-
 43
43
-
 44
44
-
 45
45
-
 46
46
-
 47
47
-
 48
48
-
 49
49
-
 50
50
-
 51
51
-
 52
52
-
 53
53
-
 54
54
-
 55
55
-
 56
56
-
 57
57
-
 58
58
-
 59
59
-
 60
60
-
 61
61
-
 62
62
-
 63
63
-
 64
64
-
 65
65
-
 66
66


Krups XP201050 Manuel utilisateur
- Catégorie
- Cafetières
- Taper
- Manuel utilisateur
dans d''autres langues
- English: Krups XP201050 User manual
- español: Krups XP201050 Manual de usuario
Documents connexes
-
Krups FNP1 Manuel utilisateur
-
-
-
-
-
-
Krups YY8201FD Le manuel du propriétaire
-
-
-
Krups KP1010 Le manuel du propriétaire
Autres documents
-
UFESA CK7355 Le manuel du propriétaire
-
Create THERA RETRO Manuel utilisateur
-
 Create THERA MATT RETRO Le manuel du propriétaire
-
Create Thera Retro Espresso Coffee Machine Manuel utilisateur
-
Fagor CR-1000 Le manuel du propriétaire
-
 Brentwood GA-125 Mode d'emploi
-
Breville VCF146X Manuel utilisateur
-
-
-
Platinum 6960467 Manuel utilisateur

