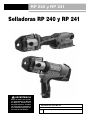
RIDGID RP 241 Press Tool Manuel utilisateur
- Catégorie
- Outils électroportatifs
- Taper
- Manuel utilisateur

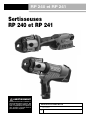
RP 240/RP 241
Press Tools
•Français – 15
•Castellano – pág. 31
RP 240/RP 241 Manual
What is covered
RIDGID®tools are warranted to be free of defects in workmanship and material.
How long coverage lasts
This warranty lasts for the lifetime of the RIDGID®tool. Warranty coverage ends when the
product becomes unusable for reasons other than defects in workmanship or material.
How you can get service
To obtain the benefit of this warranty, deliver via prepaid transportation the complete prod-
uct to RIDGE TOOL COMPANY, Elyria, Ohio, or any authorized RIDGID®INDEPENDENT
SERVICE CENTER. Pipe wrenches and other hand tools should be returned to the place of pur-
chase.
What we will do to correct problems
Warranted products will be repaired or replaced, at RIDGE TOOL’S option, and returned at no
charge; or, if after three attempts to repair or replace during the warranty period the product
is still defective, you can elect to receive a full refund of your purchase price.
What is not covered
Failures due to misuse, abuse or normal wear and tear are not covered by this warranty. RIDGE
TOOL shall not be responsible for any incidental or consequential damages.
How local law relates to the warranty
Some states do not allow the exclusion or limitation of incidental or consequential damages,
so the above limitation or exclusion may not apply to you. This warranty gives you specific
rights, and you may also have other rights, which vary, from state to state, province to
province, or country to country.
No other express warranty applies
This FULL LIFETIME WARRANTY is the sole and exclusive warranty for RIDGID®prod-
ucts. No employee, agent, dealer, or other person is authorized to alter this warranty or make
any other warranty on behalf of the RIDGE TOOL COMPANY.
Qué cubre
Las herramientas RIDGID®están garantizadas contra defectos de la mano de obra y de los
materiales empleados en su fabricación.
Duración de la cobertura
Esta garantía cubre a la herramienta RIDGID®durante toda su vida útil. La cobertura de la
garantía caduca cuando el producto se torna inservible por razones distintas a las de defec-
tos en la mano de obra o en los materiales.
Cómo obtener servicio
Para obtener los beneficios de esta garantía, envíe mediante porte pagado, la totalidad del pro-
ducto a RIDGE TOOL COMPANY, en Elyria, Ohio, o a cualquier Servicentro Independiente
RIDGID. Las llaves para tubos y demás herramientas de mano deben devolverse a la tienda
donde se adquirieron.
Lo que hacemos para corregir el problema
El producto bajo garantía será reparado o reemplazado por otro, a discreción de RIDGE TOOL,
y devuelto sin costo; o, si aún resulta defectuoso después de haber sido reparado o sustitu-
ido tres veces durante el período de su garantía, Ud. puede optar por recibir un reembolso
por el valor total de su compra.
Lo que no está cubierto
Esta garantía no cubre fallas debido al mal uso, abuso o desgaste normal. RIDGE TOOL no
se hace responsable de daño incidental o consiguiente alguno.
Relación entre la garantía y las leyes locales
Algunos estados de los EE.UU. no permiten la exclusión o restricción referente a daños in-
cidentales o consiguientes. Por lo tanto, puede que la limitación o restricción mencionada
anteriormente no rija para Ud. Esta garantía le otorga derechos específicos, y puede que,
además, Ud tenga otros derechos, los cuales varían de estado a estado, provincia a provin-
cia o país a país.
No rige ninguna otra garantía expresa
Esta GARANTIA VITALICIA es la única y exclusiva garantía para los productos RIDGID®.
Ningún empleado, agente, distribuidor u otra persona está autorizado para modificar esta
garantía u ofrecer cualquier otra garantía en nombre de RIDGE TOOL COMPANY.
Ce qui est couvert
Les outils RIDGID®sont garantis contre tous vices de matériaux et de main d’oeuvre.
Durée de couverture
Cette garantie est applicable durant la vie entière de l’outil RIDGID®. La couverture cesse dès lors
que le produit devient inutilisable pour raisons autres que des vices de matériaux ou de main
d’oeuvre.
Pour invoquer la garantie
Pour toutes réparations au titre de la garantie, il convient d’expédier le produit complet en port
payé à la RIDGE TOOL COMPANY, Elyria, Ohio, ou bien le remettre à un réparateur RIDGID®
agréé. Les clés à pipe et autres outils à main doivent être ramenés au lieu d’achat.
Ce que nous ferons pour résoudre le problème
Les produits sous garantie seront à la discrétion de RIDGE TOOL, soit réparés ou remplacés,
puis réexpédiés gratuitement ; ou si, après trois tentatives de réparation ou de remplacement
durant la période de validité de la garantie le produit s’avère toujours défectueux, vous aurez
l’option de demander le remboursement intégral de son prix d’achat.
Ce qui n’est pas couvert
Les défaillances dues au mauvais emploi, à l’abus ou à l’usure normale ne sont pas couvertes
par cette garantie. RIDGE TOOL ne sera tenue responsable d’aucuns dommages directs ou in-
directs.
L’influence de la législation locale sur la garantie
Puisque certaines législations locales interdisent l’exclusion des dommages directs ou indirects,
il se peut que la limitation ou exclusion ci-dessus ne vous soit pas applicable. Cette garantie vous
donne des droits spécifiques qui peuvent être éventuellement complétés par d’autres droits
prévus par votre législation locale.
Il n’existe aucune autre garantie expresse
Cette GARANTIE PERPETUELLE INTEGRALE est la seule et unique garantie couvrant les pro-
duits RIDGID®. Aucun employé, agent, distributeur ou tiers n’est autorisé à modifier cette
garantie ou à offrir une garantie supplémentaire au nom de la RIDGE TOOL COMPANY.
Printed 3/19 999-995-106.10
EC44008 REV. D
©2017, 2019 RIDGID, Inc.
The Emerson logo and RIDGID logo are registered trademarks of Emerson Electric Co. or RIDGID, Inc. in the U.S. and other countries.
All other trademarks belong to their respective holders.
Against Material Defects
& Workmanship
FULL LIFETIME
WARRANTY
Ridge Tool Company
400 Clark Street
Elyria, Ohio 44035-6001
U.S.A.
Parts are available online at Store.RIDGID.com
Full lifetime warranty (garantie légale étendue à la durée de vie du produit,
voir conditions de garantie / legal warranty extended to the product lifecyle,
see warranty conditions)
RP 240-RP 241 Cover 5.5x8.5_REV. D 219_Layout 1 3/7/19 4:08 PM Page B

ii 999-995-106.10_REV. D
RP 240/RP 241 Press Tools
Table of Contents
Safety Symbols.....................................................................................................................2
General Safety Rules
Work Area Safety...............................................................................................................2
Electrical Safety.................................................................................................................2
Personal Safety .................................................................................................................2
Power Tool Use and Care ..................................................................................................3
Battery Tool Use and Care.................................................................................................3
Service ..............................................................................................................................4
Specific Safety Information
Press Tool Safety ...............................................................................................................4
RIDGID Contact Information................................................................................................4
Description............................................................................................................................5
Specifications .......................................................................................................................7
Standard Equipment..........................................................................................................7
Pre-Operation Inspection ....................................................................................................7
Set-Up and Operating Instructions.....................................................................................8
Removing/Installing Attachment ........................................................................................8
Preparing Connection........................................................................................................8
Pressing A Fitting With Typical Scissor Jaws .....................................................................8
Pressing A Fitting With Typical Actuator And Press Ring Set .............................................9
Inspecting The Pressed Connection ................................................................................10
Bluetooth Functions (Wireless Data Transfer)..................................................................10
Cold Weather Operation ..................................................................................................10
Storage ................................................................................................................................11
Maintenance Instructions ..................................................................................................11
Cleaning And Lubrication.................................................................................................11
Troubleshooting................................................................................................................11
Required Maintenance By RIDGID Independent Service Center ....................................11
Service And Repair..........................................................................................................12
Optional Equipment ...........................................................................................................12
Disposal ..............................................................................................................................12
Electromagnetic Compatibility (EMC) ..............................................................................12
FCC/ISED Statement ..........................................................................................................12
EC Declaration of Conformity ..................................................................Inside Back Cover
*Original Instructions - English

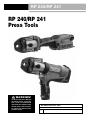
RP 240/RP 241
Press Tools
RP 240/RP 241
RP 240/RP 241 Press Tools
Record Serial Number below and retain product serial number which is located on nameplate.
Serial
No.
WARNING!
Read this Operator’s Man ual
carefully before using this
tool. Failure to understand
and follow the contents of this
manual may result in electri-
cal shock, fire and/or serious
person al injury.

Safety Symbols
In this operator’s manual and on the product, safety symbols and signal words are used to
communicate important safety information. This section is provided to improve under-
standing of these signal words and symbols.
This is the safety alert symbol. It is used to alert you to potential personal injury hazards.
Obey all safety messages that follow this symbol to avoid possible injury or death.
DANGER indicates a hazardous situation which, if not avoided, will result in death or
serious injury.
WARNING indicates a hazardous situation which, if not avoided, could result in
death or serious injury.
CAUTION indicates a hazardous situation which, if not avoided, could result in minor
or moderate injury.
NOTICE indicates information that relates to the protection of property.
This symbol means read the operator’s
manual carefully before using the equip-
ment. The operator’s manual contains im-
portant information on the safe and proper
operation of the equipment.
This symbol means always wear safety
glasses with side shields or goggles when
handling or using this equipment to re-
duce the risk of eye injury.
This symbol indicates the risk of hands,
fingers or other body parts being crushed.
This symbol indicates the risk of electrical
shock.
plugs and matching outlets will reduce risk
of electric shock.
•Avoid body contact with earthed or
ground ed surfaces such as pipes, radi-
ators, ranges and refrigerators. There
is an increased risk of electrical shock if
your body is earthed or grounded.
•Do not expose power tools to rain or
wet conditions. Water en tering a power
tool will increase the risk of electrical shock.
•Do not abuse the cord. Never use the
cord for carrying, pulling or unplugging
the power tool. Keep cord away from
heat, oil, sharp edges or moving parts.
Damaged or entangled cords increase the
risk of electric shock.
•When operating a power tool outdoors,
use an extension cord suitable for out-
door use. Use of a cord suitable for out-
door use reduces the risk of electric shock.
•If operating a power tool in a damp loca-
tion is unavoidable, use a ground fault
circuit interrupter (GFCI) protected sup-
ply. Use of a GFCI reduces the risk of
electric shock.
Personal Safety
•Stay alert, watch what you are doing
and use common sense when operat-
2999-995-106.10_REV. D
RP 240/RP 241 Press Tools
General Safety Rules*
WARNING
Read all safety warnings and instruc-
tions. Failure to follow the warnings and
instructions may result in electric shock,
fire and/or serious injury.
SAVE ALL WARNINGS
AND INSTRUCTIONS FOR
FUTURE REFERENCE!
Work Area Safety
•Keep your work area clean and well lit.
Cluttered or dark areas invite accidents.
•Do not operate power tools in explo-
sive atmospheres, such as in the pres-
ence of flammable liquids, gases or
dust. Power tools create sparks which may
ignite the dust or fumes.
•Keep children and by-standers a way
while operating a power tool. Distrac -
tions can cause you to lose control.
Electrical Safety
•Power tool plugs must match the outlet.
Never modify the plug in any way. Do
not use any adapter plugs with earthed
(grounded) power tools. Unmodified
NOTICE
DANGER
WARNING
CAUTION
* The text used in the General Safety Rules section of this manual is verbatim, as required, from the applicable UL/CSA 62841-
1 standard. This section contains general safety practices for many different types of power tools. Not every precaution ap-
plies to every tool, and some do not apply to these tools.

•Disconnect the plug from the power
source and/or remove the battery pack, if
detachable, from the power tool before
making any adjustments, changing ac-
cessories, or storing power tools. Such
preventive safety measures reduce the risk
of starting the power tool accidentally.
•Store idle power tools out of the reach
of children and do not allow persons
unfamiliar with the power tool or these
instructions to operate the power tool.
Power tools are dangerous in the hands of
untrained users.
•Maintain power tools and accessories.
Check for misalignment or binding of
moving parts, breakage of parts and
any other condition that may affect the
power tool’s operation. If damaged,
have the power tool repaired before
use. Many accidents are caused by poorly
maintained power tools.
•Keep cutting tools sharp and clean.
Properly maintained cutting tools with
sharp cutting edges are less likely to bind
and are easier to control.
•Use the power tool, accessories and
tool bits etc. in accordance with these
instructions, taking into account the
working conditions and the work to be
performed. Use of the power tool for oper-
ations different from those intended could
result in a hazardous situation.
•Keep handles and grasping surfaces
dry, clean and free from oil and grease.
Slippery handles and grasping surfaces
do not allow for safe handling and control of
the tool in unexpected situations.
Battery Tool Use And Care
•Recharge only with the charger speci-
fied by the manufacturer. A charger that is
suitable for one type of battery pack may
create a risk of fire when used with an-
other battery pack.
•Use power tools only with specifically
designated battery packs. Use of any
other battery packs may create a risk of
injury and fire.
•When a battery pack is not in use, keep
it away from other metal objects, like
paper clips, coins, keys, nails, screws or
other small metal objects that can make
a connection from one terminal to an-
other. Shorting the battery terminals to-
gether may cause burns or a fire.
ing a power tool. Do not use a power
tool while you are tired or under the
influence of drugs, alcohol, or medica-
tion. A moment of inattention while operat-
ing power tools may result in serious per-
sonal injury.
•Use personal protective equipment. Al -
ways wear eye protection. Protective
equipment such as dust mask, non-skid
safety shoes, hard hat, or hearing protec-
tion used for appropriate conditions will
reduce personal injuries.
•Prevent unintentional starting. Ensure
the switch is in the off-position before
connecting to power source and/or bat-
tery pack, picking up or carrying the
tool. Carrying power tools with your finger
on the switch or energizing power tools
that have the switch ON invites accidents.
•Remove any adjusting key or wrench
before turning the power tool ON. A
wrench or a key left attached to a rotating
part of the power tool may result in per-
sonal injury.
•Do not overreach. Keep proper footing
and balance at all times. This enables
better control of the power tool in unex-
pected situations.
•Dress properly. Do not wear loose cloth-
ing or jewelry. Keep your hair, clothing,
and gloves away from moving parts.
Loose clothes, jewelry, or long hair can
be caught in moving parts.
•If devices are provided for the connec-
tion of dust extraction and collection fa-
cilities, ensure these are connected and
properly used. Use of dust collection can
reduce dust-related hazards.
•Do not let familiarity gained from fre-
quent use of tools allow you to become
complacent and ignore tool safety prin-
ciples. A careless action can cause severe
injury within a fraction of a second.
Power Tool Use and Care
•Do not force power tool. Use the correct
power tool for your application. The
correct power tool will do the job better
and safer at the rate for which it is de-
signed.
•Do not use power tool if the switch does
not turn it ON and OFF. Any power tool
that cannot be controlled with the switch is
dangerous and must be repaired.
3
999-995-106.10_REV. D
RP 240/RP 241 Press Tools

pressing attachments during press cy -
cle. Your fingers or hands can be crushed,
fractured or amputated if they become
caught between the attachment or between
these components and any other object.
•Never attempt to repair damaged press-
ing attachments (jaws, press ring, actu-
ator, etc.). Discard the entire damaged
attachment. An attachment that has been
welded, ground, drilled or modified in any
manner can shatter during pressing re-
sulting in serious injury. Failure to replace
the entire pressing attachment may result in
component failure and serious injury.
•Large forces are generated during prod-
uct use that can break or throw parts
and cause injury. Stand clear during use
and wear appropriate protective equip-
ment, including eye protection.
•Only use RIDGID Press Tools with ap-
propriate RIDGID pressing attachments
(jaws, press ring, actuator, etc.). Other
uses or modifying the Press Tools for other
applications may damage the press tool,
damage the attachments and/or cause per-
sonal injury.
•Use proper tool, attachment and fitting
combinations. Improper combinations
can result in an incomplete joint, which in-
crease the risk of leaks, equipment dam-
age and injury.
•Before operating RIDGID®Press Tool,
read and understand:
– This operator’s manual,
– The attachment instructions,
– The battery/charger manual,
– The fitting manufacturer’s installation in-
structions,
– The instructions for any other equipment
used with this tool,
Failure to follow all instructions and warn-
ings may result in property damage and/or
serious injury.
RIDGID Contact
Information
If you have any question concerning this
RIDGID®product:
– Contact your local RIDGID distributor.
– Visit RIDGID.com to find your local
RIDGID contact point.
– Contact Ridge Tool Technical Service
De part ment at rtctechservices@emer -
•Under abusive conditions, liquid may
be ejected from the battery; avoid con-
tact. If contact accidentally occurs, flush
with water. If liquid contacts eyes, addition-
ally seek medical help. Liquid ejected from
the battery may cause irritation or burns.
•Do not use a battery pack or tool that is
damaged or modified. Damaged or mod-
ified batteries may exhibit unpredictable
behavior resulting in fire, explosion or risk of
injury.
•Do not expose a battery pack or tool to
fire or excessive temperature. Exposure
to fire or temperature above 265°F (130°C)
may cause explosion.
•Follow all charging instructions and do
not charge the battery pack or tool out-
side the temperature range specified in
the instructions. Charging improperly or at
temperatures outside the specified range
may damage the battery and increase the
risk of fire.
Service
•Have your power tool serviced by a
qual i fied repair person using on ly iden-
tical replacement parts. This will ensure
that the safety of the power tool is main-
tained.
•Never service damaged battery packs.
Service of battery packs should only be
performed by the manufacturer or author-
ized service providers.
Specific Safety
Information
WARNING
This section contains important safety in-
formation that is specific to these tools.
Read these precautions carefully before
using the press tools to reduce the risk
of electrical shock or other serious in-
jury.
SAVE ALL WARNINGS
AND INSTRUCTIONS FOR
FUTURE REFERENCE!
A compartment in the tool carrying case is in-
cluded to keep this manual with the tool for
use by the operator.
Press Tool Safety
•Keep your fingers and hands away from
4999-995-106.10_REV. D
RP 240/RP 241 Press Tools

The Tool Status Lights indicate things such
as improper temperature, low battery, or main-
tenance required. A work light turns on when
the run switch is depressed to illuminate the
work area. The head can be rotated for better
access in tight spaces.
The tools are supplied with a fabric loop that
can be used with appropriate attachments
such as shoulder straps or tie off lines.
The press tools include Bluetooth®wireless
technology to allow connection to smart
phones and tablets. See “Bluetooth Functions
(Wireless Data Transfer)” section for details.
son.com, or in the U.S. and Canada call
(800) 519-3456.
Description
The RIDGID®RP 240 and RP 241 Press Tools,
when used with appropriate attachments, are
designed to mechanically press fittings onto
tubing to create a water-tight and permanent
seal, such as for plumbing and heating applica-
tions. Attachments are also available for other
uses.
When the run switch on the press tool is de-
pressed, an internal electric motor powers a
hydraulic pump which sends fluid into the
cylinder of the tool, moving the ram forward
and applying force to the attachment, pressing
the fitting. The press cycle takes approximately
5 seconds. Once the cycle begins to deform a
fitting, it will automatically continue until comple-
tion, even if the run switch is released.
5
999-995-106.10_REV. D
RP 240/RP 241 Press Tools
The Bluetooth®word mark and logos are registered trademarks owned by Bluetooth SIG, Inc., and any use of such marks
by Emerson Electric Co. is under license. Other trademarks and trade names are those of their respective owners.
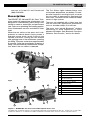
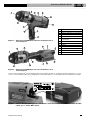
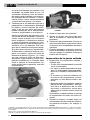
Figure 1 – RIDGID RP 240 Press Tool and Compact Series Jaw
Figure 2 – RIDGID RP 241 Press Tool and Compact Series Jaw
# Description
1 Scissor Style Jaw Set
2 Attachment Mounting Pin
3 Tool Status Lights
4 ON/OFF Button
5 Warning Label
(RP 241 Underside)
6 Fabric Loop
7 Pressure Release Button
(RP 240 Far Side)
8 Handle
9 Battery
10 Run Switch
11 LED Work Light
12 Jaw Sideplate
2
135
6
4
7
9
10
11
8
12
1
3
5
4
9
6
8
11
12
7
10
2

6999-995-106.10_REV. D
RP 240/RP 241 Press Tools
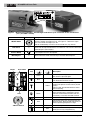
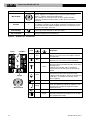
Control Marking Description
Main tool power switch (I = ON, O = OFF).
ON/OFF Button ON: Press button until light turns on, See Figure 5 – Tool Status Lights
OFF: Press button until light turns off
Tool will automatically turn OFF if left unused for ten (10) minutes.
Run Switch —
Depress to start press cycle, release when tool locks on. Releasing the
switch will not stop the tool once it has locked on. This assures consistent,
repeatable press joint integrity.
Pressure Allows tool to be released without completing press. If used, press connection
Release Button is not complete and must be repeated
Attachment —Holds attachment to tool. Must be fully inserted for tool to operate.
Mounting Pin
Figure 4 – Controls Chart
Icon
Solid Light Blinking Light
Description
Green Press completed. Light on for 10 s or until
Run Switch is pressed again.
Blue Bluetooth wireless is connected.
See Bluetooth Functions section.
Yellow
Indicates service interval approaching. Starts
2,000 cycles prior to service interval (30,000
cycles).
Tool is usable, but tool will lock after service
interval (32,000).
Yellow
Tool is locked. Tool has completed service in-
terval (32,000 cycles) and requires service.
Tool has malfunctioned. Remove and rein-
sert battery. If still ON, have tool serviced.
Red Attachment mounting pin is not fully inserted.
Red
Tool and/or battery out of Specification tem-
perature range. Bring the tool and battery to
correct operating temperature range.
Green Tool ON, ready to use.
Red Battery low. Tool will not operate. Recharge
battery/Insert fully charged battery
Figure 5 – Tool Status Lights
Green/Blue
Yellow
Red
Figure 3 – Machine Serial Number - Circled digits indicate the year and month of the manufacture.
(YY = year, MM = month).
ON\OFF Switch
IP32
XX YY MM XXX

2. Clean any oil, grease or dirt from the
equipment, especially the handles and
controls. This aids inspection and helps to
prevent the tool or controls from slipping
from your grip.
3. Inspect the press tool for:
• Proper assembly, maintenance and com -
pleteness.
• Any broken, worn, missing, misaligned
or binding parts. Confirm fabric loop is in
good condition.
• Smooth movement of attachment mount-
ing pin between the fully open and fully
closed position. Pin should lock into each
position. Confirm that the run switch
moves freely and does not bind or stick.
• Presence and readability of warning la-
bels. See Figure 6.
• Any other condition which may prevent
safe and normal operation.
Do not use the press tool until any prob-
lems have been repaired.
4. Inspect and maintain tool attachments
per their instructions. Remove attach-
ment from the tool. Confirm that attach-
ments are in good condition and clearly
marked as to use.
5. Inspect and maintain any other equip-
ment being used per its instructions to
make sure it is functioning properly.
Standard Equipment
Refer to the RIDGID catalog for details on
equipment supplied with specific tool catalog
numbers.
Selection of appropriate materials
and joining methods is the responsibility of
the system designer and/or installer. Before
any installation is attempted, careful evalua-
tion of the specific service environment, in-
cluding chemical environment and service
temperature, should be completed. Consult
Press Fitting System manufacturer for se-
lection information.
Pre-Operation
Inspection
WARNING
Daily before use, inspect your press
tool and correct any problems to re-
duce the risk of serious injury from
electric shock, crushing injures, attach-
ment failure and other causes, and pre-
vent tool damage.
1. Remove battery from tool.
7
999-995-106.10_REV. D
RP 240/RP 241 Press Tools
Specifications
RP 240 Pistol Press Tool RP 241 Inline Press Tool
Attachments ..................RIDGID®Compact Series RIDGID®Compact Series
Motor:
Voltage.........................10.8 V d.c.
Amperage....................24.1 A
Power ..........................260 W
Ram Force.....................5,400 lbs. (24 kN) 5,400 lbs. (24 kN)
Head Rotation ...............180° 180°
Duty Cycle.....................3 Press /min. 3 Press /min
Battery ...........................12 V Li-Ion Rechargeable Battery Pack (RIDGID RB-1200 Series)
Bluetooth Range ...........33 ft. (10 m)
Ingress Protection .........IP32
Permissible Humidity ....80% maximum
Operating
Temperature ..................15°F to 122°F (-10°C to 50°C)
Weight ...........................4.87 lbs. (2.21 kg) 4.72 lbs. (2.14 kg)
(No battery/attachment)
Dimensions ...................10.6" x 2.9" x 8.7" 13.4" x 3.4" x 4.4"
270 mm x 74 mm x 221 mm 340 mm x 86 mm x 112 mm
NOTICE

Set-Up and Operating
Instructions
WARNING
Keep your fingers and hands away from
the tool attachment during the press
cycle. Your fingers or hands can be
crushed, fractured or amputated in the
attachment or tool or between the at-
tachment, work piece and other objects.
Large forces are generated during prod-
uct use that can break or throw parts
and cause injury. Stand clear during use
and wear appropriate protective equip-
ment, including eye protection.
Use proper tool, attachment and fitting
combinations. Improper combinations
can result in an incomplete joint, which
increase the risk of leaks, equipment
damage and injury.
Follow setup and operation instructions
to reduce the risk of injury from crushing
and other causes and to prevent tool
damage.
1. Confirm have appropriate work area (See
General Safety Rules). Operate in clear,
level, stable, dry location. Do not use tool
while standing in water.
2. Inspect work to be done and determine
correct RIDGID tool and attachment for
the application per their specifications.
Using incorrect equipment for an applica-
tion can cause injury, damage the tool
and make incomplete connections.
3. Confirm all equipment has been inspected
and set up as directed in their instruc-
tions.
Removing/Installing
Attachment
1. Remove battery from tool.
2. Fully open the attachment mounting pin.
Remove/insert the appropriate attach-
ment (Figure 6).
3. Fully close the attachment mounting pin.
The pin must be fully closed to prevent
tool damage during use.
RP 240/RP 241 Press Tools
999-995-106.10_REV. D
8
Figure 6 – Attachment Mounting Pin
Preparing Connection
These instructions are generalized
practices for several types of press tool at-
tachments. Always follow the specific instruc-
tions for the press tool attachment being used
and the fitting manufacturers’ specific installa-
tion instructions to reduce the risk of improper
press connections and extensive property
damage.
1. Prepare the connection according to the
fitting manufacturers’ instructions.
2. With dry hands, insert a fully charged bat-
tery into tool. Depress ON/OFF button
one time to turn tool ON. Green light at
ON/OFF button should come on indicating
that the tool is ready to use. See Figure 5
– Tool Status Lights for any other lights
NOTE: Tool will automatically turn OFF if
left unused for ten (10) minutes.
Pressing A Fitting With
Typical Scissor Jaws
1. Squeeze jaw arms to open jaws.
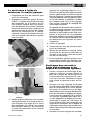
2. Place open jaws around fitting (Figure
7). Properly align jaw press profile with
contour of the fitting as specified in Fitting
Manufacturer's Installation Instructions.
Release jaw arms to close jaws around
fitting. Do not hang jaw set from fitting.
Tool could unexpectedly drop and cause
serious injury or death.
NOTICE

Figure 7 – Placing Scissor-Style Jaws Around
Fitting
Figure 8 – Jaws Square to Fitting
3. Confirm jaw is appropriately placed and
square to fitting. Keep fingers and hands
away from the jaws to avoid crushing in-
juries in jaws or between jaws and sur-
roundings.
Depress the run switch (Figure 1/2). Once
the tool cycle begins and the rollers con-
tact the jaw arms, the tool will lock-on
and automatically complete the cycle.
Releasing the switch will not stop the tool
once it has locked on. This assures con-
sistent, repeatable press joint integrity.
If tool must be removed before a con-
nection is completed, depress the pres-
sure release button (Figure 1/2). Any time
release button is depressed, press is
NOT complete and the connection must
be pressed again to ensure completion. If
the tool malfunctions during operation,
use this procedure.
4. Release the run switch.
5. Squeeze jaw arms to open jaws.
RP 240/RP 241 Press Tools
999-995-106.10_REV. D 9
6. Remove jaw from fitting. Avoid sharp
edges that may have formed on fitting
during pressing operation.
7. When operation is complete, depress
On/Off button one time to turn tool OFF.
Remove battery from tool.
Pressing A Fitting With
Typical Actuator And Press
Ring Set
1. Open ring and place around fitting. Pro -
perly align ring press profile with contour of
the fitting as specified in Fitting Manu -
fact urer's Installation Instructions. Release
ring to close around fitting.
2. Confirm appropriate actuator is installed in
tool. Squeeze actuator arms to open the
actuator tips. Align actuator tips with ring
pockets. Release actuator arms and fully
engage actuator tips into ring pockets.
Misaligning actuator tip to ring pocket
can damage the ring or actuator during
pressing. Do not hang tool and actuator
from press ring. Tool could unexpectedly
drop and cause serious injury or death.
3. Confirm ring is appropriately placed and
square to fitting. Keep fingers and hands
away from the actuator and ring to avoid
crushing injuries in attachment or be-
tween attachment and surroundings.
Depress the run switch. Once the tool
cycle begins and the rollers contact the
jaw arms, the tool will lock-on and auto-
matically complete the cycle. Releasing
the switch will not stop the tool once it has
locked on. This assures consistent, re-
peatable press joint integrity.
If tool must be removed before a con-
nection is completed, depress the re-
lease button (Figure 1/2). Any time re-
lease button is depressed, press is NOT
complete and the connection must be
pressed again to ensure completion. If
the tool malfunctions during operation,
use this procedure.

Figure 9 – Installing Press Ring onto Fitting
Figure 10 – Attaching Actuator to Press Ring
4. Release the run switch.
5. Squeeze actuator arms to open actuator.
Remove actuator from fitting.
6. Remove ring from fitting. Avoid sharp
edges that may have formed on fitting
during pressing operation.
7. When operation is complete, depress
On/Off button one time to turn tool OFF.
Remove battery from tool.
Inspecting The Pressed
Connection
1. Inspect the pressed fitting for:
• Full insertion of tube into fitting.
• Excessive misalignment of the tubes.
A slight amount of misalignment at a
pressed connection is considered nor-
mal.
• Incorrect attachment alignment with the
fitting contour. Distorted or deformed fit-
ting.
• Any other issues per the fitting manu-
RP 240/RP 241 Press Tools
999-995-106.10_REV. D
10
facturer. This could include the removal
of a control ring or decal (used to indi-
cate the connection has not yet been
pressed).
If any issues are found, remove fitting
and install a new connection.
2. Test connection in accordance with con-
nector manufacturer instructions, normal
practice and applicable codes.
Bluetooth Functions (Wireless
Data Transfer)
The RIDGID®RP 240 and RP 241 Press Tools
include Bluetooth®wireless technology allow-
ing wireless data transfer to properly equipped
smartphones or tablets (“devices”) running
iOS or Android operating systems.
1. Download the appropriate RIDGID®app to
your device by going to RIDGID.com/apps
or by going to the Google Play Store or
Apple App Store.
2. When the tool is ON, a Bluetooth wireless
technology equipped device can find and
pair with the press tool.
3. In the Bluetooth settings of your device,
select desired RIDGID tool. Refer to your
device instructions for specific informa-
tion on how to connect via Bluetooth wire-
less technology. Once connected, the
blue tool status light will be solid.
After the initial pairing, most devices will
automatically connect to the Tools when
the Bluetooth wireless technology is ac-
tive and in range. Press tools should be
less than 33 ft. (10 m) from the device to
be detected. Any obstacle between the
tool and device can reduce the opera-
tional range.
4. Follow the app instructions for proper
use. Among other things, the app allows
monitoring of tool cycles.
5. The wireless data transfer turns OFF
when the press tool is switched OFF.
Turn Bluetooth wireless device OFF to
reduce device battery drain.
Cold Weather Operation
As temperature drops, hydraulic fluid thickens
and battery performance degrades. To reduce
the risk of improper operation, the RP 240
The Bluetooth®word mark and logos are registered trademarks owned by Bluetooth SIG, Inc., and any use of such marks
by Emerson Electric Co. is under license. Other trademarks and trade names are those of their respective owners.
iOS is registered trademark of Apple Inc.
Android and the Android logo are trademarks of Google Inc.

RP 240/RP 241 Press Tools
999-995-106.10_REV. D 11
and RP 241 will not operate outside of the
specification temperature range as indicated by
the tool status lights (Figure 5).
When ambient conditions are outside the spec-
ification temperature range, keep the tool and
batteries in a conditioned space until ready
to use.
Storage
Remove battery from tool. Store press tool and
battery in case. Avoid storing in extreme heat or
cold. The tool will not turn ON if the tool is out-
side the specification range. This will be indi-
cated by the tool status lights (see Figure 5).
Store tool in a dry, secured,
locked area that is out of reach of children and
people unfamiliar with the Press Tools. The tool
is dangerous in the hands of untrained users.
Maintenance
WARNING
Make sure battery is removed from tool
before performing maintenance or mak-
ing any adjustment.
Cleaning And Lubrication
1. Wipe the tool clean daily with a clean dry
cloth.
2. Inspect the attachment mounting pin and
lubricate the pin with silicone lubricant as
needed.
3. Check return springs in attachments with
each use. Attachments should open and
close freely with only moderate finger ef-
fort required.
Required Maintenance By
RIDGID Independent Service
Center
The RP 240 and RP 241 Press Tools must
be serviced at set intervals by a RIDGID Inde -
pendent Service Center to ensure proper oper-
ation. This will be indicated by a tool status
light (See Figure 5).
WARNING
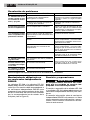
SYMPTOM POSSIBLE REASON SOLUTION
Tool will not turn ON
when ON/OFF button
is pressed.
Attachment is locked
onto fitting.
The pressed connec-
tions produced are not
complete.
Oil leaks from tool.
Motor runs but tool will
not complete a cycle.
Tool stops during op-
eration.
Troubleshooting
Battery is completely discharged or
battery has failed.
Battery not properly inserted into han-
dle of tool.
Press was not successfully completed.
Used wrong jaws for the tube size or
material.
The tool was not square to the tube.
Attachment press contour was not a -
ligned with the fitting contour.
Tool is in need of repair.
Seal or mechanical problems.
Oil level low.
Oil level low.
Insert fully charged battery/recharge
battery.
Check to assure battery is fully inserted.
Push pressure release button to remove
jaws from fitting. Inspect and repress
fitting.
Install the correct attachment.
Redo the joint with new fitting and new
tube. Make sure that the tool is square
to the tube.
Redo the joint with new tube and new
fitting. Make sure the attachment press
contour is aligned with the fitting contour.
See Contact Information for nearest
RIDGID Independent Service center.
See Contact Information for nearest
RIDGID Independent Service center.
See Figure 5 for Tool Status Lights.

Service And Repair
WARNING
Improper service or repair can make the
machine unsafe to operate.
Service and repair on the RP 240 and RP 241
Press Tools must be performed by a RIDGID
Independent Press Tool Service Center.
For information on your nearest RIDGID Inde -
pendent Service Center or any service or repair
questions, see Contact Information section in
this manual.
Optional Equipment
WARNING
To reduce the risk of serious injury, only
use equipment specifically designed and
recommended for use with the RIDGID
RP 240 and RP 241 Press Tools, such as
listed below.
RP 240/RP 241 Press Tools
999-995-106.10_REV. D
12
Ridge Tool Company provides Compact series
press attachments designed specifically for
use with RIDGID Compact Press Tools. Only
use attachments that are specifically designed
to press the fitting system you are installing.
For a complete listing of RIDGID equipment
available for these tools, see the Ridge Tool
Catalog online at RIDGID.com or see Contact
Information.
Disposal
Parts of these tools contain valuable materials
and can be recycled. There are companies
that specialize in recycling that may be found
locally. Dispose of the components in compli-
ance with all applicable regulations. Contact
your local waste management authority for
more information.
For EC Countries: Do not dispose
of elec trical equipment with house-
hold waste!
According to the European Guide -
line 2012/ 19/EU for Waste Elec trical
and Electronic Equipment and its
imple men tation into national legislation, elec-
trical equipment that is no longer usable must
be collected separately and disposed of in
an environmentally correct manner.
Electromagnetic
Compatibility (EMC)
The term electromagnetic compatibility is
taken to mean the capability of the product to
function smoothly in an environment where
electromagnetic radiation and electrostatic
discharges are present and without causing
electromagnet interference to other equip-
ment.
These tools conform to all applica-
ble EMC standards. However, the possibility of
it causing interference in other devices cannot
be precluded. All EMC related standards that
have been tested are called out in the tool’s
technical document.
FCC/ISED Statement
This device complies with Part 15 of the FCC
Rules. Operation is subject to the following two
conditions:
1. This device may not cause harmful in-
terference.
NOTICE
Catalog
No. Description
57418RP 240 Battery Press Tool, Tool Only
57423Carry Case, RP 240
RP 240 Press Tool
Catalog
No. Description
57288 RP 241 Battery Press Tool, Tool Only
57393 Carry Case, RP 241
RP 241 Press Tool
Catalog
No. Model Capacity
55183 RB-1225 12V 2.5Ah Li-Ion
Battery Packs
Battery will work with any catalog number RBC-121 Battery
Charger.
Catalog Plug
No. Region Type
55193 Charger USA, Canada and Mexico A
55198 Charger Europe C
55203 Charger China A
55208 Charger Australia & Latin America I
55213 Charger Japan A
55218 Charger United Kingdom G
44798 Charger Cord North America A
44808 Charger Cord Europe C
44803 Charger Cord China A
44813 Charger Cord Australia & LA I
44818 Charger Cord Japan A
44828 Charger Cord United Kingdom G
RBC-121 Chargers and Cords

RP 240/RP 241 Press Tools
999-995-106.10_REV. D 13
2. This device must accept any interference
received, including interference that may
cause undesired operation.
Modifications not expressly approved by this
company could void the user's authority to
operate the equipment.
This equipment has been tested and found to
comply with the limits for a Class A digital
device, pursuant to part 15 of the FCC Rules.
These limits are designed to provide reason-
able protection against harmful interference in
a residential installation.
This equipment generates, uses, and can ra-
diate radio frequency energy and, if not in-
stalled and used in accordance with the in-
structions, may cause harmful interference
to radio communications.
However, there is no guarantee that interfer-
ence will not occur in a particular installation.
If this equipment does cause harmful interfer-
ence to radio or television reception, which can
be determined by turning the equipment off
and on, the user is encouraged to try to cor-
rect the interference by one or more of the fol-
lowing measures:
• Reorient or relocate the receiving an-
tenna (radio/TV device).
• Increase the separation between the
equipment and receiver.
• Consult the dealer or an experienced
radio/TV technician for help.
This product complies with the Canadian
ICES-003 Class A specifications.
See Declaration label on tool.

RP 240/RP 241 Press Tools
999-995-106.10_REV. D
14

Sertisseuses
RP 240 et RP 241
RP 240 et RP 241
Sertisseuses RP 240 et RP 241
Enregistrez ci-dessous pour future référence le numéro de série de l’appareil indiqué sur sa
plaque signalétique.
N° de
série
AVERTISSEMENT
Familiarisez-vous avec le manuel ci-
présent avant d’utiliser l’appareil. Tout
écart aux consignes données dans
celui-ci augmenterait les risques de
choc électrique, d’incendie et/ou de
grave blessure corporelle.

Sertisseuses RP 240 et RP 241
999-995-106.10_REV. D
16
Table des matières
Symboles de sécurité.........................................................................................................17
Consignes générales de sécurité
Sécurité des lieux ............................................................................................................17
Sécurité électrique...........................................................................................................17
Sécurité individuelle.........................................................................................................18
Utilisation et entretien des appareils électriques .............................................................18
Utilisation et entretien des appareils à piles ....................................................................19
Service après-vente.........................................................................................................19
Consignes de sécurité spécifiques
Sécurité de la sertisseuse ...............................................................................................19
Coordonnées RIDGID.........................................................................................................20
Description..........................................................................................................................20
Caractéristiques techniques .............................................................................................23
Equipements de série......................................................................................................23
Inspection de l’appareil .....................................................................................................23
Préparation et utilisation ...................................................................................................24
Retrait et montage des têtes de sertissage .....................................................................24
Préparation des raccordements.......................................................................................24
Sertissage des raccords à l’aide de mâchoires à cisaille typiques..................................25
Sertissage des raccords à l’aide d’actionneurs et jeux de bagues de sertissage typiques...25
Examen des raccords sertis ............................................................................................26
Fonctions Bluetooth (transfert de données à distance) ...................................................26
Fonctionnement par temps froid (vérifications)................................................................27
Dépannage......................................................................................................................27
Stockage .............................................................................................................................28
Entretien..............................................................................................................................28
Nettoyage et lubrification de l’appareil.............................................................................28
Révisions obligatoires effectuées par un réparateur RIDGID agréé ................................28
Révisions et réparations ..................................................................................................28
Accessoires ........................................................................................................................28
Recyclage de l’appareil......................................................................................................29
Compatibilité électromagnétique (EMC) ..........................................................................29
Déclaration FCC .................................................................................................................29
Déclaration de conformité CE ......................................................recto de la page de garde
*Traduction de la notice originale

17
999-995-106.10_REV. D
Sertisseuses RP 240 et RP 241
Symboles de sécurité
Les symboles et mots clés utilisés à la fois dans ce mode d’emploi et sur l’appareil lui-même
servent à signaler d’importants risques de sécurité. Ce qui suit permettra de mieux compren-
dre la signification de ces mots clés et symboles.
Ce symbole sert à vous avertir de risques d’accident potentiels. Le respect des consignes qui le
suivent vous permettra d’éviter les risques d’accident grave ou potentiellement mortel.
Le terme DANGER signifie une situation dangereuse qui, faute d’être évitée, provo-
querait la mort ou de graves blessures corporelles.
Le terme AVERTISSEMENT signifie une situation dangereuse potentielle qui,
faute d’être évitée, serait susceptible d’entraîner la mort ou de graves blessures
corporelles.
Le terme ATTENTION signifie une situation dangereuse potentielle qui, faute d’être
évitée, serait susceptible d’entraîner des blessures corporelles légères ou modérées.
Le terme AVIS IMPORTANT indique des informations concernant la protection
des biens.
Ce symbole indique la nécessité de bien se
familiariser avec la notice d’emploi avant
d’utiliser ce matériel. La notice d’emploi
renferme d’importantes consignes de sécu-
rité et d’utilisation du matériel.
Ce symbole indique la nécessité de porter
des lunettes de sécurité à œillères ou
des lunettes fermées lors de la manipula-
tion ou utilisation de cet appareil afin de
limiter les risques de lésion oculaire.
Ce symbole signale un risque d’écrase-
ment des doigts, des mains ou autres
membres.
Ce symbole signale un risque de choc
électrique.
•Eloignez les enfants et les curieux du-
rant l’utilisation des appareils élec-
triques. Les distractions risquent de vous
faire perdre le contrôle de l’appareil.
Sécurité électrique
•La fiche de l’appareil doit correspondre
à la prise de courant utilisée. Ne jamais
tenter de modifier la fiche d’une manière
quelconque. Ne jamais utiliser d’adapta-
teur de prise sur les appareils équipés
d’une fiche avec terre. Cela limitera les
risques de choc électrique.
•Evitez tout contact physique avec des
objets reliés à la terre tels que canalisa-
tions, radiateurs, cuisinières et réfrigéra-
teurs. Tout contact avec la terre augmen -
terait les risques de choc électrique.
•N’exposez pas les appareils électriques
à la pluie ou aux intempéries. Toute
pénétration d’eau à l’intérieur de l’appareil
augmenterait les risques de choc élec-
trique.
•Ne maltraitez pas le cordon d’alimenta-
tion de l’appareil. Ne jamais utiliser le
cordon pour porter, tirer ou débrancher
Consignes générales de
sécurité*
AVERTISSEMENT
Familiarisez-vous avec l’ensemble des
consignes de sécurité et d’utilisation ci-
présentes afin d’éviter les risques de choc
électrique, d’incendie et/ou de grave
blessure corporelle.
Conservez l’ensemble de ces
consignes et instructions pour
future référence !
Sécurité des lieux
•Assurez-vous de la propreté et du bon
éclairage des lieux. Les chantiers en-
combrés ou mal éclairés sont une invitation
aux accidents.
•N’utilisez pas d’appareils électriques en
présence de substances volatiles telles
que liquides, gaz ou poussières com-
bustibles. Ce type de matériel risque de
produire des étincelles susceptibles d’en-
flammer les poussières et émanations com-
bustibles.
AVIS IMPORTANT
DANGER
AVERTISSEMENT
ATTENTION
* Le texte utilisé dans les consignes de sécurité générales ci-présentes est tiré verbatim de la section de la norme UL/CSA
62841-1 applicable, comme l’impose la réglementation. Lesdites consignes de sécurité générales sont sensé couvrir de nom-
breux types d’appareils électriques. Certaines d’entre-elles ne sont pas applicables à l’ensemble de ces appareils, et cer-
taines ne sont pas applicables à celui-ci.

Sertisseuses RP 240 et RP 241
Ne portez ni accessoires, ni bijoux.
Eloignez vos cheveux, vos vêtements
et vos gants des mécanismes lorsque
l’appareil fonctionne. Les foulards, les bi-
joux et les cheveux longs risquent d’être en-
traînés par les mécanismes en rotation.
•Vérifiez le bon raccordement et fonc-
tionnement des aspirateurs de pous-
sière éventuels. De tels aspirateurs peu-
vent limiter les risques associés à la disper-
sion des poussières.
•Ne permettez pas la familiarité issue
d’une utilisation fréquente de l’appareil
vous rendre complaisant au point d’ig-
norer les principes de sécurité applica-
bles. La moindre inattention peut engen-
drer de graves blessures corporelles dans
une fraction de seconde.
Utilisation et entretien des
appareils électriques
•Ne forcez pas l’appareil. Prévoyez l’ap-
pareil le mieux adapté aux travaux en-
visagés. Un appareil adapté produira de
meilleurs résultats et un meilleur niveau
de sécurité lorsqu’il fonctionne au régime
prévu.
•N’utilisez pas d’appareil dont l’interrup-
teur marche/arrêt ne fonctionne pas cor-
rectement. Tout appareil qui ne peut pas
être contrôlé par son interrupteur est con-
sidéré dangereux et doit être réparé.
•Débranchez l’appareil ou retirez son bloc-
piles avant tout réglage, remplacement
d’outils ou stockage. De telles mesures
préventives aideront à limiter les risques de
démarrage accidentel de l’appareil.
•Rangez les appareils électriques non
utilisés hors de la portée des enfants.
L’utilisation de cet appareil doit être ex-
clusivement réservé à du personnel
compétent. Tout appareil électrique peut
devenir dangereux entre les mains d’un
novice.
•Assurez l’entretien régulier des appa -
reils électriques et de leurs accessoires.
Assurez-vous de l’absence d’éléments
grippés ou endommagés, voire toute
autre anomalie susceptible de nuire au
bon fonctionnement et à la sécurité de
l’appareil. Faites réparer tout appareil
endommagé avant de le réutiliser. De
nombreux accidents sont le résultat d’ap-
pareils mal entretenus.
•Assurez l’affutage et la propreté des
l’appareil. Eloignez le cordon de la cha -
leur, des matières grasses, des objets
tranchants et des mécanismes. Les cor-
dons d’alimentation endommagés ou entor-
tillés augmentent les risques de choc élec-
trique.
•Lors de l’utilisation de l’appareil à l’ex-
térieur, prévoyez une rallonge électrique
homologuée pour ce type d’emploi. Cela
limitera les risques de choc électrique.
•S’il est inévitable d’utiliser l’appareil
dans des endroits humides, prévoyez
une source d’alimentation protégée par
disjoncteur différentiel. La présence d’un
disjoncteur différentiel limitera les risques
de choc électrique.
Sécurité individuelle
•Soyez attentif, restez concentré et faites
preuve de bon sens lors de l’utilisation
de ce type d’appareil. Ne jamais utiliser
ce matériel lorsque vous êtes fatigué ou
sous l’influence de drogues, de l’alcool
ou de médicaments. Lors de l’utilisation
d’un appareil électrique, un instant d’inat-
tention risque d’entraîner de graves lé-
sions corporelles.
•Prévoyez les équipements de protec-
tion individuelle appropriés. Portez sys-
tématiquement une protection oculaire.
Selon le cas, le port d’un masque à pous-
sière, de chaussures de sécurité antidéra-
pantes, du casque ou d’une protection au-
riculaire peut aider à limiter les risques de
lésion corporelle.
•Evitez les démarrages accidentels.
Assurez-vous que son interrupteur est
éteint avant de brancher l’appareil, y in-
troduire un bloc-piles, le soulever ou le
transporter. Porter un appareil électrique
avec son doigt sur l’interrupteur, voire le
brancher lorsque son interrupteur est en po-
sition « Marche » est une invitation aux
accidents.
•Retirez toute clé ou dispositif de réglage
éventuel avant de mettre l’appareil en
marche. Une clé ou tout autre dispositif
de réglage engagé sur un élément mé-
canique pourrait provoquer un accident.
•Ne vous mettez pas en porte-à-faux.
Maintenez une bonne assiette et un bon
équilibre à tout moment. Cela assurera
un meilleur contrôle de l’appareil en cas
d’imprévu.
•Habillez-vous de manière appropriée.
999-995-106.10_REV. D
18
La page charge ...
La page charge ...
La page charge ...
La page charge ...
La page charge ...
La page charge ...
La page charge ...
La page charge ...
La page charge ...
La page charge ...
La page charge ...
La page charge ...
La page charge ...
La page charge ...
La page charge ...
La page charge ...
La page charge ...
La page charge ...
La page charge ...
La page charge ...
La page charge ...
La page charge ...
La page charge ...
La page charge ...
La page charge ...
La page charge ...
La page charge ...
La page charge ...
La page charge ...
La page charge ...
La page charge ...
La page charge ...
-
 1
1
-
 2
2
-
 3
3
-
 4
4
-
 5
5
-
 6
6
-
 7
7
-
 8
8
-
 9
9
-
 10
10
-
 11
11
-
 12
12
-
 13
13
-
 14
14
-
 15
15
-
 16
16
-
 17
17
-
 18
18
-
 19
19
-
 20
20
-
 21
21
-
 22
22
-
 23
23
-
 24
24
-
 25
25
-
 26
26
-
 27
27
-
 28
28
-
 29
29
-
 30
30
-
 31
31
-
 32
32
-
 33
33
-
 34
34
-
 35
35
-
 36
36
-
 37
37
-
 38
38
-
 39
39
-
 40
40
-
 41
41
-
 42
42
-
 43
43
-
 44
44
-
 45
45
-
 46
46
-
 47
47
-
 48
48
-
 49
49
-
 50
50
-
 51
51
-
 52
52


RIDGID RP 241 Press Tool Manuel utilisateur
- Catégorie
- Outils électroportatifs
- Taper
- Manuel utilisateur
dans d''autres langues
Documents connexes
-
RIDGID RP 240 Press Tool Manuel utilisateur
-
-
-
-
-
RIDGID 37835 Manuel utilisateur
-
-
-
-
RIDGID 300 Compact Manuel utilisateur
