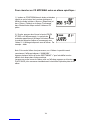
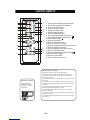
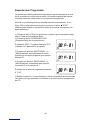
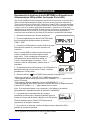
iSymphony iSymphony M1 Manuel utilisateur
- Catégorie
- Lecteur CD
- Taper
- Manuel utilisateur
Ce manuel convient également à


2
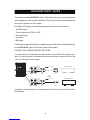
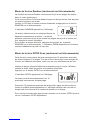
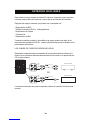
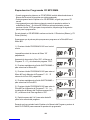
TO PREVENT FIRE OR SHOCK HAZARD, DO NOT USE THIS PLUG WITH AN
EXTENSION CORD, RECEPTACLE OR OTHER OUTLET UNLESS THE BLADES
CAN BE FULLY INSERTED TO PREVENT BLADE EXPOSURE. TO PREVENT FIRE
OR SHOCK HAZARD, DO NOT EXPOSE THIS APPLIANCE TO RAIN OR MOISTURE.
1. Read these instructions.
2. Keep these instructions.
3. Heed all warnings.
4. Follow all instructions.
5. Do not use this apparatus near water.
6. Clean only with a dry cloth.
7. Do not block any ventilation openings. Install in accordance with the manufacturer’s
instructions.
8. Do not install near any heat sources such as radiators, heat registers, stoves, or other
apparatus (including amplifiers) that produce heat.
9. Do not defeat the safety purpose of the polarized or grounding-type plug. A polarized plug has
two blades with one wider than the other. A grounding type plug has two blades and a third
grounding prong. The wide blade or the third prong is provided for your safety. If the provided
plug does not fit into your outlet, consult an electrician for replacement of the obsolete outlet.
10. Protect the power cord from being walked on or pinched particularly at plugs, convenience
receptacles, and the point where they exit from the apparatus.
11.Only use attachments / accessories specified by the manufacturer.
12.Unplug this apparatus during lightning storms or when unused for long periods of time.
13.Refer all servicing to qualified service personnel. Servicing is required when the apparatus
has been damaged in any way, such as power-supply cord or plug is damaged, liquid has
been spilled or objects have fallen into the apparatus, the apparatus has been exposed to rain
or moisture, does not operate normally, or has been dropped.
14.This appliance shall not be exposed to dripping or splashing water and no object filled with
liquids such as vases shall be placed on the apparatus.
15.Do not overload wall outlet. Use only power source as indicated.
16.Use replacement parts as specified by the manufacturer.
17.The product may be mounted to a wall only if recommended by the manufacturer.
18.Upon completion of any service or repairs to this product, ask the service technician to
perform safety checks.
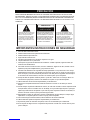
!
CAUTIO N
RISK OF ELECTRIC SHOCK
DO NOT OPEN
The lightning flash with arrow-
head symbol, within an equi-
lateral triangle is intended to
alert the user to the presence
of uninsulated‘dangerousvoltage’
within the product’s enclosure
that may be of sufficient
magnitude to constitute a risk
of electric shock to persons.
The exclamation point within
an equilateral triangle is in-
tended to alert the user to
the presence of important
operating and maintenance
(servicing) instructions in
the literature accompany-
ing the appliance.
WARNING: TO REDUCE THE
RISK OF ELECTRIC SHOCK
DO NOT REMOVE COVER
( O R B A C K ) , N O U S E R
SERVICEABLE PARTS INSIDE
R E F E R S E R V I C I N G T O
Q U A L I F I E D S E R V I C E
PERSONNEL.

3
TABLE OF CONTENTS
Important Notes
Preparation for Use
Connection
Location of Controls & Indicators
Remote Control
Operating instructions
Radio Operation
CD Operation
Playing MP3 & Windows Media Formatted Audio
Memory Card Operation
USB Operation
iPod Operation
Special Functions
Care & Maintenance
iSymphony Limited Warranty
Technical Specification
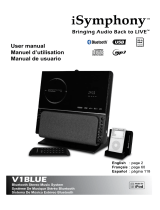
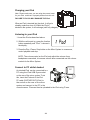
Thank you for purchasing the iSymphony M1 Micro Music System with Built-in Universal
Dock for iPod. The M1 is the world’s first compact audio system to include a Built-in
Universal Dock for iPod, a card slot for SD/MMC flash memory cards and a convenient
USB port on the front panel. This unique unit gives you the flexibility to play music from
CDs, radio, or in MP3 and Windows Media format from:
• iPod
• USB flash memory drives
• CDs including CD-R, CD-RW
• MP3 or Windows Media encoded CDs
For added convenience, you can connect the M1 to your computer and exchange songs
with your iPod, and your iPod will charge while it’s docked.
Please be sure to read this manual carefully and completely to make sure you
understand all of the exciting features and functions included in your new system. We
have taken great care to make sure that this system was in perfect working order when it
left our factory. If you experience any problem with the set-up or operation of this
system please return it to the dealer. The serial number of your system is located on a
label on the back panel. Please take a moment now to locate the serial number and to
write it in the space provided below for future reference. You may be asked to provide
this number if you call for customer service.
Serial Number: _______________________________
Please also take a moment to register your product online at
www.myisymphony.com/register
4
5
6
11
12
13
17
20
27
34
35
36
39
44
46
47
TO PREVENT FIRE OR SHOCK HAZARD, DO NOT USE THIS PLUG WITH AN
EXTENSION CORD, RECEPTACLE OR OTHER OUTLET UNLESS THE BLADES
CAN BE FULLY INSERTED TO PREVENT BLADE EXPOSURE. TO PREVENT FIRE
OR SHOCK HAZARD, DO NOT EXPOSE THIS APPLIANCE TO RAIN OR MOISTURE.
1. Read these instructions.
2. Keep these instructions.
3. Heed all warnings.
4. Follow all instructions.
5. Do not use this apparatus near water.
6. Clean only with a dry cloth.
7. Do not block any ventilation openings. Install in accordance with the manufacturer’s
instructions.
8. Do not install near any heat sources such as radiators, heat registers, stoves, or other
apparatus (including amplifiers) that produce heat.
9. Do not defeat the safety purpose of the polarized or grounding-type plug. A polarized plug has
two blades with one wider than the other. A grounding type plug has two blades and a third
grounding prong. The wide blade or the third prong is provided for your safety. If the provided
plug does not fit into your outlet, consult an electrician for replacement of the obsolete outlet.
10. Protect the power cord from being walked on or pinched particularly at plugs, convenience
receptacles, and the point where they exit from the apparatus.
11.Only use attachments / accessories specified by the manufacturer.
12.Unplug this apparatus during lightning storms or when unused for long periods of time.
13.Refer all servicing to qualified service personnel. Servicing is required when the apparatus
has been damaged in any way, such as power-supply cord or plug is damaged, liquid has
been spilled or objects have fallen into the apparatus, the apparatus has been exposed to rain
or moisture, does not operate normally, or has been dropped.
14.This appliance shall not be exposed to dripping or splashing water and no object filled with
liquids such as vases shall be placed on the apparatus.
15.Do not overload wall outlet. Use only power source as indicated.
16.Use replacement parts as specified by the manufacturer.
17.The product may be mounted to a wall only if recommended by the manufacturer.
18.Upon completion of any service or repairs to this product, ask the service technician to
perform safety checks.
!
CAUTIO N
RISK OF ELECTRIC SHOCK
DO NOT OPEN
The lightning flash with arrow-
head symbol, within an equi-
lateral triangle is intended to
alert the user to the presence
of uninsulated‘dangerousvoltage’
within the product’s enclosure
that may be of sufficient
magnitude to constitute a risk
of electric shock to persons.
The exclamation point within
an equilateral triangle is in-
tended to alert the user to
the presence of important
operating and maintenance
(servicing) instructions in
the literature accompany-
ing the appliance.
WARNING: TO REDUCE THE
RISK OF ELECTRIC SHOCK
DO NOT REMOVE COVER
( O R B A C K ) , N O U S E R
SERVICEABLE PARTS INSIDE
R E F E R S E R V I C I N G T O
Q U A L I F I E D S E R V I C E
PERSONNEL.

4
• Operate controls and switches as
described in the manual.
• Before turning ‘On’ the power, make
certain that power cord is properly
installed.
• Store your CDs, Memory Cards in a cool
area to avoid damage from heat.
• When moving the set, be sure to first
disconnect the power cord.
• Avoid installing this unit in places
exposed to direct sunlight or close to
heat radiating appliances such as
electric heaters, on top of other stereo
equipment that radiates too much heat,
places lacking ventilation or dusty areas,
places subject to constant vibration and/
or humid or moist areas.
• Do not attempt to clean this unit with
chemical solvents as this might damage
the finish. Use a clean dry cloth.
CLASS 1 LASER PRODUCT
CLASS 1 LASER PRODUCT
APPAREIL Á LASER DE CLASSE 1
PRODUCTO LASER DE CLASE 1
CAUTION
INVISIBLE LASER RADIATION
WHEN OPEN AND INTERLOCKS
DEFEATED.
AVOID EXPOSURE TO BEAM
This product contains a low power Laser Device.
FCC INFORMATION
This equipment has been tested and found to comply with the limits for a Class B digital
device, pursuant to Part 15 of the FCC Rules. These limits are designed to provide
reasonable protection against harmful interference in a residential installation. This
equipment generates, uses, and can radiate radio frequency energy and, if not installed
and used in accordance with the instructions, may cause harmful interference to radio
communications. However, there is no guarantee that interference will not occur in a
particular installation. If this equipment does cause harmful interference to radio or television
reception, which can be determined by turning the equipment off and on, the user is
encouraged to try to correct the interference by one or more of the following measures:
• Reorient or relocate the receiving antenna.
• Increase the separation between the equipment and receiver.
• Connect the equipment into an outlet on a circuit different from that to which the receiver
is connected.
• Consult the dealer or an experienced radio/TV technician for help.
This device complies with Part 15 of the FCC Rules. Operation is subject to the following
two conditions:
(1) This device may not cause harmful interference, and
(2) This device must accept any interference received, including interference that
may cause undesired operation.
IMPORTANT NOTES
Changes or modification not expressly approved by the party responsible for
compliance could avoid the user’s authority to operate the equipment.


8
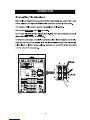
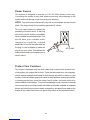
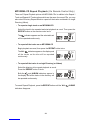
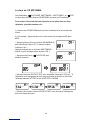
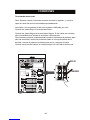
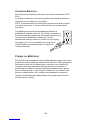
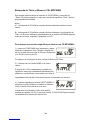
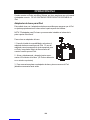
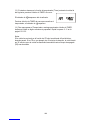
This system includes AUX IN R/L Jacks. These jacks allow you to connect external
audio equipment to this system and listen to the sound from the external equipment
through the speakers of this system.
Examples of the types of external equipment that may be connected are:
• An MP3 player
• Audio outputs from DVD or VCR
• Cassette player
• Turntable
• MD player
Connect the audio output jack(s) or headphone jack of the external audio equipment
to the AUX IN R/L jacks on the back panel of this system.
AUXILIARY INPUT JACKS
CONNECTION CABLES ARE NOT INCLUDED.
You may leave your external device permanently connected to this system if you
wish. It is not necessary to disconnect the external device in order to listen to the
Tuner or CD player in this system.
Instructions for listening to your external device will be found at the end of this
user Manual.
LINE
OUT not included
Plug x2 Plug x2
LINE
IN
EXTERNAL DEVICE
LINE
OUT not included
Plug x2 Plug x1
LINE
IN
EXTERNAL DEVICE
OR

9
Stereo Headphone Jack
This system includes a stereo PHONES jack on the front panel of the main unit.
You may connect a set of stereo headphones, not included, to this jack for private
listening without disturbing others.
The main speakers are automatically shut off when headphones are connected to
the PHONES jack. Make sure that the plug from your headphones is fully inserted
into the headphone jack. If the plug is not fully inserted the sound may be intermittent,
or you may only hear sound from one side of the headphones.
IMPORTANT: To prevent hearing damage always set the volume control to a
low level before you connect the headphones. Then connect the headphones,
put them on, and very gradually increase the volume to a comfortable listening
level. Remember that CDs may contain both very soft and very loud passages.
Adjust the volume to a comfortable level using a louder passage, so that you
always know what the maximum level will be.
Placement Of The System
The system should be placed on a stable, level surface such as a table, shelf, or
stand, convenient to a 110V 60Hz AC outlet, out of direct sunlight, and away from
sources of excess heat, dust, moisture, or vibration.
The speakers may be separated from the main as far the wires allow for maximum
stereo separation, or the may be placed to the immediate left and right of the main
unit.

10
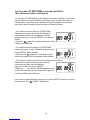
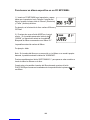
Power Source
This system is designed to operate on 110V AC 60Hz house current only.
Connecting this system to any other power source may cause damage to the
system and such damage is not covered by your warranty.
NOTE: The system has polarized AC plug with one wide blade and one narrow
blade. The plug will only fit into matching polarized AC outlets.
This is a safety feature to reduce the
possibility of electric shock. If the plug
will not fit in your AC outlets, you probably
have outdated non-polarized outlet. You
should have your outdated outlet
changed by a qualified, licensed
electrician. Do not file the wide blade on
the plug, or use an adapter to make the
plug fit into your outlet. This defeats the
safety feature and could expose you to
electric shock.
Protect Your Furniture
This model is equipped with non-skid rubber feet to prevent the product from
moving when you operate the controls. These feet are made from non-migrating
rubber material specially formulated to avoid leaving any marks or stains on your
furniture. However certain types of oil based furniture polishes, wood preservatives,
or cleaning sprays may cause the rubber feet to soften, and leave marks or a
rubber residue on the furniture. To prevent any damage to your furniture we strongly
recommend that you purchase small self-adhesive felt pads, available at hardware
stores and home improvement centers everywhere, and apply these pads to the
bottom of the rubber feet before you place the product on fine wooden furniture.
AC Plug
AC Outlet

11
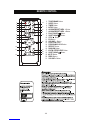
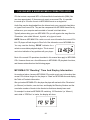
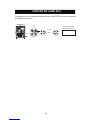
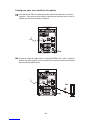
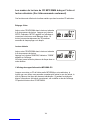
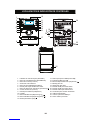
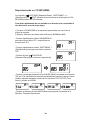
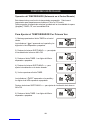
LOCATION OF CONTROLS AND INDICATORS
14. FLASH USB Slot.
15. Flash Memory USB Indicator.
16. PLAY/PAUSE Button.
17. CD Tray.
18. LINE OUT RCA Jacks.
19. AM AERIAL Socket.
20. FM AERIAL wire.
21. AUX IN RCA Jacks.
22. SPEAKER terminals.
23. AC Power Cord.
24. iPod USB Sync. Connector.
25. iPod Port (under cover)
1. STANDBY indicator.
2. STANDBY/ON Button.
3. FUNCTION Button.
4. Remote Sensor
5. TUNER/BAND Button.
6. Flash Memory Card Slot.
7. CD Tray OPEN/CLOSE Button.
8. VOLUME Control.
9. HEADPHONES socket.
10. Display.
11. SKIP/TUNING UP + Button.
12. SKIP/TUNING DOWN -Botton.
13. STOP Button.
25
2
1
311
10
5
7
8
9
12
13
14
16
17
4
615
21
20
19
18
22
23
24
AC~
AM AN T
iPo d USB Sync
R
R
R
FM AN T
LIN E OUT L
L
L
AUX I N
SPEAKERS 4
__
++

12
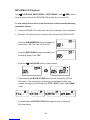
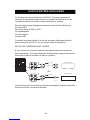
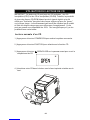
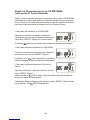
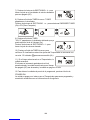
2. TUNER/BAND Button.
3. SLEEP Button.
4. TIMER Button.
5. INTRO Button.
6. ALBUM/PRESET MEM. -Button.
7. ALBUM/PRESET MEM. + Button.
8. PLAY/PAUSE Button.
9. SKIP/TUNING Button.
10. STOP Button.
11. EQ Button.
12. VOLUME - Button.
13. FUNCTION Button.
14. PORGRAM/CLOCK Button.
15. REPEAT Button.
16. RANDOM Button.
17. ID3/FM STEREO/ESP Button.
18. SKIP/TUNING Button.
19. MUTE Button.
20. DBBS Button.
21. VOLUME + Button.
3
2
1
5
6
7
8
9
11
14
19
15
20
21
17
18
16
10
4
12
13
REMOTE CONTROL
-+
-
+

13
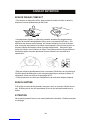
OPERATING INSTRUCTIONS
• Make sure that you have fully extended the FM antenna wire.
• Make sure that you have installed batteries in the remote
handset.
control
• Make sure that the system is connected to an AC outlet that is always
“live”.
• Do not connect the system to an AC outlet controlled by a wall switch.
General Controls
Most of the main functions of this system can be operated by the controls on the
front panel of the main unit, or by the buttons on the remote control handset. If a
specific function can only be operated by the remote handset, or by the front panel
controls, this will be clearly indicated in the instructions.
When operating this system with the remote control handset make sure that the
IR (Infrared) transmitter on the front of the remote handset is pointed at the remote
sensor on the front panel of the main unit.
The effective operating range of the remote control is approximately 15 feet. Please
note that bright sunlight or room lighting may interfere with the remote control
operation. If the remote is not operating properly try reducing the brightness of the
room or moving closer to the main unit. If this does not solve the problem, it may
be time to change the remote control battery.

14
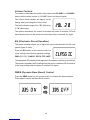
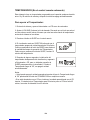
Volume Controls
To increase or decrease the system volume press the VOLUME + or VOLUME –
buttons on the remote control or VOLUME Control on the front panel.
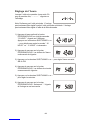
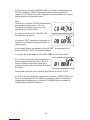
The Volume Level Indicator will appear on the
display when you change the volume level.
The level indicator ranges from “00” (Minimum)
to “30” (Maximum).
The system remembers the volume level when the power is switched ‘Off’ and
automatically returns to the same level when the power is switched ‘On’ again.
EQ (Electronic Preset Equalizer)
The preset equalizer allows you to adjust the sound characteristic for the most
popular types of music.
Press the
cycle through the following equalizer settings:
EQ button on the remote control to
PASS (EQ ‘Off’), CLASSIC,ROCK,POP,JAZZ.
The appropriate EQ indicator briefly appears in the display to confirm your selection.
The system remembers the EQ setting when the power is switched ‘Off’ and returns
to the same setting when the power is switched ‘On’ again.
DBBS (Dynamic Bass Boost) Control
Press the DBBS button on the remote control to increase the bass response.
Press again to cancel the Bass Boost function.

15
MUTE Button (On Remote Control Only)
Press the MUTE button on the remote control to shut off the speakers temporarily,
for example, to answer the telephone.
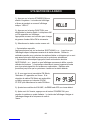
The sound stops and the “MUTE” indicator
flashes in the display.
Press the MUTE button again to cancel the mute function and restore the sound.
The “ MUTE” indicator disappears.
The mute function will also be canceled automatically by pressing the VOLUME +
or VOLUME – buttons.

16
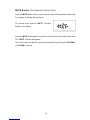
Setting The Clock
When the unit is connected to the AC outlet for
the first time the “– –:– –” flashes on the display.
Note: Do not turn the main unit power ‘On’. The clock can only be set while
the main unit power is ‘Off’. The clock can only be set with the Remote Control.
1.) Press and hold the PROGRAM/CLOCK button on the remote control.
“12 HOUR” flashes on display.
Press the SKIP/TUNING + or –buttons to
select between “24 HOUR” or “12 HOUR”
modes if necessary.
2.) Press the PROGRAM/CLOCK button again.
Just the Hour digits will continue flashing.
3.) Press the SKIP/TUNING + or –buttons to set the display to the correct hour,
AM or PM.
4.) Press the PROGRAM/CLOCK button again.
The Minute digits will begin flashing.
5.) Press the SKIP/TUNING + or –buttons to set the display to the correct minutes.
6.) Press the PROGRAM/CLOCK button once
more. Only the “:” flashing and the clock
begins to run.

17
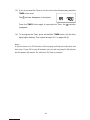
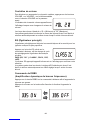
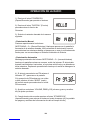
1.) Press the STANDBY/ON button to turn the system ‘On’.
The display lighting comes on and the display
briefly shows “HELLO”.
2.) Press the FUNCTION button to select the Tuner function.
An AM or FM frequency will appear on the
display.
Press the TUNER/BAND button again to
switch between the AM and FM bands if
necessary.
3.) Tune to the desired station as follows:
• Manual Tuning
Repeatedly press the SKIP/TUNING + or –buttons until the display shows the
exact frequency of the desired station. Use the Manual Tuning method to tune
to weak or distant stations that are not strong enough to be recognized by the
Automatic Tuning system.
• Automatic Tuning
Depress and hold the SKIP/TUNING + or –buttons until the display begins to
move, then release the buttons. The Tuner will search up or down the band for
the next strong signal and stop on that station. Repeat this procedure until the
tuner stops on your desired station.
4.) If you tuned to an FM Stereo station the ST
indicator will appear in the display. If the FM
Stereo reception is noisy or weak, press the
ID3/FM ST./ESP button on the remote
control to select the FM Mono mode.
5.) Adjust the VOLUME, DBBS and EQ controls to the desired settings.
6.) When you are finished listening press the STANDBY/ON button to return the
system to the Standby (Off) mode.
The display lighting goes off and the display changes from radio frequency to
correct time.
RADIO OPERATION

18
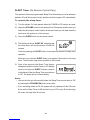
Hints For Better Reception
:The FM lead wire antenna on the back panel should be extended to its full
length. You may also have to vary the direction of this antenna until you find
the position that provides the best reception.
AM:Insert the socket of loop aerial into the AM AERIAL Socket on the unit. Adjust
the position of the loop aerial until you find the position that provides the best
reception for your favorite AM stations.
FM
AC~
AM AN T
iPod USB Sync.
R
R
R
FM AN T
LIN E OUT L
L
L
AUX I N
SPEAKERS 4
__
++
AC~
AA MMAANN TT
iPo d USB Sync.
R
R
R
FM AN T
LIN E OUT L
L
L
AUX I N
SPEAKERS 4
__
++
AM

19
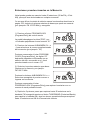
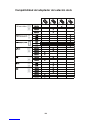
Presetting Stations In The Tuner Memory
You can store up to 40 of your favorite stations (30 FM /10 AM) in the tuner
memory for easy recall at any time.
Using either the manual or automatic tuning method described on page 17, tune to
the first station you wish to memorize (Example: FM 103.50 MHz) and then:
1.) Press the PROGRAM/CLOCK button on the remote control.
The display shows “PRG” and the channel
number “ 01” indicator flashes.
2.) Press the ALBUM/MEM CH. + or –buttons
to select your preset memory number.
Example “03”.
Press the PROGRAM/CLOCK button again,
the “03” stops flashing confirming that your
station has been entered in preset channel
number “03”.
3.) Tune to the next station you wish to memorize
Example: FM 106.70 MHz
Press the ALBUM/MEM CH. + or – buttons
select your next preset memory number.
Press the PROGRAM/CLOCK button again to enter your station in preset
channel number.
4.) Repeat Step 3 until you have stored up to 30 stations on the FM band, then
press the TUNER/BAND button to switch to the AM band and follow the same
procedure to enter up to 10 AM station in the tuner memory.

20
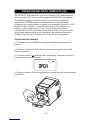
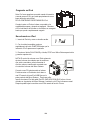
IMPORTANT: This CD player can play normal CDs plus CD Recordable (CD-R)
and CD Rewriteable (CD-RW) discs. However the playability of CD-R/RW discs
may be affected by the type of software that was used in ‘ripping’ the tracks from
the original discs and ‘burning’ the tracks onto the blank media. Playability may
also be affected by the quality and condition of the blank media you use for
recording. 100% compatibility cannot be guaranteed. This is not an indication of
any problems with your player.
Normal Playback
1.) Press the STANDBY/ON button to turn the system ‘On’.
2.) Press the FUNCTION button to select CD function.
3.) Press the OPEN/CLOSE button on front panel to open the CD tray.
4.) Load your own CD into the player with the printed ‘label’ facing up.
Music
CD OPERATION
La page est en cours de chargement...
La page est en cours de chargement...
La page est en cours de chargement...
La page est en cours de chargement...
La page est en cours de chargement...
La page est en cours de chargement...
La page est en cours de chargement...
La page est en cours de chargement...
La page est en cours de chargement...
La page est en cours de chargement...
La page est en cours de chargement...
La page est en cours de chargement...
La page est en cours de chargement...
La page est en cours de chargement...
La page est en cours de chargement...
La page est en cours de chargement...
La page est en cours de chargement...
La page est en cours de chargement...
La page est en cours de chargement...
La page est en cours de chargement...
La page est en cours de chargement...
La page est en cours de chargement...
La page est en cours de chargement...
La page est en cours de chargement...
La page est en cours de chargement...
La page est en cours de chargement...
La page est en cours de chargement...
La page est en cours de chargement...
La page est en cours de chargement...
La page est en cours de chargement...
La page est en cours de chargement...
La page est en cours de chargement...
La page est en cours de chargement...
La page est en cours de chargement...
La page est en cours de chargement...
La page est en cours de chargement...
La page est en cours de chargement...
La page est en cours de chargement...
La page est en cours de chargement...
La page est en cours de chargement...
La page est en cours de chargement...
La page est en cours de chargement...
La page est en cours de chargement...
La page est en cours de chargement...
La page est en cours de chargement...
La page est en cours de chargement...
La page est en cours de chargement...
La page est en cours de chargement...
La page est en cours de chargement...
La page est en cours de chargement...
La page est en cours de chargement...
La page est en cours de chargement...
La page est en cours de chargement...
La page est en cours de chargement...
La page est en cours de chargement...
La page est en cours de chargement...
La page est en cours de chargement...
La page est en cours de chargement...
La page est en cours de chargement...
La page est en cours de chargement...
La page est en cours de chargement...
La page est en cours de chargement...
La page est en cours de chargement...
La page est en cours de chargement...
La page est en cours de chargement...
La page est en cours de chargement...
La page est en cours de chargement...
La page est en cours de chargement...
La page est en cours de chargement...
La page est en cours de chargement...
La page est en cours de chargement...
La page est en cours de chargement...
La page est en cours de chargement...
La page est en cours de chargement...
La page est en cours de chargement...
La page est en cours de chargement...
La page est en cours de chargement...
La page est en cours de chargement...
La page est en cours de chargement...
La page est en cours de chargement...
La page est en cours de chargement...
La page est en cours de chargement...
La page est en cours de chargement...
La page est en cours de chargement...
La page est en cours de chargement...
La page est en cours de chargement...
La page est en cours de chargement...
La page est en cours de chargement...
La page est en cours de chargement...
La page est en cours de chargement...
La page est en cours de chargement...
La page est en cours de chargement...
La page est en cours de chargement...
La page est en cours de chargement...
La page est en cours de chargement...
La page est en cours de chargement...
La page est en cours de chargement...
La page est en cours de chargement...
La page est en cours de chargement...
La page est en cours de chargement...
La page est en cours de chargement...
La page est en cours de chargement...
La page est en cours de chargement...
La page est en cours de chargement...
La page est en cours de chargement...
La page est en cours de chargement...
La page est en cours de chargement...
La page est en cours de chargement...
La page est en cours de chargement...
La page est en cours de chargement...
La page est en cours de chargement...
La page est en cours de chargement...
La page est en cours de chargement...
La page est en cours de chargement...
La page est en cours de chargement...
La page est en cours de chargement...
La page est en cours de chargement...
La page est en cours de chargement...
La page est en cours de chargement...
La page est en cours de chargement...
-
 1
1
-
 2
2
-
 3
3
-
 4
4
-
 5
5
-
 6
6
-
 7
7
-
 8
8
-
 9
9
-
 10
10
-
 11
11
-
 12
12
-
 13
13
-
 14
14
-
 15
15
-
 16
16
-
 17
17
-
 18
18
-
 19
19
-
 20
20
-
 21
21
-
 22
22
-
 23
23
-
 24
24
-
 25
25
-
 26
26
-
 27
27
-
 28
28
-
 29
29
-
 30
30
-
 31
31
-
 32
32
-
 33
33
-
 34
34
-
 35
35
-
 36
36
-
 37
37
-
 38
38
-
 39
39
-
 40
40
-
 41
41
-
 42
42
-
 43
43
-
 44
44
-
 45
45
-
 46
46
-
 47
47
-
 48
48
-
 49
49
-
 50
50
-
 51
51
-
 52
52
-
 53
53
-
 54
54
-
 55
55
-
 56
56
-
 57
57
-
 58
58
-
 59
59
-
 60
60
-
 61
61
-
 62
62
-
 63
63
-
 64
64
-
 65
65
-
 66
66
-
 67
67
-
 68
68
-
 69
69
-
 70
70
-
 71
71
-
 72
72
-
 73
73
-
 74
74
-
 75
75
-
 76
76
-
 77
77
-
 78
78
-
 79
79
-
 80
80
-
 81
81
-
 82
82
-
 83
83
-
 84
84
-
 85
85
-
 86
86
-
 87
87
-
 88
88
-
 89
89
-
 90
90
-
 91
91
-
 92
92
-
 93
93
-
 94
94
-
 95
95
-
 96
96
-
 97
97
-
 98
98
-
 99
99
-
 100
100
-
 101
101
-
 102
102
-
 103
103
-
 104
104
-
 105
105
-
 106
106
-
 107
107
-
 108
108
-
 109
109
-
 110
110
-
 111
111
-
 112
112
-
 113
113
-
 114
114
-
 115
115
-
 116
116
-
 117
117
-
 118
118
-
 119
119
-
 120
120
-
 121
121
-
 122
122
-
 123
123
-
 124
124
-
 125
125
-
 126
126
-
 127
127
-
 128
128
-
 129
129
-
 130
130
-
 131
131
-
 132
132
-
 133
133
-
 134
134
-
 135
135
-
 136
136
-
 137
137
-
 138
138
-
 139
139
-
 140
140


iSymphony iSymphony M1 Manuel utilisateur
- Catégorie
- Lecteur CD
- Taper
- Manuel utilisateur
- Ce manuel convient également à
dans d''autres langues
- English: iSymphony iSymphony M1 User manual
- español: iSymphony iSymphony M1 Manual de usuario