Amazon Basics B09NS4RVQ9 Manuel utilisateur
- Taper
- Manuel utilisateur

EN . . . . . . . . . . . . . . . . . . . . Page 2
FR . . . . . . . . . . . . . . . . . . . . Page 16
DE . . . . . . . . . . . . . . . . . . . . Seite 31
IT . . . . . . . . . . . . . . . . . . .Pagina 48
ES . . . . . . . . . . . . . . . . . . .Página 63
NL . . . . . . . . . . . . . . . . . . .Pagina 78
2 in 1 Cordless Vacuum Cleaner
Aspirateur Sans Fil 2en1
2-in-1 Akkustaubsauger
Aspirapolvere Senza Filo 2 in 1
Aspiradora Sin Cable 2 en 1
2-in-1 Accustofzuiger
B09NS4RVQ9, B09NS53XPN

EN
2
Table of Contents
1. Important Safety Instructions ................................................................................................. 3
2. Battery Warnings ........................................................................................................................ 4
3. Symbols Explanation ................................................................................................................. 5
4. Intended Use ................................................................................................................................ 5
5. Specications ............................................................................................................................... 5
5.1 Appliance .............................................................................................................................. 5
5.2 Battery charger .................................................................................................................... 5
5.3 Motorised cleaning head ................................................................................................... 5
5.4 Importer Information ......................................................................................................... 5
6. Appliance Description ............................................................................................................... 6
7. Before First Use ........................................................................................................................... 7
8. Charging the Appliance ............................................................................................................ 7
9. Operation ...................................................................................................................................... 8
9.1 Accessories function ........................................................................................................... 8
9.2 Attaching accessories ......................................................................................................... 9
9.3 Detaching accessories ......................................................................................................... 9
9.4 Switching on/o ............................................................................................................... 10
10. Mounting the Wall Bracket ................................................................................................. 10
11. Cleaning and Maintenance ................................................................................................. 12
11.1 Cleaning ........................................................................................................................... 12
11.2 Storage ............................................................................................................................. 13
11.3 Maintenance .................................................................................................................... 13
11.4 Replacement parts ......................................................................................................... 14
12. Frequently Asked Questions ............................................................................................... 14
13. Disposal (for Europe only) ................................................................................................. 15
14. Battery Disposal ................................................................................................................... 15
15. Feedback and Help ............................................................................................................... 15

EN
3
1. Important Safety
Instructions
Read these instructions
carefully and retain them
for future use. If this
appliance is passed to a
third party, then these
instructions must be
included.
When using electrical
appliances, basic safety
precautions should always be
followed to reduce the risk
of re, electric shock, and/or
injury to persons including the
following:
WARNING Risk of electric
shock!
For the purposes of recharging
the battery, only use the
detachable supply unit (i.e.
battery charger model:
MC2508B-V) provided with
this appliance.
»This appliance can be used by
children aged from 8 years
and above and persons with
reduced physical, sensory
or mental capabilities or
lack of experience and
knowledge if they have
been given supervision or
instruction concerning use
of the appliance in a safe
way and understand the
hazards involved. Children
shall not play with the
appliance. Cleaning and user
maintenance shall not be
made by children without
supervision.
»Children should be
supervised to ensure that
they do not play with the
appliance.
»The plug must be removed
from the socket-outlet before
cleaning or maintaining the
appliance.
»The appliance is only to be
used with the power supply
unit (i.e. battery charger
model: MC2508B-V) provided
with the appliance.
»The appliance must only be
supplied at safety extra low
voltage corresponding to the
marking on the appliance.
»The supply cord cannot
be replaced. If the cord is
damaged the battery charger
should be scrapped.

EN
4
»Never use the appliance
without the dust cup and
lters installed. This could
damage the motor and
shorten the appliance’s
lifespan.
»Never use any of the nozzle
or brushes on people,
animals or plants.
»Do not vacuum up anything
which has been burning or
smoking such as cigarettes,
ashes or matches.
»Do not vacuum up any water,
liquid or damp dirt.
»Do not vacuum up any
inammable or combustible
liquids or gases and do not
vacuum in areas where such
substances are stored.
»Keep body parts and clothing
away from any openings
or moving parts of the
appliance.
»Switch o the appliance
before attaching, removing
and cleaning the accessories.
»Use only authorized
accessories and replacement
parts.
»Use extra care when
vacuuming on stairs.
»Do not charge the appliance
outdoors.
»Do not charge or store the
appliance near heat sources.
»Unplug the battery charger
when not in use for extended
periods.
»The LED front lights of the
motorised cleaning head are
not replaceable.
»This battery charger is
classied as protection
class II. This means the
battery charger is equipped
with reinforced or double
insulation between the mains
supply circuit and the output
voltage or the casing.
Therefore it does not require
a safety connection to an
electrical earth (ground).
2. Battery Warnings
CAUTION Risk of explosion!
Risk of explosion if the battery is replaced by an
incorrect type.
»This appliance contains battery that is only
replaceable by skilled persons.
»Before disposal, the battery must be removed
from the appliance. Contact qualied
professional.
»Do not leave the battery charging for a
prolonged period of time when the appliance
is not in use.
»Do not charge the battery overnight.
»If the appliance appears to be bulging or shows
other undesirable phenomena (e.g. excess
noise), stop using the appliance immediately.
»Do not cover the appliance while charging
the battery. Charge the appliance in a
well-ventilated environment.
»When in long term storage, charge the battery
to its 70 % capacity once every 3 months to
avoid shortening its life.
»Batteries produce heat when charging and
discharging. If the appliance becomes too hot
to touch, switch the appliance o and unplug
immediately.
»If the battery leaks, avoid contact with skin and
eyes. Rinse aected areas immediately with
plenty of clean water, then consult a doctor.

EN
5
3. Symbols Explanation
This symbol stands for “Conformité Européenne”, which declares
“Conformity with EU directives, regulations and appplicable standards”.
With the CE-marking, the manufacturer conrms that this product complies
with applicable European directives and regulation.
This symbol stands for “United Kingdom Conformity Assessed”. With the
UKCA- marking, the manufacturer conrms that this product complies with
applicable regulations and standards within Great Britain.
4. Intended Use
»This appliance is intended for dry vacuuming only. It is suitable for hard oors,
carpets, furniture and similar surfaces.
»This appliance is intended for household use only.
»This appliance is intended to be used in dry indoor areas only.
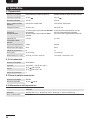
5. Specications
5.1 Appliance
Model number B09NS4RVQ9 (V18P01CP25EU) B09NS53XPN (V18P01CP25EU-BLDC)
Rated voltage 25.2 V 25.2 V
Rated power 150 W 350 W
Battery type / capacity Li-ion, 2000 mAh Li-ion, 2000 mAh
Charging time 4 to 6 hours 4 to 6 hours
Operating time
15 minutes (on Normal setting);
40 minutes (on Slow setting)
8 minutes (on high setting 3);
25 (on medium setting 2);
55 minutes (on low setting 1)
Dust cup capacity 0.7 L 0.7 L
Vacuum power 9 kPa 20 kPa
Filtration eciency 95 % 95 %
Protection class III III
Net weight approx. 2.6 kg approx. 2.6 kg
Dimensions (W x H x D) approx. 25.3 x 109 x 22.3 cm approx. 25.3 x 109 x 22.3 cm
5.2 Battery charger
Model number MC2508B-V
Input 100-240 V~, 50-60 Hz, 0.8 A
Output 25 V 0.8 A; 20 W
29 V 0.8 A; 23.2 W
Protection class II
5.3 Motorised cleaning head
Model number EBT03F
Rated power 25.2 V 10 W
5.4 Importer Information
For UK
Postal: Amazon EU SARL, UK Branch,
1 Principal Place, Worship St,
London EC2A 2FA, United
Kingdom
Business Reg.: BR017427

EN
6
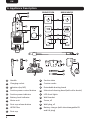
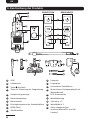
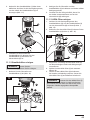
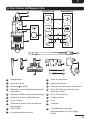
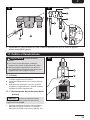
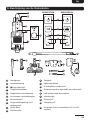
6. Appliance Description
A
G
H
I
J
B09NS4RVQ9
B09NS53XPN
F
D
E
C
B
MN
P
Q
R
L
O
K
S
AHandle KSuction tube
BCharging socket LCrevice nozzle
C button (on/o) MExtendable dusting brush
DSuction power control button NMotorised cleaning head (with roller brush)
ESuction power indicator OLED front lights
FBattery level indicator PWall bracket
GMotor unit QScrew, x3
HDust cup release button RWall plug, x3
IHEPA Filter SBattery charger (with interchangeable EU
and UK plug)
JDust cup

EN
7
7. Before First Use
DANGER Risk of suocation!
Keep any packaging materials away
from children and pets – these materials
are a potential source of danger, e.g.
suocation.
»Remove all the packing materials.
»Remove and review all components
before use.
»Check the appliance for transport
damages.
»Before charging, check that the power
supply voltage and current rating
correspond with the power supply
details shown on the rating labels on
the appliance and battery charger.
»Fully charge the appliance before using
for the rst time to activate maximum
power in the battery.
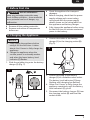
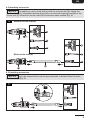
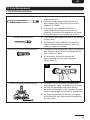
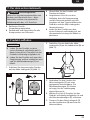
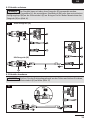
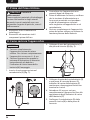
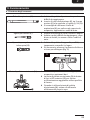
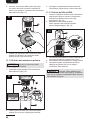
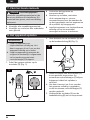
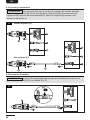
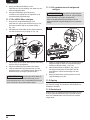
8. Charging the Appliance
NOTICE
»Fully charge the appliance before
using it for the rst time. It takes
about 4 to 6 hours to fully charge the
appliance.
»Charge the appliance when the
suction power is noticeably weaker
and when the lower battery level
indicator (F) ashes.
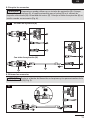
1. Slide the suitable plug onto the battery
charger (S) (Fig. 1).
1
1
2
S
2. Connect the cable of the battery
charger (S) to the charging socket (B)
(Fig. 2).
2
S
B
3. Connect the plug of the battery
charger (S) to a suitable socket-outlet.
The battery level indicators (F) keep
ashing until charging has nished.
4. Allow 4 to 6 hours to fully charge the
appliance completely until the battery
level indicators (F) go o.
5. Disconnect the battery charger (S) from
the charging socket (B) and from the
socket-outlet.

EN
8
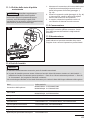
9. Operation
9.1 Accessories function
Suction tube (K) »Suitable for oor cleaning and hard-to-
reach areas.
»Assemble the suction tube (K) between the
motor unit (G) and the desired brush or
nozzle (L/ M/ N).
»It is not recommended to use the suction
tube (K) for cleaning carpeted stairs,
upholstery or car seats.
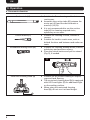
Crevice nozzle (L) »Suitable for cleaning in folds, crevices or
corners.
»Suitable for hard-to-reach areas, such as
behind furniture and between and under car
seats.
Extendable dusting brush (M) »Suitable for cleaning window blinds, shelves,
upholstery and wooden surfaces.
»Press the unlock button and pull to extend
(Fig. 3), if needed.
3
Motorised cleaning head (N) »Suitable for all normal cleaning of carpets,
rugs and hard ooring.
»The motorised cleaning head (N) is equipped
with LED front lights (O) for additional light
on the working surface.
»When using the motorised cleaning
head (N), do not use it at head height.
O

EN
9
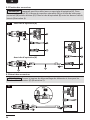
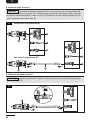
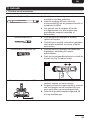
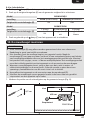
9.2 Attaching accessories
NOTICE The appliance can be used with or without suction tube (K). Attach the
crevice nozzle (L), extendable dusting brush (M) or motorised cleaning head (N) to the
motor unit (G). Attach the suction tube (K) in between when needed (Fig. 4).
4Without suction tube (K)
With suction tube (K)
G
N
L
M
K
N
L
G
M
9.3 Detaching accessories
NOTICE Press the release button on the parts and pull to detach them from the
motor unit (G) (Fig. 5).
5
G

EN
10
9.4 Switching on/o
1. Press the button (C) to switch the
appliance on.
2. Press the suction power control
button (D) to select the desired suction
power.
Model B09NS4RVQ9
Setting SLOW NORMAL
Suction
power
Indicator
(E)
O On
Model B09NS53XPN
Setting 1
(Low)
2
(Medium)
3
(High)
Suction
power
Indicator
(E)
O Lights up
white
Lights
up blue
3. After use, press the button (C) to
switch the appliance o.
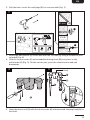
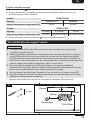
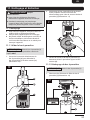
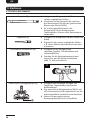
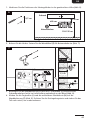
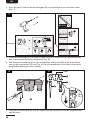
10. Mounting the Wall Bracket
NOTICE
»This wall bracket (P) should be mounted only by an adult. If in doubt, consult a
professional.
»Before mounting, determine the suitable mounting location. The wall bracket (P)
must be xed to a wooden or masonry/concrete wall using fasteners that are
appropriate for the mounting surface. Do not install on drywalls, wall boards or
thin plywood. The mounting surface must be capable of supporting the weight of
the appliance and its accessories.
»Do not drill into any pipes or power lines beneath the surface during mounting
holes preparation. Use voltage/metal detector before drilling any holes to
eliminate any such potential risks.
»Do not hang anything other than the appliance and its accessories on the wall
bracket (P).
»Mount the wall bracket on a suitable location near a suitable socket-outlet for
charging the appliance.
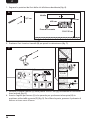
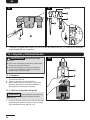
1. Mark the positions of the screw holes at the desired height (Fig. 6).
6
4.7 cm ≥15 cm
120-125 cm
≤80 cm
Cabinet
Socket-outlet

EN
11
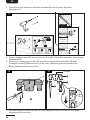
2. Drill the holes. Insert the wall plugs (R) for concrete walls (Fig. 7).
7
Ø3 mm
3.4 cm
2
1
R
3. Mount the wall bracket (P) on the wall with the 2 screws (Q) using a screwdriver (not
included) (Fig. 8).
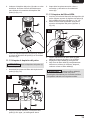
4. Click the crevice nozzle (L) and extendable dusting brush (M) into place on the
wall bracket (P) (Fig. 9). To take out the part, press the release button and pull
downwards.
Q
P
9
L
M
P
Hook
8
5. Hang the motor unit (G) with the suction tube (K) and motorised cleaning head (N) on
the hook.

EN
12
11. Cleaning and Maintenance
WARNING Risk of electric shock!
»To prevent electric shock, unplug the
appliance before cleaning.
»During cleaning do not immerse the appliance
in water or other liquids. Never hold the
appliance under running water.
11.1 Cleaning
»To clean the appliance, wipe with a soft,
slightly damp cloth.
»Wipe the appliance dry after cleaning.
»Never use corrosive detergents, wire brushes,
abrasive scourers, metal or sharp utensils to
clean the appliance.
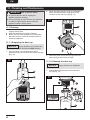
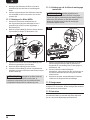
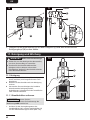
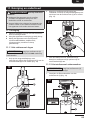
11.1.1 Emptying the dust cup
NOTICE Empty the dust cup (J) when the
amount of dust has reached the MAX marking.
1. Press the dust cup release button (H) to
detach the dust cup (J) from the motor unit (G)
(Fig. 10).
10
H
G
J
2. Hover the dust cup (J) on top of a trash bin.
Press the unlock button to dispose of the
contents in the dust cup (J) (Fig. 11).
11
J
3. Close the cover of the dust cup (J). Ret the
dust cup (J) to the motor unit (G).
11.1.2 Cleaning the dust cup
NOTICE Empty the dust cup (J) before
cleaning it.
1. Disassemble the lter parts from the dust
cup (J) (Fig. 12).
U
n
l
o
c
k
L
o
c
k
12
12
J
3
4

EN
13
2. Clean the lter parts and the dust cup (J) using
water and mild detergent.
3. Dry the parts thoroughly before reassembling
and retting to the motor unit (G).
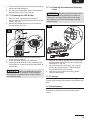
11.1.3 Cleaning the HEPA lter
1. Press the dust cup release button (H) to
detach the dust cup (J) from the motor unit (G)
(Step 1, Fig. 13).
2. Remove the HEPA lter (I) on top of the dust
cup (J) (Step 2, Fig. 13).
13
1
2
I
H
J
G
3. Tap the HEPA lter (I) gently to remove any
excess dust and debris.
4. Rinse the HEPA lter (I) with cold water.
5. Leave the HEPA lter (I) to dry completely for
a minimum of 24 hours. Ret the HEPA lter (I)
afterwards.
NOTICE Replace the HEPA lter (I) every
3 months or when it is heavily soiled. Replace
only with the compatible lter model stated in
the following table.
11.1.4 Cleaning the motorised cleaning
head
NOTICE Regularly check the brush roll of
the motorised cleaning head (N) for stubborn
soiling such as trapped hair and thread. Clean
the inside of the motorised cleaning head (N)
when needed.
14 1
2
3
1. Remove the locking guard from the motorised
cleaning head (N) by pressing the locking tab
down (Step 1, Fig. 14).
2. Take the brush roll out (Step 2, Fig. 14) and
remove any threads, hair or debris tangled
around the bristles with a brush.
3. Ret the brush roll and the locking guard
properly afterwards.
11.2 Storage
Store the appliance on the wall bracket (P) and
charge when needed. Keep away from children and
pets.
11.3 Maintenance
Any other servicing than mentioned in this manual
should be performed by a professional repair
centre.

EN
14
11.4 Replacement parts
NOTICE
»Use only authorized accessories and replacement parts.
»Replacement parts can be requested from Amazon customer service. Go to “Orders” -> nd the
order with this product -> click “Get product support” -> click “Call me”. Then, follow the on-screen
instructions.
*The terminology used on Amazon website may dier based on the languages used in the region.
Parts Part code
Dust cup B09NS53XPN: 12175000A37286
B09NS4RVQ9: 12175000A37291
HEPA lter B09NS53XPN: 12475000006248
B09NS4RVQ9: 12475000A00541
Air outlet sponge 12475000006328
Charging base assembly 12175000082993
Battery charger 17475000A07727, 17475000012230, 16075000A64974
Motorised cleaning head 12175000A27386, 16075000A64976
Suction tube 12975000011822
Crevice nozzle 12175000077578
Extendable dusting brush 12175000077577
12. Frequently Asked Questions
Problem Solution
The appliance does not switch
on.
»Charge the appliance with the supplied battery charger (S).
»Disconnect the appliance from the battery charger (S).
The appliance switches o
suddenly.
»The appliance overheats. Clear blockages from any of the
accessories (K/ L/ M/ N) and clean dust cup (J) and lter (I).
Allow the appliance to cool down for at least 30 minutes before
switching it on.
Suction power becomes weak. »Empty and clean the dust cup (J).
»Clean the HEPA lter (I).
»Clear blockages from any of the accessories (K/ L/ M/ N).
Motorised cleaning head (N)
does not rotate.
Check the motorised cleaning head (N) for debris and clean it properly.
Motor unit (G) is abnormally
noisy.
»Switch the appliance o and check for blockages.
»Empty and clean the dust cup (J).
»Clean the HEPA lter (I).
Dust comes out from the
motor unit (G).
»Clean the HEPA lter (I).
»Fit the HEPA lter (I) properly on top of the dust cup (J).

EN
15
13. Disposal (for Europe
only)
The Waste Electrical and Electronic
Equipment (WEEE) laws aim to minimise
the impact of electrical and electronic
goods on the environment and human
health, by increasing re-use and recycling and by
reducing the amount of WEEE going to landll. The
symbol on this product or its packaging signies
that this product must be disposed separately from
ordinary household wastes at its end of life. Be
aware that this is your responsibility to dispose of
electronic equipment at recycling centres in order
to conserve natural resources. Each country should
have its collection centres for electrical and
electronic equipment recycling. For information
about your recycling drop o area, please contact
your related electrical and electronic equipment
waste management authority, your local city oce,
or your household waste disposal service.
14. Battery Disposal
Contact an authorised service center to remove the
battery before disposal of the appliance:
1. Remove the battery from the appliance.
2. Insulate the metal contacts with adhesive tape
to prevent short circuits.
Do not dispose of used batteries with
your household waste. Take them to an
appropriate disposal/collection site.
15. Feedback and Help
We would love to hear your feedback. To ensure we are providing the best customer experience possible,
please consider writing a customer review.
amazon.co.uk/review/review-your-purchases#
If you need help with your Amazon Basics product, please use the website or number below.
amazon.co.uk/gp/help/customer/contact-us

FR
16
Table des Matières
1. Consignes de Sécurité Importantes ������������������������������������������������������������������������������������ 17
2. Avertissements Relatifs aux Piles ���������������������������������������������������������������������������������������� 19
3. Signication des Symboles ��������������������������������������������������������������������������������������������������� 19
4. Utilisation Prévue �������������������������������������������������������������������������������������������������������������������� 19
5. Caractéristiques ����������������������������������������������������������������������������������������������������������������������� 20
5�1 Appareil ������������������������������������������������������������������������������������������������������������������������������ 20
5�2 Chargeur de batterie �������������������������������������������������������������������������������������������������������� 20
5�3 Tête de nettoyage motorisée ����������������������������������������������������������������������������������������� 20
5�4 Renseignements sur l’importateur ������������������������������������������������������������������������������� 20
6. Description de l'Appareil ������������������������������������������������������������������������������������������������������� 21
7. Avant la Première Utilisation ����������������������������������������������������������������������������������������������� 22
8. Chargement de l'appareil ������������������������������������������������������������������������������������������������������ 22
9. Fonctionnement ����������������������������������������������������������������������������������������������������������������������� 23
9�1 Fonction des accessoires ������������������������������������������������������������������������������������������������� 23
9�2 Fixation des accessoires �������������������������������������������������������������������������������������������������� 24
9�3 Retrait des accessoires ����������������������������������������������������������������������������������������������������� 24
9�4 Mise sous/hors tension ��������������������������������������������������������������������������������������������������� 25
10. Installation du support mural ������������������������������������������������������������������������������������������� 25
11. Nettoyage et Entretien �������������������������������������������������������������������������������������������������������� 27
11�1 Nettoyage ������������������������������������������������������������������������������������������������������������������������ 27
11�2 Rangement ���������������������������������������������������������������������������������������������������������������������� 28
11�3 Entretien �������������������������������������������������������������������������������������������������������������������������� 28
11�4 Pièces de rechange �������������������������������������������������������������������������������������������������������� 29
12. Foire aux Questions �������������������������������������������������������������������������������������������������������������� 29
13. Mise au rebut (pour l’Europe uniquement) �������������������������������������������������������������������� 30
14. Mise au Rebut des Batteries ����������������������������������������������������������������������������������������������� 30
15. Vos Avis et Aide ���������������������������������������������������������������������������������������������������������������������� 30

FR
17
1. Consignes de Sécurité
Importantes
Veuillez lire
attentivement les
présentes instructions
et les conserver an de
pouvoir vous y référer
ultérieurement� En cas de
cession de cet appareil
à un tiers, le présent
manuel d’utilisation doit
également lui être remis�
Lorsque vous utilisez des
appareils électriques, vous
devez toujours prendre des
mesures de sécurité de base
an de réduire tout risque
d’incendie, d’électrocution et/
ou de blessures corporelles�
Ces précautions incluent
notamment les suivantes :
AVERTISSEMENT Risque
d’électrocution !
Pour recharger la batterie,
utilisez uniquement le module
d'alimentation amovible (c�-
à-d� le chargeur de batterie
modèle : MC2508B-V) fourni
avec cet appareil�
»Cet appareil peut être utilisé
par des enfants de 8 ans et
plus et par des personnes
ayant des capacités
physiques, sensorielles
ou mentales réduites ou
manquant d’expérience et de
connaissances, à condition
qu’ils soient surveillés ou
aient reçu les instructions
concernant l’utilisation de
l’appareil en toute sécurité
et qu’ils comprennent les
dangers encourus� Les
enfants ne doivent pas
jouer avec cet appareil� Le
nettoyage et l’entretien par
l’utilisateur ne doivent pas
être eectués par des enfants
sans surveillance�
»Les enfants doivent être
surveillés an de s'assurer
qu'ils ne jouent pas avec
l'appareil�
»La che doit être débranchée
de la prise de courant avant
de procéder au nettoyage ou
à l’entretien du produit�

FR
18
»L’appareil ne doit être
utilisé qu'avec le module
d’alimentation électrique (c�-
à-d� le chargeur de batterie
modèle : MC2508B-V) fourni
avec cet appareil�
»L'appareil ne doit être
alimenté qu'à une très
basse tension de sûreté
correspondant à la
signalétique apposée sur
l'appareil�
»Le câble d'alimentation ne
peut pas être remplacé� Si
le câble est endommagé, le
chargeur de batterie doit être
mis au rebut�
»N'utilisez jamais l'appareil
sans le bac à poussière et les
ltres installés. Cela pourrait
endommager le moteur et
réduire la durée de vie de
l'appareil�
»N'utilisez jamais les suceurs
ou les brosses sur des
personnes, des animaux ou
des plantes�
»N'aspirez rien qui ait brûlé ou
dégagé de la fumée, comme
des cigarettes, des cendres
ou des allumettes�
»N'aspirez pas d'eau, de
liquide, ni de saletés
humides�
»N'aspirez aucun liquide
ou gaz inammable ou
combustible et ne passez pas
l'aspirateur dans des zones
où de telles substances sont
entreposées�
»Tenez les parties du corps et
les vêtements éloignés de
toute ouverture ou partie en
mouvement de l'appareil�
ȃteignez l'appareil avant de
xer, d'enlever et de nettoyer
les accessoires�
»N'utilisez que des accessoires
et des pièces de rechange
approuvés�
»Faites très attention lorsque
vous passez l'aspirateur dans
les escaliers�
»Ne chargez pas l'appareil à
l'extérieur�
»Ne chargez pas ni ne rangez
l'aspirateur près de sources
de chaleur�
»Débranchez le chargeur
de batterie en cas de non-
utilisation prolongée�

FR
19
»Les éclairages à LED frontaux
de la tête de nettoyage
motorisée ne sont pas
remplaçables�
»Ce chargeur de batterie
appartient à la classe
de protection II. Cela signie
que le chargeur de batterie
est équipé d’une double
isolation ou d’une isolation
renforcée entre le circuit de
l’alimentation électrique et la
tension de sortie ou le
boîtier� Il n’a donc pas besoin
d’être relié à la terre (masse)�
2. Avertissements Relatifs
aux Piles
ATTENTION Risque d’explosion !
Risque d'explosion si les piles sont
remplacées par un modèle inadapté�
»Cet appareil contient une batterie qui
ne peut être remplacée que par des
personnes qualiées.
»Avant de procéder à la mise au rebut, la
batterie doit être retirée de l’appareil�
Contactez un professionnel qualié.
»Ne laissez pas la batterie en charge
pendant une période prolongée lorsque
l’appareil n'est pas utilisé�
»Ne chargez pas la batterie toute la nuit�
»Si l’appareil semble bombé ou
présente d'autres signes anormaux
(comme un surcroît de bruit), cessez
immédiatement d’utiliser l’appareil�
»Ne couvrez pas l’appareil pendant le
chargement de la batterie� Chargez
l’appareil dans un environnement bien
ventilé�
»En cas de rangement prolongé,
rechargez la batterie jusqu’à 70 % de
sa capacité une fois tous les 3 mois an
de ne pas réduire sa durée de vie�
»Les piles génèrent de la chaleur
lors de la charge ou de la décharge�
Si l’appareil devient trop chaud au
toucher, mettez-le hors tension, puis
débranchez-le immédiatement�
»En cas de fuite de pile, évitez tout
contact avec la peau et les yeux� Rincez
les zones touchées immédiatement
à l’eau claire en abondance, puis
consultez un médecin�
3. Signication des Symboles
Ce symbole signie
« Conformité Européenne »,
qui déclare la « Conformité
aux directives, règlements et
normes en vigueur dans l’UE »�
En apposant, le marquage CE,
le fabricant conrme que ce
produit est conforme aux
directives et réglementations
européennes en vigueur�
4. Utilisation Prévue
»Cet appareil est destiné à l'aspiration
à sec uniquement� Il convient aux sols
durs, moquettes, meubles et surfaces
du même type�
»Cet appareil est destiné à un usage
domestique exclusivement�
»Cet appareil est conçu pour être utilisé
uniquement dans des endroits secs à
l’intérieur�

FR
20
5. Caractéristiques
5.1 Appareil
Référence du modèle B09NS4RVQ9 (V18P01CP25EU) B09NS53XPN (V18P01CP25EU-BLDC)
Tension nominale 25,2 V 25,2 V
Puissance nominale 150 W 350 W
Type et capacité de la
batterie
Li-ion, 2 000 mAh Li-ion, 2 000 mAh
Temps de chargement De 4 à 6 heures De 4 à 6 heures
Autonomie
15 minutes (sur réglage Normal) ;
40 minutes (sur réglage Slow (Lent))
8 minutes (sur réglage fort 3) ;
25 (sur réglage moyen 2) ;
55 minutes (sur réglage faible 1)
Volume du bac à
poussière
0,7 l 0,7 l
Puissance d'aspiration 9 kPa 20 kPa
Ecacité de ltration 95 % 95 %
Classe de protection III III
Poids net env� 2,6 kg env� 2,6 kg
Dimensions (L x H x P) env� 25,3 x 109 x 22,3 cm env� 25,3 x 109 x 22,3 cm
5.2 Chargeur de batterie
Référence du modèle MC2508B-V
Entrée 100-240 V~, 50-60 Hz, 0,8 A
Sortie 25 V 0,8 A ; 20 W
29 V 0,8 A ; 23,2 W
Classe de protection II
5.3 Tête de nettoyage motorisée
Référence du modèle EBT03F
Puissance nominale 25,2 V 10 W
5.4 Renseignements sur l’importateur
Pour l’UE
Adresse: Amazon EU S�à r�l�, 38 avenue John F� Kennedy,
L-1855 Luxembourg
No d’Immatriculation: 134248
La page est en cours de chargement...
La page est en cours de chargement...
La page est en cours de chargement...
La page est en cours de chargement...
La page est en cours de chargement...
La page est en cours de chargement...
La page est en cours de chargement...
La page est en cours de chargement...
La page est en cours de chargement...
La page est en cours de chargement...
La page est en cours de chargement...
La page est en cours de chargement...
La page est en cours de chargement...
La page est en cours de chargement...
La page est en cours de chargement...
La page est en cours de chargement...
La page est en cours de chargement...
La page est en cours de chargement...
La page est en cours de chargement...
La page est en cours de chargement...
La page est en cours de chargement...
La page est en cours de chargement...
La page est en cours de chargement...
La page est en cours de chargement...
La page est en cours de chargement...
La page est en cours de chargement...
La page est en cours de chargement...
La page est en cours de chargement...
La page est en cours de chargement...
La page est en cours de chargement...
La page est en cours de chargement...
La page est en cours de chargement...
La page est en cours de chargement...
La page est en cours de chargement...
La page est en cours de chargement...
La page est en cours de chargement...
La page est en cours de chargement...
La page est en cours de chargement...
La page est en cours de chargement...
La page est en cours de chargement...
La page est en cours de chargement...
La page est en cours de chargement...
La page est en cours de chargement...
La page est en cours de chargement...
La page est en cours de chargement...
La page est en cours de chargement...
La page est en cours de chargement...
La page est en cours de chargement...
La page est en cours de chargement...
La page est en cours de chargement...
La page est en cours de chargement...
La page est en cours de chargement...
La page est en cours de chargement...
La page est en cours de chargement...
La page est en cours de chargement...
La page est en cours de chargement...
La page est en cours de chargement...
La page est en cours de chargement...
La page est en cours de chargement...
La page est en cours de chargement...
La page est en cours de chargement...
La page est en cours de chargement...
La page est en cours de chargement...
La page est en cours de chargement...
La page est en cours de chargement...
La page est en cours de chargement...
La page est en cours de chargement...
La page est en cours de chargement...
La page est en cours de chargement...
La page est en cours de chargement...
La page est en cours de chargement...
La page est en cours de chargement...
La page est en cours de chargement...
La page est en cours de chargement...
La page est en cours de chargement...
La page est en cours de chargement...
-
 1
1
-
 2
2
-
 3
3
-
 4
4
-
 5
5
-
 6
6
-
 7
7
-
 8
8
-
 9
9
-
 10
10
-
 11
11
-
 12
12
-
 13
13
-
 14
14
-
 15
15
-
 16
16
-
 17
17
-
 18
18
-
 19
19
-
 20
20
-
 21
21
-
 22
22
-
 23
23
-
 24
24
-
 25
25
-
 26
26
-
 27
27
-
 28
28
-
 29
29
-
 30
30
-
 31
31
-
 32
32
-
 33
33
-
 34
34
-
 35
35
-
 36
36
-
 37
37
-
 38
38
-
 39
39
-
 40
40
-
 41
41
-
 42
42
-
 43
43
-
 44
44
-
 45
45
-
 46
46
-
 47
47
-
 48
48
-
 49
49
-
 50
50
-
 51
51
-
 52
52
-
 53
53
-
 54
54
-
 55
55
-
 56
56
-
 57
57
-
 58
58
-
 59
59
-
 60
60
-
 61
61
-
 62
62
-
 63
63
-
 64
64
-
 65
65
-
 66
66
-
 67
67
-
 68
68
-
 69
69
-
 70
70
-
 71
71
-
 72
72
-
 73
73
-
 74
74
-
 75
75
-
 76
76
-
 77
77
-
 78
78
-
 79
79
-
 80
80
-
 81
81
-
 82
82
-
 83
83
-
 84
84
-
 85
85
-
 86
86
-
 87
87
-
 88
88
-
 89
89
-
 90
90
-
 91
91
-
 92
92
-
 93
93
-
 94
94
-
 95
95
-
 96
96


Amazon Basics B09NS4RVQ9 Manuel utilisateur
- Taper
- Manuel utilisateur
dans d''autres langues
- italiano: Amazon Basics B09NS4RVQ9 Manuale utente
- español: Amazon Basics B09NS4RVQ9 Manual de usuario
- Deutsch: Amazon Basics B09NS4RVQ9 Benutzerhandbuch
- Nederlands: Amazon Basics B09NS4RVQ9 Handleiding
Autres documents
-
Silvercrest 338031 2001 Operating Instructions Manual
-
Hyundai HHE203203 Cordless Stick Vacuum Cleaner Manuel utilisateur
-
Vacmaster Orson Lite VSE2101EU Manuel utilisateur
-
KALORIK VC 42475 L Manuel utilisateur
-
Shark IZ162HC Manuel utilisateur
-
-
Livoo DOH138 Manuel utilisateur
-
-
 BUTURE JR500 Manuel utilisateur
