Hamilton Beach 33961 Manuel utilisateur
- Catégorie
- Mesure, test
- Taper
- Manuel utilisateur
Ce manuel convient également à

English ...................... 2
Français .................. 16
Español ................... 30
READ BEFORE USE
LIRE AVANT UTILISATION
LEA ANTES DE USAR
Visit www.hamiltonbeach.com for our
complete line of products and Use and
Care Guides – as well as delicious recipes,
tips, and to register your product online.
Rendez-vous sur www.hamiltonbeach.ca
pour notre liste complète de produits et de
nos manuels utilisateur – ainsi que nos
délicieuses recettes et nos conseils.
Visite www.hamiltonbeach.com (
EE. UU.)
o
www.hamiltonbeach.com.mx (México)
para ver otros productos de Hamilton Beach
o para contactarnos.
Questions
Please call us – our friendly
associates are ready to help.
USA: 1.800.851.8900
Preguntas
Por favor llámenos – nuestros
amables representantes están
listos para ayudar.
EE. UU.: 1.800.851.8900
MEX: 01 800 71 16 100
Le invitamos a leer cuidadosamente este
instructivo antes de usar su aparato.
Questions
N’hésitez pas à nous appeler –
nos associés s’empresseront
de vous aider.
CAN : 1.800.267.2826
Set ’n Forget
®
6-Qt. Oval
Programmable Slow Cooker
Mijoteuse programmable
ovale de 6 L
Olla de Cocción
Lenta Programable
Ovalado de
6 Cuartos

2
IMPORTANT SAFEGUARDS
1. Read all instructions.
2. This appliance is not intended for use by persons (including chil-
dren) with reduced physical, sensory, or mental capabilities, or
lack of experience and knowledge, unless they are closely super-
vised and instructed concerning use of the appliance by a person
responsible for their safety.
3. Close supervision is necessary when any appliance is used by or
near children. Children should be supervised to ensure that they
do not play with the appliance.
4. Do not touch hot surfaces. Use handles or knobs.
5. To protect against electric shock, do not immerse cord, plug, or
base in water or other liquid.
6. Unplug from outlet when not in use and before cleaning.
Allow to cool before putting on or taking off parts.
7. Do not operate any appliance with a damaged supply cord or
plug, or after the appliance malfunctions or has been dropped
or damaged in any manner. Supply cord replacement and
repairs must be conducted by the manufacturer, its service
agent, or similarly qualified persons in order to avoid a hazard.
Call the provided customer service number for information on
examination, repair, or adjustment.
8. The use of accessory attachments not recommended by the
appliance manufacturer may cause injuries.
9. Do not use outdoors.
10. Do not let cord hang over edge of table or counter, or touch
hot surfaces, including stove.
11. Do not place on or near hot gas or an electric burner, or in a
heated oven.
12. Extreme caution must be used when moving an appliance
containing hot oil or other hot liquids.
13. To disconnect slow cooker, turn OFF ( ); then remove plug from
wall outlet.
14. CAUTION! To prevent damage or shock hazard, do not cook in
base. Cook only in removable crock.
15. Do not use appliance for other than intended use.
16. Intended for countertop use only.
17. WARNING! Spilled food can cause serious burns. Keep appliance
and cord away from children. Never drape cord over edge of
counter, never use outlet below counter, and never use with an
extension cord.
When using electrical appliances, basic safety precautions should always be followed to reduce the risk of fire, electric shock, and/or injury to
persons, including the following:
SAVE THESE INSTRUCTIONS

3
VESSEL AND LID: PRECAUTIONS AND INFORMATION
• Please handle vessel and lid carefully to ensure long life.
• Avoid sudden, extreme temperature changes. For example, do not
place a hot lid into cold water, or onto a wet surface.
• Avoid hitting vessel or lid against faucet or other hard surfaces.
• Do not use vessel or lid if chipped, cracked, or severely scratched.
• Do not use abrasive cleansers or metal scouring pads.
• The vessel and lid can become very hot. Use caution. Do not place
directly on any unprotected surface or countertop.
• The vessel is oven-proof, but never heat vessel when empty.
• Do not place lid in a microwave oven, conventional oven, or on
stove top.
REMOVING LID AND VESSEL
When removing lid, tilt so that opening faces away from you to
avoid being burned by steam.
The sides of the slow cooker’s base get very warm because
the heating elements are located here. Use handles on base if
necessary. Use oven mitts to remove vessel.
Other Consumer Safety Information
This appliance is intended for household use only.
This appliance is only intended for the preparation, cooking, and
serving of foods. This appliance is not intended for use with any
nonfood materials or products.
w WARNING
Electrical Shock Hazard: This appliance is
provided with a polarized plug (one wide blade) to reduce the risk
of electric shock. The plug fits only one way into a polarized outlet.
Do not defeat the safety purpose of the plug by modifying the plug
in any way or by using an adapter. If the plug does not fit fully into
the outlet, reverse the plug. If it still does not fit, have an electrician
replace the outlet.
A short power-supply cord is used to reduce the risk resulting from
it being grabbed by children, becoming entangled in, or tripping
over a longer cord.

4
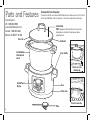
Lid and vessel are
stovetop-safe.
Vessel is oven-safe.
Parts and Features
Glass Lid
Base
Control Panel/
Display
Cast-Aluminum
Stovetop-Safe
Vessel
Probe Jack
Base Handles
Lid Gasket
Probe
Lid Vent Hole
NOTE: The purpose of the lid vent hole is to vent steam.
Cooking time is not affected. Do not remove silicone
gasket from hole.
Stovetop-Safe Vessel Capacity:
For best results, fill vessel at least half full but no more than one inch (2.5 cm) from
rim. If only half-filled, check for doneness 1 to 2 hours earlier than recipe time.
To order parts:
US: 1.800.851.8900
www.hamiltonbeach.com
Canada: 1.800.267.2826
Mexico:
01 800 71 16 100

5
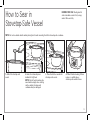
How to Sear in
Stovetop-Safe Vessel
1. Add oil to stovetop-safe
vessel.
2. Heat oil on stovetop over
medium to high heat.
NOTE: Do not heat stovetop-safe
vessel when empty since cooking
surface and/or stovetop-safe
cookware may be damaged.
3. Place food to be seared into
stovetop-safe vessel.
4. When finished searing, follow
recipe or carefully place
stovetop-safe vessel in base.
NOTE: Do not use metal utensils when placing food in and removing food from stovetop-safe cookware.
BEFORE FIRST USE: Wash glass lid
and removable vessel in hot, soapy
water. Rinse and dry.

6
Cooking Modes
No matter what you plan to cook, the Set ’N Forget
®
slow cooker
has three cooking modes to make it easy. Here is how to choose
the one that is right for your lifestyle and the food you’re cooking.
Will you be away when your food is finished cooking?
Use PROGRAM Mode. Input preferred amount of cooking time
and the slow cooker automatically shifts to WARM at end of
selected cooking time. Food won’t overcook!
Are you cooking a large cut of meat or using a recipe that
requires food to reach a certain temperature?
Use PROBE Mode. For many foods, especially large cuts of meat
like roasts, chicken, turkey, and pork, internal food temperature
is the best test for doneness. The temperature probe with this
slow cooker takes guesswork out of slow cooking. Select desired
internal food temperature and slow cooker will automatically
shift to WARM once temperature is reached. By using Cooking
Guide for Probe, you can estimate the amount of time the food
will need to cook. Visit foodsafety.gov or fsis.usda.gov for more
information about cooking times.
Do you want to cook the traditional way without setting a time?
— OR —
Do you want to heat previously cooked food?
Use MANUAL Mode. Lets you select traditional HIGH or LOW
settings.
Do you want to keep previously cooked food warm?
(For instance, moving slow cooker from kitchen to buffet table.)
Use PROBE Mode. Once food reaches desired temperature, you
can select WARM setting to monitor food temperature.
Use MANUAL Mode. Lets you select WARM setting.
Use PROGRAM Mode. Lets you select WARM setting.
Slow cooker will shut off after desired time.

7
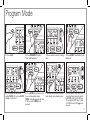
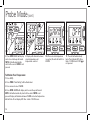
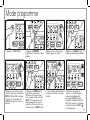
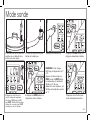
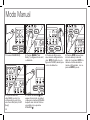
Program Mode
1. Press ON (I). 2. Press PROGRAM. “Cooking
Time” will illuminate.
3. Press arrows to select cooking
time.
4. Press ENTER. “Heat Setting” will
illuminate.
5. Press arrows to select heat
setting. NOTE: Do not use WARM
setting to cook food.
6. Press ENTER to start unit and a
3-second beep will sound.
NOTE: Unit will automatically start
in 20 seconds if ENTER is not
pressed.
7. Display will alternate between
heat setting and remaining time.
8. At the end of cook time, slow
cooker will automatically switch
to WARM setting. Unit will turn
off and display OFF after a total
of 14 ON hours if OFF
( )
is not
pressed.

8
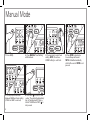
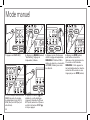
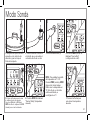
Manual Mode
1. Press ON (I). 2. Press MANUAL. “Heat Setting”
will illuminate.
3. Press arrows to select heat
setting. NOTE: Do not use
WARM setting to cook food.
4. Press ENTER to start and a
3-second beep will sound.
NOTE: Unit will automatically
start in 20 seconds if ENTER is not
pressed.
5. The display will alternate
between COOK and heat setting
(if HIGH or LOW is selected).
6. Press OFF
( )
to turn off slow
cooker. The unit will automatically
turn off and display OFF after a
total of 14 ON hours if OFF
( )
is
not pressed.

9
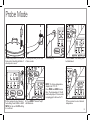
Probe Mode
1. Make sure probe is in center of
food and not touching bottom of
stovetop-safe vessel.
3. Press ON (I).
5. Press arrows to select desired
heat setting. Select HIGH or LOW.
NOTE: Do not use WARM setting
to cook food.
6. Press ENTER. “Desired Temp”
will illuminate.
4. Press PROBE. “Heat Setting” will
be illuminated.
7. Press arrows to select desired
temperature.
2. Insert probe into jack on side
of slow cooker.
NOTE: To change temperature
display from ºF to ºC:
Press PROBE and ENTER at same
time. The temperature in ºC will
now be displayed. If slow cooker
is unplugged, it will reset to ºF.

10
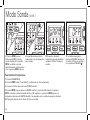
9. Display will alternate between
actual temperature and
temperature selected.
10. When selected temperature
is reached, the unit will switch to
WARM.
11. The unit will automatically
turn off and display OFF after a
total of 14 ON hours if OFF
( )
is
not pressed.
Probe Mode (cont.)
8. Press ENTER. COOK will display
and a 3-second beep will sound.
NOTE: Unit will automatically
start in 20 seconds if ENTER is not
pressed.
To Monitor Food Temperature:
1. Press ON (I).
2. Press PROBE. “Heat Setting” will be illuminated.
3. Press arrows to select WARM.
4. Press ENTER. WARM will display and 3-second beep will sound.
NOTE: Unit will automatically start in 20 seconds if ENTER is not
pressed. Display will alternate between WARM and actual temperature.
Unit will turn off and display OFF after a total of 14 ON hours.

11
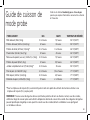
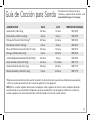
FOOD/WEIGHT LOW HIGH DESIRED TEMP
Beef Roast (3 lbs/1.4 kg) 3 to 4 hours 1.5 hours 145°F/63°C
Beef Brisket (4–5 lbs/1.8–2.3 kg) 8 hours 6 hours 145°F/63°C
Turkey Breast (6–7 lbs/2.7–3.2 kg)* 6 to 7 hours 3 to 4 hours 180°F/82°C
Whole Chicken (4–6 lbs/1.8–2.7 kg) 6 hours 4 hours 180°F/82°C
Chicken Pieces, bone-in (3–4 lbs/1.4–1.8 kg) 4 to 5 hours 1.5 hours 180°F/82°C
Chicken Breasts (4 lbs/1.8 kg) 4 hours 3.5 hours 180°F/82°C
Fully Cooked Ham (7.5 lbs/3.4 kg)* 4 to 5 hours 3 hours 145°F/63°C
Pork Tenderloin (2–3 lbs/0.9–1.4 kg) 2 to 3 hours 1.5 to 2 hours 160°F/71°C
Pork Roast (4–5 lbs/1.8–2.3 kg) 4 to 5 hours 2.5 hours 160°F/71°C
Pork Chops (2–3 lbs/0.9–1.4 kg) 5 hours 2 to 3 hours 160°F/71°C
*For 6-quart slow cooker only. Adjust the size and weight of food to fit 5-quart (or smaller) slow cooker.
NOTE: If cooking dense vegetables (such as potatoes or other root vegetables) with meats, check for doneness when
desired meat temperature is reached. These types of vegetables may take longer to cook when cooked with meats/foods
such as those listed in the Cooking Guide above.
Cooking Guide for Probe
Visit foodsafety.gov or fsis.usda.gov for more
information on food and food safety.

12
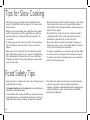
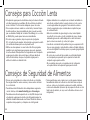
Tips for Slow Cooking
• The stovetop-safe vessel should be at least half-filled for best
results. If only half-filled, check for doneness 1 to 2 hours earlier
than recipe time.
• Stirring is not necessary when slow cooking. Removing glass lid
results in major heat loss and the cooking time may need to be
extended. However, if cooking on HIGH, you may want to stir
occasionally.
• If cooking soups or stews, leave a 2-inch (5.1-cm) space between
top of stovetop-safe vessel and food so recipe can come to a
simmer.
• Many recipes call for cooking all day. If your morning schedule
doesn’t allow time to prepare a recipe, prepare it the night before.
Place all ingredients in stovetop-safe vessel, cover with lid, and
refrigerate overnight. In the morning, simply place stovetop-safe
vessel in slow cooker.
• Some foods are not suited for extended cooking in a slow cooker.
Pasta, seafood, milk, cream, or sour cream should be added
2 hours before serving. Evaporated milk or condensed soups are
perfect for slow cooking.
• The higher the fat content of meat, the less liquid is needed. If
cooking meat with a high fat content, place thick onion slices
underneath so meat will not sit on (and cook in) fat.
• Slow cookers allow for very little evaporation. If making your
favorite soup, stew, or sauce, reduce liquid called for in original
recipe. If too thick, liquid can be added later.
• If cooking a vegetable-type casserole, there will need to be liquid
in recipe to prevent scorching on sides of stovetop-safe vessel.
• If cooking a recipe with root vegetables, place root vegetables in
bottom of stovetop-safe vessel.
Food Safety Tips
• Do not use frozen, uncooked meat in slow cooker. Thaw any meat or
poultry before slow cooking.
• Visit www.foodsafety.gov or fsis.usda.gov for more information on
safe internal cooking temperatures.
• To store leftovers after cooking, do NOT place stovetop-safe vessel
in the refrigerator since contents will take too long to cool. Instead,
divide leftovers into smaller containers and place into refrigerator.
• Never allow undercooked or raw meat to sit at room temperature
in the slow cooker. Once meat is placed into stovetop-safe
cookware, it should be cooked immediately (unless prepping slow
cooker the night before, where stovetop-safe vessel should be
placed into the refrigerator).

13
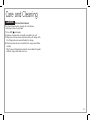
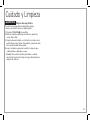
Care and Cleaning
1. Press OFF
( ) and unplug.
2. R
emove stovetop-safe vessel with oven mitts. Let cool.
3. Wipe base of slow cooker and probe with a soft, damp cloth.
Dry. Wrap probe wire around handle for storage.
4. Wash stovetop-safe vessel and lid in hot, soapy water. Rinse
and dry.
Tip: To prevent lingering food smells, clean rubber lid gasket
with hot, soapy water after each use.
Electrical Shock Hazard.
Disconnect power before cleaning. Do not immerse
cord, plug, or base in any liquid.
w WARNING

14
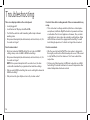
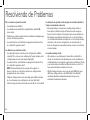
Troubleshooting
There is no display visible on the control panel.
• Is unit plugged in?
• Is unit turned on? Display should flash SEL.
• Test that the electrical outlet is working with a lamp in known
working order.
• Was power interrupted (due to brownout, electrical storm, etc.) for
5 seconds or longer?
Food is undercooked.
• Was food cooked on WARM setting? Do not cook on WARM
setting; always cook on LOW or HIGH heat settings.
• Was power interrupted (due to brownout, electrical storm, etc.) for
5 seconds or longer?
NOTE: For a power interruption of 5 seconds or less, the slow
cooker will remember the programmed heat and time settings.
• Did you select LOW heat setting, but used a cooking time based on
HIGH heat setting?
• Did you have the glass lid placed correctly on slow cooker?
Food isn’t done after cooking amount of time recommended in my
recipe.
• This can be due to voltage variations (which are commonplace
everywhere) or altitude. Slight fluctuations in power do not have
a noticeable effect on most appliances. However, they can alter
cooking times in slow cooker by extending cooking times. Allow
sufficient time and select the appropriate heat setting. You will
learn through experience if a shorter or longer time is needed.
Food is overcooked.
• Was the vessel at least half full? The slow cooker is designed to
thoroughly cook food in a filled stovetop-safe vessel. If the vessel
is only half-filled, check for doneness 1 to 2 hours earlier than
recipe time.
• Did you select time based on a LOW heat recipe but use a HIGH
heat setting? Foods will continue to increase in temperature after
desired temperature has been reached.

15
Limited Warranty
This warranty applies to products purchased and used in the U.S. and Canada. This is the only express warranty for this product and
is in lieu of any other warranty or condition.
This product is warranted to be free from defects in material and workmanship for a period of five (5) years from the date of original
purchase in Canada and one (1) year from the date of original purchase in the U.S. During this period, your exclusive remedy is repair
or replacement of this product or any component found to be defective, at our option; however, you are responsible for all costs
associated with returning the product to us and our returning a product or component under this warranty to you. If the product or
component is no longer available, we will replace with a similar one of equal or greater value.
This warranty does not cover glass, filters, wear from normal use, use not in conformity with the printed directions, or damage to
the product resulting from accident, alteration, abuse, or misuse. This warranty extends only to the original consumer purchaser or
gift recipient. Keep the original sales receipt, as proof of purchase is required to make a warranty claim. This warranty is void if the
product is used for other than single-family household use or subjected to any voltage and waveform other than as specified on the
rating label (e.g., 120 V ~ 60 Hz).
We exclude all claims for special, incidental, and consequential damages caused by breach of express or implied warranty. All
liability is limited to the amount of the purchase price. Every implied warranty, including any statutory warranty or condition
of merchantability or fitness for a particular purpose, is disclaimed except to the extent prohibited by law, in which case such
warranty or condition is limited to the duration of this written warranty. This warranty gives you specific legal rights. You may have
other legal rights that vary depending on where you live. Some states or provinces do not allow limitations on implied warranties or
special, incidental, or consequential damages, so the foregoing limitations may not apply to you.
To make a warranty claim, do not return this appliance to the store. Please call 1.800.851.8900 in the U.S. or 1.800.267.2826 in Canada
or visit hamiltonbeach.com in the U.S. or hamiltonbeach.ca in Canada. For faster service, locate the model, type, and series numbers
on your appliance.

16
PRÉCAUTIONS IMPORTANTES
1. Lire toutes les instructions.
2. Cet appareil n’est pas destiné à être utilisé par des personnes (y
compris les enfants) dont les capacités physiques, sensorielles
ou mentales sont réduites, ou manquant d’expérience et
de connaissance, sauf si elles sont étroitement surveillées
et instruites sur l’utilisation de l’appareil par une personne
responsable de leur sécurité.
3. Une surveillance étroite est requise pour tout appareil utilisé par
ou près des enfants. Surveiller que les enfants ne jouent pas avec
l’appareil.
4. Ne pas toucher les surfaces chaudes. Utiliser les poignées ou
boutons.
5. Pour éviter les risques d’électrocution, ne pas immerger le
cordon, la fiche ou la base dans l’eau ou tout autre liquide.
6. Débrancher de la prise murale dès la fin de l’utilisation et avant
le nettoyage. Laisser refroidir l’appareil avant d’installer ou retirer
des pièces.
7. Ne pas faire fonctionner un appareil électroménager avec un
cordon ou une fiche endommagée, ou lorsque l’appareil ne
fonctionne pas bien ou a été échappé ou endommagé d’une
manière quelconque. Le remplacement et la réparation du
cordon d’alimentation doivent être faits par le fabricant, son
agent de service ou toute personne qualifiée de façon à éviter
tout danger. Appeler le numéro de service à la clientèle fourni
pour des renseignements concernant l’examen, la réparation ou
l’ajustement.
8. L’utilisation d’accessoires non recommandés par le fabricant de
l’appareil peut causer des blessures.
9. Ne pas utiliser à l’extérieur.
10. Ne pas laisser le cordon pendre du bord d’une table ou d’un
comptoir, ou toucher des surfaces chaudes, y compris la
cuisinière.
11. Ne pas placer l’appareil sur ou près d’un brûleur à gaz chaud, ou
d’un élément électrique, ou dans un four chaud.
12. Une très grande prudence doit être exercée lors du déplacement
de tout appareil contenant des huiles ou des liquides chauds.
13. Pour débrancher la mijoteuse, éteigner ( ) puis débrancher la
fiche de la prise de courant.
14. ATTENTION ! Afin d’éviter les dommages ou le risque
d’électrocution, ne pas cuire dans la base. Cuire seulement dans
le pot amovible.
15. N’utiliser cet appareil que pour les fonctions auxquelles il est
destiné.
16. Utiliser uniquement sur un comptoir.
17. AVERTISSEMENT ! Les aliments renversés peuvent causer des
brûlures graves. Garder l’appareil et son cordon éloignés des
enfants. Ne jamais disposer le cordon près du bord d’un comp-
toir et ne jamais utiliser une prise de courant sous le comptoir et
ne jamais utiliser de rallonge.
Pour utiliser un appareil électroménager, vous devez toujours prendre des mesures élémentaires de sécurité pour réduire le risque d’incendie,
d’électrocution et/ou de blessure corporelle, en particulier les mesures suivantes :
CONSERVER CES INSTRUCTIONS

17
POT ET COUVERCLE : PRÉCAUTIONS ET INFORMATION
• Veuillez manipuler soigneusement le pot et le couvercle pour
assurer leur durabilité.
• Éviter des changements de température brusques et extrêmes.
Par exemple, ne pas mettre un couvercle ou un pot chaud dans
l’eau froide ou sur une surface mouillée.
• Éviter de frapper le pot ou le couvercle contre le robinet ou toute
surface dure.
• Ne pas utiliser le pot ou le couvercle si l’un ou l’autre est ébréché,
fissuré ou très éraflé.
• Ne pas utiliser de nettoyants abrasifs ou de tampons à récurer
métalliques.
• Le pot et son couvercle peuvent devenir très chauds. Faire preuve
de prudence. Ne pas les déposer directement sur une surface ou
un revêtement de comptoir non protégé.
• Le pot peut aller au four, mais ne doit jamais être chauffé à vide.
• Ne pas mettre le couvercle dans un four à micro-ondes, dans un
four conventionnel ou directement sur une table de cuisson.
SOULÈVEMENT DU COUVERCLE ET DU POT
Soulever le couvercle en l’inclinant de manière à diriger les vapeurs
loin du visage pour éviter les brûlures.
Les parois de la base de la mijoteuse deviennent très chaudes
parce que c’est à cet endroit que se trouvent les éléments
chauffants. Utiliser les poignées de la base, si nécessaire.
Utiliser des gants de cuisinier pour retirer le pot.
Autres consignes de sécurité pour le consommateur
Cet appareil est destiné à un usage domestique uniquement.
Cet appareil est conçu uniquement pour préparer, faire cuire et servir
des aliments. Cet appareil n’est pas conçu pour une utilisation avec
toute autre matière ou produit non alimentaire.
w AVERTISSEMENT
Risque de choc électrique : Cet appareil est
fourni avec une fiche polarisée (une broche large) pour réduire le
risque d’électrocution. Cette fiche n’entre que dans un seul sens dans
une prise polarisée. Ne contrecarrez pas l’objectif sécuritaire de cette
fiche en la modifiant de quelque manière que ce soit ou en utilisant
un adaptateur. Si vous ne pouvez pas insérer complètement la fiche
dans la prise, inversez la fiche. Si elle refuse toujours de s’insérer, faire
remplacer la prise par un électricien.
Un cordon d’alimentation court est utilisé afin d’éviter que les
enfants ne l’attrapent, pour éviter son enchevêtrement et de
trébucher sur un long cordon.

18
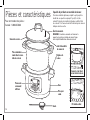
Couvercle et pot allant
sur une table de cuisson.
Pot allant au four.
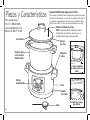
Pièces et caractéristiques
Couvercle en verre
Base
Panneau de
commande/
afficheur
Pot en aluminium
moulé allant sur une
table de cuisson
Prise pour
sonde
Poignées de
la base
Joint d’étanchéité
du couvercle
Sonde
Évent du couvercle
REMARQUE : L’évent de ce couvercle sert à évacuer la
vapeur. Ceci ne nuit pas à la durée de cuisson. Ne pas
retirer le joint d’étanchéité en silicone de cet évent.
Capacité du pot allant sur une table de cuisson :
Pour des résultats optimaux, remplir le pot jusqu’à la
moitié de sa capacité ou jusqu’à 1 po (2,5 cm) du
rebord. Si le pot est rempli à mi-hauteur, vérifier l’état
de cuisson 1 à 2 heures avant la fin du temps de cuisson
indiqué dans la recette.
Pour commander des pièces :
Canada : 1.800.267.2826

19
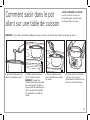
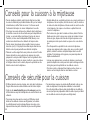
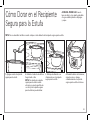
Comment saisir dans le pot
allant sur une table de cuisson
1. Ajouter de l’huile dans le pot
allant sur une table de cuisson.
2. Chauffer l’huile à feu moyen
fort sur la table de cuisson.
REMARQUE : Ne pas faire
chauffer le pot allant sur une table
de cuisson lorsqu’il lorsqu’il est
vide pour éviter d’endommager la
surface de cuisson du récipiente
et le pot allant sur une table de
cuisson.
3. Placer les aliments à saisir
dans le pot allant sur une table
de cuisson.
4. Lorsque la saisie est terminée,
suivre la recette et placer
délicatement le pot allant sur une
table de cuisson dans la base.
REMARQUE : Ne pas utiliser d’ustensiles métalliques pour placer ou retirer des aliments du pot allant sur une table de cuisson.
AVANT LA PREMIÈRE UTILISATION :
Laver le couvercle en verre et le
pot amovible dans de l’eau chaude
savonneuse. Rincer et sécher.

20
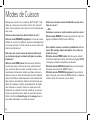
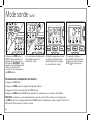
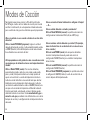
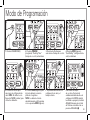
Modes de Cuisson
Quoi que vous vouliez cuire, la mijoteuse Set ‘N Forget
MD
a trois
modes de cuisson pour vous faciliter la tâche. Voici comment
choisir celui qui convient à votre style de vie et aux aliments que
vous cuisez.
Serez-vous absent quand vos aliments finiront de cuire ?
Utilisez le mode PROGRAM (programme). Inscrivez votre durée
préférée de cuisson et la mijoteuse conservera automatiquement
au chaud les aliments à la fin de la durée de cuisson choisie. Vos
aliments ne brûleront pas !
Faites-vous cuire un gros morceau de viande ou utilisez-vous
une recette qui exige que les aliments atteignent une certaine
température?
Utilisez le mode PROBE (sonde). Pour beaucoup d’aliments,
en particulier pour les morceaux de viande particulièrement
gros, comme les rôtis, les poulets, les dindes et le porc, c’est
la température intérieure des aliments qui indique le mieux le
degré de cuisson. La sonde de température de votre mijoteuse
vous permet d’obtenir automatiquement la bonne température.
Vous choisissez la température intérieure de l’aliment que vous
désirez et la mijoteuse s’arrêtera automatiquement de chauffer
mais continuera à conserver l’aliment au chaud quand cette
température sera atteinte. En utilisant le Guide de cuisson avec
sonde, vous pouvez estimer la durée de cuisson des aliments.
Visitez le site Internet foodsafety.gov ou fsis.usda.gov pour de
plus amples informations sur la durée de cuisson.
Voulez-vous cuire d’une manière traditionnelle sans préciser le
temps de cuisson ?
— OU —
Voulez-vous conserver au chaud les aliments après leur cuisson ?
Utilisez le mode MANUAL. Ce mode vous permet de choisir les
réglages traditionnels HIGH (haut) ou LOW (bas).
Vous souhaitez conserver vos aliments préalablement cuits au
chaud ? (Par exemple, déplacer la mijoteuse de la cuisine vers
la table de service.)
Utilisation du mode PROBE (sonde). Une fois que les aliments
ont atteint la température désirée, sélectionnez le réglage WARM
(chaud) pour surveiller la température des aliments.
Utilisation du mode MANUAL (manuel). Vous permet de régler
le degré de conservation de WARM (chaleur).
Utilisation du mode PROGRAM (programme). Vous permet de
régler le degré de conservation de WARM (chaleur). La mijoteuse
s’arrêtera à la fin de la durée de cuisson choisie.
La page charge ...
La page charge ...
La page charge ...
La page charge ...
La page charge ...
La page charge ...
La page charge ...
La page charge ...
La page charge ...
La page charge ...
La page charge ...
La page charge ...
La page charge ...
La page charge ...
La page charge ...
La page charge ...
La page charge ...
La page charge ...
La page charge ...
La page charge ...
La page charge ...
La page charge ...
La page charge ...
La page charge ...
-
 1
1
-
 2
2
-
 3
3
-
 4
4
-
 5
5
-
 6
6
-
 7
7
-
 8
8
-
 9
9
-
 10
10
-
 11
11
-
 12
12
-
 13
13
-
 14
14
-
 15
15
-
 16
16
-
 17
17
-
 18
18
-
 19
19
-
 20
20
-
 21
21
-
 22
22
-
 23
23
-
 24
24
-
 25
25
-
 26
26
-
 27
27
-
 28
28
-
 29
29
-
 30
30
-
 31
31
-
 32
32
-
 33
33
-
 34
34
-
 35
35
-
 36
36
-
 37
37
-
 38
38
-
 39
39
-
 40
40
-
 41
41
-
 42
42
-
 43
43
-
 44
44


Hamilton Beach 33961 Manuel utilisateur
- Catégorie
- Mesure, test
- Taper
- Manuel utilisateur
- Ce manuel convient également à
dans d''autres langues
- English: Hamilton Beach 33961 User manual
- español: Hamilton Beach 33961 Manual de usuario
- português: Hamilton Beach 33961 Manual do usuário
Documents connexes
-
Hamilton Beach 33265C Mode d'emploi
-
-
-
-
Hamilton Beach 33669 Mode d'emploi
-
-
-