Dream On Me 799 Manuel utilisateur
- Catégorie
- Meubles de bébé
- Taper
- Manuel utilisateur

Read all instructions before
assembling and using product.
IMPORTANT - Keep
Instructions for future use.
1022R1-799
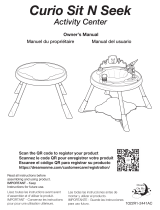
Owner’s Manual
SKYWARD
Step Stool
Scan the QR code to register your product
Scannez le code QR pour enregistrer votre produit
Escanee el código QR para registrar su producto
https://dreamonme.com/customercare/registration/
Manuel du propriétaire Manual del usuario
Lisez toutes les instructions avant avant
d'assembler et d'utiliser le produit.
IMPORTANT - Conservez les instructions
pour pour une utilisation ultérieure.
Lea todas las instrucciones antes de
montar y utilizar el producto.
IMPORTANTE - Guarde las instrucciones
para uso futuro.

2www.dreamonme.com/help
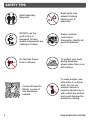
SAFETY TIPS
Adult Assembly
Required.
DO NOT use the
product if it is
damaged, broken,
and/or components are
missing or broken.
To protect your parts
during assembly,
please place them on a
soft surface.
Contact Dream On
Me Inc in case of
any assistance
needed.
Small parts may
present choking
hazard prior to
assembly.
Please read the
instructions
thoroughly. Identify all
parts & hardware.
Do Not Use Power
Drills or Drivers.
To clean surface, use
only water on a damp
cloth. Do not use
window cleaner or
cleaning abrasive as it
will scratch the surface
and could damage the
protective coating.
0-6

3
www.dreamonme.com/help
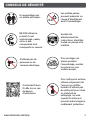
CONSEILS DE SÉCURITÉ
Un assemblage par
un adulte est requis.
NE PAS utiliser le
produit s'il est
endommagé, cassé,
et/ou si des
composants sont
manquants ou cassés.
Pour protéger vos
pièces pendant
l'assemblage, veuillez
les placer sur une
surface souple.
Contactez Dream
On Me Inc en cas
de besoin
d'assistance.
Les petites pièces
peuvent présenter un
risque d'étouffement
avant l'assemblage.
Veuillez lire
attentivement les
instructions. Identifiez
toutes les pièces et le
matériel.
N'utilisez pas de
perceuse ou de
visseuse électrique.
Pour nettoyer la surface,
utilisez uniquement de
l'eau sur un chiffon
humide. N'utilisez pas
de nettoyant pour vitres
ou d'abrasif de
nettoyage, car cela
rayerait la surface et
pourrait endommager le
revêtement protecteur.
0-6

4www.dreamonme.com/help
CONSEJOS DE SEGURIDAD
Se requiere el
montaje por parte
de un adulto.
NO utilice el producto si
está dañado, roto y/o
faltan componentes o
están rotos.
Para proteger las piezas
durante el montaje,
colóquelas sobre una
superficie blanda.
Contacte con
Dream On Me Inc
en caso de
necesitar ayuda.
Las piezas pequeñas
pueden presentar
peligro de asfixia
antes del montaje.
Lea detenidamente las
instrucciones.
Identifique todas las
piezas y herrajes.
No utilice taladros o
atornilladores
eléctricos.
Para limpiar la
superficie, utilice sólo
agua en un paño
húmedo. No utilice
limpiacristales o
productos de limpieza
abrasivos, ya que
rayarán la superficie y
podrían dañar el
revestimiento protector.
0-6

5
www.dreamonme.com/help
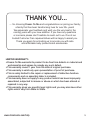
…. for choosing Dream On Me and congratulations on joining our family;
a family that has been transforming lives for over 30+ years!
We appreciate your feedback and wish you the very best in the
coming years with your new addition. If you have any questions
or concerns please don’t hesitate to reach out to us. One of our
trusted Customer Care representatives will be happy to assist you.
Thank you again for entrusting us to provide you with safe
and affordable baby products and accessories.
THANK YOU...
LIMITED WARRANTY:
• Dream On Me warrants its product to be free from defects in material and
workmanship and agrees to remedy any such defect.
• This warranty covers 1 year from the date of original purchase.
• This warranty is valid only upon presentation of proof of purchase.
• This is solely limited to the repair or replacement of defective furniture
components and no assembly labor is included.
• This warranty does not apply to any product which has been improperly
assembled, subjected to misuse or abuse or which has been altered or
repaired in any way.
• This warranty gives you specific legal rights and you may also have other
rights which vary from State to State.

6www.dreamonme.com/help
.... pour avoir choisi Dream On Me et félicitations pour avoir rejoint notre
famille ; une famille qui transforme des vies depuis plus de 30 ans ! Nous
apprécions vos commentaires et vous souhaitons le meilleur pour les années
à venir avec votre nouveau bébé. Si vous avez des questions ou des
préoccupations, n'hésitez pas à nous contacter. L'un de nos représentants
du service clientèle se fera un plaisir de vous aider. Merci encore de nous
avoir fait confiance pour vous fournir des produits et accessoires pour bébés
sûrs et abordables.
MERCI...
GARANTIE LIMITÉE :
• Dream On Me garantit que son produit est exempt de tout défaut de
matériel et de fabrication et s'engage à remédier à tout défaut de ce type.
• Cette garantie couvre 1 an à partir de la date d'achat originale.
• Cette garantie n'est valable que sur présentation d'une preuve d'achat.
• Elle est uniquement limitée à la réparation ou au remplacement des
composants défectueux du meuble et aucune main d'œuvre de montage
n'est incluse.
• Cette garantie ne s'applique pas à un produit qui a été mal assemblé,
soumis à une mauvaise utilisation ou à un abus ou qui a été modifié ou
réparé de quelque façon que ce soit.
• Cette garantie vous donne des droits légaux spécifiques et vous pouvez
également avoir d'autres droits qui varient d'un État à l'autre. droits qui
varient d'un État à l'autre.

7
www.dreamonme.com/help
.... por elegir a Dream On Me y enhorabuena por unirse a nuestra familia;
¡una familia que lleva más de 30 años transformando vidas! Apreciamos sus
comentarios y le deseamos lo mejor en los próximos años con su nueva
incorporación. Si tiene alguna pregunta o duda, no dude en ponerse en
contacto con nosotros. Uno de nuestros representantes de atención al
cliente de confianza estará encantado de ayudarle. Gracias de nuevo por
confiar en nosotros para proporcionarle productos y accesorios para bebés
seguros y asequibles.
GRACIAS...
GARANTIE LIMITÉE :
• Dream On Me garantiza que su producto está libre de defectos de
material y mano de obra y se compromete a remediar cualquier defecto.
• Esta garantía cubre 1 año a partir de la fecha de compra original.
• Esta garantía sólo es válida si se presenta el comprobante de compra.
• Se limita únicamente a la reparación o sustitución de los componentes
defectuosos del mueble y no se incluye la mano de obra de montaje.
• Esta garantía no se aplica a ningún producto que haya sido montado
incorrectamente, sometido a un mal uso o abuso o que haya sido
alterado o reparado de alguna manera.
• Esta garantía le otorga derechos legales específicos y también puede
tener otros derechos que varían de un estado a otro.

8www.dreamonme.com/help
WARNINGS
• PREVENT SERIOUS INJURY OR DEATH FROM FALLS OR TIPPING OVER: NEVER
PLACE YOUR CHILD AND PRODUCT ON AN ELEVATED SURFACE!
• ADULT ASSEMBLY IS REQUIRED.
• NEVER LEAVE THE CHILD UNATTENDED.
• ALWAYS KEEP THE CHILD WITHIN ARM’S REACH.
• ALWAYS PLACE THE PRODUCT ON A FLAT, LEVEL SURFACE.
• NEVER PLACE THE PRODUCT NEAR THE STAIRS.
• ALWAYS ENSURE THIS UNIT IS PLACED AWAY FROM DANGEROUS OBJECTS OR
APPLIANCES, SUCH AS A STOVE, OVEN, ELECTRICAL OUTLETS, ETC.
• AGE LIMIT : 3 YEARS AND UP WITH A WEIGHT LIMIT OF 154 LBS OR 70KG.
CHOKING HAZARD:
• UNASSEMBLED SMALL PARTS CAN BE A CHOKING HAZARD TO CHILDREN. FOR
THE SAFETY OF YOUR CHILD, IT IS RECOMMENDED NOT TO ASSEMBLE THIS
UNIT IN THE SAME ROOM DUE TO CONCERNS THAT THEY MAY PICK UP AND
SWALLOW SMALL PARTS.
• NEVER USE THIS PRODUCT IF THERE ARE ANY LOOSE, MISSING FASTENERS,
LOOSE JOINTS, OR BROKEN PARTS.
• CHECK AFTER ASSEMBLY AND PERIODICALLY USE AT LEAST ONCE A WEEK.
• NEVER SUBSTITUTE PARTS.
OPERATING INSTRUCTIONS:
• CHILDREN MUST NOT USE THIS PRODUCT UNTIL ASSEMBLY IS COMPLETED
AND THE PLATFORM IS SET UP ON A LEVEL SURFACE. FOR THE FIRST USE, AN
ADULT SHOULD SHOW THE CHILD HOW TO USE THIS PRODUCT.
• ADULT SUPERVISION IS REQUIRED. CHILDREN SHOULD BE INSTRUCTED NOT
TO USE THIS PRODUCT IN ANY MANNER OTHER THAN INTENDED.
• CHILDREN SHOULD BE INSTRUCTED NOT TO CLIMB ON THE PRODUCT WHEN IT
IS WET.
• DO NOT ATTACH ITEMS TO THIS PRODUCT THAT MAY BE POTENTIAL
STRANGULATION HAZARDS (SUCH AS BUT NOT LIMITED TO, PET LEASHES,
ROPES, CHAINS, ETC.).
• CHILDREN SHOULD BE DRESSED APPROPRIATELY. AVOID LOOSE-FITTING
CLOTHING AND POTENTIALLY HAZARDOUS ITEMS SUCH AS PONCHOS AND
SCARVES.

9
www.dreamonme.com/help
AVERTISSEMENTS
• POUR ÉVITER TOUTE BLESSURE GRAVE OU MORTELLE EN CAS DE CHUTE OU
DE BASCULEMENT : NE PLACEZ JAMAIS VOTRE ENFANT ET LE PRODUIT SUR
UNE SURFACE SURÉLEVÉE !
• L'ASSEMBLAGE PAR UN ADULTE EST NÉCESSAIRE.
• NE JAMAIS LAISSER L'ENFANT SANS SURVEILLANCE.
• GARDEZ TOUJOURS L'ENFANT À PORTÉE DE MAIN.
• TOUJOURS PLACER LE PRODUIT SUR UNE SURFACE PLANE ET HORIZONTALE.
• NE JAMAIS PLACER LE PRODUIT PRÈS DES ESCALIERS.
• TOUJOURS S'ASSURER QUE CET APPAREIL EST PLACÉ LOIN D'OBJETS OU
D'APPAREILS DANGEREUX, TELS QU'UNE CUISINIÈRE, UN FOUR, DES PRISES
ÉLECTRIQUES, ETC.
• GE LIMITE : 3 ANS ET PLUS, AVEC UNE LIMITE DE POIDS DE 70 KG OU 154 LB.
RISQUE D'ÉTOUFFEMENT:
• LES PETITES PIÈCES NON ASSEMBLÉES PEUVENT PRÉSENTER UN RISQUE
D'ÉTOUFFEMENT POUR LES ENFANTS. POUR LA SÉCURITÉ DE VOTRE ENFANT,
IL EST RECOMMANDÉ DE NE PAS ASSEMBLER CET APPAREIL DANS LA MÊME
PIÈCE, CAR IL POURRAIT RAMASSER ET AVALER DE PETITES PIÈCES.
• N'UTILISEZ JAMAIS CE PRODUIT S'IL Y A DES FIXATIONS L CHES OU
MANQUANTES, DES JOINTS L CHES OU DES PIÈCES CASSÉES.
• VÉRIFIER APRÈS L'ASSEMBLAGE ET UTILISER PÉRIODIQUEMENT AU MOINS UNE
FOIS PAR SEMAINE.
• NE JAMAIS REMPLACER DES PIÈCES.
INSTRUCTIONS D'UTILISATION:
• LES ENFANTS NE DOIVENT PAS UTILISER CE PRODUIT AVANT QUE
L'ASSEMBLAGE NE SOIT TERMINÉ ET QUE LA PLATE-FORME NE SOIT INSTALLÉE
SUR UNE SURFACE PLANE. POUR LA PREMIÈRE UTILISATION, UN ADULTE DOIT
MONTRER À L'ENFANT COMMENT UTILISER CE PRODUIT.
• LA SURVEILLANCE D'UN ADULTE EST NÉCESSAIRE. LES ENFANTS DOIVENT
ÊTRE INFORMÉS DE NE PAS UTILISER CE PRODUIT D'UNE MANIÈRE AUTRE QUE
CELLE PRÉVUE.
• LES ENFANTS DOIVENT ÊTRE INFORMÉS QU'ILS NE DOIVENT PAS GRIMPER SUR
LE PRODUIT LORSQU'IL EST MOUILLÉ.
• N'ATTACHEZ PAS À CE PRODUIT DES ARTICLES QUI PEUVENT PRÉSENTER UN
RISQUE D'ÉTRANGLEMENT (TELS QUE, MAIS SANS S'Y LIMITER, DES LAISSES
POUR ANIMAUX, DES CORDES, DES CHAÎNES, ETC.)
• LES ENFANTS DOIVENT ÊTRE HABILLÉS DE MANIÈRE APPROPRIÉE. ÉVITER LES
VÊTEMENTS AMPLES ET LES ARTICLES POTENTIELLEMENT DANGEREUX TELS
QUE LES PONCHOS ET LES ÉCHARPES.

10 www.dreamonme.com/help
ADVERTENCIAS
• EVITE LESIONES GRAVES O LA MUERTE POR CAÍDAS O VUELCOS: ¡NUNCA
COLOQUE A SU HIJO Y EL PRODUCTO EN UNA SUPERFICIE ELEVADA!
• ES NECESARIO EL MONTAJE POR PARTE DE UN ADULTO.
• NO DEJE NUNCA AL NIÑO SIN VIGILANCIA.
• MANTENGA SIEMPRE AL NIÑO AL ALCANCE DE LA MANO.
• COLOQUE SIEMPRE EL PRODUCTO EN UNA SUPERFICIE PLANA Y NIVELADA.
• NO COLOQUE NUNCA EL PRODUCTO CERCA DE LAS ESCALERAS.
• ASEGÚRESE SIEMPRE DE QUE ESTA UNIDAD ESTÉ COLOCADA LEJOS DE
OBJETOS O APARATOS PELIGROSOS, COMO UNA ESTUFA, UN HORNO, TOMAS
DE CORRIENTE, ETC.
• LÍMITE DE EDAD: 3 AÑOS EN ADELANTE CON UN LÍMITE DE PESO DE 154 LBS O
70KG.
PELIGRO DE ASFIXIA:
• LAS PIEZAS PEQUEÑAS SIN MONTAR PUEDEN SUPONER UN RIESGO DE ASFIXIA
PARA LOS NIÑOS. PARA LA SEGURIDAD DE SU HIJO, SE RECOMIENDA NO
MONTAR ESTA UNIDAD EN LA MISMA HABITACIÓN DEBIDO A LA
PREOCUPACIÓN DE QUE PUEDAN COGER Y TRAGAR LAS PIEZAS PEQUEÑAS.
• NO UTILICE NUNCA ESTE PRODUCTO SI HAY SUJETADORES SUELTOS,
FALTANTES, UNIONES SUELTAS O PIEZAS ROTAS.
• COMPRUEBE DESPUÉS DEL MONTAJE Y UTILICE PERIÓDICAMENTE AL MENOS
UNA VEZ A LA SEMANA.
• NO SUSTITUYA NUNCA LAS PIEZAS.
INSTRUCCIONES DE USO:
• LOS NIÑOS NO DEBEN UTILIZAR ESTE PRODUCTO HASTA QUE SE HAYA
COMPLETADO EL MONTAJE Y SE HAYA COLOCADO LA PLATAFORMA EN UNA
SUPERFICIE NIVELADA. PARA EL PRIMER USO, UN ADULTO DEBE MOSTRAR AL
NIÑO CÓMO UTILIZAR ESTE PRODUCTO.
• SE REQUIERE LA SUPERVISIÓN DE UN ADULTO. SE DEBE INSTRUIR A LOS NIÑOS
PARA QUE NO UTILICEN ESTE PRODUCTO DE FORMA DISTINTA A LA PREVISTA.
• LOS NIÑOS DEBEN SER INSTRUIDOS PARA QUE NO SE SUBAN AL PRODUCTO
CUANDO ESTÉ MOJADO.
• NO SUJETE A ESTE PRODUCTO ELEMENTOS QUE PUEDAN SUPONER UN
RIESGO DE ESTRANGULAMIENTO (COMO, POR EJEMPLO, CORREAS PARA
MASCOTAS, CUERDAS, CADENAS, ETC.).
• LOS NIÑOS DEBEN IR VESTIDOS ADECUADAMENTE. EVITE LA ROPA HOLGADA Y
LOS ARTÍCULOS POTENCIALMENTE PELIGROSOS, COMO PONCHOS Y
BUFANDAS.

11
www.dreamonme.com/help
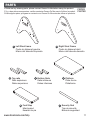
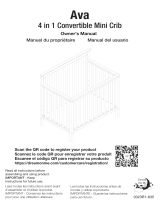
PARTS
PIÈCES
PARTES
If there are any missing parts, please contact Dream On Me before using the product.
S'il y a des pièces manquantes, veuillez contacter Dream On Me avant d'utiliser le produit.
Si falta alguna pieza, póngase en contacto con Dream On Me antes de utilizar el producto.
Left Stool frame
Cadre du tabouret gauche
Marco del taburete izquierdo
1
Top rails
Rails supérieurs
Rieles superiores
3
Foot Step
Marchepied
Escalón de pie
6Security Rod
Tige de sécurité
Barra de seguridad
7
Bottom Rails
Rails inférieurs
Rieles inferiores
4Platform
Plate-forme
Plataforma
5
Right Stool Frame
Cadre du tabouret droit
Marco del taburete derecho
2

12 www.dreamonme.com/help
If there are any missing parts, please contact Dream On Me before using the product.
S'il y a des pièces manquantes, veuillez contacter Dream On Me avant d'utiliser le produit.
Si falta alguna pieza, póngase en contacto con Dream On Me antes de utilizar el producto.
HARDWARE
Flat Head Screw Driver (NOT INCLUDED)
Tournevis à tête plate (NON INCLUS)
Destornillador de cabeza plana (NO INCLUIDO)
Tools Needed:
Outils nécessaires:
Herramientas necesarias:
Barrel Nut (x8)
Écrou de baril (x8)
Tuerca de barril (x8)
CAllen Key (x1)
Clé Allen (x1)
Llave Allen (x1)
D
Bolt M6X50mm (×8)
Boulon M6X50mm (×8)
Perno M6X50mm (×8)
ABolt M6X25mm (×10)
Boulon M6X50mm (×10)
Perno M6X50mm (×10)
B

13
www.dreamonme.com/help
Bolt M6X25mm (×4)
Boulon M6X50mm (×4)
Perno M6X50mm (×4)
B
(1)
(1)
(3)
(3)
(4)
(B)
(B)
(B)
(B)
(B)
ASSEMBLAGE DU TABOURET MARCHEUR - ASSEMBLAGE DU CADRE LATÉRAL
MONTAJE DEL TABURETE - MONTAJE DEL MARCO LATERAL
1
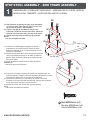
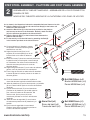
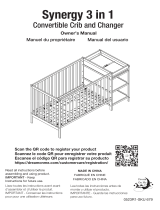
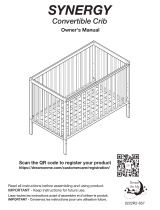
STEP STOOL ASSEMBLY - SIDE FRAME ASSEMBLY
1a. Start assembly by placing the parts to be assembled
on a soft surface. Place the Left Stool Frame (1) on a
flat surface as shown in the illustration.
1b. Align the Top Rail (3) and Bottom Rail (4) to the
insertions provided on the left stool frame. Attach the
Bolts (B) in the insertions fixing the rails to the frame.
1c. Tighten the bolts using the Allen Key (D) provided.
NOTE:
• Do not overtighten the bolts.
1a. Commencez l'assemblage en plaçant les pièces à
assembler sur une surface souple. Placez le cadre
gauche du tabouret (1) sur une surface plane, comme
indiqué sur l'illustration.
1b. Alignez la traverse supérieure (3) et la traverse inférieure
(4) sur les insertions prévues sur le cadre du tabouret
gauche. Fixer les boulons (B) dans les insertions fixant
les rails au cadre.
1c. Serrez les boulons à l'aide de la clé Allen (D) fournie.
REMARQUE :
• Ne serrez pas trop les boulons.
1a. Comience el montaje colocando las piezas a ensamblar sobre una
superficie blanda. Coloque el armazón izquierdo del taburete (1) sobre
una superficie plana como se muestra en la ilustración.
1b. Alinee el riel superior (3) y el riel inferior (4) con las inserciones
previstas en el marco del taburete izquierdo. Coloque los pernos (B)
en las inserciones que fijan los rieles al marco.
1c. Apriete los pernos con la llave Allen (D) suministrada.
NOTA:
• No apriete demasiado los tornillos.

14 www.dreamonme.com/help
Bolt M6X25mm (×4)
Boulon M6X50mm (×4)
Perno M6X50mm (×4)
B
(2)
(4) (3)
(B)
(B)
(B)
(B)
(4)
(2)
(B)
(B)
ASSEMBLAGE DE LA PLATE-FORME - ASSEMBLAGE DU CADRE LATÉRAL (suite)
MONTAJE DEL TABLERO DE PASO- MONTAJE DEL MARCO LATERAL (Cont.)
1
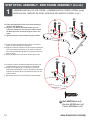
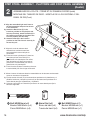
STEP STOOL ASSEMBLY- SIDE FRAME ASSEMBLY (Contd.)
1d. Place the Right Stool Frame (2) on a flat surface as
shown in the illustration.
1e. Align the Top Rail (3) and Bottom Rail (4) to the
insertions provided on the right stool frame. Attach
the Bolts (B) in the insertions fixing the rails to the
frame.
1f. Tighten the bolts using the Allen Key (D) provided.
1d. Placez le cadre du tabouret droit (2) sur une surface
plane, comme indiqué sur l'illustration.
1e. Alignez la traverse supérieure (3) et la traverse inférieure
(4) sur les insertions prévues sur le cadre du tabouret
droit. Fixer les boulons (B) dans les insertions fixant les
rails au cadre.
1f. Serrez les boulons à l'aide de la clé Allen (D) fournie.
1d. Coloque el marco derecho del taburete (2) sobre una
superficie plana, como se muestra en la ilustración.
1e. Alinee el riel superior (3) y el riel inferior (4) con las
inserciones previstas en el marco del taburete derecho.
Coloque los pernos (B) en las inserciones que fijan los
rieles al marco.
1f. Apriete los pernos con la llave Allen (D) suministrada.

15
www.dreamonme.com/help
Bolt M6X25mm (×1)
Boulon M6X50mm (×1)
Perno M6X50mm (×1)
B
(C)
(C)
(B)
(A)
(A)
(A)
(A)
(C)
(7)
(5)
(6)
(C)
Bolt M6X50mm (×4)
Boulon M6X50mm (×4)
Perno M6X50mm (×4)
A
Barrel Nut (x4)
Écrou de baril (x4)
Tuerca de barril (x4)
C
ASSEMBLAGE DU TABOURET MARCHEUR - ASSEMBLAGE DE LA PLATE-FORME ET DU
PANNEAU DE PIED
MONTAJE DEL TABURETE: MONTAJE DE LA PLATAFORMA Y DEL PANEL DE LOS PIES
2
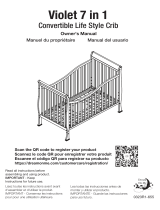
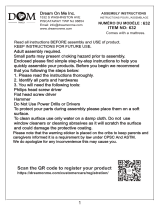
STEP STOOL ASSEMBLY - PLATFORM AND FOOT PANEL ASSEMBLY
2a. As shown in the illustration, balance the assembled left stool frame on its side.
2b. Align the Platform (5) to the top rail and the Foot Step (6) to the bottom rail
fixed on the left stool frame.
2c. Attach the Barrel Nuts (C) in the insertions provided on the platform
and foot step as shown in the illustration. Similarly, attach the Bolts
(A) in the insertions provided on the left stool frame.
2d. Align the Security Rod (7) to the left stool frame between the
platform and foot step.
2e. Fix the security rod to the side frame by attaching the Bolt (B)
in the insertion provided on the left stool frame.
2a. Comme indiqué sur l'illustration, mettez
en équilibre le cadre du tabouret gauche
assemblé sur son côté.
2b. Alignez la plate-forme (5) sur le rail
supérieur et le marchepied (6) sur le rail
inférieur fixés sur le cadre du tabouret
gauche.
2c. Fixez les écrous (C) dans les encoches prévues sur
la plate-forme et le marchepied, comme indiqué
sur l'illustration. De même, fixez les boulons (A)
dans les encoches prévues sur le cadre du
tabouret gauche.
2d. Alignez la tige de sécurité (7) sur le cadre du tabouret
gauche, entre la plate-forme et le marchepied.
2e. Fixez la tige de sécurité au cadre latéral en attachant
le boulon (B) dans l'insertion prévue sur le cadre du
tabouret gauche.
2a. Como se muestra en la ilustración, equilibre el
marco del taburete izquierdo montado sobre su lado.
2b. Alinee la plataforma (5) con la barra superior y el peldaño
(6) con la barra inferior fijada en el marco del taburete
izquierdo.
2c. Fije las tuercas de barril (C) en las inserciones
previstas en la plataforma y el escalón para los
pies, como se muestra en la ilustración. Del
mismo modo, fije los pernos (A) en las
inserciones previstas en el marco del taburete
izquierdo.
2d. Alinee la barra de seguridad (7) con el marco
del taburete izquierdo entre la plataforma y el
escalón.
2e. Fije la barra de seguridad al marco lateral
fijando el perno (B) en la inserción prevista en
el marco del taburete izquierdo.

16 www.dreamonme.com/help
(B)
(A)
(A)
(A)
(A)
(C)
(C)
(C)
(C)
Bolt M6X25mm (×1)
Boulon M6X50mm (×1)
Perno M6X50mm (×1)
B
Bolt M6X50mm (×4)
Boulon M6X50mm (×4)
Perno M6X50mm (×4)
ABarrel Nut (x4)
Écrou de baril (x4)
Tuerca de barril (x4)
C
ASSEMBLAGE DE LA PLATE - FORME ET DU PANNEAU DE PIED (suite)
MONTAJE DEL TABLERO DE PASO - MONTAJE DE LA PLATAFORMA Y DEL
PANEL DE PIE (Cont.)
STEP STOOL ASSEMBLY - PLATFORM AND FOOT PANEL ASSEMBLY
(Contd.)
2f. Align the assembled right stool frame to
the half-assembled step stool as shown
in the illustration.
2g. Attach the Barrel Nuts (C) in the
insertions provided on the platform and
foot step. Similarly, attach the Bolts (A) in
the insertions provided on the side frame
to fix the platform and foot step.
2h. Attach the Bolt (B) in the insertion
provided on the side frame to securely fix
the security rod.
2f. Alignez le cadre du tabouret droit
assemblé sur le tabouret marcheur
semi-assemblé comme indiqué sur
l'illustration.
2g. Fixez les écrous cylindriques (C) dans les
encoches prévues à cet effet sur la
plate-forme et le marchepied. De même,
fixez les boulons (A) dans les encoches
prévues sur le cadre latéral pour fixer la
plate-forme et le marchepied.
2h. Fixez le boulon (B) dans l'insertion prévue sur
le cadre latéral pour fixer la tige de sécurité.
2f. Alinee el marco del taburete derecho ensamblado con el taburete semimontado
como se muestra en la ilustración.
2g. Fije las tuercas de barril (C) en las inserciones previstas en la plataforma y el
peldaño. Asimismo, coloque los pernos (A) en las inserciones previstas en el
marco lateral para fijar la plataforma y el peldaño.
2h. Coloque el perno (B) en la inserción prevista en el marco lateral para fijar la
barra de seguridad.
2

17
www.dreamonme.com/help
YOU DID IT!
PRODUCT CARE AND MAINTENANCE
• ADULTS SHOULD CHECK ALL SCREWS WEEKLY OR IF THE PRODUCT GETS
LOOSE AND/OR WOBBLY, AND TIGHTEN AS AND IF NECESSARY.
• IF THE PRODUCT CONTINUES TO NOT BE STURDY, THEN HALT USE OF THE
PRODUCT IMMEDIATELY AND CONTACT THE DREAM ON ME CUSTOMER
SUPPORT AT THE EARLIEST VIA EMAIL: [email protected], OR
THROUGH THE LIVE CHAT FEATURE ON OUR WEBSITE
(WWW.DREAMONME.COM).
CLEANING INSTRUCTIONS:
• WITH A DAMP CLOTH, USE MILD LIQUID DISH SOAP TO WIPE CLEAN THE
PRODUCT. YOU MAY WANT TO CLEAN THE UNDERSIDE FIRST TO MAKE SURE
YOU ARE NOT DAMAGING THE FINISH.
Congratulations Mom & Dad!
Here’s to new milestones and fun with your little ones.

18 www.dreamonme.com/help
VOUS AVEZ RÉUSSI !
SOIN ET ENTRETIEN DU PRODUIT
• LES ADULTES DOIVENT VÉRIFIER TOUTES LES VIS CHAQUE SEMAINE OU SI LE
PRODUIT SE DESSERRE ET/OU VACILLE, ET LES RESSERRER SI NÉCESSAIRE.
• SI LE PRODUIT CONTINUE À NE PAS ÊTRE SOLIDE, CESSEZ IMMÉDIATEMENT
DE L'UTILISER ET CONTACTEZ LE SERVICE CLIENTÈLE DE DREAM ON ME AU
PLUS TÔT PAR E-MAIL : [email protected], OU PAR LE BIAIS DE LA
FONCTION DE CHAT EN DIRECT SUR NOTRE SITE WEB
(WWW.DREAMONME.COM).
INSTRUCTIONS DE NETTOYAGE :
• À L'AIDE D'UN CHIFFON HUMIDE, UTILISEZ DU LIQUIDE VAISSELLE DOUX POUR
NETTOYER LE PRODUIT. VOUS POUVEZ COMMENCER PAR NETTOYER LE
DESSOUS POUR VOUS ASSURER QUE VOUS N'ENDOMMAGEZ PAS LA FINITION.
Félicitations à maman et papa !
Nous vous souhaitons de franchir de nouvelles étapes et de
vous amuser avec vos petits.

19
www.dreamonme.com/help
¡LO HICIERON!
CUIDADO Y MANTENIMIENTO DEL PRODUCTO
• LOS ADULTOS DEBEN COMPROBAR TODOS LOS TORNILLOS SEMANALMENTE
O SI EL PRODUCTO SE AFLOJA Y/O SE TAMBALEA, Y APRETARLOS SI ES
NECESARIO.
• SI EL PRODUCTO SIGUE SIN SER RESISTENTE, DEJE DE UTILIZARLO
INMEDIATAMENTE Y PÓNGASE EN CONTACTO CON EL SERVICIO DE ATENCIÓN
AL CLIENTE DE DREAM ON ME LO ANTES POSIBLE A TRAVÉS DEL CORREO
ELECTRÓNICO [email protected], O A TRAVÉS DE LA FUNCIÓN DE
CHAT EN VIVO EN NUESTRO SITIO WEB (WWW.DREAMONME.COM).
INSTRUCCIONES DE LIMPIEZA :
• CON UN PAÑO HÚMEDO, UTILICE JABÓN LÍQUIDO PARA PLATOS SUAVE PARA
LIMPIAR EL PRODUCTO. ES POSIBLE QUE QUIERA LIMPIAR PRIMERO LA
PARTE INFERIOR PARA ASEGURARSE DE QUE NO ESTÁ DAÑANDO EL
ACABADO.
¡Enhorabuena, mamá y papá!
Por los nuevos hitos y la diversión con tus pequeños.

1532 S. WASHINGTON AVE STE1
PISCATAWAY, NJ 08854-9908
5375 BOUL DES GRANDES-PRAIRIES
SAINT-LEONARD, QC H1R 1B1
www.dreamonme.com
Follow Us @dreamonmeinc
to get your nursery featured on our social media.
Enter our monthly giveaway!
Scan the QR code to register.
Chat with us!
Scan the QR code to Live Chat.
E-mail: [email protected]
La page est en cours de chargement...
La page est en cours de chargement...
-
 1
1
-
 2
2
-
 3
3
-
 4
4
-
 5
5
-
 6
6
-
 7
7
-
 8
8
-
 9
9
-
 10
10
-
 11
11
-
 12
12
-
 13
13
-
 14
14
-
 15
15
-
 16
16
-
 17
17
-
 18
18
-
 19
19
-
 20
20
-
 21
21
-
 22
22


Dream On Me 799 Manuel utilisateur
- Catégorie
- Meubles de bébé
- Taper
- Manuel utilisateur
dans d''autres langues
- English: Dream On Me 799 User manual
- español: Dream On Me 799 Manual de usuario
Documents connexes
-
 Dream On Me 797 Manuel utilisateur
-
 Dream On Me 2441AC Manuel utilisateur
-
 Dream On Me 620 Manuel utilisateur
-
Dream On Me 4436 Manuel utilisateur
-
 Dream On Me 635 Manuel utilisateur
-
 Dream On Me 679 Manuel utilisateur
-
 Dream On Me 655 Manuel utilisateur
-
 Dream On Me 637 Manuel utilisateur
-
 Dream On Me SYNERGY Convertible Crib and Changer Le manuel du propriétaire
-
 Dream On Me 632 Manuel utilisateur