
KitchenAid °
STAND MIXER
ATTACHMENTS
FOOD GRINDER FGA
FRUIT/VEGETABLE STRAINER FVSFGA!FVSP
FOOD TRAY FT
INSTRUCTIONS
ACCESSOIRES DU
BATTEUR SUR SOCLE
HACHOIR FGA
PRESSE FRUITS/L_:GUMES FVSFGA!FVSP
PLATEAU D'ALIMENTS FT
INSTRUCTIONS
ADITAMENTOS
PARA LA BATIDORA
CON BASE
MOLINO FGA
COLADOR DE FRUTAS Y VEGETALES FVSFGA!FVSP
BANDEJA PARA ALIMENTOS FT
INSTRUCCIONES
These attachments have
been approved for use with
all KitchenAid _ household
stand mixers.
U,S,A,: 1-800-541 =0390
Canada: 1-800-807-6777
L'utilisation de ces
accessoires a _t_ approuv_e
pour tousles batteurs
sur socle m6nagers de
KitchenAid?
Estos aditamentos se han
aprobado para usarse
con todas las batidoras
dom6sticas con base
KitchenAid?
KitchenAid,com
KitchenAid.ca
9709647B FOR THE WAY IT'S MADE; "_

Proof of Purchase
Always keep a copy of the sales receipt
showing the date of purchase of your Stand
Mixer Attachment. Proof of purchase will
assure you of in-warranty service.
Please complete the following for your
personal records:
Model Number
Date Purchased
Store Name and Location
Preuve d'achat
Veuillez conserver une copie du coupon
de caisse indiquant la date d'achat des
Accessoires Du Batteur Sur Socle. La preuve
d'achat vous assure le service apr_s-vente sous
garantie.
Veuillez remplir ce qui suit pour votre dossier
personnel:
Num_ro de module
Date d'achat
Nom du magasin et emplacement
Comprobante de compra
Siempre conserve una copia del recibo de
ventas que especifique la fecha de compra
de su Aditamento para la batidora con base.
El comprobante de compra le asegurar_i el
servicio t_cnico bajo garantia.
Complete Io siguiente para su
registro personal:
N0mero del modelo
Fechade compra
Nombre de la tienda y direcci6n

Table of Contents
INTRODUCTION
Proof of Purchase ................................................................................. Inside Front Cover
Stand Mixer Attachment Safety....................................................................................... 3
Important Safeguards ..................................................................................................... 3
FEATURESAND OPERATION
ToAttach Stand Mixer Attachment ................................................................................. 4
Before Attaching Stand Mixer Attachment ............................................................... 4
Food Grinder Attachment ............................................................................................... 4
ToAssemble Food Grinder Attachment .................................................................... 4
ToUse Food Grinder Attachment ............................................................................. 5
ToClean Food Grinder Attachment .......................................................................... 5
Fruit/Vegetable Strainer Attachment ................................................................................ 6
ToAssemble Fruit/Vegetable Strainer Attachment .................................................... 6
ToUse Fruit/Vegetable Strainer Attachment ............................................................. 6
ToStrain Fruits and Vegetables ................................................................................ 6
ToClean Fruit/Vegetable Strainer Attachment .......................................................... 7
Food Tray Attachment ..................................................................................................... 8
ToAttach Food Tray Attachment .............................................................................. 8
ToUse Food TrayAttachment .................................................................................. 8
ToClean Food Tray Attachment ............................................................................... 8

Table of Contents
RECIPES
Smoky Salsa.................................................................................................................... 9
Swedish Meatballs with Cream Sauce............................................................................. 9
Bo]ognese Sauce........................................................................................................... 10
Pesto Sauce.................................................................................................................. 10
Golden Peach Chutney .................................................................................................. 11
HarvestApple Butter ..................................................................................................... 11
Hummus ....................................................................................................................... 11
WARRANTYAND SERVICEINFORMATION
KitchenAid Stand Mixer Attachment Warranty ............................................................ 12
Hassle-FreeReplacement Warranty - 50 United States and District of Columbia .......... 13
Hassle-FreeReplacement Warranty - Canada ............................................................... 13
How to Arrange for Warranty Service in Puerto Rico .................................................... 13
How to Arrange for Serviceafter the Warranty Expires- All Locations ......................... 14
How to Arrange for ServiceOutside these Locations .................................................... 14
How to Order Accessories and Replacement Parts ........................................................ 14

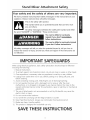
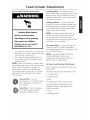
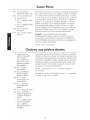
Stand Mixer Attachment Safety
Your safety and the safety of others are very important.
We have provided many important safety messages in this manual and on your
appliance. Always read and obey all safety messages.
This is the safety alert symbol.
This symbol alerts you to potential hazards that can kill or hurt
you and others.
All safety messages will follow the safety alert symbol and either
the word "DANGER" or "WARNING." These words mean:
You can be killed or seriously
injured if you don't immediately
follow instructions.
You can be killed or seriously injured
if you don't follow instructions.
All safety messages will tell you what the potential hazard is, tell you how to
reduce the chance of injury, and tell you what can happen if the instructions are
not followed.
IMPORTANT SAFEGUARDS
When using electrical appliances, basic safety precautions should always be followed
including the following:
1. Read all instructions.
2. To protect against risk of electrical shock, do not put mixer in water or other liquid.
3. Close supervision is necessarywhen any appliance is used by or near children.
4. Unplug from outlet when not in use, before putting on or taking off parts, and
before cleaning.
5. Avoid contacting moving parts. Keepfingers out of discharge opening.
6. Do not operate the mixer with a damaged cord or plug or after the mixer
malfunctions, or is dropped or damaged in any manner. Return the mixer to the
nearest Authorized Service Center for examination, repair or electrical or mechanical
adjustment.
7. The use of attachments not recommended or sold by KitchenAid may cause fire,
electric shock or injury.
8. Do not use the mixer outdoors.
9. Do not let the cord hang over the edge of table or counter.
10. Never feed food by hand. Always use combination food pusher/wrench.
11. Blades are sharp. Handle carefully.
12. This product is designed for household use only.
SAVE THESE INSTRUCTIONS

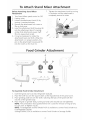
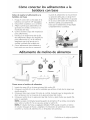
To Attach Stand Mixer Attachment
Before Attaching Stand Mixer
Attachment
1. Turn Stand Mixer speed control to 0%
2.
3.
4.
5.
6.
7. Tighten the attachment knob by turning
it clockwise until the attachment is
completely secured to mixer.
C
Unplug mixer.
Loosen the attachment knob (A) by
turning it counterclockwise.
Remove the attachment hub cover or
flip up hub cover.
Insert the attachment shaft housing (B)
into the attachment hub (C) making
certain that attachment power shaft
fits into square hub socket.
It may be necessary to rotate the
attachment back and forth. When the
attachment is in proper position, the
pin on the attachment housing will fit
into the notch on the hub rim.
Food Grinder Attachment
C
I
D
//
F
/
/
Fine Coarse
I
B
A
\\
E
To
1.
2.
3.
4.
Assemble Food Grinder Attachment
Insert the grind worm (A) into the grinder body (B).
Place the knife (C) over the square shank at the exposed end of the grind worm.
Place grinding plate (D) over the knife, matching the tabs of the plate with the
notches of the grinder body.
Place ring (E) on grinder body, turning by hand until secured but not tightened.
NOTE: The combination food pusher/wrench (F) is used for removal of ring (E) only.
Do not use it to tighten ring (E).
NOTE: Fruit/Vegetable Strainer (Model FVSP)is available to convert Food Grinder to a
Fruit/Vegetable Strainer.
Sausage Stuffer (SSA) is available to convert Food Grinder to Sausage Stuffer.

Food Grinder Attachment
To Use Food Grinder Attachment
Rotating Blade Hazard
Always use food pusher.
Keep fingers out of openings.
Keep away from children.
Failure to do so can result in
amputations or cuts.
1. Cut food into small strips or pieces and
feed them into hopper. Meat should be
cut into long narrow strips.
2. Turn mixer to Speed 4 and feed food
into hopper using combination food
pusher/wrench.
NOTE: Liquid may appear in hopper when
processing large amounts of high moisture
foods such as tomatoes or grapes. To
drain liquid, continue to operate mixer.
Toavoid damage to mixer, do not process
additional food until liquid has drained
from hopper.
Coarse Plate - Use for
grinding raw or cooked meats,
firm vegetables, dried fruits
and cheese.
Fine Plate - Use for grinding
raw meat, cooked meats for
spreads and breadcrumbs.
Grinding Meat - For better mix and
more tender results, grind beef twice. Best
texture results from grinding very cold or
partially frozen meat. Fatty meats should
be ground only once.
Grinding Bread - To grind bread for
crumbs, be sure that bread iseither oven
dried thoroughly to remove all moisture,
or not dried at all. Partially dried bread
may jam the Food Grinder.
NOTE: Very hard, dense foods such as
totally dried homemade bread should
not be ground in the Food Grinder.
Homemade bread should be ground fresh
and then oven or air-dried.
To Loosen Ring - If ring is too tight to
remove by hand, slip the combination
food pusher/wrench over the grooves and
turn counterclockwise.
NOTE: To avoid damage to the food
grinder attachment, do not use
combination food pusher/wrench to
tighten ring to grinder body.
To Clean Food Grinder Attachment
First completely disassemble food grinder
attachment.
The following parts are dishwasher safe:
• Grinder body
• Grinder worm
• Ring
• Combination food pusher/wrench
The following parts should be hand
washed in warm, sudsy water and
dried thoroughly:
• Knife
• Grinding plate

Fruit/Vegetable Strainer Attachment
C
I A
I
F
B
I
I
E
Assemble FruitNegetable Strainer Attachment
To
1. Slide the smaller end of spring and shaft assembly (A) into opening in larger worm (B)
until secured firmly in place.
2. Insert the larger worm into the grinder body (C).
3. Attach strainer cone (D) over the exposed end of the worm matching the tabs of the
cone with the notches in the grinder body.
4. Place ring (E) onto the grinder body, turning by hand until finger tight, but
not overtightened.
NOTE; The combination food pusher/wrench (F) is used for removal of ring (E)only.
Do not use it to tighten ring (E).
5. Slide the strainer tray (G) over the cone and latch on the top of ring.
6. Place splash shield (H) on strainer tray.
To Use Fruit/Vegetable Strainer
Attachment
Rotating Blade Hazard
Always use food pusher.
Keep fingers out of openings.
Keep away from children.
Failure to do so can result in
amputations or cuts.
1. After attaching Fruit/Vegetable Strainer
attachment to mixer, place mixer bowl
under strainer tray to catch strained
food and a smaller bowl under open
end to catch food waste.
2. Cut food into pieces that will fit in the
hopper.
3. Turn mixer to Speed 4 and feed food
into hopper using the combination
food pusher/wrench.
To Strain Fruits and Vegetables
• Cut into pieces that will fit into hopper
• Remove tough, thick skin or rind,
for example, oranges
• Remove all large pits, for example,
peaches
• Remove hulls or stems, for example,
strawberries, grapes
• Cook all tough or firm fruits and
vegetables before straining
NOTE: Liquid may appear in hopper when
processing large amounts of high moisture
foods such astomatoes or grapes. To
drain liquid, continue to operate mixer.
Toavoid damage to mixer, do not process
additional food until liquid has drained
from hopper.

Fruit/Vegetable Strainer Attachment
NOTE: To avoid damage to the
fruit/vegetable strainer attachment and/or
mixer, Labruscan or slip-skin type grapes
such as Concord, Catawba and Ontario
grapes should not be processed in the
Fruit/Vegetable Strainer. Only Ninifera
family grapes such as Tokay and Thompson
Seedlessmay be processed.
To Clean Fruit/Vegetable Strainer
Attachment
Firstcompletely disassemble fruit/vegetable
strainer attachment.
The following parts are dishwasher safe:
• Grinder body
• Grinder worm
• Strainer cone
• Strainer tray
• Splash shield
• Ring
• Combination food pusher/wrench
The following parts should be hand
washed in warm, sudsy water and
dried thoroughly:
• Spring and shaft assembly
Some foods may stain certain parts. These
/
stains may be removed by using one of the
following methods: (1) place dishwasher
safe parts in dishwasher and use cycle for
normally soiled dishes, or (2) rub a small
amount of oil or shortening over the stains,
wash in warm, sudsy water and rinse. A
small bottle brush can be usedto help
remove pulp from the strainer cone.
To Loosen Ring - If ring istoo tight to
remove by hand, slip the combination
food pusher/wrench over the grooves and
turn counterclockwise.
NOTE: To avoid damage to the fruit/
vegetable strainer attachment, do not
use combination food pusher/wrench to
tighten ring to grinder body.
Fruit/Vegetable Strainer Parts (Model FVSP)
are available to convert a Model FGA Food
Grinder to a Fruit/Vegetable Strainer.

Food Tray Attachment
To Use Food Tray Attachment
To Attach Food Tray Attachment
Before attaching food tray attachment:
1. Turn Stand Mixer speed control to OFE
2. Unplug mixer. The Food Tray
Attachment is designed to be used
with the Food Grinder (model FGA)
and the Fruit/Vegetable Strainer (model
FVSFGA)attachments.
3. Attach Food Grinder or Fruit/Vegetable
Strainer Attachment to stand mixer.
4. Slide front of Food Tray Attachment
forward over back of hopper until it
rests firmly in place.
Rotating Blade Hazard
Always use food pusher.
Keep fingers out of openings.
Keep away from children.
Failure to do so can result in
amputations or cuts.
1. Fill Food Tray Attachment with food
cut into pieces that will fit in the
hopper.
2. Turn mixer to Speed 4 and feed food
into hopper using combination food
pusher/wrench.
To Clean Food Tray Attachment
Wash in warm sudsy water. If you wish,
you may place on top rack of your
dishwasher.

Smoky Salsa
4 large tomatoes,
laeeled and cut
into sixths
1 or 2 chipotle peppers
1 medium onion, cut
into sixths
1 clove garlic
7/j cup (80 mL) vinegar
1 teaspoon (5 mL) salt
Assemble Food Grinder, using coarse grinding plate.
Attach Food Grinder to mixer. Turn to Speed 4 and grind
tomatoes, peppers, onion, and garlic into large bowl
or saucepan placed under grinder. Add all remaining
ingredients; mix well. Forthicker salsa, heat mixture to
/
boiling in saucepan. Reduce heat to low. Cook 5 to
10 minutes, or until desired consistency.
Tip: Chipotle peppers are dried, smoked jalape_o
peppers. If they are not available, substitute fresh
jalape_o peppers and 1 drop of liquid smoke.
Yield: 20 servings (2 tablespoons [30 mL] per serving).
Perserving: About 8 cal, 0 g protein, 2 g carb, 0 g fat,
0 mg chol, 109 mg sodium.
Swedish Meatballs with Cream Sauce
Swedish Meatballs
1 tb (455 g) boneless
beef round steak, cut
into 1" (2.5 cm) strips
7/2 tb (225 g) boneless
veal, cut into 1" (2.5
cm) strips
1 medium onion, cut
into sixths
2 slices whole wheat
bread, broken into
pieces
1 teaspoon (5 mL) salt
7/2 teaspoon (2 mL)
nutmeg
7/4 teaspoon (1 mL)
allspice
7/4 teaspoon (1 mL)
black pepper
7/4 cup (60 mL) fat-free
egg substitute or 1egg
7/2 cup (120 mL)
tow-fat milk
Cream Sauce
7/4 cup (60mL) drippings
from meatballs or
margarine or butter
7/4 cup (60mL) flour
2 cups (475 mL)
whole milk
2 teaspoons (10 mL)
instant beef bouillon
granules
7/_ teaspoon (0,5 mL)
black pepper
Assemble Food Grinder, using fine grinding plate. Attach
Food Grinder to mixer. Turn to Speed 4 and grind beef,
veal, onion, and bread into bowl placed under grinder.
(Return mixture to grinder and grind once or twice more
for extra fine meatballs.) Add all remaining ingredients;
mix well.
Shapemixture into 1" (2.5 cm) meatballs and arrange in
15_Ax 10_/_x 1" (38.8 x 26.3 x 2.5 cm) baking pans. Bake
at 450°F (232°C) for 15 minutes, or until browned and no
longer pink in center.
While meatballs are baking, prepare Cream Sauce.
Heat drippings or melt margarine in large saucepan.
Add flour and stir until bubbly. Gradually stir in all
remaining ingredients. Cook over medium-low heat until
mixture thickens and just begins to bubble. Pour over
Swedish Meatballs.
Servemeatballs as an appetizer or combine with cooked
noodles as a main dish.
Yield: 20 appetizer servings (4 meatballs per serving) or
10 main dish servings (8 meatballs per serving).
Perappetizer serving: About 86 cal, 9 g protein, 5 g carb,
3 g fat, 28 mg chol, 247 mg sodium.
Permain dish serving: About 173 cal, 19 g protein, 9 g
carb, 6 g fat, 56 mg chol, 494 mg sodium.

Boiognese Sauce
2 tablespoons (30 mL)
olive oil
2 carrots, peeled and
cut into 1"
(2.5 cm) pieces
2 stalks celery cut into
1" (2.5 cm)pieces
1 large onion, cut into
eigths
7/4 cup (60 mL)
parsley sprigs
17/2 tbs (680 g) ground
beef
7/2 tb (225 g) ground
pork
3 cloves garlic
6 large ripe tomatoes,
cut into sixths
1 teaspoon (5 mL) basil
1 teaspoon (5 mL)
oregano
1 bay leaf
17/2 teaspoon (7 mL) salt
7/4 teaspoon (1 mL)
pepper
7/4 cup (60 mL) water
7/4 cup (60 mL)
dry red wine
Heat oil in a 12" (30 cm) skillet over medium heat. Add
carrots, celery, onion, parsley, ground beef, ground pork,
and garlic. Saut_ 20 minutes. Remove mixture from heat
and cool 10 minutes.
Assemble Food Grinder using coarse grinding plate and
attach to mixer. Turn to Speed 4 and grind mixture into a
6 qt (5.7 L) pot.
Assemble Fruit/Vegetable Strainer and attach to mixer.
Turn to Speed 4 and strain tomatoes. Measure out
4 cups (945 mL) puree. Add tomato puree, basil,
oregano, bay leaf, salt, pepper, tomato paste, water,
and wine to meat mixture. Cover and simmer on
medium-low heat for 1 hour.
Yield: 2 qt (1.9 L).
Per serving: (_/2 cup [120 mL]) About 330 cal, 22 g
protein, 8 g carb, 23 g fat, 77 mg chol, 534 mg sodium.
Pesto Sauce
2 cups (475 mL) fresh
basil leaves
1 cup (235 mL)
parsley sprigs
8 cloves garlic
1 teaspoon (5 mL) salt
7/2 teaspoon (2 mL)
pepper
1 cup (235 mL)
Parmesan cheese
7/2 cup (120 mL) olive
oil
Assemble Food Grinder using fine grinding plate and
attach to mixer. Turn to Speed 4 and grind basil leaves,
parsley sprigs, and garlic into mixer bowl. Add salt,
pepper, and Parmesan cheese. Attach bowl and wire
whip. Turn to Speed 6 and whip 1 minute. Stop and
scrape bowl. Turn to Speed 8 and gradually add olive oil
in a thin, steady stream, whipping until absorbed. Use
about 2 tablespoons (30 mL) of PestoSauce per serving
of pasta.
Tip: If PestoSauce isnot used at once, place it in ajar and
coverwith a thin layer of olive oil to keepit from darkening.
Refrigeratefor a week or freeze for longer storage.
Yield: 2 cups (475 mL).
10

Golden Peach Chutney
4 large peaches, peeled
and cut into chunks
or 1package (16 oz.
[455 g]) frozen
peaches, thawed
7/2 cup (120 mL) vinegar
2 tablespoons (30 mL)
finely chopped onion
7/4 cup (60 mL) dried
fruit bits
7/2 cup (120 mL) firmly
packed brown sugar
7/4 cup (60 mL) sugar
2 tablespoons (30 mL)
finely chopped
crystallized ginger
7/4 teaspoon (1 mL)
cloves
7/4 teaspoon(1 mL)
allspice
Assemble Fruit/Vegetable Strainer and attach to mixer.
Turn to Speed 4 and strain peaches into large saucepan
placed under strainer. Add all remaining ingredients. Heat
to boiling. Reduce heat to low. Cook about 20 minutes,
or until thick, stirring frequently.
Yield: 24 servings (1 tablespoon [15 mL] per serving).
Perserving: About 40 cal, 0 g protein, 11 g carb, 0 g fat,
0 mg chol, 3 mg sodium.
Harvest Apple Butter
3 tbs. (1.5 kg) cooking
apples, cut into
fourths
3/4 cup (175 mL)
apple cider
7/2 cup (120 mL) vinegar
2 cups (475 mL) sugar
2 teaspoons (10 mL)
cinnamon
7/2 teaspoon (2 mL)
cloves
17/2 teaspoon(7 mL)
allspice
Placeapples, cider, and vinegar in large saucepan or
Dutch oven. Cook over medium heat about 15 minutes,
or until very soft, stirring occasionally.
Assemble Fruit/Vegetable Strainer and attach to mixer.
Turn to Speed 4 and strain cooked apples into mixer bowl
placed under strainer. Return apples to pan. Add sugar and
spices;mix well. Cook over low heat until sugar is dissolved,
stirring constantly. Cook 15 to 20 minutes longer, or until
thick, stirring frequently. Ladle into hot, sterilized Vz-pint
(235 mL)jars. Process10 minutes in boiling water bath.
Removejars from water. Cool; check seals.
Yield: About 5 cups (1.2 L)(2 teaspoons [10 mL] per
serving).
Perserving: About 21 cal, 0 g protein, 5 g carb, 0 g fat,
0 mg chol, 0 mg sodium.
Hummus
1 can (20 oz [565 g])
chickpeas, drained
V4 cup (60 mL)cold
water
7/4 cup (60 mL) fresh
lemon juice
7/4 cup (60 mL)tahini
(sesameseed paste)
3 cloves garlic, minced
7/2 teaspoon (2 mL) salt
7/4 teaspoon (1 mL)
paprika (optional)
Assemble Fruit/Vegetable Strainer and attach to mixer.
Turn to Speed 4 and strain chickpeas into mixer bowl.
Return waste to strained chickpeas.
Add water, lemon juice, tahini, garlic, salt, and paprika.
Attach bowl and wire whip to mixer.Turnto Speed4 and
whip 1 minute. Stop and scrapebowl. Increaseto Speed 10
and whip 1 minute or until smooth. Servewith Pita Bread.
Yield: 2 cups (475 mL).
Perserving: (2 tablespoons [30 mL]) About 66 cal, 2 g
protein, 9 g carb, 2 g fat, 0 mg chol, 180 mg sodium.
11

KitchenAid Stand Mixer Attachment Warranty
Length of
Warranty:
50 United States, the
District of Columbia,
Canada, and Puerto
Rico: One-year limited
warranty from date of
purchase.
KitchenAid
Will Pay For:
50 United States, the
District of Columbia
and Canada: Hassle-free
replacement of your Stand
Mixer Attachment. Seethe
following page for details
on how to arrange for
replacement.
OR
In Puerto Rico:
The replacement parts
and repair labor costs to
correct defects in materials
and workmanship. Service
must be provided by an
Authorized KitchenAid
Service Center. To arrange
for service, follow the
instruction in the "How
to Arrange for Warranty
Service in Puerto Rico"
section.
KitchenAid
Will Not Pay For:
A. Repairs when Stand
Mixer Attachment are
used in other than
normal single family
home use.
B. Damage resulting from
accident, alteration,
misuse or abuse or
use with products
not approved by
KitchenAid.
C. Replacement parts
or repair labor costs
for Stand Mixer
Attachment when
operated outside the
country of purchase.
DISCLAIMER OF IMPLIED WARRANTIES; LIMITATION OF REMEDIES IMPLIED
WARRANTIES,INCLUDING TO THE EXTENTAPPLICABLEWARRANTIESOF
MERCHANTABILITYOR FITNESSFORA PARTICULARPURPOSE,AREEXCLUDEDTO THE
EXTENTLEGALLYPERMISSIBLE.ANY IMPLIEDWARRANTIESTHAT MAY BEIMPOSED BY
LAWARE LIMITEDTO ONE YEAR, ORTHE SHORTESTPERIODALLOWED BY LAW. SOME
STATESAND PROVINCESDO NOT ALLOW LIMITATIONSOR EXCLUSIONSON HOW LONG
AN IMPLIEDWARRANTY OF MERCHANTABILITYOR FITNESSLASTS,SOTHE ABOVE
LIMITATIONSOR EXCLUSIONSMAY NOT APPLYTO YOU.
IFTHIS PRODUCTFAILSTO WORK AS WARRANTED, CUSTOMER'SSOLEAND EXCLUSIVE
REMEDYSHALLBEREPAIROR REPLACEMENTACCORDINGTO THE TERMSOF THIS
LIMITEDWARRANTY. KITCHENAtDAND KtTCHENAtDCANADA DO NOT ASSUME ANY
RESPONSIBILITYFORINCIDENTALOR CONSEQUENTIALDAMAGES. This warranty gives
you specific legal rights and you may also have other rights which vary from state to
state or province to province.
12

Hassle-Free Replacement Warranty-
50 United States and District of Columbia
We're soconfident the quality of our
products meets the exacting standards
of KitchenAid that, if your Stand Mixer
Attachment should fail within the first yearof
ownership, KitchenAid will arrange to deliver
an identical or comparable replacement to
your door free of charge and arrange to
haveyour original Stand Mixer Attachment
returned to us.Your replacement unit will
also be covered by our oneyear limited
warranty. Pleasefollow these instructions to
receivethis quality service.
If your Stand Mixer Attachment should fail
within the first year of ownership, simply call
our toll-free Customer Satisfaction Center at
1-800-541-6390 Monday through Friday,
8 a.m. to 8 p.m. (EasternTime), or Saturday,
10 a.m. to 5 p.m. Givethe consultant your
complete shipping address.(No RO. Box
numbers, please.)
When you receiveyour replacement Stand
Mixer Attachment, usethe carton and
packing materialsto pack up your original
Stand Mixer Attachment(s). In the carton,
include your name and addresson a sheetof
paper along with acopy of the proof
of purchase (register receipt, credit card
slip, etc.).
Hassle-Free Replacement Warranty- Canada
We're soconfident the quality of our
products meetsthe exacting standards of
the KitchenAid brand that, if your Stand
Mixer Attachment should fail within the first
yearof ownership, KitchenAid Canada will
replace your Stand Mixer Attachment with
an identical or comparable replacement.
Your replacement unit will alsobe covered
by our one year limited warranty. Please
follow these instructions to receivethis
quality service.
If your Stand Mixer Attachment should fail
within the first year of ownership, take the
Stand Mixer Attachment or ship collect to
an Authorized KitchenAid CanadaService
Centre. In the carton include your name
and complete shipping addressalong
with a copy of the proof of purchase
(register receipt, credit card slip, etc.). Your
replacement Stand Mixer Attachment will
be returned prepaid and insured. If you
are unable to obtain satisfactory service
in this manner call our toll-free Customer
eXperienceCentre at 1-800-807-6777. Or
write to us at:
Customer eXperienceCentre
KitchenAid Canada
200-6750 Century Ave.
Mississauga, ON L5N OB7
How to Arrange for Warranty Service
in Puerto Rico
Your Stand Mixer Attachment(s) is covered
by a one-year limited warranty from the
date of purchase. KitchenAid will pay for
replacement parts and labor coststo correct
defects in materialsand workmanship.
Servicemust be provided by an Authorized
KitchenAid ServiceCenter.
Takethe Stand Mixer Attachment(s) or
ship prepaid and insured to an Authorized
KitchenAid ServiceCenter.Your repaired
Stand Mixer Attachment(s) will be returned
prepaid and insured. If you are unable to
obtain satisfactory service in this manner,
call toll-free 1-800-541-6390 to learn the
location of a ServiceCenter near you.
13

How to Arrange for Service
after the Warranty Expires - All Locations
For service information in the 50
United States, District of Columbia,
and Puerto Rico,
call toll-free 1-800-541-6390.
Or write to:
Customer Satisfaction Center
KitchenAid Portable Appliances
P.O.Box 218
St. Joseph, MI 49085-0218
Or contact an Authorized ServiceCenter
For service information in Canada,
call toll-free 1-800-807-6777.
Or write to:
Customer eXperience Centre
KitchenAid Canada
200 - 6750 Century Ave.
Mississauga, Ontario L5N 0B7
near you.
How to Arrange for Service
Outside these Locations
Consult your local KitchenAid dealer or
the store where you purchased the Stand
Mixer Attachment for information on how
to obtain service.
For service information in Mexico,
call toll-free
01-800-024-17-17
(JV Distribuciones)
Or
01-800-902-31-00
(lndustrias Birtman)
How to Order Accessories
and Replacement Parts
To order accessories or replacement
parts for your Stand Mixer Attachment
in the 50 United States, District of
Columbia, and Puerto Rico,
call toll-free 1-800-541-6390 Monday
through Friday,8 a.m. to 8 p.m. (Eastern
Time), or Saturday, 10 a.m. to 5 p.m.
Or write to:
Customer Satisfaction Center
KitchenAid Portable Appliances
P.O.Box 218
St. Joseph, MI 49085-0218
To order accessories or replacement
parts for your Stand Mixer Attachment
in Canada,
call toll-free 1-800-807-6777.
Or write to:
Customer eXperience Centre
KitchenAid Canada
200 - 6750 Century Ave.
Mississauga, Ontario L5N 0B7
To order accessories or replacement
parts for your Stand Mixer Attachment
in Mexico,
call toll-free
01-800-024-17-17
(JV Distribuciones)
Or
01-800-902-31-00
(lndustrias Birtman)
14

Table des mati res
INTRODUCTION
Preuved'achat ............................................................................. Deuxi_me de couverture
S_¢urit_ des accessoires du batteur sur sode ................................................................. 17
Consignes de s_curit_ importantes ................................................................................ 17
CARACTI'--RISTtQUESETOPI_RATION
Pour installer I'accessoire du batteur sur sode .............................................................. 18
Avant d'installer I'accessoire du batteur sur sode .................................................. 18
Accessoire hachoir ........................................................................................................ 18
Pour assembler I'accessoire hachoir ....................................................................... 18
Pour utiliser I'accessoire hachoir ............................................................................. 19
Pour nettoyer I'accessoire hachoir .......................................................................... 19
Accessoire presse fruits/l_gumes ................................................................................... 20
Pour assembler I'accessoire presse fruits/l_gumes ................................................... 20
Pour utiliser I'accessoire pressefruits/l_gumes ........................................................ 20
Pour presser les fruits et I_gumes........................................................................... 21
Pour nettoyer I'accessoire presse-fruits/l_gumes ..................................................... 21
Accessoire plateau d'aliments ....................................................................................... 22
Pour fixer I'accessoire plateau d'aliments ............................................................... 22
Pour utiliser I'accessoire plateau d'aliments ............................................................ 22
Pour nettoyer I'accessoire plateau .......................................................................... 22
15

Table des mati res
RECETTES
Salsa fum_e .................................................................................................................. 23
Boulettes de viande su_doises avec sauce _ la cr_me .................................................... 24
Sauce bolognaise .......................................................................................................... 25
Sauce Pesto .................................................................................................................. 26
Chutney aux p_ches dories ........................................................................................... 26
Beurre de pommes des r_coltes .................................................................................... 27
Humus .......................................................................................................................... 27
INFORMATION SURLA GARANTtE ETLESERVICE
Garantie KitchenAid d'accessoires de batteur sur socie ................................................ 28
Garantie de remplacement sans tracas - 50 Etats am@ricainset District de Columbia ....29
Garantie de remplacement sans tracas - Canada........................................................... 29
Comment obtenir le service sous garantie _ Puerto Rico ............................................... 30
Comment obtenir ]e service apr@s]a fin de ]a garantie - tous]es endroits ...................... 30
Comment obtenir ]e service _ ]'ext@rieurde ces endroits ............................................... 30
Comment commander des accessoireset des pi@cesde rechange ................................. 31
16

S6curit6 des accessoires du batteur sur socle
Votre s6curit6 et celle des autres est tres irnportante.
Nous donnons de nombreux messages de s6curit6 importants dans ce manuel
et sur votre appareil m6nager. Assurez-vous de toujours lire tousles messages
de s6curit6 et de vous y conformer.
Voici le symbole d'alerte de s6curit6.
Ce symbole d'alerte de s6curit6 vous signale les dangers
potentiels de d6c_s et de blessures graves a vous et &d'autres.
Tousles messages de s6curit6 suivront le symbole d'alerte de
s6curit6 et le mot "DANGER" ou "AVERTISSEMENT". Ces mots signifient :
Risque possible de d6c_s ou de
blessure grave si vous ne suivez pas
imm6diatement les instructions.
Risque possible de d6c_s ou de
blessure grave si vous ne suivez pas
les instructions.
Tousles messages de s6curit6 vous diront quel est le danger potentiel et vous
disent comment r6duire le risque de blessure et ce qui peut se produire en cas
de non-respect des instructions.
f f
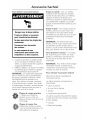
CONSIGNES DE SECURITE
IMPORTANTES
Lorsde I'utilisation d'appareils 61ectriques, il faut observer des mesures de s6curit6
616mentaires, et en particulier :
1. Lire toutes lesinstructions.
2. Pour se prot6ger contre les chocs 61ectriques, ne pas plonger le batteur dans I'eau
ou dans tout autre liquide.
3. II faut une supervision 6troite Iorsque I'appareil est utilis6 par ou pros d'enfants.
4. D6brancher J'appareil Iorsqu'il n'est pas utilis6, avant d'installer ou d'enlever des
pi_ces ainsi que pour le nettoyage.
5. Evitertout contact aveclespi_cesmobiles. Garderlesdoigts loin de I'ouverlure de d6charge.
6. Ne pas faire fonctionner le batteur avec un cordon ou une fiche endommag6(e),
ou si le batteur fonctionne mal ou est endommag6 de quelque facon que ce soit.
Retourner le batteur au centre de service autoris6 le plus proche pour qu'il soit
v6rifi6, r6par6 ou que les 616ments61ectriquesou m6caniques soient ajust6s.
7. L'utilisation de tout accessoire non recommand6 par KitchenAid peut provoquer des
incendies, des chocs 6lectriques ou des blessures.
8. Ne pas I'utiliser & I'ext6rieur.
9. Ne pas laisser le cordon pendre au bord de Jatable ou du comptoir.
10. Ne jamais alimenter & la main. Toujours utiliser la combinaison de poussoir/d6.
11. Les lames sont ac6r6es. Manipuler avec prudence.
12. Ce produit est r6serv6_ I'utilisation r6sidentielle.
CONSERVEZ CES DIRECTIVES
17

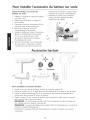
Pour installer i'accessoire du batteur sur socle
Avant d'installer I'accessoire du
batteur sur sode
7.
1. Mettez le contr61e de vitesse du batteur
sur socle _ OFR
2. D_branchez le batteur ou mettez-le
hors tension.
3. Desserrez le bouton d'accessoire (A) en
tournant dans le sens antihoraire.
4. Retirez ou relevez le couvercle
d'embottement d'accessoire.
5. Ins_rez le bottier de I'arbre d'accessoire
(B) dans I'embottement d'accessoire
(C), en vous assurant que I'arbre
de courant s'ajuste dans la douille
d'embottement carrie.
6. Tournez I'accessoire d'un mouvement
de va-et-vient, si n_cessaire. Lorsque
I'accessoire est en bonne position, la
goupille de I'accessoire s'ajustera dans
I'encoche du bord de I'embottement.
Resserrezle bouton de I'accessoire
jusqu'_ ce que I'appareil soit bien
install_ dans le batteur.
B C A
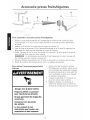
Accessoire hachoir
I
B
A
Pour assembler l'accessoire hachoir :
I.
2.
3.
4.
Ins_rez la vis sans fin de hachage (A) dans le corps du hachoir (B).
Placez le couteau (C) sur la tige carrie du c6t_ expos_ de la vis sans fin de hachage.
Placez la plaque de hachage (D) sur le couteau en associant les languettes de la
plaque avec les encoches du corps du hachoir.
Placez I'anneau (E) sur le corps du hachoir en toumant _ la main jusqu'_ ce que le
tout soit bien fix_, mais non resserr_.
REMARQUE : La combinaison poussoir/cl6 (F) sert seulement _ retirer I'anneau (E).
Ne I'utilisez pas pour resserrer I'anneau (E).
REMARQUE : Le presse-fruits/l_gumes (modUle FVSP) est disponible pour convertir le
hachoir en presse-fruits/l_gumes.
Le poussolr _ saucisses (SSA) est disponible pour convertir le hachoir en poussoir
saucisses.
18
La page est en cours de chargement...
La page est en cours de chargement...
La page est en cours de chargement...
La page est en cours de chargement...
La page est en cours de chargement...
La page est en cours de chargement...
La page est en cours de chargement...
La page est en cours de chargement...
La page est en cours de chargement...
La page est en cours de chargement...
La page est en cours de chargement...
La page est en cours de chargement...
La page est en cours de chargement...
La page est en cours de chargement...
La page est en cours de chargement...
La page est en cours de chargement...
La page est en cours de chargement...
La page est en cours de chargement...
La page est en cours de chargement...
La page est en cours de chargement...
La page est en cours de chargement...
La page est en cours de chargement...
La page est en cours de chargement...
La page est en cours de chargement...
La page est en cours de chargement...
La page est en cours de chargement...
La page est en cours de chargement...
La page est en cours de chargement...
La page est en cours de chargement...
La page est en cours de chargement...
La page est en cours de chargement...
La page est en cours de chargement...
-
 1
1
-
 2
2
-
 3
3
-
 4
4
-
 5
5
-
 6
6
-
 7
7
-
 8
8
-
 9
9
-
 10
10
-
 11
11
-
 12
12
-
 13
13
-
 14
14
-
 15
15
-
 16
16
-
 17
17
-
 18
18
-
 19
19
-
 20
20
-
 21
21
-
 22
22
-
 23
23
-
 24
24
-
 25
25
-
 26
26
-
 27
27
-
 28
28
-
 29
29
-
 30
30
-
 31
31
-
 32
32
-
 33
33
-
 34
34
-
 35
35
-
 36
36
-
 37
37
-
 38
38
-
 39
39
-
 40
40
-
 41
41
-
 42
42
-
 43
43
-
 44
44
-
 45
45
-
 46
46
-
 47
47
-
 48
48
-
 49
49
-
 50
50
-
 51
51
-
 52
52


KitchenAid FVSFGA Instructions Manual
- Taper
- Instructions Manual
dans d''autres langues
- español: KitchenAid FVSFGA
Documents connexes
-
KitchenAid FVSP Le manuel du propriétaire
-
-
-
-
-
-
KitchenAid KSM7586P Manuel utilisateur
-
-
KitchenAid KSM1JA Mode d'emploi
-