Dustbane QS2 Operations Manual
- Catégorie
- Aspirateurs
- Taper
- Operations Manual

Parts & Operations Manual
Manuel de pièces et d’opérations
QS2
Quiet Series Upright
Code: 70200
Serial Number:
Numéro de série : _____________________
Date of Purchase:
Date d’achat : ________________________
More info / Plus d’info : www.dustbane.ca
2015-08

2

3
ENGLISH
Safety, Operations and Maintenance
Save these instructions. Read and follow all warnings and cautions before using this oor machine.
This unit is intended for commercial use.
This machine will give you many years of trouble-free operating satisfaction, provided it is given proper care. All parts have passed
rigid quality control standards prior to their assembly to produce the nal product. Prior to packaging, your oor machine was again
inspected for assurance of awless assembly.
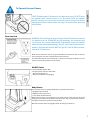
This machine is protectively packed to prevent damage in shipment. We recommend that upon delivery, you unpack the unit and
inspect it for any possible damage. Only a visual examination will reveal damage that may have occurred during shipping.
Important Safety Instructions
WARNING: Electric shock may occur if used on wet surfaces. Store indoors.
To reduce the risk of re, electric shock or injury:
• Use your vacuum cleaner only as described in this manual. Use only with recommended attachments.
• Disconnect electrical supply before servicing or cleaning out the agitator area. Failure to do so could result in the agitator
unexpectedly starting, causing personal injury from moving parts.
• Do not leave vacuum cleaner when plugged in. Unplug from outlet when not in use and before servicing.
• To reduce the risk of electrical shock - Do not use outdoors or on wet surfaces.
• Do not allow to be used as a toy. Close attention is necessary when used by or near children.
• Do not use with a damaged cord or plug. If vacuum cleaner is not working as it should, has been dropped, damaged, left
outdoors, or dropped in water, return it to an authorized service center.
• Do not pull or carry by cord, use cord as a handle, close a door on cord, or pull cord around sharp edges or corners. Do not
run vacuum cleaner over cord. Keep cord away from heated surfaces.
• Do not unplug by pulling on cord. To unplug, grasp the plug, not the cord.
• Do not handle plug or vacuum cleaner with wet hands.
• Do not put any objects into openings.
• Do not use with any opening blocked; keep free of dust, lint, hair, and anything that may reduce air ow.
• Keep hair, loose clothing, ngers, and all parts of body away from openings and moving parts.
• Turn o all controls before unplugging.
• Use extra care when cleaning on stairs. Do not put on chairs, tables, etc. Keep on oor.
• Do not use vacuum cleaner to pick up ammable or combustible liquids (gasoline, cleaning uid, perfumes, etc.), or use
in areas where they may be present. The fumes from these substances can create a re hazard or explosion.
• Do not pick up anything that is burning or smoking, such as cigarettes, matches, or hot ashes.
• Do not use vacuum cleaner without dust bag and/or lters in place.
• You are responsible for making sure that your vacuum cleaner is not used by anyone unable to operate it properly.
• Connect to a properly grounded outlet only. See Grounding Instructions.
Grounding Instructions
IMPORTANT: Improper grounding method can result in a risk of electrical shock.
The machine must be grounded.
Electrical equipment must be grounded. If the machine should malfunction or breakdown, grounding provides a path of least
resistance for electrical current to reduce the risk of electric shock. The QS2 is equipped with a cord containing a grounding
conductor and grounding plug. The plug must be inserted into an appropriate outlet that is properly installed and grounded in
accordance with all local codes and ordinances.
If repair or replacement of the cord or plug is necessary, DO NOT connect the grounded wire to a at bed terminal. The grounding
wire is the wire with insulation and an outer green surface, with or without yellow stripes.

4
ENGLISH
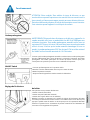
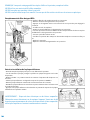
Parts Identication
WARNING: Improper connection of the equipment grounding conductor can result in a risk of electric shock.
Check with a qualied electrician or service person if you are in doubt as to whether the outlet is properly
grounded. Do not modify the plug provided with the appliance - if it will not t the outlet, have a proper outlet
installed by a qualied electrician. INTENDED FOR USE ON A NOMINAL 120-VOLT SUPPLY CIRCUIT: the carpet
extractors have a grounding attachment plug that looks like the plug illustrated. Make sure that the oor
machine is connected to an outlet having the same conguration as the plug. No adaptor should be used with
these carpet extractors.

5
ENGLISH
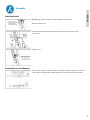
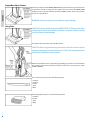
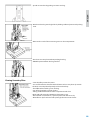
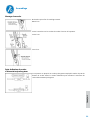
Assembly
Attaching handle
DO NOT plug in until assembly is complete. Remove handle screw.
Remove handle screw.
Insert handle with cord hook to the back of the vacuum cleaner. Insert screw.
Insert screw.
Tighten screw.
Power/Extension Cord Retainer
This vacuum cleaner is equipped with a replaceable extension power cord. Use the
cord retainer as illustrated to maintain the power cord - extension cord connection.

6
ENGLISH
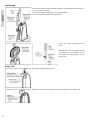
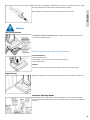
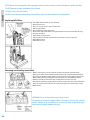
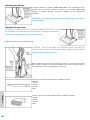
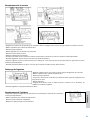
Tool Storage
•Placewandincenterslotoftoolholder,twistingandpushingdownovershorthose
to assure a good connection.
•Placecrevicetoolintorectangularrearslotoftoolholder.
•Placedustingbrushintofrontslotoftoolholder.
Place hose in front of handle on hose
holder.
Attach wand to hose by aligning the two
(2) raised tabs on wand with “J” slots in
hose, guide tabs along grooves, twist to
lock in place.
Power Cord
Push power cord into locking notch.
Wrap power cord around cord hook. Secure retainer (plug head) to power cord.

7
ENGLISH
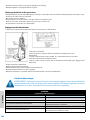
To Operate Vacuum Cleaner
CAUTION: Moving parts! To reduce the risk of personal injury, DO NOT touch
the agitator when vacuum cleaner is on. Any contact with the agitator
while it is rotating can cut, bruise or cause other injuries. Always turn o and
unplug from electrical outlet before servicing. Use caution when operating
near children.
Extension Cord
WARNING: Electrical Shock or Personal Injury Hazard! The cord set used with
this product must be GROUNDED for safe operation. Any extension cord
set used with this vacuum cleaner MUST be grounded (3-wire with two at
blades and one round ground prong). Only use a UL Listed Cord Set with this
product. The Extension Cord Set MUST be Type SJT, sized 16 AWG minimum,
and rated 120V minimum.
Make sure the extension cord set is in good condition. The extension cord set must be
heavy enough to carry the current from the vacuum cleaner.
An undersized extension cord setwill cause a drop in line voltage resulting in a loss of
power and overheating of the vacuum cleaner.
ON-OFF Switch
•EnsureON-OFFswitchisOFF.
•Plugthepowercordinto120Voutlet.
•Turnvacuumcleaneron.
•Alwaysturnobeforeunplugging.
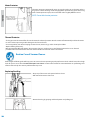
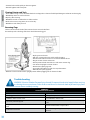
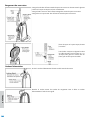
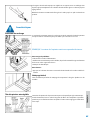
Body Release
Your vacuum cleaner is equipped with three (3) position body release;
•Uprightposition(locked)
•Middleposition(normaluse)
•Lowposition(underfurniture)
Release the body by pressing down on the body release pedal with your foot and
pulling back and down on the handle with your hand. Step on pedal and pull back to
change from normal use position to low position.
Move the vacuum cleaner to upright position for storage and tool use.

8
ENGLISH
8
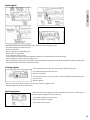
Carpet/Bare Floor Selector
SelectorshouldbeplacedinBAREFLOOR(TOOLS)positionwhenusingvacuumcleaner
onbareoorsandwhenusingtools.TheagitatordoesnotrotateintheBAREFLOOR
(TOOLS)position.SelectorshouldbeplacedinCARPETpositionwhenusingvacuum
cleaner on carpeted oors.
WARNING: Incorrect setting may cause oor or carpet damage.
Using Tools
CAUTION: Selector should be placed in BARE FLOOR (TOOLS) position when
using vacuum cleaner on bare oors and when using tools. Incorrect setting
my cause oor or carpet damage.
The agitator does not rotate in the upright position.
CAUTION: When using attachments, place one hand on the vacuum cleaner
to prevent tipping the vacuum cleaner over. DO NOT overextend your reach
with hose as it could tip vacuum cleaner.
Remove wand from short hose by twisting and pulling up. The tools can be attached to
hose, wand or crevice tool. Place all tools and hose back in the same manner as shown
inTOOLSTORAGE.
The Crevice Tool may be used on the following items:
•Furniture
•Cushions
•Drapes
•Stairs
•Walls
The Dusting Brush may be used onthe following items:
•Furniture
•Drapes
•Stairs
•Walls

9
ENGLISH
9
The telescopic wand length is adjustable and requires no assembly. To adjust, simply
press the wand button and slide the wand to the desired setting.
Release button and continue to slide wand until it locks into position.
Features
Overload Protection
TheOVERLOADPROTECTIONRESETbuttonstopsthenozzlemotorwhenthebrush
jams to prevent belt breakage.
NOTE: The vacuum cleaner motor will continue to run.
To Correct Problem:
•Unplugelectricalcord.
•Checknozzleareasforexcessivelintbuilduporjamming.
•Cleanjammedarea.
To Reset:
•Pressresetbuttonontopofthenozzle.Pluginandturnonvacuumcleaner.
Edge Cleaning
Edge cleaning feature enables improved cleaning of carpets near walls and furniture.
Automatic Adjusting Nozzle
The nozzle of your vacuum cleaner automatically adjusts to any carpet pile height.
Feature allows nozzle to oat evenly over carpet pile surfaces. No manual adjustments
required.

10
ENGLISH
10
Motor Protector
The motor protector automatically opens to provide cooling air to the motor when a
clog occurs or when dust bag needs changing. Motor protector may open when using
tools. If motor protector opens, the vacuum will make a slightly dierent sound.
NOTE: Do not block motor protector.
Thermal Protector
•Ifaclogpreventsthenormalowofairtothemotor,thethermalprotectorturnsthemotoroautomaticallytoallowthemotor
to cool in order to prevent possible damage to the vacuum cleaner.
•Tocorrectproblem,turnoandunplugvacuumcleaner,removeclogs,and/orclean/replacelters.
•Replacefullbagifnecessary.
•Waitapproximatelyfty(50)minutes,plugvacuumcleanerin,andturnontoseeifthermalprotectorhasreset.Thermal
protector will not reset if vacuum cleaner is not turned o even if vacuum cleaner cools down.
Routine Care of Vacuum Cleaner
Performing the following tasks will keep your new vacuum cleaner operating at peak performance levels and will ensure these high
levelsforyearstocome.ChecktheBEFOREREQUESTINGSERVICEsectioninthismanualforrecommendationsonperformingsome
of these tasks to help solve various problems that may occur.
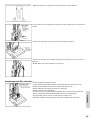
Replacing Dust Bag
•Grasptopofdustcoverandsqueezelatchtorelease.
•Pulloutwardtoremovedustcover.
•Removedustbagbygraspingcardboardportionandpullingout.

11
ENGLISH
11
•Spreadoutnewdustbag,takingcarenottotearbag.
•Attachnewdustbagontobagholderbyholdingcardboardportionandpushing
back.
•Reinserttabonendofdustcoverintogrooveondustcompartment.
•Pressdustcoverintoplacewithoutpinchingdustbag.
•DONOToperatewithoutdustbaginstalled.
Cleaning Secondary Filter
•Secondarylterprotectsthemotor.
•Itisrecommendedtocleanlterwithcoldwateratleasteverythree(3)months.
Check the secondary lter frequently and clean when dirty.
•Checklterwheninstallinganewdustbag.
•Turnoandunplugthevacuumcleaner.
•Ifdirty,pulllterfrombottomofdustcompartmentandclean.
•Washwithcoldwateronly,DONOTusedetergentorsoap.
•Oncethelteriswashedclean,squeezebyhandandallowtoair-dry.
•Allowltertodryfor24hoursbeforeplacingbackintovacuumcleaner.

12
ENGLISH
12
NOTE: When the cleaning of the lter no longer restores vacuum cleaner suction to full power, replace the lter.
DO NOT operate without secondary lter installed.
DO NOT wash in the dishwasher.
DO NOT install the lter when damp. Ensure lter is fully inserted under plastic rib projections.
Replacing HEPA Filter
•Checklterwheninstallinganewdustbag.
•Removedustcover.
•Presstabondustcovertoreleasefrontcover.
•Ifdirty,replacelter.
•Placenewlterintothedustcover.
•Ensurefoamedgeofthelterisfacingtowardsthevacuumcleanerwhenplacing
lter into dust cover.
•Ensurelterisfullyinserted.
•Filterscannotbecleanedandshouldbereplacedatleastonceeachyear.
•Reinstallfrontcover.
•Reinstalldustcover.
Removing and Installing Lower Plate
•Beforeservicinganyparts,disconnectvacuumcleanerfromelectricaloutlet.
•Alwaysplacepaperundernozzlewheneverlowerplateisremovedtoprotectoor.
•Placebodyinuprightpositionandturnvacuumcleanerovertoexposelowerplate.
•ReleaselowerplatebyrotatingthelowerplatelatchestotheUNLOCKposition.
•Removelowerplateandremoveanyresiduethatmayexistinbeltarea.
•Reinstalllowerplatebyhookingfrontendoflowerplateintoslotsonfrontofnozzle.
•Presslowerplateontonozzleandsecurebyrotatingthelowerplatelatchestothe
LOCKposition.
WARNING Electrical Shock or Personal Injury Hazard
Disconnect the electrical supply before servicing or cleaning the vacuum
cleaner. Failure to do so could result in electrical shock or personal injury
from vacuum cleaner suddenly starting.

13
ENGLISH
13
Replacing Belt
•Replacebeltwheneveraburningrubbersmellcausedbyexcessiveslippageoccurs.
•Turnoandunplugthevacuumcleaner.
•Removelowerplate.
•Removeagitatorbycarefullyliftingout.
•Removewornorbrokenbelt.
•Cleanagitatorandtheendcaps.
•Loopnewbeltaroundmotorshaftandagitatorbeltgroove;seeillustrationforcorrectbeltrouting.
•Reinstallagitatorbackintonozzlehousinggrooves.
•Afterreinstallingtheagitator,turnitbyhandtomakesurethatbeltisnottwistedorpinchedandthatallrotatingpartsturnfreely.
•Reinstalllowerplate.Ensuretabsarelockedintoslots.
Cleaning Agitator
•Cleanagitatoraftereveryveusesandeverytimethebeltisreplaced.
•Turnoandunplugthevacuumcleaner.
•Removelowerplate.
•Cutoanyhair,thread,string,carpetpile,andlintentangledaroundagitatorwitha
pair of scissors.
•Removeagitator.
•Removeanystringordebrislocatedontheendcaps,washersoragitatorshaft.
•Reinstallagitator(page46)andlowerplate.
Replacing Agitator
•Whenthebristlesontheagitatorarewornsothattheydonottouchacardheldacross
the lower plate, the agitator should be replaced.
•Turnoandunplugthevacuumcleaner.
•Removelowerplateandagitator.
•Cleandebrisfromendcaps.

14
ENGLISH
14
•Positionbeltoverbeltpulleyonthenewagitator.
•Reinstallagitatorandlowerplate.
Cleaning Exterior and Tools
•Cleanexteriorusingaclean,softcloththathasbeendippedinasolutionofmildliquiddetergentandwaterandwrungdry.
•DONOTdripwateronvacuumcleaner
•Wipedryaftercleaning.
•DONOTcleantoolsindishwasherorclotheswasher.
•Washtoolsinwarmsoapywater,rinseandair-dry.
•DONOTusetoolsiftheyarewet.
Removing Clogs
The hose located on the back of the vacuum cleaner carries the dirt from
the nozzle up to the dust bag. If the hose should become clogged:
•Unplugvacuumcleaner.
•Pullopensuctioninletcoverandcheckforclogging.
•Disconnectwandfromshorthoseandcheckwandandhose.
•Pluginvacuumcleanerandturnon.
•Disconnectwandandstretchhoseinandouttoremoveclog.
•Turnoandunplugthevacuumcleaner.
•Removelowerplate(page44).
•Inspectinletofnozzlehoseandclearanyobstructions.
•Reinstalllowerplate(page44).
•Returnthevacuumcleanertotheuprightpositionbeforepluggingintoanelectricaloutlet.
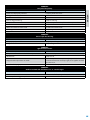
Troubleshooting
WARNING : Electrical Shock or Personal Injury Hazard. Disconnect the electrical supply before servicing
or cleaning the vacuum cleaner. Failure to do so could result in electrical shock or personal injury from
vacuum cleaner suddenly starting.
PROBLEM :
Vacuum cleaner will not run.
CAUSE SOLUTION
1. Unplugged at wall outlet. 1. Plug in rmly. Push ON-OFF
2. ON-OFF switch not turned on. 2. Push ON-OFF switch to ON.
3. Thermal protector tripped.
3. Allow to cool 50 minutes and thermal protector will reset
itself.
4.Trippedcircuitbreaker/blownfuseathouseholdservice
panel.
4.Resetcircuitbreakerorreplacefuse.
5. Defective wall outlet.
5. Check with a good appliance or lamp. Have outlet properly
serviced.

15
ENGLISH
15
PROBLEM :
Poor job of dirt pickup.
CAUSE SOLUTION
1. Dust cover improperly installed. 1. Properly install dust cover.
2. Clogged hose or nozzle. 2. Clean hose or nozzle area.
3. Hose not inserted fully. 3. Insert hose.
4.Fullorcloggeddustbag. 4.Replacedustbag.
5. Dirty lters. 5. Clean or replace secondary lter and/or replace exhaust lter.
6.Brokenbelt. 6.Replacebelt.
7. Belt not installed on motor shaft. 7. Install belt on motor shaft.
8. Worn agitator. 8. Replace agitator.
9. Hole in hose. 9. Replace hose.
PROBLEM :
Dust escapes the dust bag.
CAUSE SOLUTION
1. Bag improperly installed. 1. Properly install bag.
2. Bag torn. 2. Replace bag.
PROBLEM :
Agitator does not turn.
CAUSE SOLUTION
1.Carpet/BareoorselectorinBAREFLOORposition. 1. Select CARPET position.
2. Broken belt. 2. Replace belt.
3. Tripped overload protector in nozzle.
3. Remove any items that may be caught or jammed, then reset.
If vacuum cleaner starts and stops again, clean agitator and end
caps, then reset.
4.Handleinfulluprightposition. 4.Movehandlefromuprightposition.
PROBLEM :
Airow restricted with attachment use -or- sound changes.
CAUSE SOLUTION
1. Tool use restricts air ow. 1. Check tools for fuzz, lint, pet hair or other debris.
2. New carpet fuzz clogged air path. 2.SeeCLOGREMOVALsectionandcleanhose.

16
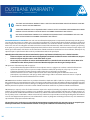
TENYEARSUNCONDITIONALWARRANTYONALLPOLYETHYLENEROTATIONALMOLDEDRESERVOIRSTOBEFREE
FROMALLCRACKSAND/ORCORROSION.
THREEYEARSWARRANTYONALLEQUIPMENTPARTSAGAINSTDEFECTSINMATERIALANDWORKMANSHIPUNDER
NORMALUSEANDCAREWITHTHEEXCEPTIONOFANYRUBBERCOMPONENTSANDSPRINGS.
ONEYEARUNCONDITIONALWARRANTYONLABOURANDEQUIPMENTPARTSUNDERNORMALUSEANDCARE
WITHTHEEXCEPTIONOFANYRUBBERCOMPONENTSANDSPRINGS.
DUSTBANE PRODUCTS LIMITED warrants each new unit of Dustbane Equipment accompanied by this Warranty, including acces-
soriesthereto(butexceptanyrubberpartsandsprings)manufacturedorsuppliedbyDustbaneProductsLimitedanddelivered
to the original retail purchaser by an authorised Dustbane distributor, to be free from defects in material and workmanship under
normaluseandcare.TheobligationofDustbaneProductsLimitedunderthisWarrantyshallbelimitedtorepairingorreplacing,
at its option, any part or parts of Dustbane Equipment which shall have been returned to a Dustbane authorised repair depot, and
which,uponexamination,shalldisclosetothesatisfactionofDustbaneProductsLimitedtohavebeendefective,whereuponany
required repair or replacement shall be made by such Dustbane authorised repair depot.
THE obligation of Dustbane Products Limited to the repair or replacement of defective parts is further limited to :
• to the cost of parts and labour for returns of polyethylene rotational moulded reservoirs made within ten (10) years
• to the cost of parts only for returns made within three (3) years
• the cost of parts and labour for returns made within twelve (12) months based on Dustbane’s Labour Rates all as
calculated from the delivery date of such unit of Dustbane Equipment to the original retail purchaser.
THE provisions of this Warranty shall not apply to:
• any unit of Dustbane Equipment which has been subject to misuse, negligence or accident, or which shall have been
repaired or altered by a person or persons outside a Dustbane authorised repair depot, in any way so as, in the
judgementofDustbaneProductsLimited,toaectadverselyitsperformanceandreliability
• normal maintenance services and the replacement of service items (including but not limited to electric cord,
painted parts, any rubber parts and springs, switch and bearings) made in connection with such services as required
in the Dustbane Recommended Maintenance Schedule
NEITHERDustbaneProductsLimitednoranyauthorisedDustbanedistributorshallbeliableforanyclaimsordamage(including
but not limited to consequential damage and loss of income) resulting from any failure of Dustbane Equipment, whether caused by
negligence or otherwise; Nor for claims or damages resulting from service delays while in performance of the obligations under this
WarrantywhicharebeyondthereasonablecontrolofDustbaneProductsLimitedoranyauthorisedDustbaneDistributor.
THIS Warranty is expressly in lieu of all other warranties expressed or implied, (including any implied warranty of merchantability
or tness for a particular purpose), and there are no conditions, warranties or representations, whether oral or written except as ex-
presslystatedherein.NeitherDustbaneProductsLimited,anyauthorisedDustbaneDistributor,anysalesmanoremployeesthereof,
nor any other person or individual is authorised to make any statement or representation concerning the obligations of Dustbane
as to the new Equipment unit purchased, nor will Dustbane assume any obligation or liability pursuant to any such statement or
representation except pursuant to this Warranty.
The purchaser upon purchasing any unit of Dustbane Equipment accompanied by this warranty agrees to accept the pro-
tection provided herein and the limitations thereto as being both suffi cient and commercially reasonable.
1999DustbaneProductsLimited
10
3
1
DUSTBANE WARRANTY
Dustbane Products Ltd. www.dustbane.ca

17

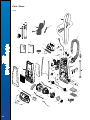
70200
QS2 Quiet Series Upright
Parts - Pièces
18
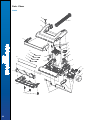
Body
32
57
58
59
56
60
61
62
64
63
31
65
69
67
68
66
41
13
12
11
14
2
4
3
5
7
7
7
7
8
8
6
9
9
10
15
16
17
18
19
21
20
42
43
22
24
23
25
44
26
27
28
45
29
47
48
46
32
31
31
49
50
51
33
52
40
34
35
36
37
38
39
1
54
30
30
53
55

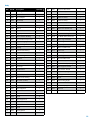
Parts - Pièces
19
Body
Ref. Part N. Description Quantity
1 70001 Dust Bag 1
2 70002 Wand Holder 1
3 70003 Hose Adapter 1
4 70004 Hose Hook 1
5 70005 Roller Shaft 1
6 70006 Screw 1
7 70007 Washer 4
8 70008 Wheel Unit 2
9 70009 Ring Clip 2
10 70010 Dust Container Packing 2
11 70011 Nut,Hex-#m4TorqueLock 1
12 70012 Body Packing, Right 1
13 70013 BodyPackingLeft 1
14 70014 Packing 1
15 70015 Suction Inlet Packing 1
16 70016 Protector Case 1
17 70018 Protector Support 1
18 70019 Protector 1
19 70020 Rubber Protector 1
20 70021 On/o Switch 1
21 70022 Cover Cap 1
22 70023 Cord Retainer 1
23 70024 Cord Retainer 1
24 70025 Flat Washer, Round 1
25 70027 Switch Cover Packing 1
26 70028 Hose Unit (stretch) 1
27 70029 Handle Screw 1
28 70030 Cover 1
29 70031 Filter Supporter 1
30 70032 Wire Connector 7
31 70033 Screw 6
32 70034 Screw 6
33 70035 Noise Suppressor 1
34 70036 Handle Assembly 1
35 70037 Hose Holder 1
36 70038 Screw 1
39 70041 Extension Wand Unit 1
40 70201 LeadAssembly 1
41 70202 Wire Cord 1
42 70203 Power Cord Assy. 1
43 70204 Power Cord Assy. 1
44 70205 Switch Cover (machined) 1
45 70206 Secondary Filter 1
46 70207 Motor Case (machined) 1
47 70208 Motor Case Packing 1
48 70209 Rear Cover Packing 1
49 70210 Fan Motor Unit (cinderson) 1
50 70211 Motor Support Rubber 1
51 70212 Motor Support Rubber (front) 1
52 70213 Motor Cap 1
53 70214 WhiteLeadWireUnit 1
54 70215 Dust Cover 1
55 70216 Operating Instructions 1
56 70217 Hose Plug B 1
57 70218 BlackLeadWireUnit 1
58 70219 FrontCover(decoLabel) 1
59 70220 ExhaustFilter(hepa)Large 1
60 70221 Noise Suppressor Unit 1
61 70222 Main Switch - On/o 1
62 70223 Nut (nozzle Spring) 1
63 70224 LockingCam 1
64 70225 Screw 1
65 70226 Body Packing, Right 1
66 70227 Dust Container Unit 1
67 70028 Protector Spring 1
68 70229 PartsList 1
69 70026 Tie Cable 1
37 70039 Dusting Brush 1
38 70040 Crevice Tool 1

20
1
2
3
4
5
6
11
12
13
14
15
16
17
18
19
20
21
22
23
24
25
26
28
28
28
10
7
8
9
27
29
70200
QS2 Quiet Series Upright
20
Parts - Pièces
Nozzle
La page est en cours de chargement...
La page est en cours de chargement...
La page est en cours de chargement...
La page est en cours de chargement...
La page est en cours de chargement...
La page est en cours de chargement...
La page est en cours de chargement...
La page est en cours de chargement...
La page est en cours de chargement...
La page est en cours de chargement...
La page est en cours de chargement...
La page est en cours de chargement...
La page est en cours de chargement...
La page est en cours de chargement...
La page est en cours de chargement...
La page est en cours de chargement...
La page est en cours de chargement...
La page est en cours de chargement...
-
 1
1
-
 2
2
-
 3
3
-
 4
4
-
 5
5
-
 6
6
-
 7
7
-
 8
8
-
 9
9
-
 10
10
-
 11
11
-
 12
12
-
 13
13
-
 14
14
-
 15
15
-
 16
16
-
 17
17
-
 18
18
-
 19
19
-
 20
20
-
 21
21
-
 22
22
-
 23
23
-
 24
24
-
 25
25
-
 26
26
-
 27
27
-
 28
28
-
 29
29
-
 30
30
-
 31
31
-
 32
32
-
 33
33
-
 34
34
-
 35
35
-
 36
36
-
 37
37
-
 38
38


Dustbane QS2 Operations Manual
- Catégorie
- Aspirateurs
- Taper
- Operations Manual
dans d''autres langues
- English: Dustbane QS2
Documents connexes
-
Dustbane QS1 Operations Manual
-
-
-
-
-
-
Targa XL 12 Mode d'emploi
-
-
-