NewAir NGH1K6WH00 Le manuel du propriétaire
- Catégorie
- Chauffe-eau
- Taper
- Le manuel du propriétaire

EN: Pg.3 | FR: Pg.20 | ES: Pg.40 Manual v1.0
10,000-Watt Hardwired Garage Heater
Nouveau chauffage de garage électriqueencastré de 10 000 watts
Nuevo calentador eléctrico empotrado de 10,000 vatios para garaje
NGH1K6WH00
OWNER’S MANUAL
Manuel de L'utilisateour
Manual del Propietario

EN
www.newair.com 2
A Name You Can Trust
Trust should be earned and we will earn yours. Customer happiness is the focus of our
business.
From the factory to the warehouse, from the sales floor to your home, the whole
Newair family promises to provide you with innovative products, exceptional service,
and support when you need it the most.
Count on Newair
As a proud Newair owner, welcome to our family. There are no robots here, real people
shipped your product and real people are here to help you.
Contact Us
Please reach out to our customer service team before making a return to your store of
purchase. We are happy to help with any questions or concerns!
Mon-Fri from 8-4 PST at:
A team member will respond to you within 24 hours.
Follow Us
Facebook.com/newairusa
Instagram.com/newairusa
YouTube.com/newairusa
Twitter.com/newairusa
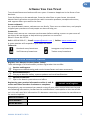
REGISTER YOUR PRODUCT ONLINE
Register Your Newair Product Online Today!
Take advantage of all the benefits product registration has to offer:
Service and Support
Diagnose troubleshooting and service issues faster and more accurately
Recall Notifications
Stay up to date for safety, system updates and recall notifications
Special Promotions
Opt-in for Newair promotions and offers
Registering your product information online is safe &
secure and takes less than 2 minutes to complete:
Alternatively, we recommend you attach a copy of your sales receipt below and record
the following information, located on the manufacturer’s nameplate on the rear of the
unit. You will need this information if it becomes necessary to contact the manufacturer
for service inquiries.
Date of Purchase:
Serial Number:
Model Number:
newair.com/register

EN
www.newair.com 3
READ AND SAVE THESE INSTRUCTIONS
TABLE OF CONTENTS
Specifications ..................................................................................................................... 3
Safety Information & Warnings ......................................................................................... 4
Parts List ................................................................................................................... 7
Installation Instructions ..................................................................................................... 8
Tools Needed ............................................................................................................ 8
Hardware Required for Wiring Heater ...................................................................... 8
Locating The Heater .................................................................................................. 8
Heater Mounting .................................................................................................... 10
Wiring Instructions ................................................................................................. 12
Operating Instructions ..................................................................................................... 15
Heater Control Panel .............................................................................................. 15
Cleaning & Maintenance ................................................................................................. 17
User Cleaning Instruction ....................................................................................... 17
Maintenance Cleaning Instructions ........................................................................ 17
Troubleshooting .............................................................................................................. 17
Limited Manufacturer’s Warranty ................................................................................... 19
SPECIFICATIONS
MODEL NO.:
NGH1K6WH00
VOLTAGE / FREQUENCY:
240V/60HZ
CURRENT:
42 Amps
POWER CONSUMPTION:
10000 Watts
POWER:
34120 BTU/HR
MINIMUM CIRCUIT:
50

EN
www.newair.com 4
WARNING! FAILURE TO ADHERE STRICTLY TO THE INSTRUCTIONS IN THIS MANUAL
MAY LEAD TO THE POSSIBILITY OF FIRE, RESULTING IN DAMAGE TO PROPERTY, HARM
TO INDIVIDUALS, OR EVEN LOSS OF LIFE.
This heater should be installed by qualified persons only and in accordance with the
National Electric Code (Canadian Electrical Code in Canada) and all applicable
local codes. Supply wiring must be copper and suitable for at least 167°F.
Minimum 6-gauge SJO or SJTO copper type wiring required.
CALIFORNIA RESIDENTS ONLY-WARNING:
This product contains chemicals including di(2-ethylhexyl) phthalate (DEHP), which is
known to the State of California to cause cancer and reproductive harm. For more
information, go to: www.P65Warnings.ca.gov.
UL 2021. FIXED AND LOCATION – DEDICATED ELECTRIC ROOM HEATERS
DO NOT DISCARD THIS MANUAL
CUSTOMER: PLEASE RETAIN THIS MANUAL FOR FUTURE USE
FOR YOUR SAFETY
DO NOT STORE OR USE GASOLINE OR OTHER
FLAMMABLE VAPORS OR LIQUIDS IN THE
VICINITY OF THIS OR ANY OTHER APPLIANCE

EN
www.newair.com 5
SAFETY INFORMATION & WARNINGS
When using any electrical appliance, basic safety precautions must be followed
in order to reduce the risk of fire, electrical shock and/or injury to persons or
property. Be sure to read all instructions before using this appliance and
observe the following safety tips:
• Read all instructions before using this heater.
• This heater is hot when in use. To avoid burns, do not let bare skin touch hot
surfaces. If provided, use handles when moving this heater. Keep combustible
materials, such as furniture, pillows, bedding, paper, clothes, and curtains at least 3
feet (0.9m) from the heater.
• Extreme caution is necessary when any heater is used by or near children, pets, or
invalids and whenever the heater is left operating unattended.
• Do not operate any heater with a damaged cord or plug or after the heater
malfunctions, has been dropped or damaged in any manner. Disconnect power at
service panel and have heater inspected and or repaired by a qualified service
person.
• Do not use this heater outdoors.
• Under no circumstances should this appliance be modified. Parts having to be
removed for servicing must be replaced prior to operating this appliance again.
• This heater is intended for comfort heating applications and not intended for use in
special environments. Do not use in damp or wet locations such as marine or
greenhouse or in areas where corrosive or chemical agents are present.
• To disconnect heater, first turn controls to off, and turn off power to heater circuit at
main disconnect panel.
• Do not insert or allow foreign objects to enter any ventilation or exhaust opening as
this may cause an electrical shock or fire or damage to the heater.
• To prevent a possible fire, do not block air intakes or exhaust in any manner. Do not
use on soft surfaces, like a bed, where openings may become blocked.
• This appliance has hot and arcing or sparking parts inside. Do not use it in areas
where gasoline, paint or flammable liquids are used or stored.
• Use this heater only as described in this manual. Any other use not recommended by
the manufacturer may cause fire, electric shock, or injury to persons.
• This heater is not to be used as a portable unit and or have a cord and plug installed.
(HARD WIRED ONLY)
• This heater is provided with automatic resetting thermal limit and an alarm beeper to
alert user if heater has overheated. If the alarm has activated, immediately turn off
the heater and inspect and remove any objects around heater that may have blocked
the airflow or otherwise caused the heater to overheat. Do not continue to use
heater if it repeatedly overheats and activates the alarm. DO NOT OPERATE THE
HEATER WITH THE ALARM SOUNDING (FLASHING).
• CAUTION - Once heater has cycled off on the thermal limit, the heater will not return
to operation until the user restarts and reprograms the control. Therefore, this unit is
not recommended for freeze protection applications.
• When installing, see INSTALLATION INSTRUCTIONS for additional warnings and
precautions.

EN
www.newair.com 6
• For safe and efficient operation, and to extend the life of your heater, keep your
heater clean – See CLEANING & MAINTENANCE.
WARNING! To prevent a possible fire, injury to persons or damage to the heater,
adhere to the following:
1. Disconnect all power coming to heater at main service panel before wiring or
servicing.
2. All wiring procedures and connections must be in accordance with the National and
Local Codes having jurisdiction and the heater must be grounded.
3. Verify the power supply voltage coming to heater matches the ratings as shown on
the heater nameplate.
CAUTION: ENERGIZING HEATER AT A VOLTAGE GREATER THAN THE VOLTAGE
PRINTED ON THE NAMEPLATE WILL DAMAGE THE HEATER AND VOID THE
WARRANTY AND COULD CAUSE A FIRE.
4. High temperature, risk of fire, keep electrical cords, drapery, furnishings, and other
combustibles at least 3 feet (0.9 m) from front of heater. Do not install this heater
behind doors, below towel racks, or in an area where it is subject to being blocked by
furniture, curtains, or storage materials. Hot air from the heater may damage certain
fabrics and plastics.
5. To reduce the risk of fire do not store or use gasoline or other flammable vapors and
liquids in the vicinity of the heater.
6. When heater is to be wall or ceiling mounted, the anchoring provision must be
sufficient strength to support the total weight of the heater plus the weight of the
mounting provisions. Failure to properly secure the supporting members of the
building structure could allow the heater to fall.
7. The following minimum clearances must be maintained: 30° Tilted, Bottom of Heater
to Floor: 6’ (1.8 m) minimum, 11’ (3.3 m) recommended maximum Horizontal
Airflow, Bottom of Heater to Floor: 6’ (1.8 m) minimum, 8’ (2.4 m) recommended
maximum Side of heater to adjacent wall: 13” (33 cm).
8. Do not use this heater for drying out paint, plaster, sawdust and drywall sanding dust
as this will permanently damage the heater and must be kept out of the heater.
Unpacking Your New Heater: Remove heater from box, locate parts bag in packing
material, and inspect to make sure heater is not damaged or missing parts. If
damaged or parts are missing, call our Technical
For immediate assistance, please call our service number at 1-855-963-9247. We
recommend reaching out to our service team before initiating any returns. They will
provide you with the necessary guidance and support.

EN
www.newair.com 7
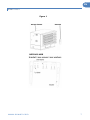
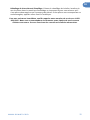
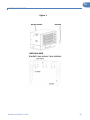
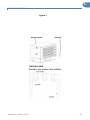
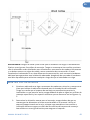
PARTS LIST
Figure 1

EN
www.newair.com 8
INSTALLATION INSTRUCTIONS
Note: This heater should be installed by qualified persons only and in accordance with
the National Electric Code (Canadian Electrical Code in Canada) and all applicable
local codes. Supply wiring must be copper and suitable for at least 167°F.
TOOLS NEEDED
• Phillips head screwdriver
• Power Drill
• 5/32 in. or 4mm drill bit
• Stud Finder
• The remote control is powered by 2 AAA batteries. Batteries are NOT included
HARDWARE REQUIRED FOR WIRING HEATER
• Adequate gauge and length of copper wire (2 power conductors plus ground) suitable
for application to route electrical panel to heater.
• Suitable junction box and connectors as required for application.
• Appropriate size wire nuts for connection branch circuit wires to pigtails.
• A length of flexible conduit (or as required by the NEC and local codes) to route
power to heater.
NOTE: Hardware supplied is intended for installation into wood framing only. If
installation into other type of construction, additional hardware will be required for
correct installation.
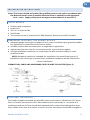
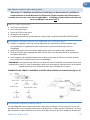
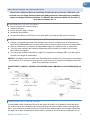
CONNECTORS, CABLE AND HARDWARE USED TO WIRE THE HEATER (Figure 2)
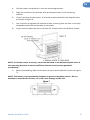
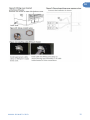
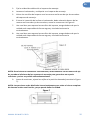
LOCATING THE HEATER
The heater should be installed out of traffic areas and at least 6' off the floor. (8” above
floor in Canada) The direction of air flow should not be restricted (i.e., by columns or
machinery) and the air flow should wipe exposed walls, rather than blowing directly at
them. When more than one heater is used in an area, the heaters should be arranged so

EN
www.newair.com 9
that the air discharge of each heater supports the air flow of the others to provide best
circulation of warm air, as indicated in the Figure below (Figure 3).
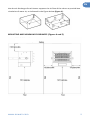
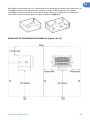
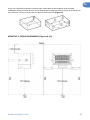
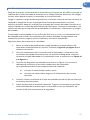
MOUNTING AND MINIMUM CLEARANCES (Figures 4 and 5)

EN
www.newair.com 10
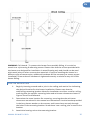
WARNING: Fall Hazard - To prevent the heater from possibly falling, it is crucial to
attach it to a joist using 6 mounting screws. Please note that the screws provided with
the heater are designed for installation in wood framing only and should not be used
with metal joists or other construction materials. If you are installing the heater in a
different type of construction, additional hardware will be necessary to ensure proper
installation. Ensure that all hardware is tightened securely to minimize any risk of the
heater falling.
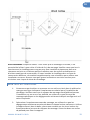
HEATER MOUNTING
1. Begin by locating a wood stud or joist in the ceiling and mark a line indicating
the desired location for the heater installation. Please note that the
wall/ceiling mounting bracket allows for installation on either a wall or ceiling,
ensuring that the specific mounting holes and minimum clearances shown in
Figures 4 and 5 are followed.
2. Determine the exact location for mounting, ensuring that the minimum
clearances mentioned in the manual are maintained. Use the bracket provided
in the box, place a washer on the screws, and insert them securely through
the holes in the mounting bracket. Screw them into a ceiling joist to secure the
bracket.
3. Attach the heating unit to the mounting bracket.

EN
www.newair.com 11
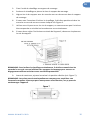
4. Lift the heater and position it into the mounting bracket.
5. Align the screws on the bracket with the keyhole slots in the mounting
bracket.
6. If you intend to tilt the heater, it must be positioned within the keyhole slots
as shown in Figure 6.
7. Use a wrench to tighten the bracket screws, ensuring that the unit is securely
suspended and level horizontally or vertically.
8. If you need to adjust the unit's vertical tilt, simply loosen the bracket screws.
NOTE: To tilt the heater vertically, it must be mounted in the bottom keyhole slots of
the mounting brackets to ensure sufficient clearance and prevent potential
overheating.
9. Before proceeding, adjust the louvers to your desired position (refer to Figure
7).
NOTE: The louvers are intentionally designed to prevent complete closure. Do not
attempt to override this feature, as it can cause damage to the unit.

EN
www.newair.com 12
WIRING INSTRUCTIONS
After properly mounting the heater to the building structure and routing the branch
circuit wiring in accordance with the National Electrical Code and local codes, you can
now connect the heater to the branch circuit.
Please be aware of the risk of electric shock or fire. Before attempting to connect the
heater, ensure that the electric power is disconnected at the main electrical panel. Also,
verify that the voltage of the branch circuit matches the voltage indicated on the
heater's nameplate. Connecting the heater to a higher voltage than specified could
damage the heater and pose a fire hazard.
The heater is equipped with a 1.11 in (28.3mm) hole in the wiring compartment for
routing the branch circuit conductors. To ensure correct and safe installation, use
appropriate conduit and fittings.
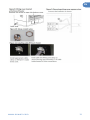
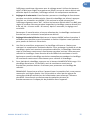
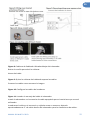
Follow these steps to connect the heater:
1. Remove the field wiring cover located at the bottom of the heater by
unscrewing one screw. Refer to Figure 8 and Figure 9 for guidance.
2. Bring the branch circuit conductors to the heater and connect them to the
appropriate terminals according to their designated positions. Install the
suitable cable fitting into the heater as shown in Figure 10 and Figure 11.
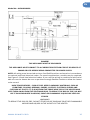
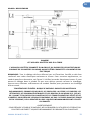
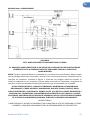
3. Consult the wiring diagrams provided in Figure 12 and connect the supply
wiring to the corresponding heater lead wires inside the wiring compartment.
• Connect the green pigtail wire to the earth ground.
• Connect the black pigtails to the branch circuit power.
4. Replace the wiring box cover using the two screws that were previously
removed.
5. Adjust the louvers to your desired position. Please note that the louvers are
designed in such a way that they cannot be completely closed. Do not attempt
to bypass this safety feature.

EN
www.newair.com 13

EN
www.newair.com 14
Model No.: NGH1K6WH00
DANGER!
THIS APPLIANCE MUST BE GROUNDED
THE APPLIANCE MUST CONNECT TO A CURRENT PROTECTION CIRCUIT OR DEVICE AT
50AMP OR LESS BEFORE BEING CONNECTED TO POWER SUPPLY
NOTE: All wiring must be carried out by a Certified Electrician and must be in accordance
to national and local electrical codes. For certain applications, conduit may be required,
See Figure 2. Check local electrical codes. If you run the wiring in conduit and wish to be
able to turn the heater be sure to purchase enough flexible conduit to allow the heater
to be turned.
HIGH TEMPERATURES – RISK OF FIRE. KEEP FLAMMABLE MATERIALS, SUCH AS
FURNITURE, PILLOWS, BEDDING, PAPERS, CLOTHES, ELECTRICAL CORDS AND
CURTAINS AT LEAST 3 FT. (0.9 M) FROM THE FRONT AND TOP OF THE HEATER AND
KEEP THEM AWAY FROM THE SIDES AND REAR. TO REDUCE THE RISK OF FIRE, DO NOT
USE IT IN AREAS WHERE GASOLINE, PAINT OR FLAMMABLE LIQUIDS ARE USED OR
STORED.
WARNING!
TO REDUCE THE RISK OF FIRE, DO NOT STORE OR USE GASOLINE OR OTHER FLAMMABLE
VAPORS AND LIQUIDS IN THE VICINITY OF THE HEATER.

EN
www.newair.com 15
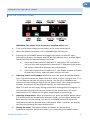
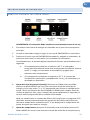
OPERATING INSTRUCTIONS
HEATER CONTROL PANEL
WARNING: The Heater must be properly installed before use.
1. Turn on the power supply to the heater at the main switch panel.
2. When the heater has power, the red POWER light will turn on.
3. Pressing the red POWER button will toggle the heater on and off. Upon
pressing this button, the heater and fan will immediately start, and the digital
display will flash for approximately 5 seconds.
a. If the room temperature is below 65°F, the heater will continue to
run until the room temperature reaches 65°F. Afterward, the heater
will cycle on and off to maintain this temperature.
b. If the room temperature is above 65°F, the display window will show
65 and flash 5 times, and the heater and fan will stop.
4. Adjusting Power Level (Mode): While the unit is on, press the MODE button
once. This will activate the power selection mode, and the red light over "L" or
"H" will flash to indicate the current setting. Use the UP or DOWN Arrow
buttons to switch between High and Low power levels. After approximately 5
seconds, the control will be programmed for the selected output.
Note: The unit has an Energy Saving system with a designed ECO program. It
will automatically adjust the power output to low power when the room
temperature is 2°F below the set point temperature to save energy.
5. Adjusting temperature: While the heater is on, press the MODE button twice.
This will activate the temperature selection mode, and the digital display will
flash with the current setting. Use the UP or DOWN buttons to adjust the
temperature until the desired value is displayed. After 5 seconds, the display
will revert to showing the room temperature.
6. Setting the timer: This feature allows the heater to operate for a
predetermined time. While the heater is on, press the green MODE button

EN
www.newair.com 16
three times. This will activate the timer mode, and the display will flash with
"0H". Use the UP or DOWN arrow buttons to set the number of hours the
heater will remain on (1H-9H, where 1H = 1 hour and 9H = 9 hours). After 5
seconds, the setting will be locked in.
Note: If this feature is not selected, the heater will continue to operate to
maintain the desired temperature.
7. Setting Fahrenheit/Celsius: Hold the MODE button for 3 seconds to switch
between Fahrenheit and Celsius. Repeat this operation to switch from Celsius
to Fahrenheit.
8. Once the controller is programmed, the heater will cycle on and off to
maintain the desired room temperature. To prolong the heater's lifespan,
after reaching the desired temperature, the heating element will turn off, but
the fan will continue to operate for approximately 3 minutes to cool down the
heater. This fan delay off feature also activates when the heater is manually
turned off while heating. The fan will continue running to cool down the
heater.
9. To turn off the heater, press the red POWER button. If the heater is operating,
it will turn off, but the fan will continue running for about 3 minutes to allow
the heater to cool.
NOTE: When operating the unit for the first time, you may notice slight smoke.
This is normal and caused by residual cleaning agents used during
manufacturing to clean the heating element. This smoke will dissipate after a
few minutes of operation and does not indicate a problem with the unit.

EN
www.newair.com 17
CLEANING & MAINTENANCE
USER CLEANING INSTRUCTIONS
1. Turn off the power to the heater.
2. Wait for the heater to cool down, and then use a vacuum cleaner with a brush
attachment to remove dust and lint from the heater's exterior surfaces,
including the grille opening. You can also use compressed air to blow out any
dust from inside the heater.
3. Take a damp cloth and gently wipe away any dust and lint from the grille and
the exterior surfaces of the heater. Make sure not to let water enter the inside
of the appliance.
4. Avoid splashing water onto the heater to protect its enclosure, and never use
solvents for cleaning the heater.
5. Once you've completed the cleaning process, restore the power to the heater
and check to ensure that it is operating correctly.
MAINTENANCE CLEANING INSTRUCTIONS
(To be performed by Qualified Service Personnel Only)
It is recommended that the heater undergoes cleaning and servicing by a qualified
service person at least once a year to ensure safe and efficient operation. After the
cleaning and servicing process is completed, the heater should be thoroughly checked to
ensure proper functionality.
The remote control of the heater is powered by 2 AAA batteries. It is advisable to
replace these batteries periodically or at least once a year.

EN
www.newair.com 18
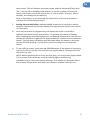
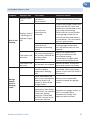
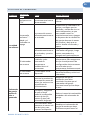
TROUBLESHOOTING
Problem
Display Code
Root Cause
Corrective Action
Unit is not
heating
Display shows
”E1”
The thermostat sensor
is broken or
disconnected.
Please call customer service.
Display shows "
" Nothing and
indicator lights
off
The overheat
protection has
activated.
Inspect the garage heater and
check that the air inlets and
outlets are not blocked as this
may cause overheating.
Switch off the circuit breaker
to the garage heater for at
least 30 minutes and allow it
to cool down. Turn the power
back on and operate.
The overheat
protection has
activated and already
cooled.
Switch off the circuit breaker
to the garage heater then
turn the power back on and
operate.
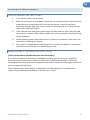
The heater will
not start
The room temperature
has already reached the
set thermostat
temperature
Adjust the temperature
setting to make sure the
thermostat setting
temperature is higher than
current room temperature.
The heater will
not start
The breaker has tripped
Rest the breaker at the fuse
panel and restart the heater
Garage
heater
emits a
burning
smell
During production dust
and/or oil debris
gathered on heating
coils.
Make sure the room is well
ventilated. Allow the garage
heater to run until the smell is
dissipated.
Check and make sure
there is no combustible
material within 0.9
meters (3 feet) of the
garage heater.
Remove the combustible
material around the garage
heater.
This heater must be
mounted at least 6 feet
off the floor, for specific
clearances, please
check the "LOCATING
HEATER" section in the
instruction manual
Relocate the garage heater so
there is enough space
between the heater and
adjacent wall and floor.

EN
www.newair.com 19
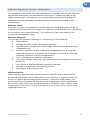
LIMITED MANUFACTURER’S WARRANTY
This appliance is covered by a limited manufacturer’s warranty. For one year from the
original date of purchase, the manufacturer will repair or replace any parts of this
appliance that prove to be defective in materials and workmanship, provided the
appliance has been used under normal operating conditions as intended by the
manufacturer.
Warranty Terms:
During the first year, any components of this appliance found to be defective due to
materials or workmanship will be repaired or replaced, at the manufacturer’s discretion,
at no charge to the original purchaser. The purchaser will be responsible for any
removal or transportation costs.
Warranty Exclusions:
The warranty will not apply if damage is caused by any of the following:
• Power failure
• Damage in transit or when moving the appliance
• Improper power supply such as low voltage, defective household wiring or
inadequate fuses
• Accident, alteration, misuse or abuse of the appliance such as using non-
approved accessories, inadequate air circulation in the room or abnormal
operating conditions (extreme temperatures)
• Use in commercial or industrial applications
• Fire, water damage, theft, war, riot, hostility or natural disasters as hurricanes,
floods, etc.
• Use of force or damage caused by external influences
• Partially or completely dismantled appliances
• Excess wear and tear by the user
Obtaining Service:
When making a warranty claim, please have the original bill of purchase with the
purchase date available. Once confirmed that your appliance is eligible for warranty
service, all repairs will be performed by a Newair™ authorized repair facility. The
purchaser will be responsible for any removal or transportation costs. Replacement
parts and/or units will be new, re-manufactured or refurbished and is subject to the
manufacturer’s discretion. For technical support and warranty service, please email

FR
www.newair.com 20
Un nom de confiance
La confiance doit être gagnée et nous allons mériter la vôtre. La satisfaction du client est
notre priorité. De l’usine à l’entrepôt et de la surface de vente à votre domicile, les
fabricants des produits Newair font la promesse de vous fournir des produits novateurs,
un service exceptionnel et un soutien au moment où vous en avez le plus besoin.
Vous pouvez compter sur Newair
En votre qualité de fier propriétaire d’un produit Newair, nous vous souhaitons la
bienvenue dans notre famille. Notre entreprise n’utilise aucun robot, uniquement de
véritables personnes pour vous livrer votre produit et de véritables personnes pour vous
aider.
Contactez-nous
Veuillez contacter notre équipe du service client avant de faire un retour dans votre
magasin d'achat. Nous sommes heureux de répondre à toutes vos questions ou
préoccupations!
Contactez-nous du lundi au vendredi de 8h à 4h HNP au:
Un membre de l'équipe vous répondra dans les 24 heures.
Suivez-nous :
Facebook.com/newairusa
Instagram.com/newairusa
YouTube.com/newairusa
Twitter.com/newairusa
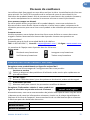
ENREGISTRER VOTRE PRODUIT EN LIGNE
Enregistrer votre produit Newair en ligne dès aujourd’hui!
Profitez de tous les avantages de l’enregistrement de votre produit :
Services et soutien
Faites un diagnostic des problèmes d’utilisation et de service plus rapidement et
plus efficacement
Avis de rappel
Restez à l’affût des mises à jour du système et de sécurité, et des avis de rappel
Promotions spéciales
Abonnez-vous pour recevoir les promotions et offres de Newair
Enregistrer l’information relative à votre produit en
ligne est sécuritaire et prendra moins de 2 minutes :
Alternativement, nous vous recommandons de joindre une copie de votre reçu de vente
ci-dessous et de noter les informations suivantes, situées sur la plaque signalétique du
fabricant à l'arrière de l'appareil. Vous aurez besoin de ces informations pour contacter
le fabricant pour des demandes de service.
Date d’Achat:
Numéro De Série:
Numéro De Modèle:
newair.com/register
La page est en cours de chargement...
La page est en cours de chargement...
La page est en cours de chargement...
La page est en cours de chargement...
La page est en cours de chargement...
La page est en cours de chargement...
La page est en cours de chargement...
La page est en cours de chargement...
La page est en cours de chargement...
La page est en cours de chargement...
La page est en cours de chargement...
La page est en cours de chargement...
La page est en cours de chargement...
La page est en cours de chargement...
La page est en cours de chargement...
La page est en cours de chargement...
La page est en cours de chargement...
La page est en cours de chargement...
La page est en cours de chargement...
La page est en cours de chargement...
La page est en cours de chargement...
La page est en cours de chargement...
La page est en cours de chargement...
La page est en cours de chargement...
La page est en cours de chargement...
La page est en cours de chargement...
La page est en cours de chargement...
La page est en cours de chargement...
La page est en cours de chargement...
La page est en cours de chargement...
La page est en cours de chargement...
La page est en cours de chargement...
La page est en cours de chargement...
La page est en cours de chargement...
La page est en cours de chargement...
La page est en cours de chargement...
La page est en cours de chargement...
La page est en cours de chargement...
La page est en cours de chargement...
-
 1
1
-
 2
2
-
 3
3
-
 4
4
-
 5
5
-
 6
6
-
 7
7
-
 8
8
-
 9
9
-
 10
10
-
 11
11
-
 12
12
-
 13
13
-
 14
14
-
 15
15
-
 16
16
-
 17
17
-
 18
18
-
 19
19
-
 20
20
-
 21
21
-
 22
22
-
 23
23
-
 24
24
-
 25
25
-
 26
26
-
 27
27
-
 28
28
-
 29
29
-
 30
30
-
 31
31
-
 32
32
-
 33
33
-
 34
34
-
 35
35
-
 36
36
-
 37
37
-
 38
38
-
 39
39
-
 40
40
-
 41
41
-
 42
42
-
 43
43
-
 44
44
-
 45
45
-
 46
46
-
 47
47
-
 48
48
-
 49
49
-
 50
50
-
 51
51
-
 52
52
-
 53
53
-
 54
54
-
 55
55
-
 56
56
-
 57
57
-
 58
58
-
 59
59


NewAir NGH1K6WH00 Le manuel du propriétaire
- Catégorie
- Chauffe-eau
- Taper
- Le manuel du propriétaire
dans d''autres langues
- English: NewAir NGH1K6WH00 Owner's manual
- español: NewAir NGH1K6WH00 El manual del propietario
Documents connexes
-
NewAir NKR058MB00 Freestanding Single Tap Kegerator Le manuel du propriétaire
-
-
NewAir NBC126HX00 Le manuel du propriétaire
-
-
NewAir NIM044BS00 Le manuel du propriétaire
-
NewAir NEC1K6WH00 Le manuel du propriétaire
-
NewAir NCI080SS00 Le manuel du propriétaire
-
-