NewAir NKR058MB00 Freestanding Single Tap Kegerator Le manuel du propriétaire
- Taper
- Le manuel du propriétaire

Manual v1.1
Freestanding 5.8 Cu. Ft. Single Tap Kegerator
Kegerator À Un Robinet 5.8 Pi. Cu. Autonome
Dispensador Independiente para Cerveza con
una Llave
NKR058MB00
OWNER’S MANUAL
Manuel de L'utilisateour
Manual del Propietario

www.newair.com 2
LANGUAGE INDEX
English Manual .......................................................................................... 3
Manuel en Français ................................................................................. 26
Manual en Español .................................................................................. 49

EN
www.newair.com 3
A Name You Can Trust
Trust should be earned and we will earn yours. Customer happiness is the focus
of our business.
From the factory to the warehouse, from the sales floor to your home, the
whole Newair family promises to provide you with innovative products,
exceptional service, and support when you need it the most.
Count on Newair
As a proud Newair owner, welcome to our family. There are no robots here,
real people shipped your product and real people are here to help you.
Contact Us
Please reach out to our customer service team before making a return to your
store of purchase. We are happy to help with any questions or concerns!
Mon-Fri from 8-4 PST at:
Call:
1-855-963-9247
Email:
support@newair.com
Online:
www.newair.com
A team member will respond to you within 24 hours.
Follow Us:
Facebook.com/newairusa Instagram.com/newairusa
YouTube.com/newairusa Twitter.com/newairusa

EN
www.newair.com 4
READ AND SAVE THESE INSTRUCTIONS
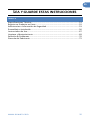
TABLE OF CONTENTS
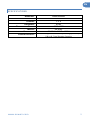
Specifications ....................................................................................................... 5
Register Your Product Online ............................................................................... 6
Safety Information & Warnings ........................................................................... 7
Assembly & Installation ..................................................................................... 10
Operating Instructions ....................................................................................... 20
Cleaning & Maintenance .................................................................................... 22
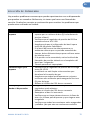
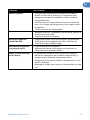
Troubleshooting ................................................................................................. 23
Limited Manufacturer’s Warranty ..................................................................... 25

EN
www.newair.com 5
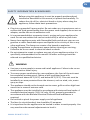
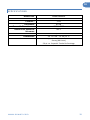
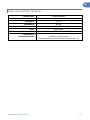
SPECIFICATIONS
MODEL NO.
NKR058MB00
VOLTAGE:
115v
C
URRENT
:
1.2 A
FREQUENCY:
60 Hz
TEMPERATURE RANGE:
32°F - 75°F
WEIGHT:
94.8 lbs.
DIMENSIONS:
24.3” W x 24” D x 53” H
S
TORAGE
C
APACITY
:
Holds one (1) Full Size or Pony Size Keg (60 Liters)
5.8 cu.ft. Total Storage Capacity

EN
www.newair.com 6
REGISTER YOUR PRODUCT ONLINE
Register Your Newair Product Online Today!
Take advantage of all the benefits product registration has to offer:
Service and Support
Diagnose troubleshooting and service issues faster and more accurately
Recall Notifications
Stay up to date for safety, system updates and recall notifications
Special Promotions
Opt-in for Newair promotions and offers
Registering your product information online is safe & secure and takes less than
2 minutes to complete:
Alternatively, we recommend you attach a copy of your sales receipt below and
record the following information, located on the manufacturer’s nameplate on
the rear of the unit. You will need this information if it becomes necessary to
contact the manufacturer for service inquiries.
Date of Purchase: ___________________________________________
Serial Number: ____________________________________________
Model Number: ____________________________________________
newair.com/register

EN
www.newair.com 7
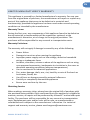
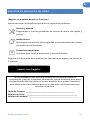
SAFETY INFORMATION & WARNINGS
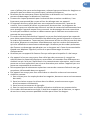
Before using this appliance, it must be properly positioned and
installed as described in this manual, so please read carefully. To
reduce the risk of fire, electrical shock or injury when using the
appliance, follow these basic precautions.
• Plug into a grounded 3-prong outlet. Do not under any circumstances cut or
remove the third ground prong from the power cord supplied, do not use an
adapter, and do not use an extension cord.
• It is recommended that a separate circuit, serving only your appliance be
used. Do not use outlets that can be turned off by a switch or pull chain.
• Never clean appliance parts with flammable fluids and do not store or use
gasoline or other flammable vapors and liquids in the vicinity of this or any
other appliance. The fumes can create a fire hazard or explosion.
• Unplug the appliance or disconnect power before cleaning or servicing.
Failure to do so can result in electrical shock or death.
• Do not attempt to repair or replace any part of your appliance unless it is
specifically recommended in this manual. All other servicing should be
referred to a qualified technician.
WARNING
• Use two or more people to move and install appliance. Failure to do so can
result in back or other injury.
• To ensure proper ventilation for your appliance, the front of the unit must
be completely unobstructed. Choose a well-ventilated area with
temperatures above 60°F (16°C) and below 90°F (32°C). This unit must be
installed in an area protected from the element, such as wind, rain, water
spray or drips.
• The appliance should not be located next to ovens, grills or other high heat
sources or in areas of extreme cold.
• The appliance must be installed in accordance with state and local codes. A
standard electrical supply (115 V AC only, 60 Hz), properly grounded in
accordance with the National Electrical Code and local ordinances is
required.
• Do not kink or pinch the power supply cord of appliance.
• The fuse (or circuit breaker) size should be 15 amperes.
• It is important for the appliance to be leveled in order to work properly. You
may need to make several adjustments to level it.

EN
www.newair.com 8
• Never allow children to operate, play with or crawl inside the appliance.
Child entrapment and suffocation are not just problems of the past, junked
or abandoned appliances are still dangerous. When no longer using your old
kegerator, take off the door and leave the shelves in place so that children
may not climb inside easily.
• Do not use solvent-based cleansers or abrasives on the interior as they may
damage or discolor the interior.
• Because of potential safety hazards under certain conditions, it is strongly
recommended that you do not use an extension cord with this appliance.
• If the appliance is going to be used in an area that is prone to power
surges/outages, it is suggested that you use a power surge protector. The
surge protector that you select must have a surge block high enough to
protect the appliance it is connected to. Damages due to power surges are
not considered a manufacturer covered defect and will void your product
warranty.
• The cord should be secured behind the appliance and not left exposed or
dangling to prevent accidental injury. Never unplug the appliance by pulling
the power cord. Always grip the plug firmly and pull straight out from the
receptacle. Repair or replace immediately all power cords that have become
frayed or otherwise damaged. Do not use a cord with cracks or abrasion
damage along its length or at either end. When moving the appliance, be
careful not to damage the power cord.
• Do not use this apparatus for other than its intended purpose.
• This appliance is not intended for use by persons (including children) whose
physical, sensory or mental capabilities may be different or reduced, or who
lack experience or knowledge, unless such persons receive supervision or
training to operate the appliance by a person responsible for their safety.
• Do not store explosive substances such as aerosol cans with a flammable
propellant in this appliance.
• This appliance is intended to be used in household and similar applications
such as:
1.Staff kitchen areas in shops, offices and other working environments;
2.Farm houses and by clients in hotels, motels and other residential type
environments;
3.Bed and breakfast type environments;
4.Catering and similar non-retail applications.
• If the power supply cord is damaged, it must be replaced by the
manufacturer, its service agent or similar qualified person in order to avoid
hazard.

EN
www.newair.com 9
WARNING:
Keep ventilation openings, in the appliance enclosure or in the built-in
structure,
clear of obstruction.
WARNING:
Do not use mechanical devices or other means to accelerate the defrosting
process,
other than those recommended by the manufacturer.
WARNING:
Do not damage the refrigerant circuit.
WARNING:
Do not use electrical appliances inside the food storage compartments of the
appliance, unless they are of the type recommended by the manufacturer.
CAUTION:
Children should be supervised to ensure that they do not play with the
appliance.
DANGER:
Risk of child entrapment. Before throwing away an old appliance:
1. Remove the door or lid.
2. Leave shelves in place so that children may not easily climb inside.
DANGER:
Do not add a lock to the door or lid. This can cause child entrapment and harm.
California Proposition 65 Warning: This product contains a chemical or
chemicals known to the State of California to cause cancer and birth defects or
other reproductive harm.
Failure to heed these safety warnings may result in extensive product
damage, serious personal injury, or death.

EN
www.newair.com 10
ASSEMBLY & INSTALLATION
INSTALLATION INSTRUCTIONS
BEFORE USE:
• Remove the exterior and interior packaging.
• Before connecting the unit to the power source, let it stand upright for
approximately 2 hours. This will reduce the possibility of a malfunction in the
cooling system from handling during transportation.
• Clean the interior surface with lukewarm water using a soft cloth.
• This appliance is designed for free standing installation.
• Place the unit on a flat, solid floor that is strong enough to support it when it
is fully loaded. To level the appliance, adjust the front leveling leg at the
bottom of the unit.
• When moving your kegerator, please do not incline it more than 45 degrees.
• Locate the appliance away from direct sunlight and sources of heat (stove,
heater, radiator, etc.). Direct sunlight may affect the acrylic coating and heat
sources may increase electrical consumption.
• The kegerator should be placed in an area where the ambient temperature is
less than 90 degrees Fahrenheit and higher than the lowest temperature you
want to store your kegs at. If the ambient temperature is lower than the set
temperature, the internal temperature will match the ambient temperature.
• Avoid locating the unit in damp areas.
• Plug the kegerator into an exclusive, properly installed and grounded wall
outlet. Do not under any circumstances cut or remove the third (ground)
prong from the power cord. Any questions concerning power and/or
electrical grounding should be directed to a certified electrician or
authorized products service center.
• After plugging the appliance into a wall outlet, allow the unit to cool down
for 3 to 4 hours before placing a keg or any other items in the appliance.

EN
www.newair.com 11
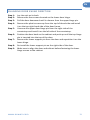
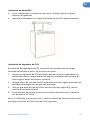
CHANGING DOOR SWING DIRECTION
Step 1: Lay the unit on its back.
Step 2: Remove the four screws located on the lower door hinge.
Step 3: Pull the door downward until it releases from the upper hinge pin.
Step 4: Remove the plastic screw cap from the top left-hand side and install
it on the top right-hand side of the door frame.
Step 5: Unscrew the upper door hinge pin from the right side of the
countertop and install it on the left side of the countertop.
Step 6: Position the door back on the cabinet and push up until the top hinge
pin is inserted into the top of the door.
Step 7: Remove the lower support pin from the door and reposition it on the
lower hinge.
Step 8: Re-install the lower support pin on the right side of the door.
Step 9: Make sure to align the door and cabinet before fastening the lower
hinge screws to the cabinet.

EN
www.newair.com 12
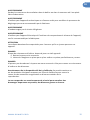
ASSEMBLY INSTRUCTIONS
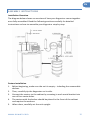
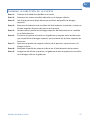
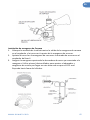
Installation Overview
The diagram below shows an overview of how your Kegerator comes together
once fully assembled. Read the following sections carefully for detailed
instructions on how to assemble your Kegerator step-by-step.
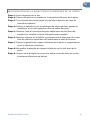
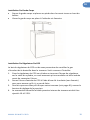
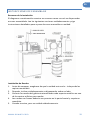
Casters Installation
1. Before beginning, make sure the unit is empty – including the removeable
shelves.
2. Then, carefully tip the Kegerator on its side.
3. Connect the casters to the cabinet by screwing in each metal bracket into
one of four caster holes.
4. The casters with the brakes should be placed in the front of the cabinet
and require the washers.
5. When done, carefully set the unit upright.

EN
www.newair.com 13
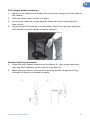
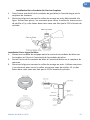
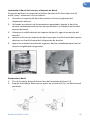
CO2 Cylinder Holder Installation
1. Match up the holes on the holder with the screws jutting out of the back of
the cabinet.
2. Slide the holder down to lock it in place.
3. No tools are required, simply align the holes with the screws and push
down firmly.
4. Place your full CO2 cylinder into the holder. (Note: You may also place the
CO2 cylinder onto the holder inside the cabinet.)
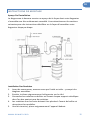
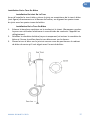
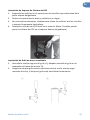
Stainless Steel Tap Installation
1. Screw the black faucet handle on to the faucet (1), then screw the faucet
onto the faucet adapter on the front of the tower (2).
2. Make sure the faucet is vertical with the black handle facing the ceiling,
and that the faucet is screwed on tightly.

EN
www.newair.com 14
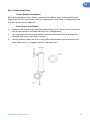
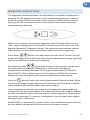
Beer Tower Installation
Tower Gasket Installation
Before installing the beer tower, position the rubber beer tower gasket (see
figure) directly on top of the cabinet, aligning the four holes in the gasket with
the four holes on the cabinet.
Beer Tower Installation
1. Remove the top plug by twisting and pulling it out. (Note: Save it for later
use if you decide to convert the unit to a refrigerator.)
2. Unravel the beer line (clear hose) and insert the beer line and wing nut
through the uncovered hole on top.
3. Place the beer tower on top of the gasket and make sure to position the
beer faucet so it is aligned with the cabinet front.

EN
www.newair.com 15
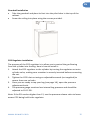
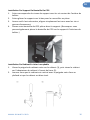
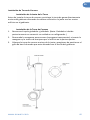
Guardrail Installation
• Take the guardrail and place its feet into the pilot holes in the top of the
cabinet.
• Screw the railing into place using the screws provided.
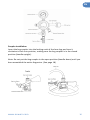
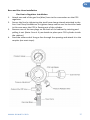
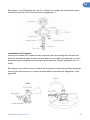
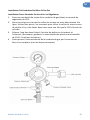
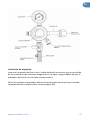
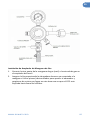
CO2 Regulator Installation
The purpose of the CO2 regulator is to allow you to control the gas flowing
from the cylinder into the keg. Here is how to install it:
1. Attach the CO2 regulator to the cylinder by turning the regulator nut onto
cylinder valve, making sure a washer is securely inserted before connecting
the nut.
2. Tighten the CO2 Inlet nut using an adjustable wrench (not supplied) to
assure there are no leaks.
3. Once you are ready to tap your keg (see page 18 ), open the pressure
adjustment knob.
4. The pressure gauge monitors low internal keg pressure and should be
adjusted to 10-12 PSI.
Note: If the PSI reaches higher than 12, use the pressure release valve to lower
excess CO2 being held in the regulator.

EN
www.newair.com 16
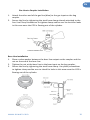
Coupler Installation
Insert the keg coupler into the locking neck of the beer keg and turn it
clockwise to lock into position, making sure the keg coupler is in the closed
position (handle upright).
Note: Do not put the keg coupler in the open position (handle down) until you
have assembled the entire Kegerator. (See page 18)

EN
www.newair.com 17
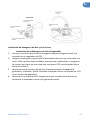
Beer and Gas Lines Installation
Gas Line to Regulator Installation
1. Attach one end of the gas line (blue) hose to the connection on the CO2
regulator.
2. Secure the line by tightening the steel hose clamp already attached to the
line. Use Pliers/screwdriver to tighten clamp and be sure to check for leaks
in this area once the CO2 is flowing out of the cylinder.
3. Remove one of the two plugs on the back of the cabinet by twisting and
pulling it out. (Note: Save it if you decide to place your CO2 cylinder inside
the cabinet.)
4. Feed the other end of the gas line through the opening and attach it to the
coupler (see next steps).

EN
www.newair.com 18
Gas Line to Coupler Installation
1. Attach the other end of the gas line (blue) to the gas input on the keg
coupler.
2. Secure the line by tightening the steel hose clamp already attached to the
line. Use Pliers/screwdriver to tighten clamp and be sure to check for leaks
in this area once the CO2 is flowing out of the cylinder.
Beer Line Installation
1. Place a valve washer between the beer line output on the coupler and the
nut on the end of the beer line.
2. Tighten the nut at the beer line to the beer input on the keg coupler.
3. Secure the line by tightening the steel hose clamp. Use pliers/screwdriver
to tighten clamp and be sure to check for leaks in this area once the CO2 is
flowing out of the cylinder.

EN
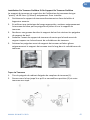
www.newair.com 19
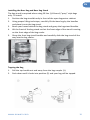
Installing the Beer Keg and Beer Keg Stand
The keg stand is required when using 30 liter (1/4 barrel) “pony” style kegs
only. To install:
1. Position the keg stand directly in front of the open kegerator cabinet.
2. Using proper lifting technique, carefully lift the beer keg by the handles
and place it onto the keg stand.
3. Brace your knees behind the keg stand and grasp the keg stand handles.
4. Lift the front of the keg stand so that the front edge of the stand is resting
on the front edge of the keg cooler.
5. Grasp the front keg stand handles and carefully slide the keg stand all the
way into the keg cooler.
Tapping the Keg
1. Pull the tap handle out and away from the keg coupler (1).
2. Push down until it locks into position (2) and your keg will be tapped.

EN
www.newair.com 20
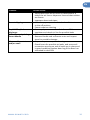
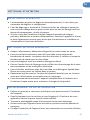
OPERATING INSTRUCTIONS
The kegerator should be placed in an area where the ambient temperature is
between 32-100 degrees Fahrenheit. If the ambient temperature is above or
below this range, the performance of the unit may be affected. For example,
placing your unit in extreme cold or hot conditions may cause the interior
temperatures to fluctuate.
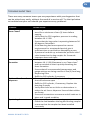
When you first plug in your Newair Kegerator, the LED display will show the
“live” cabinet temperature in Fahrenheit and the thermostat will be set to 41
degrees Fahrenheit (5 degrees Celsius). The operating panel includes several
other features to operate and control the temperature of the kegerator:
Press either button once and release to enter the SET mode; the LED
display will begin to flash and show the previous temperature setting, signifying
that the temperature is ready to be adjusted
Each press of either button will increase or decrease the temperature
incrementally by one degree Fahrenheit or Celsius until the desired
temperature is reached, between 32-75 degrees Fahrenheit (0-24 degrees
Celsius) NOTE: After a button is pressed, the display will flash for 5 seconds
before returning to displaying the internal temperature of the cabinet
Press the button to alternate the display between Fahrenheit and Celsius;
the corresponding pilot light adjacent to the selector will illuminate to signify
which temperature mode has been selected for display
If you are going on vacation, you may leave the kegerator operating during
vacations of less than three weeks. If the appliance will not be used for several
months, you should remove all items and turn off the appliance. Clean and dry
the interior thoroughly. To prevent mold growth, leave the door open slightly,
blocking it open if necessary.
PLEASE NOTE: In the event of a power failure, any modified settings will be lost
and the default settings will be restored once the power resumes.
La page est en cours de chargement...
La page est en cours de chargement...
La page est en cours de chargement...
La page est en cours de chargement...
La page est en cours de chargement...
La page est en cours de chargement...
La page est en cours de chargement...
La page est en cours de chargement...
La page est en cours de chargement...
La page est en cours de chargement...
La page est en cours de chargement...
La page est en cours de chargement...
La page est en cours de chargement...
La page est en cours de chargement...
La page est en cours de chargement...
La page est en cours de chargement...
La page est en cours de chargement...
La page est en cours de chargement...
La page est en cours de chargement...
La page est en cours de chargement...
La page est en cours de chargement...
La page est en cours de chargement...
La page est en cours de chargement...
La page est en cours de chargement...
La page est en cours de chargement...
La page est en cours de chargement...
La page est en cours de chargement...
La page est en cours de chargement...
La page est en cours de chargement...
La page est en cours de chargement...
La page est en cours de chargement...
La page est en cours de chargement...
La page est en cours de chargement...
La page est en cours de chargement...
La page est en cours de chargement...
La page est en cours de chargement...
La page est en cours de chargement...
La page est en cours de chargement...
La page est en cours de chargement...
La page est en cours de chargement...
La page est en cours de chargement...
La page est en cours de chargement...
La page est en cours de chargement...
La page est en cours de chargement...
La page est en cours de chargement...
La page est en cours de chargement...
La page est en cours de chargement...
La page est en cours de chargement...
La page est en cours de chargement...
La page est en cours de chargement...
La page est en cours de chargement...
La page est en cours de chargement...
-
 1
1
-
 2
2
-
 3
3
-
 4
4
-
 5
5
-
 6
6
-
 7
7
-
 8
8
-
 9
9
-
 10
10
-
 11
11
-
 12
12
-
 13
13
-
 14
14
-
 15
15
-
 16
16
-
 17
17
-
 18
18
-
 19
19
-
 20
20
-
 21
21
-
 22
22
-
 23
23
-
 24
24
-
 25
25
-
 26
26
-
 27
27
-
 28
28
-
 29
29
-
 30
30
-
 31
31
-
 32
32
-
 33
33
-
 34
34
-
 35
35
-
 36
36
-
 37
37
-
 38
38
-
 39
39
-
 40
40
-
 41
41
-
 42
42
-
 43
43
-
 44
44
-
 45
45
-
 46
46
-
 47
47
-
 48
48
-
 49
49
-
 50
50
-
 51
51
-
 52
52
-
 53
53
-
 54
54
-
 55
55
-
 56
56
-
 57
57
-
 58
58
-
 59
59
-
 60
60
-
 61
61
-
 62
62
-
 63
63
-
 64
64
-
 65
65
-
 66
66
-
 67
67
-
 68
68
-
 69
69
-
 70
70
-
 71
71
-
 72
72


NewAir NKR058MB00 Freestanding Single Tap Kegerator Le manuel du propriétaire
- Taper
- Le manuel du propriétaire
dans d''autres langues
Documents connexes
-
NewAir NEC1K6WH00 Le manuel du propriétaire
-
NewAir NCR032SS00 Le manuel du propriétaire
-
-
NewAir NCI080SS00 Le manuel du propriétaire
-
NewAir NIM044BS00 Le manuel du propriétaire
-
-
NewAir NBC126HX00 Le manuel du propriétaire
Autres documents
-
BLACK DECKER BBD20HS Manuel utilisateur
-
Summit SBC677BINK Manuel utilisateur
-
Sears 183.91579 Manuel utilisateur
-
Danby DKC054A9SLDB Le manuel du propriétaire
-
Danby DKC054A1BSL2DB Le manuel du propriétaire
-
Haier BrewMaster HBF205E Manuel utilisateur
-
-
Danby DKC055D1SSPRO Le manuel du propriétaire