
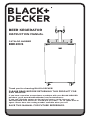
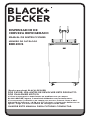
INSTRUCTION MANUAL
Thank you for choosing BLACK+DECKER!
PLEASE READ BEFORE RETURNING THIS PRODUCT FOR
ANY REASON.
If you have a question or experience a problem with your BLACK+DECKER
purchase, go to www.blackanddecker.com/instantanswers
If you can’t find the answer or do not have access to the Internet, call
844-299-0879 from 10:30 a.m. to 6:30 p.m. EST Mon. - Fri. to speak with an
agent. Please have the catalog number available when you call.
SAVE THIS MANUAL FOR FUTURE REFERENCE.
CATALOG NUMBER
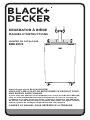
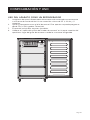
BBD20HS
BEER KEGERATOR

Page 2
Thank you for purchasing our
BLACK+DECKER product. This
easy-to-use manual will guide you
in getting the best use of your Beer
Kegerator.
Remember to record the model and
serial numbers. They are on a label
on the rear.
Staple your receipt to your manual.
You will need it to obtain warranty service.
Model number
Serial number
Date of purchase
PRODUCT REGISTRATION
CONTENTS
SAFETY INFORMATION
Important Safety Instructions ..........................................................................................................................................3-4
Refrigerant ....................................................................................................................................................................................5
Important Safety Precautions of CO Gas ..................................................................................................................... 5
SET UP & USE
Parts & Features .....................................................................................................................................................................6-7
Use of Extension cords ........................................................................................................................................................... 8
Electrical Requirements ..........................................................................................................................................................8
Installation Guide ................................................................................................................................................................. 9-13
Operating Your Beer Kegerator ........................................................................................................................................ 14
Operating the Unit as A Refrigerator ..............................................................................................................................15
CLEANING & CARE ...............................................................................................................................................16
TROUBLESHOOTING & WARRANTY
Before You Call For Service .................................................................................................................................................17
Customer Service......................................................................................................................................................................17
Limited Warranty ......................................................................................................................................................................18

Page 3
SAFETY INFORMATION
1. Use this appliance only for its intended purpose as described in this
operation manual.
2. This appliance must be properly installed in accordance with the
installation instructions before it is used. See the installation section for
more details.
3. This appliance must be connected to a proper electrical outlet with the
correct electrical supply.
4. Proper grounding must be ensured to reduce the risk of shock and fire.
Do not cut or remove the grounding pin! If you do not have a three-
prong electric receptacle outlet in the wall, have a certified electrician
install the proper outlet. The wall receptacle must be properly
grounded.
5. Never unplug your appliance by pulling on the power cord. Always
grasp the plug firmly and pull straight out from the outlet.
6. Immediately replace worn power cords, loose plugs and power outlets.
If the supply cord is damaged it must be replaced by the manufacturer
or its service agent or a similarly qualified person in order to avoid a
hazard.
7. To reduce the risk of electric shock or fire, do not use extension cords
or adapters to connect the unit to an electrical power source.
8. Unplug your appliance before cleaning or making any repairs.
9. Only a certified technician should perform any required service needed.
10. This appliance should not be recessed or built into an enclosed cabinet.
It is designed for freestanding installation only.
11. Do not operate your appliance in the presence of explosive fumes.
12. Do not tamper with the controls.
13. Do not operate this appliance when parts are missing or broken.
14. Do not use this appliance for commercial use.
15. This appliance is designed for indoor use only and should not be
used outdoors.
WARNING
Read all of the instructions before using this appliance. When using this
appliance, always exercise basic safety precautions, including the following:
DANGER
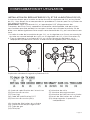
DANGER - Immediate hazards
which WILL result in severe
personal injury or death
WARNING
WARNING - Hazards or unsafe
practices which COULD result in
severe personal injury or death
CAUTION
CAUTION - Hazards or unsafe
practices which COULD result in
minor personal injury
IMPORTANT SAFETY INSTRUCTIONS

Page 4
16. To reduce the risk of injury, do not allow children to play in or on the
appliance. Close supervision is necessary when the appliance is used
near children.
17. The appliance door must be closed during operation. Do not leave the
door open when children are near the dispenser.
18. Do not run cord under carpeting or other heat insulators. Do not cover
the cord. Keep cord away from trac areas, and do not submerge in
water. DO NOT attempt to operate this unit with a damaged cord or
plug.
19. DO NOT roll the beer kegerator with loaded beer kegs on carpet floor.
20. This appliance is not intended for use by young children or infirm
persons without supervision.
21. This appliance is NOT A TOY!
22. Young children should be supervised to ensure that they do not play
with this appliance.
23. When transporting the unit, keep it in the upright position. Do not tilt
the appliance beyond 45° or place the unit in upside down position.
24. Take o the doors. Leave the shelves or other accessories in place so
that children may not easily become trapped inside.
25. Handle the unit carefully when moving or using the product to avoid
damaging the refrigerant tubing or increasing the risk of a leak.
SAVE THESE INSTRUCTIONS
HOUSEHOLD USE ONLY
SAFETY INFORMATION

Page 5
SAFETY INFORMATION
IMPORTANT SAFETY PRECAUTIONS OF CO
(CARBON DIOXIDE) GAS
WARNING
1. CO gas can be dangerous! CO cylinders contain high-pressure
compressed gas, which can be hazardous if not handled properly. Make
sure you read and understand all the procedures for the CO cylinders.
2. Always connect the CO cylinder to a regulator! Failure to do so may
cause an explosion resulting in possible death or injury when the
cylinder valve is opened.
3. Never connect the CO cylinder directly to the product container.
4. Always follow the correct procedures when changing cylinders.
5. Never drop or throw a CO cylinder.
6. Always keep CO cylinders away from heat. Store extra cylinder at a
cool place (preferably lower than 7F)Securelyfastenwithachainin
anuprightpositionwhenstoring
7. AlwaysventilateandleavetheareaimmediatelyifCO leakage has
occurred!
8. There are two safety devices in the pressure system in the form of
valves. One safety feature is on the CO bottle. The second is on the
regulator.
9. Never attempt to refill CO cylinder yourself. CO tanks can be refilled at
locations such as welding supply shops, party stores, fire supply shops,
or where kegs are purchased.
REFRIGERANT
GAS WARNINGS
DANGER - Risk of fire or explosion. Flammable refrigerant used. To
be repaired only by trained service personnel. DO NOT puncture
refrigerant tubing.
DANGER - Risk of fire or explosion. Flammable refrigerant used.
Consult repair manual/owner’s guide before attempting to service
this product. All safety precautions must be followed.
WARNING - Risk of fire or explosion. Dispose of properly in
accordance with federal or local regulations. Flammable refrigerant
used.
WARNING - Risk of fire or explosion due to puncture of refrigerant
tubing; Follow handling instructions carefully. Flammable refrigerant
used.

Page 6
SET UP & USE
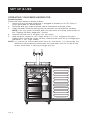
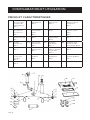
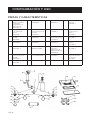
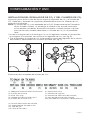
PARTS & FEATURES
#1 Keg Coupler
(Fits D-Sankey
Keg Valves)
Qty.2
#2 Backflow
Stopper
Qty.2
#3 Rubber Washer
Qty.2
#4 Rubber Directional
Washer
Qty.2
#5 Beer Tower /
Rubber Washer
Qty.1
#6 Beer Tower/
Hose Assembly
Qty.1
#7 CO Regulator
Qty.1
#8 High Pressure
Washer, White
Nylon
Qty.1
#9 CO Tank Valve
Qty.1
#10 Guard Rail
Qty.1
#11 Drip Tray Grate
Qty.1
#12 Drip Tray Pan
Qty.1
#13 Rubber Foot
Qty.4
#14 Keg Base
Board
Qty.1
#15 Metal Washer
Qty.4
#16 Casters with
Locking Mechanism
Qty.2
#17 Casters
Qty.2
#18 CO Tank Band
Qty.1
#19 Air Hose Wing
Nut Washer
Qty.2
#20 CO Line
Qty.2
#21 CO Line
Connector
Washer
Qty.2
#22 Beer Tap
Wrench
Qty.1
#23 Regulator
Wrench
Qty.1
#24 Beer Tower Hole
Plug
Qty.1
#25 Beer Tap
Qty.2

Page 7
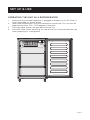
SET UP & USE
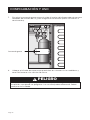
The coupler for this beer kegerator is compatible with the following barrels:
NOTE: The keg is not included.
1/4 barrel - Such as a Pony
or a Slim Pony Keg
1/6 barrel - Such as a
Cornelius Keg
1/2 barrel - Or a U.S. Full
Sized keg
(2) (2)

Page 8
SET UP & USE
PROPER LOCATION
• To ensure that your beer kegerator works to the maximum eciency it was designed
for, keep it in a location where there is proper air circulation and electrical outlets.
• Choose a location where the beer kegerator will be away from heat and will not be
exposed to direct sunlight.
• This beer kegerator is designed for indoor use only - it should NOT be used outdoors.
• This beer kegerator is a freestanding design and should not be placed in a
built-in or recessed area.
• Beer kegerator unit dimensions:
21.1” × 26.6” × 33.2” (WxDxH)
Recommended clearance space around the beer kegerator: Side: 5 inches; Back: 5
inches
USE OF EXTENSION CORDS
1. If the power supply cord is too short, do not use an extension cord. Have a qualified
electrician or serviceman install an outlet near the appliance.
NOTE: Neither BLACK+DECKER nor the dealer can accept any liability for damage to the
product or personal injury resulting from failure to observe the electrical connection
procedures.
WARNING: RISK OF FIRE
TECHNICAL DATA:
Input: 115V
Rated: 115V~60Hz
Rated Current: 1.1A
Capacity: 173L/6.1 CU. FT
ELECTRICAL REQUIREMENTS
This appliance has a polarized plug (one blade is wider than the other). To reduce the risk
of electric shock, this plug is intended to fit into a polarized outlet only one way. If the
plug does not fit into the outlet, reverse the plug. If it still does not fit, contact a qualified
electrician.
WARNING: Do not attempt to modify the plug in any way. If the plug does not fit fully
in the outlet, reverse the plug. If it still does not fit, contact a qualified
electrician to install the proper outlet.
Double insulated appliances are constructed throughout with two separate layers of
electrical insulation or one single layer of reinforced insulation between the user and the
appliance’s electrical system. Products built with this insulation system are not intended to
be grounded. As a result, this appliance is equipped with a two-prong plug which permits it
to be used without concern for maintaining ground connection.
NOTE: Double insulation does not take the place of the normal safety precautions when
operating this appliance. The secondary insulation system is for protection against
injury resulting from a possible failure of the primary insulation within the product.
CAUTION: When servicing use only identical replacement parts. Repair or replace
damaged cords.

Page 9
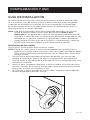
SET UP & USE
INSTALLATION GUIDE
Read the installation guide carefully to ensure you understand all instructions before
installing the beer kegerator. If after completing the process you are still unsure
whether the beer kegerator has been properly installed, we recommend that you
contact a qualified installer.
NOTE: Allow the beer kegerator to stand in an upright position for at least 8 hours
before plugging in the unit. This is very important! Once the unit is laid on
its side, the refrigerant in the refrigeration system is shifted. If the kegerator
has been placed in a horizontal or tilted position for any period of time,
please wait at least 24 hours before plugging the unit in. The refrigerant in
the refrigeration system needs to stabilize before the unit is turned on.
Installing the Casters
Follow the steps below to install casters:
NOTE: Two of the casters include locking mechanisms to ensure the unit does not
slide on hard floors. These two locking casters should be fastened at the front
end of the unit, with the unlocked casters fastened on the rear end.
1. Empty the inside of the beer kegerator. Once emptied, place the unit down
on it’s side. We recommend that you place a piece of cardboard or cloth
underneath the cabinet to prevent dents or scratches.
2. Remove the front leveling legs. Insert the casters into the holes on the bottom
corners of the cabinet. Tighten each caster by turning the nut clockwise with a
wrench (not provided in the kit).
3. Once all four casters have been tightened, stand the cabinet in its upright
position.

Page 10
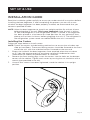
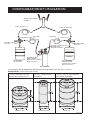
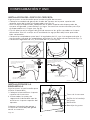
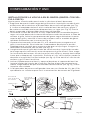
INSTALLING THE BEER TAP
Follow the steps below to install the beer tap.
• Place the beer tower rubber washer on top of the unit prior to installing the
dispenser. (See illustration A).
• To install the dispenser, place it on top of the kegerator unit, and screw into place.
Four screws are needed to lock the dispenser into place. (See illustration B).
• Attach the (two) black, beer tap handles to the threaded taps on the beer tower.
Turn the handles clockwise until securely connected.
• Connect the Keg Couplers to the CO Regulator with the air hose. Then connect
the keg couplers to the beer taps. (Illustration C).
• Connect the CO Regulator to the CO bottle. (Illustration D).
SET UP & USE
D
Air Hose Connecting Beer Tap to
Regulator & CO Bottle
Hose #2 Connecting Dispenser
Assembly to Beer Tap
CO Bottle
Part Shown in Illustration C,
Connects to Keg
Keg Coupler
CO Regulator
C
Large Butterfly Nut Secures Hose
to Beer Tap
Beer Tap Shown connected to
Regulator by Hose
Air Hose Connecting
Beer Tap to Regulator &
CO Bottle
AB
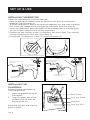
INSTALLING THE
GUARDRAIL
Following these steps below to
install the guardrail.
1. Place the guardrail on top of
the cabinet.
2. Align all support feet of the
guardrail with the holes on
the top of the unit.
Place drip tray pan and drip tray
grate as shown.
Beer Tower
Drip Tray Pan
Drip Tray Grate
Guardrail

Page 11
SET UP & USE
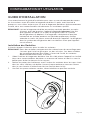
INSTALLING THE CO REGULATOR AND THE CO CYLINDER
Follow these steps to safely install the CO regulator and CO cylinder. You must read
and understand the following procedures for the CO cylinders before installation.
NOTE: Your CO cylinder has DOT (USA Department of Transportation) approval,
however the cylinder has been shipped empty to avoid any possible accidents
during transportation. When you purchase the first keg of beer, you must also
have your CO cylinder filled at your local supplier.
1. Install the CO gas line tube to the regulator by attaching one end of the tube to
the hose barb connection on the CO regulator. (See illustration E)
2. Attach the regulator to the CO cylinder by screwing the regulator nut onto the
cylinder valve and tightening with an adjustable wrench. (See illustration F)
EF
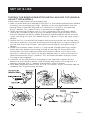
CO Cylinder Stamping Explanation:
(1) Aluminum specification code
(2) Service Pressure
(3) Tare Weight (Kg.)
(4) DOT specification code
(5) Service Pressure (PSI)
(11) Cylinder Manufacturing Year
(12) Fill capacity in lbs.
(13) Type of gas
(14) Tare Weight (lbs.)
(6) Serial Number
(7) Registration Number
(8) Cylinder Manufacturer Number
(9) Manufacturing month of Cylinder
(10) Independent Inspectors Marking

Page 12
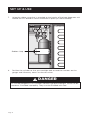
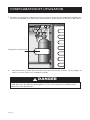
3. Wrap the rubber strap that is attached to the interior of the beer kegerator unit
around the CO bottle to secure the bottle in place (as shown below).
SET UP & USE
4. Position the cylinder so that you would be able to read the numbers on the
gauges and have easy access to shut-off valves.
Rubber Strap
DANGER
CO can be dangerous! CO cylinders contain high-pressured gas, which can be
hazardous if handled improperly. They must be handled with care.

Page 13
SET UP & USE
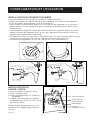
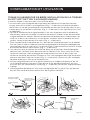
TAPPING THE BEER KEGERATOR INSTALLING KEG TAP (SINGLE-
VALVE TYPE BARREL)
Follow these steps below to tap the beer keg.
1. Make sure the black pull handle of the tap is in the closed (up) position before
installing it on the kegerator (Fig.1 - below). Insert the keg coupler into the
locking neck of the beer keg and turn clockwise ¼ to lock it into position
(Fig.2 - below). This means that it is secured to the kegerator.
2. When connecting the beer line, it is very important that the black rubber
washer be installed inside the wing nut before connecting the beer line to
the tap. Remove the black rubber protective cap located on top of tap and
screw the Wing nut with the rubber washer. Tighten it firmly by hand. (Fig.2 -
below)
3. Attach the CO line end of the tube to the hose connection on the tap. Next,
secure the tube by using the remaining self-locking plastic snap-on clamp to
ensure that there are no leaks. Secure the clamp tightly with pliers (Fig.3 -
below).
4. Make sure the beer tower faucet is in the closed (handle pointing straight
back) position before connecting the tap to the keg. To secure the tank
connection, pull the tapping handle out and push down until it locks into
position. Listen for the “click” of the pull handle when it shifts into the final
downward position (Fig.4 - below). This will open the beer and gas valves.
The keg is now tapped.
5. Carefully tilt the keg and rest the edge on the keg floor support on the
bottom of the interior cabinet. Slide the beer keg slowly, ensuring that it is
properly located (Fig.5 - below) and carefully close the door.
6. Your beer kegerator comes with a 2.5 lb. CO bottle, which should be able to
dispense four 15 gallon kegs of beer.

Page 14
SET UP & USE
OPERATING YOUR BEER KEGERATOR
Dispensing Beer
Follow the steps below to dispense beer.
1. Make sure that the beer kegerator is plugged in properly to a 115V, 60Hz, 1.1
Amps grounded AC power outlet.
2. Place the drip tray under the beer tap to avoid excessive beer stains.
3. Open the beer faucet by pulling the tap towards you to dispense the beer.
NOTE: If for any reason the beer does not come out of the tap, please refer to
the “Tapping the Beer Kegerator” section.
4. Increase the pressure if the beer runs too slowly.
5. Hold the glass steady at a 45˚angle. When it is ⅔ full, straighten the glass.
Proper foam should be a tight creamy head and the collar on an average glass
should be ¾” to 1” high, ideally.
NOTE: It is normal to see condensation form on the faucet. It is caused by the
difference of temperature between the cold beer and the inside of the
faucet when beer is flowing through the line.

Page 15
SET UP & USE
OPERATING THE UNIT AS A REFRIGERATOR
1. Make sure that the beer kegerator is plugged in properly to a 115V, 60Hz, 1.1
Amps grounded AC power outlet.
2. Adjust the temperature using the mechanical control dial. This unit can be
programmed from 35.6 – 50.0 degrees Fahrenheit.
3. Two adjustable shelves are provided with the unit.
4. Place the “Beer Tower Hole Plug” on top of the unit instead of the beer tap
when operating as a refrigerator.

Page 16
CLEANING AND CARE
PROTECTING YOUR INVESTMENT
Keeping your kegerator clean maintains appearance and prevents odor build-up.
Wipe up any spills immediately and clean the kegerator at least twice a year. When
cleaning, take the following precautions:
WARNING: Always unplug the electrical power cord from the wall outlet before
cleaning.
Never use CHLORIDE or cleaners with bleach to clean stainless steel.
Do not wash any removable parts in a dishwasher.
Remove adhesive labels by hand. Do not use razor blades or other sharp instruments
which can scratch the appliance surface.
Do not remove the serial plate.
Do not use abrasive cleaners such as window sprays, scouring cleansers, brushes,
flammable fluids, cleaning waxes, concentrated detergents, bleaches or cleansers
containing petroleum products on plastic parts, interior doors, gaskets or cabinet
liners. Do not use paper towels, metallic scouring pads, or other abrasive cleaning
materials or strong alkaline solutions.
NOTE: If you set your temperature controls to turn o cooling, power to lights and
other electrical components will continue until you unplug the power cord
from the wall outlet.
CAUTION: Damp objects stick to cold metal surfaces. Do not touch refrigerated
surfaces with wet or damp hands.
IMPORTANT: If you store or move your kegerator in freezing temperatures, be sure
to completely drain the water supply system. Failure to do so could
result in water leaks when the kegerator is put back into service.
Contact a service representative to perform this operation.
NOTE: This kegerator is designed for Indoor Home Use Only.
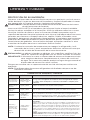
CARE AND CLEANING TIPS
Part What To Use Tips and Precautions
Interior and
Door Liners
• Soap and water
• Baking soda and
water
Use 30 mL (2 tbsp) of baking soda in 945 mL (1 qt.) of warm water.
Be sure to wring excess water out of sponge or cloth before cleaning
around controls, light bulb or any electrical part.
Door Gaskets • Soap and water Wipe gaskets with a clean soft cloth.
Drawers and
Bins • Soap and water Use a soft cloth to clean drawer runners and tracks.
Exterior and
Handles
• Soap and water
• Non-abrasive
glass cleaner
Do not use commercial household cleaners containing ammonia, bleach
or alcohol to clean handles. Use a soft cloth to clean smooth handles.
DO NOT use a dry cloth to clean smooth doors.
Exterior and
Handles
(Stainless
Steel Models
Only)
• Soap and water
• Stainless steel
cleaners
Never use CHLORIDE or cleaners with bleach to clean stainless steel.
Clean stainless steel front and handles with non-abrasive soapy water and
a dishcloth. Rinse with clean water and a soft cloth. Use a non-abrasive
stainless steel cleaner. These cleaners can be purchased at most home
improvement or major department stores. Always follow manufacturer’s
instructions. Do not use household cleaners containing ammonia or
bleach.
NOTE: Always clean, wipe and dry with the grain to prevent scratching.
Wash the rest of the cabinet with warm water and mild liquid detergent.
Rinse well, and wipe dry with a clean soft cloth.

Page 17
TROUBLESHOOTING & WARRANTY
BEFORE YOU CALL FOR SERVICE
IF THE APPLIANCE FAILS TO OPERATE:
A) Check to make sure that the kegerator/refrigerator is plugged in securely. If it is
not, remove the plug from the outlet, wait 10 seconds and plug it in again securely.
B) Check for a blown circuit fuse or a tripped main circuit breaker. If these seem to be
operating properly, test the outlet with another appliance.
IF NONE OF THE ABOVE SOLVES THE PROBLEM, CONTACT A QUALIFIED
TECHNICIAN.
WARNING: USER SHOULD NOT TRY TO ADJUST OR REPAIR THIS APPLIANCE.
THERE ARE NO USER SERVICEABLE PARTS INSIDE.
IMPORTANT
DO NOT RETURN THIS PRODUCT TO THE STORE
If you have a problem with this product, please contact the
BLACK+DECKER Customer Satisfaction Center at
844-299-0879 or service@equitybrands.com
DATED PROOF OF PURCHASE, MODEL # AND SERIAL #
REQUIRED FOR WARRANTY SERVICE

Page 18
LIMITED WARRANTY
Any repair, replacement, or warranty service,
and all questions about this product should
be directed to W Appliance at 844-299-0879
from the USA or Puerto Rico.
W Appliance warrants to the original purchaser that
the product will be free from defects in material,
parts and workmanship for the period designated for
this product. The warranty commences the day the
product is purchased and covers up to a period of 1
year (12 months) for labor/1 year (12 months) for parts
(manufacturing defects only).
W Appliance agrees that it will, at its option,
replace the defective product with either a new
or remanufactured unit equivalent to your original
purchase during the warranty period.
Exclusions: This warranty does not apply to the
below:
1. If the appearance or exterior of
the product has been damaged or
defaced, altered or modified in design or
construction.
2. If the product original serial number
has been altered or removed or cannot
be readily determined.
3. If there is damaged due to power line
surge, user damage to the AC power
cord or connection to improper voltage
source.
4. If damage is due to general misuse,
accidents or acts of God.
5. If repair attempts are done by
unauthorized service agents, use of
parts other than genuine parts or parts
obtained from persons other than
authorized service companies.
6. On units that have been transferred
from the original owner.
7. On products that have been purchased
as refurbished, like new, second-hand, in
a “As-Is” or “Final Sale” terms.
8. To products used in a commercial or
rental setting.
9. To products used in settings other than
ordinary household use or used other
than in accordance with the provided
instructions.
10. To damages for service calls for
improper installations.
11. Transportation and shipping costs
associated with the replacement of the
unit.
12. Service calls to instruct you how to use
your product.
13. Service calls to repair or replace the
house fuse, reset the circuit breaker or
correct the wiring in the house.
REPAIR OR REPLACEMENT AS PROVIDED UNDER
THIS WARRANTY IS THE EXCLUSIVE REMEDY OF
THE CUSTOMER; W Appliance. SHALL NOT BE
LIABLE FOR ANY INCIDENTAL OR CONSEQUENTIAL
DAMAGES FOR BREACH OF ANY EXPRESS OR
IMPLIED WARRANTY ON THIS PRODUCT, EXCEPT
TO THE EXTENT PROHIBITED BY APPLICABLE LAW.
ANY IMPLIED WARRANTY OF MERCHANTABILITY
OF FITNESS FOR A PARTICULAR PURPOSE ON THIS
PRODUCT IS LIMITED TO THE DURATION OF THE
WARRANTY.
Some states do not allow the exclusion or limitations
of incidental or consequential damages, or limitations
on how long the warranty lasts. In these cases the
above exclusions or limitations may not apply to you.
This warranty gives you specific legal rights and you
may also have other rights which vary from state to
state.
Obtaining Service: To obtain service, product
literature, supplies or accessories please call
844-299-0879 to create a ticket for exchange/repair.
Please make sure to provide the date of purchase,
model number and a brief description of the problem.
Our customer service representative will contact you
or send detailed return instructions.
W Appliance does not warrant that the appliance will work
properly in all environmental conditions, and makes no warranty
and representation, either implied or expressed, with respect
to the quality, performance, merchantability, or fitness for a
particular purpose other than the purpose identified within this
user’s manual. W Appliance has made every eort to ensure
that this user’s manual is accurate and disclaims liability for any
inaccuracies or omissions that may have occurred. Information in
this user’s manual is subject to change without notice and does
not represent a commitment on the part of W Appliance. W
Appliance reserves the right to make improvements to this user’s
manual and/or to the products described in this user’s manual
at any time without notice. If you find information in this manual
that is incorrect, misleading, or incomplete, please contact us at
844-299-0879.
W Appliance Co.
1356 Broadway
New York, NY 10018


Page 20
BLACK & DECKER, BLACK+DECKER, the BLACK & DECKER and
BLACK+DECKER logos and product names and the orange and black color
scheme are trademarks of The Black & Decker Corporation, used under
license. All rights reserved.
Product in this box may differ slightly from that pictured. Does not affect
function. Not all accessories shown in photography are included in this
package.
Imported by W Appliance, Inc., 1356 Broadway, New York, NY 10018
May 2022 Printed in China
La page est en cours de chargement...
La page est en cours de chargement...
La page est en cours de chargement...
La page est en cours de chargement...
La page est en cours de chargement...
La page est en cours de chargement...
La page est en cours de chargement...
La page est en cours de chargement...
La page est en cours de chargement...
La page est en cours de chargement...
La page est en cours de chargement...
La page est en cours de chargement...
La page est en cours de chargement...
La page est en cours de chargement...
La page est en cours de chargement...
La page est en cours de chargement...
La page est en cours de chargement...
La page est en cours de chargement...
La page est en cours de chargement...
La page est en cours de chargement...
La page est en cours de chargement...
La page est en cours de chargement...
La page est en cours de chargement...
La page est en cours de chargement...
La page est en cours de chargement...
La page est en cours de chargement...
La page est en cours de chargement...
La page est en cours de chargement...
La page est en cours de chargement...
La page est en cours de chargement...
La page est en cours de chargement...
La page est en cours de chargement...
La page est en cours de chargement...
La page est en cours de chargement...
La page est en cours de chargement...
La page est en cours de chargement...
La page est en cours de chargement...
La page est en cours de chargement...
La page est en cours de chargement...
La page est en cours de chargement...
-
 1
1
-
 2
2
-
 3
3
-
 4
4
-
 5
5
-
 6
6
-
 7
7
-
 8
8
-
 9
9
-
 10
10
-
 11
11
-
 12
12
-
 13
13
-
 14
14
-
 15
15
-
 16
16
-
 17
17
-
 18
18
-
 19
19
-
 20
20
-
 21
21
-
 22
22
-
 23
23
-
 24
24
-
 25
25
-
 26
26
-
 27
27
-
 28
28
-
 29
29
-
 30
30
-
 31
31
-
 32
32
-
 33
33
-
 34
34
-
 35
35
-
 36
36
-
 37
37
-
 38
38
-
 39
39
-
 40
40
-
 41
41
-
 42
42
-
 43
43
-
 44
44
-
 45
45
-
 46
46
-
 47
47
-
 48
48
-
 49
49
-
 50
50
-
 51
51
-
 52
52
-
 53
53
-
 54
54
-
 55
55
-
 56
56
-
 57
57
-
 58
58
-
 59
59
-
 60
60


dans d''autres langues
- English: BLACK DECKER BBD20HS User manual
- español: BLACK DECKER BBD20HS Manual de usuario
Autres documents
-
Igloo BK49BS Manuel utilisateur
-
NewAir NKR058MB00 Freestanding Single Tap Kegerator Le manuel du propriétaire
-
Master Chef 399-6488-6 Manuel utilisateur
-
BLACK+DECKER BLACK+DECKER BHDC201 Portable Space Heater Manuel utilisateur
-
Nostalgia Electrics KRS-6100SS Mode d'emploi
-
Haier BrewMaster HBF205E Manuel utilisateur
-
Haier BrewMaster HBF05E Manuel utilisateur
-
-
Sears 183.91579 Manuel utilisateur
-
Kenmore 25591589010 Le manuel du propriétaire