Pfaff expression 150 Le manuel du propriétaire
- Catégorie
- Machines à coudre
- Taper
- Le manuel du propriétaire

Owner’s manual

This household sewing machine is designed to comply with IEC/EN 60335-2-28 and UL1594.
IMPORTANT SAFETY INSTRUCTIONS
When using an electrical appliance, basic safety precautions should always be followed, including the
following:
Read all instructions before using this household sewing machine.
DANGER – To reduce the risk of electric shock:
• A sewing machine should never be left unattended when plugged in. Always unplug this sewing
machine from the electric outlet immediately after using and before cleaning.
• Always unplug before relamping. Replace bulb with same type rated 5 Watt.
WARNING – To reduce the risk of burns, À re, electric
shock, or injury to person:
• This sewing machine is not intended for use by persons (including children) with reduced physical,
sensory or mental capabilities, or lack of experience and knowledge, unless they have been given
supervision or instruction concerning use of the sewing machine by a person responsible for their
safety.
• Children should be supervised to ensure that they do not play with the sewing machine.
• Use this sewing machine only for its intended use as described in this manual. Use only attachments
recommended by the manufacturer as contained in this manual.
• Never operate this sewing machine if it has a damaged cord or plug, if it is not working properly, if
it has been dropped or damaged, or dropped into water. Return the sewing machine to the nearest
authorized dealer or service center for examination, repair, electrical or mechanical adjustment.
• Never operate the sewing machine with any air openings blocked. Keep ventilation openings of the
sewing machine and foot controller free from the accumulation of lint, dust, and loose cloth.
• Keep À ngers away from all moving parts. Special care is required around the sewing machine needle.
• Always use the proper needle plate. The wrong plate can cause the needle to break.
• Do not use bent needles.
• Do not pull or push fabric while stitching. It may deÁ ect the needle causing it to break.
• Wear safety glasses.
• Switch the sewing machine off (“0”) when making any adjustment in the needle area, such as threading
needle, changing needle, threading bobbin, or changing presser foot, etc.
• Always unplug sewing machine from the electrical outlet when removing covers, lubricating, or when
making any other user servicing adjustments mentioned in the instruction manual.
• Never drop or insert any object into any opening.
• Do not use outdoors.
• Do not operate where aerosol (spray) products are being used or where oxygen is being administrated.
• To disconnect, turn all controls to the off (“0”) position, then remove plug from outlet.
• Do not unplug by pulling on cord. To unplug, grasp the plug, not the cord.
• This sewing machine is provided with double insulation. Use only identical replacement parts.
See instructions for Servicing of Double-Insulated Appliances.
SAVE THESE INSTRUCTIONS
SERVICING OF DOUBLE INSULATED PRODUCTS
In a double-insulated product, two systems of insulation are provided instead of grounding. No ground
means is provided on a double-insulated product, nor should a means for grounding be added to the
product. Servicing of a double-insulated product requires extreme care and knowledge of the system and
should be done only by qualiÀ ed service personnel. Replacement parts for a double-insulated product must
be identical to those parts in the product. A double-insulated product is marked with the words ‘DOUBLE
INSULATION’ or ‘DOUBLE INSULATED’.

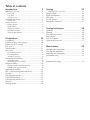
Table of contents
Introduction 4
Machine overview ....................................................... 4
Front side ......................................................................... 4
Top parts .......................................................................... 4
Accessory tray ................................................................. 5
Included accessories ................................................... 5
Presser feet ....................................................................... 6
Stitch overview ............................................................ 7
Utility stitches ................................................................. 7
Quilt stitches ................................................................... 8
Needle art stitches .......................................................... 9
Decorative stitches ......................................................... 9
Optional feet stitches...................................................... 9
Preparations 10
Unpacking .................................................................. 10
Connect to the power supply .................................. 10
Pack away after sewing ............................................ 11
Free arm ...................................................................... 11
Thread cutter.............................................................. 11
Spool pins ................................................................... 11
Horizontal position ...................................................... 11
Vertical position ............................................................ 12
Auxiliary spool pin ...................................................... 12
Threading the machine............................................. 12
Needle threader ............................................................ 13
Threading for twin needle........................................... 13
Bobbin winding ......................................................... 14
Winding from horizontal position ............................. 14
Winding through the needle ....................................... 14
Inserting the bobbin .................................................. 15
IDT™ system (integrated dual feed) ...................... 15
Needles ....................................................................... 16
Changing the needle ................................................. 17
Lowering feed dogs .................................................. 17
Changing the presser foot ........................................ 17
Buttons ........................................................................ 18
Settings menu ............................................................ 20
Sewing 21
Sewing mode - overview ............................................. 21
Select a stitch .............................................................. 21
Stitch adjustments ..................................................... 22
Mirroring .................................................................... 23
Tie-off options ............................................................ 23
Mainmotor overload ................................................. 23
Sewing techniques 24
Quilting ....................................................................... 24
Darning ....................................................................... 24
Free-motion position ................................................ 25
Buttonholes ................................................................ 25
Sew on a button ......................................................... 26
Optional presser feet ................................................. 27
Maintenance 30
Changing the light bulbs .......................................... 30
Cleaning the machine ............................................... 30
Replacing the stitch plate ......................................... 31
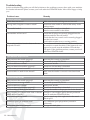
Troubleshooting ........................................................ 32
Intellectual Property ................................................. 35

4 - Introduction
232221 24 25 26
28 27
293031
10
20
30
40
50
2
1
mm
inch
00
1
2
3
4
1
2
14
3
4
5
6
7
8
9
10
11
13
12
15
17
18
19
20
5
16
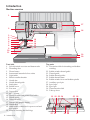
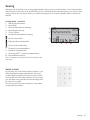
Front side
1. Lid with stitch overview and button ruler
2. Threading slots
3. Thread cutter
4. Sensormatic buttonhole foot socket
5. Light bulbs
6. Built-in needle threader
7. Needle bar
8. Needle thread guide
9. Stitch plate
10. Bobbin cover
11. Free arm
12. Presser foot
13. IDT™ system
14. Presser foot bar and presser foot holder
15. Needle screw
16. Presser foot lift
17. Buttons and graphic display
18. Handwheel
19. Main switch, connectors for power cord and
foot control
20. Slide for lowering the feed dogs
Top parts
21. Pre-tension disk for threading and bobbin
winding
22. Bobbin winder thread guide
23. Thread guide
24. Bobbin thread guides
25. Bobbin thread cutter
26. Bobbin winder lever and bobbin spindle
27. Auxiliary spool pin
28. Spool caps
29. Spool pin
30. Thread tension disk
31. Take-up lever
Introduction
Machine overview

Introduction - 5
34
33
32
373635
414039
44
43
42
4645
38
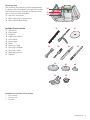
Accessory tray
The accessory tray features special compartments
for presser feet and bobbins, plus space for needles
and other accessories. Store the accessories in the
tray so they are easily accessible.
32. Space for accessories
33. Removable tray for presser feet
34. Removable bobbin holder
Included accessories
35. Thread net
36. Edge guide
37. Felt pad
38. Light bulb remover
39. Screwdriver
40. Seam ripper
41. Brush
42. Spool cap, large
43. Spool cap, medium
44. Spool cap, small
45. Multi-purpose tool
46. Bobbins
Included accessories not in picture
• Foot control
• Power cord
• Needles

6 - Introduction
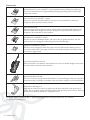
Presser feet
Standard presser foot 0A with IDT™ system (attached on the machine upon delivery)
This foot is used mainly for straight stitching and zigzag stitching with a stitch length
longer than 1.0 mm.
Fancy stitch foot 1A with IDT™ system
This foot is used for decorative stitches. The groove on the underside of the foot is
designed to Á ow smoothly over the stitches.
Fancy stitch foot 2A
When sewing decorative stitches or short zigzag stitches and other utility stitches with
less than 1.0mm stitch length, use this foot. The groove on the underside of the foot is
designed to Á ow smoothly over the stitches.
Blindhem foot 3 with IDT™ system
This foot is used for blindhem stitches. The toe on the foot guides the fabric. The red
guide on the foot is designed to ride along the fold of the hem edge.
Zipper foot 4 with IDT™ system
This foot can be snapped on either the right or the left of the needle, making it easy to
sew close to both sides of the zipper teeth. Move the needle position to the right or left to
sew closer to zipper teeth.
Sensormatic buttonhole foot 5A
When connected to the machine, the buttonhole is sewn in a suitable length to the button
size that has been entered into the machine.
Manual buttonhole foot 5M
This foot is used for sewing manual buttonholes. Use the markings on the foot to position
the garment edge. The À nger on the back of the foot holds cording for corded buttonhole.
Free-motion/Darning foot
Insert the pin of the foot as far as it will go into the hole at the back of the presser foot
holder. The ”C-shaped” guide should be positioned around the presser foot bar. The long
arm must be behind the needle bar. Tighten the screw.
Important: Make sure that the IDT™ system is disengaged when using presser foot 2A, 5A, 5M and
the free-motion/darning foot.

Introduction - 7
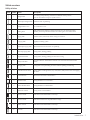
Stitch overview
Utility stitches
Stitch
Stitch
number
Name Description
1
Straight stitch
For seaming and topstitching. Select from 37 different needle positions.
Note: This stitch makes a stronger tie-off than stitch 37.
2
Stretch triple straight stitch Reinforced seam. Topstitching.
3
Straight stitch reverse Sew continuous reverse.
4
Basting stitch
Single stitch used for basting. Touch foot control to sew one stitch. Move fabric
manually to desired position and touch foot control again to sew another stitch.
5
Zigzag stitch Reinforce seams, clean À nish, stretch sewing, lace insertion.
6
Z-zigzag stitch Appliqué, couching, eyelets.
7
Stretch triple zigzag stitch Elastic stitch for decorative hems or topstitching.
8
Three-step zigzag stitch Sewing elastic, darning, patching.
9
Triple stretch stitch Sewing elastic, darning, patching and decorative sewing.
10
Honeycomb stitch
Decorative stitch for stretch fabrics and hems. Also used with elastic thread in the
bobbin.
11
Bridging stitch Joining fabrics and quilt batting, decorative stitch for quilting, hemstitching.
12
Foundation elastic stitch
Joining stitch for undergarments, terry cloth, leather, bulky fabrics where overlapping
the seams.
13
Crosshem stitch Elastic decorative hem for stretch fabrics.
14
Blindhem stitch Sewing blindhems on woven fabrics.
15
Elastic blindhem stitch Sewing blindhems on stretch fabrics.
16
Stretch tricot stitch Sewing seams on stretch fabrics.
17
Closed overlock Seam and overcast stretch fabrics in one step.
18
Closed overlock Seam and overcast in one step with reinforced edge.
19
Elastic overcast Seam and overcast stretch fabrics in one step.
20
Overlock Seam and overcast stretch fabrics in one step.

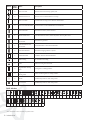
8 - Introduction
Stitch
Stitch
number
Name Description
21
Closed overlock Seam and overcast in one step, patch, hem.
22
Stretch knit overlock Seam and overcast stretch fabrics in one step.
23
Mock cover hem Create the look of a serger cover hem for stretch fabrics.
24
Closed overlock blind hem Create decorative overlock blindhem for stretch fabrics.
25
Linen buttonhole Buttonhole for blouses, shirts and linen.
26
Standard buttonhole Basic buttonhole for blouses, shirts and jackets. Also for pillowcases.
27
Rounded buttonhole with
pointed tack
Buttonhole for garments.
28
Eyelet buttonhole with
pointed tack
Tailors buttonhole or decorative buttonhole.
29
Rounded buttonhole Buttonhole for light garments or jackets.
30
Bound buttonhole Foundation stitch for bound buttonhole.
31
Button sewing Sew on buttons or tacking.
32
Eyelet Heirloom sewing decorative trim.
33
Programmable darning
stitch
Darning holes or damaged fabric.
34
Programmable reinforced
darning stitch
Reinforced darning holes or damaged fabric.
35
Bartack Automatically reinforce seams and pockets.
36
Cross bartack Automatically reinforce seams and pockets.
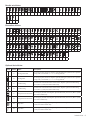
Quilt stitches
37* 38 39 40 41 42 43 44 45 46 47 48 49 50 51 52 53 54 55 56 57 58 59 60
61 62 63 64 65 66 67 68 69 70 71 72
* This stitch makes a more decorative tie-off than stitch 1.

Introduction - 9
Needle art stitches
73 74 75 76 77 78 79 80 81 82 83 84 85 86 87 88 89 90 91 92 93 94 95 96
97 98 99 100
Decorative stitches
101 102 103 104 105 106 107 108 109 110 111 112 113 114 115 116 117 118 119 120 121 122 123 124
125 126 127 128 129 130 131 132 133 134 135 136 137 138 139 140 141 142 143 144 145 146 147 148
149 150 151 152 153 154 155 156 157 158 159 160 161 162 163 164 165 166 167 168 169 170 171 172
173 174 175 176 177 178 179 180 181 182 183 184 185 186 187 188 189 190 191 192
Optional feet stitches
Stitch
Stitch
number
Name Description
193
Beading stitch 4mm
For sewing on pearls, beads etc. Requires optional Beading Foot, delivered in a separate
package with your PFAFF® expression™ sewing machine.
194
Beading stitch
For sewing on pearls, beads etc. Requires optional Beading Foot, delivered in a separate
package with your PFAFF® expression™ sewing machine.
195
Candlewicking
Create the look of hand embroidered French knots. Requires optional Candlewicking
Foot w/IDT™ system (Part number 820613-096).
196
Candlewicking
Create the look of hand embroidered French knots. Requires optional Candlewicking
Foot w/IDT™ system (Part number 820613-096).
197
Three part decorative stitch
For sewing on yarn and cord. Requires optional Three Hole yarn Foot w/ IDT™ system
(Part number 820920-096).
198
Three part decorative stitch
For sewing on yarn and cord. Requires optional Three Hole yarn Foot w/ IDT™ system
(Part number 820920-096).
199
Edge stitch
Use for edge À nish or applique. Requires optional Bi-level Topstitch Foot w/IDT™
system (Part number 820676-096).
200
Edge stitch
Use for edge À nish or applique. Requires optional Bi-level Topstitch Foot w/IDT™
system (Part number 820676-096).

10 - Preparations
ABC
Preparations
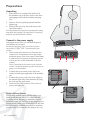
Unpacking
1. Place the box on a steady, Á at surface. Lift
the machine out of the box, remove the outer
packaging and lift off the machine carrying
case.
2. Remove all outer packing material and the
plastic bag.
3. Slide off the accessory tray and remove the
styrofoam inside.
Note: Styrofoam left in the accessory tray while sewing
may affect stitch quality. The styrofoam is for packing
purposes only and should be removed.
Connect to the power supply
Among the accessories you will À nd the power
cord and the foot control.
Note: Before plugging in the foot control, check to
ensure that it is type ”FR5” (see underside of foot
control).
1. Take out the foot control cord. Turn the foot
control over. Connect the cord to the socket
inside the space of the foot control. Push À rmly
to make sure it is properly connected. Lay the
cord in the slot on the underside of the foot
control.
Note: Connecting the foot control cord to the foot
control is only necessary the very À rst time you are
going to use the machine.
2. Connect the foot control cord to the front
socket on the bottom right side of the machine
(A).
3. Connect the power cord to the rear socket on
the bottom right side of the machine (B). Plug
the cord into the wall socket.
4. Press the ON/OFF switch to ON to turn on
power and light (C).
For the USA and Canada
This sewing machine has a polarized plug (one
blade wider than the other). To reduce the risk
of electric shock, this plug is intended to À t in a
polarized outlet only one way. If the plug does not
À t fully in the outlet, reverse the plug. If it still does
not À t, contact a qualiÀ ed electrician to install the
proper outlet. Do not modify the plug in any way.

Preparations - 11
A
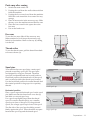
Pack away after sewing
1. Switch the main switch off.
2. Unplug the cord from the wall socket and then
from the machine.
3. Unplug the foot control cord from the machine.
Wind the cord around the foot control for easy
storage.
4. Place all accessories in the accessory tray. Slide
the tray on to the machine around the free arm.
5. Place the foot control in the space above the
free arm.
6. Put on the hard cover.
Free arm
To use the free arm, slide off the accessory tray.
When attached, a hook keeps the accessory tray
locked to the machine. Remove the tray by sliding
it to the left.
Thread cutter
To use the thread cutter, pull the thread from back
to front as shown (A).
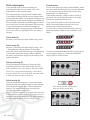
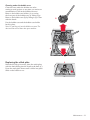
Spool pins
Your machine has two spool pins, a main spool
pin and an auxiliary spool pin. The spool pins
are designed for all types of thread. The main
spool pin is adjustable and can be used both in a
horizontal position (the thread reels off the spool)
and a vertical position (the thread spool rotates).
Use the horizontal position for normal threads and
the vertical position for large spools or specialty
threads.
Horizontal position
Place a spool cap and the thread spool on the spool
pin. Make sure that the thread reels over the top
and slide on a second spool cap.
Use a spool cap slightly larger than the thread
spool. For narrow thread spools, use a smaller
spool cap in front of the spool. For large thread
spools, use a larger spool cap in front of the spool.
The Á at side of the spool cap should be pressed
À rmly against the spool. There should be no space
between the spool cap and the thread spool.
Small spool cap
Large spool cap

12 - Preparations
PF
A
1
2
3
4
A
C
D
E
B
C
B
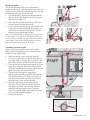
Main spool pin in vertical position
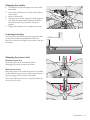
Vertical position
Raise the spool pin to the vertical position. Slide
on the large spool cap and place a felt pad under
the thread spool. This is to prevent the thread from
reeling off too fast.
Do not place a spool cap on top of the spool pin as
that would prevent the spool from rotating.
Auxiliary spool pin
The auxiliary spool pin is used when winding a
bobbin thread from a second spool of thread or for
a second spool when sewing with a twin needle.
Raise the auxiliary spool pin. Slide on a large spool
cap and place a felt pad under the thread spool.
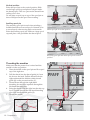
Threading the machine
Make sure that the presser foot is raised and the
needle is in the up position.
1. Place the thread on the spool pin and À t a spool
cap of the right size.
2. Pull the thread into the thread guide (A) from
the front to the back. Pull the thread from the
right underneath the bobbin winder thread
guide (B) on the pre-tension disc (C).
3. Thread down through the right-hand
threading slot and then upwards through the
left-hand threading slot.
4. Bring the thread from the right into the take-up
lever (D) and down in the left-hand threading
slot to the needle thread guide (E).
5. Thread the needle.
Auxiliary spool pin and main spool pin in vertical
position.

Preparations - 13
C
B
H
G
PF
A
1
2
3
4
D
A
C
E
F
B
Needle threader
The needle threader allows you to thread the
needle automatically. The needle must be in the up
position to use the built-in needle threader. We also
recommend lowering the presser foot.
1. Use the handle to pull the needle threader all
the way down. The threader hook (G) swivels
through the needle eye.
2. Place the thread from the back over the hook
(H) and under the thread hook (G).
3. Let the needle threader gently swing back. The
hook pulls the thread through the needle eye
and forms a loop behind the needle. Pull the
thread loop out behind the needle.
Note: The needle threader is designed to be used for size
70-120 needles. You cannot use the needle threader for
size 60 needles or smaller, a wing needle, twin needle or
triple needle. There are also some optional accessories
that require manual threading of the needle.
Threading for twin needle
Replace the sewing needle with a twin needle.
Make sure that the presser foot is raised and the
needle is in the up position.
1. Place the thread on the spool pin and À t a
spool cap of the right size. Raise the auxiliary
spool pin. Slide on a large spool cap and a felt
pad. Place the second thread on the spool pin.
2. Pull the threads into the thread guide (A) from
the front to the back. Pull both threads from
the right underneath the bobbin winder thread
guide (B) on the pre-tension disc (C).
3. Thread down through the right-hand
threading slot and then upwards through the
left-hand threading slot. Make sure that you
pass one thread to the left and one thread to
the right sides of the tension disk (D).
4. Bring the threads from the right into the
take-up lever (E) and down in the left-hand
threading slot. Make sure that one thread is
inside the needle thread guide (F) and the
other one outside. Make sure that the threads
do not become twisted together.
5. Thread the needles.

14 - Preparations
B
C
A
C
A
B
D
C C
E
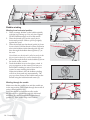
Bobbin winding
Winding from horizontal position
1. Place an empty bobbin on the bobbin spindle,
with the logo facing up. Use only the original
PFAFF® bobbins approved for this model.
2. Place the thread spool on the spool pin in
horizontal position. Slide a spool cap tightly
against the spool.
3. Place the thread into the thread guide (A) from
front to back. Pull the thread counter-clockwise
above the bobbin winder thread guide (B) and
then through the bobbin thread guides (C) at
the rear.
Note: Make sure the thread is pulled securely inside
the pre-tension device for correct thread tension.
4. Thread through the hole in the bobbin (D) from
the inside to the outside.
5. Push the bobbin lever to the right to wind. A
pop-up appears on the screen to inform you
that bobbin winding is active. Press the foot
control to start winding the bobbin.
When the bobbin is full, the bobbin winding
will slow down and stop automatically. The
pop-up closes. Remove the bobbin and cut the
thread using the bobbin thread cutter (E).
Winding through the needle
Make sure that the presser foot and the needle are
in the up position. Only wind through the needle if
using a metal presser foot.
Bring the thread up from the needle, under
the presser foot, upward through the left-hand
threading slot and through the bobbin thread
guides (C). Then follow step 4 and 5 above.

Preparations - 15
1
2
43
A
B
C
D
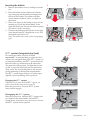
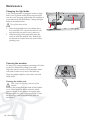
Inserting the bobbin
1. Remove the bobbin cover by sliding it towards
you.
2. Place the bobbin in the bobbin case with the
logo facing up and the thread unreeling from
the left of the bobbin. The bobbin will then
rotate counter-clockwise when you pull out
the thread.
3. Place your À nger on the bobbin to keep it from
turning as you pull the thread À rmly to the
right and then to the left into the tension spring
(A) until it “clicks” into place.
4. Continue threading around (B) and to the right
of the thread cutter (C). Replace the cover. Pull
the thread to the left to cut.
Note: The bobbin cover can be used as a magnifying
glass.
IDT™ system (integrated dual feed)
For sewing any fabric precisely PFAFF®
expression™ sewing machine provides the ideal
solution: the integrated dual feed, IDT™ system. As
on industrial machines, the IDT™ system feeds the
fabric from the top and bottom at the same time.
The material is fed precisely. On light fabrics such
as silk or rayon the dual feed prevents puckering
of the seam. The even feeding action also ensures
perfect matching of checked and striped fabrics.
The IDT™ system keeps all layers of quilt projects
aligned to prevent shifting of the top layers.
Engaging the IDT™ system
Important: For all work with the IDT™ system, use
presser feet with the center back cut-out (D).
Raise the presser foot. Press the IDT™ system
down until it engages.
Disengaging the IDT™ system
Raise the presser foot. Hold the IDT™ system with
two À ngers at the ribbed ankle. Pull the IDT™
system down, then pull it away from you to release
the IDT™ system slowly upward.

16 - Preparations
G
H
I
BCDEF
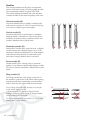
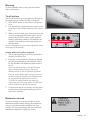
Needles
The sewing machine needle plays an important
role in successful sewing. Use only quality needles.
We recommend needles of system 130/705H.
The needle package included with your machine
contains needles of the most frequently used sizes.
Universal needle (B)
Universal Needles have a slightly rounded point
and come in a variety of sizes. For general sewing
in a variety of fabric types and weights.
Stretch needle (C)
Stretch Needles have a special scarf to eliminate
skipped stitches when there is a Á ex in the fabric.
For knits, swimwear, Á eece, synthetic suedes and
leathers. Marked with a yellow band.
Embroidery needle (D)
Embroidery Needles have a special scarf, a slightly
rounded point and a slightly larger eye to avoid
damage to thread and materials. Use with metallic
and other specialty threads for embroidery and
decorative sewing. Marked with a red band.
Denim needle (E)
Denim needles have a sharp point to penetrate
tightly woven fabrics without deÁ ecting the needle.
For canvas, denim, microÀ bers. Marked with a blue
band.
Wing needles (F)
The Wing Needle has wide wings on the side of
the needle to poke holes in the fabric when sewing
entredeux and other hemstitches on natural À ber
fabrics. Decrease the stitch width for best results.
Note: Change the needle often. Always use a straight
needle with a sharp point (G).
A damaged needle (H) can cause skipped stitches,
breakage or snapping of the thread. A damaged needle
can also damage the stitch plate.
Do not use asymmetrical twin needles (I), since it may
damage your sewing machine.

Preparations - 17
Changing the needle
1. Use the hole in the multi-purpose tool to hold
the needle.
2. Loosen the needle screw. Use the screw driver
if necessary.
3. Remove the needle.
4. Insert the new needle, using the multi-purpose
tool. Push the new needle upwards with the
Á at side away from you until it will go no
further.
5. Tighten the needle screw as tight as it will go.
Lowering feed dogs
You can lower the feed dogs by moving the switch
on the front of the sewing machine to the left.
Move the switch to the right if you wish to raise the
feed dogs.
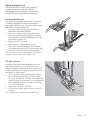
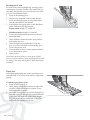
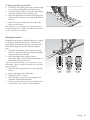
Changing the presser foot
Remove presser foot
Press the presser foot downwards until it
disengages from the presser foot holder.
Attach presser foot
Place the presser foot under the presser foot holder,
so that when the presser foot is lowered, the pins of
the foot engage in the presser foot holder.
Note: Check that the presser foot is properly attached by
raising the presser foot.

18 - Preparations
1
2
3
4
1
378 109 11 12 13
14 15 16 17
2
4
5
6
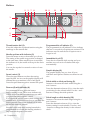
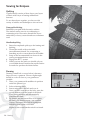
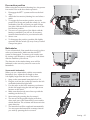
Buttons
Thread tension dial (1)
If needed, adjust the top thread tension using the
markings on the tension dial.
Needle up/down with indicator (2)
Press this button to move the needle up or down.
The set ting of the needle stop po si tion is changed
at the same time. When needle down is activated,
the indicator is lit, the needle will stop in the down
position.
You can also tap the foot control to raise or lower
the needle.
Speed control (3)
Press the speed button to reduce the sewing
speed by half. An icon on the graphic display will
indicate that your machine is set to half speed.
Press the speed button again to resume full speed.
Reverse (6) with indicator (4)
For permanent reverse, press the button
before starting to sew. The reverse indicator (4)
will be lit and the machine sews in reverse until
you press the button again to cancel.
If you press the reverse button while sewing, the
machine sews in reverse for as long as you keep the
button pressed. The reverse indicator is lit when
the reverse button is pressed.
Reverse is also used when sewing buttonholes,
programmed tie-off end and darning stitches to
step between the parts of the stitch.
Programmed tie-off indicator (5)
The programmed tie-off indicator is lit to indicate
that one or several tie-off options are activated. The
indicator stays lit until the tie-off options are no
longer in use.
Immediate tie-off (7)
Press the tie-off button while sewing and your
machine sews a few tie-off stitches and stops
automatically.
Graphic display (8)
The graphic display lets you view all your
selections and options. Stitches are shown in real
size.
Stitch width or stitch positioning (9)
Increase or decrease the stitch width using the +
and - buttons.
Press the alternatives button (11) to view the stitch
positioning for the selected stitch. Use the + and -
buttons to change the stitch position.
Stitch length or stitch density (10)
Increase or decrease the stitch length using the +
and - buttons.
Press the alternatives button (11) to view the
density setting for satin stitches. Use the + and
- buttons to change the density for the selected
stitch.

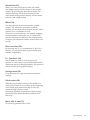
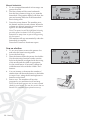
Preparations - 19
Alternatives (11)
When you select a decorative stitch, the width
and length settings will be shown on the graphic
display. By pressing the alternatives button, the
stitch positioning will be shown instead of the
stitch width setting and the density will be shown
instead of the length setting.
Wheel (12)
Use these buttons to move around the graphic
display. The wheel has up and down arrow
buttons, left and right arrow buttons and the wheel
center icon is a checkmark for OK.
They have several functions, for example stepping
between stitches, setting the size of a buttonhole
and moving between options in the settings menu.
ConÀ rm your selections with the wheel center icon
for OK.
Direct selection (13)
By pressing one of, or a combination of, the 0 to 9
buttons, you select the stitch represented by that
number immediately.
F1 - Function 1 (14)
The F1 button is used to activate the tie-off
options. It is also used to repeat buttonholes and to
deactivate repeat for darning stitches. All selections
will be shown on the graphic display.
Settings menu (15)
Press this button to open the menu for machine
settings.
Stitch restart (16)
When having stopped sewing in the middle of a
stitch, press restart to start sewing at the beginning
of the stitch again without having to reset any
special settings you have made.
If pressing the stitch restart button while sewing,
the stitch will be À nished and the machine will
then stop.
Mirror side to side (17)
For mirroring stitches side to side.

20 - Preparations
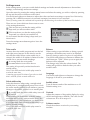
Settings menu
In the settings menu, you can override default settings and make manual adjustments to the machine
settings, sound settings and screen settings.
Open the menu by pressing the settings menu button and select the setting you wish to adjust by pressing
the up and down arrow buttons on the wheel.
Use the left and right arrow buttons to adjust the values and activate settings or open a list of choices by
pressing OK. A À lled box means it is activated, an empty box means it is not activated.
Note: If a setting cannot be combined with a previously selected setting, the outlines of that box will be dashed.
There are two icons which are shown next to some
of the setting alternatives.
This icon shows you that the setting will be
kept until you select another stitch.
This icon shows you that the setting will be
kept until you switch your machine off.
No icon means that this setting is kept until you
deactivate it.
Press the settings menu button again to leave the
settings menu.
Twin needle
Activate the twin needle program and use the left
and right arrow buttons on the wheel to set the
twin needle width. When a twin needle size is
selected, the width of all stitches is limited for that
needle size to prevent needle breakage.
In sewing mode the twin needle
recommendation icon will be shown.
The setting is kept until you deselect the twin
needle setting.
Note: Twin needle and stitch width safety cannot be
used at the same time.
A warning pop-up will be shown if you select a stitch
that is too wide for the set twin needle size.
Stitch width safety
Select this function when using a straight stitch
needle plate or a straight stitch presser foot to lock
the center needle position for all stitches to prevent
damage to the needle, presser foot or needle plate.
In sewing mode the stitch width safety icon will
be shown.
When turning on the machine with this setting
activated and for every stitch selection that is not
a straight stitch, a pop-up informs you that it is set
to straight stitch. Deselect stitch width safety to go
back to normal sewing.
Note: Twin needle and stitch width safety cannot be
used at the same time.
Balance
When sewing on special fabrics or doing a special
technique, the balance may need to be adjusted.
Start by sewing a stitch on a piece of scrap fabric.
Use the left and right arrow buttons to balance the
stitch between -7 and 7. When you sew again, the
balance will be adjusted.
The changes only affect the selected stitch. The
setting will go back to default when you select
another stitch.
Language
Use the left and right arrow buttons to change the
language of all text in your machine.
Audible alarm
Turn all alarm sounds of the machine on or off.
Default setting is on.
Contrast
Adjust the contrast of the graphic display by using
the left and right arrow buttons. The value can be
set between -20 to 20 in steps of 1.
Software version
Check the software version for your sewing
machine.
La page est en cours de chargement...
La page est en cours de chargement...
La page est en cours de chargement...
La page est en cours de chargement...
La page est en cours de chargement...
La page est en cours de chargement...
La page est en cours de chargement...
La page est en cours de chargement...
La page est en cours de chargement...
La page est en cours de chargement...
La page est en cours de chargement...
La page est en cours de chargement...
La page est en cours de chargement...
La page est en cours de chargement...
La page est en cours de chargement...
La page est en cours de chargement...
-
 1
1
-
 2
2
-
 3
3
-
 4
4
-
 5
5
-
 6
6
-
 7
7
-
 8
8
-
 9
9
-
 10
10
-
 11
11
-
 12
12
-
 13
13
-
 14
14
-
 15
15
-
 16
16
-
 17
17
-
 18
18
-
 19
19
-
 20
20
-
 21
21
-
 22
22
-
 23
23
-
 24
24
-
 25
25
-
 26
26
-
 27
27
-
 28
28
-
 29
29
-
 30
30
-
 31
31
-
 32
32
-
 33
33
-
 34
34
-
 35
35
-
 36
36


Pfaff expression 150 Le manuel du propriétaire
- Catégorie
- Machines à coudre
- Taper
- Le manuel du propriétaire
dans d''autres langues
- English: Pfaff expression 150 Owner's manual
Documents connexes
-
Pfaff creative vision 5.5 Le manuel du propriétaire
-
-
Pfaff select 150 Le manuel du propriétaire
-
-
Pfaff select 4.0 Le manuel du propriétaire
-
-
-
-
Pfaff powerquilter 1600 Mode d'emploi
-
Autres documents
-
Husqvarna H-CLASS 100Q Manuel utilisateur
-
IKEA Sewing Machine Manuel utilisateur
-
Viking Emerald 116 Manuel utilisateur
-
SINGER 7640 Le manuel du propriétaire
-
ELNA eXperience 620 Manuel utilisateur
-
SINGER 5560 Le manuel du propriétaire
-
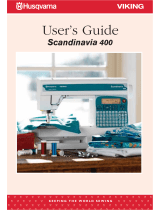 Husqvarna Viking Scandinavia 400 Manuel utilisateur
-
-
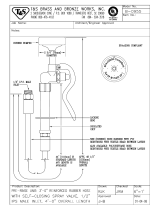 T & S Brass & Bronze Works B-0955 Fiche technique
-
 Silver Reed F-270 Le manuel du propriétaire


