Samsung VCC96P0H1G/XAA Le manuel du propriétaire
- Catégorie
- Aspirateurs
- Taper
- Le manuel du propriétaire

user m,,,,,a,nLI,,,,,8,,,,,,l,
the possibilities
Thank you for purchasing a Samsung product
To receive more complete service,
please register your product at
www.samsung.com/register

SAFETY INFORMATION
WARNING
• Before operating the appliance, please read this manual thoroughly and retain
it for your reference.
• Because the following operating instructions cover various models, the
characteristics of your vacuum cleaner may differ slightly from those
described inthis manual.
CAUTION/WARNING SYMBOLS USED
Indicates that a risk of death or serious injury exists.
WARNING
Indicates that a risk of personal injury or material damage exists.
CAUTION
OTHER SYMBOLS USED
Represents something you must NOT do.
Represents something you must follow.
Indicates that you must disconnect the power plug from the socket.
Z_ This vacuum cleaner is designed for domestic household use only. Do not use this
WARNINGvacuum cleaner to clear building waste or debris. Do not use this vacuum cleaner with
any of the filters removed as this could cause damage to the internal components and
void your warranty.
SAVE THESE INSTRUCTIONS
POLARIZED PLUG INSTRUCTIONS
- To reduce the risk of electric shock, this appliance has a polarized plug (one blade is wider than
the other). This plug will fit in a polarized outlet only one way. If the plug does not fit fully in the
outlet, reverse the plug. If it still does not fit, contact a qualified electrician to install the proper
outlet. Do not change the plug in any way.
02 safety information

safety nformaton
J
IMPORTANT SAFETY INSTRUCTIONS
When using an electrical appliance, you should always follow these basic precautions:
READ ALL INSTRUCTIONS BEFORE USING YOUR CANISTER VACCUM
WARNING -Toredocathor,sko,f,re,e,ectr,cshock,or,ojory"
1. Do not leave the appliance unattended when it is plugged in. Unplug from the outlet
when not in use and before servicing.
2. Do not use outdoors or on wet surfaces.
3. Do not allow the vacuum to be used as a toy. Pay close attention when the vacuum is
used by or near children.
4. Use only as described in this manual. Use only manufacturer's recommended
attachments.
5. Do not use with a damaged cord or plug. Ifthe appliance is not working as it should,
has been dropped, damaged, left outdoors, or dropped into water, bring it to a service
center.
6. Do not pull or carry by the cord, use the cord as a handle, close a door on the cord, or
pull the cord around sharp edges or corners. Do not run appliance over the cord.
Keep the cord away from heated surfaces.
7. Do not unplug by pulling on the cord. To unplug, grasp the plug, not the cord.
8. Do not handle the plug or appliance with wet hands.
9. Do not put any object into openings. Do not use with any opening blocked.
Keep free of dust, lint, hair,and anything that may reduce air flow.
10. Keep hair, loose clothing, fingers, and all parts of your body away from openings and
moving parts.
11. Turn off all controls before unplugging.
12. Use extra care when cleaning on stairs.
13. Do not use to pick up flammable or combustible liquids, such as gasoline, or use in
areas where they may be present.
14. Do not pick up anything that is burning or smoking, such as cigarettes, matches, or
hot ashes.
15. Do not use without the dirt cup and/or filters in place.
16. Do not use the vacuum cleaner in an enclosed space filled with vapors given off by oil
base paint, paint thinner, some moth proofing substances, flammable dust, or other
explosive or toxic materials.
17. Do not pick up hard or sharp objects such as glass, nails, screws, coins, etc.
18. The hose contains electrical wires. Do not use when damaged, cut, or punctured.
19. Always turn off this appliance before connecting or disconnecting either the hose or
motorized nozzle.
20. Unplug before connecting the motorized nozzle.
21. Hold the plug when rewinding onto the cord reel. Do not allow the plug to whip when
rewinding.
safety information 03

ASSEMBLING THE VACUUM 05 Assemblingthe vacuum
OPERATING THE VACUUM
06 Power cord
06 On/Off switch
07 Power control
08 Power Brush
MAINTAINING THE TOOLS AND
FILTERS
09 Using accessories
10 Maintaining floor tools
11 Emptying the dust bin
12 Cleaning the dust pack
14 Cleaning the outlet filter
14 Changing the battery
TROUBLESHOOTING
04 contents

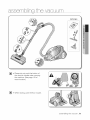
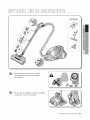
assemb nq the vac(A(Am
/
OPTIONS
............_j
/
o
o
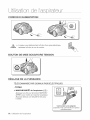
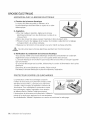
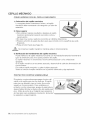
Please do not push the button of
the dust bin handle when carrying
the machine. (See page 12 for
exact location.)
When storing, park the floor nozzle.
assembling the vacuum 05

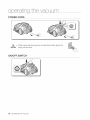
oDerat na the vac(](]m
i <_J
POWER CORD
Z_ • When removing the plug from an electrical outlet, grasp the
CAUTION plug, not the cord.
ON/OFF SWITCH
06 operating the vacuum

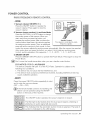
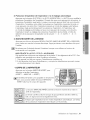
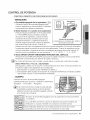
POWER CONTROL
RADIO FREQUENCY REMOTE-CONTROL
®
- HOSE
1. Vacuum cleaner ON/OFF( _ )
Press the ON/OFF button to operate the
vacuum cleaner. Press again to stop the
vacuum cleaner.
2. Vacuum cleaner suction(-/+} and Auto Mode
Pressthe SUCTION(-/+)AUTO button to change
the suction power of the vacuum. When you
start, each time you press the button, you
increasethe suction power. After you pressthe
suction button three times, the vacuum reaches
its maximum suction power. Then, an additional
presswill set the vacuum to Auto mode. InAuto
mode, the vacuum adjusts the suction power automatically. After the vacuum has reached
Auto mode, when you press the button, you return it to its minimum suction power.
Inshort, suction operates in this sequence: 1 - 2 - 3 -AUTO - 1 - 2 - 3 - AUTO, etc.
3. BRUSH ON/OFF
Press the BRUSH ON/OFF button to operate the Power Brush. Press again to stop the
Power Brush.
Don't cover the handle transmitter when you use a handle control button.
- BODY
Press the power ON/OFF button repeatedly to start
and to stop the vacuum cleaner.
(OFF_ ON _ OFF)
lf the remote handle control is not working, the
cleaner can be operated using the ON/OFF
button on the body of the machine.
...........................
ti;iiii!_!_!!!i;
_;iiiiii_O:i:il;_
_i i_iiil; i
|Iiii:iiiiiii :!ii !!i:im
//iii iiiiii: !iiiiii i ! !m
,-,ood,eCoo,,o,
........................!iequen°Ys!gna
FCC NOTICE / FCC ID : A3LROH20S
This device complies with part 15 of the FCC Rules. Operation is subject to the
following two conditions:
1. This device may not cause harmful interference, and
2. This device must accept any interference received, including interference that may
cause undesired operation.
f.
The ON/OFF button operates the vacuum cleanner or stops it.
The filter light is illuminated when the dust pack requires checking or
emptying. An audio signal will also sound.
This indicates that the automatic suction mode is selected. The level of
suction is indicated by the LED display.
operating the vacuum 07

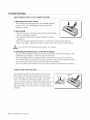
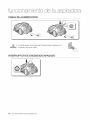
POWER BRUSH
VACUUMING WiTH THE POWER BRUSH
1. Attaching the Power Brush
The hose must be plugged into the canister and the
power brush must be plugged into the hose and
extension wand.
2. Vacuuming
• For best results, move the power brush slowly using
short, overlapping strokes.
For heavily soiled areas, repeat strokes in several
directions.
Push the height adjustment button to match the surface being cleaned.
Press the height adjustment button at the bottom of the wand until it clicks.
Z_ Do not invert the power brush while it is running.
CAUTION
3. Checking the Performance of the Power Brush
You can check whether the power brush isoperating correctly by lifting up the
extension tube slightly to view the back of the brush.
The Power Brush will not operate when it is jammed or the unit is turned off.
Ifthe Power Brush isjammed, unplug the power cord from the electrical outlet.
Turnthe power brush over and remove the jammed object.
Turnthe power brush back to the vacuuming position and resume vacuuming.
OVERLOAD PROTECTOR
The overload protector shuts off the brush motor
ifthe floor brush becomes obstructed. The floor
brush will stop, but the suction motor will continue
to run. To reset the overload protector, turn the
vacuum off and unplug it. Clear the obstruction from
the floor brush area. Use a pen tip to press down
the reset switch. Turn the vacuum on and continue
cleaning.
08 operating the vacuum

rnanta nnq the too s and
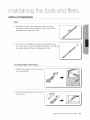
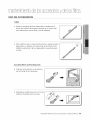
USING ACCESSORIES
PIPE
• Adjust the length of the telescopic pipe by sliding
the length control button located in the center of the
telescopic pipe back and forth.
Tocheck for blockages, separate the telescopic pipe
from the vacuum, and then adjust to shorten. This allows
for easier removal of waste clogging the tube.
ACCESSORIES (OPTIONAL)
Push the accessory onto the end of
the hose handle.
Pull out the dusting brush to use the
crevice tool.
maintaining the tools and filters 09

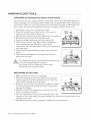
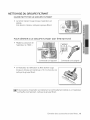
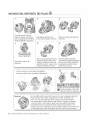
MAINTAIN FLOOR TOOLS
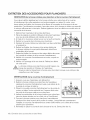
CHECKING the Rotating Floor Brush and Drive Belt
You should check your vacuum cleaner's rotating floor brush and drive belt regularly for
wear or damage. You should also clean strings, hair,and carpet fibers off the brush and
brush ends. These can wrap around the brush and hamper its ability to effectively clean
your carpet. Also remove any debris that has accumulated under the brush cover.
1. Unplug the vacuum from the electrical outlet.
2. Place the handle in low position and turn the vacuum
cleaner over so the bottom side is up.
3. Remove the six screws (at arrows, right) with a screwdriver.
4. Remove the brush cover from the floor brush.
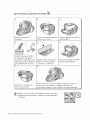
5. Grasp the rotating floor brush at both ends and lift.
6. Clean string, hair and other debris off the rotating floor
brush, paying particular attention to brush ends.
7. Clean string, hair and other debris off the motor pulley and
drive belt areas.
8. Check the drive belt carefully for wear, cuts or stressed
areas.
9. Check the air passageway for obstructions. Remove
debris from this area.
Z_ The rotating floor brush could cause the fringe of a rug
CAUTIONto become tangled within the vacuum.
Use caution and turn off the floor brush when
vacuuming throw rugs with fringe.
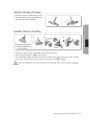
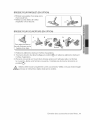
REPLACING the Drive Belt
1.
2.
3.
4.
5.
6.
Make sure that the vacuum is unplugged.
With the rotating floor brush removed from the vacuum
cleaner, grasp the old drive belt and remove it from the
motor pulley. Discard the old drive belt.
Place the new drive belt over the motor pulley and stretch
the other end over the rotating floor brush in the space
between the bristles.
Place the ends of the rotating floor brush down into the
slots on the sides as shown.
Turn the rotating floor brush by hand several times inthe ...._'........................
direction of the motor pulley. If properly installed, the drive belt will center itself on the
rotating brush crown.
Reposition the brush cover and screws. Tighten the screws securely.
10 maintaining the tools and filters

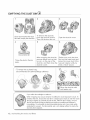
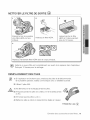
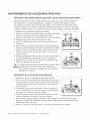
PARQUET BRUSH (OPTIONAL)
o Vacuums dust inawide area at once.
Removewaste matter completelyfrom
the inletif theinlet isblocked.
BLANKET BRUSH (OPTIONAL)
2
Turbine
For picking up pet hair
andfibre on upholstery
and bed linen.
1. Remove waste matter completely when inlet is blocked.
2. Turn the lock button to (i_), and remove.
3. To reassemble, align the cover to the front of the main body and close. After closing
the cover, ensure that the lock button isturned to the (I_ ) position.
z_ Use for bedclothes only. Be careful not to damage the brush during unclogging.
CAUTION
maintaining the tools and filters 11

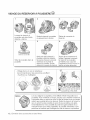
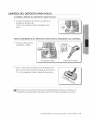
EMPTYING THE DUST BIN
1 2 3
Once dust reaches the dust
full mark, empty the dust bin.
Throw the dust inthe bin
away.
To remove the dust bin,
3ushthe dust bin button.
Then, lift the dust bin out.
5
After emptying the dust bin,
remove debris such as hair,
fur, etc. on the cap of the
dust bin, and then close the
dust bin cover.
Openthe dust bin cover
Before use, push the dust
bin into the main body and
press the cover dust of the
vacuum cleaner untilyou
hear a"click" sound.
- To empty into a plastic bag:
(recommended for asthma/allergy sufferers)
[_ inse the dust bin with
cold water only.
Ifyou suffer from allergies or asthma...
When emptying any vacuum cleaner, it is difficult to avoid exposure to dust. To
minimize this risk, encase the dust bin in a large bag to empty it, and then close
the bag as tightly as possible around the bin. After the bin is empty, remove
the bin and close the bag as tightly and quickly as possible and dispose it
immediately. It is advisable to wear disposable gloves and a face mask while
emptying the vacuum. If at all possible, ask a non allergy sufferer to empty the
dust bin when required.
12 maintaining the tools and filters

CLEANING THE DUST PACK
WHEN TO CLEAN THE DUST PACK
• The lamp will turn red when suction is reduced.
Ifthe light comes on, please clean the dust pack.
TO CONFIRM THE DUST PACK NEEDS CLEANING
Turn the vacuum power
to 'MAX'.
Body Control
HandleControl
Ifthe filter check indicator turns red with the inlet held
10cm (4 inches) above a flat floor, clean the dust pack.
_lf suction is and reduced the cleaner overheats
noticeably continuously
or vacuum
abnormally, please clean the dust pack.
maintaining the tools and filters 18

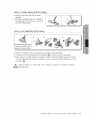
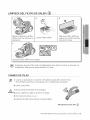
CLEANING THE DUST PACK
Takethe dust binout.
£
Shakethe sponge and
filter over agarbage can
to remove loosedust, then
wash the sponge andfilter of
the dust pack with water.
Closethe dust bin cover.
Pullthe dust pack cover to
open.
Removethe spongeand
filterfrom the dust pack.
Before use, push the dust bin into the main body of the
vacuum cleaner untilyou hear a "click" sound.
Make sure the filter is completely dry before putting it back
into the vacuum cleaner. Allow 12 hours for it to dry.
14 maintaining the tools and filters

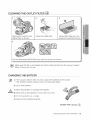
CLEANING THE OUTLET FILTER
Remove the dust bin and
HEPA Filter as shown.
Clean the HEPA Filter.
3
Let the HEPAFilterdry inthe
shade for more than12 hours.
4
Put the assembled HEPA Filter back into the vacuum as shown.
Make sure the filter is completely dry before putting it back into the vacuum cleaner.
Allow 12 hours for it to dry.
CHANGING THE BATTERY
1. Ifthe vacuum cleaner does not work, replace the batteries in the handle.
Ifthe problem persists, please contact an authorized dealer.
2. Use 2 AAA batteries.
,_ 1. Never disassemble or recharge the batteries.
WARNING2. Never heat up the batteries or throw them into afire.
3. Do not reverse the (+), (-) poles.
4. Dispose of the batteries property.
BATTERYTYPE : AAA Size
maintaining the tools and filters 15

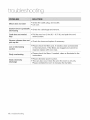
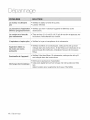
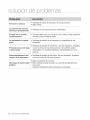
troLAb }qoot
Motor does not start
Suction force is gradually
decreasing
Cord does not rewind
fully
Vacuum cleaner does not
pick up dirt
Low or decreasing
suction
• Check the cable, plug, and socket.
Let cool.
• Check for a blockage and remove.
Pull the cord out 2-3m (6.5 - 9.75 ft.) and push the cord
rewind button.
Check the hose and replace if necessary.
• Please check the filters and, if needed, clean as illustrated
in the instructions. If the filters are clogged and cannot be
cleaned, replace with new ones.
• Please check the filters. If needed, clean as illustrated in the
Body overheating instructions.
• Please decrease power suction.
Static electricity • This can also occur when the air in the room is very dry.
discharge Please ventilate the room to increase the humidity.
1 troubleshooting

N_N_O


AcDir tour
Guide d' utii,isat,,,i,on
les possibiiites
Merci d'avoir choisi un produit Samsung
Afin de beneficier d'un service plus complet,
veuillez enregistrer votre produit _ I'adresse
www.samsung.com/register

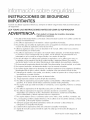
F en e'anernent re tfs seeLArte
LJ
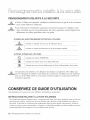
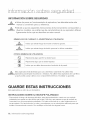
RENSEIGNEMENTS RELATIFS ,,_LA SC:CURITI:!:
• Avant d'utiliser cet appareil, veuillez lire attentivement ce guide et le conserver
AVERT_SSEMENTpour toute ref6rence ulterieure.
Z_ • Les instructions d'utilisation suivantes concernent plusieurs modeles; il est
AVERT_SSEMENTdonc possible que les caracteristiques de votre aspirateur soient legerement
differentes de celles specifi6es darts ce guide.
SYMBOLES AVERTISSEMENT/ATTENTION UTILISES
Indique un danger de mort ou de blessure grave.
AVERTISSEMENT
Indique un risque de blessure ou de dommage materiel.
ATTENTION
AUTRES SYMBOLES UTILISt_S
Indique une action INTERDITE.
Indique une action que vous devez effectuer.
Indique que vous devez d_brancher la fiche d'alimentation de la prise.
,/_ Cet aspirateur est destin_ 5,une utilisation domestique uniquement. Ne I'utilisez pas
AVERT_S'--'--_HEENTPour le nettoyage de salet_s ou de d_bris de construction. N'utilisez pas cet aspirateur
avec un de ses filtres retir_ car cela risque d'endommager les composants internes et
d'annuler la garantie.
CONSERVEZ CE GUIDE D'UTILISATION
Cet aspirateur est con% pour une utilisation domestique uniquement.
INSTRUCTIONS RELATIVE A LA FICHE POLARISC:E
- Pour limiter les risques d'electrocution, cet appareil est dote d'une fiche polarisee (une broche est
plus large que I'autre). Cette fiche ne peut s'inserer clans la prise murale polarisee que clans un
seul sens. Si la fiche ne s'enfonce pas entierement clans la prise murale, retournez-la. Si elle ne
s'enfonce toujours pas correctement, contactez un electricien qualifie pour faire installer une prise
murale adequate. Ne remplacez et ne modifiez jamais la fiche.
02 Renseignements rehtifs _ la s_Scurit6
La page charge ...
La page charge ...
La page charge ...
La page charge ...
La page charge ...
La page charge ...
La page charge ...
La page charge ...
La page charge ...
La page charge ...
La page charge ...
La page charge ...
La page charge ...
La page charge ...
La page charge ...
La page charge ...
La page charge ...
La page charge ...
La page charge ...
La page charge ...
La page charge ...
La page charge ...
La page charge ...
La page charge ...
La page charge ...
La page charge ...
La page charge ...
La page charge ...
La page charge ...
La page charge ...
La page charge ...
La page charge ...
La page charge ...
La page charge ...
La page charge ...
La page charge ...
-
 1
1
-
 2
2
-
 3
3
-
 4
4
-
 5
5
-
 6
6
-
 7
7
-
 8
8
-
 9
9
-
 10
10
-
 11
11
-
 12
12
-
 13
13
-
 14
14
-
 15
15
-
 16
16
-
 17
17
-
 18
18
-
 19
19
-
 20
20
-
 21
21
-
 22
22
-
 23
23
-
 24
24
-
 25
25
-
 26
26
-
 27
27
-
 28
28
-
 29
29
-
 30
30
-
 31
31
-
 32
32
-
 33
33
-
 34
34
-
 35
35
-
 36
36
-
 37
37
-
 38
38
-
 39
39
-
 40
40
-
 41
41
-
 42
42
-
 43
43
-
 44
44
-
 45
45
-
 46
46
-
 47
47
-
 48
48
-
 49
49
-
 50
50
-
 51
51
-
 52
52
-
 53
53
-
 54
54
-
 55
55
-
 56
56


Samsung VCC96P0H1G/XAA Le manuel du propriétaire
- Catégorie
- Aspirateurs
- Taper
- Le manuel du propriétaire
dans d''autres langues
Documents connexes
Autres documents
-
Electrolux EL6985A Important s Le manuel du propriétaire
-
Hoover U6453-900 Le manuel du propriétaire
-
-
 Euro-Pro Bagless Stick Shark EP601 HEPA Le manuel du propriétaire
-
Panasonic MC-V7722-00 Le manuel du propriétaire
-
Shark NV501 Le manuel du propriétaire
-
LumiSource TL25-FRINGE-AUW2 Assembly Instructions
-
-
Halo UV-ST Le manuel du propriétaire
-
