
Scientific Instruments Manufacturer GmbH
D-Oberhausen ● +49 (0)208/ 94 10 78-0 ● www.sim-gmbh.de
User Manual
SIM Sample Cooler
for Agilent 1220 Infinity II LC System

Scientific Instruments Manufacturer GmbH
D-Oberhausen ● +49 (0)208/ 94 10 78-0 ● www.sim-gmbh.de
2 User Manual SIM Sample Cooler_06/2018
Document History
Edition 06/2018
The information contained in this document is subject to change without notice.
SIM GmbH makes no warranty of any kind with regard to this material, including, but not
limited to, the implied warranties of merchantability and fitness for a particular purpose.
SIM GmbH shall not be liable for errors contained herein or for incidental or consequential
damages in connection with the furnishing, performance or use of this material.
Reproduction, adaptation, or translation without prior written permission is prohibited, except
as allowed under the copyright laws.
© Copyright 2018, SIM GmbH. Printed in Germany. All rights reserved.
NOTE
Read this instruction carefully prior to installation and/or use. Pay attention particularly to all
advises and safety instructions to prevent injuries. SIM GmbH shall not be liable for
misusing the product or unreliable function due to unauthorized modifications.

Scientific Instruments Manufacturer GmbH
D-Oberhausen ● +49 (0)208/ 94 10 78-0 ● www.sim-gmbh.de
User Manual SIM Sample Cooler_06/2018 3
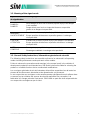
CONTENT
1. SAFETY INSTRUCTIONS 4
1.1. Warnings 4
1.2. Meaning of the signal words 5
1.3. General Safety Instructions/ Informations générales de sécurité 5
2. SCOPE OF DELIVERY 8
2.1. LC 1220 90 40/ LC 1220 90 60/ LC 1220 94 60 8
2.2. OPT021 Driver for OpenLAB CDS ChemStation 8
2.3. OPT022 Driver for OpenLAB CDS EZChrom 8
2.4. OPT023 Standalone-Software 8
2.5. OPT024 Driver for OpenLAB CDS 2.x 9
3. SITE REQUIREMENTS 9
4. MODE OF OPERATION 10
5. INITIAL OPERATION 11
5.1. Connections 11
5.2. Software Installation 12
5.3. Set-Up and configuration for OpenLAB ChemStation/ EZChrom (OPT021/022/024) 12
5.3.1. Software settings for OPT021/022/024 (OpenLAB CDS ChemStation/EZChrom/2.x) 19
5.3.2. Installation of the Standalone Software (OPT023) 20
5.3.3. Software settings for OPT023 (Standalone Software) 22
6. START OF THE SYSTEM 24
6.1. Start of the cooling module 24
6.2. Installation of the Sample Tray 24
6.3. Water level check 24
6.4. Setting of Parameters for the Sample Tray Cooling 24
7. MAINTENANCE 25
7.1. Cleaning the module 26
7.2. Water level 26
8. TROUBLESHOOTING 28
9. TECHNICAL DATA 29

Scientific Instruments Manufacturer GmbH
D-Oberhausen ● +49 (0)208/ 94 10 78-0 ● www.sim-gmbh.de
4 User Manual SIM Sample Cooler_06/2018
1. SAFETY INSTRUCTIONS
NOTE
The cooling module for the Agilent 1220 Infinity II LC system has to be mounted, started-up
and serviced by fully trained and qualified personnel only, taking into consideration the
generally recognized standard rules of technology.
It has to be ensured that employees or third persons are not exposed to any danger.
All safety instructions and warnings in this manual, particularly those concerning installation,
start-up, and maintenance must be strictly observed.
(1) Unpack the module and ensure that all parts and materials listed on the attached packing
list have been delivered. In case of transport damage please inform the transport
company immediately.
(2) Check all relevant safety regulations and technical indications for the specific installation
place with reference to the “User Manual of the Agilent 1220 Infinity II LC System”
(G4280-90016).
(3) Prevent errors and protect persons against injuries and the device against damage.
(4) Make sure that the ventilation slots of the module are not covered and sufficient
ventilation is provided (additional 10 cm (3.9 in) space to the side and in the rear).
(5) Periodically remove dust from the ventilation slots to prevent overheating of the system.
1.1. Warnings
The warnings in this manual are highlighted with pictograms and signal words:
Les avertissements de ce manual sont mis en evidence par des pictogrammes et des mots
de signalisation:
The pictogram and the signal word indicate the level of danger.
Le pictogramme et le mot de signalisation indiquent le niveau de danger.
The warnings that precede each action are depicted as follows:
Les avertissements qui précèdent chaque action sont représentés comme suit:
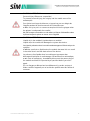
DANGER/WARNING
DANGER/ AVERTISSEMENT
Type and source of danger
Type et source de danger
Explanation of the type and source of danger
Explication du type et de la source du danger.
Measures to avert the danger
Mesures pour éviter le danger

Scientific Instruments Manufacturer GmbH
D-Oberhausen ● +49 (0)208/ 94 10 78-0 ● www.sim-gmbh.de
User Manual SIM Sample Cooler_06/2018 5
1.2. Meaning of the signal words
Signal word/ Mot
de signalisation
Meaning/ Signification
DANGER/
DANGER
Direct danger to life or risk of severe physical injury if this danger
is not avoided.
Danger direct pour la vie ou risque de blessures corporelles
graves si ce danger n’est pas évité.
WARNING/
AVERTISSEMENT
Possible risk of severe physical injury if this danger is not avoided.
Risque possible de blessures corporelles graves si ce danger
n’est pas évité.
CAUTION/
ATTENTION
Possible risk of minor physical injury if this danger is not avoided.
Risque possible de blessures corporelles mineures si ce danger
n’est pas évité.
NOTE/
CONSEILS
Damage to property if this danger is not avoided.
Dommages matériels si ce danger n’est pas évité.
1.3. General Safety Instructions/ Informations générales de sécurité
The following safety instructions are essential and have to be observed in all operating
modes including maintenance and repair work of the module.
Failure to observe the precautions and warnings in the manual result in the violation of
development production and intended use. SIM GmbH shall not be liable for misusing the
product or unreliable function due to unauthorized modifications.
Les consignes générales de sécurité suivantes doivent être respectées lors de toutes les
phases de fonctionnement, d'entretien et de réparation de cet instrument.
Le non-respect de ces consignes ou des avertissements spécifiques énoncés ailleurs dans
ce manuel, est en violation des normes de sécurité applicable à la conception, à la
fabrication et à l'usage prévu de l'instrument. SIM GmbH ne peut être tenu responsable du
non-respect de ces exigences par le client.

Scientific Instruments Manufacturer GmbH
D-Oberhausen ● +49 (0)208/ 94 10 78-0 ● www.sim-gmbh.de
6 User Manual SIM Sample Cooler_06/2018
DANGER/ DANGER
Dangerous Voltage! Tension électrique dangereuse!
If the covers are attached correctly, no contact with dangerous tension
is possible. Never remove the cover!
Lorsque les capots sont fixés correctement, n’y a pas de contact avec
tension dangereuse est possible.N'ouvrez jamais le capot de
l’instrument!
It is not allowed to insert objects into the housing.
Ne jamais introduire d'objets non prévus à cet effet dans les
ouvertures du boîtier
Module is partially energized when switched off, as long as power cord
is plugged in.
L'alimentation continue à utiliser un peu d'électricité, même si
l'interrupteur du panneau avant est en position d'arrêt (OFF).
Repair work at the module can lead to personal injuries, e.g. shock
hazard, when the module cover is opened and the instrument is
connected to power.
Les travaux de réparation sur le module peuvent entraîner des
blessures, par ex. des électrocutions, lorsque le capot du module est
ouvert et que l'instrument est branché au secteur.
Provide sufficient space next to the power socket of the instrument
to allow the cable to be unplugged.
Prévoyez un espace suffisamment important à proximité de la prise
d'alimentation pour que le câble puisse être débranché.
Unplug the power cord before opening the module.
Débranchez le câble d’alimentation de l’instrument avant d’ouvrir le
capot de l’instrument.
WARNING/ AVERTISSEMENT
Sharp Metal Edges! Arêtes métalliques tranchantes!
Sharp-edged parts of the equipment may cause injuries.
Les composants de l'instrument dotées d'arêtes tranchantes peuvent
occasionner des blessures.
In order to prevent personal injury, be careful when getting in
contact with sharp metal areas.
Afin d'éviter de vous blesser, prenez garde aux arêtes métalliques
tranchantes.

Scientific Instruments Manufacturer GmbH
D-Oberhausen ● +49 (0)208/ 94 10 78-0 ● www.sim-gmbh.de
User Manual SIM Sample Cooler_06/2018 7
CAUTION/ ATTENTION
Personal Injury! Blessures corporelles!
To prevent personal injury, do not grip into the needle area of the
autosampler.
Pour éviter tout risque de blessure, n'approchez pas vos doigts de
l'aiguille pendant le fonctionnement de l'échantillonneur.
Do not try to put in or remove a sample vial into the gripper when
the gripper is underneath the needle!
Ne pas essayer d’introduire ou de retirer un flacon d’échantillon dans
la pince lorsque la pince se trouve sous l’aiguille!
CAUTION/ ATTENTION
Liquids at/ in the module!/ Liquides dans ce module!
Liquids at/in the module will damage the system electronics.
Les liquids présents dans le module endommageront l’électronique du
système.
Make sure that no liquid enters the module because this can result
in electrical shock and the destruction of the device.
La présence d'un liquide dans le module peut provoquer des
décharges électriques et endommager l'échantillonneur automatique.
In case of emergency, immediately disconnect the power plug of
the module and have it inspected by a specialist before you use it
again.
En cas d'urgence débranchez immédiatement le cordon secteur et
faites contrôler l'appareil par un technicien qualifié avant de l'utiliser à
nouveau.

Scientific Instruments Manufacturer GmbH
D-Oberhausen ● +49 (0)208/ 94 10 78-0 ● www.sim-gmbh.de
8 User Manual SIM Sample Cooler_06/2018
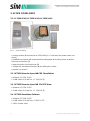
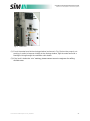
2. SCOPE OF DELIVERY
2.1. LC 1220 90 40/ LC 1220 90 60/ LC 1220 94 60
cooling module (1) mounted at an 1220 Infinity II LC side wall, with power cable (not
shown)
modified tray-support with preassembled cooling plate and cooling hoses as well as
electrical connections (2)
edge protection and fixing screw (3)
syringe with threaded connection (4) for refilling the coolant
manual (not shown)
2.2. OPT021 Driver for OpenLABCDS ChemStation
software (LC 1220 10 21)
2 LAN cables (0.2 and 2m , LC 1220 10 75)
2.3. OPT022 Driver for OpenLAB CDS EZChrom
software (LC 1220 10 22)
2 LAN cables (0.2 and 2m , LC 1220 10 75)
2.4. OPT023 Standalone-Software
software (LC 1220 10 23)
2 LAN cables (0.2 and 2m, LC 1220 10 75)
1 APG remote cable
Fig. 1 Scope of delivery

Scientific Instruments Manufacturer GmbH
D-Oberhausen ● +49 (0)208/ 94 10 78-0 ● www.sim-gmbh.de
User Manual SIM Sample Cooler_06/2018 9
2.5. OPT024 Driver for OpenLAB CDS 2.x
Software (LC 1220 10 24)
2 LAN cables (0.25 m and 2.0 m, LC 1220 10 75)
3. SITE REQUIREMENTS
DANGER/ DANGER
Absence of ground connection or use of unspecified power cord!
Absence de raccordement à la terre et utilisation d'un câble d'alimentation
non adapté!
The absence of ground connection or the use of an unspecified power cord
can lead to electric shock or short circuit.
L'absence de mise à la terre ou l'utilisation d'un câble d'alimentation non
recommandé peuvent entraîner des chocs électriques ou des courts-
circuits.
Never connect the device to a voltage source without ground
connection.
N'utilisez jamais votre instrument avec une prise de courant sans mise à la
terre.
Never use cables other than the ones supplied by SIM and Agilent
Technologies to ensure proper functionality and compliance with safety or
EMS regulations.
N'utilisez jamais de câble d'alimentation autre que le modèle SIM et Agilent
Technologies destiné à votre pays.
NOTE
In case of emergency it must be possible to disconnect the instrument from the power line
any time.
Make sure that there is easy access to the power cable of the instrument so that the
instrument can quickly and easily be disconnected from the line voltage.
Power considerations
Power supply:
The power supply has wide ranging capabilities so that there is no voltage selector at the
instrument. The fuse (T 3.15 A / 250 VAC) is accessible from the outside.
Power cord:
Different power cords are offered as options with the system. The female ends of all power
cords are identical. The female end plugs into the power-input socket at the rear of the
cooling module. The male end of each power cord is different and designed to match the wall
socket of a particular country or region.

Scientific Instruments Manufacturer GmbH
D-Oberhausen ● +49 (0)208/ 94 10 78-0 ● www.sim-gmbh.de
10 User Manual SIM Sample Cooler_06/2018
Bench space
If using the cooling module together with the Agilent 1220 Infinity II LC System, the LC
system needs an additional 15 cm of space on the left side (view from the front).
Moreover, the module needs approximately 10 cm (3.9 in) at the rear and the left side for air
circulation.
Environment
NOTE
Condensation within the module can damage the system electronics in case of improper
use or storage!
Of the cooling module was shipped in cold weather, leave it in its box and allow it to warm
slowly to room temperature to avoid condensation.
The cooling module will work within specifications at ambient temperatures and relative
humidity as described in chapter 9 (see Tab. 4)
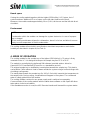
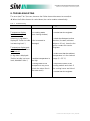
4. MODE OF OPERATION
The cooling module for the sample tray of the Agilent 1220 Infinity II LC System is firmly
mounted on the LC. It is designed to temper the sample tray from 5 ⁰C to 40 ⁰C.
The module is controlled by the delivered SIM software (possible options: driver for
OpenLAB CDS ChemStation/EZChrom/2.x or a standalone version).
The original sample tray is modified by a metal plate beneath the sample tray. This plate is
cooled with a Peltier element. Heat is drawn outside the system using a heat exchanger with
circulating cooling water.
The metal plate beneath the sample tray (for 100 x 1.8 ml vials) transmits the temperature to
the sample vials. During cooling, condensation will appear in the system. The condensed
water is safely guided out of the module.
The cooling module contains its own power supply and is switched on separately.
Communication of the cooling module with the stand-alone software or the OpenLAB driver
takes place via the local network.
If the standalone version is used, the APG Remote interface will transmit the system status.

Scientific Instruments Manufacturer GmbH
D-Oberhausen ● +49 (0)208/ 94 10 78-0 ● www.sim-gmbh.de
User Manual SIM Sample Cooler_06/2018 11
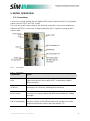
5. INITIAL OPERATION
5.1. Connections
Connect the cooling module with the Agilent 1220 Infinity System and the PC using patch
cables (see also Fig. 2 and Tab. 1 LAN).
Then use the power supply cable for the electrical connection. If you use a stand-alone
software (OPT023), connect the cooling module with the LC system by using the APG
remote cable.
Fig. 2 Connections
Tab. 1 Connections
Connection
Action
LAN
connect the cooling module through LAN with the LC system
(upper LAN port) as well as with the PC or laboratory network
(lower LAN port)
USB Port
currently not in function, developed for future use
APG Remote
combined with the stand-alone software this port is used for
connection of cooling module and APG remote cable (for “Ready”
message)
Inlet Cooling Water
For trained personnel only!
Use the syringe to fill/ refill the water tank and then lock it with
the blind plug and the security bar (see chapter 7.2)

Scientific Instruments Manufacturer GmbH
D-Oberhausen ● +49 (0)208/ 94 10 78-0 ● www.sim-gmbh.de
12 User Manual SIM Sample Cooler_06/2018
Connection
Action
Viewing Window
the water level should be within the min/max marking when the
pump is not working (possibly use a torch)
5.2. Software Installation
(1) Finalize the installation of the Agilent 1220 Infinity system with performing a checkout run
(User Manual G4280-90016, chapter 3).
(2) Then install the software file setup_SIMPeltierDriver_Vxxx.exe (for using OpenLAB
CDS ChemStation/EZChrom/2.x, see chapter 5.3.1) or setup_SIM_LC1220_Vxxx.exe
(for using stand-alone version, see chapter 5.3.2) on the PC.
The cooling module is set to a default fixed IP address – 192.168.254.99 (Class C
network with a subnet mask of 255.255.255.0). You can communicate with the device as
long as no DHCP server assigns another IP address to the module.
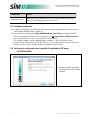
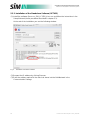
5.3. Set-Up and configuration for OpenLAB ChemStation/ EZChrom
(OPT021/022/024)
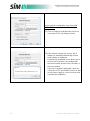
(1) Start the exe.file and follow
the instructions of the Setup
Wizard.

Scientific Instruments Manufacturer GmbH
D-Oberhausen ● +49 (0)208/ 94 10 78-0 ● www.sim-gmbh.de
User Manual SIM Sample Cooler_06/2018 13

Scientific Instruments Manufacturer GmbH
D-Oberhausen ● +49 (0)208/ 94 10 78-0 ● www.sim-gmbh.de
14 User Manual SIM Sample Cooler_06/2018
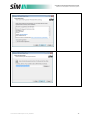
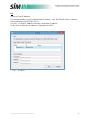
(2) When the installation is
finished, start your
Chromatographic data
system and note the
differences between
ChemStation edition and
EZChrom edition.

Scientific Instruments Manufacturer GmbH
D-Oberhausen ● +49 (0)208/ 94 10 78-0 ● www.sim-gmbh.de
User Manual SIM Sample Cooler_06/2018 15
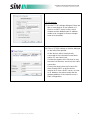
Configuration of the Sample
Cooler (ChemStation edition):
(3) At the instrument
configuration screen select
the SIM Sample Cooler and
add this module using the
Arrow button.
With a click on the button
Configure the device
specific configuration
dialogue is opened.
Configuration of the Sample
Cooler (EZChrom and 2.x
edition):
(4) At the instrument
configuration screen select
the SIM Sample Cooler and
add this module using the
Arrow button.
Double click the entry on the
right side or right click and
choose Open to enter the
device specific configuration
dialogue.

Scientific Instruments Manufacturer GmbH
D-Oberhausen ● +49 (0)208/ 94 10 78-0 ● www.sim-gmbh.de
16 User Manual SIM Sample Cooler_06/2018
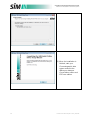
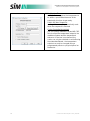
Device specific configuration (any OpenLAB
CDS edition):
(5) Click on Request Serial Number to test the
connection of PC and Sample Cooler.
(6) If the network settings are correct, the IP
address is obtained automatically and the
serial number is displayed.
Complete the installation of the driver with a
click on the OK button in the window with
the serial number and then the OK button in
the main window.
If an error message is displayed, check the
connection of PC and Sample Cooler as well
as the power supply to correct this error and
complete the installation.

Scientific Instruments Manufacturer GmbH
D-Oberhausen ● +49 (0)208/ 94 10 78-0 ● www.sim-gmbh.de
User Manual SIM Sample Cooler_06/2018 17
TCP/IP settings:
(7) Use the TCP/IP settings dialogue if there are
two or more devices in the network or if
there is no DHCP server in the current
network and the default static IP address
needs to be changed (or former changes
have to be reverted).
(8) Click on TCP/IP settings so that the dialogue
on the left will be opened:
All the devices which are physically
connected to the instrument server/ work-
station PC are shown here.
If no device appears click Discover to retry
the search for devices, and check the cable
connection.
Choose the device from the list and click
either Enable DHCP to let the device
retrieve its IP from a DHCP server, or enter
an IP address, the subnet mask and the
gateway address of the network to use a
static configuration.

Scientific Instruments Manufacturer GmbH
D-Oberhausen ● +49 (0)208/ 94 10 78-0 ● www.sim-gmbh.de
18 User Manual SIM Sample Cooler_06/2018
(9) Equilibration Time:
the SIM Cooler requires the temperature to
be within a specifiable tolerance of the
setpoint for this time to get ready.
Switch Off after Sequence:
cooling of the samples automatically ends
when the sequence is finished.
Cooler Controlled by method:
you can specify methods in OpenLAB CDS
which control the temperature setpoint, the
readiness feature and the temperature
tolerance. If the box is unchecked, the
cooler can only be switched on and off using
the status dashboard - the temperature
setpoint can only be changed using a
programmed preset or a physical panel on
the device.

Scientific Instruments Manufacturer GmbH
D-Oberhausen ● +49 (0)208/ 94 10 78-0 ● www.sim-gmbh.de
User Manual SIM Sample Cooler_06/2018 19
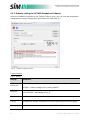
5.3.1. Software settings for OPT021/022/024 (OpenLAB CDS
ChemStation/EZChrom/2.x)
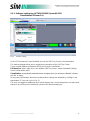
Fig. 3 Software settings
In the CDS Instrument Control Window you see the SIM Tray Cooler in the dashboard.
The method settings allow you to customize the behavior of the SIM Tray Cooler.
There are little differences between EZChrom/2.x and ChemStation:
EZChrom/2.x: after a right click in the window SIM Tray Cooler, select Download Settings
from the drop-down menu.
ChemStation: automatically transmits these changes when you close the “Method” window
with OK or Apply.
All necessary information about this module and its settings are obtained by clicking on the
help button “?” (see red circle in Fig. 3).
The user can toggle an additional pane which displays the current temperature, set point and
tolerance by clicking on the Maximize symbol of the dashboard plug-in.

Scientific Instruments Manufacturer GmbH
D-Oberhausen ● +49 (0)208/ 94 10 78-0 ● www.sim-gmbh.de
20 User Manual SIM Sample Cooler_06/2018
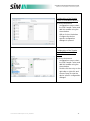
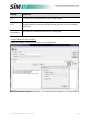
5.3.2. Installation of the Standalone Software (OPT023)
(1) Install the software file SETUP_SIM_LC1220_VXXX.EXE and follow the instructions in the
Setup Wizzard (similar procedure described in chapter 5.3).
At the end of the installation you see the following window:
Fig. 4 Installation standalone software
(2) Request the IP address by clicking Discover.
(3) Enter the address marked in the red circle above into the field Network in the
Communication Settings.
La page est en cours de chargement...
La page est en cours de chargement...
La page est en cours de chargement...
La page est en cours de chargement...
La page est en cours de chargement...
La page est en cours de chargement...
La page est en cours de chargement...
La page est en cours de chargement...
La page est en cours de chargement...
-
 1
1
-
 2
2
-
 3
3
-
 4
4
-
 5
5
-
 6
6
-
 7
7
-
 8
8
-
 9
9
-
 10
10
-
 11
11
-
 12
12
-
 13
13
-
 14
14
-
 15
15
-
 16
16
-
 17
17
-
 18
18
-
 19
19
-
 20
20
-
 21
21
-
 22
22
-
 23
23
-
 24
24
-
 25
25
-
 26
26
-
 27
27
-
 28
28
-
 29
29


Agilent Technologies LC 1220 90 40 Manuel utilisateur
- Taper
- Manuel utilisateur
- Ce manuel convient également à
dans d''autres langues
Documents connexes
Autres documents
-
Appro Dionex UltiMate 3000 Series Mode d'emploi
-
Infinity MOOG-INFORNG Small Volume Enteral Feeding Pump Manuel utilisateur
-
Mettler Toledo SevenExcellence™ Manuel utilisateur
-
 TA Instruments ARES-G2 Getting Started Manual
-
Inseego AT&T Global Modem USB800 Manuel utilisateur
-
Meyer Sound MJF-212ATM Manuel utilisateur
-
 Hach FL900 Series Basic User Manual
-
Edirol AudioCapture UA-700 Le manuel du propriétaire
-
Yamaha XF6 Le manuel du propriétaire
-
 Winmate M101P-ME Manuel utilisateur


