EarthWise SN74014 Le manuel du propriétaire
- Catégorie
- Tondeuses à gazon
- Taper
- Le manuel du propriétaire

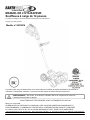
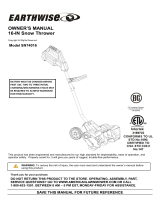
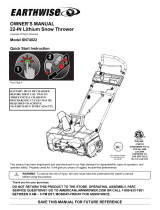
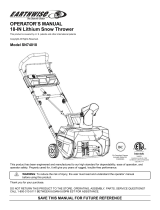
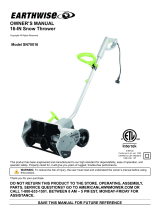
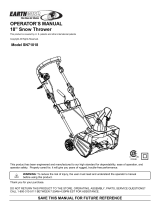
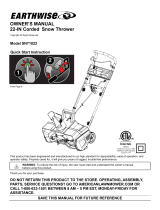
Model SN74014
OPERATOR’S MANUAL
14-IN Snow Thrower
This product is covered by U. S. patents and other international patents
Copyright All Rights Reserved.
Thank you for your purchase.
DO NOT RETURN THIS PRODUCT TO THE STORE. OPERATING, ASSEMBLY, PARTS, SERVICE QUESTIONS?
CALL 1-800-313-5111 BETWEEN 7:30AM-4:30PM EST FOR ASSISTANCE.
SAVE THIS MANUAL FOR FUTURE REFERENCE
This product has been engineered and manufactured to our high standard for dependability, ease of operation, and
operator safety. Properly cared for, it will give you years of rugged, trouble-free performance.
WARNING: To reduce the risk of injury, the user must read and understand the operator’s manual
before using this product.
BATTERY MUST BE CHARGED BEFORE FIRST USE.
1090

Precautions that involve your safety.
CAUTION! Read the instruction manual and follow the warning and safety instructions!
CAUTION! Remove plug from outlet immediately if the cable is damaged or cut.
CAUTION! Always wear eye and ear protection.
Wear safe, sturdy, nonskid footwear!
DANGER! objects may be thrown out at high speed when motor is running. Do not walk in front of running
machine.
Keep bystanders at a safe distance.
DANGER! Rotating blades. Keep hands and feet at a safe distance.
Do not place hand under auger.
Do not place hand in front of chute deflector.
Do not place feet under auger.
DANGER! Risk of electric shock.
Do not use in rain or electrical storms.
Waste electrical products should not be disposed of with household waste. Please recycle
where facilities exist. Check with your Local Authority or retailer for recycling advice.
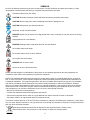
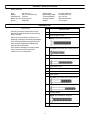
SYMBOLS
Some of the following symbols may be used on this product. Please study them and learn their meaning. Proper
interpretation of these symbols will allow you to operate the product better and safer.
2
Please note that changes or modifications of this product is not expressly approved by the party responsible for
compliance could void the user's authority to operate the equipment.
NOTE: This equipment has been tested and found to comply with the limits for a Class B digital device, pursuant to
Part 15 of the FCC Rules. These limits are designed to provide reasonable protection against harmful interference in
a residential installation. This equipment generates, uses and can radiate radio frequency energy and, if not installed
and used in accordance with the instructions, may cause harmful interference to radio communications. However,
there is no guarantee that interference will not occur in a particular installation. If this equipment does cause harmful
interference to radio or television reception, which can be determined by turning the equipment off and on, the user
is encouraged to try to correct the interference by one or more of the following measures:
-- Reorient or relocate the receiving antenna.
-- Increase the separation between the equipment and receiver.
-- Connect the equipment into an outlet on a circuit different from that to which the receiver is connected.
-- Consult the dealer or an experienced radio/TV technician for help.
This device complies with Part 15 of the FCC Rules. Operation is subject to the following two conditions: (1) this device
may not cause harmful interference, and (2) this device must accept any interference received, including interference
that may cause undesired operation.

TO REDUCE RISK OF INJURY: Before any use
be sure everyone using this product reads and
understands all safety instructions and other
information contained in this manual.
CAUTION: Wear appropriate personal hearing
protection during use. Under some conditions
and duration of use, noise from this product may
contribute to hearing loss.
Save these instructions and review frequently prior
to use and in instructing others.
WARNING: When using electric appliances, basic
safety precautions should always be followed to
reduce risk of fire, electric shock, and personal
injury, including the following:
READ ALL INSTRUCTIONS
CHECK FOR DAMAGED PARTS - Before further
use of the product, any part that is damaged should
be carefully checked to determine that it will operate
properly and perform its intended function. Check
for alignment of moving parts, binding of moving
parts, breakage of parts, mounting and any other
condition that may affect its operation. Any part that
is damaged should be properly repaired or replaced.
For assistance call our customer service help line at
1-800-313-5111.
AVOID DANGEROUS ENVIRONMENTS - Don’t
use this product in rainy or stormy conditions. Do
not operate in gaseous or explosive atmospheres.
Motors in these products normally spark, and the
sparks might ignite fumes.
KEEP CHILDREN AWAY - All visitors, children and
pets should stay at a safe distance from the work
area.
DRESS PROPERLY- Don’t wear loose clothing or
jewelry and wear protective hair covering to contain
long hair. They can be caught in moving parts.
Wear rubber boots when operating the snow
thrower. Maintain good footing at all times,
especially on slopes.
USE SAFETY GLASSES - Wear safety glasses
with side shields or goggles that are marked to
comply with ANSI Z87.1 standard when operating
this product.
WARNING: Keep hands away from moving parts.
Never put your hands near the auger to remove
snow, sticks or other debris. Blocked auger can
“spring back” when cleared and may cause personal
injury even when the snow thrower is stopped.
Always use a wooden stick such as a broom handle
to clear blockages.
REMOVE THE BATTERY from the snow thrower
when not in use or when servicing or cleaning. Do
not leave unattended.
USE RIGHT APPLIANCE - Do not use this product
for any job except that for which it is intended.
Avoid Accidental Starting—Don’t carry snow thrower
with finger on switch when the battery is installed.
Be sure switch is off when installing battery.
DO NOT FORCE SNOW THROWER - It will
perform better and safer at the rate for which it
was designed.
DON’T OVERREACH - Guide the snow thrower at a
walking pace only. Keep proper footing and balance
at all times.
LIGHTING - Only operate your snow thrower in
daylight or good artificial light.
STORE IDLE UNIT INDOORS-When not in use, the
snow thrower should be stored indoors in a dry area
out of children’s reach.
MAINTAIN UNIT WITH CARE-Keep clean for best
performance and to reduce the risk of injury. Inspect
extension cord periodically and replace if damaged.
Keep handles dry, clean and free from oil.
Do not operate the snow thrower on a slope that is
too steep for safe operation. When on slopes, slow
down and make sure you have good footing.
Before starting the snow thrower make sure the
auger is not touching any object and is free to move.
Do not use on graveled surface unless the snow
thrower is adjusted for such a surface in accordance
with the operator’s manual.
Operation of the show thrower in the hand-held
position is unsafe, except in accordance with the
special instructions for such use provided in the
operator’s manual.
CAUTION: Never throw snow towards people, pets
or cars and never allow anyone in front of the snow
thrower while in operation.
Objects that might clog the snow thrower or cause
other damage can be hidden in the snow. Clear the
area of doormats, sleds, boards, wires and other
debris prior to use.
If the auger strikes a foreign body, examine the
snow thrower for signs of damage and make any
necessary repairs before restarting and continuing
to work.
STAY ALERT - Watch what you are doing. Use
common sense. Do not operate the snow thrower
when you are tired or under the influence of drugs,
alcohol or medications.
IMPORTANT SAFETY WARNINGS
GENERAL SAFETY
3

CAUTION: Auger does not stop immediately after
the snow thrower is turned off.
CAUTION: Risk of injury. Do not put hands, feet or
any body part or clothing near the rotating auger.
WARNING: California Proposition 65:
This product contains chemicals known to the State
of California to cause cancer, birth defects or other
reproductive harm.
Make sure cord is located so that it will not be
stepped on, tripped over, come in contact with
sharp edges or moving parts or otherwise
subjected to damage or stress. This will reduce
the risk of accidental falls, which could cause
injury and damage to the cord, which could
result in electric shock.
Keep cord and charger away from heat to prevent
damage to housing or internal parts.
Do not let gasoline, oils, petroleum-based products,
etc. come in contact with plastic parts. They
contain chemicals that can damage, weaken or
destroy plastic.
An extension cord should not be used unless
absolutely necessary. Use of improper extension
cord could result in a risk of fire and electric shock.
If extension cord must be used, make sure:
a. That pins on plug of extension cord are the
same number, size and shape as those of plug
on charger
b. That extension cord is properly wired and in
good condition; and
c. That wire size is large enough for AC ampere
rating of charger as specified below:
Cord length (Feet) - 25’ 50’ 100’
Cord Size (AWG) - 16 16 16
NOTE: AWG= American Wire Gauge
Save these instructions. Refer to them frequently
and use them to instruct others who may use this
product. If you loan someone this snow thrower,
loan them these instructions also.
WARNING: Keep all connections dry and off the
ground. Do not touch plug with wet hands.
If the snow thrower starts to vibrate abnormally,
turn it off immediately and check for the cause.
Vibration is generally a warning of trouble.
Always turn off the snow thrower, remove the
battery from the snow thrower and wait until the
auger comes to a complete stop before carrying
out maintenance or repairs.
Do not abuse the cord. Never use the cord for
carrying, pulling or unplugging the power tool. Keep
cord away from heat, oil, sharp edges or moving
parts. Damaged or entangled cords increase the
risk of electric shock.
Use of an attachment not recommended or sold by
the battery charger manufacturer may result in a
risk of fire, electric shock, or injury to persons.
Following this rule will reduce the risk of electric
shock, fire, or serious personal injury.
Do not service snow thrower with battery, switch
key, or charger installed.
Do not use the charger when the ambient
temperature is above 45°C (113°F) or below
-20°C (-68°F)
Do not operate charger with a damaged cord or
plug which could cause shorting and electric shock.
If damaged, replace the charger with an identical
charger.
Do not operate charger if it has received a sharp
blow, been dropped or otherwise damaged in any
way. Take it to a qualified individual for electrical
check to determine if the charger is in good working
order.
Unplug charger from outlet before attempting any
maintenance or cleaning to reduce the risk of
electric shock.
Disconnect charger from the power supply when
not in use to prevent damage to the charger during
a power surge.
Risk of electric shock, Do not touch uninsulated
portion of output connector or uninsulated battery
terminal.
Do not expose charger to wet or damp conditions,
Water entering charger will increase the risk of
electric shock.
GENERAL SAFETY
4
SAFETY RULES FOR CHARGER

PRODUCT SPECIFICATIONS
Model: SN74014
Input: 40V, DC only Sweep width: 16 inches (406 mm)
Battery: 40V, 4.0 Ah Lithium-ion Max clearing depth: 8 inches (200 mm)
Charging time: 2.5 hours Throwing distance: Up to 32 feet
Battery run time: 25-40 minutes Clearing capacity: 300 pounds/minute
Speed: 2000 RPM Weight: 17.6 pounds
5
PACKING LIST
UNPACKING
Carefully remove the product from the box.
Make sure that all items listed in the packing
list are included.
Inspect all items carefully to make sure no
breakage or damage occurred during shipping.
Do not discard the packing material until you
have carefully inspected and satisfactorily
operated the snow thrower.
If any parts are damaged or missing please
call our customer service help line at
1-800-313-5111 for assistance.
QTY DESCRIPTION
1 Snow Thrower
1 Lower & Upper Handle
1
M6x45 Carriage Bolt & Wing Nut
4
ST4.2x30 Philips Head Self Tapping Screw
1 Adjust Knob
1
ST4.0x50 Philips Head Self Tapping Screw
1 Adjust Knob Cover
1 Wheel Bracket
2 Wheel
2 Wheel Cover
2
ST3.9x45 Philips Head Self Tapping Screw
2
ST3.9x55 Philips Head Self Tapping Screw
1 Auxiliary Handle
1
M6x50 Hex Head Bolt & Wing Nut
1 Operator’s Manual

This product must be correctly assembled before use.
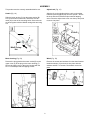
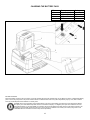
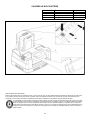
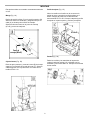
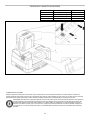
Handle (Fig. 1A)
Slide the lower section (C) into the upper section (B).
Line up the holes on each tube, and make sure the
cable (A) is clear of the mounting holes. Secure the two
sections together with the M6x45 carriage bolt and wing
nut.
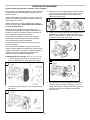
Motor housing (Fig. 1B)
Remove the plug guard and connect socket (B) on the
upper cover (6) to the plug on the motor housing (7).
Secure the upper cover to the motor housing with the
ST4.2 x 30 Philips head self tapping screws.
ASSEMBLY
6
Adjust knob (Fig. 1C)
Align the rib on the spindle with the notch on the adjust
knob and push the adjust knob onto the spindle. Secure
the knob with the ST4.0x50 Philips head self tapping
screw. Place the adjust knob cover onto the top and push
to secure into place.
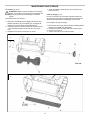
Wheel (Fig. 1D)
Remove the screws and washers from the wheel bracket.
Install the wheels (13) and secure into place with the
washers and M5 x 12 screws. Push wheel covers into
place.
M6x45 Carriage
Bolt
B
C
A
ST4.0x50

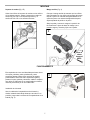
Auxiliary handle (Fig. 2)
Position the auxiliary handle so that the holes are in
alignment with the holes in the handle support bracket.
Insert the M6X50 hex head bolt into the hex shaped bolt
hole of the bracket. Secure by tightening the wing nut
onto the bolt.
Loosen the wing nut and adjust the angle and height of
the handle to a safe and comfortable position. Secure
into place by tightening the wing nut onto the bolt.
ASSEMBLY
7
Wheel bracket (Fig. 1E)
Align the holes on the wheel bracket with the holes on
the upper cover. Secure into place with ST3.9x45 Philips
head self tapping screws in the two (2) top holes and the
ST3.9x55 Philips head self tapping screws in the two (2)
bottom holes.
This snow thrower is intended to be used to sweep snow
from sidewalks, steps, patios, decks and other hard flat
surfaces such as paved driveways. Use it only on hard,
flat surfaces free of sand, stone and debris, wires or any
other objects. The manufacturer is not liable for any
damage or injury resulting from misuse.
Install battery
Open the battery compartment cover and slide the
battery down until it clicks to lock it into position, then
close the battery department cover (Fig. 3)
M6x50 Hex
Head Bolt
2
OPERATING
3

Clear snow often, before it gets too deep. It is best to
remove the snow as soon as possible after it falls.
Lift the auger up slightly before starting the snow thrower.
Switch on and tilt the snow thrower forward until the
scraper blade contacts the ground. Push the snow
thrower forward at a comfortable rate of speed, yet slow
enough to clear the path completely. The width and depth
of the snow determines your forward speed.
Pull up and turn the adjust knob to direct the snow to the
right or to the left. For the most efficient snow removal
throw the snow downwind and slightly overlap each
swath.
The snow thrower can remove up to 8” deep in one pass.
When clearing deeper drifts, hold the snow thrower by
the upper and lower handles and use a swinging or
sweeping motion. Shave off the top layer and make
multiple passes. (Fig. 6).
OPERATING
8
On/Off Switch (Fig. 4)
WARNING: The auger starts rotating immediately
after the snow thrower is switched on. Keep hands
and feet away from the auger.
To switch ON, hold the snow thrower firmly with two
hands, make sure the auger is not touching any surface
and press the Safety Lock Off Button (2) while squeezing
the On/Off trigger switch (3).
Once the snow thrower is started you can release the
Safety Lock Off Button.
To switch Off simply release the trigger.
Removing snow
WARNING: Before starting work, make sure that
the area to be cleared is free of stones, debris,
wires and any other objects.
Make sure all fasteners on the snow thrower (screws,
nuts, etc.) are fully tightened.
Check the auger for wear and tear at regular intervals.
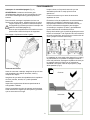
Position the snow thrower so that snow will discharge in
a safe direction away from the operator and bystanders.
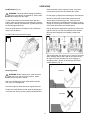
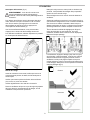
6
Correct
Incorrect
5
8”
4

OPERATING
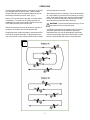
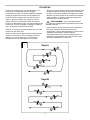
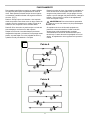
For large areas a definite pattern of operation is required
to thoroughly clean an area of snow. These patterns
will avoid throwing snow in unwanted places as well as
eliminating a second removal of snow. (Fig. 7)
Pattern A: Throw the snow to the right or left side where
it is possible. For areas such as a long driveway it is
advantageous to start in the middle. Plow from one end
to the other, throwing snow to both sides.
Pattern B: If the snow can only be thrown to one side of
the area to be cleared, start on the opposite side.
Scraping the snow all the way down to the pavement will
wear out the scraper and auger. To protect these parts,
one or two inches of snow can be left behind and cleared
with de-icing salt or a shovel.
After clearing the snow, continue to run the snow thrower
for a few minutes to prevent ice from freezing on moving
parts. Then switch off the motor, wait for all moving parts
to stop, remove the battery pack, and wipe the ice and
snow from the snow thrower with a clean rag.
WARNING: To avoid serious personal injury, do not
use hands or feet to unclog the chute.
Your lithium snow thrower is equipped with overcurrent
protection. When the current reaches a certain pre-
determined level, the unit will automatically slow down
until the current drops. When the current drops to a safe
level, the snow thrower will resume normal operation.
9
7

Regular cleaning and maintenance of your snow thrower
will ensure efficiency and prolong the life of the product.
After each use, take apart and clean out the ice and
debris from the ventilator and its slots, the auger and
the housing.
Only use a cloth soaked with hot water and a soft brush
to clean the snow thrower. Never wet or spray water on
the machine!
Do not use detergents or solvents as these could cause
irreparable damage to the snow thrower. Chemicals can
destroy the plastic parts.
To protect the snow thrower from corrosion when storing
for long periods, lightly oil the metal parts.
Store the appliance in a dry area out of reach of children.
For the user’s safety, worn or damaged parts must be
replaced. Replace with original replacement parts only.
Parts from another snow thrower may not fit properly
causing an unsafe situation.
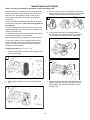
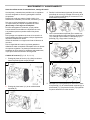
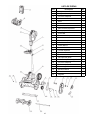
Changing the belt (Fig. 8, 9, 10, 11, 12)
1. Remove friction plate (16) and loosen left side cover
(8) from main body.
2. Remove the side plate (11) from the left side cover
(8).
MAINTENANCE AND STORAGE
Before carrying out maintenance operations, remove the battery pack.
3. Move the left side cover (8) downward to loosen the
belt (6). Remove the belt (6) from the wheel and push
it down through the slot in the left side cover (8).
4. Turn the left side cover (8) counterclockwise to
expose fix plate (13). Remove M5x12 bolt, washer
(14), fix plate (13), and then remove the belt (6).
5. Replace worn belt with new belt and install the fix
plate (13), left side cover (8), side plate (11), and
friction plate (16) by following the above steps in
reverse order.
10
8
9
10
11
12

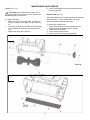
Auger (Fig. 8, 13)
CAUTION Check fasteners before each use. A
loose auger can result is excessive vibration and
damage the snow thrower.
To replace the auger:
1. Remove cover (8) and friction plate (16). Remove
bolt (15), washer (14), fix plate (13), and drive belt
(6).
Loosen the nut (24) from the other side of the auger
(18) and dismount the pulley (12) and auger axle
(19).
Replace the auger with a new one.
4. When reassembled ensure all screws and nuts are
properly tightened.
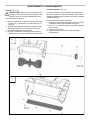
Scraper blade (Fig. 14)
The scraper blade is a wear item and should be replaced
when necessary. A worn scraper blade can cause
extreme vibration and damage the auger.
To replace the scraper blade:
1. Remove the three screws from the bottom of the
blade and slide the blade forward to remove.
2. Install new scraper blade.
3. Secure with the three screws.
4. Ensure the screws are properly tightened.
MAINTENANCE AND STORAGE
11
13
14
17

A small leakage of liquid from the battery cells may
occur under extreme usage, charging or temperature
conditions. This does not indicate a failure. However, if
the outer seal is broken and this leakage gets on your
skin:
a. Wash quickly with soap and water.
b. Neutralize with a mild acid such as lemon juice or
vinegar.
c. If the battery liquid gets in your eyes, flush them with
clean water for a minimum of 10 minutes and seek
immediate medical attention.
To charge the battery:
1) Plug in the charger. The red LED (B) will glow.
2) Place the battery pack in the charger. The battery
pack and charger have keyways so they will fit
together only one way.
3) When properly connected, the Green LED (C) will
flash. If the Red LED flashes, this indicates a
defective or wrong battery.
4) The charger indicator will flash Green continuously
while charging. When fully charged the LED will
remain Green.
5) Unplug the charger and remove the battery pack
from the charger.
A battery that is completely discharged requires 2.5
hours to fully charge. The charger will shut OFF
automatically if the battery is left on the charger for eight
(8) hours and the Red LED will flash.
A battery pack may last much longer if you charge it as
soon as one green light illuminates and you do not let it
completely discharge. The battery has four (4) LED
lights to indicate battery capacity. These lights will
illuminate when the light indicator button (A) is pushed.
Important! To keep the battery in good condition charge
the battery after each use. Never store the battery in a
low charge condition. If storing the battery for long
periods, charge the battery every 90 days.
The 40 volt battery supplied is sealed, maintenance free
and spill free.
Charge the battery pack only with the charger provided.
Allow at least 150 minutes of charge time before initial
use.
Make sure the power supply is normal household
voltage, 120volts, 60Hz, AC only.
The battery charger should be operated in temperatures
between 32 and 113 degrees F.
The battery should be charged in a cool, dry place.
2 to 3 initial charging/discharging cycles may be required
to achieve maximum run time/capacity.
Do not attempt to open the charger or the unit. There are
no customer serviceable parts inside. Call the customer
service help line at 1-800-313-5111 for assistance.
DO NOT incinerate battery packs even if they are
severely damaged or completely worn out. They can
explode in a fire causing injury.
Use the battery charger indoors only.
Disconnect charger from the power supply when not in
use to prevent damage to the charger during a power
surge.
When fully charged, the battery can be safety stored in
temperatures down to –68° degrees F for a period of up
to four weeks, before requiring charging. Fully charge
battery pack every 90 days.
If over a period of time the battery pack quickly runs
down after a full 150 minutes charging period, a
replacement battery pack is needed.
To prevent permanent damage to the battery, never
store in a discharged condition.
WINTER STORAGE—Fully recharge before storage and
then again every 90 days.
Since the battery will not develop a memory, it does not
have to be fully discharged before recharging.
CHARGING THE BATTERY PACK
12

BATTERY DISPOSAL
Remove the battery pack from the snow thrower. Cover the terminals with heavy duty adhesive tape. Do not attempt to destroy or disassemble battery
pack or remove any components. This product contains lithium-ion batteries which must be recycled or disposed of properly. Local, state or federal
laws may prohibit disposal of these batteries in ordinary trash.
The RBRC seal on the li-ion battery pack indicates that the costs to recycle the battery pack at the end of its useful life has already
been paid by The Great States Corporation American Lawn Mower Company. It is illegal to place spent li-ion batteries in the local
municipal solid waste or in the trash. RBRC in cooperation with The Great States Corporation American Lawn Mower Company has
provided an environmentally friendly and easy way to recycle spent li-ion batteries. Just contact your local recycling center or call
1-800-8BATTERY for information on where to drop off the spent battery.
13
CHARGING THE BATTERY PACK
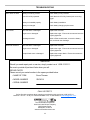
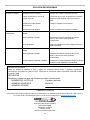
LED status Battery status Voltage
1 Green Approx. 20% Full 31V less
2 Green Approx. 50% Full 31V to 35V
3 Green Approx. 75% Full 35V to 38V
4 Green Full 38V more
C
B
A
1
2

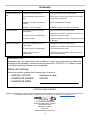
TROUBLESHOOTING
Problem Possible causes Remedy
Motor does not start Battery not making contact.
Lock off not fully operated.
Battery not installed properly.
Battery not charged.
Check battery is fully inserted.
Check that lock off is fully forward prior to moving
trigger.
Check battery installation.
Check battery charging requirements.
Poor results Drive belt worn or damaged.
Auger worn or damaged.
Discharge blocked.
Replace the drive belt.
Replace the auger. Ensure the screws and nuts are
properly tightened.
Switch off the snow thrower, remove the battery
pack, and clean the discharge.
Abnormal vibrations Drive belt worn or damaged.
Auger worn or damaged.
Scraper blade worn or damaged.
Replace the drive belt.
Replace the auger. Ensure the screws and nuts are
properly tightened.
Replace the scraper blade. Ensure the screws are
properly tightened.
CALL US FIRST !!
Call us first with questions about operating or maintaining this product at 1.800.313.5111
between 7:30 a.m. – 4:30 p.m. Eastern Standard Time, or send emails to [email protected].
The Great States Corporation
American Lawn Mower Company
830 Webster Street
Shelbyville, IN 46176
www.americanlawnmower.com
14
SERVICE
Should you need repair parts or service, simply contact us at 1-800-313-5111.
Be sure to provide all pertinent facts when you call.
REPAIR PARTS
Please record your serial number in the space provided below.
• NAME OF ITEM Snow Thrower
• MODEL NUMBER SN74014
• SERIAL NUMBER

15
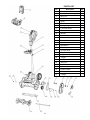
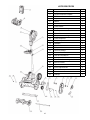
PARTS LIST
Pos. Description Qty
1 Handle 1
2 Auxiliary handle complete 1
3 Wing nut 1
4 Cover 1
5 Motor 1
6 Drive belt 1
7 Wiring trough 1
8 Left cover plate 1 1
9 Small pulley 1
10 M8 Nut 1
11 Left cover plate 2 1
12 Driven pulley 1
13 Pulley frame 1
14 Washer 1
15 Bolt M5x12 1
16 Friction plate 2
17 Scraper blade 1
18 Auger 1
19 Auger axle 1
20 Trigger 1
21 Safety lock off button 1
22 Wing nut 1
23 Adjust knob 1
24 Acorn nut M8 1
25 Elastic washer 1
26 Battery 1
27 Charger 1

The Great States Corporation
American Lawn Mower Company
830 Webster Street
Shelbyville, IN 46176
Phone 1-800-313-5111
www.americanlawnmower.com
In a continued commitment to improve quality, the Manufacturer reserves the right to
make component changes or design changes when necessary.
OPERATOR’S MANUAL
14-IN Snow Thrower
This product is covered by U. S. patents and other international patents
Copyright All Rights Reserved.
Rev. 2015/09/30
WARRANTY
This product is manufactured for The Great States Corporation/American Lawn Mower Company. The
Great States Corporation/American Lawn Mower Company, Shelbyville, Indiana, has been making
lawn mowers for over 100 years and it warrants to the original owner that each new product and
service part is free from defects in material and workmanship and agrees to repair or replace under
this warranty any defective product or part from the original date of purchase for two (2) years except
for the conditions and circumstances listed below. Proof of purchase (original dated sales receipt)
must accompany all warranty claims.
THIS WARRANTY IS NOT TRANSFERABLE AND DOES NOT COVER:
Products sold damaged or incomplete, sold
“as is”, sold reconditioned, or used as rental
equipment.
Delivery, installation, or normal adjustments
explained in the operator’s manual.
Damage or liability caused by shipping,
improper handling, improper installation,
incorrect voltage or improper wiring,
improper maintenance, improper
modification, or the use of accessories and/
or attachments not specifically
recommended.
Repairs necessary because of operator
abuse or negligence, or the failure to install,
operate, maintain, or store the product
according to the instructions in the
operator’s manual.
Damage caused by cold, heat, rain,
excessive humidity, corrosive environments
and materials, or other contaminants.
Expendable items that become worn
during normal use, including but not limited
to, belts, auger, and scraper blade.
Cosmetic defects that do not interfere with
product functionality.
Freight costs from customer to vendor.
Repair and transportation costs of products
or parts determined not to be defective.
ANY INCIDENTAL, INDIRECT, OR
CONSEQUENTIAL LOSS, DAMAGE, OR
EXPENSE THAT MAY RESULT FROM
ANY DEFECT, FAILURE, OR
MALFUNCTION OF THE PRODUCT.
Some states do not allow the exclusion or
limitation on how long an implied warranty
lasts, so the above limitations may not
apply to you.
ANY NON-RESIDENTIAL USE OR
COMMERCIAL USE VOIDS ALL
WARRANTIES.

Modèle n° SN74014
MANUEL DE L’UTILISATEUR
Souffleuse à neige de 14 pouces
Ce produit est protégé par des brevets américains et d'autres brevets internationaux.
Copyright Tous droits réservés.
Merci pour votre achat.
NE RENVOYEZ PAS CE PRODUIT AU MAGASIN. AVEZ-VOUS DES QUESTIONS CONCERNANT LE
FONCTIONNEMENT, L’ASSEMBLAGE, LES PIÈCES OU LA RÉPARATION DU PRODUIT? COMPOSEZ
LE 1-800-313-5111 DE 07 h 30 à 16 h 30, HEURE NORMALE DE L’EST, POUR TOUTE ASSISTANCE.
CONSERVEZ CE MANUEL POUR POUVOIR LE CONSULTER ULTÉRIEUREMENT
Ce produit a été conçu et fabriqué selon nos normes élevées de fiabilité, de facilité d’utilisation et de sécurité de
l’utilisateur. Correctement entretenu, il vous procurera des années de service intensif et sans souci.
AVERTISSEMENT : afin d’éviter de se blesser, l’utilisateur doit lire et comprendre le manuel de
l’utilisateur avant d’utiliser ce produit.
LA BATTERIE DOIT ÊTRE CHARGÉE AVANT LA PREMIÈRE UTILISATION.
1090

Les équipements électriques usagés ne doivent pas être éliminés avec les ordures ménagères. Recyclez
l’appareil lorsque des installations à cet effet existent. Pour obtenir des conseils de recyclage, renseignez-vous
auprès des autorités locales ou de votre vendeur.
SYMBOLES
Certains des symboles suivants peuvent apparaître sur ce produit. Examinez-les et apprenez leur signification.
Une interprétation correcte des symboles vous permettra d’utiliser ce produit plus efficacement et en meilleure sécurité.
2
Précautions concernant votre sécurité.
ATTENTION! Lisez le manuel de l’utilisateur, et respectez les notices d’avertissement et les consignes de
sécurité.
ATTENTION! Débranchez immédiatement l'appareil si le câble est endommagé ou usé.
ATTENTION! Portez toujours une protection oculaire et auditive.
Portez des chaussures couvertes solides, à semelles antidérapantes.
DANGER! Des objets peuvent être projetés à de grande vitesse lorsque le moteur est en route. Ne pas
marcher devant la machine en marche.
Gardez les personnes alentour à une distance de sécurité.
DANGER! Lames rotatives. Gardez les mains et les pièces à une distance sûre.
Ne mettez pas la main dans la vis sans fin.
Ne mettez pas la main devant le déflecteur de la goulotte.
Ne mettez pas les pièces dans la vis sans fin.
DANGER! Risque de décharge électrique.
N’utilisez pas cette machine sous la pluie. N’utilisez pas cette machine pendant les orages électriques.
Veuillez prendre note que des changements ou modifications à ce produit non expressément approuvés par le tiers
responsable de la conformité peut annuler le droit de l'utilisateur à utiliser le produit.
REMARQUE : Cet équipement a été testé et trouvé conforme avec les limites d'un dispositif numérique de Classe B,
suivant les règles de la Partie 15 du FCC. Ces limites existent pour offrir une protection raisonnable contre les
interférences nuisibles lors d'une installation résidentielle. Cet équipement génère, utilise et peut émettre de l'énergie
de radiofréquences et, s'il n'est pas installé et utilisé selon les présentes instructions, peut provoquer des interférences
nuisibles aux communications radio. Il n'existe cependant aucune garantie que des interférences ne vont pas se
produire lors d'une installation en particulier. Si cet équipement produit des interférences nuisibles à la réception radio
ou télévision, qui peuvent être déterminées en allumant et en éteignant l'appareil, l'utilisateur est encouragé à essayer
de corriger les interférences grâce à l'une ou plusieurs des mesures suivantes :
-- Réorienter ou déplacer l'antenne réceptrice.
-- Augmenter la distance entre l'équipement et le récepteur.
-- Brancher l'équipement sur une prise d’un circuit autre que celui auquel le récepteur est branché.
-- Consulter le ou un technicien radio/télévision professionnel pour de l'aide.
Cet appareil est conforme avec la Partie 15 des Règles de la FCC. Le fonctionnement est sujet aux deux conditions
suivantes : (1) cet appareil peut ne pas causer d'interférences nuisibles, et (2) cet appareil doit accepter toutes les
interférences reçues, y compris celles pouvant causer un fonctionnement indésirable.

POUR RÉDUIRE LE RISQUE DE BLESSURE : avant
toute utilisation, assurez-vous que toute personne utilisant
ce produit a lu et compris toutes les consignes de sécurité
et les autres renseignements contenus dans ce manuel.
ATTENTION : portez des protections auditives
appropriées pendant l’utilisation. Dans certaines
conditions, ou en cas d’utilisation prolongée,
le bruit émis par ce produit peut contribuer à une perte
auditive.
Conservez ces instructions et relisez-les souvent avant
d’utiliser le produit et lorsque vous apprenez son emploi
à d’autres personnes.
AVERTISSEMENT : lorsque vous utilisez un appareil
électrique, vous devez toujours respecter des consignes
de sécurité de base afin de réduire le risque d’incendie,
de décharge électrique et de blessures, notamment :
LIRE TOUTES LES INSTRUCTIONS
AVERTISSEMENTS DE SÉCURITÉ IMPORTANTS
SÉCURITÉ GÉNÉRALE
3
Ne pas forcer la souffleuse à neige : elle fonctionne
mieux et de façon plus sûre à la vitesse pour laquelle elle
a été conçue.
NE PAS ESSAYER D’ATTEINDRE TROP LOIN –
Guidez la souffleuse à un rythme de marche à pied
seulement. Gardez toujours les pieds fermement sur le
sol, et ne vous tenez pas en déséquilibre.
ÉCLAIRAGE - N'utilisez la souffleuse à neige qu'à la
lumière du jour ou sous un bon éclairage artificiel.
RANGER L'APPAREIL INUTILISÉ À L’INTÉRIEUR –
Lorsqu’elle n’est pas utilisée, la souffleuse à neige doit
être rangée à l’intérieur dans un local sec, hors de portée
des enfants.
ENTRETENIR L'APPAREIL AVEC SOIN – Maintenez-le
propre pour un rendement optimal et pour réduire le
risque de blessure. Inspectez régulièrement la rallonge
et remplacez-la si elle est endommagée. Gardez les
poignées sèches, propres et exemptes d’huile et de
graisse.
N’utilisez pas la souffleuse à neige sur une pente trop
raide pour un fonctionnement sans danger. Sur une
pente, ralentissez et tenez-vous de façon à ne pas
perdre l’équilibre.
Avant de démarrer la souffleuse à neige, assurez-vous
que la vis sans fin ne touche aucun objet et qu’elle est
libre de tourner.
Ne pas utiliser sur une surface de gravier à moins que la
souffleuse à neige ne soit ajustée pour une telle surface
selon les instruction du manuel de l'utilisateur.
L’utilisation de la souffleuse à neige en position manuelle
est dangereuse à moins de respecter les instructions
spéciales du manuel de l’utilisateur.
ATTENTION : ne projetez pas de neige vers les
passants, animaux ou voitures et ne laissez personne
passer devant la souffleuse lorsqu’elle est en marche.
Des objets susceptibles d’obstruer la souffleuse ou de
provoquer d’autres dégâts peuvent être cachés dans la
neige. Avant emploi, enlevez tout paillasson, luge,
planches, fils électriques et autres débris de la zone.
Si la vis sans fin frappe un objet étranger, inspectez-la
pour vérifier qu’elle n’est pas endommagée. Faites toute
réparation nécessaire avant de redémarrer la souffleuse
et de reprendre le déneigement.
RESTER VIGILANT – Regardez ce que vous faites.
Faites preuve de bon sens. N’utilisez pas la souffleuse à
neige si vous être fatigué ou sous l’influence de
médicaments, de drogues ou d’alcool.
VÉRIFIER LES PIÈCES ENDOMMAGÉES – Avant de
poursuivre l’utilisation du produit, toute pièce endommagée
doit être vérifiée scrupuleusement afin de déterminer qu’elle
fonctionnera correctement et remplira sa fonction prévue.
Vérifiez l’alignement des pièces mobiles, si ces dernières
sont coincées, si certaines pièces sont cassées, la qualité
du montage et toute autre condition pouvant affecter le
fonctionnement de l’outil. Toute pièce endommagée doit
être correctement réparée ou remplacée. Appelez notre
service clientèle au 1-800-313-5111 pour assistance.
ÉVITER LES ENVIRONNEMENTS DANGEREUX –
N’utilisez pas ce produit sous la pluie ou par temps
orageux. N’utilisez pas l'appareil dans les atmosphères
gazeuses ou explosives. Le moteur de ce produit émet
normalement des étincelles capables d’enflammer les
vapeurs chimiques.
GARDER HORS DE PORTÉE DES ENFANTS – Tous les
visiteurs, enfants et animaux domestiques doivent
se tenir au-delà du périmètre de sécurité de la zone
de travail.
S'HABILLER DE FAÇON APPROPRIÉE – Ne portez ni
vêtements amples ni bijoux et portez une protection des
cheveux pour contenir les cheveux longs. Ceux-ci risquent
d’être happés par des pièces en mouvement.
Porter des bottes en caoutchouc lors de l'utilisation de la
souffleuse à neige. Ne vous tenez pas en déséquilibre, en
particulier sur les pentes.
PORTER DES LUNETTES DE SÉCURITÉ – Lors de
l'utilisation de ce produit, portez des lunettes de sécurité
avec des écrans latéraux, marquées à la norme
ANSI Z87.1.
AVERTISSEMENT : Tenir les mains éloignées des pièces
mobiles. N’approchez jamais les mains de la vis sans fin
pour en retirer de la neige, des brindilles ou d’autres
débris. Une vis sans fin bloquée peut se débloquer
brusquement et provoquer des blessures personnelles
même si la souffleuse est arrêtée. Servez-vous toujours
d’un bâton, une poignée de balai par ex., pour dégager
les obstructions.
RETIRER LA BATTERIE DE LA SOUFFLEUSE À
NEIGE quand il n’est pas utilisé ou lors de l’entretien ou
du nettoyage. Ne le laissez pas sans surveillance.
UTILISER LE BON OUTIL – N’utilisez pas ce produit pour
une tâche à laquelle il n’est pas destiné.
Évitez les démarrages accidentels : ne pas transporter la
souffleuse à neige avec le doigt sur le contacteur lorsque
la batterie est installée. Assurez-vous que le contacteur
est sur arrêt avant d'installer la batterie.

4
ATTENTION : la vis sans fin ne s’arrête pas
immédiatement après l’extinction de la souffleuse.
ATTENTION : risque de blessures. N’approchez
jamais les mains, les pieds ou d’autres parties du
corps et des vêtements de la vis sans fin en
rotation.
AVERTISSEMENT : Proposition 65 de la
Californie : Ce produit contient des agents
chimiques connus dans l'État de la Californie pour
causer le cancer et des malformations congénitales
ou autres appareil reproducteur.
Assurez-vous que le cordon de ne pas mettre le
cordon dans un endroit où il risqué d’être piétiné,
accroché , endommagé mis en contact avec des
objets tranchants ou malmené. Cette mesure réduit
le risqué de chute pouvant entraîner des blessures
et l’endommagement du cordon, susceptible de
causer un choc électrique.
Gardez le cordon et le chargeur à l’écart des
sources de chaleur pour éviter des dommages au
boîtier ou aux piẻces internes.
Ne laissez jamals de liquids pour freins,de
gasoline, de produits à base de pértole, d’huiles
dégrippantes, etch., entrer en contact avec les
piẻces en plastique. Ces liquids contiennent des
produits chimiques susceptibles d’endommager,
d’affaiblir ou de détruire ie plastique.
N’utilisez un cordon prolongateur qu’en cas
d’absolve nécessité L’usage d’un cordon
prolongateur incorrect peut présenter des risques
d’incendie et de choc électrique. Si un cordon
prolongateur doit être utilisé, s’assurer:
Que la fiche du cordon comporte le même nombre
de broches que celles du chargeur et qu’elles sont
identiques.
Que le cordon est correctement câblé et en bon
état électrique: et
Que le caliber des fils est suffisant pour l’intensité
c.a. du chargeur spéciflé ci-dessous:
Longueur du cordon (en pieds) 25’ 50’ 100’
Calibre du cordon (AWG) 16 16 16
REMARQUE:AWG= American Wire Gauge(caliber
de fils américain)
Conservez ces instructions. Consultez-les
fréquemment et utilisez-les pour instruire les
autres utilisateurs éventuels. Si vous prêtez cet
souffleuse à neige, il doit être accompagné de ces
instructions.
AVERTISSEMENT : Maintenez toutes les
connexions sèches et au-dessus du sol. Ne
touchez pas la fiche avec des mains mouillées.
Si la souffleuse se met à vibrer de façon anormale,
éteignez-la immédiatement et recherchez la cause
des vibrations. La présence de vibrations est
généralement un signe de problème.
Éteignez toujours la souffleuse à neige, retirer la
batterie et attendez que la vis sans fin se soit
complètement arrêtée avant d’effectuer des travaux
d’entretien ou des réparations.
Ne malmenez pas le cordon d’alimentation.
N’utilisez jamals le cordon d’alimentation pour
transporter le produit. Ne débranches jamals le
chargeur en tirant sur le cordon. Tirez la prise pour
la débrancher. Un cordon ou un chargeur
endommagé peut présenter un risqué de choc
électrique.
L’utilisation d’accessoires non recommandés ou qui
ne sont pas achetés auprẻs du fabricant du
chargeur peut poser un risqué d’incendie, de choc
électrique ou de blessures. Appliquez cette mesure
de sécurité pour réduire les riques de choc
électrique, d’incendie ou de blessures.
N’entretenez pas la souffleuse à neige lorsque la clé
de sûreté ou le chargeur sont en place.
N’utilisez pas le chargeur quand la tempérapture
ambiante est au-dessus 45˚C(113˚F) o menor de
–20˚C(-68˚F).
N’utilisez pas un chargeur dont la prise ou le
cordon est endommagé , ce qui pourrait entraîner
un court-circuit et un choc électrique. Le cas
échéant, remplacer le chargeur immédiatement.
N’utilisez pas le chargeur s’il a été soumis à un choc
violent ou s’il est endommagé. Confiez-le à un
organisme de réparation qualifié afin qu’il détermine
s’il est en bon état de fonctionnement.
Pour réduire les risques de choc électrique,
débranches le chargeur de la prise secteur avant de
procéder à tout nettoyage ou entretien.
Lorsqu’il n’est pas utilisé, débranchez le chargeur
pour éviter de l’endommager en cas du saute de
tension.
Risque de choc électrique. Ne touches pas les
parties non isolées du connecteur de sortie ou les
bornes de batteries non isolées.
N’utilisez pas le chargeur à l’extérieur, ne l’exposez
ni à l’eau ni à l’humidité. La pénétration d’eau dans
le chargeur accroît le risqué de choc éléctrique.
SÉCURITÉ GÉNÉRALE
RÈGLES DE SÉCURITÉ CONCERNANT LE CHARGEUR
La page est en cours de chargement...
La page est en cours de chargement...
La page est en cours de chargement...
La page est en cours de chargement...
La page est en cours de chargement...
La page est en cours de chargement...
La page est en cours de chargement...
La page est en cours de chargement...
La page est en cours de chargement...
La page est en cours de chargement...
La page est en cours de chargement...
La page est en cours de chargement...
La page est en cours de chargement...
La page est en cours de chargement...
La page est en cours de chargement...
La page est en cours de chargement...
La page est en cours de chargement...
La page est en cours de chargement...
La page est en cours de chargement...
La page est en cours de chargement...
La page est en cours de chargement...
La page est en cours de chargement...
La page est en cours de chargement...
La page est en cours de chargement...
La page est en cours de chargement...
La page est en cours de chargement...
La page est en cours de chargement...
La page est en cours de chargement...
-
 1
1
-
 2
2
-
 3
3
-
 4
4
-
 5
5
-
 6
6
-
 7
7
-
 8
8
-
 9
9
-
 10
10
-
 11
11
-
 12
12
-
 13
13
-
 14
14
-
 15
15
-
 16
16
-
 17
17
-
 18
18
-
 19
19
-
 20
20
-
 21
21
-
 22
22
-
 23
23
-
 24
24
-
 25
25
-
 26
26
-
 27
27
-
 28
28
-
 29
29
-
 30
30
-
 31
31
-
 32
32
-
 33
33
-
 34
34
-
 35
35
-
 36
36
-
 37
37
-
 38
38
-
 39
39
-
 40
40
-
 41
41
-
 42
42
-
 43
43
-
 44
44
-
 45
45
-
 46
46
-
 47
47
-
 48
48


EarthWise SN74014 Le manuel du propriétaire
- Catégorie
- Tondeuses à gazon
- Taper
- Le manuel du propriétaire
dans d''autres langues
- English: EarthWise SN74014 Owner's manual
- español: EarthWise SN74014 El manual del propietario
Documents connexes
-
 EarthWise SN74016 Le manuel du propriétaire
-
 EarthWise SN70010 Le manuel du propriétaire
-
 EarthWise SN72018 Manuel utilisateur
-
 EarthWise SN72018 Le manuel du propriétaire
-
 EarthWise SN74022 Le manuel du propriétaire
-
 EarthWise SN74018 Manuel utilisateur
-
 EarthWise SN70016 Le manuel du propriétaire
-
 EarthWise SN71018 Le manuel du propriétaire
-
 EarthWise SN71022 Manuel utilisateur
-
 EarthWise SN74018 Le manuel du propriétaire