HomeRight C800915.M Manuel utilisateur
- Catégorie
- Pulvérisateur de peinture
- Taper
- Manuel utilisateur

Instruction Manual
WARNING
TO REDUCE THE RISK OF INJURY,
USER MUST READ INSTRUCTION MANUAL.
FOR HOUSEHOLD USE ONLY.
KEEP CHILDREN AWAY FROM WORK AREA.
Customer Service
1-800-264-5442 or 763-780-5115,
8 a.m. to 5 p.m. CST.
English (page 1)
Français (page 17)
Español (página 33)
Contents
Important Safeguards and Warnings 2
Quick Start Reference Guide 4
Items Needed for Project 5
Preparing Area for Your Project 6
Spraying Tips 7
Sprayer Setup 8
How To Use Sprayer 9
Clean-Up 10
Lubrication and Reassembly 12
Troubleshooting & FAQs 13
Parts List 15
Two-Year Limited Warranty 48
Made in Taiwan
Light Duty
Stain Sprayer
Register Online Today
To Activate Your Two-Year Warranty
Go online at www.homeright.com or scan the QR Code to the left. See back page for warranty details.

English
www.homeright.com2
Safeguards and Warnings
Read and Follow All Safeguards
Like other power tools, airless sprayers are safe
when properly used but can be dangerous if
misused. It is the responsibility of the user to read
and understand all instructions, IMPORTANT
SAFEGUARDS, and safety precautions before
operating the unit and to use the unit properly.
Failure to do so may result in product damage,
personal injury or loss of life.
Do not try to repair (or disassemble) the unit
yourself. Repairs should be performed by a
qualified shop familiar with this unit or returned to
HomeRight® (See warranty.) This unit is to be used
with authorized parts only. When using parts that
do not comply with the specifications and safety
devices of the manufacturer, the user assumes all
risks and liabilities.
Warnings
• DO NOT aim sprayer at yourself or anyone else.
In the event of injury, seek expert medical advice
immediately.
• DO NOT operate sprayer without paint or fluid in
it. The sprayer force can cause injuries to people
and animals.
• DO NOT cover the nozzle with any part of your
body. High velocity jet can cause accidental
injuries.
• DO NOT leave your sprayer unclean or allow
stain to dry in the pump. An unclean sprayer will
not work next time you attempt to use it and you
could void the warranty.
• DO NOT spray textured materials containing
asbestos fibers.
• DO NOT spray any textured materials containing
particles or fibers such as metallic or fire retardant
paints.
• DO NOT spray flammable liquid.
• DO NOT use the spray gun outside when it’s
raining.
• DO NOT use sprayer below garage floor or grade
level.
• DO NOT disassemble the sprayer without reading
directions.
• DO NOT allow any part of the body to come into
contact with the fluid stream.
• DO use a three-pronged extension cord that is at
least 18 gauge. (See page 3.)
• DO only plug the cord or extension cord into a
three-pronged grounded power supply.
• DO keep the sprayer out of the reach of children.
• ALWAYS place the sprayer upright (do not place
the sprayer upside down or on its side) to prevent
liquid entering internal wiring and causing electric
shock.
• ALWAYS clean and lubricate piston and cylinder
after spraying water or stain.
• ALWAYS wear mask, goggles, and ear and eye
protection while operating the sprayer.
• ALWAYS unplug the cord when not in-use to
prevent accidental spraying.
• To prevent electrical shock, NEVER immerse the
spray gun into water or other liquid.
Caution
1. HAZARD: Solvent and paint fumes can explode
or ignite, causing property damage and severe
injury. Avoid all low ignition sources such as static
electricity sparks and open flames.
2. HAZARD: Paints, solvents, insecticides, and
other materials may be harmful if inhaled, causing
severe nausea, fainting, or poisoning.
3. HAZARD: Do not hold cord at plug connections
to support sprayer. Failure to observe may result
in electrical shock.
Prop 65 Warning
Handling the coated electrical wires of this product
exposes you to lead, a chemical known to the
State of California to cause birth defects or other
reproductive harm. Wash hands after use.
Hazard: Injection Injury
The airless sprayer pumps materials at high
pressure and can pierce skin and underlying tissue,
leading to serious injury or amputation.
Do not treat injection injuries as simple cuts.
Injection injuries can lead to amputation. Seek a
physician’s help immediately.
• Never put hand in front of gun. Gloves will not
prevent injection injuries.

www.homeright.com
English
3
Safeguards and Warnings
• Never leave sprayer unattended.
• Never leave sprayer plugged in while cleaning.
• Never remove tip guard while spraying.
Hazard: Explosion Or Fire
Paint, stain, and solvent fumes can explode or
ignite, causing property damage and/or severe
injury.
• Keep area well ventilated. Exhaust and introduce
fresh air to keep fumes from accumulating in work
area.
• Do not spray in areas where there are ignition
sources, static electricity sparks, pilot lights,
heaters, hot objects, cigarettes, or open flames.
• Have fire extinguishing equipment present and in
good working order.
• Follow safety instructions and IMPORTANT
SAFEGUARDS of material manufacturers.
Hazard: Hazardous Vapors
Paint, stain and solvents, insecticides, varnishes,
and other materials may be harmful if inhaled,
causing severe nausea, fainting, or poisoning.
• Use a mask or respirator when spraying when
there is a chance of inhaling vapors.
• Use protective eye wear.
Grounding Instructions
The product must be grounded. In the event of an
electrical short circuit, grounding reduces the risk
of electrical shock by providing an escape wire for
the electric current. This product is equipped with
a cord having a grounding wire with an appropriate
grounding plug. The plug must be plugged into
an appropriate outlet that is properly installed and
grounded in accordance with all local codes and
ordinances.
Warning
DANGER - Improper use of the grounding plug can
result in a risk of electric shock.
If repair or replacement of the cord or plug is
necessary, do not connect the grounding wire to
either flat blade terminal. The grounding wire has
green insulation, with or without yellow stripes.
Check with a qualified electrician or serviceman
if the grounding instructions are not completely
understood, or if in doubt as to whether the product
is properly grounded. Do not modify the plug
provided; if it will not fit the outlet, have the proper
outlet installed by a qualified electrician.
This product is for use on a nominal 120 volt circuit
and has a grounding plug that looks like the plug
illustrated in Figure A (illustrated at right). Make
sure the product is connected to an outlet having
the same configuration as the plug. A temporary
adapter, which looks like the adapter illustrated
in Figures B and C, may be used to connect the
plug to a two-pole receptacle as shown in Figure
B if a properly grounded outlet is not available.
The temporary adapter should only be used until a
properly grounded outlet (Figure A) can be installed
by a qualified electrician. The green colored rigid
ear lug or the like extending from the adapter must
be connected to a permanent ground such as a
properly grounded outlet box cover. Whenever the
adapter is used, it must be held in place by a metal
screw.
Extension Cords
Use only a three-pronged extension cord that
has a three-blade grounding plug and a three-slot
receptacle that will accept the plug on the product.
Make sure your extension cord is UL/ETL/CSA
listed and is in good condition. When using an
extension cord, be sure to use one heavy enough
for the current. For lengths less than 18 feet, use
a No. 18 AWG. or heavier; for lengths more than
18 feet, use No. 16 AWG. If in doubt, use a heavier
gauge. An undersized cord will cause a drop in line
voltage resulting in loss of power and overheating.
Storage
Make sure unit is clean and dry before storing. Store
in a dry location. To prevent damage, the electrical
cord should not be crimped during storage.
Grounded
Outlet
Grounded
Outlet Box
Adapter
Tab and
Grounding
Screw
A

English
www.homeright.com4
INCREASE
Quick Start Reference Guide
This is only a quick reference. Read the entire instruction manual prior to using the product.
Read all warnings and safety instructions in the instruction manual before use.
1 2 3
NOTE: Sprayer requires lubrication before each
use to work properly. See lubrication section on
page 12 for details.
Mix your material thoroughly. Remove and fill
container with material. Use a filter to strain
material if it is old, as it may be chunky and
clog the sprayer.
Tightly attach angled pick-up tube to the
forward-most port of the cylinder housing.
Attach the container filled with your material to
the sprayer and plug into outlet.
4 5 6
7
Set flow to maximum by turning the control
knob fully counterclockwise.
Adjust the spray pattern by turning the knob
back in a clockwise direction until you have
the spray pattern you want. See page 9 for
information on proper spray pattern.
When finished spraying, unplug sprayer.
Remove container and empty contents. Rinse
container out completely.
Spray your surface, keeping the sprayer level
and 10" to 12" from surface. Use a sweeping
and overlapping motion for best overall coverage.
8
Fill sprayer with cleaning solution, plug in sprayer
and engage trigger until solution comes through
nozzle. See page 10 for information on latex and
oil clean up suggestions.
Unplug sprayer. Remove parts. Clean and dry
according to instructions on page 10. Lubricate
sprayer before storing with lightweight oil
(included), or use WD40
®
, 3-in-One
®
oil, or similar
product.
9

www.homeright.com
English
5
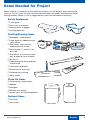
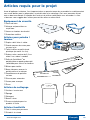
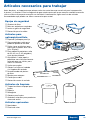
Items Needed for Project
Before staining, it is important to first gather the materials you will need for prep, staining and
clean-up. This will insure that you have what you need when you need it and keep your project
moving smoothly. Below is a list of suggested items you may find helpful or necessary.
Safety Equipment
Latex gloves
Dust mask or respirator
Safety glasses or goggles
Hearing protection
Painting/Staining Items
Sandpaper / sanding block
Large piece of cardboard to test
spray pattern
Drop cloths, tarps or plastic
sheeting (at least 10'x20')
Masking tape, 1" and/or 2" roll,
duct tape
QuickMask
®
or similar pre-taped
poly or paper to cover windows
Stir sticks
Empty bucket for priming sprayer
and clean-up
Latex paint conditioner
Paint brush for touch-ups
Cardboard for masking
Spray shield
Clean-Up Items
Cleaning rags / paper towels
Sponge
Detergent
Buckets for cleaning
Mineral spirits for oil based products
Optional Items
Drill mixer
Hot air tool

English
www.homeright.com6
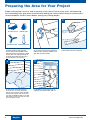
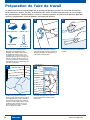
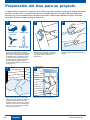
Preparing the Area for Your Project
Proper surface prep is the first step in ensuring a stain job will last for many years and protecting
the surrounding areas guarantees a professional looking job. Always follow the paint manufacturer’s
recommendations for best results before starting any staining project.
1 2 3
Remove everything you can from the area that
you do not want stained, including light fixtures,
mailbox, shutters, decorations, window screens,
storm doors and storm windows.
When preparing for a staining project, be sure
the weather will permit proper application
and stain adherence. Ideal conditions include
temperature above 45º and below 85º, humidity
less than 50%, and if staining outside, little to
no wind to minimize drift. Also make sure no
inclement weather is in the near future.
Always follow the stain manufacturer’s
recommendations for surface preparation.
To avoid paint or stain overspray damage,
assess your area. Use canvas or poly drop
cloths to cover and protect surfaces like floors,
decking shrubs or plants, grills lawn furniture,
cars, boats and mailboxes. Make sure the drop
cloth extends at least five feet past the surface
you are painting or staining.
4 5
Use QuickMask
®
, poly sheeting or paper to
completely mask windows, doors, soffits, etc.
Calm wind <5 mph
No rain in forecast
Humidity <50%
Temperature 45º-85º

www.homeright.com
English
7
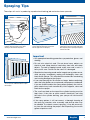
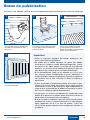
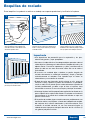
Spraying Tips
These tips will assist in producing a professional-looking job and make clean-up easier.
2 3
When spraying deck railings or spindles, hold or
secure a piece of cardboard behind to capture
the overspray.
4
When spraying a project task, like a chair, make
sure the drop cloth extends at least five feet
from the project to catch overspray.
When spraying a surface like a deck, mask the
exterior of the house and nearby landscaping.
Don’t forget to protect anything that might be
under the deck too.
1
Use large pieces of cardboard or a spray shield
to further reduce overspray in areas where
masking is not convenient or possible.
Important
• Use appropriate breathing protection, eye protection, gloves, and
clothing.
• Do not twist electrical cord. Do not place heavy objects on
electrical cord. Keep electrical cord away from heat and sharp
objects. To avoid a tripping hazard, make sure cord is not in a
heavy traffic area. Do not use the cord if it is damaged.
• Should a low humming sound and/or irregular spray pattern occur
while spraying, immediately unplug and thoroughly clean and
lubricate the sprayer. This will prevent the motor from overheating
and causing damage to the sprayer.
• If you stop spraying for 30 minutes or longer, before continuing,
retest the spray pattern on scrap board, newspaper or cardboard.
If you are unable to adjust the spray pattern properly, the stain or
paint material may have started to dry. If this happens, clean and
lubricate the sprayer.
• The small vent hole on the top of the cylinder housing must be
kept clean. If the stain or paint material should dry and clog
the hole in the cylinder housing, your sprayer will not function
properly.
• If the spray pattern is still not correct, a thorough cleaning of
the spray tip, atomizer valve assembly, and pick-up tube may
be needed. To maintain correct spraying, it may be necessary
to clean the unit during the project after dispensing five to nine
gallons of paint or stain.

English
www.homeright.com8
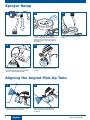
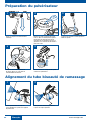
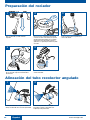
Sprayer Setup
Aligning the Angled Pick-Up Tube
1
1
2
2
3
Squeeze a small amount of oil (included,
3-in-One
®
oil or similar) into the angled pick-up
tube port and the return port. Plug in sprayer
and squeeze trigger 3-5 seconds to lubricate
piston with oil.
If you are spraying at a downward angle,
position the basket toward the object you
are spraying.
Remove container and angled pick-up tube.
If you are spraying at an upward angle, position
the basket toward the spray handle.
Insert angled pick-up tube into cylinder
housing.
4 5
Fill container with paint/stain, and thin if
needed. We recommend thinning exterior latex
paint 5-8%. About 6-10 oz per gallon.
Screw container to cylinder housing and plug
in sprayer.

www.homeright.com
English
9
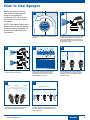
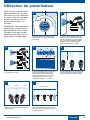
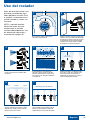
How to Use Sprayer
INCREASE
1 2
Begin spraying on a piece of scrap board, paper
or cardboard and adjust the spray pattern by
turning the knob clockwise until you find the
optimal setting. Thin material may spray better
at a lower flow setting.
Turn the flow control knob counter-clockwise to
maximum.
3
A correct spray pattern will distribute the paint
or stain evenly across the surface.
10"-12"
4 5
If you can not get a proper spray pattern by
adjusting the knob, you may have to thin
the paint/stain. If still not correct, refer to
“Troubleshooting” on page 13.
Hold the sprayer 10 to 12 inches from the
surface. To avoid runs and sags in the paint/
stain, do not speed up or slow down while
moving the sprayer.
Before spraying for the first
time, practice spraying with
water on newspaper or
cardboard. This will give you
the feel of the sprayer and all
its features.
NOTE: Gun requires lubrication
before each use for the sprayer
to work properly. See page 12
for details on lubrication and
reassembly.
HeavyLight Light
Keep stroke even
Keep the sprayer at right angles to the surface.
This means moving your entire arm back and
forth rather than just flexing your wrist.
Make sure to start your stroke before pulling
the trigger and then releasing before the end of
the stroke. Overlap each stroke with about 1/3
of the spray pattern.
6 7

English
www.homeright.com10
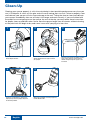
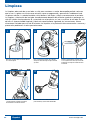
Clean-Up
1 2
Fill the container half full of the cleaning
solution appropriate to the type of material
you sprayed.
Unplug the unit. Pour the left over material back
into the original container.
Plug in the unit. Squeeze the trigger and spray
into a second container until the cleaning
solution coming through the sprayer is free
of material.
3
4
Unplug the unit. Remove the container and
angled pick-up tube and properly dispose of
the remaining solution.
Cleaning your sprayer properly is critical to maintaining its best possible performance every time you
use it. Dried paint or stains act like glue and will cause moving parts to stick. Failure to properly clean
and lubricate your sprayer will also cause damage to the unit. Taking the time to clean and lubricate
your sprayer immediately after use will help it last longer and work correctly. If you are finished with
the project or are not going to use the sprayer the rest of the day you must follow these instructions
for proper clean-up and lubrication. Never store the sprayer longer than 30 minutes without cleaning
or the paint/stain will begin to dry and cause issues with spraying at a later time.
5
With sprayer unplugged, unscrew spray tip and
remove atomizer valve.

www.homeright.com
English
11
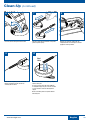
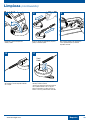
Clean-Up (continued)
6 7
Unscrew cylinder locking knob and remove. Slide out cylinder housing. Remove and separate
piston and piston spring.
Vent
Hole
9 10
Make sure to completely remove all material
from the inside of the piston chamber by
scrubbing with the brush.
Use the brush to clean out the pick-up tube port
and the return port.
Be sure to clear the vent hole with a toothpick
or straightened paper clip or a vacuum can build
up in the container and cause damage to the
sprayer.
Never reassemble piston and cylinder without
lubricating first.
Remove any remaining residue from the
components with the cleaning brush and the
appropriate cleaning solution.
8

English
www.homeright.com12
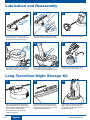
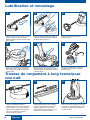
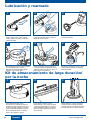
Lubrication and Reassembly
Long-Term/Over-Night Storage Kit
1 2
Lubricate piston and piston spring with oil
(included), 3-in-One
®
, or similar, install spring
on piston and insert into cylinder housing.
Insert cylinder housing assembly into the front of
sprayer. Insert cylinder locking knob and tighten
4 5
3
Insert atomizer valve and screw on spray tip.
Turn upside down. Squeeze a small amount of
oil (included), 3-in-One
®
oil, or similar into the
angled pick-up tube port and the return port.
6
Unplug the sprayer and reinstall the angled
pick-up tube and container. Store the unit.
Plug in sprayer and squeeze trigger 3-5 seconds
to lubricate piston with oil and protect the
sprayer from drying and the piston from seizing.
1
With the pump disassembled, heavily coat the
pipe cleaner with half of the included petroleum
jelly. Insert into the cylinder, working it around to
ensure the inside is completely coated.
Leave the pipe cleaner in the cylinder and
reattach the pump to gun.
Heavily coat the metal area of the piston and
lightly coat all areas of the atomizer valve with
the remaining petroleum jelly. Place in the plastic
storage bag from the Storage Kit.
Place the bag in the container along with the
piston spring and spray nozzle, and screw
the container to the cylinder housing for safe
keeping during storage.
2 3

www.homeright.com
English
13
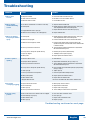
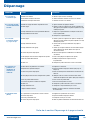
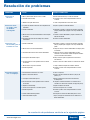
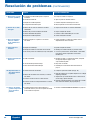
Troubleshooting
PROBLEM CAUSE REMEDY
1. Motor does
not run
A. No power to motor.
B. Loose electrical connection.
C. Defective motor or switch.
A. Check wall outlet and extension cord.
B. Discontinue use. Call Customer Service.
C. Call Customer Service.
2. Motor makes
muffled humming
sound
A. The volume control knob is screwed in all the way.
B. Seized piston.
C. Plugged atomizer valve or spray tip.
D. Atomizer valve assembly is not seated properly.
A. Adjust the volume control knob.
B. Remove piston and cylinder housing and clean. (See pg 12)
Then add petroleum oil to metal shaft of piston.
C. Replace atomizer valve and clean holes in spray tip.
D. Replace atomizer valve.
3. Motor is running,
but sprayer will not
spray
A. Seized piston.
B. Atomizer valve plugged.
C. Atomizer valve not properly seated.
D. Stain or paint material is too thick.
E. Pick-up tube is not tight to cylinder housing.
F. Spray tip clogged.
G. Worn piston.
A. Remove piston and cylinder housing and clean. (See pg 12)
Then add petroleum oil to metal shaft of piston.
B. Ensure that atomizer valve is clean and free from debris.
C. Ensure that the atomizer valve is properly seated in the
cylinder housing. Also, check to make sure the atomizer valve
is inserted correctly.
D. Thin stain/paint according to manufacturer’s requirements.
We recommend thinning 5-8%.
E. Reattach pick-up tube to cylinder housing.
F. Thoroughly clean or replace spray tip.
G. Replace piston. Call Customer Service.
4. Stain or paint is
spitting
A. Container volume is low.
B. Improper volume adjustment.
C. Stain or paint material is too thick.
D. Pick-up tube is not tight to cylinder housing.
E. Loose spray tip.
F. Stain or paint material has impurities.
G. Worn piston/cylinder.
H. Worn atomizer valve.
I. Plugged atomized valve/
A. Refill container.
B. Adjust volume control knob. (See pg 9, steps 1-2)
C. Thin according to stain/paint manufacturer’s requirements.
We recommend thinning 5-8%.
D. Clean and firmly insert into intake opening on pump housing.
(See pg 8, step 3)
E. Tighten spray tip.
F. Pour stain/paint material through strainer.
G. Replace piston. Call Customer Service.
H. Replace with new atomizer valve.
I. Clean and clear debris from three holes in atomizer valve.
5. Excessive
overspray (fogging)
A. Sprayer too far from surface.
B. Pressure too high.
C. Worn spray tip.
D. Stain or paint material is too thick.
A. Move sprayer closer to surface.
B. Adjust volume control knob.
C. Replace with new spray tip.
D. Thin according to manufacturer’s requirements.
6. Uneven spray
pattern
A. One or more holes in the atomizer valve are clogged.
B. Partial blockage in spray tip.
C. Worn atomizer valve.
D. Worn spray tip.
A. Clean three holes in atomizer valve.
B. Clean spray tip.
C. Replace with new atomizer valve.
D. Replace spray tip.
Troubleshooting continued on next page

English
www.homeright.com14
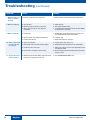
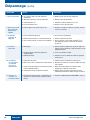
PROBLEM CAUSE REMEDY
7. Material leaks into
head of cylinder
housing
A. Piston or cylinder housing scored or worn. A. Replace piston or cylinder housing. Call Customer Service.
8. Material dripping A. Spray tip loose.
B. Operating sprayer at more than a 40° angle.
C. When using certain paints, some dripping is
unavoidable.
A. Tighten spray tip.
B. Keep sprayer upright and level.
C. If using latex paint, add Floetrol
®
or other latex paint additive
per manufacturer’s instructions.
9. Motor overheats A. Seized piston.
B. Operating sprayer for a prolonged period of time.
C. Extension cord too long.
A. Remove piston and cylinder housing and clean. (See pg 12)
Then add petroleum oil to metal shaft of piston.
B. Let sprayer cool.
C. Replace with proper size. See page 3.
10. Stain or paint will
not draw up into
the sprayer
A. Sprayer not lubricated.
B. Hole between inlet and cylinder housing plugged.
C. Suction tube not in correct port.
D. Suction tube is not tight on cylinder housing.
A. Lubricate sprayer parts. (See pg 13)
B. Remove debris with cleaning brush or thin, pointed object.
C. Make sure pick-up tube is in the correct port (longer one) and
then tighten the nozzle.
D. Clean and firmly insert into intake opening on pump housing.
(See pg 8, step 3)
11. Sags and runs in
stained surface
A. Movement of arm too slow, holding sprayer too close to
work surface or applying too much stain.
A. See SPRAYING INSTRUCTIONS page 9.
Troubleshooting (continued)

www.homeright.com
English
15
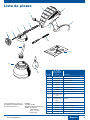
HomeRight
1661 94th Lane N.E.
Minneapolis, Minnesota 55449-4324
Phone: 763-780-5115
1-800-264-5442
8:00 a.m. to 5:00 p.m. CST.
If you cannot obtain parts and
accessories at your local retail
dealer, call or write:
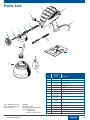
1
1
15
11
13
12
9
2
3
4
5
6
7
10
8
14
Item
Customer
Service
Part No. Description
1 C817683 Spray Tip, .8mm fan
2 C816713 Atomizer Valve
3 C816698 Cylinder Housing
4 C816550 Piston Spring
5 C817677 Piston
6 C816695 Cylinder Locking Knob
7 C806078 Powerhead
8 C816723 Volume Control Knob
9
Call customer
service
Cord
10
Call customer
service
Switch
11 C800847 Long Term Storage Kit
12 C816545 Cleaning Brush
13 C816737 Oil
14 C817647 Angled Pick-up Tube
15 C816553 Container – 1 quart
Parts List


Service à la clientèle
1-800-264-5442 ou 763-780-5115,
8 h à 17 h, heure normale du Centre.
English (page 1)
Français (page 17)
Español (página 33)
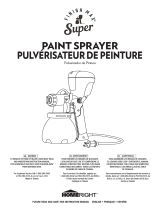
Fabriqué à Taïwan
Manuel
d’instruction
AVERTISSEMENT
POUR RÉDUIRE LES RISQUES DE BLESSURE,
L’UTILISATEUR DOIT LIRE LE MANUEL D’INSTRUCTION.
DESTINÉ À UN USAGE DOMESTIQUE SEULEMENT.
TENEZ LES ENFANTS ÉLOIGNÉS DE L’AIRE
DE TRAVAIL.
Table des matières
Mesures de protection et
avertissementsimportants 2
Guide de référence pour démarrage rapide 4
Articles requis pour le projet 5
Aménagez un emplacement pour votre projet 6
Conseils de pulvérisation 7
Sprayer Setup 8
Utilisation du pulvérisateur 9
Nettoyage 10
Lubrification et réassemblage 12
Dépannage et FAQ 13
Liste des pièces 15
Garantie limitée de deux ans 52
Pulvérisateur léger
de Tache de Devoir
Enregistrez en ligne aujourd’hui
Pour lancer votre garantie de deux ans
Attaquez-vous en ligne chez www.homeright.com ou balayez le code de QR vers la gauche. Voyez secondaire pour des détails de garantie.

Français
www.homeright.com18
Mesures de protection et avertissements
Lire et suivre toutes les mesures
de protection
Tout comme les autres outils électriques, les
pulvérisateurs sans air comprimé sont sécuritaires
lorsqu’ils sont utilisés correctement, mais peuvent être
dangereux s’ils sont mal utilisés. Il incombe à l’utilisateur
de lire et de comprendre toutes les directives, les
MESURES DE PROTECTION IMPORTANTES et les
consignes de sécurité avant de faire fonctionner ou
d’utiliser l’appareil. Si ces précautions ne sont pas
prises, des blessures corporelles, des dommages
matériels, voire la mort pourraient en résulter.
Ne tentez jamais de réparer (ou de démonter) l’appareil
vous-même. Les réparations doivent être effectuées par
un atelier professionnel familier avec cet appareil ou par
HomeRight
®
en lui retournant l’appareil (voir la garantie).
Cet appareil ne doit être utilisé qu’avec des pièces
approuvées. L’utilisateur assume tous les risques et les
responsabilités découlant de l’utilisation de pièces qui
ne répondent pas aux spécifications et aux dispositifs
de sécurité du fabricant.
Avertissements
• N’orientez PAS le pulvérisateur vers vous ou toute
autre personne. En cas de blessures, contactez
immédiatement un médecin.
• N’utilisez PAS le pulvérisateur sans peinture ou fluide.
La force du pulvérisateur peut blesser des personnes
ou des animaux.
• NE couvrez PAS la buse avec une quelconque partie
de votre corps. Un jet à grande vitesse peut entraîner
des blessures accidentelles.
• NE laissez PAS votre pulvérisateur sale ou de la
teinture sécher dans la pompe. Un pulvérisateur
sale ne fonctionnera pas lorsque vous l’utiliserez de
nouveau et pourra rendre la garantie nulle.
• NE pulvérisez PAS des produits texturés contenant
des fibres d’amiante.
• NE pulvérisez PAS des produits texturés contenant
des particules ou des fibres comme des peintures
métallisées et des peintures ignifuges.
• NE pulvérisez PAS de liquides inflammables.
• N’utilisez PAS le pistolet de pulvérisation à l’extérieur
lorsqu’il pleut.
• N’utilisez PAS le pulvérisateur à un niveau inférieur à
un plancher de garage ou au niveau du sol.
• NE démontez PAS le pulvérisateur sans avoir lu
lesdirectives.
• NE laissez AUCUNE partie du corps venir en contact
avec le jet de fluide.
• UTILISEZ une rallonge à trois fils de calibre
18auminimum. (voir la page 19)
• BRANCHEZ le cordon électrique ou la rallonge
uniquement dans une prise à trois bornes avec terre.
• MAINTENEZ le pulvérisateur hors de portée
des enfants.
• Placez TOUJOURS le pulvérisateur en position
verticale (ne le placez pas à l’envers ou sur le côté)
afin d’empêcher que le liquide pénètre dans le circuit
interne et cause des chocs électriques.
• Nettoyer et lubrifier TOUJOURS le piston et le cylindre
après avoir vaporisé de l’eau ou de la teinture.
• Portez TOUJOURS un masque, des lunettes étanches
et des protecteurs d’oreille lorsque vous utilisez le
pulvérisateur.
• Débranchez TOUJOURS le cordon électrique afin
d’éviter toute pulvérisation accidentelle.
• Pour éviter des chocs électriques, NE plongez
JAMAIS le pistolet de pulvérisation dans de l’eau ni
d’autres liquides.
Mise en garde
1. DANGER : Les émanations de solvant ou de peinture
peuvent exploser ou s’enflammer et causer des
dommages à la propriété ou des blessures graves.
Évitez toutes les faibles sources d’inflammation,
comme les étincelles d’électricité statique et les
flammes nues.
2. DANGER : Les peintures, solvants, insecticides et
autres produits similaires peuvent être dangereux s’ils
sont inhalés. Ils peuvent causer des nausées, des
évanouissements et des empoisonnements graves.
3. DANGER : Ne tenez pas le cordon électrique au
niveau des connexions pour le soutenir. Ceci peut
entraîner des chocs électriques.
Avertissement Proposition 65
La manipulation des fils électriques enrobés de ce
produit vous expose à du plomb, un matériau chimique
connu dans l’État de Californie pour causer des
anomalies congénitales et d’autres malformations de la
reproduction. Lavez-vous les mains après utilisation.
Danger : blessures par injection
Le pulvérisateur sans air pompe les produits à haute
pression et peut pénétrer la peau et les tissus sous-
jacents, ce qui peut entraîner des blessures graves,
voire l’amputation.
Ne traitez pas les blessures par injection comme de
simples coupures. Les blessures par injection peuvent
entraîner l’amputation d’un membre. Consultez
immédiatement un médecin.
• Ne mettez jamais les mains devant le pulvérisateur.
Les gants ne peuvent prévenir les blessures
par injection.

www.homeright.com
Français
19
Mesures de protection et avertissements
• Ne laissez jamais le pulvérisateur sans surveillance.
• Ne laissez jamais le pulvérisateur branché durant
le nettoyage.
• N’enlevez jamais la protection de la buse lors
de la pulvérisation.
Danger : explosion ou incendie
Les émanations de peintures, teintures et solvants
peuvent exploser ou s’enflammer et causer des
dommages à la propriété ou des blessures graves.
• Gardez la zone bien aérée. Évacuez l’air vicié et faites
pénétrer de l’air frais dans la pièce pour éviter que les
émanations ne s’y accumulent.
• Le pulvérisateur ne doit pas être utilisé en présence
de sources d’inflammation, d’étincelles d’électricité
statique, de veilleuses, de radiateurs, d’objets
chauds, de cigarettes et de flammes nues.
• Ayez toujours un extincteur en état de
fonctionnement à portée de la main.
• Suivez les consignes de sécurité et les MESURES
DE PROTECTION IMPORTANTES émises par les
fabricants des produits.
Danger : émanations
dangereuses
Les teintures, peintures, solvants, insecticides, vernis
et autres produits similaires peuvent être dangereux
s’ils sont inhalés. Ils peuvent causer des nausées, des
évanouissements et des empoisonnements graves.
• Utilisez un masque ou un respirateur lors de la
pulvérisation lorsqu’il y a un risque d’inhalation de
vapeurs nocives.
• Utilisez des lunettes de protection.
Directives de mise à la terre
Cet appareil doit être mis à la terre. Dans l’éventualité
d’un court-circuit, la mise à la terre réduit les risques de
choc électrique en évacuant le courant dans un fil. Cet
appareil est muni d’un cordon électrique comportant
un fil de mise à la terre et une fiche de mise à la terre.
La fiche doit être branchée dans une prise appropriée
correctement installée et mise à la terre selon les
ordonnances et les codes locaux.
Avertissement
DANGER - Une mise à la terre inadéquate peut
provoquer un choc électrique.
Si vous devez réparer ou remplacer le cordon
électrique ou la fiche, ne branchez pas le fil de mise à
la terre à l’une des lames de contact plates. Le fil de
mise à la terre est recouvert d’un isolant vert, avec ou
sans rayures jaunes.
Consultez un électricien qualifié ou un expert en
réparations si les directives de mise à la terre ne
sont pas entièrement comprises, ou si des doutes
subsistent quant à la méthode adéquate de mise à la
terre du produit. Ne modifiez jamais la fiche fournie si
elle ne peut être insérée dans la prise. Confiez la tâche
d’installer une prise adéquate à un électricien qualifié.
Cet appareil est conçu pour être utilisé sur un circuit
nominal de 120 volts et a une fiche de mise à la terre
identique à celle de l’illustration A (à gauche). Veillez
à ce que l’appareil soit branché dans une prise ayant
la même configuration que la fiche. Un adaptateur
temporaire, ressemblant à celui des illustrations B
et C, peut être utilisé pour brancher la fiche dans
une prise bipolaire, comme le montre l’illustration B,
si une prise correctement mise à la terre n’est pas
disponible. L’adaptateur temporaire doit être utilisé
uniquement tant qu’une prise correctement mise à la
terre (illustration A) n’est pas installée par un électricien
qualifié. La languette rigide, de couleur verte, ou la
partie en saillie de l’adaptateur doit être branchée à une
mise à la terre permanente comme un couvercle de
prise correctement mise à la terre. Lorsque l’adaptateur
est utilisé, il doit être maintenu en place à l’aide d’une
vis métallique.
Rallonges
Utilisez uniquement une rallonge à trois fils dotée d’une
fiche de mise à la terre à trois lames ainsi qu’une prise
à trois fentes compatible avec la fiche de l’appareil.
Assurez-vous que la rallonge est homologuée UL/
ETL/CSA et qu’elle est en bon état. Lorsque vous
utilisez une rallonge, assurez-vous que le câble est
suffisamment gros. Pour des distances de moins de
5 mètres (18 pieds) utilisez un câble de calibre 18 AWG,
ou supérieur, et pour des distances de plus de
5 mètres (18 pieds), utilisez un câble de calibre 16
AWG. En cas de doute, utilisez un câble de calibre
supérieur. Un cordon sous-dimensionné entraînera une
chute de tension ainsi qu’une perte de courant et une
surchauffe.
Rangement
Assurez-vous que l’appareil est propre et sec avant de
le ranger. Rangez-le dans un endroit sec. Le cordon
électrique ne doit pas être pincé durant l’entreposage
de manière à ne pas l’endommager.
Prise mise
à la terre
Boîte de courant
mise à la terre
Adaptateur
Languette et
vis de mise
à la terre
A

Français
www.homeright.com20
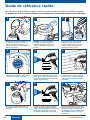
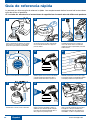
Guide de référence rapide
Ceci n’est qu’un guide de référence rapide. Lisez le manuel d’instruction au complet avant d’utiliser ce produit.
Veuillez lire tous les avertissements et les consignes de sécurité du manuel avant l’utilisation.
REMARQUE : le pulvérisateur exige une
lubrification avant chaque utilisation pour
fonctionner convenablement. Consultez la
section de lubrification à la page 28 pour
lesdétails.
Mélangez soigneusement votre produit. Enlevez
et remplissez le récipient avec le produit.
Utilisez un filtre pour filtrer le produit s’il est
usé, puisqu’il pourrait contenir des grumeaux et
obstruer le pulvérisateur.
Attachez fermement le tube biseauté de
ramassage au port de l’extrémité avant
du boîtier du cylindre. Attachez le récipient
contenant le produit au pulvérisateur et
branchez-le à la prise de courant.
Réglez le débit au maximum en tournant
complètement le bouton de commande dans le
sens contraire des aiguilles d’une montre.
Réglez maintenant la forme du jet en tournant le
bouton dans le sens des aiguilles d’une montre
jusqu’à obtenir la forme de jet souhaitée. Suivez
les directives de la page 43 pour une répartition
adéquate de la pulvérisation.
Une fois la pulvérisation terminée, débranchez
le pulvérisateur. Retirez le contenant et videz
son contenu.
Pulvérisez la surface en maintenant le
pulvérisateur de niveau entre 25 et 30 cm de
la surface. Utilisez un mouvement de balayage
et de chevauchement pour obtenir le meilleur
recouvrement.
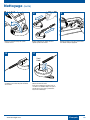
Remplissez le pulvérisateur avec une solution de
nettoyage, branchez-le et actionnez la gâchette
jusqu’à ce que la solution sorte par la buse. Consultez
la page 26 pour les informations concernant les
suggestions de nettoyage pour le latex et l’huile.
Débranchez le pulvérisateur. Enlevez les pièces.
Nettoyez et séchez selon les instructions figurant
à la page 26. Lubrifiez le pulvérisateur avec
une huile légère (incluse) avant d’entreposer, ou
utilisez du WD40
®
, de l’huile 3-in-One
®
ou un
produit similaire.
INCREASE
4 5 6
7 8 9
1 2 3
La page est en cours de chargement...
La page est en cours de chargement...
La page est en cours de chargement...
La page est en cours de chargement...
La page est en cours de chargement...
La page est en cours de chargement...
La page est en cours de chargement...
La page est en cours de chargement...
La page est en cours de chargement...
La page est en cours de chargement...
La page est en cours de chargement...
La page est en cours de chargement...
La page est en cours de chargement...
La page est en cours de chargement...
La page est en cours de chargement...
La page est en cours de chargement...
La page est en cours de chargement...
La page est en cours de chargement...
La page est en cours de chargement...
La page est en cours de chargement...
La page est en cours de chargement...
La page est en cours de chargement...
La page est en cours de chargement...
La page est en cours de chargement...
La page est en cours de chargement...
La page est en cours de chargement...
La page est en cours de chargement...
La page est en cours de chargement...
-
 1
1
-
 2
2
-
 3
3
-
 4
4
-
 5
5
-
 6
6
-
 7
7
-
 8
8
-
 9
9
-
 10
10
-
 11
11
-
 12
12
-
 13
13
-
 14
14
-
 15
15
-
 16
16
-
 17
17
-
 18
18
-
 19
19
-
 20
20
-
 21
21
-
 22
22
-
 23
23
-
 24
24
-
 25
25
-
 26
26
-
 27
27
-
 28
28
-
 29
29
-
 30
30
-
 31
31
-
 32
32
-
 33
33
-
 34
34
-
 35
35
-
 36
36
-
 37
37
-
 38
38
-
 39
39
-
 40
40
-
 41
41
-
 42
42
-
 43
43
-
 44
44
-
 45
45
-
 46
46
-
 47
47
-
 48
48


HomeRight C800915.M Manuel utilisateur
- Catégorie
- Pulvérisateur de peinture
- Taper
- Manuel utilisateur
dans d''autres langues
Documents connexes
-
HomeRight C800917.M Manuel utilisateur
-
-
-
-
-
-
-
-
-
Autres documents
-
WAGNER 0525009 Mode d'emploi
-
 Finish Max Super Paint Sprayer Manuel utilisateur
-
 Wagner SprayTech Power Painter II Sprayer Manuel utilisateur
-
Black & Decker BDPS400 Manuel utilisateur
-
 Wagner SprayTech Power Painter/Stainer Sprayer Manuel utilisateur
-
Black & Decker BDPS200 Manuel utilisateur
-
Ryobi SSP050 Manuel utilisateur
-
-
-


