Paradigm Persona SUB Le manuel du propriétaire
- Catégorie
- Amplificateur d'instruments de musique
- Taper
- Le manuel du propriétaire
Ce manuel convient également à

SUB
PERSONA
TM
Owners Manual

i
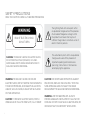
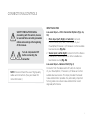
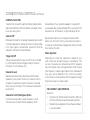
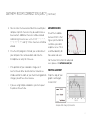
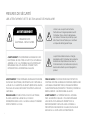
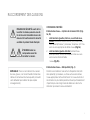
SAFETY PRECAUTIONS
READ THIS SECTION CAREFULLY BEFORE PROCEEDING!
WARNING: TO REDUCE THE RISK OF ELECTRIC SHOCK,
DO NOT REMOVE COVER (OR BACK). NO USER-
SERVICEABLE PARTS INSIDE. REFER SERVICING TO
QUALIFIED SERVICE PERSONNEL.
The exclamation point within an equilateral
triangle warns users of the presence of
important operating and maintenance
(servicing) instructions in the literature
accompanying the appliance.
WARNING: TO REDUCE THE RISK OF FIRE OR
ELECTRIC SHOCK, DO NOT EXPOSE THIS APPARATUS
TO RAIN OR MOISTURE, AND OBJECTS FILLED WITH
LIQUIDS, SUCH AS VASES, SHOULD NOT BE PLACED
ON THIS APPARATUS.
CAUTION: TO PREVENT ELECTRIC SHOCK, MATCH
WIDE BLADE OF PLUG TO WIDE SLOT, FULLY INSERT.
CAUTION: FOR CONTINUED PROTECTION AGAINST
RISK OF FIRE, REPLACE THE FUSE ONLY WITH THE
SAME AMPERAGE AND VOLTAGE TYPE. REFER
REPLACEMENT TO QUALIFIED SERVICE PERSONNEL.
WARNING: UNIT MAY BECOME HOT. ALWAYS
PROVIDE ADEQUATE VENTILATION TO ALLOW FOR
COOLING. DO NOT PLACE NEAR A HEAT SOURCE, OR
IN SPACES THAT CAN RESTRICT VENTILATION.
The lightning flash with arrowpoint within
an equilateral triangle warns of the presence
of uninsulated “dangerous voltage” within
the product’s enclosure that may be of
sufficient magnitude to constitute a risk of
electric shock to persons.
WARNING
RISK OF ELECTRIC SHOCK
DO NOT OPEN

ii
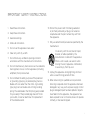
IMPORTANT SAFETY INSTRUCTIONS
1. Read these instructions.
2. Keep these instructions.
3. Heed all warnings.
4. Follow all instructions.
5. Do not use this apparatus near water.
6. Clean only with dry a cloth.
7. Do not block any ventilation openings. Install in
accordance with the manufacturer’s instructions.
8. Do not install near any heat sources such as radiators,
heat registers, stoves, or other apparatus (including
amplifiers) that produce heat.
9. Do not defeat the safety purpose of the polarized
or grounding-type plug. A polarized plug has two
blades with one wider than the other. A grounding
type plug has two blades and a third grounding
prong. The wide blade or the third prong are provided
for your safety. If the provided plug does not fit into
your outlet, consult an electrician for replacement
of the obsolete outlet.
10. Protect the power cord from being walked on
or pinched, particularly at plugs, convenience
receptacles and the point where they exit from
the apparatus.
11. Only use attachments/accessories specified by the
manufacturer.
12. Use only with the cart, stand, tripod,
bracket, or table specified by the
manufacturer or sold with the apparatus.
When a cart is used, use caution when
moving the cart/ apparatus combination,
to avoid injury from tip-over.
13. Unplug this apparatus during lightning storms or
when unused for long periods of time.
14. Refer all servicing to qualified service personnel.
Servicing is required when the apparatus has been
damaged in any way, such as power-supply cord or
plug is damaged, liquid has been spilled or objects
have fallen into the apparatus, the apparatus has
been exposed to rain or moisture, does not operate
normally, or has been dropped.

iii
15. Use the mains plug to disconnect the apparatus from
the mains or ”TO COMPLETELY DISCONNECT THIS
APPARATUS FROM THE AC MAINS, DISCONNECT
THE POWER SUPPLY CORD PLUG FROM THE AC
RECEPTACLE.
16. “WARNING – TO REDUCE THE RISK OF FIRE
OR ELECTRIC – SHOCK, DO NOT EXPOSE THIS
APPARATUS TO RAIN OR MOISTURE”
17. “DO NOT EXPOSE THIS EQUIPMENT TO DRIPPING
OR SPLASHING AND ENSURE THAT NO OBJECTS
FILLED WITH LIQUIDS, SUCH AS VASES, ARE
PLACED ON THE EQUIPMENT.”
18. “THE MAINS PLUG OF THE POWER SUPPLY CORD
SHALL REMAIN READILY OPERABLE.”
The “Watts” (W) rating indicated on the rear panel is the typical power your subwoofer will draw during normal use.
However, when producing its maximum power output, the actual wattage draw will vary with the bass content of
the program material—more if there is a lot of deep bass, less when there is not as much bass.

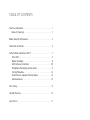
TABLE OF CONTENTS
Your New Subwoofer ........................................
1
Break-In/Cleaning .......................................1
Room Acoustics & Placement .................................
2
Connection & Controls .......................................
4
Anthem Room Correction (ARC™) .............................
7
Why ARC? ..............................................7
Before You Begin ....................................... 9
ARC Software Installation ...............................10
Microphone Positioning & Connection ....................11
Testing Procedure ......................................12
Quick Measure Speaker Position Helper ...................13
Advanced Users ........................................14
Fine Tuning .................................................
15
Limited Warranty ..........................................
16
Specifications .....................................................17

1
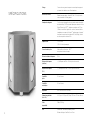
Your new Persona subwoofer is a supremely powerful, accurate, as well as physically attractive six-sided sealed
system that boasts:
• A Compact Hexagonal Form Factor;
• Vibration-Canceling Design Architecture: Six identical, perfectly-balanced inside the cabinet. As opposing forces
of equal magnitude, powerful vibration-reaction forces effectively cancel each other out. Place a martini glass on
top of the Persona SUB and barely a ripple disturbs the contents while the subwoofer is playing.
• Six Cutting-Edge High-Excursion Bass Drivers with advanced Pure Aluminum (X-PAL™) Cones and distortion-
reducing surrounds;
• 2 Cutting-Edge Ultra-Class-D
™
Amplifiers;
• Our Own Digital Signal Processing Design;
• A Comprehensive Range of Input and Control Facilities;
YOUR NEW SUBWOOFER
Break-In
Although your Persona SUB will sound great “out of the carton” it will sound even better when broken in. Allow it to
operate for several hours before you begin to listen critically.
Cleaning
Your subwoofer has a durable premium finish. To clean, use a damp soft cloth. Do not use a strong or abrasive
cleaner. Avoid getting any part of the subwoofer system wet. Do not place wet objects (drinking glasses, potted
plants, etc.) directly on top of your new subwoofer. A coaster must be used every time. If allowed to soak in, even a
small amount of water may permanently damage the gorgeous high-end furniture finish.

2
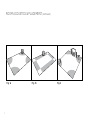
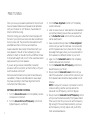
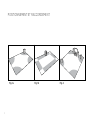
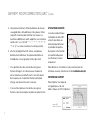
ROOM ACOUSTICS & PLACEMENT
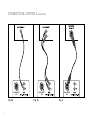
Bass is less and less directional as it goes down in frequency. For best sonic integration, locating your subwoofer
between your front speakers or beside one of them and close to the back wall will usually provide the best bass
performance. If this location is not possible your subwoofer may be placed anywhere in the room without affecting the
stereo image of your front speakers or the soundstage of your multichannel speaker system.
Figure 1a: Corner placement provides the most bass, but sometime at the expensive of accuracy.
Figure 1b: A subwoofer placed near a wall usually provides a good balance of quality and accuracy.
Although controls are provided to align your subwoofer’s output to the other speakers in your system, see “Fine Tuning”
on Page 18, you have at your disposal the most powerful, accurate and innovative tool in the industy for achieving
optimal bass performance in any room situation. The critically acclaimed Anthem Room Correction (ARC™) is a true
audiophile solution to the provlems of the room. It allows you to correct for the effects of room boundaries on the quality
of bass.
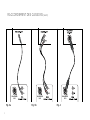
The Advantages of Using Two Subwoofers in your Listening Room
What’s the only thing better than a single Persona SUB? Two of them! Although a single Persona SUB provides
breathtaking output, the quality of bass can be further improvded with the use of two subwoofers. Placing one in the
front and of the room and the other in the rear of the room (see Fig. 2) usually provides the best bass performance and
sonic integration. Begin by placing your subwoofers in these standard positions, then apply ARC™ to the first subwoofer,
then to the second subwoofer.

3
ROOM ACOUSTICS & PLACEMENT (continued)
Fig. 1a
Fig. 1b Fig. 2

4
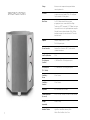
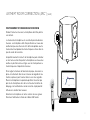
CONNECTION & CONTROLS
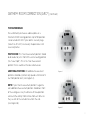
INPUT FACILITIES
Low-Level Input — 2 RCA Connection Options (Figs. 3a,
3b)
1. Mono Input (Left, Right, or Sub-Out) connects
from the RCA (S/E) Sub / LFE–Output of your
Preamplifier/Processor, A/V Receiver or other suitable
low-level source (Fig. 3a).
2. Stereo Input (Left & Right) connects from the Stereo
Preamplifier, Stereo Receiver or other suitable low-
level stereo source (Fig. 3b).
Low-Level Input — Balanced XLR (Fig. 4)
Connects from the Balanced XLR Sub/LFE–Output
of your Preamplifier / Processor, A/V Receiver or other
suitable low-level source. This input provides the lowest
noise and distortion possible. It is particularly important
for long cable runs where noise and distortion could
degrade performance.
SAFETY PRECAUTION: Before
proceeding with this section, be sure
to read and follow all safety precaution
notices and warnings at the beginning
of this manual.
Turn all components OFF
before connecting the
subwoofer.
NOTE: We recommend the use of high-quality
cables and connectors. (See your Dealer for
more information.)

5
Fig. 3a
Fig. 3b Fig. 4
BALANCED
XLR
BALANCED
XLR
BALANCED
XLR
CONNECTION & CONTROLS (continued)

6
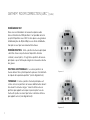
CONNECTION & CONTROLS (continued)
Take the time to read through the following descriptions
and become familiar with them before you begin to fine
tune your new system.
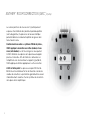
Auto-On/Off
Eliminates the need for a manually operated power switch.
Turns the subwoofer on whenever there is an input signal.
If no input signal is sensed after a period of time the
subwoofer will switch off automatically.
Trigger-On/Off
Allows the subwoofer’s power on/off to be controlled
by components that have trigger outputs (Preamp/
Processor or A/V Receiver, etc.).
Subwoofer Level
Balances the subwoofer’s output level with the other
speakers in your system. Once set, to make on-the-fly
changes for particular program material or personal
taste, use your Processor or A/V Receiver’s subwoofer
level control.
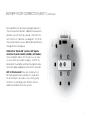
Subwoofer Cut-Off and Bypass Option
Controls the subwoofer’s upper-frequency cut-off.
This can be set to match the low-frequency roll-off
characteristics of your system’s speakers. For example: If
your speakers play to approximately 80 Hz, you can set the
subwoofer cut-off frequency to approximately 80 Hz.
Bypass option allows you to bypass the subwoofer’s
built-in cut-off control to let your preamp/processor’s
or receiver’s internal bass management system provide
the crossover function.
Phase Alignment
Depending on where the subwoofer is placed in your
room, there may be bass frequency cancellation. This
can occur because your subwoofer and front speakers
are out-of-phase—they work against each other through
their frequency overlap region. Bass is then reduced and
may even sound disjointed. This control accurately
synchronizes your subwoofer and front speakers through
their bass frequency overlap region.
THE USB PORT / ARC INTERFACE
Allows for:
• Connection of Anthem Room Correction (ARC) Kit
(for more information see the preceding section);
• Possible future upgrades to the software installed
in your subwoofer.
CONTROL FACILITIES

7
ANTHEM
®
ROOM CORRECTION (ARC
™
)
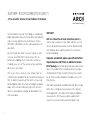
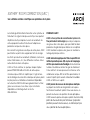
A True Scientific Solution to the Problems of the Room
Anthem Room Correction Technology is a proprietary
digital signal processing system that allows you to quickly
and accurately optimize the performance of your
PERSONA SUB to better suit the unique parameters of
your room.
By listening to your room’s acoustic signature, ARC
can tune your PERSONA SUB to correct for the
performance-robbing effects (reflections, resonances,
standing waves, etc.) of the various surfaces and other
obstacles in your room.
ARC is easy to use, and just a few simple steps can
customize your subwoofer for your unique listening space.
ARC is sophisticated, one of the most accurate and
detailed digital room correction technologies available
today. ARC will work tomorrow, too; with constant
advances and updates available for download on the
Anthem website.
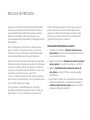
WHY ARC?
ARC is a state-of-the-art room correction system that
analyzes bass response in your room, and then sets the
correct equalization parameters to attain optimal sound.
ARC improves bass response and enhances seamless
dynamic blending.
Computer-assisted ARC applies super-efficient Infinite
Impulse Response (IIR) Filters, in addition to Custom
Filter Topology, to minimize delay and reduce processing
noise. If any audio artifacts could overcome this unique
combination of IIR plus Custom Filtering, they would
be so small as to be completely inaudible. ARC is just
that effective.
Most room equalization methods work from only a single
point source, taking one measurement at the “primary
listening position.” ARC allows for multiple microphone
measurements. ARC measures room response from
at least five user-selected measurement points (up
Room Correction Technology

8
ANTHEM
®
ROOM CORRECTION (ARC
™
)
(continued)
to ten positions may be measured), beginning with a
“main measurement position.” Additional measurement
positions are symmetrically spaced a minimum of 2
feet from the first position (see diagram). This multi-
measurement process ensures optimal bass performance
throughout the listening area.
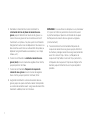
Unlike other “Room EQ” systems, ARC applies
correction to peaks (modes) and dips (anti-modes).
Correcting both allows ARC to achieve a far more
accurate and natural room response. To limit the
demands on the amplifier and maximize signal-to-noise
ratio, ARC applies appropriate limits to this correction.
ARC is Ultra-Accurate! Your own computer’s 64-
bit floating-point processor does the hard work
of calculating the correction curves, which greatly
minimizes the rounding errors common with less
sophisticated room correction systems.

9
ANTHEM
®
ROOM CORRECTION (ARC
™
)
(continued)
HOW DOES ARC WORK?
The “room correction” process begins when a test signal
generated from your PERSONA SUB and is picked up by
the ARC calibrated microphone. The system then runs
a frequency sweep to highlight possible problem areas
and determine necessary adjustments. Once your ARC
measurements are captured by the microphone and saved
on the connected PC, the optimized solutions are calculated
by ARC and uploaded to your subwoofer. You will hear
the difference, with more realistic, better-blended bass
response.
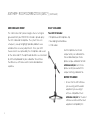
WHAT’S INCLUDED:
Your ARC Kit includes:
• Microphone and microphone clip
• Telescoping stand and base
• 2 USB cables
Each microphone has its own
unique factory-set calibration file.
You can download your micro-
phone’s unique calibration file from
anthemav.com/arc. Each micro-
phone can only be used with its
unique matching calibration file.
BEFORE YOU BEGIN
• Ensure that the ARC software
you are using, and the audio
equipment you are using it
with, are compatible. Check
anthemav.com/arc for the latest
software versions and the latest
equipment compatibility list.

10
ANTHEM
®
ROOM CORRECTION (ARC
™
)
(continued)
• Your ARC microphone and its calibration file work
together as a pair. Before the microphone can be used
by the ARC software, its exact response must be known.
So each ARC microphone’s frequency response is
precisely measured at the factory to create its unique
calibration file. Download your microphone’s unique
calibration file from anthemav.com/arc.
• Your computer must running Windows 7 or later. If
you’re using a laptop computer, check its power settings
and battery meter to ensure that ARC procedures will
not be interrupted.
• The ARC acoustic measurement process rejects typical
background noise, but if loud noise is present it may
interfere with the ARC process. ARC may indicate that
re-measurement is required. To avoid this, ensure that
the room being tested will be sufficiently quiet during
measurement.
ARC SOFTWARE INSTALLATION
• Download the latest software version to your computer
desktop at anthemav.com/arc.
• Right-click on the downloaded .zip file folder and extract
to desktop.
• Open the extracted folder and double-click on “Setup.”
• Software installation instructions will appear on
your screen.
• Go to Start Menu and “run” ARC.
If you are downloading an ARC update, make sure the
existing ARC program is closed on your computer before
installing a new version.

11
MICROPHONE POSITIONING & CONNECTION
During all measurements, the microphone must point
straight up.
The microphone’s height is critical to proper measurement
and should be positioned at ear-level when seated to
correspond with the height of the high-frequency drivers in
the front speaker array.
Incorrect microphone positioning may result in a dull or
bright sound. Readjust the microphone to seated ear-level,
in line with the high-frequency drivers and repeat ARC
measurements.
To adjust the length of the telescoping tube, first loosen its
clamp by rotating it counterclockwise; reposition, then rotate
clockwise to lock. Set the microphone in the first position.
Don’t stand near the microphone while sweep tones are
playing, otherwise, reflections from your body may cause
bad measurements.
Connect the microphone and your subwoofer to the
computer using the supplied USB cables.
Frequency (Hz)
15
50 20
90
80
70
60
50
100 200 500 1k 2k
5k
1Ok
dB
ANTHEM
®
ROOM CORRECTION (ARC
™
)
(continued)

12
ANTHEM
®
ROOM CORRECTION (ARC
™
)
(continued)
TESTING PROCEDURE
We recommend you measure audio response at a
minimum of FIVE listening positions. Up to TEN positions
can be tested with ARC if your room is unusually large
(more than 40’ x 40’) or unusually shaped—more is not
necessarily better.
POSITION ONE: This “main measurement position” should
be located at or just in front of the central seating position
(the “Sweet Spot”). This is the “main measurement
position” that is used to set the bass volume levels.
ADDITIONAL POSITIONS: All additional measurement
positions should be symmetrically spaced a minimum of 2
feet from position one* (see Diagram A).
NOTE: If your “main measurement position” is against a
wall, additional measurement positions should be in front
of the seating area. Vary the distance of these positions
relative to the wall by 1 foot or more from each other so
they are not all the same distance from the wall.
(see Diagram B).
Diagram A
Diagram B

13
QUICK MEASURE SPEAKER POSITION HELPER
If subwoofer positioning is flexible, you can try using Quick
Measure before running ARC. (Alternatively you can start
with a full measurement and then see whether it might be
necessary to re-position your subwoofer.) To use Quick
Measure:
• Click the Quick Measure icon.
• Click Connect and then select the device you want
to measure.
• Once connected, click Start to enable the sweep tone
for the speaker that you are positioning.
• After a few sweeps the graph will show a live update of
the uncorrected measurement. It will keep running until
you turn it off.
• You may now move your subwoofer around the room
and watch for when the response graph
is flattest.
• Leave your subwoofer where the graph is flattest,
particularly in the bass frequencies, click Stop and close
the Quick Measure window, and then run ARC normally.
NOTE: If you are using multiple subwoofers, you must
repeat the process for each one.
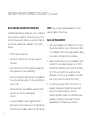
BASIC ARC MEASUREMENT
1. With your microphone set in Position One, the “main
measurement position,” use the USB to connect both
the microphone and the ARC-ready equipment being
measured to a USB input on your computer.
2. Before starting to measure, set the subwoofer’s GAIN
control to the center/detent position; set CUT-OFF
FREQUENCY to BYPASS, and set PHASE CONTROL
to “0”. After running ARC, these controls can be
adjusted as necessary as you complete the setup of
your system. (Refer to section on Fine Tuning)
3. Run ARC by selecting it from the Start Menu. The
program will guide you through the measurement
steps. At the end of the process, ARC will
automatically load the room correction data to your
equipment. The process takes about 10 minutes
depending on the number of measurements.
ANTHEM
®
ROOM CORRECTION (ARC
™
)
(continued)

14
ANTHEM
®
ROOM CORRECTION (ARC
™
)
(continued)
4. You can name the measurement data file saved to your
computer. Up to 16 characters may be used to name a
measurement. Additional characters will be removed.
Valid naming characters are: a-z, A-Z, 0-9, “ “, “-”, “.”, “:”,
“;”, “<”, “=”, “>”, “?”, and “@”. Other characters will not be
allowed.
5. Once the ARC program is finished, you can disconnect
your computer. You can break down and store the
microphone set safely for future use.
• If the positions of your subwoofer changes, or if
new furniture or other sound-reflective materials are
introduced into the room, or your main listening position
changes, you will have to re-measure.
• If you are using multiple subwoofers, you must repeat
the process for each one.
ADVANCED USERS
One of the incredible
features of ARC is that
it gives you the tools to
customize your room
response curves. This is
recommended only for
more advanced users.
For the latest instructions for advanced
users, please visit anthemav.com/arc.
PRINTING A REPORT
To print a copy of your
graphics and targets,
click on Print.
Sample ARC Analysis/Correction

15
FINE TUNING
Once you have your speakers positioned in the room and
have set speaker distances and speaker level calibration
with your Processor or A/V Receiver (if applicable), it’s
time for a little fine tuning.
When fine tuning your subwoofer to best integrate with
the rest of your system use music and video soundtracks
that you know well. They should contain selections with
extended bass that is continuous and repetitive.
Assess subwoofer bass output for best blend with your
main speakers. It should not be overbearing or draw
attention to itself, nor should it be thin and difficult to hear.
It should add ‘weight’ and ‘punch’ to the overall sound and
keep pace with your main speakers.
If you are using a receiver, preamplifier or preamp/
processor with tone controls, set them to flat (i.e. ‘0’) and
switch loudness controls off.
Some subwoofer locations may result in bass frequency
cancellations. If bass sounds dislocated or weak, adjust
the phase according to the Phase Alignment Control
instructions that follow below.
SETTING SUBWOOFER CONTROLS
1. Turn the Subwoofer Level control completely counter-
clockwise to its minimum.
2. Turn the Subwoofer Cut-off Frequency control to its
highest frequency (i.e.150 Hz).
3. Turn the Phase Alignment control to 0° completely
counter-clockwise.
4. Listen to a bass music or video selection while seated in
your primary listening area and have an assistant turn
up the Subwoofer Level control until the subwoofer
can be clearly heard.
5. Have an assistant slowly rotate the Phase Alignment
control until you hear the most bass. Your subwoofer
and front speakers are now in phase. Do not change
phase alignment again unless you move subwoofer or
front speakers to a different location in your room.
6. Again, turn the Subwoofer Level control completely
counter-clockwise to its minimum.
7. Turn the Subwoofer Cut-off Frequency control to its
lowest frequency (i.e. 50 Hz).
8. Slowly rotate the Subwoofer Level control until you
match the subwoofer’s volume with the volume of your
front speakers. Bass should be clearly audible, but not
intrusive.
NOTE: If using an A/V receiver or processor to control
crossover setting, skip the next step and set the
subwoofer cut-off frequency control to ‘Bypass’.
9. Slowly rotate the Subwoofer Cut-off Frequency control
until you hear the best subwoofer/front speaker blend.
If the sound is too thin you have not set the frequency
high enough; if the sound becomes boomy you have
set the frequency too high. Adjust until you find the
most natural bass balance.
La page est en cours de chargement...
La page est en cours de chargement...
La page est en cours de chargement...
La page est en cours de chargement...
La page est en cours de chargement...
La page est en cours de chargement...
La page est en cours de chargement...
La page est en cours de chargement...
La page est en cours de chargement...
La page est en cours de chargement...
La page est en cours de chargement...
La page est en cours de chargement...
La page est en cours de chargement...
La page est en cours de chargement...
La page est en cours de chargement...
La page est en cours de chargement...
La page est en cours de chargement...
La page est en cours de chargement...
La page est en cours de chargement...
La page est en cours de chargement...
La page est en cours de chargement...
La page est en cours de chargement...
La page est en cours de chargement...
La page est en cours de chargement...
La page est en cours de chargement...
La page est en cours de chargement...
La page est en cours de chargement...
La page est en cours de chargement...
-
 1
1
-
 2
2
-
 3
3
-
 4
4
-
 5
5
-
 6
6
-
 7
7
-
 8
8
-
 9
9
-
 10
10
-
 11
11
-
 12
12
-
 13
13
-
 14
14
-
 15
15
-
 16
16
-
 17
17
-
 18
18
-
 19
19
-
 20
20
-
 21
21
-
 22
22
-
 23
23
-
 24
24
-
 25
25
-
 26
26
-
 27
27
-
 28
28
-
 29
29
-
 30
30
-
 31
31
-
 32
32
-
 33
33
-
 34
34
-
 35
35
-
 36
36
-
 37
37
-
 38
38
-
 39
39
-
 40
40
-
 41
41
-
 42
42
-
 43
43
-
 44
44
-
 45
45
-
 46
46
-
 47
47
-
 48
48


Paradigm Persona SUB Le manuel du propriétaire
- Catégorie
- Amplificateur d'instruments de musique
- Taper
- Le manuel du propriétaire
- Ce manuel convient également à
dans d''autres langues
- English: Paradigm Persona SUB Owner's manual
Documents connexes
-
Paradigm Cinema Sub Manuel utilisateur
-
Paradigm Defiance X15 Manuel utilisateur
-
Paradigm Cinema 100 CT Manuel utilisateur
-
Paradigm Prestige 2000SW Manuel utilisateur
-
Paradigm Defiance V12 Manuel utilisateur
-
Paradigm PW Soundbar Manuel utilisateur
-
-
-
Paradigm PA-PW800B Manuel utilisateur
-
Paradigm PW 600 Le manuel du propriétaire
Autres documents
-
 MartinLogan Dynamo 800X Manuel utilisateur
-
Bryston Mini T Subwoofer Le manuel du propriétaire
-
-
-
Anthem STR Preamplifier Manuel utilisateur
-
 MartinLogan Verse Manuel utilisateur
-
-
Anthem STR Power Amplifier Manuel utilisateur
-
Monitor Audio Silver W12 Manuel utilisateur
-
Monitor Audio Silver W-12 Le manuel du propriétaire

