MartinLogan Dynamo 800X Manuel utilisateur
- Catégorie
- Équipement musical supplémentaire
- Taper
- Manuel utilisateur
Ce manuel convient également à

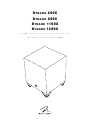
Dy n a m o 600X
Dy n a m o 800X
Dy n a m o 1100X
Dy n a m o
1600X
Model/型号: Dy n a m o 600 X / Dy n a m o 8 00X / Dy n a m o 110 0X / Dy n a m o 1600 X
®
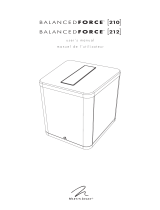
user’s manual / manuel de l’utilisateur / 使用手册

Serial Numbers: _________________________________________
Record your serial numbers here for easy reference. You will need this informa-
tion when filling out your warranty registration. Your serial number is located
near the bottom of the backplate and on the shipping container.
Settings:
Volume (level): __________________________________________
Low Pass Filter: _________________________________________
Phase: ________________________________________________
20–30Hz Level: ________________________________________
A/V Processor Bass Management Settings:
Main Speaker Size: ___________ (large recommended for full range speakers)
Center Speaker Size: _______________________ (small recommended)
Surround Speaker Size: _____________________ (small recommended)
Level: _________________________________________________
High-Pass: _____________________________________________
Low-Pass: ______________________________________________
Numéro de série _______________________________________________
Veuillez noter vos numéros de série ici afin de pouvoir les consulter facilement. Vous aurez
besoin de ces renseignements lorsque vous remplirez l’inscription à la garantie. Le numéro
de série se trouve dans la partie inférieure de la plaque arrière et sur le carton d’emballage.
Paramètres` :
Volume (niveau) ________________________________________________
Filtre passe basse ______________________________________________
Phase ________________________________________________________
Niveau 20–30 Hz _____________________________________________
Paramètres de gestion des graves du processeur A/V :
Taille de l’enceinte principale ____________________________________
(grande taille recommandée pour les enceintes à gamme complète)
Taille de l’enceinte centrale ______________________ (petite taille recommandée)
Taille de l’enceinte ambiophonique _______________ (petite taille recommandée)
Niveau ______________________________________________________
Passe haute __________________________________________________
Passe basse __________________________________________________

Thank you—to you the MartinLogan owner,
for loving what we do,
and making it possible for us to do what we love.
— — — — — — — — — — — — — — — — — — — — — — — — — — — — — —
Merci à vous, propriétaire d’un produit MartinLogan,
d’aimer ce que nous faisons,
et de faire en sorte que nous puissions faire ce que nous aimons.


Contents | table des matières
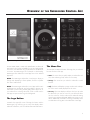
Overview of Controls and Connections ......... 2
Controls ...................................2
Audio Signal Connections .......................3
Wireless Audio Signal Connection ..................4
AC Power Connection ..........................4
Break-In....................................4
Overview of the Subwoofer Control App ....... 5
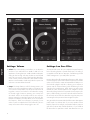
The Logo Button ..............................5
The Menu Bar ...............................5
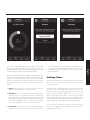
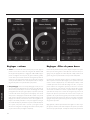
Settings: Volume ..............................6
Settings: Low Pass Filter .........................6
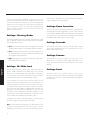
Settings: Phase ...............................7
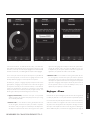
Settings: Listening Modes ........................8
Settings: 20–30Hz Level ........................8
Settings: Room Correction........................8
Settings: Passcode.............................8
Settings: Rename..............................8
Settings: Reset ...............................8
Connecting the Subwoofer and Setting Controls .. 9
Before Connecting the
Dynamo ....................9
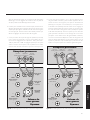
2-Channel Mode .............................9
Multi-Channel Mode ..........................10
Simultaneous 2-Channel/Multi-Channel Mode .........12
Using Speaker Level Inputs ......................14
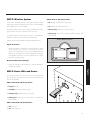
SWT-X Wireless Systems .......................15
SWT-X Status LEDs and Power ....................15
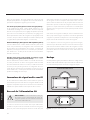
Placement ............................. 16
Subwoofer Position ...........................16
www.martinlogan.com/subsetup ..................16
Ask Your Dealer .............................16
Enjoy Yourself...............................16
Installing in a Cabinet .........................16
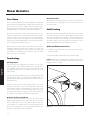
Changing Woofer Orientation....................17
Room Acoustics ......................... 18
Your Room.................................18
Terminology ...............................18
Solid Footing ...............................18
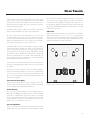
Home Theater .......................... 19
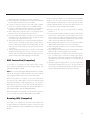
Anthem Room Correction (ARC™) Setup ....... 20
About ARC ................................20
Before You Begin ............................20
ARC Connection (Mobile Device)..................20
Running ARC (Mobile Device) ....................20
ARC Conneciton (Computer) .....................21
Running ARC (Computer) .......................21
Frequently Asked Questions and Troubleshooting 22
Frequently Asked Questions......................22
Troubleshooting .............................22
Control App Troubleshooting.....................23
ARC Troubleshooting ..........................23
General Information ..................... 24
Warranty and Registration ......................24
Service ...................................24
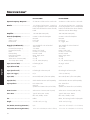
Specifications........................... 26
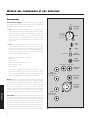
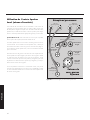
Aperçu des commandes et des raccords ....... 30
Commandes ................................30
Connexions de signal audio .....................31
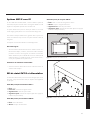
Connexions de signal audio sans fil .................32
Raccord de l’alimentation CA ....................32
Rodage...................................32
Aperçu de l’application de commande du
caisson de sous-graves ................... 33
Le bouton Logo . . . . . . . . . . . . . . . . . . . . . . . . . . . . 33
La barre de menu ............................33
Réglages : volume............................34
Réglages : filtre de passe basse...................34
Réglages : phase ............................35
Réglages : modes d’écoute......................36
Réglages : 20–30Hz level (niveau) ................36
Réglages : correction de la pièce..................36
Réglages : mot de passe .......................36
Réglages : renommer..........................36
Réglages : réinitialiser .........................36
Raccord du caisson de sous-graves et commandes
de réglage
.............................. 37
Avant de raccorder le
Dynamo ...................37
Mode à 2 canaux............................37
Mode canaux multiples ........................38
Mode 2 canaux/canaux multiples simultanés ..........40
Utilisation de l’entrée Speaker Level (niveau d’enceinte) ....42
Système SWT-X sans fil.........................43
DEL de statut SWT-X et alimentation ................43
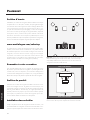
Placement ............................. 44
Position d’écoute.............................44
www.martinlogan.com/subsetup ..................44
Demandez à votre revendeur.....................44
Profitez du produit ............................44
Installation dans un boîtier ........................44
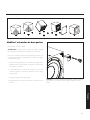
Modifier l’orientation du haut-parleur
..................45
Acoustique de la pièce .................... 46
Votre pièce ................................46
Terminologie ...............................46
Base solide ................................46
Cinéma maison ......................... 47
Configuration de l’Anthem Room Correction (ARC
MC
)
. 48
À propos de l’ARC ...........................48
Avant de commencer..........................48
Connexion ARC (appareil mobile) .................48
Lancement de l’ARC (appareil mobile)
................48
Connexion de l’ARC (ordinateur) ..................49
Lancement de l’ARC (ordinateur)...................49
Foires aux questions et dépannage .......... 50
Foires aux questions...........................50
Dépannage ................................51
Dépannage de l’application de commande ...........51
Dépannage de l’ARC..........................51
Renseignements généraux ................. 53
Garantie et Enregistrement ......................53
Service ...................................53
Spécifications........................... 54

6

7
Congratulations! You have invested in one of the world's pre-
mier subwoofers.
MartinLogan Dynamo subwoofers represent the extension of an
intensive, dedicated team research program directed toward
establishing a world class line of reference subwoofers using lead-
ing-edge technology, without compromising durability, reliability,
craftsmanship or aesthetics.
Dynamo subwoofers feature a high-excursion driver to achieve
deep, tight, well-defined bass and a powerful amplifier to drive
the output stage with precision and extremely high efficiency.
Low-pass filtering and phase control have been designed to make
integrating the
Dynamo subwoofer with MartinLogan and non-
MartinLogan products both seamless and simple.
Dynamo subwoofers are designed with a Bluetooth control system
to simplify the setup process. Additionally,
Dynamo subwoofers fea-
tures the ability to connect to Anthem Room Correction™ technology
(sold separately). ARC measures acoustic output within your room
and optimizes the subwoofer's performance within your unique lis-
tening environment.
The materials in your new subwoofer are of the highest quality and
will provide years of enduring enjoyment and deepening respect.
The cabinet is constructed from the finest composite material for
acoustical integrity and is finished with an attractive custom coating.
This User's Manual will explain in detail the operation of your
subwoofer and the philosophy applied to its design. A clear
understanding will insure that you obtain maximum performance
and pleasure from this most exacting subwoofer.
Félicitations! Vous avez acheté un des meilleurs caissons de
sous-grave au monde.
Les caissons de sous-graves MartinLogan
Dynamo sont le fruit d’un
programme de recherche intensif mené par une équipe dévouée
visant à développer une gamme de caissons de sous-graves
de classe mondiale à l’aide d’une technologie de pointe, sans
faire de compromis sur la durabilité, la fiabilité, le savoir-faire ou
l’esthétique.
Les caissons de sous-graves
Dynamo sont dotés d’un haut-parleur
de graves à excursion élevée qui produit des graves profondes,
serrées et bien définies, et d’un amplificateur puissant qui reproduit
la sortie avec une précision et une efficacité très élevées. La filtra-
tion à passe basse et la commande de phase ont été conçues
pour faciliter et simplifier l’intégration des caissons de sous-graves
Dynamo avec les produits fabriqués par MartinLogan ou non.
Les caissons de sous-graves
Dynamo sont dotés d’un système
de commande Bluetooth qui simplifie le processus de configura-
tion. De plus, les caissons de sous-graves
Dynamo peuvent se
connecter au système de correction de la pièce Anthem Room
Correction
MC
(vendu séparément). L’ARC mesure la sortie acous-
tique dans la pièce et optimise le rendement du caisson de
sous-graves au sein de votre environnement d’écoute unique.
Les matériaux utilisés dans votre nouveau caisson de sous-graves
Dynamo sont de la plus haute qualité et vous offriront des années de
plaisir d’écoute et de profond respect. Le boîtier est construit avec le
matériau composite le plus fin pour garantir l’intégrité acoustique et il
est enduit d’un revêtement spécial attrayant.
Ce manuel de l’utilisateur explique en détail le fonctionnement du
caisson de sous-graves
Dynamo et la philosophie sous-jacente à sa
conception. En comprenant bien le fonctionnement du caisson de
sous-graves, vous pourrez en profiter au maximum.
introduCtion


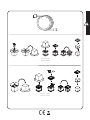
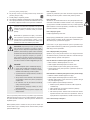
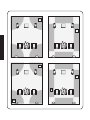
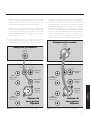
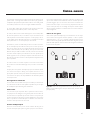
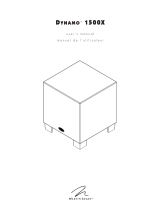
180°
180°
180°
180°
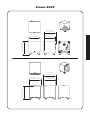
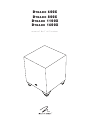
Dynamo 600X
Dynamo 800X
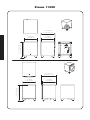
Dynamo 1100X
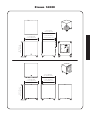
Dynamo 1600X

EU COMPLIANCE INFORMATION
Hereby, SVI Holdings (US), Inc.’s declares that this Dynamo 600X, Dynamo 800X, Dynamo 1100X, or Dynamo 1600X
ments and other relevant provisions of the following EU Compliance Directive Information.
• Conforms to European Union Low Voltage Directive 2014/35/EU;
• European Union EMC Directive 2014/30/EU;
• European Union Radio Equipment Directive (RED) 2014/53/EU.
• European Union Eco-Design Directive 2009/125/EC;
• European Union WEEE Directive 2012/19/EU;
• European Union Restriction of Hazardous Substances Recast (RoHS2) Directive 2011/65/EU;
• European Union Registration, Evaluation, Authorization and Restriction of Chemicals (REACH) Directive
2006/121/EC;
• You may obtain a free copy of the Declaration of Conformity by contacting your dealer, distributor, or
SVI Holdings (US), Inc.’s worldwide headquarters. Contact information can be found here: http://www.
martinlogan.com
INFORMATION SUR LA CONFORMITÉ POUR L’UE
Par la présente, SVI Holdings (US), Inc. déclare que son produit Dynamo 600X, Dynamo 800X, Dynamo 1100X, ou
Dynamo 1600X est conforme aux principales exigences et autres clauses pertinentes des directives suivantes sur
l’information de la conformité pour l’EU.
• Conforme à la Directive européenne Basse tension 2014/35/UE;
• Directive européenne CEM 2014/30/UE;
• Directive européenne 2014/53/UE relatives aux équipements radioélectriques (RED);
• Directive européenne d’écoconception 2009/125/CE;
• Directive européenne WEEE 2012/19/UE;
•
Directive européenne sur la restriction de l’utilisation de certaines substances dangereuses dans les équipe-
ments électriques et électroniques (Union Restriction of Hazardous Substances Recast) (RoHS2) 2011/65/UE;
• Directive européenne concernant l’enregistrement, l’évaluation et l’autorisation des substances chimiques
ainsi que les restrictions applicables à ces substances (REACH) (Registration, Evaluation, Authorization
and Restriction of Chemicals) 2006/121/CE.
• Vous pouvez obtenir un exemplaire gratuit de la Déclaration de conformité en communiquant avec votre
revendeur, votre distributeur ou le siège social mondial de SVI Holdings (US), Inc. Les coordonnées sont
disponibles ici : http://www.martinlogan.com
This device complies with Industry Canada’s licence-exempt RSSs. Operation is subject to the following two conditions:
(1) This device may not cause interference; and
(2) This device must accept any interference, including interference that may cause undesired operation of
the device.
Any changes or modifications not expressly approved by the party responsible for compliance could void the
user’s authority to operate the equipment.
This equipment complies with IC radiation exposure limits set forth for an uncontrolled environment.
Le présent appareil est conforme aux CNR d’Industrie Canada applicables aux appareils radio exempts de licence.
L’exploitation est autorisée aux deux conditions suivantes :
(1) l’appareil ne doit pas produire de brouillage, et
(2) l’utilisateur de l’appareil doit accepter tout brouillage radioélectrique subi, même si le brouillage est
susceptible d’en compromettre le fonctionnement.
Les changements ou modifications non expressément approuvés par les autorités compétentes en matière de
conformité peuvent priver l’utilisateur du droit d’utiliser l’équipement en question.
Ce dispositif respecte les limites de l’IC sur l’exposition aux radiations établies pour un environnement non contrôlé.
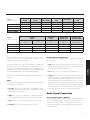
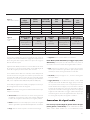
specifications / SPÉCIFICATIONS / 规格
Contains / Contient / 包含 FCC ID : QOQBGM113 Contains IC : 5123A-BGM113
Frequency Range / Frequency Range / 频率范围 : 2402 – 2480 MHz
Max. Transmitter Power / Puissance max du transmetteur / 最大发射功率 : 2.5dBm / 瓦

This device complies with part 15 of the FCC Rules. Operation is subject
to the following two conditions: (1) This device may not cause harmful
interference, and (2) this device must accept any interference received,
including interference that may cause undesired operation.
Cet appareil est conforme à la partie 15 des règles du FCC. L’utilisation
est assujettie aux deux conditions suivantes : (1) cet appareil ne doit
pas causer d’interférence nuisible, et (2) cet appareil doit accepter
l’interférence reçue, notamment l’interférence qui peut causer un mauvais
fonctionnement.
In accordance with the European Union WEEE (Waste
Electrical and Electronic Equipment) directive effective
August 13, 2005, we would like to notify you that this
product may contain regulated materials which upon
disposal, according to the WEEE directive, require special reuse and
recycling processing.
For this reason MartinLogan has arranged with our distributors in
European Union member nations to collect and recycle this product at
no cost to you. To find your local distributor please contact the dealer
from whom you purchased this product, email [email protected]
or visit the distributor locator at www.martinlogan.com.
Please note, only this product itself falls under the WEEE directive.
When disposing of packaging and other related shipping materials we
encourage you to recycle these items through the normal channels.
En vertu de la directive WEEE de l’Union européenne (direc-
tive sur les déchets électriques et électroniques) entrée en
vigueur le 13 août 2005, nous vous avisons que ce produit
pourrait renfermer des matériaux réglementés dont l’élimination
doit faire l’objet de procédures de réutilisation et de recyclage particulières.
À cette fin, MartinLogan a demandé à ses distributeurs dans les pays mem-
bres de l’Union européenne de reprendre et recycler ce produit gratuitement.
Pour trouver le distributeur le plus près, veuillez communiquer avec le revendeur
auprès de qui vous avez acheté ce produit, envoyer un courriel à info@mar-
tinlogan.com ou consulter le localisateur de distributeur sur le site Web www.
martinlogan.com.
Veuillez noter que seul le produit est régi par la directive WEEE. Nous vous
encourageons à recycler les matériaux d’emballage et autres matériaux
d’expédition selon les procédures normales.
Dynamo 600X, Dynamo 800X,
Dynamo 1100X, Dynamo 1600X
Tested to Comply with FCC Standards
FOR HOME OR OFFICE USE
Dynamo 600X, Dynamo 800X,
Dynamo 1100X, Dynamo 1600X
Testé pour être conforme aux normes du FCC
POUR UNE UTILISATION À LA MAISON OU AU BUREAU
NOTE: This equipment has been tested and found to comply with the limits for a Class B digital device, pursu-
ant to part 15 of the FCC Rules. These limits are designed to provide reasonable protection against harmful
interference in a residential installation. This equipment generates uses and can radiate radio frequency
energy and, if not installed and used in accordance with the instructions, may cause harmful interference
to radio communications. However, there is no guarantee that interference will not occur in a particular
installation. If this equipment does cause harmful interference to radio or television reception, which can be
determined by turning the equipment off and on, the user is encouraged to try to correct the interference by
one or more of the following measures:
— Reorient or relocate the receiving antenna.
— Increase the separation between the equipment and receiver.
— Connect the equipment into an outlet on a circuit different from that to which the receiver is con-
nected.
— Consult the dealer or an experienced radio/TV technician for help.
REMARQUE : cet équipement a été testé et jugé conforme aux limites d’un appareil numérique de Classe B, en
vertu de la Section 15 du règlement de la FCC. Ces limites sont conçues pour offrir une protection jugée raisonnable
contre l’interférence nuisible dans une installation résidentielle. Cet équipement génère des utilisations et peut
émettre une énergie radiofréquence et, s’il n’est pas installé et utilisé conformément aux instructions, peut causer
une interférence nuisible aux radiocommunications. Toutefois, il n‘existe aucune garantie qu’une interférence ne
se produira pas dans une installation particulière. Si cet équipement cause une interférence nuisible à la réception
radiophonique ou télévisuelle, qu’on peut déterminer en ouvrant et en fermant l’équipement, l’utilisateur est invité
à essayer de corriger l’interférence à l’aide d’une des mesures suivantes :
— Réorienter l’antenne de réception ou la changer de place.
— Augmenter la distance entre l’équipement et le récepteur.
— Raccorder l’équipement à une prise située sur un autre circuit que celui sur lequel le récepteur est rac-
cordé.
— Consulter le revendeur ou un technicien radio/TV compétent pour obtenir de l’aide.

12
Safety Warnings and Installation in Brief (English)
Important Safety Instructions
1 Read these instructions.
2 Keep these instructions.
3 Heed all warnings.
4 Follow all instructions.
5 Do not use this apparatus near water.
6 Clean only with dry cloth.
7 Do not block any ventilation openings. Install in accordance with the
manufacturer's instructions.
8 Do not install near any heat sources such as radiators, heat registers,
stoves, or other apparatus (including amplifiers) that produce heat.
9 Do not defeat the safety purpose of the polarized or grounding-type
plug. A polarized plug has two blades with one wider than the other.
A grounding type plug has two blades and a third grounding prong.
The wide blade or the third prong are provided for your safety. If the
provided plug does not fit into your outlet, consult an electrician for
replacement of the obsolete outlet.
10 Protect the power cord from being walked on or pinched, particu-
larly at plugs, convenience receptacles, and the point where they exit
from the apparatus.
11 Only use attachments/accessories specified by the manufacturer.
12 Use only with the cart, stand, tripod, bracket, or table
specified by the manufacturer, or sold with the appara-
tus. When a cart is used, use caution when moving the
cart/apparatus combination to avoid injury from tip-over.
13 Unplug this apparatus during lightning storms or when unused for
long periods of time.
14 Refer all servicing to qualified service personnel. Servicing is required
when the apparatus has been damaged in any way, such as power-
supply cord or plug is damaged, liquid has been spilled or objects
have fallen into the apparatus, the apparatus has been exposed to
rain or moisture, does not operate normally, or has been dropped.
15 The apparatus shall not be exposed to dripping or splashing and
that objects filled with liquids, such as vases, shall not be placed on
apparatus.
16 Maintain a minimum of 20-30cm distance around the apparatus for
sufficient ventilation;
17 The ventilation should not be impeded by covering the ventilation
openings with items, such as newspapers, tablecloths, curtains, etc.;
18 No naked flame sources, such as candles, should be placed on the
apparatus;
19 The use of apparatus in tropical climates
20 This equipment is a Class II or double insulated electrical appliance
21 Mains plug or an appliance coupler is used as the disconnect
device, the disconnect device shall remain readily operable.
The exclamation point within an equilateral triangle is
intended to alert the user to the presence of important
operating and maintenance (servicing) instructions in the
literature accompanying the appliance.
The lightning bolt flash with arrowhead symbol, within
an equilateral triangle, is intended to alert the user to the
presence of uninsulated “dangerous voltage” within the
product’s enclosure that may be of sufficient magnitude to
constitute a risk of electric shock.
WARNING! Do not use this product outside of the coun-
try of original sale—voltage requirements vary by country.
Improper voltage can cause damage that will be poten-
tially expensive to repair. The subwoofer is shipped to
MartinLogan authorized distributors with the correct power
supply for use in the country of intended sale. A list of
authorized distributors can be accessed at www.martinlo-
gan.com or by emailing [email protected].
WARNING!
•
Hazardous voltages exist inside—do not remove cover.
• Refer servicing to a qualified technician.
• To prevent fire or shock hazard, do not expose this
module to moisture.
• Turn amplifier off and unplug subwoofer should any
abnormal conditions occur.
• The power cord should not be installed, removed, or
left detached from the speaker while the other end is
connected to an AC power source.
• No candles or other sources of open flame should be
placed on the speaker.
• No liquids either in glasses or vases should be placed
on speaker.
• Speaker should not be exposed to dripping or splash-
ing liquids.
• The power cord should remain readily operable
should any abnormal conditions occur.
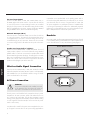
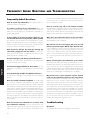
We know you are eager to hear your new MartinLogan subwoofer, so
this section is provided to allow fast and easy set up. Once you have your
subwoofer operational, please take the time to read, in depth, the rest of
the information in the enclosed manual. It will give you perspective on how
to attain the greatest possible performance from this most exacting woofer
system.
If you should experience any difficulties in the setup or operation of your
MartinLogan subwoofer, please refer to the Room Acoustics, Placement or
Operation sections of the enclosed owner’s manual. Should you encounter
a persistent problem that cannot be resolved, please contact your autho-
rized MartinLogan dealer. They will provide you with the appropriate
technical analysis to alleviate the situation.
Step 1: Unpacking
Remove your new subwoofer from its packing. Please retain the original pack-
ing materials for future use—replacement packaging may be expensive.
Step 2: Placement
You may choose to begin by placing the subwoofer in a corner near the

front of the room. Before deciding on a permanent corner placement,
experiment with other positions. Locations away from corners often prove
more effective in providing ideal low-frequency performance and blend
with the main speakers. Please see the Placement section for details.
Step 3: Signal Connection
Use the best cables you can. High quality cables, available from your spe-
cialty dealer, are recommended and will give you superior performance.
Attach your preamplifier/processor outputs to the signal input connec-
tors located on the subwoofer’s rear panel. Please see the Controls and
Connections section for details.
If you plan to connect your subwoofer using Speaker Level (high level)
inputs, refer to the Speaker Level Inputs section for details.
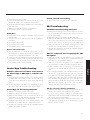
Step 4: Power Connection (AC) (see warning)
Make sure the level knob is set at 0. Plug the subwoofer into a wall outlet.
Review the AC Power Connection section of this manual for details.
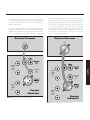
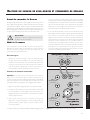
Step 5a: Setting the Controls (Using LFE Input)
• Setting Control: Set the switch to 'Local'.
• Power Mode: Set the switch to 'Auto'.
• Level: Set at one-o'clock (just right of straight up).
• Use your processor/receiver's bass management system to adjust
subwoofer integration.
Step 5b: Setting the Controls (Using Left/Right Inputs)
• Setting Control: Set the switch to 'App'.
• Power Mode: Set the switch to 'Auto'.
• Download the MartinLogan Sub Control app (from Google Play or the
Apple App Store).
• Using the app, adjust the following settings:
o Volume (level): Set at -10dB and increase until sound has deep,
extended bass.
o Phase: Start with 90° (with Inverted polarity turned on).
o 20–30Hz Level: Start with 0dB.
o Low Pass Filter: Set lower than the low-end frequency response of
your main speakers. If you are uncertain of your main speaker low-
frequency response, start with 35Hz.
Step 6: Listen and Enjoy.
安全警告及安装简介 (中国的 / Chinese)
重要的安全说明
1 阅读这些说明。
2 请保留这些说明。
3 注意所有警告。
4 遵循所有说明。
5 请勿在靠近水的地方使用本设备。
6 只能用干布清洁。
7 请勿堵塞通风口。按照制造商的说明进行安装。
8 请勿安装在散热器,加热器,炉子或其他产生热量的设备(包括
放大器)等热源附近。
9 不要损害极化或接地型插头的安全用途。极化插头有两个刀片,
一个比另一个宽。接地型插头有两个刀片和第三个接地插脚。宽
刀片或第三叉是为了您的安全而设置的。如果提供的插头不适合
您的插座,请咨询电工更换过时的插座。
10 保护电源线不被踩踏或挤压,特别是在插头,便利插座和设备出
口处。
11 只能使用制造商指定的附件/附件。
12 只能使用制造商指定的或与本设备一起出售的推车,
支架,三角架,支架或桌子。使用推车时,请小心移
动推车/设备组合,以免翻倒造成伤害。
13 雷雨期间或长时间不使用时,请拔下本设备的插头。
14 将所有维修工作交给合格的维修人员。如果设备受到任何损坏,
如电源线或插头损坏,液体溅落或物体掉入设备,设备受到雨淋
或潮湿,不能正常工作,则需要进行维修,或者已经被丢弃。
15 产品不得暴露在滴水或溅水的环境中,充满液体的物体如花瓶不
得放在产品上。
16 保持设备周围至少20-30cm的距离,以保证足够的通风。
17 不应通过用报纸,桌布,窗帘等物品盖住通风口来阻止通风。
18 设备上不应放置明火等火源,例如蜡烛。
19 产品可用于热带气候地区使用
20 本设备属II类或双重绝缘电器
21
电源插头或电器耦合器用作断开装置,断开装置应保持可操作性。
内部的感叹号等边三角形的意图提醒用户存在重要的操
作和维护(维修)文献中的说明伴随着电器。
在等边三角形内带有箭头符号的闪电闪光灯旨在提醒用
户,产品外壳内存在未绝缘的“危险电压”,可能具有足
够大的触电危险。
警告! 请勿在原产国以外的地区使用本产品。 不正确的
电压会造成损坏,修理费用可能很高。 扬声器运送到
MartinLogan授权经销商处,不同国家的电源适配器可
在此购买。可以通过www.martinlogan.com或通过电子
邮件[email protected]访问授权分销商名单。
警告!
• 内部存在危险电压—请勿擅自拆盖。
• 如需服务,请联系有资质的技术人员。
• 为防止火灾或电击危害,请勿将组件暴露于潮湿环
境中。
• 如发生任何反常情况,请立即关闭功放,并拔掉低
音炮插头。
• 当电源线接入交流电源插座时,请勿插拔电源线与
扬声器连接的另一端口,以避免危险发生,和可能
导致的对产品本身带来的损害。
• 请勿将蜡烛或其它明火源置于扬声器上。
• 请勿将含有液体的玻璃容器或花瓶置于扬声器上。
• 请勿使扬声器接触到水滴或飞溅液体。
• 如发生任何反常情况,电源线应保持随时可操作状
态。

我们深知,您已迫不及待想感受下这款全新的扬声器了。所以我们为
您编写了以下内容,便于您更加简易迅速地进行安装。一旦您着手操
作时,请花点时间仔细阅读本章节,并深入了解随产品附上的用户手
册中的信息。它能教您如何使这款最精确的低音扬声器系统发挥最佳
的性能。
如果您在设置或操作扬声器时遇到任何问题,请参考用户手册中关于
室内声学,摆位或操作的相关信息。如果遇到持续未能解决的问题,
请联系经授权的MartinLogan经销商,他们会向您提供适当的技术分析
来减少问题。
我们深知,您已迫不及待想感受这款全新的扬声器了。所以我们为您编
写了以下内容,便于您更简易迅速地进行安装。一旦您着手操作时,
请花点时间仔细阅读本章节,并深入了解随产品附上的用户手册中的
信息。它能教您如何使这款最精确的低音扬声器系统发挥最佳的性能。
如果您在设置或操作扬声器时遇到任何问题,请参考用户手册中关于
室内声学、摆位或操作的相关信息。如果遇到持续未能解决的问题,
请联系经授权的MartinLogan经销商,他们会向您提供适当的技术分析
来减少问题。
步骤1: 拆开包装箱
将您全新的扬声器从包装箱中取出。出于您可能的将会重新使用原包
装的考虑,请保留原始包装材料– 重换包装会比较昂贵。
步骤2: 摆位
一开始您可能会将扬声器摆在房间前方的墙角处。在决定永久摆放在
墙角前时,试试其它位置的效果。通常远离墙角摆放效果会更好,能
带来理想的低频效果并与主音箱更好地融合。请参考说明书中“摆位”章
节获得更多信息。
步骤3: 信号连接
使用您所能用到的最好的线材。推荐您向专门的经销商购买高品质的
线材,以此获得最好的性能。
将您前级放大器/处理器的输出连接到位于扬声器后面板上的信号输入
连接器。请参考说明书中“控制”和“连接”章节获得更多信息。
如果您打算将扬声器连接到喇叭线输入(高电平输入),请参考“喇叭
线输入”章节获得更多信息。
步骤 4: 电源连接 (交流电) (见“警告”)
请先确保将音量旋钮设置为0。将扬声器插头插入壁装电源插座中。参
考用户手册中“交流电电源连接”章节获得更多信息。
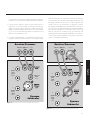
步驟5a:設置控件(使用LFE輸入)
• 設置控制:將開關設置為“本地”。
• 電源模式:將開關設置為“自動”。
• 級別:設置在一點(正好朝上)。
• 使用處理器/接收器的低音管理系統來調整扬声器的整合。
步驟5b:設置控件(使用左/右輸入)
• 設置控制:將開關設置為“應用程序”。
• 電源模式:將開關設置為“自動”。
• 從Google Play或Apple App Store下載MartinLogan Sub Control應
用程序。
• 使用應用程序,調整以下設置:
o 音量(電平):設定在-10dB,並增加,直到聲音深沉,延長低音。
o 相位:從90°開始(反轉極性打開)。
o 房間增益:從0dB開始。
o 低通濾波器:設置低於主揚聲器的低頻響應。 如果您不確定主
揚聲器的低頻響應,則從35Hz開始。
步骤6: 开启聆听享受之旅
Bezpečnostní varování a instalace v krátkosti (Česky/Czech)
Důležité bezpečnostní pokyny
1 Přečtětesitytopokyny.
2 Uchovávejtetytopokyny.
3 Dodržujtevšechnavarování.
4 Postupujtepodlepokynů.
5 Nepoužívejtetotozařízenívblízkostivody.
6 Očistětepouzesuchoulátkou.
7 Neblokujteventilačníotvory.Instalujtepodlepokynůvýrobce.
8 Neinstalujtevblízkostizdrojůtepla,jakojsouradiátory,tepelné
registry,kamnanebojinépřístroje(včetnězesilovačů),které
vyrábějíteplo.
9 Nepoškozujtebezpečnostníúčelpolarizovanénebozemnící
zástrčky.Polarizovanázástrčkamádvěčepele,znichžjedna
ješiršíneždruhá.Zástrčkauzemňovacíhotypumádvěnožea
třetíuzemňovacíhrot.Širokáčepelnebotřetíhrotjsouurčeny
provašibezpečnost.Pokudsedodávanázástrčkanezapadádo
elektrickézásuvky,obraťtesenaelektrikářenavýměnuzasta-
ralézásuvky.
10 Chraňtenapájecíšňůrupředprasknutímnebosevřením,zejmé-
napřizástrčkách,zásuvkáchamístu,kdevystupujízezařízení.
11 Používejtepouzepříslušenství/příslušenstvíurčenévýrobcem.
12 Používejtepouzesvozíkem,stojanem,stativem,
držákemnebostolemurčenýmvýrobcemnebo
prodávanýmispřístrojem.Připoužitívozíkubuďte
opatrnípřipřemísťováníkombinacevozík/přístroj,
abystezabrániliporaněnípřipřevrácení.
13 Běhembleskovýchbouřínebopřidlouhodobémnepoužívání
odpojtetotozařízení.
14 Proveďteveškeréservisníprácekvalifikovanýmservisním
pracovníkům.Servisjezapotřebí,jestližebylpřístrojnějakým
způsobempoškozen,napříkladpoškozenýnapájecíkabelnebo
zástrčka,kapalinanebopředmětyspadlydopřístroje,přístroj
bylvystavendeštinebovlhkosti,nepracujenormálně,nebobyl
vynechán.
15 Zařízenínesmíbýtvystavenokapajícínebostříkajícívoděaže
nazařízenínesmíbýtumístěnypředmětynaplněnékapalinami,
jakojsouvázy.
16 Zajistěteminimálnívzdálenost20-30cmkolempřístrojepro
dostatečnévětrání;
17 Větráníbynemělobránitpokrytívětracíchotvorůpředměty,jako

jsounoviny,ubrusy,záclonyapod.;
18 Napřístrojinesmíbýtumístěnyžádnézdrojeotevřeného
plamene,jakojsousvíčky;
19 Použitípřístrojůvtropickémpodnebí
20 TotozařízeníjeelektrickýspotřebičtřídyIInebodvojitéizolace
21 Jakoodpojovacízařízenísepoužívásíťovázástrčkanebospo-
jkazařízení,odpojovacízařízenímusíbýtsnadnoovladatelné.
Vykřičníkvrovnostrannémtrojúhelníkumáupozornit
uživatelenapřítomnostdůležitýchpokynůproobsluhu
aúdržbu(údržbu)vliteratuře,kterájesoučástí
přístroje.
Bleskbleskusesymbolemhrotušipkyvrovnostran-
némtrojúhelníkuupozorňujeuživatelenapřítomnost
neizolovaného "nebezpečnéhonapětí" v krytu
produktu,kterémůžemítdostatečnouvelikost,aby
představovalorizikoúrazuelektrickýmproudem.
VAROVÁNÍ! Nepoužívejte tento výrobekmimo
zemipůvodníchpožadavkůnaprodejanapětív
různýchzemích.Nesprávnénapětímůžezpůsobit
poškození,kterémůžebýtopravdudrahé.Subwoofer
jedodávánautorizovanýmdistributorůmMartinLogan
se správným napájecím zdrojempro použití v
zemiurčenéhoprodeje.Seznamautorizovaných
distributorůjedostupnýnaadresewww.martinlogan.
comneboe-mailemnaadrese[email protected].
VAROVÁNÍ!
•
Vnitřnínebezpečnénapětí-neodstraňujtenikdykryt.
•
Opravymůžeprovádětpouzekvalifikovanýtechnik.
•
Neprovozujte subwoofer ve vlhkémprostředí,
zabráníteúrazuelektrickýmproudemapožáru.
•
Vypnětezesilovačaodpojtesubwoofer,docházílik
abnormálnímpodmínkám.
•
Síťovýkabelsenesmíinstalovat,neboodstraňovat
odreproduktoru,zatímcodruhýkonecjepřipojenék
napájení230V.
•
Nasubwoofer,nebodojehoblízkostineumisťujte
svíčky,aniotevřenýplamen.
•
Žádnétekutinybynemělybýtumístěnyna,nebov
blízkostisubwooferu
•
Reproduktorbynemělbýtvystavenkapajícínebo
stříkajícítekutině.
Víme,žejižtoužíteposlouchatsvůjnovýMartinLogansubwoofer,
takžetatočástjeurčenaprorychléasnadnénastavení.Věnujtepro-
símpozornosttěmtoinformacím,kterévámpomohoudosáhnoutco
největšíhovýkonu.
Máte-lijakékolipotížesnastavenímneboprovozemvašehosub-
wooferuMartinLogan,kontaktujtesvéhoautorizovanéhoprodejce
společnostiMartinLogan.
Krok 1: Vybalení
Vyjmětenovýsubwooferzjehoobalu.Ponechtesioriginálníobalové
materiályprobudoucípoužití-náhradníobalymohoubýtdrahé.
Krok 2: Umístění
Začnětetím,žeumístítesubwooferdorohupoblížpředníčástmíst-
nosti.Nežserozhodnetektrvalémuumístěnívrohu,experimentujte
sjinýmipozicemi.Umístěnísubwooferumimorohysečastoprojevuje
lepšímsladěnímshlavnímireproduktoryahlubšímibasy.Podrobné
informacenaleznetevčástiUmístění.
Krok 3: Připojení signálu
Použijtenejlepšíkabely,kterémáte.
Připojtevýstupypředzesilovače/procesorukevstupnímkonektorům
signáluumístěnýnazadnímpanelusubwooferu.Prohlédnětesipro-
símovládacíprvkyapodrobnostiopřipojení.
Pokudmátevúmyslupřipojitsubwooferpomocíreproduktorových
výstupůvašehozesilovače(vysokáúroveň),podrobnostinaleznetev
částiVstupyúrovněreproduktorů.
Krok 4: Napájení 230V (viz výstraha)
Ujistětese,žejeotočnýknoflíknastavenna0.Připojtesubwoofer
doelektrickézásuvky.PodrobnostinaleznetevčástiPříručkapro
napájenístřídavýmproudemvtétopříručce.
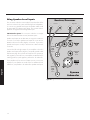
Krok 5a: Nastavení ovládacích prvků (pomocí vstupu LFE)
• Řízenínastavení:Nastavtepřepínačna"Local".
• Režimnapájení:Nastavtepřepínačnahodnotu"Auto".
• Úroveň:Nastavtenajednuhodinu(přímovpravonahoru).
• Použijtesystémsprávybasůprocesoru/přijímačekúpravěinte-
gracesubwooferu.
Krok 5b: Nastavení ovládacích prvků (pomocí levého / pravého vstupu)
• Nastaveníovládání:Nastavtepřepínačna"App".
• Režimnapájení:Nastavtepřepínačnahodnotu"Auto".
• StáhněteaplikaciMartinLoganSubControl(zaplikaceGoogle
PlayneboAppleAppStore).
• Pomocíaplikaceupravtenásledujícínastavení:
o Hlasitost(úroveň):Nastavtenahodnotu-10dBazvyštetak,
rozšířenébasy.
o Fáze:začnětes90°(sezapnutouobrácenoupolaritou).
o Ziskmístnosti:začnětes0dB.
o Filtrnízkéhoprůchodu:nastavtenižšínežfrekvenčníodezvu
nejnižšíhokmitočtuvašichhlavníchreproduktorů.Pokudsi
nejstejistihlavnímreproduktorem,začnětesfrekvencí35Hz.
Krok 6: Poslouchejte a užívejte si.

Sikkerhedsanvisning og kort vejledning i
ibrugtagning. (Dansk/Danish)
Vigtige sikkerhedsinstruktioner
1 Læs disse instruktioner.
2 Opbevar disse instruktioner.
3 Overhold alle advarsler.
4 Følg alle instruktioner.
5 Brug ikke dette apparat i nærheden af vand.
6 Rengør kun med tør klud.
7 Bloker ikke ventilationsåbninger. Installer i overensstemmelse med pro-
ducentens anvisninger.
8 Installer ikke i nærheden af varmekilder som radiatorer, varmel-
egemer, komfurer eller andet apparat (herunder forstærkere), der
producerer varme.
9 Undgå at besejre sikkerhedsformålet med polariseret eller jordforbin-
delse. En polariseret stik har to blade med en bredere end den
anden. En stikkontaktstik har to knive og en tredje jordstik. Den brede
kniv eller den tredje stang er til gavn for din sikkerhed. Hvis den
medfølgende stik ikke passer ind i stikkontakten, skal du kontakte en
elektriker for at udskifte det forældede stik.
10
Beskyt strømledningen fra at blive slået på eller klemt, især ved stikprop-
per, forsyningsbeholdere og det punkt, hvor de kommer ud af apparatet.
11 Brug kun tilbehør / tilbehør specificeret af producenten.
12 Brug kun med vogn, stativ, stativ, beslag eller bord angivet
af producenten eller solgt med apparatet. Når der bru-
ges en vogn, skal du være forsigtig, når du flytter vogn /
apparatkombinationen for at undgå skader fra tip-over.
13 Tag stikket ud af dette apparat under lynvejr eller når det ikke bruges
i længere tid.
14 Henvis alle serviceydelser til kvalificeret servicepersonale.
Vedligeholdelse er nødvendig, når apparatet er blevet beskadiget på
nogen måde, som f.eks. Strømforsyningsledning eller stik er beskadi-
get, væske er spildt eller genstande er faldet i apparatet, apparatet
er blevet udsat for regn eller fugt, fungerer ikke normalt , eller er ble-
vet droppet.
15 Apparatet må ikke udsættes for dryp eller stænk, og genstande fyldt
med væsker, såsom vaser, må ikke anbringes på apparatet.
16 Vedligeholde mindst 20-30 cm afstand omkring apparatet for tilstræk-
kelig ventilation;
17 Ventilationen må ikke forhindres ved at dække ventilationsåbningerne
med genstande, såsom aviser, duge, gardiner mv .;
18 Der må ikke anbringes ildkilder, såsom lys, på apparatet;
19 Anvendelse af apparater i tropiske klimaer
20 Dette udstyr er et Klasse II eller dobbelt isoleret elektrisk appa-
rat
21 Netstikket eller en apparatkobler bruges som frakoblingsenhed, frako-
blingsenheden skal forblive let at betjene.
Udråbstegn i en ligesidet trekant er beregnet til at advare
brugeren om tilstedeværelsen af vigtige drifts- og vedlige-
holdelsesanvisninger (instruktioner) i den ledsagende
litteratur.
Lynbolten blinker med pilehovedsymbolet inden for en
ligesidet trekant med det formål at advare brugeren om
tilstedeværelsen af uisoleret "farlig spænding" i produktets
kabinet, der kan være tilstrækkelig stor til at udgøre en
risiko for elektrisk stød.
ADVARSEL! Brug ikke dette produkt uden for det land,
hvor originale salgsspændingskrav varierer fra land til land.
Forkert spænding kan forårsage skade, som vil være poten-
tielt dyr at reparere. Subwooferen sendes til MartinLogan
autoriserede distributører med den korrekte strømforsyning
til brug i det planlagte salg. En liste over autoriserede dis-
tributører kan fås på www.martinlogan.com eller ved at
sende en e-mail til [email protected].
ADVARSEL!
• ben ikke apparatet. Det indeholder elektriske dele med
høj spænding.
• Overlad altid service til en kvalificeret tekniker.
• For at undgå brand eller elektrisk stød må du ikke
udsætte denne enhed for fugt.
• Sluk forstærker og frakobl subwoofer, hvis udstyret ikke
fungerer efter hensigten.
• Strømledningen må ikke tilsluttes, frakobles eller efter-
lades frakoblet fra højttaleren når den modsatte ende
er tilsluttet til strøm.
• Placer ikke stearinlys eller anden kilde til åben ild på
højttaleren.
• Placer ikke væsker i glas eller vaser på højtaleren.
• Højttaleren må ikke udsættes for dryppende eller sprøj-
tende væske.
•
Strømledningen skal være let tilgængelig, så det kan
betjenes i tilfælde af udstyret ikke fungerer efter hensigten.
Vi ved, at du er ivrig efter, at høre din nye Martin Logan subwoofer, så
det følgende giver dig en instruktion i hurtig og nem opsætning. Når din
subwoofere er monteret og fungerer, tag da venligst tiden til at læse den
vedlagte manual i dybden. Den vil give dig en dybdegående indsigt i
hvorledes du får den bedst mulige ydelse fra subwooferen.
Hvis du oplever problemer ved opsætning eller betjening af din Martin
Logan subwoofer, henvises der til afsnittene om akustik, placering eller
betjening i den vedlagte manual. Støder du på et vedvarende problem,
der ikke umiddelbart lader sig løse, bedes du kontakte din autoriserede
Martin Logan forhandler. De vil bistå dig med den nødvendige tekniske
assistance til at afhjælpe problemet.
Trin 1: Udpakning
Tag din nye subwoofer ud af emballagen. Opbevar venligst emballagen
til senere brug – tilsvarende emballage kan være bekostelig.
Trin 2: Placering
Du kan vælge, til en start, at placere subwooferen i et hjørne i den forreste
ende af rummet. Eksperimenter gerne med andre placeringer før du beslut-

ter dig endeligt for at placere subwooferen i et hjørne. Placeringer væk fra
hjørner vil ofte resultere i bedre lavfrekvens ydelse og bedre kobling til de
øvrige højttalere. Se venligst afsnittet om placering for yderligere detaljer.
Trin 3: Tilslutning af signal
Brug de bedste kabler du kan. Kvalitetskabler kan anbefales og vil give
dig en overlegen ydeevne. De kan anskaffes hos din faghandler.
Tilslut din forforstærker/processors udgang til terminalerne (input) på sub-
wooferens bagside. Se venligst afsnittene om kontrolpanelet og tilslutninger
for yderligere detaljer.
Hvis du ønsker at tilslutte din subwoofer med højttalersignal (ved hjælp af
højttalerledninger), henvises til afsnittet om Speaker Level Inputs for yder-
ligere detaljer.
Trin 4: Tilslutning til strøm (se advarsel)
Sørg for at volumenknappen (level) er indstillet til 0. Tilslut subwooferen
til en stikkontakt. Se øvrige detaljer for tilslutning til strøm i denne manual.
Trin 5a: Indstilling af kontroller (ved hjælp af LFE-indgang)
• Setting Control: Indstil kontakten til 'Local'.
• Power Mode: Indstil kontakten til 'Auto'.
• Level: Indstil niveau til "klokken et" (Lidt over lodret position).
• Brug din processor / modtager's basstyringssystem til at justere sub-
wooferintegrationen.
Trin 5b: Indstilling af kontroller (Brug af venstre / højre
indgange)
• Setting Control: Indstil kontakten til 'App'.
• Power Mode: Indstil kontakten til 'Auto'.
• Download MartinLogan Sub Control-appen (fra Google Play eller
Apple App Store).
• Brug appen, juster følgende indstillinger:
o Level (niveau): Indstil til -10dB og øg niveau til lyden har dyb,
kraftig bas.
o Phase: Start med 90 ° (med omvendt polaritet tændt).
o 20–30Hz Level: Start med 0dB.
o Low Pass Filter: Indstilles til en frekvens lavere end resonans-
frekvensen på dine hovedhøjttalere. Hvis du er usikker på
højttalerens Resonansfrekvens, skal du starte med 35Hz.
Trin 6: Lyt og nyd.
Veiligheidswaarschuwingen en installatie in het kort
(Nederlandse/Dutch)
Belangrijke veiligheidsinstructies
1 Lees deze instructies.
2 Bewaar deze instructies.
3 Let op alle waarschuwingen.
4 Volg alle instructies.
5 Gebruik dit apparaat niet in de buurt van water.
6 Maak alleen schoon met een droge doek.
7 Blokkeer geen ventilatieopeningen. Installeer in overeenstemming met
de instructies van de fabrikant.
8 Installeer het apparaat niet in de buurt van warmtebronnen zoals
radiatoren, warmteroosters, kachels of andere apparaten (inclusief
versterkers) die warmte produceren.
9 Negeer niet het veiligheidsdoel van de gepolariseerde of geaarde
stekker. Een gepolariseerde stekker heeft twee bladen waarvan de
ene breder is dan de andere. Een geaarde stekker heeft twee bladen
en een derde aardingstong. Het brede mes of de derde vorktand is
bedoeld voor uw veiligheid. Als de meegeleverde stekker niet in uw
stopcontact past, raadpleeg dan een elektricien om het verouderde
stopcontact te vervangen.
10 Zorg ervoor dat er niet op het netsnoer kan worden getrapt of dat het
kan worden afgekneld, met name bij stekkers, stopcontacten en het
punt waar ze uit het apparaat komen.
11 Gebruik alleen hulpstukken / accessoires die zijn gespecificeerd
door de fabrikant.
12 Gebruik alleen met de wagen, standaard, statief, beugel
of tafel die is opgegeven door de fabrikant of die wordt
verkocht bij het apparaat. Wanneer een wagen wordt
gebruikt, wees dan voorzichtig bij het verplaatsen van
de wagen / apparaat combinatie om verwonding door kantelen te
voorkomen.
13 Koppel dit apparaat los tijdens onweer of wanneer het gedurende
lange tijd niet wordt gebruikt.
14 Laat alle onderhoud over aan bevoegd onderhoudspersoneel.
Onderhoud is vereist wanneer het apparaat op enigerlei wijze is
beschadigd, zoals het netsnoer of de stekker is beschadigd, vloeistof
is gemorst of voorwerpen in het apparaat zijn gevallen, het apparaat
is blootgesteld aan regen of vocht, niet normaal functioneert of is
verwijderd.
15 Het apparaat mag niet worden blootgesteld aan druipende of spat-
tende vloeistoffen en objecten die met vloeistof zijn gevuld, zoals
vazen, mogen niet op het apparaat worden geplaatst.
16 Houd een afstand van minimaal 20-30 cm rondom het apparaat
aan voor voldoende ventilatie;
17 De ventilatie mag niet worden belemmerd door de ventilatieope-
ningen te bedekken met voorwerpen zoals kranten, tafelkleden,
gordijnen, enz .;
18
Plaats geen open vuurbronnen, zoals kaarsen, op het apparaat;
19 Het gebruik van apparaten in tropische klimaten
20 Dit apparaat is een Klasse II of dubbel geïsoleerd elektrisch apparaat
21 De netstekker of een apparaatkoppelaar wordt gebruikt als ont-
koppelapparaat, het ontkoppelingsmechanisme moet gemakkelijk
bedienbaar blijven.
Het uitroepteken in een gelijkzijdige driehoek is bedoeld
om de gebruiker attent te maken op de aanwezigheid van
belangrijke bedienings- en onderhoudsinstructies in de lite-
ratuur die bij het apparaat wordt geleverd.

De bliksemflits met pijlpuntsymbool, binnen een gelijkzijdige
driehoek, is bedoeld om de gebruiker te waarschuwen voor
de aanwezigheid van niet-geïsoleerde "gevaarlijke span-
ning" in de behuizing van het product die voldoende groot
kan zijn om een risico van een elektrische schok te vormen.
WAARSCHUWING! Gebruik dit product niet buiten
het land van de oorspronkelijke specificaties voor verkoop-
spanning, maar verschilt per land. Onjuiste spanning kan
schade veroorzaken die mogelijk duur is om te repareren.
De subwoofer wordt naar de geautoriseerde distributeurs van
MartinLogan verzonden met de juiste voeding voor gebruik
in het land van de beoogde verkoop. Een lijst met erken-
de distributeurs is beschikbaar op www.martinlogan.com of
door een e-mail te sturen naar [email protected].
WAARSCHUWING!
• In het toestel zijn gevaarlijke spanningen aanwezig -
verwijder de kap niet.
• Laat onderhoud uitvoeren door een gekwalificeerde
technicus.
• Stel dit apparaat niet bloot aan vocht om brand of
elektrische schokken te voorkomen.
• Schakel de versterker uit en ontkoppel de subwoofer
van het lichtnet mochten zich abnormale omstan-
digheden voordoen.
• Het netsnoer mag niet worden geïnstalleerd, verwij-
derd of losliggen van de luidspreker terwijl het andere
uiteinde is aangesloten op het lichtnet.
• Er mogen geen kaarsen of andere bronnen van open
vuur op de luidspreker worden geplaatst.
• Er mogen geen vloeistoffen in glazen of vazen op de
luidspreker worden geplaatst.
• Luidspreker mag niet worden blootgesteld aan druipe-
nde of spattende vloeistoffen.
• Het netsnoer moet gemakkelijk bereikbaar blijven
mochten zich abnormale omstandigheden voordoen.
We kunnen ons voorstellen dat u graag naar uw nieuwe MartinLogan
subwoofer wilt luisteren, dus dit gedeelte is bedoeld om een snelle en een-
voudige installatie te bewerkstelligen. Nadat u uw subwoofer in gebruik
hebt genomen, neemt u alstublieft de tijd om de rest van de informatie in
de bijgevoegde handleiding grondig te lezen. Het stelt u in staat om de
best mogelijke prestaties te halen uit dit hoogwaardige subwoofersysteem.
Als u problemen ondervindt bij het instellen of gebruik van uw MartinLogan-
subwoofer, raadpleegt u dan de hoofdstukken Kamer akoestiek, Plaatsing
of Bediening in de bijgevoegde gebruikershandleiding. Mocht u een bli-
jvend probleem ondervinden dat niet kan worden opgelost, neem dan
contact op met uw geautoriseerde MartinLogan-dealer. Zij zullen u voorz-
ien van de juiste technische ondersteuning om de situatie te verhelpen.
Stap 1: Uitpakken
Haal uw nieuwe subwoofer uit de verpakking. Bewaar het originele ver-
pakkingsmateriaal voor toekomstig gebruik - vervangende verpakking kan
duur zijn.
Stap 2: Plaatsing
U kunt ervoor kiezen om te beginnen door de subwoofer in een hoek aan
de voorkant van de kamer te plaatsen. Voordat u voor een definitieve
plaatsing in de hoek kiest, experimenteer met andere posities. Locaties
uit de buurt van hoeken blijken vaak effectiever in het leveren van ideale
laagfrequente prestaties en zorgen voor een betere aansluiting met de
hoofdluidsprekers. Raadpleeg het hoofdstuk Plaatsing voor meer informa-
tie.
Stap 3: Signaalverbinding
Gebruik de beste kabels waarover u kunt beschikt beschikken. Kabels van
hoge kwaliteit, verkrijgbaar bij uw speciaalzaak, worden aanbevolen en
bieden superieure prestaties. Bevestig de uitgangen van uw voorversterker
/ processor aan de signaal ingangsaansluitingen op het achterpaneel van
de subwoofer. Raadpleeg de hoofdstukken Instellingen en Aansluitingen
voor meer informatie. Als u van plan bent om uw subwoofer aan te sluiten
met behulp van luidsprekerniveau (hoog niveau) ingangen, raadpleegt u
dan het hoofdstuk Luidspreker niveau ingangen voor details.
Stap 4: Stroomaansluiting (AC) (zie waarschuwing)
Zorg ervoor dat de niveauknop op 0 staat. Sluit de subwoofer aan op
een stopcontact. Raadpleeg het hoofdstuk AC-stroomaansluiting in deze
handleiding voor meer informatie.
Stap 5a: De regelaars instellen (met LFE-invoer)
• Setting Control: zet de schakelaar op 'Local'.
• Power-modus: zet de schakelaar op 'Auto'.
• Niveau: stel in op stand één uur (net rechts van het midden).
• Gebruik het basmanagementsysteem van uw processor / receiver om
de subwoofer-integratie aan te passen
Stap 5b: De regelaars instellen (links / rechts-ingangen
gebruiken)
• Setting Control: Zet de schakelaar op 'App'.
• Power-modus: zet de schakelaar op 'Auto'.
• Download de MartinLogan Sub Control-app (via Google Play of de
Apple App Store).
• Pas de volgende instellingen aan met behulp van de app:
o Volume (niveau): stel in op -10 dB en verhoog totdat het geluid een
diepe en volle bas heeft.
o Fase: begin met 90 ° (met omgekeerde polariteit ingeschakeld).
o 20–30Hz Level: begin met 0dB.
o Laagdoorlaatfilter: lager instellen dan het lage frequentiebereik van
uw hoofdluidsprekers. Als u niet zeker bent van de lage frequentie
van uw hoofdluidspreker, begin dan met 35Hz.
Stap 6: Luister en geniet.

Turvallisuusvaroitukset ja lyhyt asennusohje
(Suomi/Finnish)
Tärkeitä turvallisuusohjeita
1 Lue nämä ohjeet.
2 Pidä nämä ohjeet.
3 Huomioi kaikki varoitukset.
4 Noudata kaikkia ohjeita.
5 Älä käytä laitetta veden läheisyydessä.
6 Puhdista vain kuivalla kankaalla.
7 Älä tuki mitään tuuletusaukkoja. Asenna valmistajan ohjeiden
mukaisesti.
8 Älä asenna lähelle lämmönlähteitä, kuten lämpöpattereita,
lämpörekistereitä, uuneja tai muita lämpöä tuottavia laitteita (mukaan
lukien vahvistimet).
9 Älä pudota polarisoidun tai maadoitetun pistokkeen turvallisuustarkoitu-
sta. Polarisoidulla pistokkeella on kaksi terää, joilla on yksi leveämpi
kuin toinen. Maadoitustyyppisellä pistokkeella on kaksi terää ja yksi
kolmas maadoituskoukku. Laaja terä tai kolmas kiinnitysosa on tarkoitet-
tu turvallisuutesi vuoksi. Jos toimitettu pistoke ei sovi pistorasiaan, ota
yhteyttä sähköasentajaan vanhentuneen pistorasian vaihtamisesta.
10 Suojaa virtajohtoa kävelemästä tai puristustöistä, erityisesti pistokkeis-
sa, sopivissa astioissa ja kohdassa, jossa ne poistuvat laitteesta.
11 Käytä vain valmistajan ilmoittamia lisälaitteita / lisävarusteita.
12 Käytä vain valmistajan määrittelemää tai laitteen mukana
myytävällä kori-, jalusta-, jalustalla, kannalla tai taulu-
kolla. Käytettäessä kärryä varoen siirrettäessä kärryä /
laitekokonaisuutta estäen tartuntavaurioiden välttämiseksi.
13 Irrota laite pistorasiasta ukkosmyrskyjen aikana tai jos sitä ei käytetä
pitkiä aikoja.
14 Tarkasta kaikki huolto pätevälle huoltohenkilökunnalle. Huoltoa tarvi-
taan, kun laite on vahingoittunut millään tavoin, kuten virtajohdon tai
pistokkeen vaurioitunut, nestettä on kaadettu tai esine on pudonnut
laitteeseen, laite on altistunut sateelle tai kosteudelle, ei toimi normaa-
listi , tai on pudonnut.
15 Laitetta ei saa altistaa tippumiselle tai roiskeille ja että nesteitä, kuten
maljakoita, sisältäviä esineitä ei saa laittaa laitteeseen.
16 Säilytä laitteen ympärillä vähintään 20-30 cm etäisyydelle riittävä
ilmanvaihto.
17 Tuuletusta ei saa estää peittämällä tuuletusaukot esineisiin, kuten
sanomalehtiin, pöytäliinoihin, verhoihin jne .;
18 Laitteeseen ei saa sijoittaa avotulen lähteitä, kuten kynttilöitä;
19 Laitteen käyttö trooppisissa ilmasto-olosuhteissa
20 Tämä laite on luokan II tai kaksinkertainen eristetty sähkölaite
21 Irrotuslaitteena käytetään verkkovirtaa tai laitteen liitintä, irrotuslaitteen
on oltava helposti käytettävissä.
Tasapainotteisen kolmion sisällä oleva huutomerkki on
tarkoitettu ilmoittamaan käyttäjälle tärkeiden käyttö- ja
huolto-ohjeiden olemassaolosta laitteen mukana toimitetus-
sa kirjallisuudessa.
Salamavalon salpa, jossa nuolenpääsymboli, tasasivuisen
kolmion sisällä, on tarkoitettu varoittamaan käyttäjää
sellaisen eristämättömän "vaarallisen jännitteen" esii-
ntymisestä tuotteen kotelossa, joka voi olla riittävän suuri
sähköiskun vaaran syntymiseksi.
VAROITUS! Älä käytä tätä tuotetta maan ulkopuolella,
kun alkuperäiset myyntijännitetarpeet vaihtelevat mait-
tain. Väärä jännite voi aiheuttaa vahinkoja, jotka ovat
mahdollisesti kalliita korjata. Subwoofer toimitetaan
MartinLogan-valtuutetuille jakelijoille, joissa on oikea
virtalähde käytettäväksi myyntiin tarkoitetussa maassa.
Luettelo valtuutetuista jakelijoista on osoitteessa www.
martinlogan.com tai lähettämällä sähköpostia osoitteeseen
VAROITUS!
• Laitteessa on hengenvaarallinen jännite — älä avaa
tai poista osia.
• Vikatapauksissa käänny valtuutetun huoltoliikkeen
puoleen.
• Välttääksesi tulipalon tai sähköiskun vaaran, älä altista
laitetta kosteudelle.
• Sammuta vahvistin ja irrota subwoofer jos huomaat
ongelmia laitteissa tai niiden käyttöympäristössä.
• Älä liitä, irrota tai jätä virtajohtoa irti kaiuttimesta jos
seinän puoleinen virtapistoke on kiinni.
• Älä sijoita kynttilöitä tai muita palavia esineitä kaiut-
timien läheisyyteen.
• Älä sijoita nestettä sisältäviä laseja, maljakoita tms.
kaiuttimien läheisyyteen.
• Kaiutinta ei saa altistaa tippuvalle tai roiskuvalle nest-
eelle. Varmista kuiva ja turvallinen käyttöympäristö.
• Virtajohdon tulee olla nopeasti irrotettavissa mahdol-
lisen ongelmatilanteen varalta.
Tiedämme että haluat jo kovasti päästä kuulemaan uutta MartinLogan sub-
wooferiasi, joten tämä osio on kirjoitettu nopeaa ja helppoa asennusta
silmälläpitäen. Kun olet tehnyt perusasennuksen, suosittelemme kuitenkin
lukemaan laitteen käyttö-ohjeen perusteellisesti. Se tarjoaa paljon vinkkejä
parhaan suorituskyvyn mahdollistamiseksi tästä huipputason subwooferi-
sta. Mikäli koet hankaluuksia MartinLogan subwooferin asennuksessa tai
käytössä, tutustu tarkemmin käyttö-ohjeen “Room Acoustics”, “Placement”
ja “Operation” -osioihin. Jos törmäät ylitsepääsemättömään ongelmaan,
olethan ensin yhteydessä MartinLogan jälleenmyyjääsi, jotta voimme par-
haiten auttaa teknisessä analyysissä ja ongelman ratkaisussa.
Vaihe 1: Laitteen purkaminen paketista
Poista uusi subwooferisi paketista. Säilytä alkuperäiset pakkausmateriaalit
mahdollista tulevaa tarvetta varten.
Vaihe 2: Laitteen sijoittaminen
Voit aloittaa sijoittamalla subwooferin kuuntelutilan etuosaan lähelle nurk-
kaa. Ennenkuin päätät lopullisen sijainnin, kokeile subwooferia useassa

eri paikassa. Subwoofer voi usein soida erottelevammin ja yhtenäisemmin
pääkaiuttimien toiston kanssa jos se on sijoitettu etäämmälle nurkasta. Lue
”Placement” –osio lisätietoja varten.
Vaihe 3: Äänisignaalin kytkentä
Käytä parhaita johtoja mitä voit. Erikoisliikkeestä saatavat laadukkaat
johdot takaavat parhaan lopputuloksen.
Liitä johto esivahvistimen/prosessorin ulostulosta subwooferin takapaneelin
sisääntuloon. Lue tarkempia lisätietoja “Controls and Connections” –osiosta.
Jos aiot kytkeä subwooferin Speaker Level -liitännöillä (kaiutintasoinen sig-
naali), tutustu käyttö-ohjeen kohtaan “Speaker Level Inputs”.
Vaihe 4: Virran kytkentä (huomioi turvallisuusvaroitukset)
Tarkista että voimakkuussäädin on minimiasennossa (0). Kytke virta-
johto subwooferiin ja seinäpistokkeeseen. Katso lisätietoja “AC Power
Connection” –osiosta.
Vaihe 5a: Säätimien asetus (jos käytät LFE sisääntuloa)
• Setting Control (asetusten valinta): Aseta kytkin asentoon 'Local'.
• Power Mode (virran kytkentä): Aseta kytkin asentoon 'Auto'.
• Level (voimakkuus): Käännä aluksi noin klo 12 - 13 kohdalle.
• Aseta AV-prosessorin tai viritinvahvistimen kaiutinsäädöt mieleiseksi.
Vaihe 5b: Säätimien asetus (jos käytät RCA Left/Right sisääntuloa)
• Setting Control (asetusten valinta): Aseta kytkin asentoon 'App'.
• Power Mode (virran kytkentä): Aseta kytkin asentoon 'Auto'.
• Lataa Android tai Apple sovelluskaupasta "MartinLogan Sub Control"
applikaatio mobiililaitteellesi.
• Valitse applikaatiossa seuraavat asetukset:
o Volume (voimakkuus): Aseta ensin -10dB ja lisää voimakkuutta
kunnes bassotoisto kuulostaa syvältä ja ulottuvalta.
o Phase (vaihe): Aloita 90° (Inverted polarity kytkettynä päälle).
o 20–30Hz Level (huonevahvistus): Aloita 0dB asetuksella.
o Low Pass Filter (alipäästöfiltteri): Aseta hieman alemmaksi, kuin
mihin pääkaiuttimesi toistavat.
Vaihe 6: Kuuntele, hienosäädä ja nauti.
Avertissements de sécurité et installation en bref
(Français/French)
Consignes de sécurité importantes
1 Lisez ces instructions.
2 Conservez ces instructions.
3 Tenez compte de tous les avertissements.
4 Suivez toutes les instructions.
5 N'utilisez pas cet appareil près de l'eau.
6 Nettoyez uniquement avec un chiffon sec.
7 Ne bloquez pas les ouvertures de ventilation. Installez conformément
aux instructions du fabricant.
8 N'installez pas l'appareil à proximité de sources de chaleur telles
que des radiateurs, des bouches de chaleur, des poêles ou tout autre
appareil (y compris les amplificateurs) produisant de la chaleur.
9 Ne pas mettre en échec l'objectif de sécurité de la fiche polarisée
ou de mise à la terre. Une fiche polarisée possède deux lames dont
l'une est plus large que l'autre. Une fiche de type mise à la terre com-
porte deux lames et une troisième broche de mise à la terre. La lame
large ou la troisième broche sont fournies pour votre sécurité. Si la
fiche fournie ne rentre pas dans votre prise, consultez un électricien
pour le remplacement de la prise obsolète.
10 Protégez le cordon d'alimentation de tout piétinement ou pincement,
en particulier au niveau des prises, des prises de courant et du point
de sortie de l'appareil.
11 N'utilisez que des accessoires / accessoires spécifiés par le fabricant.
12 Utilisez uniquement le chariot, le support, le trépied, le
support ou la table spécifié par le fabricant ou vendu
avec l'appareil. Lorsqu'un chariot est utilisé, soyez pru-
dent lorsque vous déplacez la combinaison chariot / appareil pour
éviter les blessures causées par un renversement.
13 Débranchez cet appareil pendant les orages ou lorsqu'il n'est pas
utilisé pendant de longues périodes.
14 Confiez toute réparation à un technicien qualifié. L'entretien est
nécessaire lorsque l'appareil a été endommagé de quelque façon
que ce soit, par exemple un cordon d'alimentation ou une prise
endommagée, du liquide a été renversé ou des objets sont tombés
dans l'appareil, l'appareil a été exposé à la pluie ou à l'humidité ou
a été abandonné.
15 L'appareil ne doit pas être exposé à des gouttes ou à des éclabous-
sures et les objets remplis de liquides, tels que des vases, ne doivent
pas être placés sur l'appareil.
16 Maintenir une distance minimale de 20 à 30 cm autour de l'appareil
pour une ventilation suffisante.
17 La ventilation ne devrait pas être gênée en couvrant les ouvertures de
ventilation avec des articles tels que des journaux, des nappes, des
rideaux, etc .;
18 Aucune source de flamme nue, telle que des bougies, ne doit être
placée sur l'appareil;
19 L'utilisation d'appareils dans les climats tropicaux
20
Cet appareil est un appareil électrique de classe II ou à double isolation
21 La fiche secteur ou un coupleur d'appareil est utilisé comme dispositif
de déconnexion, le dispositif de déconnexion doit rester facilement
accessible.
Le point d'exclamation dans un triangle équilatéral est
destiné à alerter l'utilisateur de la présence d'instructions
importantes d'utilisation et de maintenance (entretien) dans
la documentation accompagnant l'appareil.
Le symbole représentant un éclair dans le triangle équila-
téral est destiné à alerter l'utilisateur de la présence d'une
«tension dangereuse» non isolée à l'intérieur de l'enceinte
du produit, qui peut être suffisamment importante pour
constituer un risque d'électrocution.
La page est en cours de chargement...
La page est en cours de chargement...
La page est en cours de chargement...
La page est en cours de chargement...
La page est en cours de chargement...
La page est en cours de chargement...
La page est en cours de chargement...
La page est en cours de chargement...
La page est en cours de chargement...
La page est en cours de chargement...
La page est en cours de chargement...
La page est en cours de chargement...
La page est en cours de chargement...
La page est en cours de chargement...
La page est en cours de chargement...
La page est en cours de chargement...
La page est en cours de chargement...
La page est en cours de chargement...
La page est en cours de chargement...
La page est en cours de chargement...
La page est en cours de chargement...
La page est en cours de chargement...
La page est en cours de chargement...
La page est en cours de chargement...
La page est en cours de chargement...
La page est en cours de chargement...
La page est en cours de chargement...
La page est en cours de chargement...
La page est en cours de chargement...
La page est en cours de chargement...
La page est en cours de chargement...
La page est en cours de chargement...
La page est en cours de chargement...
La page est en cours de chargement...
La page est en cours de chargement...
La page est en cours de chargement...
La page est en cours de chargement...
La page est en cours de chargement...
La page est en cours de chargement...
La page est en cours de chargement...
La page est en cours de chargement...
La page est en cours de chargement...
La page est en cours de chargement...
La page est en cours de chargement...
La page est en cours de chargement...
La page est en cours de chargement...
La page est en cours de chargement...
La page est en cours de chargement...
La page est en cours de chargement...
La page est en cours de chargement...
La page est en cours de chargement...
La page est en cours de chargement...
La page est en cours de chargement...
La page est en cours de chargement...
La page est en cours de chargement...
La page est en cours de chargement...
La page est en cours de chargement...
La page est en cours de chargement...
La page est en cours de chargement...
La page est en cours de chargement...
La page est en cours de chargement...
La page est en cours de chargement...
La page est en cours de chargement...
La page est en cours de chargement...
La page est en cours de chargement...
La page est en cours de chargement...
La page est en cours de chargement...
La page est en cours de chargement...
La page est en cours de chargement...
La page est en cours de chargement...
La page est en cours de chargement...
La page est en cours de chargement...
La page est en cours de chargement...
La page est en cours de chargement...
La page est en cours de chargement...
La page est en cours de chargement...
La page est en cours de chargement...
La page est en cours de chargement...
La page est en cours de chargement...
La page est en cours de chargement...
La page est en cours de chargement...
La page est en cours de chargement...
La page est en cours de chargement...
La page est en cours de chargement...
La page est en cours de chargement...
La page est en cours de chargement...
La page est en cours de chargement...
La page est en cours de chargement...
-
 1
1
-
 2
2
-
 3
3
-
 4
4
-
 5
5
-
 6
6
-
 7
7
-
 8
8
-
 9
9
-
 10
10
-
 11
11
-
 12
12
-
 13
13
-
 14
14
-
 15
15
-
 16
16
-
 17
17
-
 18
18
-
 19
19
-
 20
20
-
 21
21
-
 22
22
-
 23
23
-
 24
24
-
 25
25
-
 26
26
-
 27
27
-
 28
28
-
 29
29
-
 30
30
-
 31
31
-
 32
32
-
 33
33
-
 34
34
-
 35
35
-
 36
36
-
 37
37
-
 38
38
-
 39
39
-
 40
40
-
 41
41
-
 42
42
-
 43
43
-
 44
44
-
 45
45
-
 46
46
-
 47
47
-
 48
48
-
 49
49
-
 50
50
-
 51
51
-
 52
52
-
 53
53
-
 54
54
-
 55
55
-
 56
56
-
 57
57
-
 58
58
-
 59
59
-
 60
60
-
 61
61
-
 62
62
-
 63
63
-
 64
64
-
 65
65
-
 66
66
-
 67
67
-
 68
68
-
 69
69
-
 70
70
-
 71
71
-
 72
72
-
 73
73
-
 74
74
-
 75
75
-
 76
76
-
 77
77
-
 78
78
-
 79
79
-
 80
80
-
 81
81
-
 82
82
-
 83
83
-
 84
84
-
 85
85
-
 86
86
-
 87
87
-
 88
88
-
 89
89
-
 90
90
-
 91
91
-
 92
92
-
 93
93
-
 94
94
-
 95
95
-
 96
96
-
 97
97
-
 98
98
-
 99
99
-
 100
100
-
 101
101
-
 102
102
-
 103
103
-
 104
104
-
 105
105
-
 106
106
-
 107
107
-
 108
108


MartinLogan Dynamo 800X Manuel utilisateur
- Catégorie
- Équipement musical supplémentaire
- Taper
- Manuel utilisateur
- Ce manuel convient également à
dans d''autres langues
- English: MartinLogan Dynamo 800X User manual
Documents connexes
-
 MartinLogan Dynamo 400 Manuel utilisateur
-
 MartinLogan 210 Manuel utilisateur
-
 MartinLogan SWT-X Wireless Subwoofer Kit Manuel utilisateur
-
 MartinLogan Dynamo 1000W Manuel utilisateur
-
 MartinLogan ODSUB120 Manuel utilisateur
-
 MartinLogan Dynamo 1500X Manuel utilisateur
-
 MartinLogan Dynamo 1500X Manuel utilisateur
-
 MartinLogan FORTE Manuel utilisateur
-
 MartinLogan 300 Manuel utilisateur
-
 MartinLogan 300 Manuel utilisateur


Autres documents
-
Q Acoustics 3000i Series Manuel utilisateur
-
Paradigm PERSONATM SUB Le manuel du propriétaire
-
Energy Take Classic 5.1 Manuel utilisateur
-
JBL SUB80P Wireless Powered Subwoofer Le manuel du propriétaire
-
PSB CHS212 Manuel utilisateur
-
Anthem STR Preamplifier Manuel utilisateur
-
 Sunfire Atmos XTATM265 Manuel utilisateur
-
REL G1 Mkii Sub-Bass System Manuel utilisateur
-
Monitor Audio Silver W12 Manuel utilisateur
-
Monitor Audio Silver W-12 Le manuel du propriétaire
