La page est en cours de chargement...

1
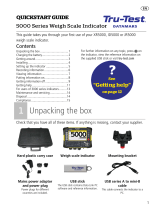
QUICKSTART GUIDE
This quickstart guide provides basic instructions for setting up and using your SRS2
Stick Reader.
Contents
Unpacking the box .................................. 1
Charging the battery ................................ 2
Getting around ........................................ 2
Recording EID tags .................................. 3
Bluetooth
®
connection ............................. 5
Viewing sessions ..................................... 6
Getting information off ............................ 7
Datamars Livestock cloud software .......... 8
Getting help ............................................ 9
Modifying settings ................................. 10
Maintenance and servicing .................... 12
Compliance ........................................... 14
For further information, view the reference
information on the supplied USB stick or
visit tru-test.com
?
See
“Getting help”
onpage 9
1
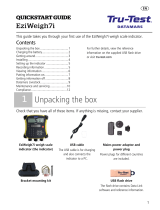
Unpacking the box
Check that you have all of these items. If anything is missing, contact your supplier.
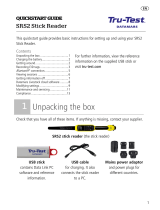
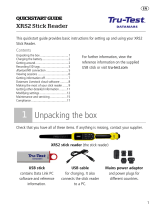
SRS2 stick reader (the stick reader)
USB stick
contains Data Link PC
software and reference
information.
USB cable
for charging. It also
connects the stick reader
to a PC.
Mains power adaptor
and power plugs for
different countries.

2
2
Charging the battery
• Use only the power adaptor and cables supplied.
• Do not charge the battery if the temperature is less than 5 °C (41 °F),
or greater than 40 °C (104 °F).
3
Getting around
Parts of the stick reader

3
The Home screen
When you first switch on the
stick reader, the Home screen is
displayed:
Scroll through the options using
the arrow keys
and
and choose an option using the
Select button.
4
Recording EID tags
Ways of using the stick reader
The stick reader can be used in two ways:
1. Standalone - the stick reader saves each scanned tag in its internal memory.
These records can be transferred afterwards, as described in
Section 7 –
Getting information off
.
2. Connected – the EID reader immediately transmits every scanned tag to a
connected device, such as a weigh scale indicator.

4
Recording EID tags (standalone)
You should start a new session file each time you begin a new scanning
session.
1. Press
to switch on the stick reader.
2. On the Home screen, press
and select New Session.
3. Press
.
4. Press the Read button while holding the stick reader near to an EID tag.
When scanning EID tags, if animals are moving quickly through a race or
into a pen, you can hold down the Read button continuously. Scanning
will stop when the Read button is released.
Displaying VIDs (visual IDs) during scanning
EID/VID pairs can be transferred from the PC to the stick reader prior to scanning
using the Data Link PC software. This means that when an animal's EID tag is
scanned, the corresponding VID number will be displayed automatically.

5
5
Bluetooth
®
connection
The stick reader will automatically connect to any Tru-Test
Bluetooth
enabled
weigh scale indicator, or any other device, with which it has previously been paired
(when in BT Auto mode - default).
In order to manually establish a
Bluetooth
wireless connection (if you are using a
non-Tru-Test weigh scale indicator, or you are having trouble establishing a
Bluetooth
wireless connection):
1. With both devices off, position the stick reader close to the other
device.
2. Switch on the device and, if necessary, check that its
Bluetooth
setting is enabled.
3. Switch on the stick reader.
4. Select Settings, then Bluetooth to display the Bluetooth
Settings screen.
5. Select Search for devices.
A list of available devices will be displayed.
6. Select a device.
Wait for up to one minute until the two devices are paired. When
pairing is complete, the
Bluetooth
indicator light above the
Read/Select button will illuminate blue.
7. Use the stick reader to scan an EID tag in order to test the
connection.
Always turn on the device you are trying to pair with first, BEFORE the
stick reader.

6
6
Viewing sessions
You can view information collected during a session in the Sessions screen.
1. If necessary, press
to go to the Home screen.
2. Select Sessions.
A list of sessions is displayed.
3. Select a session to view:

7
7
Getting information off
There are two ways to get information off the SRS2 stick reader.
Data Link PC software
You can:
• save session files.
• register a transaction with NAIT
(NZ) or NLIS (Australia).
• upload sessions to Datamars
Livestock.
To do this:
1. Connect the stick reader to a PC using
the cable supplied.
2. Launch Data Link on your PC.
3. Click
to get information off the
stick reader.
Data Link app for mobile devices
You can:
• email a session file.
• register a transaction with NAIT (NZ)
or NLIS (Australia).
• upload sessions to Datamars
Livestock.
To do this:
Launch the app on your
smartphone and follow the
instructions.
The Tru-Test Data Link app is available to download for free from the Google
Play* store (Android* devices) or the Apple App store* (Apple iOS*).

8
8
Datamars Livestock cloud
software
View your data online, anywhere, with Datamars Livestock. Datamars Livestock
allows you to monitor animal weight gains and track performance to target weights.
Monitor animals in groups, and act early if they fall behind target; or track
individually to identify top performers and slow growing stock.
livestock.datamars.com

9
9
Getting help
Help articles and videos
The Datamars Livestock Help Centre provides searchable articles and videos to help
you when you need it. The Help Centre provides instant support for our apps,
software and products. Access the help centre via the Data Link app or go to
support.livestock.datamars.com
Online training
The Datamars Livestock Training Academy provides easy, accessible online training
modules. You can work at your own pace to learn about our products and
solutions. Register for free at livestock.datamars.com/training-academy

10
Troubleshooting
For personalised troubleshooting and advice, chat with us directly. In the Data Link
app, tap on
, then . In the Tru-Test website tru-test.com, Data Link Help
Centre or Datamars Livestock Training Academy click on
in the bottom right-
hand corner of the screen.
10
Modifying settings
When shipped, the stick reader is set up to simply scan EID tags. You can change the
way that the stick reader is set up to suit the task that you are about to perform.
Settings menu
To modify the settings, from the Home screen, select Settings.
General
Change the
Date/Time
,
Language/Country
,
Auto Off
,
Vibration
and
Buzzer
settings.
View the stick reader
Firmware
details.
Bluetooth
Bluetooth
Auto** – Automatically connect to the
Bluetooth
®
enabled device most
recently used or to a Tru-Test
Bluetooth
enabled weigh scale indicator.
Off – Turn off
Bluetooth
wireless connectivity.
Manual – Manually search for a
Bluetooth
enabled device and accept
incoming
Bluetooth
connections.
Search for Devices
– Manually search for a
Bluetooth
enabled device within
range (see row above).
Paired Devices
– Display previously connected (paired) devices.

11
Advanced
Connect Mode
Default** – set this mode to connect to weigh scale indicators and most
software systems.
HID (Human Interface Device) – set this mode if you want the scanned
EID tag to be automatically transmitted to a spreadsheet (e.g. Excel), or
another device that has not directly integrated with the stick reader.
Tag Reading
Read Mode
Standard** – Press the Read button to scan a tag. Hold down the Read
button to continuously scan tags.
Continuous – Press the Read button to continuously scan tags. Scanning will
only stop when the Read button is pressed again.
Single – Press the Read button to scan a single tag. Even if you hold down
the Read button, another tag will not be scanned.
Tag Format -
Format and example shown:
Decimal** 964 155000012939
Decimal2
964155000012939
Hex
8000F66416B8808B
ISO
1000000964155000012939
ISO23 A0000000964000000123456 (animal) or
R0000000964000000123456 (non-animal)
Allow Duplicates
No** – Set to ensure that an EID is not recorded multiple times in the same
session.
Yes – Set to allow EIDs to be recorded multiple times in the same session.
Default settings marked **

12
11
Maintenance and servicing
Backing up your information
We strongly recommend that you regularly back up the data on your stick reader by
transferring it to a PC using Data Link PC software.
Updating your software
We recommend that you regularly update the stick reader software so that you
keep up with the latest features and improvements.
To update the software:
1. Connect the stick reader to a PC using the cable supplied.
2. Launch Data Link on your PC.
3. Click Tools / Updates.
4. Follow the step-by-step instructions.
For more information, see the Data Link help.
When updating software, the data on your stick reader will remain
intact. However, we strongly recommend that you transfer the
information on your stick reader onto a PC
before
updating.

13
Caring for the stick reader
Wipe the stick reader clean using a damp cloth, warm water and soap. Other
cleaners may damage the case or screen.
Do not immerse the stick reader in water.
Do not leave the stick reader where it may be exposed to extreme temperatures
(e.g. on the dashboard of a vehicle).
Store the stick reader in a cool, dry place.
Fit the dust cap when there are no cables connected to the stick reader. This will
prevent moisture and dirt from entering the socket.
Europe - Instructions for disposal of product
This symbol on the product or its packaging indicates that this product
(and its batteries) must not be disposed of with other waste. Instead, it is
your responsibility to dispose of your waste equipment by handing it over
to a designated collection point for the recycling of waste electrical and
electronic equipment. The separate collection and recycling of your waste
equipment at the time of disposal will help conserve natural resources and
ensure that it is recycled in a manner that protects human health and the
environment. For more information about where you can drop off your
waste equipment for recycling, please contact your local city recycling
office or the dealer from whom you purchased the product.
This product incorporates both a lithium-ion (LiNiMnCoO
2
) rechargeable battery
and a lithium metal (CR1220 35 mAh) button/coin cell battery.
For instructions on how to dismantle this product for recycling, email
service.dept@datamars.com

14
12
Compliance
FCC notice
This device complies with part 15 of the FCC Rules. Operation is subject to the following two conditions: (1) This device may not cause
harmful interference, and (2) this device must accept any interference received, including interference that may cause undesired
operation.
This equipment has been tested and found to comply with the limits for a Class B digital device, pursuant to part 15 of the FCC Rules.
These limits are designed to provide reasonable protection against harmful interference in a residential installation.
This equipment generates, uses and can radiate radio frequency energy and, if not installed and used in accordance with the
instructions, may cause harmful interference to radio communications. However, there is no guarantee that interference will not occur in
a particular installation. If this equipment does cause harmful interference to radio or television reception, which can be determined by
turning the equipment off and on, the user is encouraged to try to correct the interference by one or more of the following measures:
- Reorient or relocate the receiving antenna.
- Increase the separation between the equipment and receiver.
- Connect the equipment into an outlet on a circuit different from that to which the receiver is connected.
- Consult the dealer or an experienced radio/ TV technician for help.
- Any changes or modifications not expressly approved by Datamars could void the user's authority to operate the equipment
FCC warning
Note: Users are cautioned that changes or modifications not expressly approved by the party responsible for compliance could void
the user’s authority to operate the equipment.
Responsible party in the USA
This product is supplied by:
Datamars Inc
528 Grant Road
Mineral Wells
Texas 76067
UNITED STATES
Toll free: 800 874 8494
ISED Canada notice
This radio transmitter, model SRS2-1, has been approved by Innovation, Science and Economic Development Canada to operate
only with its integral antenna.
This device complies with Innovation, Science and Economic Development Canada licence-exempt RSS standard(s). Operation is
subject to the following two conditions:
(1) this device may not cause interference, and
(2) this device must accept any interference, including interference that may cause undesired operation of the device.
UK declaration of conformity
Hereby, Datamars declares that the radio equipment type SRS2-1 is in compliance with the relevant statutory
requirements. The full text of the declaration of conformity is available at the following internet address
http://livestock.tru-test.com/en/compliance
UK Importer:
Datamars UK,
Pheasant Mill, Dunsdale Rd,
Selkirk TD7 5DZ,
United Kingdom

15
EU declaration of conformity
Hereby, Datamars declares that the radio equipment type SRS2-1 is in compliance with Directive 2014/53/EU. The full
text of the EU declaration of conformity is available at the following internet address:
http://livestock.tru-test.com/en/compliance
This radio equipment emits a maximum of 0.7 mW e.i.r.p. in the frequency band 134.18 to 134.22 kHz and a maximum of 18 mW
e.i.r.p. in the frequency band 2.40 to 2.48 GHz.
The
Bluetooth
®
word mark and logos are registered trademarks owned by Bluetooth SIG, Inc. and any use of such marks by
Datamars SA and its subsidiaries is under license. Other trademarks and trade names are those of their respective holders.
All trademarks with an * are neither owned by nor licensed to Datamars SA and belong to their respective owners.
EU Importer:
Datamars Slovakia s.r.o.
Dolné Hony 6, 949 01
Nitra, Slovak Republic

16
GUÍA DE
INICIO RÁPIDO
Esta guía de inicio rápido ofrece instrucciones básicas para configurar y usar su
lector de bastón SRS2.
Contenidos
Instrucciones de desempacado ......................... 16
Cómo cargar la batería .................................... 17
Vistazo general ................................................ 17
Registro de etiquetas IDE ................................. 18
Conexión
Bluetooth
® ...................................... 20
Visualización de sesiones ................................. 21
Transferencia de datos ..................................... 22
Software en la nube de Datamars Livestock ..... 23
Ayuda ............................................................. 24
Modificación de la configuración ...................... 25
Mantenimiento y servicio ................................. 28
Cumplimiento normativo ................................. 29
Para mayor información, vea la información
de referencia en la unidad flash USB
suministrada o visite tru-test.com
?
Véase
“Ayuda”
en la página 24
1
Instrucciones de desempacado
Revise que cuente con todos estos artículos. Si falta algo, póngase en contacto con
su proveedor.
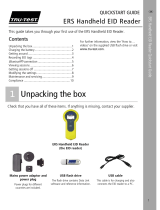
Lector de bastón SRS2 (el lector de bastón)
La memoria USB
contiene el software Data
Link para PC y la
información de referencia.
Cable USB
para cargar. También se
usa para conectar el lector
de bastón a una PC.
Adaptador de corriente
eléctrica
y enchufes para distintos
países.

17
2
Cómo cargar la batería
• Use solo el adaptador de corriente y los cables suministrados.
• No cargue la batería si la temperatura es menor que 5 °C, o mayor
que 40 °C.
3
Vistazo general
Partes del lector de bastón

18
La pantalla de Inicio
Cuando encienda el lector de
bastón por primera vez, se
mostrará la pantalla de Inicio:
Desplácese por las opciones
usando las teclas con flechas
y y elija la opción
usando el botón de Selección.
4
Registro de etiquetas IDE
Métodos de empleo del lector de bastón
El lector de bastón puede usarse de dos maneras:
1. Independiente: El lector de bastón guarda cada etiqueta escaneada en su
memoria interna. Estos registros pueden transferirse posteriormente, como se
describe en la
Sección 7 – Transferencia de datos del dispositivo
.
2. Conectado: El lector de bastón transmite inmediatamente cada etiqueta
escaneada a un dispositivo conectado, como por ejemplo un indicador de pesaje.

19
Registro de etiquetas IDE (independiente)
Se recomienda usar un archivo de sesión nuevo cada vez que dé inicio a
una sesión de escaneo nueva.
1. Pulse
para encender el lector de bastón.
2. En la pantalla de Inicio, pulse
y seleccione Sesión nueva.
3. Pulse
.
4. Pulse el botón de lectura mientras sostiene el lector de bastón cerca de una
etiqueta IDE.
Al escanear etiquetas IDE, si los animales se mueven rápidamente por un
corredor o corral, puede mantener pulsado el botón de lectura. La acción
de escaneo se detendrá cuando suelte el botón de lectura.
Cómo mostrar los IDV (ID visuales) durante el escaneo
Las parejas IDE/IDV pueden transferirse de su PC al lector de bastón antes de la
acción de escaneo usando el software Data Link para PC. Esto quiere decir que
cuando se escanea la etiqueta IDE de un animal, se mostrará automáticamente el
número IDV correspondiente.

20
5
Conexión
Bluetooth
®
El lector de bastón se conectará automáticamente a cualquier indicador de pesaje
Tru-Test
Bluetooth
activado, u otro dispositivo que se haya sincronizado previamente
(en modo BT Auto - predeterminado).
Para establecer manualmente una conexión inalámbrica
Bluetooth
(en caso de que
no esté usando un indicador de pesaje de Tru-Test, o si tiene problemas
estableciendo la conexión
Bluetooth
):
1. Apague ambos dispositivos y coloque el lector de bastón cerca
del otro dispositivo.
2. Encienda el dispositivo y, si es necesario, revise que esté activada
la función
Bluetooth
.
3. Encienda el lector de bastón.
4. Seleccione Configuración, y luego Bluetooth para mostrar la
pantalla de Configuración Bluetooth.
5. Elija Buscar dispositivos.
Se mostrará una lista de los dispositivos disponibles.
6. Seleccione un dispositivo.
Espere hasta un minuto para que los dos dispositivos se
sincronicen. Al finalizar la sincronización, se iluminará en azul la
luz
Bluetooth
arriba del botón de lectura/selección.
7. Use el lector de bastón para escanear una etiqueta IDE y
comprobar la conexión.
Siempre debe encender primero el dispositivo con el que desea
sincronizarse ANTES del lector de bastón.
/