Toro 9 hp Log Splitter Manuel utilisateur
- Catégorie
- Fendeuses de bûches
- Taper
- Manuel utilisateur

Form No. 3366-331 Rev A
9 hp Log Splitter
Model No. 22606-Serial No. 310000001 and Up
Register your product at www.Toro.com
Operator’s Manual
Original Instructions (EN)

2
This product complies to the US National Highway Traffic
Safety Administration (NHTSA) for street legal trailer.
WARNING
The engine exhaust from this product contains chemicals
known to the State of California to cause cancer, birth
defects, or other reproductive harm.
This spark ignition system complies with Canadian ICES-
002.
In some areas there are local, state, or federal regulations
requiring that a spark arrester be used on the engine of this
machine, a spark arrester is incorporated with the muffler
assembly. Genuine Toro spark arresters are approved by the
USDA Forestry Service.
This engine is equipped with a spark arrester muffler. It is
a violation of California Public Resource Code Section
4442 to use or operate the engine on any forest-covered,
brush-covered, or grass-covered land without a spark
arrester muffler maintained in working order, or the
engine constricted, equipped, and maintained for the
prevention of fire. Other states or federal areas may have
similar laws.
The enclosed Engine Owner’s Manual is supplied for
information regarding the US Environmental Protection
Agency (EPA) and the California Emission Control
Regulation of emission systems, maintenance, and
warranty. Replacements may be ordered through the
engine manufacturer.
INTRODUCTION
This log splitter can operate in the horizontal or vertical
position. It is designed to split wood logs cut to a size to fit
within the machine splitting wedge opening. It is not intended
to split rock, metal, or any materials other than wood. The log
splitter can be towed behind a vehicle equipped with an
appropriate ball hitch.
You may contact Toro directly at www.Toro.com
for product
and accessory information, help finding a dealer, or to register
your product.
Read this information carefully to learn how to operate and
maintain your product properly and to avoid injury and
product damage. You are responsible for operating the
product properly and safely.
Whenever you need service, genuine Toro parts, or additional
information, contact an Authorized Service Dealer or Toro
Customer Service and have the model and serial numbers of
your product ready. Write the numbers in the space provided.
This Manual identifies potential hazards and has safety
messages identified by the safety alert symbol, (Figure 1)
which signals a hazard that may cause serious injury or death
if you do not follow the recommended precautions.
Figure 1
1. Safety alert symbol
This manual uses two other words to highlight information.
Important calls attention to special mechanical information
and Note emphasizes general information worthy of special
attention.
Tire Information
The tire identification number (TIN) is branded into the
sidewall of all street legal tires (Figure 2).
Figure 2
1. Tire identification number (TIN)
SAFETY
Hazard control and accident prevention are dependent
upon the awareness, concern, and proper training of the
personnel involved in the operation, transport,
maintenance, and storage of the machine. Improper use or
maintenance of the machine can result in injury or death.
To reduce the potential for injury or death, comply with
the following safety instructions.
Safe Operating Practices
This product is capable of crushing and amputating hands and
feet. Always follow all safety instructions to avoid serious
injury or death.
WARNING
Engine exhaust contains carbon monoxide, an odorless,
deadly poison that can kill you.
Do not run the engine indoors or in an enclosed area.
If you believe that your vehicle* has a defect which could
cause a crash or could cause injury or death, you should
immediately inform the National Highway Traffic Safety
Administration (NHTSA) in addition to notifying The Toro
Company.

3
If NHTSA receives similar complaints, it may open an
investigation, and if it finds that a safety defect exists in a
group of vehicles*, it may order a recall and remedy
campaign. However, NHTSA cannot become involved in
individual problems between you, your dealer, or The Toro
Company.
To contact NHTSA, you may call the Vehicle Safety Hotline
toll-free at 1–888–327–4236 (TTY: 1–800–424–9153); go to
http://www.safercar.gov ; or write to: Administrator, NHTSA,
400 Seventh Street, SW., Washington, DC 20590. You can
also obtain other information about motor vehicle safety from
http://www.safercar.gov.
* log splitter
Training
• Read the Operator’s Manual and other training material. If
the operator(s) or mechanic(s) can not read English, it is the
owner’s responsibility to explain this material to them.
• Do not allow anyone to operate the machine who has not
read the Operator’s Manual or has not been instructed on the
safe use of the machine.
• Never let children or untrained people operate or service the
equipment. Local regulations may restrict the age of the
operator.
• Many accidents occur when more than one person operates
the machine. If a helper is assisting in loading logs, never
activate the control until the helper is a minimum of 10 feet
from the machine.
• All operators and mechanics should be trained. The owner is
responsible for training the users.
Hydraulic log splitters develop high fluid pressures during
operation. Hydraulic fluid escaping through a pin hole
opening can penetrate your skin and cause blood poisoning or
death. Follow these instructions at all times:
• Do not operate machine with frayed, kinked, cracked, or
damaged hoses, fitting, or tubing.
• Stop the engine and relieve hydraulic system pressure
before changing or adjusting fittings, hoses, tubing, or
other system components.
• Do not adjust the pressure settings of the pump or valve.
• Do not check for leaks with your hand.
• Leaks can be detected by passing cardboard or wood,
while wearing protective gloves and safety glasses, over
the suspected area. Look for discoloration of cardboard
or wood.
• Keep the operator zone and adjacent area clear for safe,
secure footing.
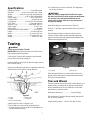
Towing
Check with your local county or state safety towing
regulations, in addition to meeting Department of
Transportation (DOT) Safety Towing Regulations, before
towing the log splitter.
• In order to reduce the possibility of an accident while
transporting the log splitter on public roads, ALWAYS make
sure the towing vehicle is mechanically sound and in good
operating condition.
• ALWAYS shutdown engine before transporting.
• ALWAYS inspect the hitch and coupling for wear. NEVER
tow the debris blower with defective hitches, couplings,
chains, etc.
• Check the tire air pressure on both towing vehicle and
debris blower. The log splitter tires should be inflated to 60
psi
(410 kpa) cold.
• Check the tire tread for wear.
• ALWAYS properly attach the safety chains to towing
vehicle.
• ALWAYS make sure that the towing vehicle’s directional,
backup, and brake lights are working properly.
• Avoid sudden stops and starts. This can cause skidding, or
jack knifing. Smooth, gradual starts and stops will improve
towing.
• Avoid sharp turns to prevent rolling. Tow only with a
vehicle that has a hitch designed for towing. Do not attach
towed equipment except at the hitch point.
Before towing check to make certain your log splitter is
correctly and securely attached to the towing vehicle.
• Be sure that the ball hitch you are using is the proper size
for the hitch coupler on the log splitter.
• Be sure the safety chains are properly hooked to the
vehicle leaving enough slack for turning.
• Always turn the fuel valve to the OFF position.
• Be sure the log splitter is secured in the horizontal
position.
• Be sure the jack stand is secured in the UP position.
• Do not tow machine faster than 45 mph (75 km/h).
• Use caution when backing up; use a spotter outside the
vehicle to guide you.
• Do not allow anyone to sit or ride on unit when towing.
• Never carry any cargo or wood on unit when towing.
• Always disconnect the unit from the tow vehicle before
using it.
• Place chock blocks underneath wheel to prevent rolling
while unit is parked.
Preparation
Become familiar with the safe operation of the equipment,
operator controls, and safety signs.
• Always wear safety shoes or heavy boots.
• Always wear safety glasses or safety goggles during
operating this machine.
• Wear tight fitting gloves without draw strings or loose
cuffs.
• Never wear jewelry or loose clothing that might become
entangled in moving or rotating parts of the machine.
• Make sure machine is on level surface before operating.
• Always operate this machine from the operator zone
specified in the manual.

4
• Logs should be cut with ends as square as possible prior to
splitting.
• Block the machine to prevent unintended movement, and
lock in either horizontal or vertical position.
• Use extra care when handling gasoline and other fuels. They
are flammable and vapors are explosive.
• Use only an approved fuel container.
• Never remove the gas cap or add fuel when the engine is
running. Allow the engine to cool before refueling. Do
not smoke.
• Never refuel or drain the machine indoors.
• Replace gasoline cap and tighten securely.
• Keep container nozzle in contact with the tank during
filling.
• If gasoline is spilled, wipe it off the engine and
equipment.
Operation
Before every use:
• Inspect the coupler, ball and hitch.
• Always use safety chains.
• Verify all lights are functioning properly.
• Verify the tires are properly inflated as recommended on
tires.
• Verify lug nuts are tight and torqued properly.
• Machine is properly secured.
• Before starting this machine, review the “Safety
Instructions” Failure to follow these rules may result in
serious injury to the operator or bystanders.
• Never leave this machine unattended with the engine
running.
• Never operate machine while under the influence of alcohol,
drugs, or medication.
• Never allow anyone to operate this machine without proper
instruction.
• Always operate this machine with all safety equipment in
place and working.
• Do not change the engine governor setting or over speed the
engine.
• Use only your hand to operate the control lever.
Always keep hands and feet clear of moving parts.
• Never place your hands or feet between the log and the
splitting wedge or between the log and the ram during the
forward or reverse stroke.
• When loading a log, place your hands on the sides of the
log, not on the ends. Never place your hands or any part of
your body between a log and any part of the log splitter.
• Do not straddle or reach across the log splitting area when
operating the machine.
• Never attempt to split more than one log at a time.
• For logs which are not cut square, the least-square end and
the longest portion of the log should be placed toward the
beam and wedge, and the square end placed toward the end
plate.
• Keep the work area clean; remove split logs from around the
machine so you do not slip on them.
• Do not touch parts which may be hot from operation. Allow
them to cool before attempting to maintain, adjust, or service.
• Locate the pinch point areas marked on the machine and
keep hands and feet away from these areas.
• Never run an engine in an enclosed area.
• Never move this machine while the engine is running.
• Lightning can cause severe injury or death. If lightning is
seen or thunder is heard in the area, do not operate the
machine; seek shelter.
• Do not touch the engine or muffler while the engine
is running or soon after it is stopped. These areas
could be hot enough to cause a burn.
Maintenance and Storage
• Stop the engine and remove the spark plug wire before
making any repairs. Wait for all movement to stop before
adjusting, cleaning, or repairing.
• Inspect the machine before each use. Make sure all nuts,
bolts, screws, hydraulic fittings, hose clamps, are securely
tightened.
• Clean debris from the muffler and engine to help prevent
fires. Clean up oil or fuel spillage.
• Let the engine cool before storing and do not store near
flame.
• Do not store fuel near flames or drain indoors.
• Park the machine on level ground. Never allow untrained
personnel to service the machine.
• Keep hands and feet away from moving parts. If possible,
do not make adjustments with the engine running.
• Keep all parts in good working condition and all hardware
tightened. Replace all worn or damaged decals.
• Use extra care when handling gasoline and other fuels. They
are flammable and vapors are explosive.
• Never store the machine or fuel container inside where there
is an open flame, such as near a water heater or furnace.
• Use only genuine Toro replacement parts to ensure that
original equipment standards are maintained.

5
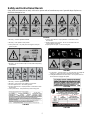
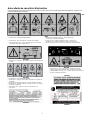
Safety and Instructional Decals
Safety decals and instructions are easily visible to the operator and are located near any area of potential danger. Replace any
decal that is damaged or lost.
119-4695
1. Warning – read the Operator’s Manual. 4. Thrown object hazard – keep bystanders a safe distance from
the machine.
2. Warning – lower splitter to lock position. 5. Broken hydraulic lines hazard – do not use machine if lines are
cracked, broken or leaking.
3. Pinch point, hand – stay away from moving parts; keep all 6. Split logs with the grain – not across the grain.
guards in place.
119-4696
1. Warning – do not exceed 45 mph (72 km/h) when transporting
the machine.
119-4694
1. Warning – read the Operator’s Manual.
2. Warning – learn how to lower splitter to lock position
3. Thrown object hazard – wear safety glasses.
4. Thrown object hazard – keep bystanders a safe distance from
the machine.
5. Pinch point hazard – keep hands away from moving parts.
120-1853
119-4697
1. To operate 1 - start the engine, 2 - move the lever to engage the
machine 3 - release the lever to disengage the machine.
2. Cutting/dismemberment of hand, blade – do not place hands on
the wood when engaging the splitter.
117-2718
120-1854

6
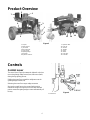
Product Overview
Figure 3
1. Coupler 9. Hydraulic filter
2. Safety Chains 10. Fuel cap
3. Jack stand 11. Air filter
4. Rail locking pin 12. Throttle
5. Control lever 13. Choke
6. Splitting wedge 14. Starter
7. End plate 15. Fuel valve
8. Hydraulic reservoir 16. Fuel filter
Controls
Control Lever
The control lever (Figure 4) actuates the hydraulic valve that
moves the splitting wedge forward (out) and reverse (back)
during the log splitting process.
Holding the control lever toward the end plate moves the
splitting wedge forward (out).
Releasing the control lever stops wedge movement.
Moving the control lever to the reverse (back) position
retracts the wedge. Moving the lever to the fully retracted
position causes the spitting wedge to retract automatically all
the way.
Figure 4
1. Control lever
1
7
6
5
3
2
8
9
4
10
12
13
15
14
16

7
Specifications
Operating Positions .............................. Vertical/Horizontal
Slide Rail .................... 6 inch (15 cm) heavy-duty, I-beam
Wedge ................... 9 inch (22.5 cm) with compound angle
Engine .................................. 9 HP (6.7 kW) Robin/Subaru
Force/Tonnage ..................................... 28 ton (30.9 m ton)
Cylinder Stroke ...................................... 24 inches (60 cm)
Log Opening ......................... 25 inch (62.5 cm) maximum
Cycle Time ........................................ 12 seconds (approx.)
Wheels & Tires ............................... High-Speed, 4.80 x 12
Hitch Coupler ................................................ 2 inch (5 cm)
Safety Chains ........................................................ Standard
Jack Stand with two caster wheels ................. 4.10/3.50 x 4
Length .................................................. 97 inches (246 cm)
Width ............................................... 53.1 inches (135 cm)
Height .............................................. 45.5 inches (115 cm)
Weight ..................................................... 826 lbs (375 Kg)
Towing
WARNING
Do not tow over 45 mph (75 km/h).
IMPORTANT Always turn fuel valve to the OFF position
before transporting the log splitter.
Lower the rail I-beam of the log splitter to the horizontal
position and lock with rail locking pin.
Crank the handle of the lift jack to align the coupler with the
ball of the tow vehicle.
Remove the locking pin from the lever, squeeze the latch lock
and lift the lever up to open the coupler (Figure 5).
Figure 5
1. Tongue 4. Safety chains
2. Coupler 5. Locking pin
3. Lever in locked position
Attach coupler to a class I or higher 2 inch
(50.8 cm) ball on a towing vehicle and latch securely.
• If coupler does not fit over the ball: Turn adjustment nut
one turn counter-clockwise.
• If coupler hitch is too loose on the ball: Turn adjustment
nut one turn clockwise.
WARNING
Failure to properly engage the hitch ball in the coupler
ball socket and securely lock the coupler latch mechanism
can cause the unit to become detached from the tow
vehicle while traveling, which may cause serious injury
and property damage.
Install the locking pin to secure the lever (Figure 5).
Cross or “X” the safety chains and attach them to the holes on
the hitch.
Plug tail light wire harness connector to the tow vehicle
connector. Check to make sure the brake lights illuminate
properly with the brake pedal applied and the taillights flash
when the turning signals are use.
Figure 6
1. Jack stand 2. Release pin
Raise jack stand (Figure 6) so caster wheels are free of the
ground, pull the release pin and rotate wheels rearward and
lock in the horizontal position.
Tires and Wheels
The most common cause of tire trouble is under-inflation. It is
important that you maintain full air pressure as indicated by
the tire manufacturer on the tire’s sidewall or on the trailer
manufacturer’s certification label.
Inflate main axle tires to ....................... 60 psi (410 kpa)
Check the torque of the wheel lug nuts initially and after the
first 10 hours of operation.
Torque wheel lug nuts to .... 80-90 ft. lbs (108-122 N·m)
1
2

8
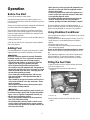
Operation
Before You Start
Review all the machine’s safety decals.
Disconnect the unit from the tow vehicle, position it on a
level location and block the wheels front and back to prevent
it from moving.
Ensure you are familiar with safety regulations and shutdown
procedures described in the Operator’s Manual.
Before loading and operating the log splitter, always wear
protective gear, such as safety goggles, face shield, hearing
protection, tight fitting gloves without draw strings or loose
cuffs, and steel-toed shoes.
Ensure that the work area is free of wood and debris that you
could trip and fall over.
Check the fuel and oil level of the engine, and the hydraulic
fluid in the reservoir.
Adding Fuel
Use unleaded gasoline (87 pump octane minimum). Leaded,
regular gasoline may be used if unleaded us not available.
WARNING
In certain conditions, gasoline is extremely flammable
and highly explosive. A fire or explosion from gasoline
can burn you and others and can damage property.
• Fill the fuel tank outdoors, in an open area, when the
engine is cold. Wipe up any gasoline that spills.
• Never fill the fuel tank inside an enclosed trailer.
• Do not fill the fuel tank completely full. Add gasoline to
the fuel tank until the level is 1/4 to 1/2 inch (6 to 13 mm)
below the bottom of the filler neck. This empty space in
the tank allows gasoline to expand.
• Never smoke when handling gasoline, and stay away
from an open flame or where gasoline fumes may be
ignited by a spark.
• Store gasoline in an approved container and keep it out
of the reach of children. Never buy more than a 30-day
supply of gasoline.
• Do not operate without entire exhaust system in place
and in proper working condition.
WARNING
In certain conditions during fueling, static electricity can
be released causing a spark which can ignite the gasoline
vapors. A fire or explosion from gasoline can burn you
and others and can damage property.
• Always place gasoline containers on the ground away
from your vehicle before filling.
• Do not fill gasoline containers inside a vehicle or on a
truck or trailer bed because interior carpets or plastic
truck bed liners may insulate the container and slow the
loss of any static charge.
• When practical, remove gas-powered equipment from
the truck or trailer and refuel the equipment with its
wheels on the ground.
• If this is not possible, then refuel such equipment on a
truck or trailer from a portable container, rather than
from a gasoline dispenser nozzle.
• If a gasoline dispenser nozzle must be used, keep the
nozzle in contact with the rim of the fuel tank or
container opening at all times until fueling is complete.
Do not use methanol, gasoline containing methanol, or
gasohol containing more than 10% ethanol because the fuel
system could be damaged. Do not mix oil with gasoline.
Using Stabilizer/Conditioner
Use a fuel stabilizer/conditioner in the machine to provide the
following benefits:
• Keeps gasoline fresh during storage of 90 days or less. For
longer storage it is recommended that the fuel tank be
drained.
• Cleans the engine while it runs.
• Eliminates gum-like varnish buildup in the fuel system,
which causes hard starting.
Do not use fuel additives containing methanol or ethanol.
Add the correct amount of gas stabilizer/conditioner to the
gas.
A fuel stabilizer/conditioner is most effective when mixed
with fresh gasoline. To minimize the chance of varnish
deposits in the fuel system, use fuel stabilizer at all times.
Filling the Fuel Tank
1. Park the machine on a level surface and stop the engine.
2. Allow the engine to cool.
3. Clean around the fuel tank cap and remove it
(Figure 7).
Figure 7
1. Fuel tank cap
4. Only fill tank to bottom of the fill neck tube, do not
overfill.
1

9
Checking the Engine Oil Level
The best time to check the engine oil is when the engine is
cool before it has been started for the day. If it has already
been run, allow the oil to drain back down to the sump for at
least 10 minutes before checking. If the oil level is at or
below the “L” mark on the dipstick, add oil to bring the oil
level to the “H” mark. Do not overfill. If the oil level is
between the “H” and “L” marks, no oil addition is required.
1. Place the machine on a flat level surface, and stop the
engine.
2. Allow the engine to cool.
3. Clean around the oil dipstick.
4. Remove the dipstick and wipe the end clean.
5. Slide the dipstick fully into the dipstick tube without
threading it into the filler neck.
6. Pull the dipstick out and look at the end. The oil should be
to the top of the upper limit range (Figure 8).
Figure 8
1. Oil dipstick
Running the engine with low oil level can cause engine
damage. This type of damage is not covered by warranty.
7. If the oil level is low, slowly pour only enough oil into the
crankcase to raise the level to the upper limit. See
Maintenance section for oil specifications.
Do not overfill the crankcase with oil because the engine
may be damaged.
8. Replace the dipstick.
Checking the Hydraulic Fluid
Level
Check the hydraulic fluid level daily, before each use. The
best time to check the hydraulic fluid is when the unit is cool
before it has been started for the day.
1. Place the machine on a flat level surface.
2. Clean around the hydraulic vent plug (Figure 9).
3. Remove the hydraulic vent plug and measure the hydraulic
fluid level.
4. Maintain fluid level 3 inch (7.6 cm) below the top of the
tank fitting, with the cylinder retracted. If the hydraulic
fluid is low, add SAE 10W30 or 15W40 Diesel Engine
Oil, API Service CH-4 or higher.
Figure 9
1. Vent plug 2. Ruler
Changing the Rail Position
The rail I-beam on this machine can be rotated to use in the
horizontal or vertical position.
1. To move the rail into the vertical position, press the spring-
loaded button on the rail locking pin handle IN and pull the
rail locking pin from the lock down plate (Figure 10).
2. Set the vertical lock lever in the open position.
3. Lift and rotate the rail I-beam into the vertical position.
Figure 10
1. Rail Locking Pin - Button 2. Vertical locking pin
4. Rotate the handle or the vertical locking lever so it engages
the lower rail of the I-beam locking to secure it in the
vertical position (Figure 10).
1
2
1
2
1

10
Starting and Stopping the
Engine
Starting the Engine
1. Turn the engine ON/OFF switch to the “I” ON position
(Figure 11-1).
2. Move the choke lever left to the ON position if you are
starting a cold engine (Figure 11-2). A warm or hot
engine may not require choking.
3. Move the throttle lever 1/3 way to the FAST position
(Figure 11-3).
4. Move the fuel valve to the Open position, all the way to
the right (Figure 11-4).
5. Pull the starter handle lightly until you feel resistance, then
pull the handle briskly (Figure 11-5). Return the starter
handle gently.
4
Figure 11
1. ON/OFF Switch 4. Fuel Valve
2. Choke 5. Starter
3. Throttle
6. After the engine starts, gradually move the choke lever
back to the Off position. If the engine stalls or hesitates,
move the choke back to On again until the engine warms
up. Then move it to the Off position.
7. Move the throttle lever to the FAST position.
Stopping the Engine
1. Move the throttle lever to the SLOW position. If the engine
has been working hard or is hot, let it run for a minute
before turning off. This helps to cool the engine before
stopping. In an emergency, the engine may be stopped
immediately.
2. Turn the engine ON/OFF switch to the “O” OFF position.
3. Move the fuel valve to the Closed position, all the way to
the left.
Using the Log Splitter
WARNING
Do not attempt to operate the log splitter without fully
understanding all instructions, safety precautions, and/or
warnings.
• Always wear protective gear, such as safety goggles, face
shield, hearing protection, tight-fitting gloves without
draw strings or loose cuffs, and steel-toed shoes, when
using the machine.
• Make sure you are standing in the safe operating area,
as shown in these pictures. You must stay in the safe
operating area at all times when the splitting wedge is in
motion (whether extending or retracting).
• Never place any part of your body into a position that
causes an unsafe operating condition.
1. Place the log splitter on level, dry ground and block the
front and back of both wheels to prevent any movement.
2. Make sure you read all the recommendations from the
“Safety” section before using the log splitter.
3. Adjust the rail position horizontal or vertical as desired and
lock in position.
4. Start the engine; refer to Starting the Engine and allow
engine to warm up at idle for two minutes.
5. Make sure both ends of the log you are splitting are cut as
square as possible. This will prevent the log from sliding
out of position while under pressure. All logs should be
shorter than 24 inches (60 cm) long.
6. Place the log against the end plate and only split wood in
the direction of the grain.
Figure 12
IMPORTANT Never attempt to split logs across the grain
(Figure 12).
2
3
1
5

11
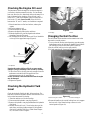
CAUTION
Do not place your hands on the ends of the log when
loading the log splitter. This is a very UNSAFE method
and could result in injury to your hands.
• Only use your hand to push the control lever forward
(towards the log). If the log moves before it is contacted by
the splitting wedge, do not touch it while the wedge is
moving. Release the control lever, then reposition the log.
• Operate the log splitter only when standing in the safe
operating zone by the control lever (Figure 13).
Figure 13
1. Control lever
7. Only one adult should stabilize the log and operate the
control handle, to ensure full control over the log and the
splitting wedge.
8. To stop the machine; refer to Stopping the Engine.
Maintenance
Maintenance Schedule
Daily - before each use Check the engine oil level
Check the hydraulic fluid level
Grease the rail I-beam
Remove debris from the unit
Check for loose fasteners or damaged components
Initial 20 hours Change the engine oil
Every 25 hours Check the hydraulic lines for leaks, loose fittings, kinked lines, loose mounting
supports, wear, weather, and chemical deterioration
Every 50 hours Clean the air filter
Every 100 hours - after the initial oil
change
Change the engine oil
Every 100 hours Change the hydraulic fluid
Change the hydraulic filter
Every 200 hours Change the air filter
Clean the fuel filter
Clean and adjust the spark plug
Every 500 hours Change the spark plug
Lubricate the wheel bearings

12
Servicing the Air Cleaner
Service Interval: Every 50 hours
Clean the air filter. Replace the air filter every 200 hours or
once a month.
1. Make sure wire is off spark plug.
2. Remove cover over the air cleaner and clean cover
thoroughly (Figure 14).
Figure 14
1. Foam element 2. Paper element
3. If foam element is dirty, remove it from paper element
(Figure 14). Clean thoroughly as follows:
• Wash foam element in a solution of liquid soap and warm
water. Squeeze to remove dirt, but do not twist because
the foam may tear.
• Dry by wrapping in a clean rag. Squeeze rag and foam
element to dry, but do not twist because the foam may
tear.
• Saturate element with clean engine oil. Squeeze element to
remove excess oil and to distribute oil thoroughly. An oil
damp element is desirable.
4. When servicing foam element, check condition of paper
element. Replace as required. Do not use compressed air
to clean the paper element.
5. Install foam element, paper element, and air cleaner cover.
Do not operate the engine without the air cleaner element
because extreme engine wear and damage will likely result.
Servicing the Engine Oil
The crankcase must be filled with approximately 34 fl oz (1
L) of proper viscosity oil before starting. The engine uses
any high-quality oil having the American Petroleum
Institute - API - “service classification" SF, SG, SH or SJ.
Oil viscosity - weight - must be selected according to
ambient temperature. (Figure 15) illustrates the
temperature/viscosity recommendations.
Figure 15
Using multi-grade oils (5W-20, 10W-30, and 10W-40) will
increase oil consumption. Check the oil level more
frequently when using them.
Changing the Engine Oil
Service Interval: After the initial 20hours, then every 100
hours after the initial oil change.
1. Start the engine and let it run five minutes. This warms
the oil so it drains better.
2. Place a pan under the oil drain hole.
3. Remove the drain plug and drain the oil.
Dispose of the used oil at a certified recycling center.
5. Install the drain plug and refill the crankcase with the
specified oil. Refer to Checking the Engine Oil Level
(Figure 16).
Figure 16
1. Oil drain plug
1

13
Replacing the Spark Plug
Service Interval: Clean the spark plug every 50 hours.
Replace the spark plug every 500 hours.
Type: NGK BR 6HS or equivalent
Air Gap: 0.28–0.032 inch (0.70-0.80 mm)
1. Pull molded wire off spark plug (Figure 17).
Figure 17
1. Spark plug wire
2. Clean around spark plug and remove plug from cylinder
head.
Replace a cracked, fouled, or dirty spark plug. Do not
sand blast, scrape, or clean electrodes because engine
damaged could result from grit entering the cylinder.
3. Set air gap at 0.028-0.032 inch (Figure 18). Install
correctly gapped spark plug and tighten firmly to
17 ft.-lb (23 N-m).
Figure 18
Cleaning the Fuel Filter
Service Interval: Clean the fuel filter every 200 hours.
1. Close the fuel shut off valve and unscrew the bowl from
the filter body (Figure 19).
Figure 19
1. Shut-off valve 2. Bowl
2. Clean the bowl and filter in clean gasoline.
3. Install the bowl and filter.
Replacing the Hydraulic Filter
Service Interval: Every 100 hours.
1. Place a pan under the hydraulic filter and slowly loosen it,
catching the oil as it runs out.
2. Remove the hydraulic filter and clean the mounting
flange (Figure 20).
3. Wipe hydraulic fluid on the gasket of the new hydraulic
filter.
4. Install new hydraulic filter until just tight, then turn ¾
turn more.
Figure 20
1. Hydraulic filter 2. Suction hose
1
2

14
Replacing the Hydraulic Fluid
Service Interval: Every 100 hours.
Contaminants in fluid may damage the hydraulic
components. Flushing the reservoir tank and hoses with
kerosene after repairs are performed on the tank, hydraulic
pump, or valve is recommended. Contact an authorized
service dealer for hydraulic system repairs.
1. Disconnect the suction hose from the bottom of the
reservoir tank. Next to the hydraulic filter (Figure 20).
2. Allow the fluid to drain into a suitable container.
3. Tilt unit down in front to completely drain reservoir.
4. Install the suction hose and secure with clamp.
5. Refill the reservoir with approximately 10 gallons
(38 L) of SAE 10W30 or 15W40 Diesel Engine Oil, API
Service CH-4 or higher.
6. Maintain fluid level 1 inch (2.5 cm) below the top of the
tank, with the cylinder retracted (Figure 9).
NOTE: Always dispose of used hydraulic fluid and engine
oil at approved recycling centers only.
Lubricate the Rail I-beam
Service Interval: Lubricate before every use.
The rail I-beam area where the splitting wedge slides should
be lubricated with general purpose grease. Make sure to
lubricate both the front and the back of the beam face.
Lubricate the Wheel Bearings
Service Interval: Every 500 hours.
1. The wheel bearing grease zerk is accessible behind the
rubber plug of the dust cover (Figure 21).
2. Lubricate the bearings with No. 2 General Purpose
lithium base grease.
3. Connect the grease gun to the grease zerk and pump
several times until grease comes out around the bearing.
4. Replace rubber plug.
Figure 21
1. Rubber plug 2. Grease zerk
Inspecting the Tires
Service Interval: Every 100 hours.
IMPORTANT Keep tires properly inflated. Failure to
maintain correct pressure may result in tire failure and loss
of control resulting in serious injury and property damage.
Operating accidents can damage a tire or rim, so inspect tire
condition after an accident.
Check the tire pressure frequently to ensure proper inflation.
If the tires are not inflated to the correct pressure, the tires
will wear prematurely.
Always replace worn or damaged tires with DOT approved
tires.
See (Figure 22) for the location of the tire identification
numbers.
Figure 22
Figure 23 is an example of tire wear caused by under
inflation.
Figure 23
1. Under inflated tire
Figure 24 is an example of tire wear caused by over
inflation.
2 1

15
Figure 24
1. Over inflated tire
Storage
For storage over 30 days, prepare the unit as follows:
1. Remove dirt and grime from the external parts of the
entire unit, especially the engine. Clean dirt and wood
chips from the outside of the engine cylinder head fins
and blower housing.
2. Add a petroleum based stabilizer/conditioner to fuel in
the tank. Follow mixing instructions from stabilizer
manufacturer. (1 oz per US gallon). Do not use an
alcohol based stabilizer (ethanol or methanol).
NOTE: Fuel stabilizer/conditioner is most effective when
mixed with fresh gasoline and used at all times.
IMPORTANT: Do not store stabilizer/conditioned
gasoline over 90 days.
3. Run the engine to distribute conditioned fuel through the
fuel system (5 minutes).
4. Stop the engine, allow it to cool and drain the fuel tank
using a pump type siphon. Dispose of fuel properly.
Recycle as per local codes.
5. Restart the engine and run it until it stops.
6. Choke the engine.
7. Start and run the engine until it will not start again.
8. Clean the fuel filter; refer to Cleaning the Fuel Filter.
9. Service the air cleaner; refer to Servicing the Air Filter.
10. Change the engine crankcase oil; refer to Changing the
Engine Oil.
11. Remove the spark plug and check the condition; refer to
Servicing the Spark Plug.
12. With the spark plug removed from the engine, pour two
tablespoons of engine oil into the spark plug hole.
13. Pull the starter slowly to crank the engine and distribute
the oil inside the cylinder.
14. Install the spark plug, but do not install the wire on the
spark plug.
15. Check and tighten all bolts, nuts, and screws. Repair or
replace any damaged parts.
16. Paint all scratched or bare metal surfaces. Paint is
available from your Authorized Service Dealer.
17. Store the unit in a clean, dry garage or storage area.
19. Cover the unit to protect it and keep it clean.
Troubleshooting
Problem Cause Remedy
The engine will not start. 1. The engine switch is in the Off
position.
2. The fuel shutoff valve is closed.
3. The choke is open.
4. The fuel tank is empty.
5. Throttle is not in correct position
6. The spark plug is fouled, wire is
loose or disconnected.
1. Turn the engine switch is in the ON
position.
2. Open the fuel valve.
3. Close the choke when starting a cold
engine.
4. Fill tank with fresh fuel.
5. Move throttle to correct position.
6. Check the electrode gap and clean or
replace the spark plug.
The engine runs rough. 1. The choke is on.
2. The air filter is clogged.
3. The fuel filter is clogged.
4. There is water or contaminants in the
fuel.
5. The spark plug is worn or has
buildup on the electrodes.
1. Open the choke.
2. Clean or replace the air filter.
3. Clean the fuel filter.
4. Drain and fill the tank with fresh fuel.
Clean the fuel filter.
5. Check electrode gap and clean or replace
the spark plug.
Splitting wedge does not move. 1. Hydraulic fluid level may be low.
2. Blocked or damaged directional
control valve or pump.
1. Add hydraulic fluid until reservoir is full.
2. See Authorized Service Dealer
Splitting wedge moves slowly. 1. Engine speed set on idle.
2. Contaminated hydraulic fluid.
3 Damage to pump, cylinder, or
directional valve.
1. Move throttle to FAST.
2. Change hydraulic fluid and hydraulic filter.
3. See Authorized Service Dealer

ToroCompactUtilityEquipmentWarranty
AOne-YearLimitedWarranty
CUEProducts
ConditionsandProductsCovered
TheToro®Companyanditsafliate,ToroWarrantyCompany,pursuant
toanagreementbetweenthem,jointlywarrantyourToroCompactUtility
Equipment(“Product”)tobefreefromdefectsinmaterialsorworkmanship.
Thefollowingtimeperiodsapplyfromthedateofpurchase:
ProductsWarrantyPeriod
Loaders,Trenchers,StumpGrinders,
Chippers,LogSplitters,andAttachments
1yearor1000operating
hours,whicheveroccursrst
KohlerEngines3years
AllotherEngines2years
Whereawarrantableconditionexists,wewillrepairtheProductatnocost
toyouincludingdiagnosis,labor,andparts.
InstructionsforObtainingWarrantyService
IfyouthinkthatyourToroProductcontainsadefectinmaterialsor
workmanship,followthisprocedure:
1.ContactanyAuthorizedToroCompactUtilityEquipment(CUE)
ServiceDealertoarrangeserviceattheirdealership.Tolocatea
dealerconvenienttoyou,accessourwebsiteatwww.T oro.com.
YoumayalsocallourToroCustomerCareDepartmenttollfree
at888-865-5676(U.S.customers)or888-865-5691(Canadian
customers).
2.Bringtheproductandyourproofofpurchase(salesreceipt)tothe
ServiceDealer.
3.IfforanyreasonyouaredissatisedwiththeServiceDealer’s
analysisorwiththeassistanceprovided,contactusat:
LCBCustomerCareDepartment
ToroWarrantyCompany
8111LyndaleAvenueSouth
Bloomington,MN55420-1196
TollFree:888-865-5676(U.S.customers)
TollFree:888-865-5691(Canadacustomers)
OwnerResponsibilities
YoumustmaintainyourToroProductbyfollowingthemaintenance
proceduresdescribedintheOperator’sManual.Suchroutine
maintenance,whetherperformedbyadealerorbyyou,isatyourexpense.
Partsscheduledforreplacementasrequiredmaintenance(“Maintenance
Parts”),arewarrantedfortheperiodoftimeuptothescheduled
replacementtimeforthatpart.Failuretoperformrequiredmaintenance
andadjustmentscanbegroundsfordisallowingawarrantyclaim.
ItemsandConditionsNotCovered
Notallproductfailuresormalfunctionsthatoccurduringthewarranty
periodaredefectsinmaterialsorworkmanship.Thisexpresswarranty
doesnotcoverthefollowing:
•Productfailureswhichresultfromtheuseofnon-Tororeplacement
parts,orfrominstallationanduseofadd-on,modied,orunapproved
accessories
•Productfailureswhichresultfromfailuretoperformrequired
maintenanceand/oradjustments
•ProductfailureswhichresultfromoperatingtheProductinan
abusive,negligentorrecklessmanner
•Partssubjecttoconsumptionthroughuseunlessfoundtobe
defective.Examplesofpartswhichareconsumed,orusedup,during
normalProductoperationinclude,butarenotlimitedto,teeth,tines,
blades,sparkplugs,tires,tracks,lters,chains,etc.
•Failurescausedbyoutsideinuence.Itemsconsideredtobeoutside
inuenceinclude,butarenotlimitedto,weather,storagepractices,
contamination,useofunapprovedcoolants,lubricants,additives,or
chemicals,etc.
•Normal“wearandtear”items.Normal“wearandtear”includes,butis
notlimitedto,wornpaintedsurfaces,scratcheddecalsorwindows,
etc.
•Anycomponentcoveredbyaseparatemanufacturer’swarranty
•Pickupanddeliverycharges
GeneralConditions
RepairbyanAuthorizedToroCompactUtilityEquipment(CUE)Service
Dealerisyoursoleremedyunderthiswarranty.
NeitherTheToro®CompanynorToroWarrantyCompanyisliable
forindirect,incidentalorconsequentialdamagesinconnectionwith
theuseoftheToroProductscoveredbythiswarranty,including
anycostorexpenseofprovidingsubstituteequipmentorservice
duringreasonableperiodsofmalfunctionornon-usepending
completionofrepairsunderthiswarranty.Allimpliedwarranties
ofmerchantabilityandtnessforusearelimitedtotheduration
ofthisexpresswarranty.Somestatesdonotallowexclusionsof
incidentalorconsequentialdamages,orlimitationsonhowlong
animpliedwarrantylasts,sotheaboveexclusionsandlimitations
maynotapplytoyou.
Thiswarrantygivesyouspeciclegalrights,andyoumayalsohaveother
rightswhichvaryfromstatetostate.
ExceptfortheenginewarrantycoverageandtheEmissionswarranty
referencedbelow,ifapplicable,thereisnootherexpresswarranty.The
EmissionsControlSystemonyourProductmaybecoveredbyaseparate
warrantymeetingrequirementsestablishedbytheU.S.Environmental
ProtectionAgency(EPA)ortheCaliforniaAirResourcesBoard(CARB).
ThehourlimitationssetforthabovedonotapplytotheEmissions
ControlSystemWarranty.RefertotheCaliforniaEmissionControl
WarrantyStatementsuppliedwithyourProductorcontainedintheengine
manufacturer’sdocumentationfordetails.
CountriesOtherthantheUnitedStatesorCanada
CustomerswhohavepurchasedToroproductsexportedfromtheUnitedStatesorCanadashouldcontacttheirToroDistributor(Dealer)toobtain
guaranteepoliciesforyourcountry,province,orstate.IfforanyreasonyouaredissatisedwithyourDistributor’sserviceorhavedifcultyobtaining
guaranteeinformation,contacttheToroimporter.Ifallotherremediesfail,youmaycontactusatToroWarrantyCompany.
374-0261RevB

Impreso Nº 3366-331 Rev A
Partidora de troncos de 9 cv
Modelo Nº 22606- Nº de Serie 310000001 y superiores
Registre su producto en www.Toro.com
Traducción del original (ES)
Manual del Operador

2
Este producto cumple las normas de la Administración de seguridad
nacional del tránsito en carreteras (National Highway Traffic Safety
Administration/NHTSA) de EE.UU. para remolques homologados.
ADVERTENCIA
Los gases de escape del motor de este producto contienen
sustancias químicas que en el estado de California se consideran
causantes de cáncer, defectos congénitos y otros trastornos del
sistema reproductor.
Este sistema de encendido por chispa cumple la norma canadiense
ICES-002.
Puesto que en algunas zonas existen normas locales, estatales o
federales que requieren el uso de un parachispas en el motor de esta
máquina, se ha incorporado un parachispas en el conjunto de
silenciador. Los parachispas genuinos de Toro están homologados
por el Servicio Forestal del Departamento de Agricultura de EE.UU.
(USDA Forestry Service).
Este motor está equipado con un silenciador de parachispas. El
uso o la operación del motor en cualquier terreno forestal, de
monte o cubierto de hierba con el motor obstruido o sin
silenciador con parachispas mantenido en buenas condiciones de
funcionamiento, equipado y mantenido para la prevención de
incendios, constituye una infracción de la legislación de
California (California Public Resource Code Section 4442).
Otros estados o zonas federales pueden tener una legislación
similar.
El Manual del usuario del motor adjunto ofrece información
sobre las normas de la Agencia de protección ambiental de
EE.UU. (U.S. Environmental Protection Agency/EPA) y de la
norma de control de emisión de California (California Emission
Control Regulation) sobre sistemas de emisiones, mantenimiento
y garantía. Puede solicitarse un manual nuevo al fabricante del
motor.
INTRODUCCIÓN
Esta partidora de troncos puede funcionar en posición horizontal o
vertical. Se ha diseñado para partir troncos cortados con un tamaño
acorde a la abertura de la cuña de corte de la máquina. No se ha
diseñado para partir piedras, metales ni ningún otro material que no
sea madera. La partidora de troncos puede remolcarse detrás de un
vehículo equipado con un enganche de bola adecuado.
Usted puede ponerse en contacto directamente con Toro en
www.Toro.com
si desea información sobre productos y accesorios, o
si necesita localizar un distribuidor o registrar su producto.
Lea este manual detenidamente para aprender a utilizar y mantener
correctamente su producto, y para evitar lesiones y daños al
producto. Usted es el responsable de utilizar el producto de forma
correcta y segura.
Cuando necesite asistencia técnica, piezas genuinas Toro o
información adicional, póngase en contacto con un Servicio Técnico
Autorizado o con Asistencia al Cliente Toro, y tenga a mano los
números de modelo y serie de su producto. Escriba los números en el
espacio provisto.
Este manual identifica posibles peligros y contiene mensajes de
seguridad identificados por el símbolo de alerta de seguridad (Figura
1), que señala un peligro que puede causar lesiones graves o la
muerte si usted no sigue las precauciones recomendadas.
Figura 1
1. Símbolo de alerta de seguridad
Este manual utiliza dos palabras más para resaltar información.
Importante llama la atención sobre información mecánica especial,
y Nota resalta información general que merece una atención
especial.
Información sobre los neumáticos
El número de identificación de neumático (TIN, por sus siglas en
inglés) está marcado en la pared externa de todos los neumáticos
homologados (Figura 2).
Figura 2
1. Número de identificación de neumático (TIN)
SEGURIDAD
El control de riesgos y la prevención de accidentes dependen de
los conocimientos, la atención y la correcta formación del
personal implicado en el manejo, el mantenimiento y el
almacenamiento de la máquina. El uso o el mantenimiento
inadecuado de la máquina puede causar lesiones o la muerte.
Para reducir la posibilidad de lesiones o la muerte, observe las
siguientes instrucciones de seguridad.
Prácticas de operación segura
Este producto es capaz de aplastar y amputar manos y pies. Siga
siempre todas las instrucciones de seguridad con el fin de evitar
lesiones físicas graves e incluso la muerte.
ADVERTENCIA
Los gases de escape del motor contienen monóxido de carbono,
que es un veneno inodoro que puede matarle.
No haga funcionar el motor dentro de un edificio o en un lugar
cerrado.
Si considera que su vehículo* presenta un defecto que podría
provocar un accidente, lesiones o incluso la muerte, debe informar
de inmediato a la Administración de seguridad nacional del tránsito
en carreteras (National Highway Traffic Safety
Administration/NHTSA) y notificar a The Toro Company.

3
Si la NHTSA recibe quejas similares, podría iniciar una
investigación y si determina que existe un defecto de seguridad en
un grupo de vehículos*, podría ordenar una campaña de retirada y
corrección. Sin embargo, la NHTSA no puede intervenir en
problemas individuales entre usted, su distribuidor o The Toro
Company.
Para ponerse en contacto con la NHTSA, puede llamar a la línea
gratuita de seguridad vehicular 1–888–327–4236 (TTY: 1–800–424–
9153); visitar el sitio http://www.safercar.gov ; o escribir a:
Administrator, NHTSA, 400 Seventh Street, SW., Washington, DC
20590, EE. UU. Asimismo, puede obtener más información sobre la
seguridad de vehículos en http://www.safercar.gov.
* partidora de troncos
Formación
• Lea el Manual del operador y otros materiales de formación. Si el
o los operadores o mecánicos no saben leer el español, es la
responsabilidad del propietario explicarles este material.
• Evite el uso de la máquina por parte de operadores que no hayan
leído el Manual del operador o que no hayan recibido una adecuada
formación sobre el uso seguro de la máquina.
•No deje nunca que el equipo sea utilizado o mantenido por niños o
por personas que no hayan recibido la formación adecuada al
respecto. La normativa local puede imponer límites sobre la edad del
operador.
• Se producen muchos accidentes cuando más de una persona utiliza
la máquina. Si un asistente ayuda a cargar los troncos, no active
nunca el control hasta que el asistente se haya alejado de la máquina
y se encuentre a unos 3 metros (10 pies) de la máquina.
•Todos los operadores y mecánicos deben recibir una formación
adecuada. El propietario es responsable de proporcionar formación a
los usuarios.
Durante su funcionamiento, las partidoras hidráulicas de troncos
alcanzan presiones elevadas. El aceite hidráulico que sale por un
orificio pequeño puede penetrar en la piel y provocar una
intoxicación sanguínea o incluso la muerte. Siga siempre estas
instrucciones:
• No utilice la máquina si presenta mangueras, accesorios o tubos
deshilachados, doblados, fisurados o dañados.
• Pare el motor y libere la presión del sistema hidráulico antes de
cambiar o ajustar accesorios, mangueras, tubos u otros
componentes del sistema.
• No ajuste los parámetros de la presión de la bomba o válvula.
• Absténgase de controlar con las manos si hay fugas.
• Para detectar fugas, póngase guantes y gafas de seguridad, y
pase un trozo de cartón o madera por la zona que podría
presentar fugas. Observe si se decolora el cartón o la madera.
• Mantenga despejadas la zona del operador y el espacio adyacente
para garantizar un desplazamiento seguro.
Remolque
Consulte la normativa de seguridad estatal o local y cumpla las
normas de seguridad del Departamento de Transporte (Department
of Transportation/DOT), antes de remolcar la partidora de troncos.
• Para reducir las posibilidades de accidente mientras transporta la
partidora de troncos por carreteras públicas, compruebe SIEMPRE
que el vehículo de remolque se encuentra en buen estado mecánico y
de funcionamiento.
• Pare SIEMPRE el motor antes de transportar la máquina.
• Inspeccione SIEMPRE el enganche y el acoplamiento para ver si
están desgastados. No remolque NUNCA el soplador de residuos
con enganches, acoplamientos, cadenas, etc. defectuosos.
• Controle la presión de aire de los neumáticos del vehículo de
remolque y el soplador de residuos. Los neumáticos de la partidora
de troncos deben inflarse a 60 psi
(410 kpa) en frío.
• Inspeccione el dibujo de los neumáticos para ver si está gastado.
• Conecte SIEMPRE de forma adecuada la cadenas de seguridad al
vehículo de remolque.
• Compruebe SIEMPRE que funcionan correctamente las luces
direccionales, de marcha atrás y del freno del vehículo de remolque.
• Evite las paradas y los arranques repentinos, ya que podría patinar
la máquina o desviarse el patín. Los arranques y paradas suaves y
graduales mejorarán el remolque.
• Evite los giros bruscos para no volcar. Utilice únicamente un
vehículo equipado con un enganche diseñado para remolque.
Únicamente conecte el equipo remolcado en el punto de enganche.
Antes de remolcar la partidora de troncos, compruebe que está
conectada de forma correcta y segura al vehículo de remolque.
• Compruebe que el enganche de bola en uso tenga el tamaño
adecuado para el acoplador de la partidora de troncos.
• Compruebe que las cadenas de seguridad están debidamente
enganchadas al vehículo y que se haya dejado la holgura
necesaria para los giros.
• Coloque siempre la válvula de combustible en la posición de
cerrado (OFF).
• Compruebe que la partidora de troncos está bien ubicada en
posición horizontal.
• Compruebe que el soporte del patín está bien ubicado en
posición de elevado.
• No remolque la máquina a una velocidad superior a los 75 km/h
(45 mph).
• Proceda con cautela al dar marcha atrás; hágase ayudar por un
observador fuera del vehículo para que le guíe.
• No permita que ninguna persona se siente o viaje en la unidad
mientras la remolca.
• No lleve nunca ninguna carga ni madera en la unidad mientras la
remolca.
• Desconecte siempre la unidad del vehículo de remolque antes de
utilizarla.
• Ponga cuñas debajo de las ruedas para evitar que la unidad se
mueva mientras está aparcada.
Preparación
Familiarícese con la operación segura del equipo, los controles del
operador y las señales de seguridad.
• Póngase siempre zapatos de seguridad o botas reforzadas.
• Póngase siempre anteojos o gafas de seguridad al utilizar esta
máquina.
• Póngase guantes ajustados sin cordones ni puños sueltos.
• No se ponga nunca alhajas ni prendas sueltas que podrían
enredarse en las piezas móviles o giratorias de la máquina.
• Compruebe que la máquina está situada en una superficie nivelada
antes de usarla.
• Utilice siempre la máquina desde la zona del operador que se
especifica en el manual.
• Los troncos deben cortarse con los extremos lo más rectos posible
antes de partirlos.

4
• Bloquee la máquina para evitar su movimiento accidental y trábela
en posición horizontal o vertical.
•Extreme las precauciones cuando maneje gasolina y otros
combustibles. Son inflamables y sus vapores son explosivos.
• Utilice solamente un recipiente de combustible homologado.
• No retire nunca el tapón de combustible ni añada combustible
con el motor en marcha. Deje que se enfríe el motor antes de
repostar combustible. No fume.
• No añada ni drene nunca el combustible dentro de un edificio.
• Vuelva a colocar el tapón de combustible y apriételo
firmemente.
• Mantenga la boquilla del recipiente en contacto con el depósito
durante el repostaje.
• Si se derrama combustible, límpielo del motor y el equipo.
Operación
Antes de cada uso:
• Inspeccione el acoplador, la bola y el enganche.
• Utilice siempre las cadenas de seguridad.
• Compruebe que todas las luces funcionan correctamente.
• Compruebe que los neumáticos están bien inflados según lo
recomendado.
• Compruebe que las tuercas están bien apretadas.
• Compruebe que la máquina está bien ubicada.
• Antes de poner en marcha la máquina, lea las "Instrucciones de
seguridad". Si no sigue estas reglas, podría provocarse una lesión
grave al operador o a otras personas cercanas.
• No deje nunca la máquina sin atención de un operador cuando el
motor está en marcha.
• No utilice nunca la máquina bajo la influencia de alcohol, drogas o
medicamentos.
• Nunca permita que una persona utilice la máquina si no ha recibido
la debida formación.
• Utilice siempre la máquina con todos los equipos de seguridad
instalados y en funcionamiento.
• No cambie los ajustes del regulador del motor ni haga funcionar el
motor a una velocidad excesiva.
• Únicamente use la mano para utilizar la palanca de mando.
Mantenga siempre las manos y los pies alejados de las piezas
móviles.
• No coloque nunca las manos o los pies entre el tronco y la cuña de
corte ni entre el tronco y el ariete durante el golpe hacia adelante o
hacia atrás.
• Al cargar un tronco, coloque las manos en los lados del tronco y no
en los extremos. No ponga nunca las manos ni ninguna parte del
cuerpo entre un tronco y cualquier pieza de la partidora de troncos.
• No trate de estirarse ni de pasar por encima de la zona de corte de
troncos para alcanzar algo que está del otro lado mientras la máquina
está en funcionamiento.
• No trate nunca de partir más de un tronco por vez.
• Si los troncos no están cortados en ángulo recto, el extremo menos
recto y la parte más larga del tronco deben situarse entre la viga y la
cuña, y el extremo recto debe ubicarse hacia la placa de extremo.
• Mantenga limpia la zona de trabajo; retire los troncos partidos de
la zona alrededor de la máquina para no tropezarse con ellos.
•No toque piezas que pueden estar calientes después de estar en
funcionamiento. Deje que se enfríen antes de realizar cualquier
operación de mantenimiento, ajuste o revisión.
• Localice las zonas peligrosas señaladas en la máquina, y mantenga
alejados los pies y las manos de estas zonas.
• No haga funcionar nunca el motor en un lugar cerrado.
• No mueva nunca la máquina mientras el motor está en marcha.
•Los rayos pueden causar graves lesiones o incluso la muerte. Si se
ven relámpagos o rayos, o se oyen truenos en la zona, no utilice la
máquina; busque un lugar donde resguardarse.
• No toque el motor ni el silenciador mientras el motor
está en marcha ni poco después de su parada. Estas zonas
podrían estar muy calientes y provocar quemaduras.
Mantenimiento y almacenamiento
• Pare el motor y retire el cable de la bujía antes de efectuar
cualquier reparación. Deje que se detenga todo movimiento antes de
ajustar, limpiar o reparar.
• Inspeccione la máquina antes de cada uso. Compruebe que todas
las tuercas, pernos, tornillos, acoplamientos hidráulicos y
abrazaderas de mangueras están bien apretados.
• Limpie cualquier residuo del silenciador y el motor para ayudar a
prevenir incendios. Limpie cualquier aceite o combustible
derramado.
• Espere a que se enfríe el motor antes de guardar la máquina, y no
la guarde cerca de una llama.
• No almacene el combustible cerca de una llama, y no lo drene
dentro de un edificio.
•Aparque la máquina en una superficie nivelada. No permita jamás
que la máquina sea revisada o reparada por personal no debidamente
formado.
•Mantenga las manos y los pies alejados de las piezas en
movimiento. Si es posible, no haga ajustes mientras el motor está
funcionando.
•Mantenga todas las piezas en buenas condiciones de
funcionamiento, y todos los herrajes bien apretados. Sustituya
cualquier pegatina desgastada o deteriorada.
•Extreme las precauciones cuando maneje gasolina y otros
combustibles. Son inflamables y sus vapores son explosivos.
• No guarde nunca la maquina o un recipiente de combustible dentro
de un edificio cerca de una llama desnuda, por ejemplo, cerca de un
calentador de agua o una caldera.
• Utilice solamente piezas de repuesto genuinas Toro para asegurar
que se mantengan los niveles de calidad de los equipos originales.
La page est en cours de chargement...
La page est en cours de chargement...
La page est en cours de chargement...
La page est en cours de chargement...
La page est en cours de chargement...
La page est en cours de chargement...
La page est en cours de chargement...
La page est en cours de chargement...
La page est en cours de chargement...
La page est en cours de chargement...
La page est en cours de chargement...
La page est en cours de chargement...
La page est en cours de chargement...
La page est en cours de chargement...
La page est en cours de chargement...
La page est en cours de chargement...
La page est en cours de chargement...
La page est en cours de chargement...
La page est en cours de chargement...
La page est en cours de chargement...
La page est en cours de chargement...
La page est en cours de chargement...
La page est en cours de chargement...
La page est en cours de chargement...
La page est en cours de chargement...
La page est en cours de chargement...
La page est en cours de chargement...
La page est en cours de chargement...
-
 1
1
-
 2
2
-
 3
3
-
 4
4
-
 5
5
-
 6
6
-
 7
7
-
 8
8
-
 9
9
-
 10
10
-
 11
11
-
 12
12
-
 13
13
-
 14
14
-
 15
15
-
 16
16
-
 17
17
-
 18
18
-
 19
19
-
 20
20
-
 21
21
-
 22
22
-
 23
23
-
 24
24
-
 25
25
-
 26
26
-
 27
27
-
 28
28
-
 29
29
-
 30
30
-
 31
31
-
 32
32
-
 33
33
-
 34
34
-
 35
35
-
 36
36
-
 37
37
-
 38
38
-
 39
39
-
 40
40
-
 41
41
-
 42
42
-
 43
43
-
 44
44
-
 45
45
-
 46
46
-
 47
47
-
 48
48


Toro 9 hp Log Splitter Manuel utilisateur
- Catégorie
- Fendeuses de bûches
- Taper
- Manuel utilisateur
dans d''autres langues
- English: Toro 9 hp Log Splitter User manual
- español: Toro 9 hp Log Splitter Manual de usuario
Documents connexes
Autres documents
-
MTD 5DM Manuel utilisateur
-
-
 Red Rock 9015918 Le manuel du propriétaire
-
Anova RLT8C Le manuel du propriétaire
-
Southland SLS20825 Mode d'emploi
-
Detail K2 9204520 Le manuel du propriétaire
-
Swisher LS722A Le manuel du propriétaire
-
Texas Power Split 2100V Manuel utilisateur
-
-
Oregon 9217530 Le manuel du propriétaire
